10. Browsing and Searching the Web

In this chapter, you find out how to use Google Chrome to browse and search the Web.
The Google Chrome OS is built around Google’s Chrome web browser. Chrome (the browser) is similar to other web browsers available today, but with a sleeker interface—there’s no menu bar, search bar, or status bar, as older browsers tend to have. This difference makes the web page bigger in the browser window, and it simplifies the browsing experience. In essence, Chrome moves the business of the browser out of the way so that you can pay more attention to the web page itself.
Browsing the Web
Google’s Chrome web browser is integrated into the Chrome OS interface. You use the Chrome browser to access all web-based apps, as well as most system settings.
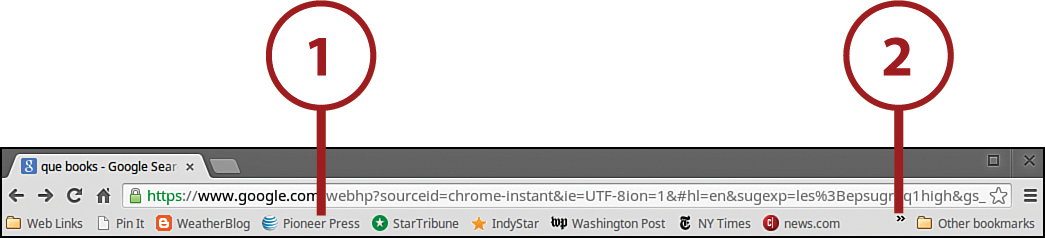
The Chrome browser resembles Internet Explorer, Firefox, and other modern web browsers, complete with tabs for different web pages. To go to a web page, type the page’s address (also called a URL) into the Omnibox at the top of the Chrome window; the web page displays in the current tab.

Go to a Web Page
One of the quickest ways to browse the Web is to go directly to a given web page. You do this by entering the page’s address, or URL, into Chrome’s Omnibox.
Omnibox
What others call an Address box, Chrome calls the Omnibox. That’s because it’s more than a simple address box; you can also use it to enter queries for web searches. When you start typing in the Omnibox, Google suggests both likely web pages and search queries. Just select what you want from the list or finish typing your URL or query, and then press Enter.
1. Type a web page’s URL into the Omnibox at the top of the Chrome window.
2. Google suggests both likely queries and web pages you are likely to visit. Select the page you want from the drop-down list.
Or
3. Finish typing your URL and press Enter.

Chrome navigates to and displays the page you entered.
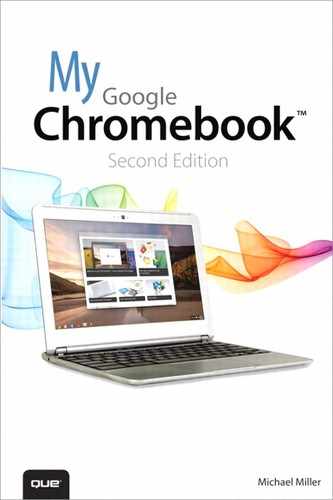
Click Links
Another way to navigate the Web is to click links to other pages you find on web pages. Clicking a link takes you directly to the linked-to page; you can open links in the current browser tab or, if you prefer to keep the current page visible, in a new tab or window.
1. To open the link in the current tab, click the link.
2. To open the link in a new tab, right-click the link and select Open Link in New Tab.
3. To open the link in a new window, right-click (tap with two fingers) the link and select Open Link in New Window.
Reload a Page
If you stay on a web page too long, you might miss updates to that page’s content. In addition, if a page doesn’t fully or properly load, you might need to “refresh” or reload that page.
1. Click the Reload This Page button to the left of the address bar.

Move Forward and Back Through Pages
You can easily revisit pages you’ve previously displayed and then move forward again through visited pages.
1. Click the Back button to move backward through previously visited pages.
2. Click the Forward button to move forward through pages.

Zoom into a Page
If you’re having trouble reading small text on a page, Chrome lets you increase the zoom level to make that text bigger. You can also decrease the zoom level to make the entire page smaller.
1. Click the Customize and Control button at the top right to display the drop-down menu.
2. To increase the zoom level, go to the Zoom section of the menu and click the + button.
3. To decrease the zoom level, go to the Zoom section of the menu and click the – button.

Viewing and Managing Browser History
Another way to revisit web pages you have viewed in the past is to use Google Chrome’s history feature. Chrome keeps track of your history for up to ten weeks.
View Your Recent History
1. Click and hold the Back button to display a list of pages you’ve visited in your current browsing session.
2. To revisit a specific page, click it in the list.

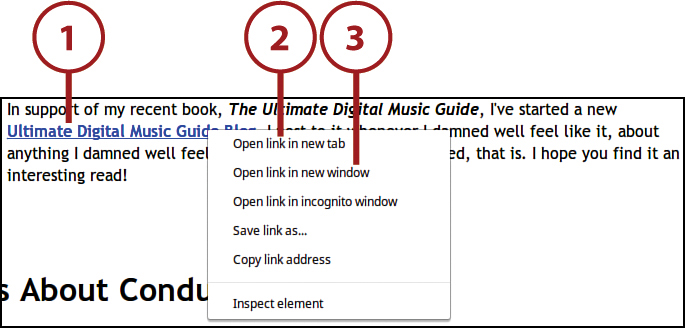
View Your Full History
To revisit pages viewed on other days, you can access your full browsing history.
1. Click the Customize and Control button to display the drop-down menu.
2. Click History. The History page displays in a new tab.

3. To revisit any particular page, click that page’s link.
More History
To view additional pages in your history, scroll to the bottom of the page and click the Older link.
4. To search for a particular page you’ve visited, enter that page’s name or URL into the search box and click the Search History button.
Delete Browsing History
You might not want your entire browsing history visible to others using your Chromebook—or accessing your Chrome browser on another computer. To that end, you can delete your browsing history—as well as other “tracks” to your web browsing.
Chrome enables you to do any and all of the following:
• Delete browsing history (web pages you’ve visited)
• Delete download history (files you’ve downloaded)
• Empty the cache
• Delete cookies and other site data
• Clear saved passwords
• Clear saved Autofill form data
Cache
The cache is a local storehouse of recently visited pages. By accessing cached pages, Chrome can reload these pages faster.
Cookies
A cookie is a small text file, stored on your computer, that certain websites use to track your browsing behavior. Cookies are sometimes used to record personal data to facilitate future visits; they’re also sometimes used to serve up relevant web ads.
You can clear any of these items stored in the past hour, the past day, the past week, the past four weeks, or from the beginning of time (or at least when you started using your Chromebook).
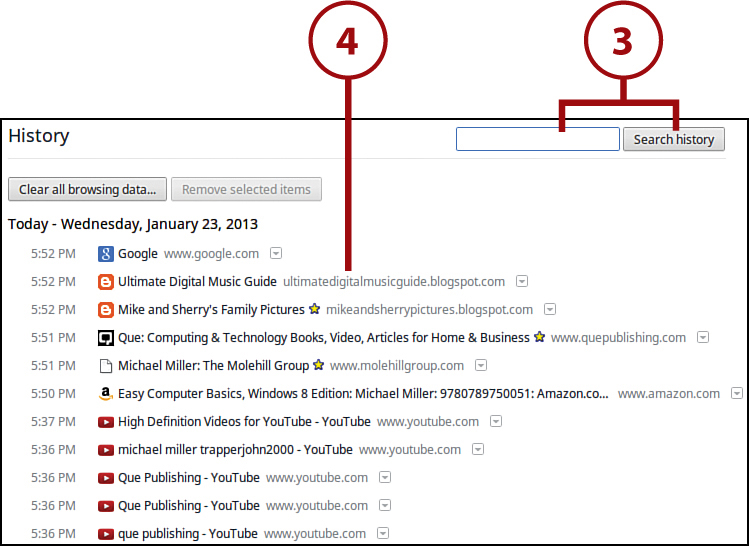
1. Click the Customize and Control button to display the drop-down menu.
2. Select More Tools, Clear Browsing Data to display the Clear Browsing Data dialog box.
3. Check those items you want to delete or clear.
4. Pull down the Obliterate the Following Items From list and select how much data to delete: past hour, past day, past week, last 4 weeks, or from the beginning of time.
5. Click the Clear Browsing Data button.

Searching the Web
As mentioned previously, Google Chrome’s Omnibox functions not only as an address box but also as a search box for searching the Web. That is, you can also use the Address box to enter a search query and send your search to Google or another search engine.
Enter a Query
You use the Omnibox to enter search queries that are then sent to your favorite web search engine. By default, your queries are sent to Google, so it should be a familiar experience.
1. Enter your search query into the Omnibox at the top of the browser window.
2. Google suggests both likely queries and web pages you are likely to visit in a drop-down list. Select the query you want from the drop-down list.
Or
3. Finish typing your query and then press Enter.

Your search results are now displayed in the browser window.
Google Search Page
You can also, of course, do your searching from Google’s main search page on the Web (www.google.com)—but you get the exact same results as you do when searching from Chrome’s Omnibox.
Using Google Search
Learn more about searching with Google in my companion ebook, Using Google Advanced Search (Michael Miller, Que, 2011).
Use Google Instant
Google is always striving to simplify the search process and provide better results, faster. To this end, the company recently introduced a new featured dubbed Google Instant. When activated, Google Instant displays predicted search results on the search page as you type, instead of waiting for you to click the Google Search button. These instant search results can save time and help you fine-tune your query as you’re typing it.
1. Click the Customize and Control button in the Chrome browser and select Settings.

2. Go to the Search section and check the Enable Instant for Faster Searching option.

Use Google’s Advanced Search
If you want to perform a more targeted search, you can use Google’s Advanced Search page. You access the Advanced Search page by performing an initial search, clicking the Options (gear) button at the top of the search results page, and then clicking Advanced Search.
The Advanced Search page contains a number of options you can use to fine-tune your searches. All you have to do is make the appropriate selections on the page, and Google does all the fine-tuning for you.

What options are available on the Advanced Search page? The following table provides the details.
Options on Google’s Advanced Search Page

Additional links at the bottom of the page enable you to find pages that are similar to a given page, search pages you’ve previously visited, use search operators in the search box, and customize your search settings.
Understand Search Results
After you enter your search query, Google searches its index for all the web pages that match your query. Then it displays the results on a search results page.
Interestingly, each results page is unique; what you see depends on what you’re searching for. In fact, the same query made on different days, or by different users, might return different results. That’s just Google’s way of trying to serve the best results for each individual user.
That said, there are some common elements you’re likely to encounter as a result of a Google Search. These include the following:

• Search box—This is where you can enter a new search query.
• Search button—Click here, after you’ve entered a new query, to initiate the search.
• Search tools—Click any of these options to display only web pages, images, maps, shopping results, and such. Click the Search Tools button to display additional filtering options for your specific search.
• Search statistics—This displays how many results were returned for your query, and how long it took to display those results. In some cases, this bar also includes a link to a definition of the keyword.
• Ads—These are paid ads by Google’s advertisers. You should not confuse these ads with the “organic” search results, as they might have only indirect relevance to your query. These ads typically are positioned to the right of the main search results, and sometimes above the main results.
• Page title—For each search result, Google displays the title of the page. The title is a clickable link; click it to view the linked-to page.
• URL—This is the full web address of the selected web page. It is not a clickable link; you have to click the page title to jump to the page.
• Page excerpt—Below the page title is an excerpt from the associated web page. This may be the first few sentences of text on the page, a summary of page contents, or something similar.
Local Searches
If Google thinks you’re looking for something locally, Google often displays a map on the right side of the search results page. Local businesses that match your query are pinpointed on the map; these businesses are displayed in the search results under a Places heading. Click the Places heading or the map to display a full page of local results, via Google Maps.
Change Search Providers
By default, Google Chrome uses Google for all of its browser-based searches. You can, however, change this so that you send all your queries to Yahoo! or Bing or to another search site of your choice.
1. Click the Customize and Control button and select Settings.

2. Go to the Search section and select a provider from the pull-down list: Google, Yahoo!, or Bing.
3. Click the Manage Search Engines button to choose from additional search providers.

4. Select from one of the choices in the Other Search Engines section, or enter a new search engine in the fields provided.
5. Click OK.

Managing Your Home Page
In a traditional web browser, the Home page is the page that opens when you first launch the browser. With the Google Chrome OS, the Home page is the one that appears when you first turn on your Chromebook—as well as when you click the Home button next to Chrome’s Address box.
Choose a New Home Page
By default, Chrome displays its New Tab page as its Home page. You can, however, specify any web page as Chrome’s Home. To do so, you need to know the URL of the page you want to go to.
1. Click the Customize and Control button and then select Settings.

2. Go to the Appearance section and check Show Home Button.
3. Click Change beside the New Tab Page item to display the Home Page panel.

4. Check Open This Page.
5. Enter the URL for the desired page.
6. Click OK.

Display the Home Button
Chrome can display a Home button, next to the Address bar, that opens the Home page when clicked. This button is not displayed by default; you need to enable it.
1. Click the Customize and Control button and then select Settings.

2. Go to the Appearance section and check the Show Home Button option.

Bookmarking Favorite Pages
Google Chrome enables you to keep track of your favorite web pages via the use of bookmarks. You can bookmark the pages you want to return to in the future and display your bookmarks in a bookmarks bar that appears just below Chrome’s Address bar.
Favorites
Google Chrome’s bookmarks are the same as Internet Explorer’s “Favorites.”
Bookmark a Web Page
There are several ways to bookmark a web page. The following steps are for the fastest method.
1. Navigate to the web page you want to bookmark.
2. Click the Bookmark This Page (star) icon in the Address box.

3. Chrome now bookmarks the page and displays the Bookmark Added! information bubble. Edit the name of the bookmark, if you want.
4. Pull down the Folder list to determine where you want to save this bookmark.
5. Click the Done button to save the bookmark.

Display the Bookmarks Bar
To view your bookmarks, you need to display Chrome’s Bookmarks bar. This is not turned on full-time; by default, it only appears at the top of the New Tab page.
You can, however, enable the Bookmarks bar so that it appears on every open tab. It displays beneath the Omnibox.
1. Click the Customize and Control button to display the drop-down menu.
2. Select Bookmarks, Show Bookmarks Bar.

Go to a Bookmarked Page
With the Bookmarks bar visible, returning to a bookmarked page is as easy as clicking a button.
1. Click a button on the Bookmarks bar to display the bookmarked web page.
2. If you have more bookmarks than can fit in the width of the browser window, the bookmarks bar displays a double arrow on the far-right side. Click this double arrow to display the additional bookmarks in a drop-down menu.
Manage Bookmarks
Google Chrome enables you to organize your bookmarks into folders and subfolders that branch off from the bookmarks bar, as well as in other folders on the same level as the bookmarks bar. You do this by using Chrome’s Bookmark Manager.
1. Click the Customize and Control button to display the drop-down menu.
2. Select Bookmarks, Bookmark Manager. In the Bookmark Manager that opens, the folders and subfolders of bookmarks are displayed in the left navigation pane; the individual bookmarks are displayed in the right pane.

3. Select a folder or subfolder in the navigation pane to display the contents of that folder.
4. Click and drag a bookmark to a new position to change the order of bookmarks in a folder.
5. Select a folder, click the Organize button on the menu bar, and then select Reorder by Title to list a folder’s bookmarks in alphabetical order.
6. Drag and drop a bookmark onto the new folder to move the bookmark to a different folder.
7. Click the Organize button and select Add Folder to create a new folder or subfolder.
8. To rename a folder, select that folder, click the Organize button, then select Rename and enter a new name for the folder.
9. To edit information about a specific bookmark, select the bookmark, click the Organize button, and then select Edit. You can then edit the bookmark’s name and URL from within the URL list.
10. Select a bookmark, click the Organize button, and select Delete to remove the bookmark from the list.

Browsing in Incognito Mode
Google Chrome, like most web browsers, keeps a record of every web page you visit. That’s fine, but every now and then you might browse some web pages that you don’t want tracked.
If you want or need to keep your browsing private, Google Chrome offers what it calls Incognito mode. In this special mode (actually, a separate browser window), the pages you visit aren’t saved to your browser’s history file, cookies aren’t saved, and your activity is basically done without any record being kept.
Simultaneous Windows
Chrome enables you to run both normal and Incognito windows simultaneously.
Open an Incognito Window
1. Click the Customize and Control button to display the drop-down menu.
2. Click New Incognito Window.

3. A new Incognito window opens; it’s recognizable by the little spy icon next to the first tab. You can switch between the Incognito and other open windows by pressing the Next Window button on your Chromebook’s keyboard.
