2. Getting to Know Your Chromebook

In this chapter, you become familiar with the various pieces and parts of your new Chromebook, as well as how to use the keyboard and touchpad.
A Chromebook looks much like a traditional netbook or notebook computer. The lid opens to reveal the LCD display and keyboard, and there are ports and connectors and such along all sides of the case.
Before you use your Chromebook, you need to know what all these items are and what they do. You also want to get to know the Chromebook’s keyboard and touchpad, which are a bit different from those found on other computers.
Getting to Know Your Chromebook
A Chromebook is like a simplified version of a traditional notebook computer. There are fewer ports and connectors, and also fewer keys on the keyboard and touchpad. That makes it easier to operate—if you know where everything is located.
As an example, we’ll take a close look at features present on the best-selling model, the Samsung Chromebook. Other Chromebooks from Acer, HP, and Lenovo have similar features, as well as their own unique feature sets.
Because a Chromebook is streamlined by design, it lacks some of the connections found in a traditional Windows or Mac computer. For example, there is no CD/DVD drive—which helps contribute to the Chromebook’s light weight and small form factor.
Screen
When you open the Chromebook case, the screen is the first thing you see. Most Chromebooks have a screen 11.6″ in diameter, with a widescreen aspect ratio. This is an LCD screen, typically backlit, for decent viewing even under bright light.

Illumination Sensor
Above the screen, grouped in the middle of the frame, are four key items. The first of these, on the left, is the illumination sensor. Your Chromebook uses this to sense the level of ambient light, and adjusts the screen brightness accordingly. If there’s a lot of light, it increases the screen brightness; if there is less light, it decreases the screen brightness.
Webcam
All current Chromebooks come with a built-in camera, also known as a webcam. The webcam is located directly above the screen, in the middle of the frame. You can use the webcam to conduct video chats and conferences, make video calls, create recorded videos, and take still photographs of yourself.
When you’re using the webcam, the webcam’s operating LED lights. This LED is located directly to the left of the webcam, above the Chromebook’s screen.
Microphone
The Chromebook’s microphone is located above the screen on the middle right. It is used to capture audio during video chats, conferences, calls, and recordings. You can also use it for audio chats and Internet phone calls.
Keyboard
The keyboard is located on the base of the Chromebook. It’s a little different from a traditional Windows or Mac keyboard in that nonessential keys have been removed and web-specific keys have been added. Learn more about the Chromebook’s keyboard in the “Using the Keyboard” section, later in this chapter.

Touchpad
The Chromebook’s touchpad is located directly below the primary keyboard. It functions as your Chromebook’s mouse and cursor controller. Note that the touchpad does not include a right or left click button; instead, you tap the touchpad itself to click. Learn more in the “Using the Touchpad” section, later in this chapter.
Memory Card Slot
On the left side of the Chromebook, on the edge of the base section closest to the screen, is a 3-in-1 slot for inserting memory cards. You can insert SD, SDHC, and SDXC memory cards into this slot. You can use this slot to access photos from a digital camera, MP3 audio files, or even stored video files.

Headset Jack
The left side of the case also features a headset jack, which you can use to connect headphones or earbuds for listening to your Chromebook’s audio.
The Acer C7 Chromebook has similar ports to the Samsung Chromebook, but in different places. (All of the Acer’s connectors are on the left and right side of the unit, not on the back.) The Acer also offers a VGA port to connect to an external computer monitor, and an Ethernet port to connect to wired home and business networks.
HP Pavilion Chromebook
HP’s Pavilion Chromebook also has similar ports in different places. Most of the HP’s connectors are on the right side of the case, including an Ethernet connector for wired networks.
USB Ports
There are no connectors on the right side of the Samsung Chromebook. Instead, the rest of the connectors are located on the back of the unit.
First up are two USB ports. The port on the left is compatible with the new USB 3.0 standard; the one on the right is a USB 2.0 port. You can use these ports to connect any USB devices to your Chromebook.

The 3G version of the Samsung Chromebook includes a slot for a USIM card. This covered slot is on the back of the unit, to the left of the USB ports.
HDMI Connector
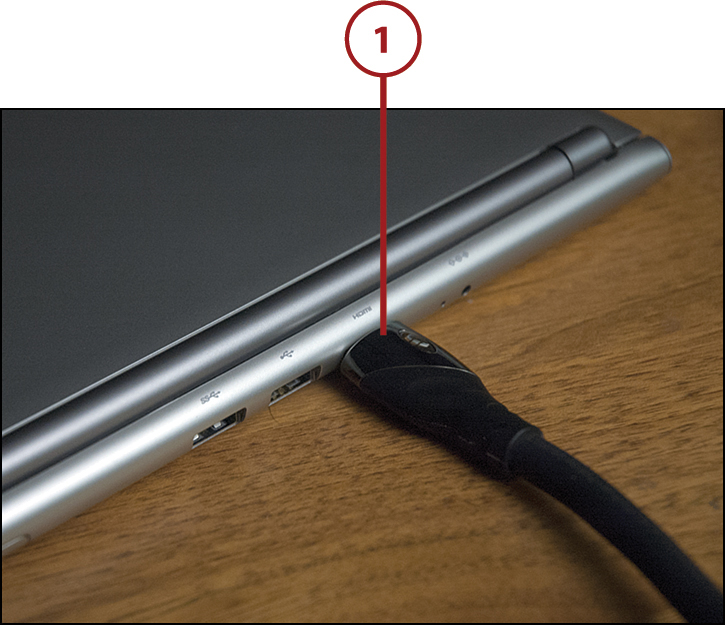
To the right of the USB ports, on the back of the unit, is an HDMI connector. Use this connector to connect your Chromebook to a flat panel TV or audio/video receiver; it transmits both HD video and audio from your Chromebook.
Status Indicator
Next to the HDMI connector is a small LED light that serves as a status indicator for your Chromebook. The indicator glows green when the Chromebook is running on external power and the battery is fully charged; it glows red when running on external power and the battery is being charged, and it is off when the computer is running on battery power.
Power Connector
The final item on the back of the Chromebook, on the far right, is the DC jack. This is where you connect the AC adapter to your Chromebook for external power.
AC/DC
Your Chromebook natively runs on DC (direct current) power, such as that supplied by the internal battery. Because the electricity from a wall outlet is AC (alternating current), the external power adapter is necessary to convert the AC power to DC power.
Using the Keyboard
The Chromebook keyboard is a simplified version of a traditional keyboard. It’s simplified in that several lesser-used keys are missing; this lets your Chromebook make the remaining keys bigger in a smaller space.
The first keys that are missing are the traditional function (F1, F2, F3, and so on) keys normally found on the top row of the keyboard. In place of these functions keys, your Chromebook features a row of “web keys” that perform specific functions for web browsing. The following table describes these web keys found on the top row of the Chromebook keyboard.

The row of web keys also includes your Chromebook’s Power button, which you use to turn your Chromebook on or off. The LED on this button shows your Chromebook’s operating status: It lights on when your Chromebook is running, blinks when your Chromebook is in sleep mode, and is dark when your Chromebook is turned completely off. There’s also an Esc key on the far left side of this row.
Beneath the top row of web keys is the expected row of numeric (1, 2, 3, and so on) keys. This row also includes the backspace key, which deletes the previous character entered.
The next four rows contain the traditional alphabetic (a, b, c, and so on) keys. At the ends of these rows are your Chromebook’s Shift, Ctrl, Alt, and Enter keys, along with a grouping of four arrow keys for navigation.
Note that there is no Caps Lock key on the Chromebook; if you need to type successive capital letters, you need to hold down the Shift key as necessary.
![]()
Where you might expect to find a Caps Lock key is a new Chrome-specific Search key. Press this key to go to the address bar on the New Tab page to initiate a web search.
Turn the Search Key into a Caps Lock Key
You can, with a little work, turn Chrome’s Search key into a Caps Lock key. Click your profile picture at the bottom right of the screen and select Settings. When the Settings page appears, go to the Device section and click the Keyboard Settings button. When the Keyboard Settings dialog box appears, pull down the Search list and select Caps Lock. Click the OK button when done.
Using the Touchpad
Just below the keyboard is your Chromebook’s touchpad, which provides the same functionality as an external mouse. That is, you use the touchpad to move the onscreen cursor and click and select items onscreen.

External Mouse
If you don’t like the touchpad, you can connect an external mouse to one of the Chromebook’s USB ports. See the “Connecting External Devices” section, later in this chapter, to learn how.
Moving the Cursor
You use your finger on the touchpad to move the cursor around the Chromebook screen.
1. Place your finger lightly on the touchpad.
2. Move your finger in the direction in which you want to move the cursor.
The mouse cursor moves in the direction you moved your finger.
Clicking the Cursor
You can either single-click or double-click items on your Chromebook’s screen. Single-clicking is most common.
1. Move the cursor on top of the item to click.
2. Tap your finger anywhere on the touchpad.
To double-click an item, tap twice instead of once.
Right-Clicking the Cursor
Many useful functions often appear via a pop-up menu when you right-click an item onscreen. But how do you right-click a touchpad that doesn’t have a right button?
1. Move the cursor to the item you want to right-click.
2. Place two fingers anywhere on the touchpad and press once.
Dragging an Item
To move an item to another position on screen, you drag it to a new position.
1. Move the cursor to the item you want to move.
2. Press and hold the touchpad while you drag the item to a new location.
3. Lift your finger from the touchpad to “drop” the item in place.
Scrolling the Screen
If you’re viewing a long web page or editing a long document, you need to scroll down the screen to see the entire page. Although you can do this with the keyboard’s up arrow and down arrow keys, you can also scroll with the touchpad.
1. Place two fingers lightly on the touchpad, but do not press down on the touchpad.
2. Drag your fingers down to scroll down the page.
3. Drag your fingers up to scroll up the page.
Adjusting Touchpad Sensitivity
If you find that your touchpad is too sensitive, or not sensitive enough, you can adjust the sensitivity of the touchpad.
1. Click your profile picture at the bottom of the screen to display the pop-up menu.
2. Select Settings.

3. When the Settings page appears, select the Settings tab, on the left.
4. Go to the Device section and drag the Touchpad Speed slider to the left to make it less sensitive, or to the right to make it more sensitive.

Tap-to-Click
By default, you tap within the touch area of the touchpad to click an onscreen item. If you’d prefer to press in the touch area instead, check the Touchpad Settings button and then uncheck the Enable Tap-to-Click box. Click OK when done.
Connecting External Devices
Although a Chromebook is a relatively self-contained unit, you can connect various external devices to the machine, typically via USB.
Connecting an External Mouse
If you don’t like your Chromebook’s built-in touchpad, you can connect an external mouse to one of the USB ports. You can connect either a corded or cordless model.
1. Connect the cable from the external mouse to one of the Chromebook’s USB ports. (If you’re connecting a wireless mouse, plug the wireless receiver into the USB port.)

2. Your Chromebook should immediately recognize the external mouse and make it available for use.
Connecting an External Keyboard
You can also connect a larger external keyboard to your Chromebook via USB. As with an external mouse, you can connect either a corded or cordless keyboard.
1. Connect the cable from the external keyboard to one of the Chromebook’s USB ports. (If you’re connecting a wireless keyboard, plug the wireless receiver into the USB port.)

2. Your Chromebook should immediately recognize the external keyboard and make it available for use.
Connecting to a Large-Screen TV
If you’re watching streaming movies or television programs, the 11.6″ Chromebook screen doesn’t quite deliver a big-screen viewing experience. Fortunately, you can use your Chromebook to deliver streaming Internet programming to your living room TV—and watch it all on the big screen.
1. Connect one end of an HDMI cable to the HDMI connector on your Chromebook.

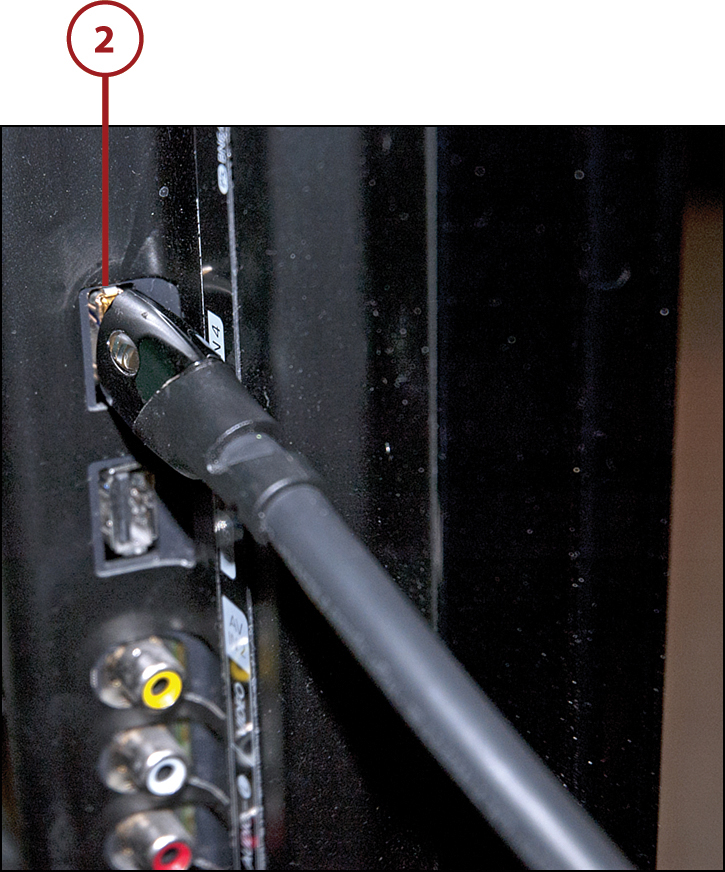
2. Connect the other end of the HDMI cable to an HDMI input on your television set or audio/video receiver.

3. Switch your TV or receiver to the proper HDMI input.
You should now see on your television screen whatever is playing on your Chromebook.
External Storage
You can also connect certain external storage devices to your Chromebook via USB. Learn more in Chapter 7, “Managing Files and Using External Storage.”
Adjusting Brightness and Volume
Your Chromebook includes dedicated keys, located in the top row of the keyboard, for adjusting screen brightness and audio volume.
Adjusting Screen Brightness
You can make your Chromebook display brighter or darker. A brighter display might look nicer, especially under bright lighting, but can drain the battery faster. Dimming the screen a tad can still look good while maximizing battery life.
1. To increase screen brightness, press the Increase Brightness key.
2. To decrease screen brightness, press the Decrease Brightness key.
One press of either key changes the brightness by one level.
Adjusting and Muting the Volume
Whether you’re using your Chromebook’s built-in speaker or listening through headphones or earbuds, you’ll probably need to adjust the volume level at some point.
1. To increase the volume level, press the Increase Volume key.
2. To decrease the volume level, press the Decrease Volume key.
3. To mute the volume, press the Mute button; press the button again to unmute the sound.

