14. Watching and Creating Videos
In this chapter, you find out how to use your phone to view videos from a variety of sources, as well as to shoot and share your own videos. Topics include the following:
![]() Streaming video over the Internet to your phone
Streaming video over the Internet to your phone
![]() Using the Video app to play videos
Using the Video app to play videos
![]() Converting DVD videos for playback on your phone
Converting DVD videos for playback on your phone
![]() Recording videos with the rear and front cameras
Recording videos with the rear and front cameras
![]() Using dedicated video chat apps
Using dedicated video chat apps
With the pair of cameras on the Galaxy S5, you can record videos of yourself, others, or anything that moves. The phone’s high-resolution screen makes it ideal for viewing those videos, as well as movies and TV shows that you’ve extracted from DVDs, rented or purchased online, or streamed to the phone.
Streaming Video to the Phone
Streaming video is sent to your phone as a stream of data that plays as it’s transmitted. Unlike material that you download, streaming requires an active Internet connection and doesn’t result in a file that’s permanently stored on your phone. If you want to watch the same video again, you need to stream it again. You can access streaming video through dedicated apps such as YouTube or by clicking web page links.
Streaming with a Dedicated App
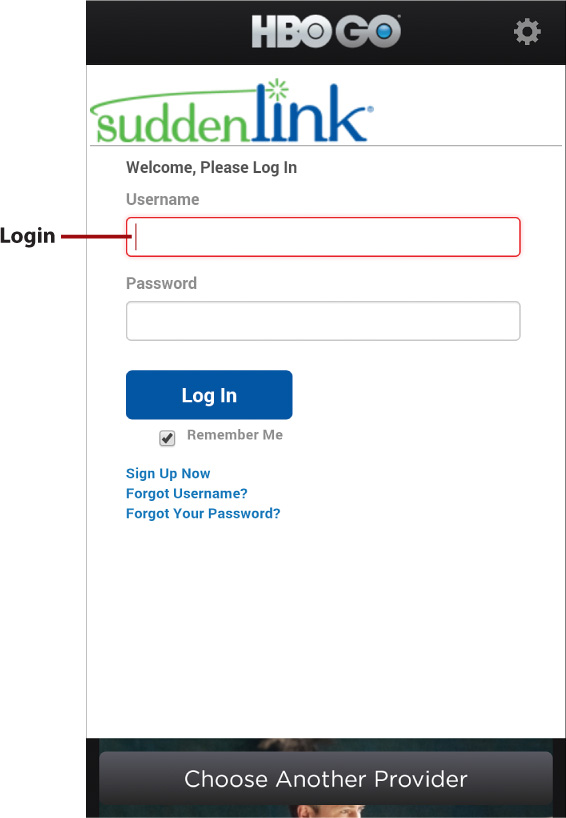
The two common classes of streaming video apps are subscription-based and free. Examples of subscription-based apps include Netflix, HBO Go, and Max Go (for Cinemax). To access Netflix movies, you must be a Netflix streaming subscriber. To access HBO or Cinemax, you must currently receive HBO or Cinemax through a supported satellite or cable TV provider.
After installing and launching one of these apps, you sign in with the username and password that you use to log on to www.netflix.com, www.hbogo.com, or www.maxgo.com. (In the case of subscription TV services, your username and password are generally the ones you use for your cable or satellite provider’s website.) The apps are designed to remember this login information, so future launches won’t require you to reenter it.
Many other apps for streaming video don’t require a subscription for basic access. Examples include YouTube, MTV News, and Adult Swim.
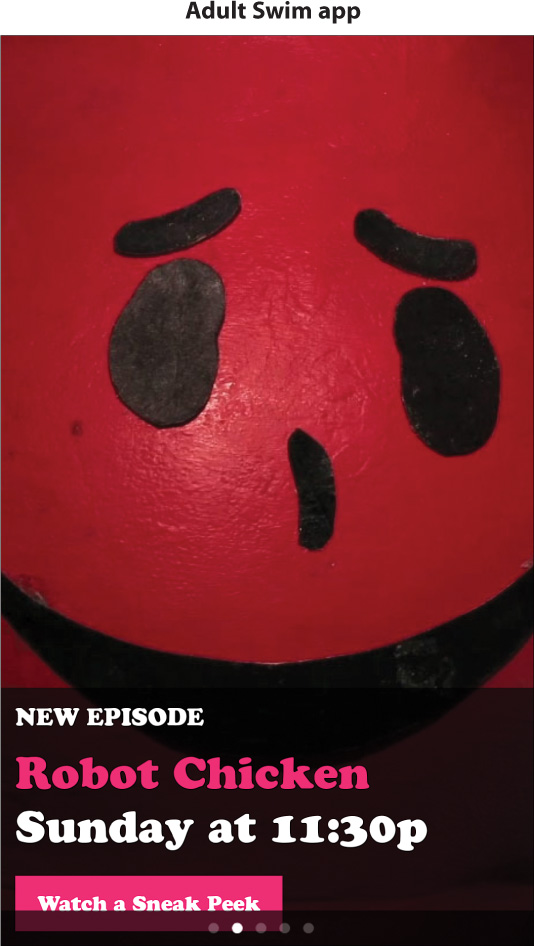
Depending on how the streaming app was designed, when you select a video to view, it plays in a dedicated player or in Video, an app that’s preinstalled on the Galaxy S5. The controls most players provide are similar to the ones in Video. The most recent implementation of the Adult Swim player, on the other hand, has a spartan controller that focuses on the progress bar (also called a scrubber bar). You can tap the screen at any time to display the bar, and then tap the approximate spot on it that indicates where you want the video to continue playing. To dismiss the bar, tap the video.
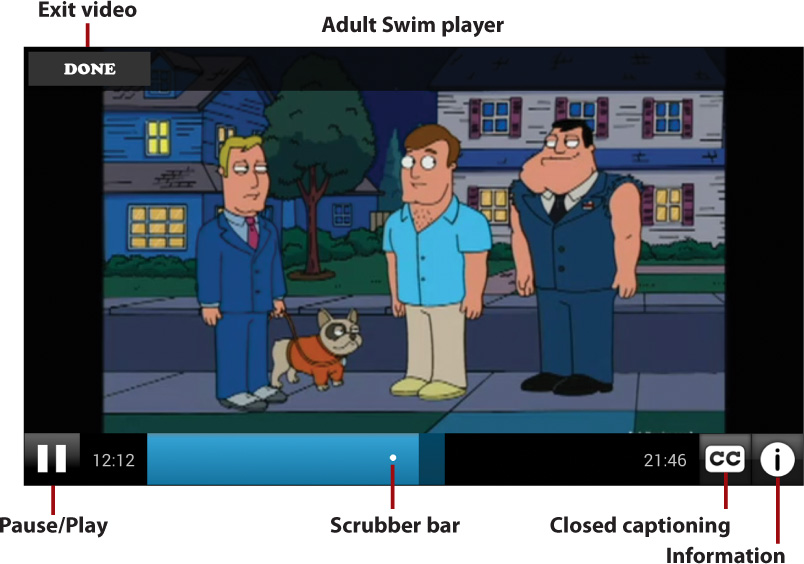
You can also do the following:
• To exit the current video, press the Back key or tap the Done button when the scrubber bar is onscreen.
• Press and hold the Recent Apps key to assist in your search for videos, clips, games, and scheduling information.
Streaming from Web Pages
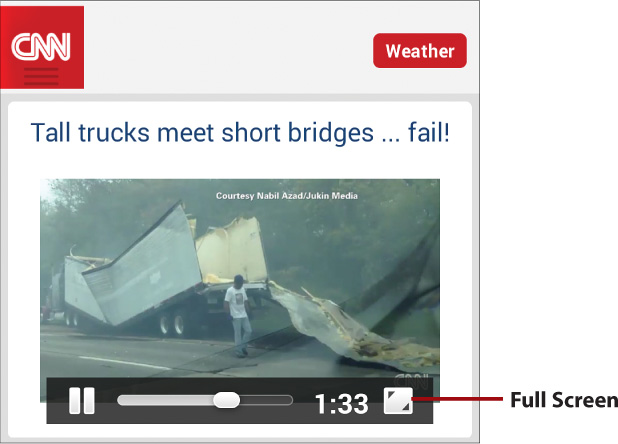
Video clips are embedded in many web pages. When viewed in the Internet or Chrome app, these clips play in a similar manner to what you’d see in a computer browser—although the controls might be different. For example, some embedded clips display only a progress bar. However, if you search carefully, you might find a Full Screen icon or a similarly worded link that enlarges the video and adds normal playback controls.
Playing Videos with the Video App
Regardless of whether a video was shot by you, downloaded, bundled with or converted from a DVD, sent by a friend, or rented or purchased online, all compatible videos stored on your phone play using the Video app.
The Video app is not the app that actually plays your videos; it’s Video Player—a linked app, but one that has no icon in Apps. When you want to return from the Home screen or another app to continue viewing a paused video, press the Recent Apps key to see the list of active and recently run apps. You’ll see that both Video and Video Player are listed. If you tap Video Player, playback resumes. Tapping Video takes you to the Video app launch screen rather than to your video.
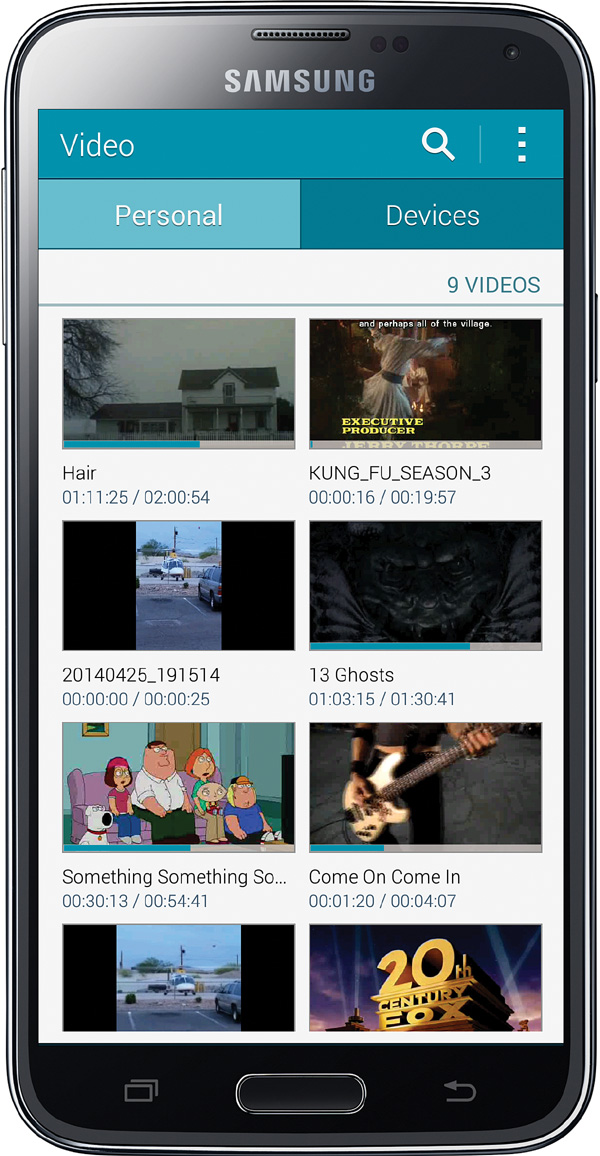
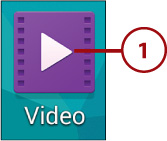
1. From the Home screen, tap Apps, followed by Video.
2. To play a video that’s stored on your phone, select the video by tapping its title or thumbnail.
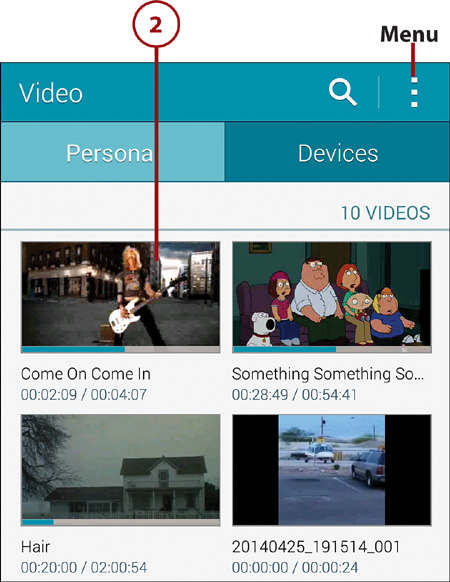

To make it easier to find the video that you want to watch, your video collection can be displayed as live thumbnails, as a list, or organized by the folders in which videos are stored. Tap the menu icon, choose View As, and select an option. If you have many videos, you can specify a different sort order for the thumbnails or list by tapping the menu icon and choosing Sort By.
You can also open a video in Gallery, My Files, or another app. Doing this launches Video Player, enabling you to skip Steps 1 and 2. Tap the Play icon to play the selected movie or clip.
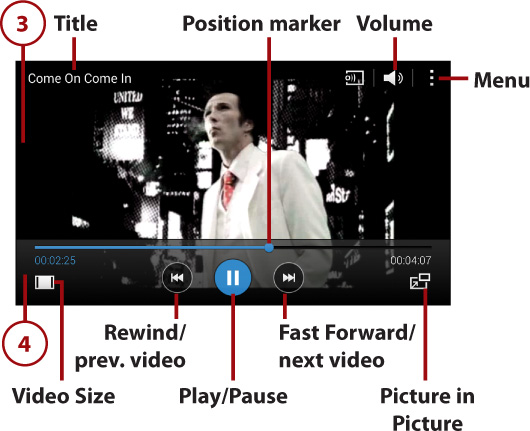
3. The controller appears and the video begins to play. Rotate the screen to the desired orientation: landscape or portrait.
4. You can tap the screen while the video is playing to display the controller and then do any of the following:
• Start/restart or pause playback by tapping the Play/Pause button.
• Tap the Video Size icon to change the way the video is sized to fit the screen. Depending on how the video was encoded and the display type for which it was intended, some sizes may stretch the image in one direction, and others may clip the image horizontally or vertically to fit. Tap the icon repeatedly to see all display options.
• Jump forward or backward in the current video by dragging the position marker to the approximate spot.
• Tap the Rewind button to jump to the beginning of the current video or, if you’re at the beginning, to the previous video in the list. Press and hold the Rewind button to scroll backward through the current video; the longer you hold the button, the faster it scrolls.
• Tap the Fast Forward button to jump to the next video. Press and hold the Fast Forward button to scroll forward through the current video; the longer you hold the button, the faster it scrolls.
• Adjust playback volume by tapping the Volume icon and dragging the slider that appears. (You can also change the volume by pressing the Volume control on the left side of the phone.)
• Leave the current video by pressing the Back key twice. To exit Video, press the Home key.
Using the Video Menus
On Video’s main screen, you can tap the menu icon and choose from these commands:
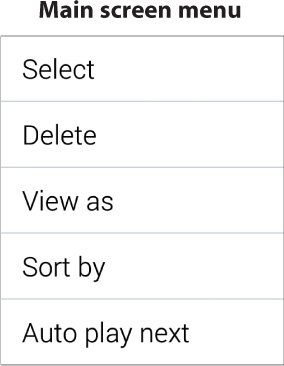
• Select, Delete. Delete unwanted videos that are stored on the phone. Tap the check box of each video that you want to delete, tap the Delete icon or Done, respectively, and tap OK in the confirmation dialog box that appears.
• View As, Sort By. See “Video Selection Assistance,” earlier in this section.
• Auto Play Next. When enabled, this option causes Video to automatically play the next video in sequence when the current one finishes.
While a video is playing, you can press and hold the Recent Apps key (or pause the video and tap the menu icon), and then choose from these menu commands:
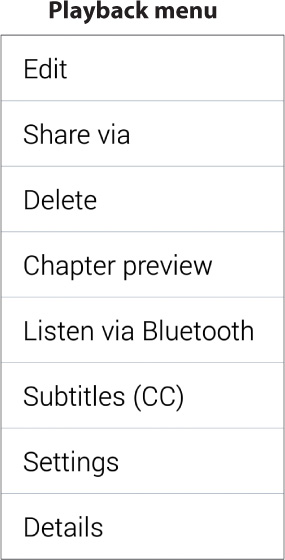
• Edit. Launch Video Trimmer to remove extraneous material from the beginning or end of the video, or launch Video Editor to create a video by combining photos and videos. You can add themes, music, voiceovers, and special effects. (If Video Editor isn’t installed, choosing this command launches Samsung Apps so you can download and install the app.)
• Share Via. Transmit the video to others (Messaging, Email, and Gmail) or another device (Bluetooth and Wi-Fi Direct), or post it on a social networking or chat site (YouTube, ChatON, Google+, and Facebook). Note that many videos are too large to be shared via text messaging, email, or Gmail.
• Delete. Delete the current video, removing it from your phone. Tap OK in the confirmation dialog box.
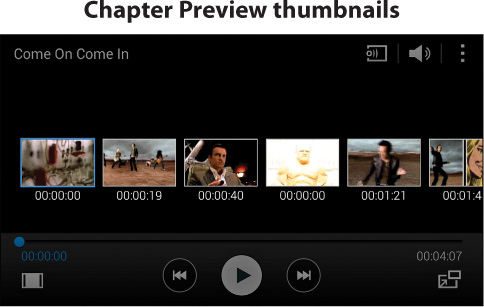
• Chapter Preview. Displays thumbnails representing breakpoints in the video. When you tap a thumbnail, the video resumes at that point.
• Listen Via Bluetooth. Transmit the audio to a paired Bluetooth headset.
• Subtitles (CC). If subtitles/close captioning are stored as part of the video file, you can elect to display them.
• Settings. Change playback settings for all videos, such as setting the brightness, switching to a mini controller, and adding an onscreen capture button to simplify the process of taking screenshots of favorite scenes.
• Details. Display information about the video, such as its file format, resolution, size, and storage location.
Converting DVD Videos for Playback on the Phone
You can use many programs to extract video content from DVDs for playback on the Galaxy S5 and other devices. The following task shows how to extract video using DVDFab/DVD Ripper, a DVD-to-mobile conversion utility for Windows and Mac OS X from www.dvdfab.cn. Each extracted movie or TV show results in a single MPEG-4 (.mp4) file that you can view with the Video app.
Which Version Should I Use?
Currently, there are two versions of the DVDFab line of products: the older DVDFab 8 QT and the new DVDFab 9. Both are available as free 30-day trials. If you decide to purchase a license for DVDFab, you are entitled to use both versions. As an example of converting DVD videos for playback on your phone, the following task employs DVDFab 9.
1. Launch DVDFab on your computer.
2. Select the Ripper tab. Ensure that the correct profile to convert the video is selected. If so, go to Step 4.
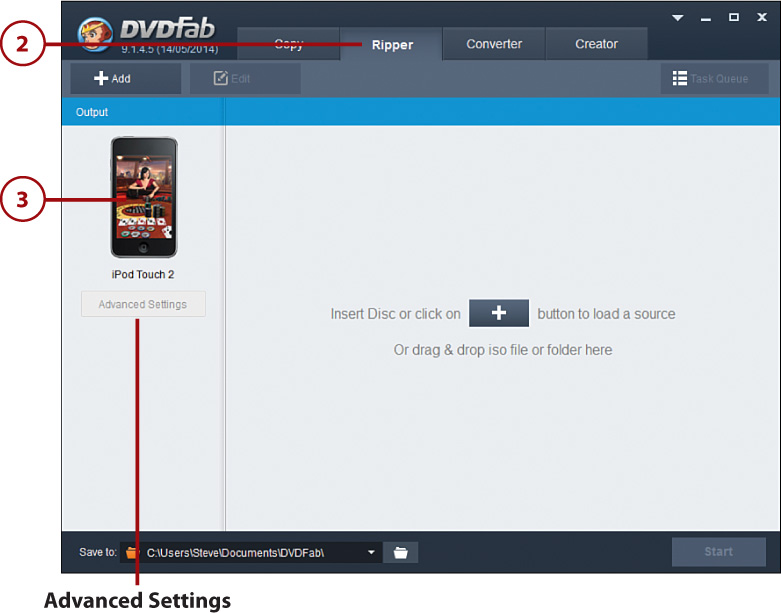
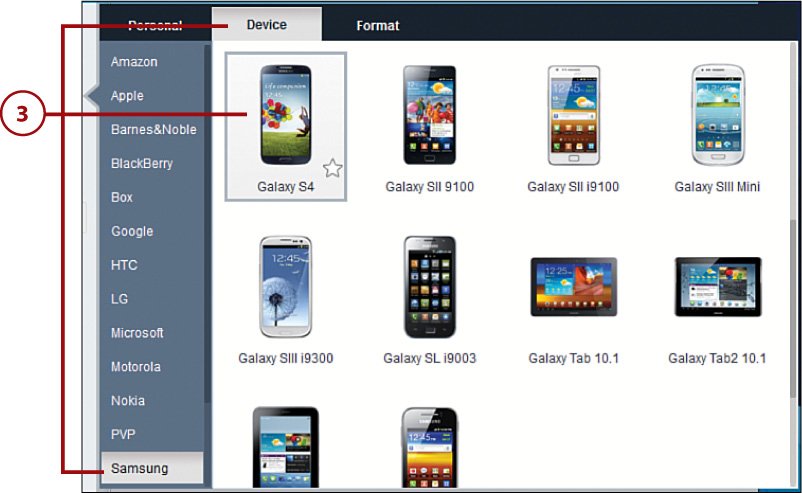
3. To change profiles, click the current profile icon. In the dialog box that appears, select the Device tab, select Samsung in the scrolling list, and select the Galaxy S5 profile (or a comparable one, such as the Galaxy S 4).
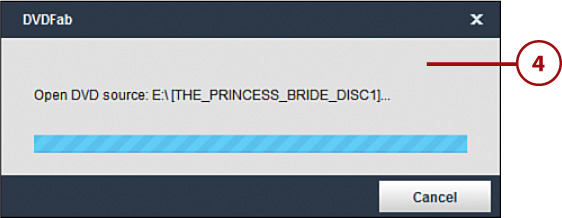
4. Insert the DVD that contains the material you want to extract. Wait for the program to scan and analyze the DVD’s file structure.
5. Select the material that you want to convert to videos for the phone by doing one of the following:
• If this is a movie DVD, the movie is automatically selected. (Generally, the movie will have the longest Runtime of the items on the DVD.)

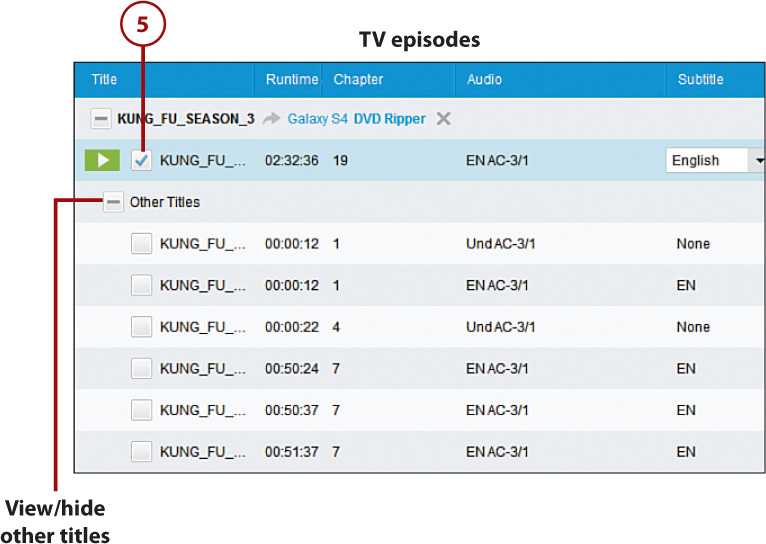
• If this is an episodic DVD (containing multiple episodes of a television show, for example), click the check box of each episode that you want to convert. The application analyzes each checked episode; each results in a separate video.
If the individual episodes aren’t visible, click the Other Titles icon to view them. You can usually tell the episodes from extraneous material (such as recaps and previews) by their runtimes. In the figure, the last three entries are the episodes.
All Episodes
In the TV episodes example, the first entry combines all episodes into a single video—note its long runtime. Some DVDs provide this option; others don’t. You can either convert this lengthy video or individual episodes.
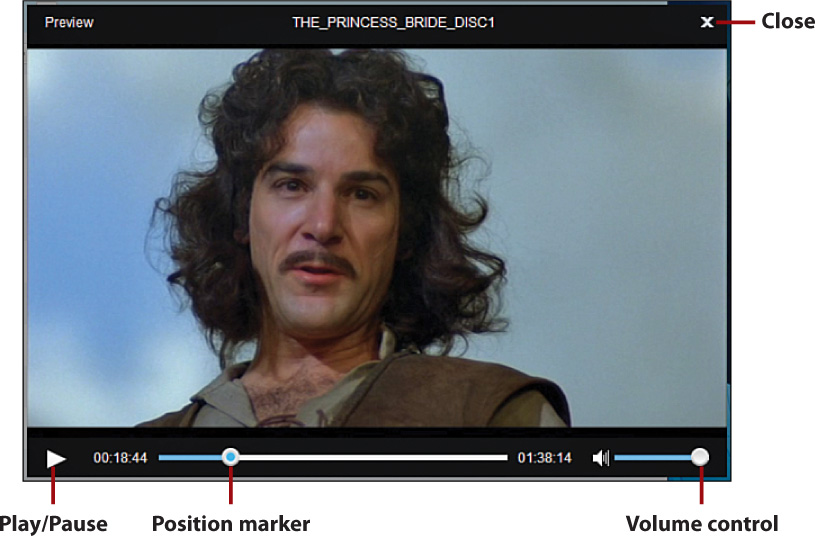
Regardless of a DVD’s contents, you can preview each movie, episode, and other material (such as bloopers and deleted scenes) in the Preview window. Previewing can ensure that you’ve selected the correct video(s) and appropriate audio. Preview a video by moving the cursor over its entry and then clicking the green play button that appears (as shown in the previous figure, for example).
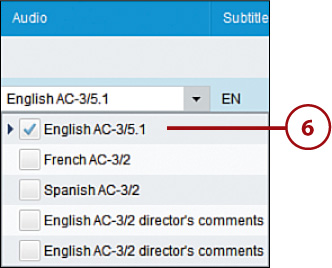
6. For each checked item, select an audio option. Normally, the recommended option will be correct. You can preview the material in the Preview window to ensure that you’ve chosen normal dialogue rather than the director’s commentary or a foreign language version.
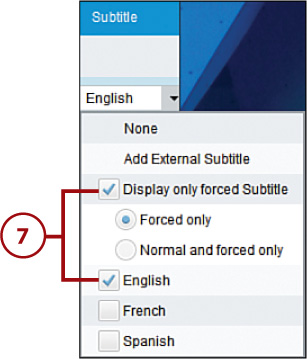
7. For each checked item, you can enable or disable subtitles (if the disk includes them). Select a subtitle language, and do one of the following:
• To disable normal subtitles, ensure that Display Only Forced Subtitle is checked. Subtitles will appear only when an actor is momentarily speaking in a foreign language.
• To display subtitles throughout the video, remove the check mark from Display Only Forced Subtitle.
8. Select a movie, episode, or another checked item and review the proposed conversion settings displayed under the Advanced Settings button. If they’re satisfactory, skip to Step 14; otherwise, continue with Step 9.
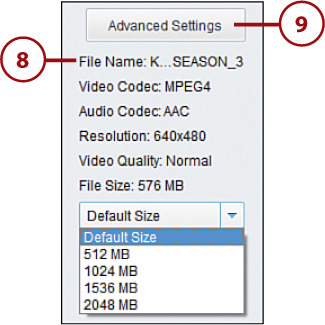
9. You can review or change the settings for resolution and other options for each item you’re extracting. Select the checked video that you want to modify. Then click the Advanced Settings button (beneath the device profile) to review its settings in the window that appears.
Changes you make in Advanced Settings can apply to only the selected video or to all checked videos. This is determined by the state of the Apply to All check box. When converting TV episodes, you’ll generally want to apply the same settings to all episodes.
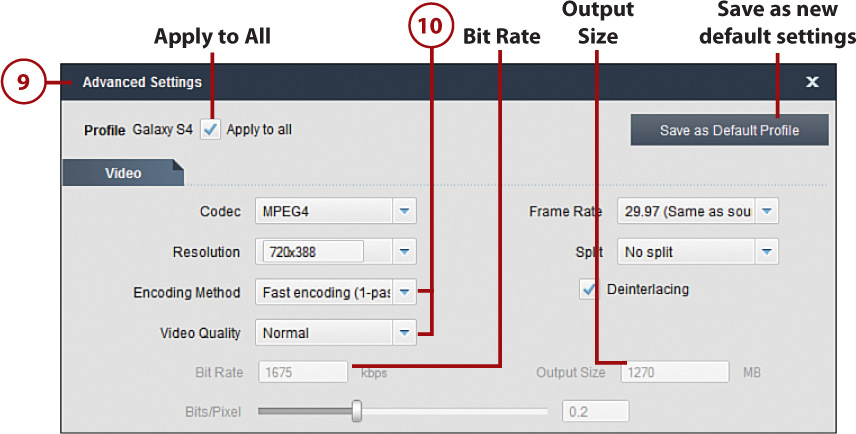
10. Video. You can change Encoding Method and/or Video Quality to improve the visual quality of the video or reduce the size of the video output file.
• Encoding Method can be 1- or 2-pass. The latter improves the quality but increases the time required to perform the encoding because it makes two passes through the source video.
• Changes in Video Quality (Low, Normal, and High Quality) are reflected in Bit Rate and Output Size. The higher the Video Quality setting, the higher the bit rate (quality) and the larger the file size. To manually set Bit Rate and Output Size, choose Customized.
Can You Tell the Difference?
As an experiment, you might try encoding the same movie at the three Video Quality settings and see if you can detect the difference. If you can’t or you’re willing to accept a small sacrifice in quality, smaller is better because you can fit more videos on your S5. For example, when encoding the movie shown in this example, the High Quality file size is almost twice that of the Low Quality file.
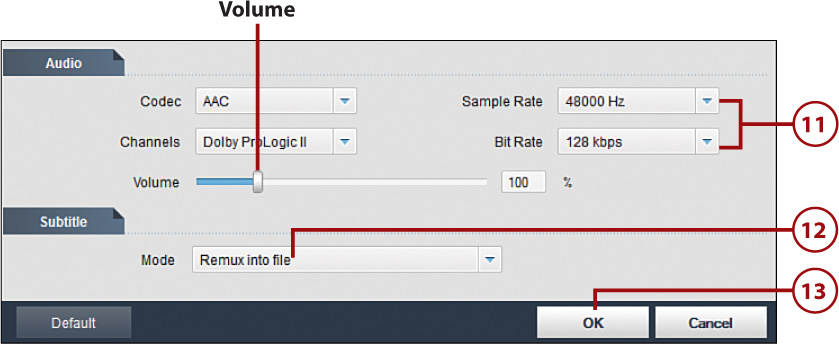
11. Audio. Set audio quality/clarity by choosing a Sample Rate and Bit Rate. Higher numbers yield higher-quality audio. (Bit Rate options are profile-dependent.) After conversion, if you notice that the playback audio is unusually loud or quiet, you can repeat the conversion after making an appropriate change in the Volume setting.
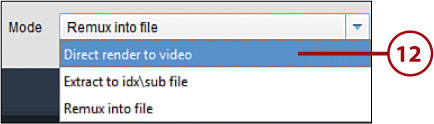
12. Subtitle. If you want the video to include subtitles, choose Direct Render to Video. This setting embeds subtitle text into the video rather than generating a separate subtitle file. As a result, subtitles will always display when the video is played. (If you disabled subtitles in Step 7, this setting is irrelevant.)
13. Click OK when you’ve finished reviewing the settings and are ready to close the Advanced Settings window.
14. The Save To box at the bottom of the window shows the path (diskfolder) where the resulting video file will be saved on your computer. To pick a different location, click the down arrow to specify a location you’ve previously used or click the folder icon to browse for a new location.

15. Convert the selected video(s) by clicking the Start button (refer to the Step 2 figure). When you finish extracting videos, transfer them to your phone using any of the file-transfer techniques described in Chapter 16, “Transferring and Sharing Files.” (You’ll find the video files in a Samsung folder in the location specified in Step 14.) After transferring the new files to the phone, they’ll appear in the Video file list.
Recording Videos with the Phone
Using your phone’s cameras, you can create movies that are suitable for posting on websites, emailing to friends, and playing on your phone or a flat-screen TV.
1. Launch Camera by doing one of the following:
• Tap a Camera shortcut on the Home screen.
• On the Home screen, tap Apps and then Camera.
• On the lock screen, slide the Camera icon up (if present).
2. Decide whether to shoot the video in portrait or landscape. Rotate the phone to the proper orientation.
3. Optional: Switch between the rear-facing and front-facing cameras by tapping the Switch Camera icon. (Yes, you can make “selfie” videos.)
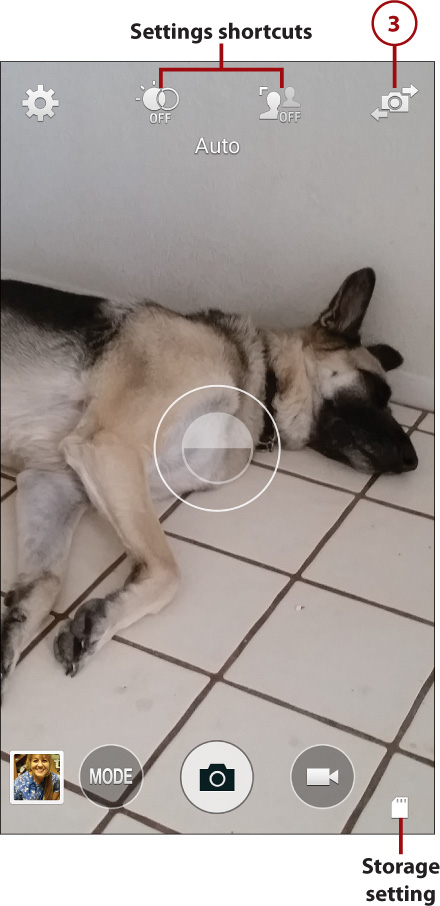
Settings Shortcuts
You can change the Settings shortcuts that appear at the top of the screen to ones that you use more often, as explained in “Configure and Use the Shortcuts” in Chapter 13, “Shooting, Editing, and Sharing Photos.”
When You’re in a Rush
You won’t always have time to leisurely set options before you begin recording. If you’re in a hurry to capture something that’s happening right now, you can often make do by simply launching Camera, rotating the phone to the appropriate orientation, and tapping the Video button.
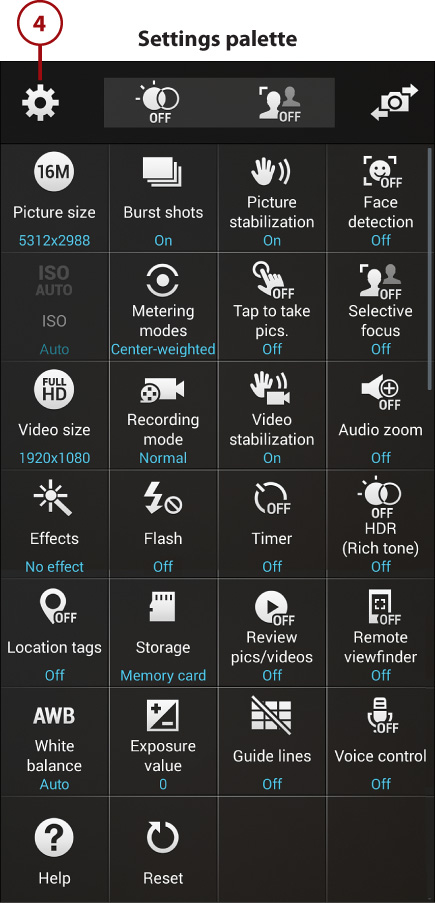
4. Tap the Settings icon to check the current settings in the scrolling Settings palette. Note that most settings are for photos and have no effect when shooting a video. However, you should pay close attention to these settings:
• Video Size. Select a Video Size that’s appropriate for the device on which the video will be played. Each setting specifies the horizontal by vertical dimensions (in pixels). For playback on a flat-screen TV in letterbox format (16:9), select any of the first three resolutions: 3840×2160, 1920×1080, or 1280×720, depending on whether the set or video monitor is capable of displaying UHD/4K videos (2160), full HD (1080), or only HD (720). Select 640×480 (4:3) for playback on the Web or for video that you intend to email. Note that the Galaxy S5 can play videos at any of these resolutions.
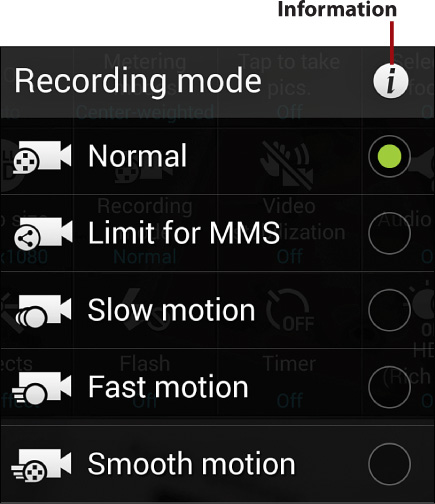
• Recording Mode. Tap the Recording Mode icon and select a setting. Use Normal for a standard recording and Limit for MMS for a video that you intend to attach to a multimedia (MMS) message. For a description of the other settings, tap the i (Information) button.
• Video Stabilization. Compensate for camera shake while recording. (Picture Stabilization, on the other hand, must be disabled while recording.)
• Audio Zoom. When enabled, zooming in on a person or object amplifies sound coming from that source.
• Storage. The video can be stored in the phone’s internal memory (Device) or on a memory card, if one’s installed.
• White Balance, Exposure Value. Adjust one or both of these settings to accommodate difficult lighting conditions.
When you finish making changes, dismiss the menu by tapping anywhere else onscreen, tapping the Settings icon, or pressing the Back key.
5. Set the zoom level by placing two fingers on the screen and spreading them apart or squeezing them together. Note that you can change the zoom level as you record.
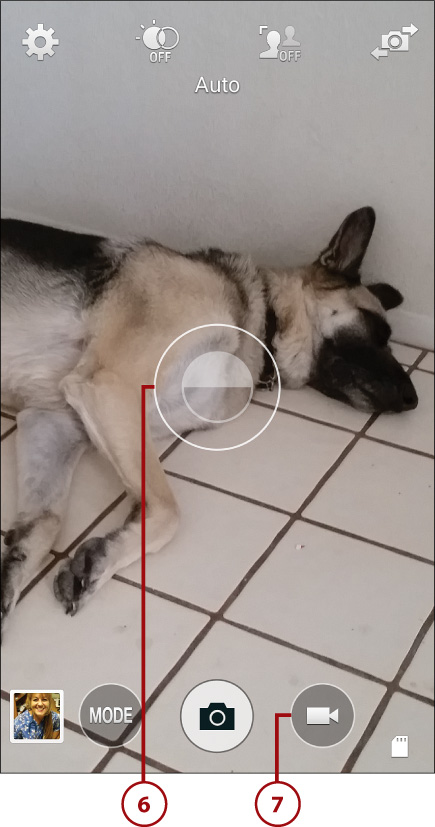
6. Set the focal point for the recording by tapping the approximate spot or subject on the viewfinder screen.
7. Tap the Video button to begin recording.
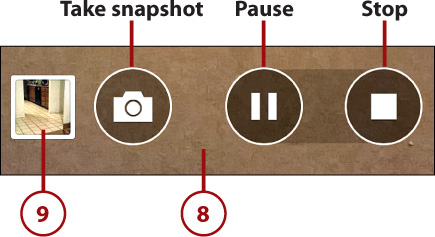
8. Temporarily pause during recording by tapping the Pause button. To resume recording, tap the button again. When you finish recording, tap the Stop button. The MPEG-4 video is automatically stored in the DCIM/Camera folder in the phone’s built-in memory or on the memory card, depending on the Storage setting in Step 4.
Take a Quick Snapshot
While recording, you can also take photos by tapping the Camera button.
9. If you want to view the resulting video immediately, tap the thumbnail icon in the lower-left corner of the screen.
>>>Go Further: Other Settings
• With varying degrees of success, you can shoot in dim or even pitch black settings when Flash is forced On. Repeatedly tap the Flash icon to change its setting.
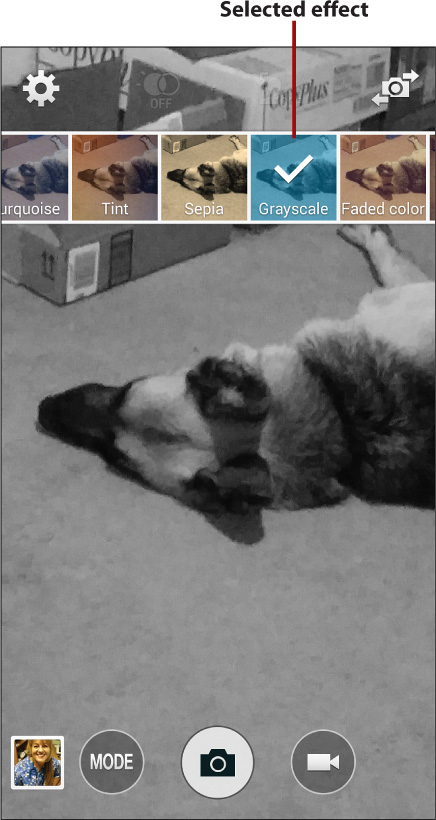
• You can apply an Effect (such as Grayscale or Moody) as you record. To download additional free or inexpensive camera and recording effects, tap the Download icon near the beginning of the Effects list. To remove a selected effect, tap the No Effects icon.
• Enable Guidelines if you have trouble framing your subject.
• When Voice Control is active, you can begin recording by saying “Record video.”
Participating in Video Chats
A final video-related use for your front (and, occasionally, rear) camera is participating in video chats—Internet-based conversations that combine voice and video. Not only can you hear each other, but you can also see the other person’s expressions as he/she talks, as well as what’s happening nearby. Because of the large amount of data exchanged during video chats, they’re best conducted over Wi-Fi or between users who have steady, high-speed connections and unlimited data plans.
To get started with one-on-one or group video chats, launch Google Play (Play Store) and search for video chat. As you read the app descriptions, you’ll note that many require you and your friends to use the same app and be on the same platform; that is, Android, not Apple’s iOS. Some apps also let you chat with people who have a desktop or tablet version of the app. Regardless, to test any of the apps (other than those that permit uninvited chat requests from strangers), you need someone willing to download and try them with you.