6. Using the Calendar
In this chapter, you find out how to use Calendar to create, view, and edit events and tasks. Topics include the following:
![]() Adding Calendar accounts to display events and tasks from your Gmail, Microsoft Exchange ActiveSync, and other account calendars
Adding Calendar accounts to display events and tasks from your Gmail, Microsoft Exchange ActiveSync, and other account calendars
![]() Creating events and tasks, viewing the calendar, and managing events and tasks
Creating events and tasks, viewing the calendar, and managing events and tasks
![]() Responding to reminders for upcoming events and tasks
Responding to reminders for upcoming events and tasks
Similar in design to a full-featured calendar application (such as the one in Microsoft Outlook), the Calendar app enables you to record upcoming events, meetings, and tasks and then receive reminders for them. If you already maintain calendars in Google, Facebook, Outlook.com (Microsoft Exchange ActiveSync), or a corporate Exchange Server account, you can synchronize your Calendar app data with that of your other calendars.
Adding Calendar Accounts
If you’ve used a Google/Gmail account on your phone to access any Google service, Calendar has two calendars that it can immediately associate with new events and tasks: your Google/Gmail Calendar and My Calendar, a phone-specific calendar created by the Calendar app. In addition to these sources, Calendar can use data from and sync with Samsung, Facebook, and Microsoft Exchange Server calendars. Thus, before you experiment extensively with Calendar, decide which external calendar sources you want to use and keep in sync with Calendar (adding other accounts as needed). You can find instructions for automatically and manually synchronizing your calendar data in Chapter 17, “Synchronizing Data.”
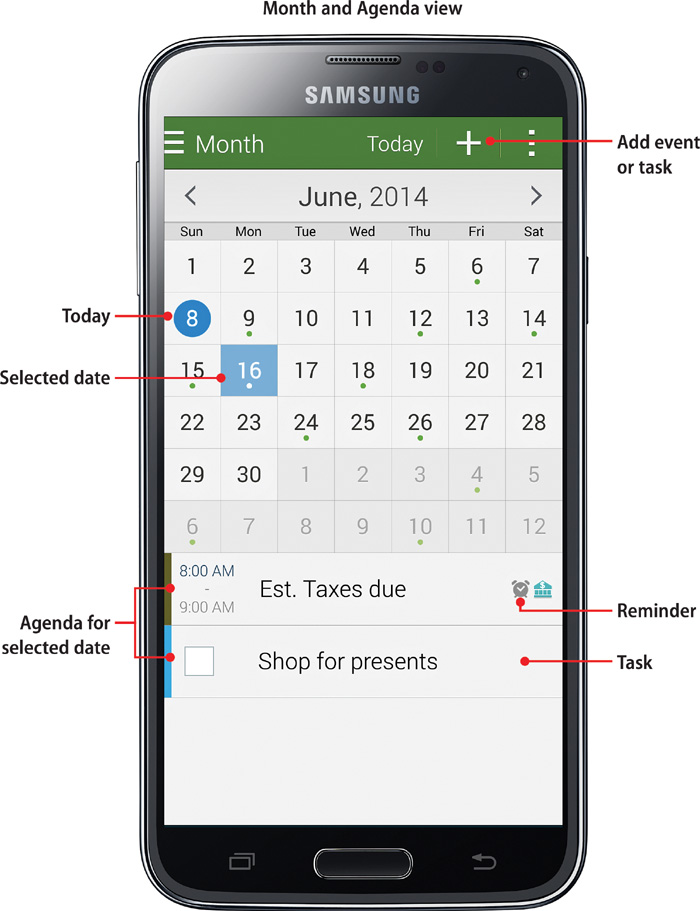
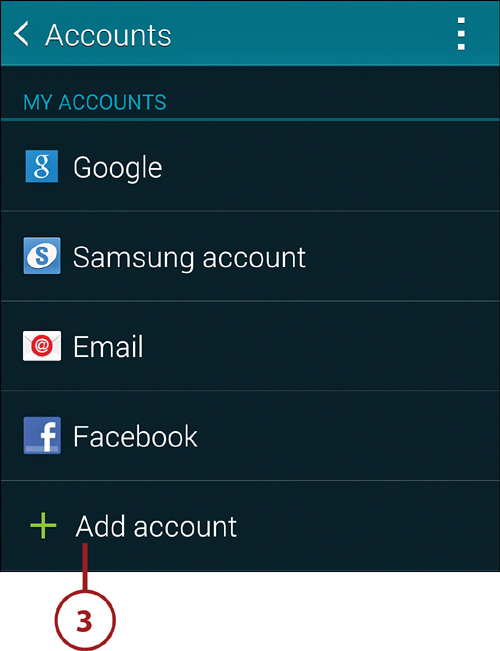
1. To add a Facebook, Microsoft Exchange ActiveSync, Samsung, or Gmail calendar account (only these account types support calendar syncing with your phone), go to the Home screen and tap Apps, followed by Settings.
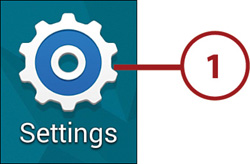
2. Tap the Accounts icon.
3. Tap Add Account at the bottom of the My Accounts list.
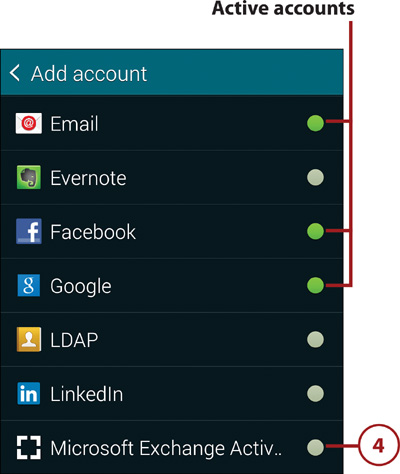
Multiple Accounts of the Same Type
Account types that are marked with a green dot have already been added. You can have multiple Exchange, Email, and Google accounts, but only one instance each of Samsung and Facebook accounts.
4. Select one of these account types: Facebook, Microsoft Exchange ActiveSync, Google, or Samsung Account. This example uses Microsoft Exchange ActiveSync.
5. Follow the instructions to add the account. At a minimum, you need to supply your username and password (or use the provided option to create an account).
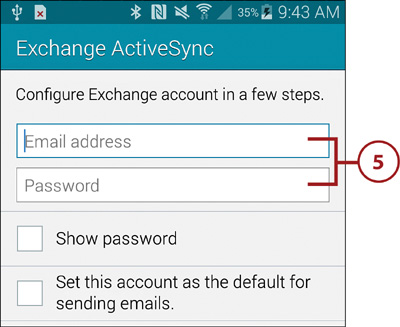
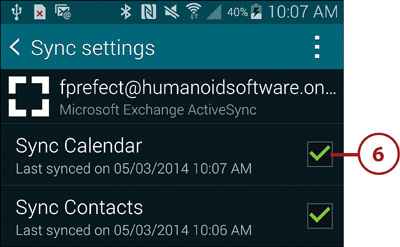
6. Ensure that Sync Calendar is enabled if that option is available on the Sync Settings screen.
7. You can add other accounts by repeating Steps 3–6. When you finish, press the Home key to return to the Home screen.
Working in Calendar
Within Calendar, you can create events and tasks, choose a view (Year, Month, Month and Agenda, Week, Day, or Agenda), and edit or delete events and tasks.
Creating Events and Tasks
In addition to events and tasks that are pulled from your Gmail/Google, Facebook, Exchange, and Samsung accounts, you can also create new items within the Calendar app. These new items can be synced with your accounts automatically, manually, or not at all (as explained in Chapter 17).
Every Calendar item is either an event (a scheduled item for a specific date, with or without a start time) or a task (an unscheduled item with or without a due date). An event can be an all-day occurrence, such as a vacation day or birthday, or have a defined start and end time.
Create an Event
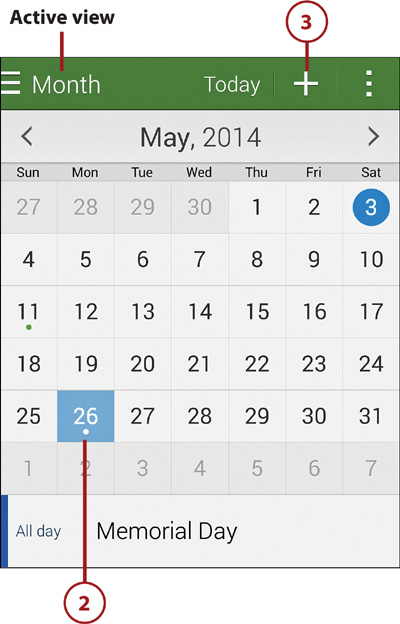
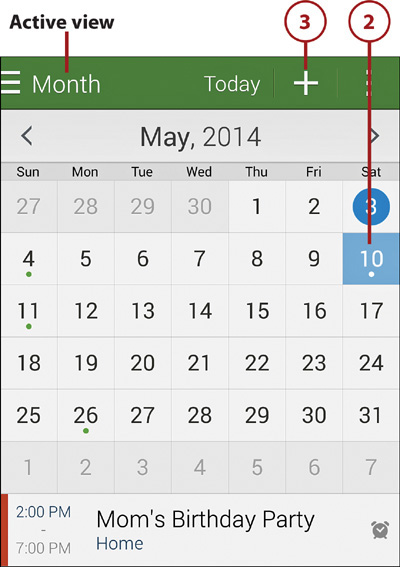
1. Launch the Calendar app by tapping Apps, Calendar or by tapping a Home screen shortcut.

2. Optional: On the calendar, select the date or time when you want to schedule the event. (Selecting the start date or time saves you the trouble of specifying this information when you create the event.) To change the Calendar view so that you can pick a start date or time, tap the active view name and choose Month, Week, or Day.
3. Tap the plus (+) icon to create a new event. The scheduling screen displays.
Be General or Specific
The more specific your selection (start date or date/time), the more information is prefilled for the event. On the other hand, regardless of the currently selected date or start time, you can still set a different date or time when you create the event.
You can also create a new event or task by tapping the plus icon in a Calendar widget.

4. Ensure that Add Event is selected.
5. Select an account to use if you want to associate the event with a different calendar. (My Calendar is the phone-specific calendar.)
Using Multiple Calendars
The calendar you specify for each new item is very important. When you sync calendars, it’s the calendar that records the event. If you choose your Google/Gmail calendar, for example, the event will also be available to you from Google’s website using any browser. On the other hand, if you choose My Calendar, the event will be available only on your Galaxy S5. To use other account calendars with Calendar, see “Adding Calendar Accounts” at the beginning of this chapter.
6. Enter a title for the event.
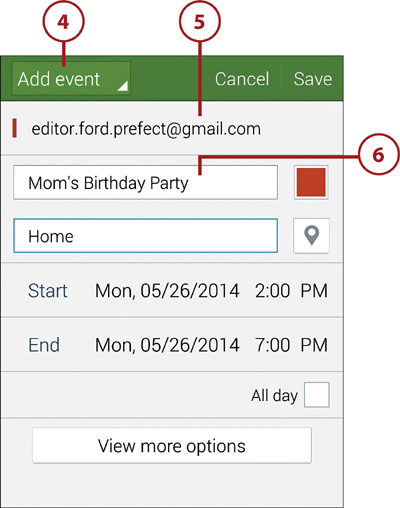
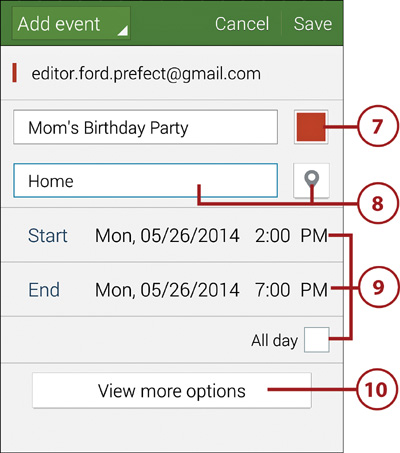
7. Optional: Select a color that signifies something about or helps classify the event.
8. Optional: Enter the event’s location. This can be something simple like “Home” or a real, physical address. Type in the Location box or tap the Location icon, perform a search, and tap Done.
9. Do one of the following:
• If this is an all-day event or one with no specific schedule other than the day on which it occurs, tap the All Day check box. The From and To times are removed, as well as the time zone. Go to Step 10.
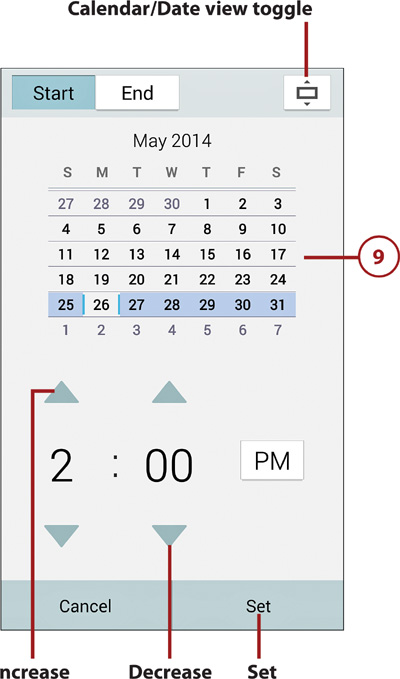
• If the Start or End date or time is incorrect, tap the date or time item and correct it. Tap arrow icons to increment or decrement a component (such as the hour) by one unit. Alternatively, you can select the item you want to change and type the new value. If the other date or time is also incorrect, tap its button at the top of the screen (Start or End) and repeat this process. Tap Set to accept the corrected dates and/or times.
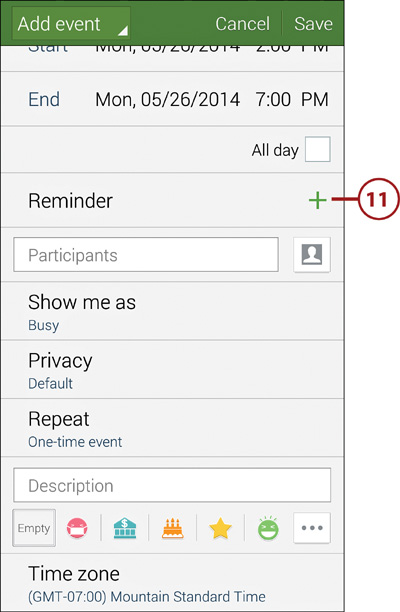
10. Tap View More Options to view more event options including the ability to set a reminder, choose a meeting time zone, and more.
11. Optional: Set a reminder (alarm) for the event by tapping the Reminder plus (+) icon. To specify an interval other than the default (15 minutes before), tap the interval box, and select a new one from the scrolling list. Select Customize if none of the intervals is correct.

More About Reminders
You can optionally set multiple reminders for an event. Tap the plus (+) icon to add a new reminder. To remove a reminder, tap the minus (–) icon to its right. If the Calendar account with which this event is associated has an email address (such as your Google/Gmail account), you can elect to be notified via email rather than by the usual methods. Tap the box to the right of the reminder interval and choose Email.
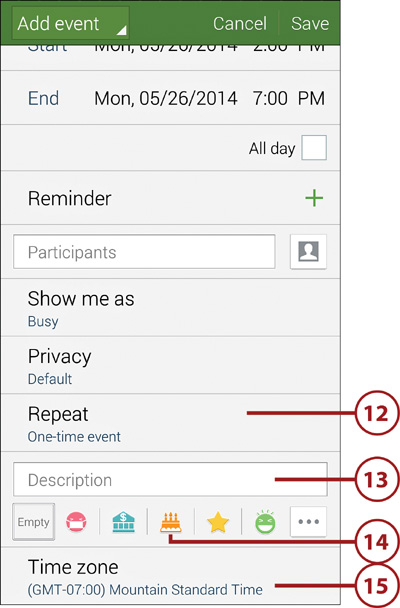
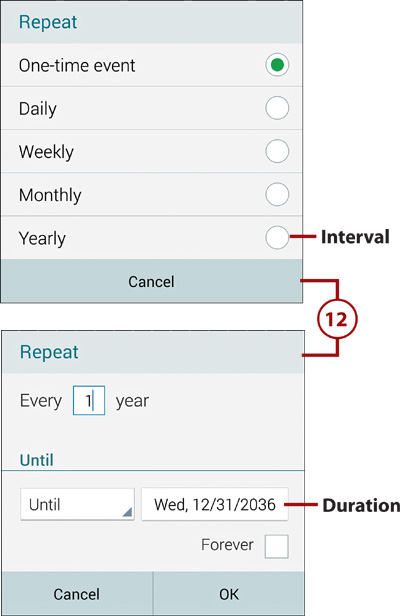
12. Optional: Specify an interval for repeating this event (such as a weekly staff meeting on Monday at 1:00 p.m.) by tapping Repeat and selecting a repetition interval. Then specify a duration or end date, and tap OK.
13. Optional: Enter a detailed description of or notes related to the event in the Description box.
14. Optional: Select a sticker to visually identify the event on the calendar and to use as a filtering criterion.
15. Optional: Tap the Time Zone entry to specify a different time zone to use for scheduling this event.
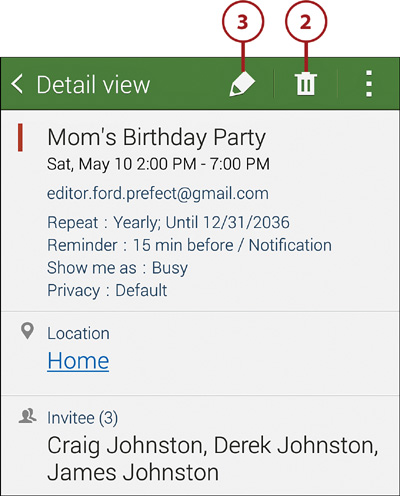
To maintain compatibility with events created in Google/Gmail and Microsoft Exchange ActiveSync accounts (or created in Calendar and designated as either of these account types), additional fields (Participants, Show Me As, and Privacy) appear when you create, edit, or view such events. The fields are normally used to manage attendance at corporate meetings and can—or should—be skipped when creating standard Calendar events. When you save an item with designated participants, each person is automatically emailed an invitation when you save the event.

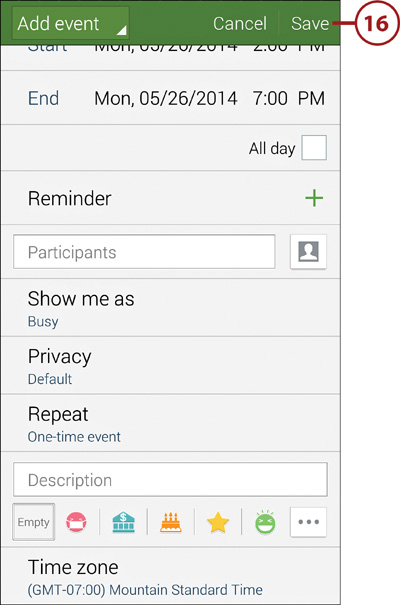
16. Tap the Save button at the top of the screen to add the event to the calendar or tap Cancel to discard it.
Create a Task
1. Launch the Calendar app by tapping Apps, Calendar or by tapping a Home screen shortcut.
2. Optional: Select the due date for the task’s completion from the calendar. (Selecting the date saves you the trouble of specifying it when you create the task.) To change the Calendar view so that you can select a due date, tap the active view name and choose Month, Week, or Day.
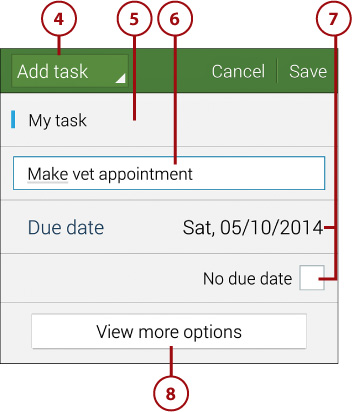
3. Tap the plus (+) icon. The scheduling screen appears.
4. Ensure that Add Task is selected.
5. Select the account to use if you want to associate the new task with a different account. (My Task is the phone-specific account.)
6. Enter a title for the task.
7. Do one of the following:
• If there’s a particular date on or by which the task must be completed, tap the Due Date entry, specify the date in the Set Date dialog box, and tap the Set button.
• If the task is open-ended, tap the No Due Date check box.
8. Tap View More Options to see other scheduling options for the task.
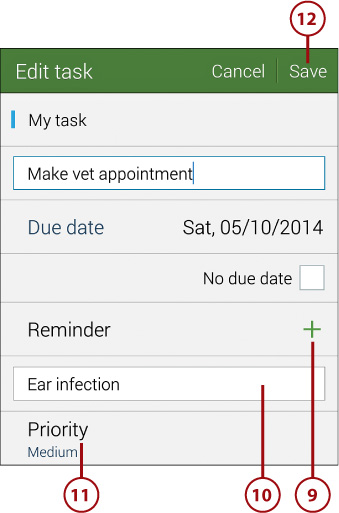
9. Optional: Set a reminder (alarm) for the task by tapping the plus (+) icon. In the Reminder dialog box, select either On Due Date or Customize (to specify a different date). The selected date and the current time are set as the reminder. To change the time, tap its entry, specify the time in the Set Time dialog box, and tap the Set button.
10. Optional: Enter a detailed description of or notes related to the task in the Description text box.
11. Optional: Specify a completion priority (high, medium, or low) by tapping Priority.
12. Tap the Save button to add the task to the calendar or tap Cancel to discard it. (When added to a calendar, a task is preceded by a check box.)
View the Calendar
Calendar has six views: Year, Month, Month and Agenda, Week, Day, and Agenda. You interact differently with Calendar in each view.
1. When you launch Calendar, the last displayed view appears. To change views, tap the active view (such as Month) or swipe from the left edge of the screen, and then select a new view.
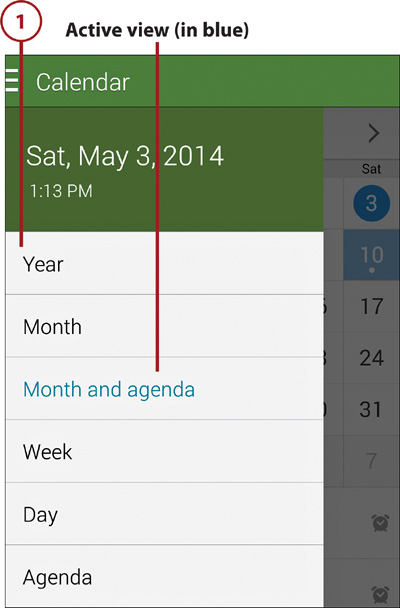
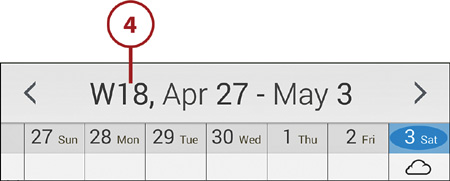
2. Year view. You can’t view events or tasks in Year view. Its purpose is to enable you to easily select a month for viewing—in this or another year. Scroll to previous or future years by tapping the arrow icons or by swiping the screen horizontally. When the target month and year appear, tap the month to view it in Month view.
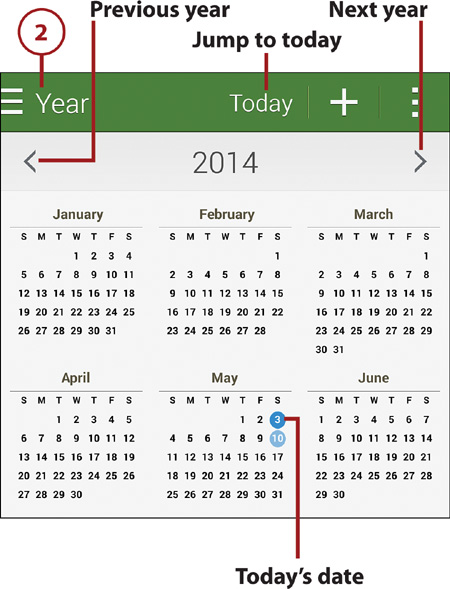
Other Year View Options
To immediately return to the current year, tap the Today button. Today’s date is encircled in dark blue.
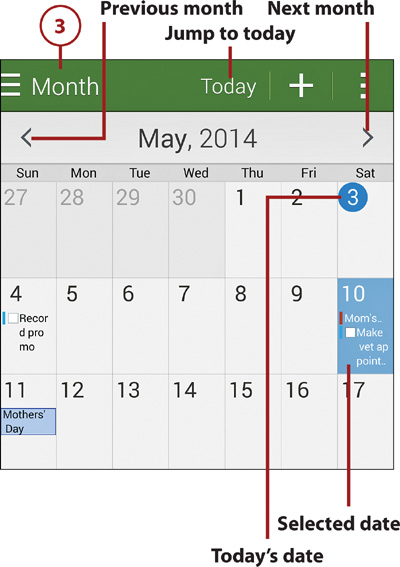
3. Month view. In Month view, event/task text is color-coded to match the calendar account with which the item is associated. For example, bright blue text is used to show My Calendar items, dark blue for Facebook events, purple for Google Calendar items, and green for holidays. Tap a date to display events and tasks for that date in a pop-up window. To move forward or back one month, tap an arrow icon or flick the screen vertically or horizontally.
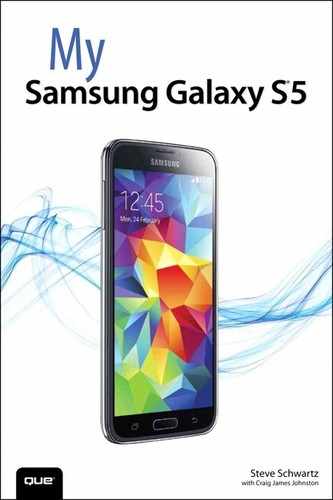
Month and Agenda
If you choose the Month and Agenda view, a reduced version of Month view is presented. Scheduled events and tasks for the selected date appear at the bottom of the screen.
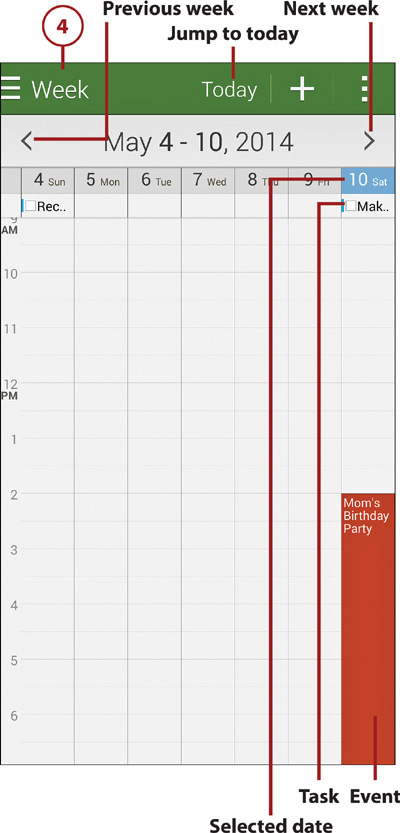
4. Week view. In Week view, items are colored-coded to match the calendar with which they’re associated. Tap an item to view its details in a pop-up. Tap the pop-up to edit or delete the item. Scroll to the previous or next week by tapping an arrow icon or swiping horizontally.
Changing the Magnification
To make it easier to examine scheduled items in Week or Day view, you can change the magnification by pinching two fingers together (decrease) or spreading them apart (increase).
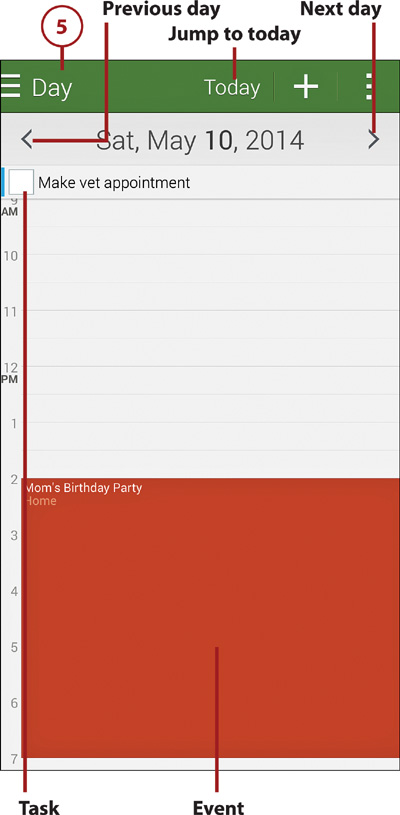
5. Day view. Use Day view to see scheduled items and their duration for a selected date. Items are colored-coded to match the calendar with which they’re associated. Tap an item to view its details in a pop-up. Tap the pop-up to edit or delete the item. Press and hold a time slot to create a new item with that start time. You can scroll the day’s time slots by flicking vertically and switch days by tapping arrow icons or swiping horizontally.
6. Agenda view. Select Agenda view to see a chronological list of events and tasks. Items are color-coded to match the calendar with which they’re associated. Tap an item to view its details, edit, or delete it. Scroll through the list by flicking vertically.
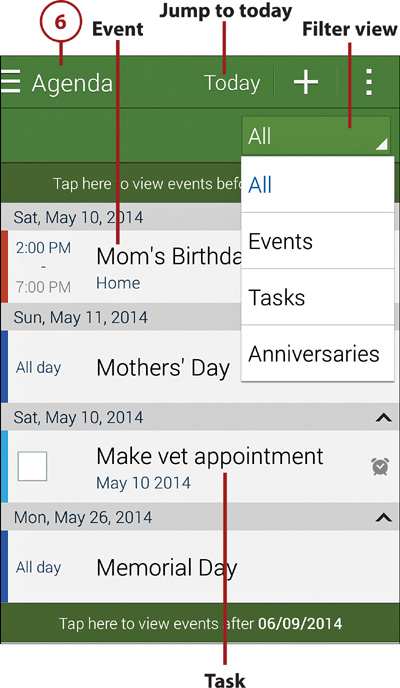
Filtering the Agenda
Your Agenda is made up of Events, Tasks, and Anniversary items. Normally the filter for the view is set to All, which means that all Events, Tasks, and Anniversaries are shown. You can limit the view by filtering it to only show certain items. For example, if you choose Events, you only see Event items.
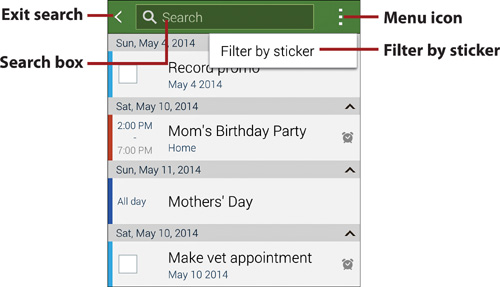
Searching in Views
To display the search box, tap the menu icon and choose Search. You can optionally filter a search to display only events to which a particular sticker has been assigned. With the search box displayed, open the menu, choose Filter by Sticker, and select a sticker.
7. Go to a specific date by tapping the menu icon and choosing Go To. In the Go To dialog box, specify the target date and tap Done.

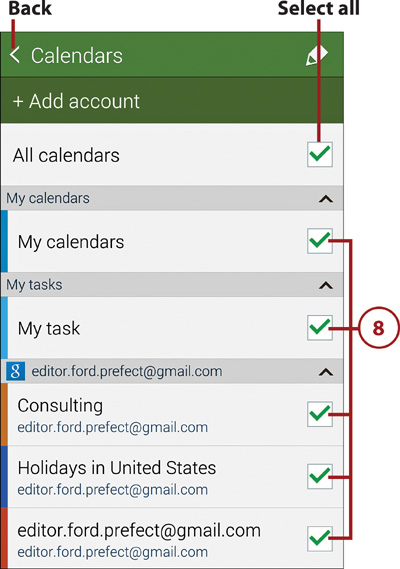
8. You can display events and tasks from one or multiple calendar accounts. To select accounts to show, tap the menu icon and choose Calendars. Select the calendar and task accounts to display, and tap the Back icon when done.
Manage Events and Tasks
After creating an event or task, you can delete it or edit any aspect of it, such as the title, start date, start time, description, reminder interval, or completion status.
1. Open the Calendar app and, in any view, tap the item that you want to delete or edit. If a pop-up appears, tap the item in the pop-up to examine it in Detail view. In certain views (such as Agenda), no pop-up appears; the item is immediately displayed in Detail view.
Faster Editing, Deleting, and Rescheduling
In Week and Day views, you can change the date/time or duration of an event by dragging in the Calendar. To reschedule the event, press and hold the event, and drag it to a new date/time slot. To change its duration, drag the event’s top or bottom edge (marked by dots) up or down. Note that only events—not tasks—can be rescheduled this way.
2. Tap the Trash icon to delete the task or event and confirm by tapping OK.
3. Tap the edit icon to edit the task or event, and then tap Save to save your edits.
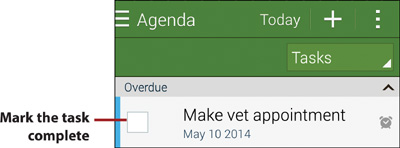
To mark a task complete, tap its check box on the calendar, in its pop-up, or in a widget.
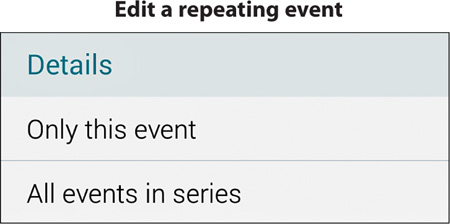
Editing or Deleting a Repeating Event
When you edit a repeating event, a dialog box appears that enables you to change only this occurrence or every occurrence. Similarly, when you try to delete a repeating event, a dialog box asks you to confirm whether to delete all or only a specific occurrence of the event.
Responding to Reminders
When an event or task reminder is triggered, a message appears briefly in the status bar and is replaced by a number (denoting the number of current alerts) or a separate alert screen appears. A distinctive ringtone may also play. The notification methods used are determined by Event Notification settings, as explained in “Setting Calendar Preferences,” later in this chapter. You can respond to a reminder by snoozing (requesting that it repeat later), dismissing, or ignoring it.
If you just need an alarm to remind you that it’s time to wake up or do something, you don’t need to schedule a Calendar event. You can create alarms in the Clock app.
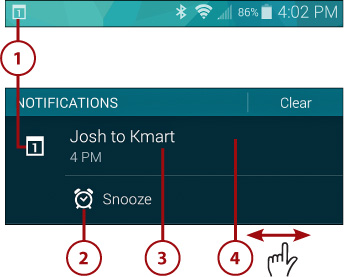
1. If the Set Alerts and Notifications setting is Status Bar Notifications, an icon showing the number of waiting reminders appears in the status bar. Open the Notification panel to view them.
2. Tap Snooze to snooze the alert.
3. Tap the event to open an Event Notifications screen in which you can set a specific snooze duration.
4. Swipe the alert left or right off the screen to dismiss it.
Dismissing an event or task’s reminder doesn’t delete the item from Calendar; it merely eliminates the reminder. To delete the event or task, you must perform the procedure described in “Manage Events and Tasks,” earlier in this chapter.
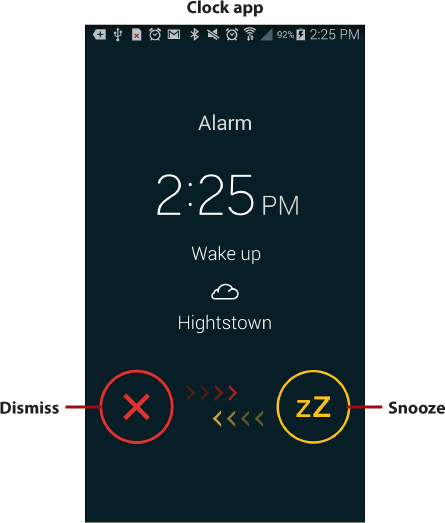
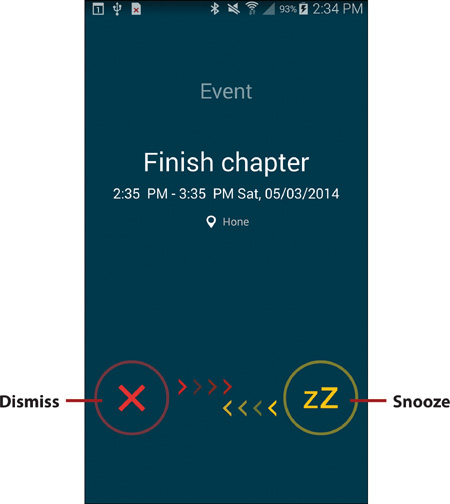
Responding to a Lock Screen Reminder
A full-screen notification appears when the screen is dark; that is, when the lock screen is active. To respond, press and drag the Dismiss (X) or Snooze (zZ) icon. If you elect to snooze, the reminder is snoozed for the default duration.
Setting Calendar Preferences
You can set options on Calendar’s Settings screen to customize the way the app works.
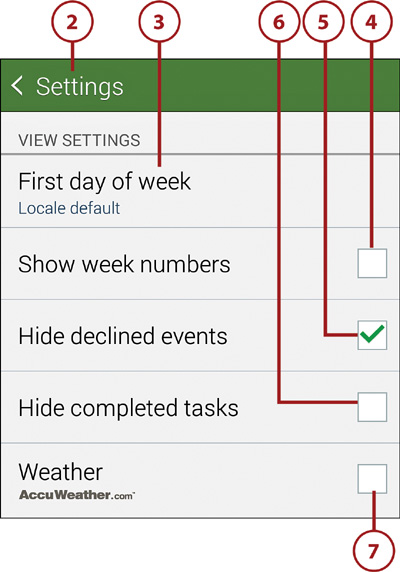
2. Tap the menu icon and choose Settings. Review Steps 3–14 for descriptions of each option that you can set.
3. First Day of Week. Specify whether calendar weeks should start on Saturday, Sunday, Monday, or match local customs.
4. Show Week Numbers. When checked, Week view also displays the week number (1–52).
5. Hide Declined Events. When checked, event invitations that you’ve declined aren’t shown in Calendar.
6. Hide Completed Tasks. When checked, tasks that have been marked as completed aren’t shown in Calendar.
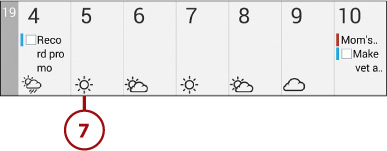
7. Weather. When this option is checked and the calendar is in Month view, the weather forecast for the next six days is shown.
8. Lock Time Zone. When Lock Time Zone is disabled (unchecked), all event times reflect the phone’s current location. When enabled (checked), event times always reflect the time zone specified in Select Time Zone (see Step 10).
A Lock Time Zone Recommendation
This is one of the most confusing aspects of Calendar. In general, the easiest way to use Lock Time Zone is to leave it disabled. When you’re home in California, for example, all event times reflect Pacific time. If you travel to New York, the events display Eastern times. Finally, when you return home, events automatically change to show Pacific times again.
9. Select Time Zone. To force all event times to reflect a particular time zone (when you’re traveling or if you want events to always reflect the home office’s time zone, for example), enable Lock Time Zone (see Step 8) and tap Select Time Zone to choose a time zone.
10. View Today According To. If you have chosen to lock the time zone (as described in Step 8), use this option to specify how today’s events are displayed. You can elect to use the current local time zone or the one you specified in Step 9.
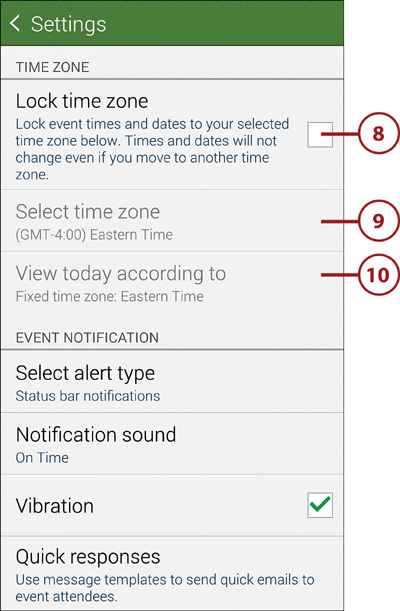
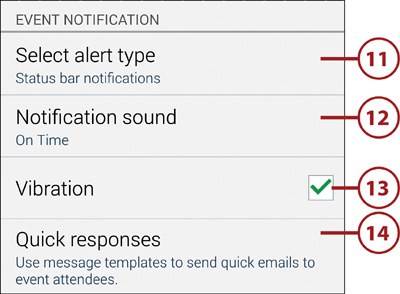
11. Select Alert Type. Specify whether a reminder will display as a status bar icon (Status Bar Notification), as a full screen pop-up (Sound Alerts), or not at all (Off).
12. Notification Sound. Select a sound to play with each reminder alert. Select Silent if you want to disable this option.
13. Vibration. Enable Vibration if you want Calendar reminders to cause the phone to vibrate. Like other notification settings, you can set Vibration as the sole notification method or use it in combination with other methods.
14. Quick Responses. View, edit, add, or delete brief email responses that you can send in response to event invitations.
What Are Quick Responses?
Quick Responses are canned messages that you can send to event attendees. For example, if you are running late, there is a Quick Response that reads “I’m running just a couple of minutes late.” As your meeting approaches, your Galaxy S5 alerts you. If you are running late, you will be given the option to send one of the Quick Responses.
Synchronizing Calendar Data
To quickly perform a manual Calendar sync based on your current account settings, tap the menu icon and choose Sync. To learn more about synchronizing data, see Chapter 17.