2. Understanding the Android/TouchWiz Interface

In this chapter, you become familiar with the Samsung Galaxy S5 interface and how to interact with it. Topics include the following:
![]() Understanding the Home screen and its components
Understanding the Home screen and its components
![]() Using the three hardware keys below the touchscreen
Using the three hardware keys below the touchscreen
![]() Working with the Notification panel
Working with the Notification panel
![]() Tapping and interacting with touchscreen elements
Tapping and interacting with touchscreen elements
![]() Using the onscreen keyboard and voice input to enter and edit text
Using the onscreen keyboard and voice input to enter and edit text
![]() Searching for material on the phone and on the Web
Searching for material on the phone and on the Web
The Galaxy S5 has a touch-sensitive screen (or touchscreen) that can detect location, pressure, and motion on its surface. The Android operating system and Samsung’s TouchWiz modifications to it determine how the phone and its applications react to various touches. Even if you’ve previously owned an Android phone or another touch-sensitive device, such as an iPod touch or a tablet, you need to be familiar with the information in this chapter. Read on for the essential methods of interacting with the touchscreen and the hardware keys below the screen, techniques for entering and editing text, and methods of conducting searches for material on the phone and the Web.
The Home Screen
The Home screen is Command Central for your phone. You launch apps (applications) from this screen, view the latest information presented on widgets (such as the local weather from AccuWeather.com), and initiate phone calls and messaging sessions.
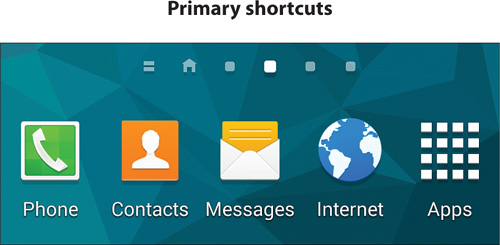
The important parts of the Home screen include the status or Notification bar, the main area (equivalent to a PC or Mac desktop), Home screen indicator, and icons for five primary shortcuts.
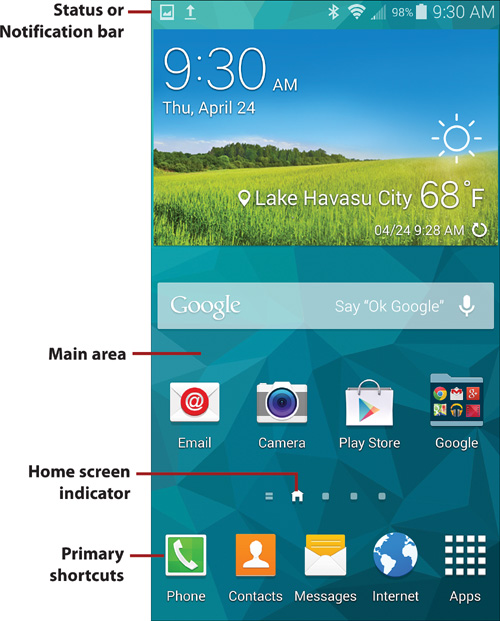
The Status or Notification Bar
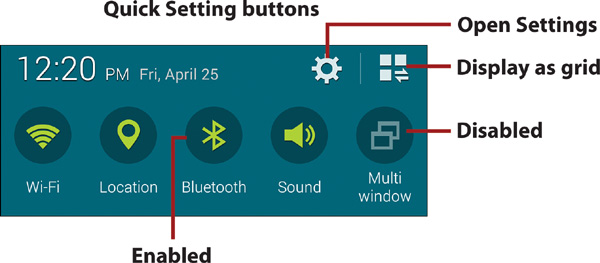
The status or Notification bar at the top of the screen serves two functions. First, icons on the right side of the bar show the active communication features (such as Wi-Fi, 4G, Bluetooth, and GPS) and display status information (such as the current battery charge and Wi-Fi signal strength). Second, the left side of the bar displays notification icons for important events, such as new email, new text messages, missed calls, and downloaded or uploaded items.
Although it might be tempting to do so, you can’t interact with the bar; tapping its icons does nothing. To change the active features or respond to notifications, you use the Notification panel (described in “The Notification Panel,” later in this chapter).

Main Area
The Home screen is yours to embellish as you like. As you can see, you can place widgets and shortcuts wherever you want, as well as choose a custom background (wallpaper) for it, as explained in Chapter 3, “Making the Phone Your Own.”
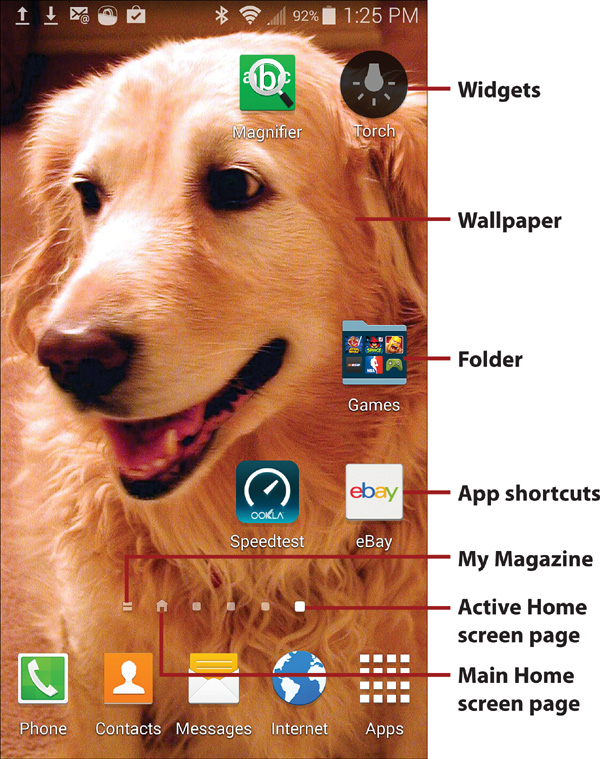
Extended Home Screen
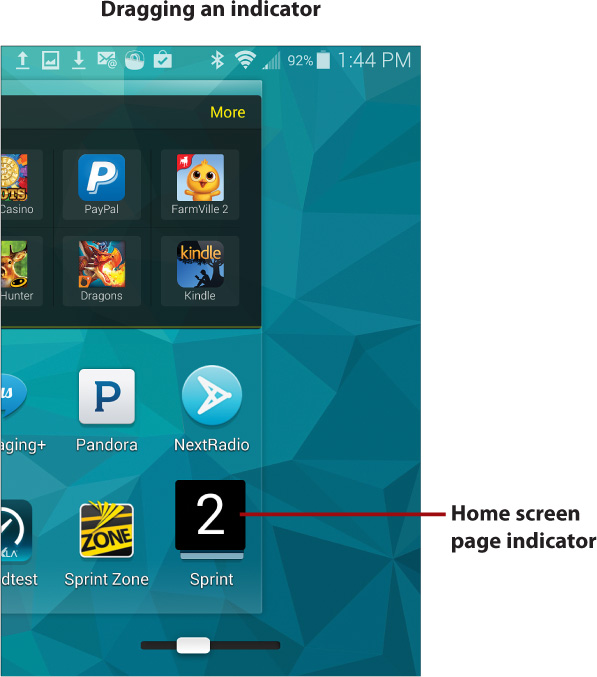
The Home screen can consist of up to seven different screens or pages, each represented by a Home screen indicator—plus an indicator for My Magazine, a personalized magazine of web content and social networking feeds. As with the main Home screen page, you can add different widgets and shortcuts to each page. To move from one page to another, do any of the following:
• Press the Home key to go directly to the main Home screen page (marked by the house icon).
• Tap the Home screen indicator of the page that you want to view.
• Swipe left or right to flip to the desired page.
• Drag a Home screen indicator to the left or right to see a visual and numeric representation of each Home screen page.
• To view My Magazine, tap the equal sign (=) Home screen indicator or continue swiping to the left past all Home screen pages.
As explained in Chapter 3, you can rearrange the Home screen pages, add new ones (up to the maximum of seven), and delete unwanted ones.
The indicator dots in Apps and Widgets work in the same manner as they do on the Home screen pages. Each dot represents a screen or page of icons. The lit dot indicates the screen or page that you’re viewing.
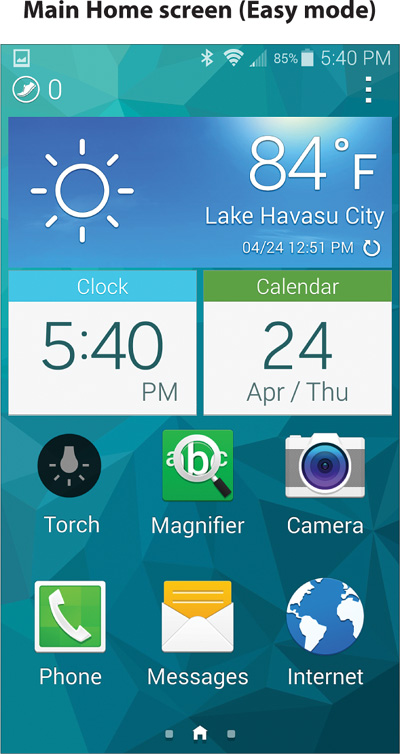
>>>Go Further: Easy Mode
• Three simple Home screen layouts with larger icons and text
• Large, easy-to-read text in important apps, such as Contacts, Calendar, and Phone
• Fixed shortcuts to 12 essential apps and the option to add 3 more of your choosing
• Three fixed widgets (time, date, and temperature)
• Access to additional apps as a scrolling alphabetical list
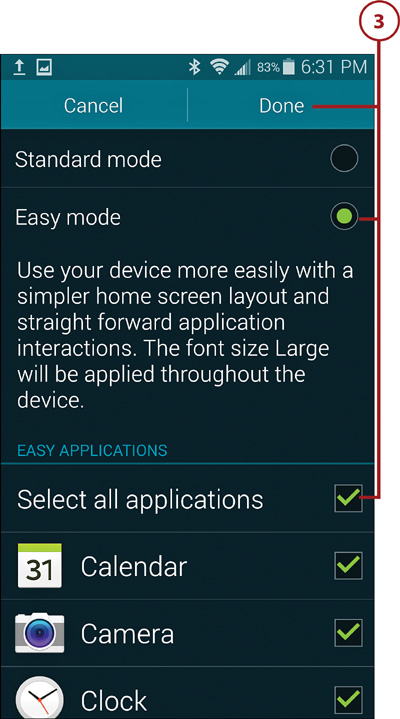
Set the Home Screen Mode
You can switch between Standard and Easy mode whenever you like. Customizations that you’ve made to the Home screen pages in either mode are restored when you return to that mode.
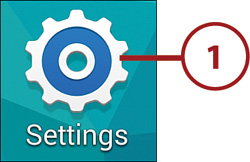
1. On the Home screen, tap Apps, followed by Settings. (Or use one of the other methods for opening Settings described in “Changing System Settings” in Chapter 1, “Galaxy S5 Essentials.”)
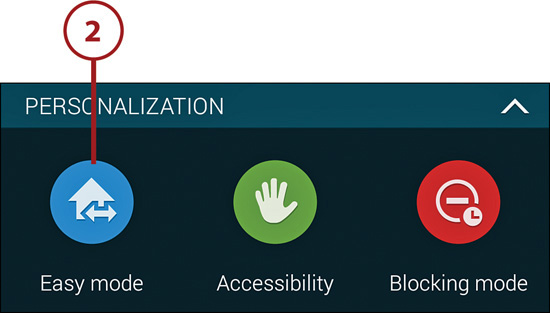
2. In the Personalization section of Settings, tap Easy Mode.
3. Select Easy Mode, select up to 12 important apps that you want to display as Home screen shortcuts, and tap Done.
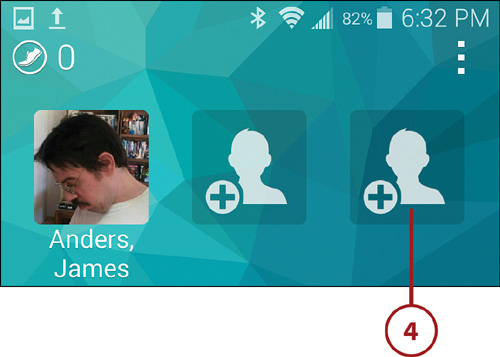
4. On the first Home screen page, you can add contact icons for people that you frequently call or text. Tap a placeholder, and select a person from Contacts or create a new record from scratch. To later call or text the person, tap his or her icon.
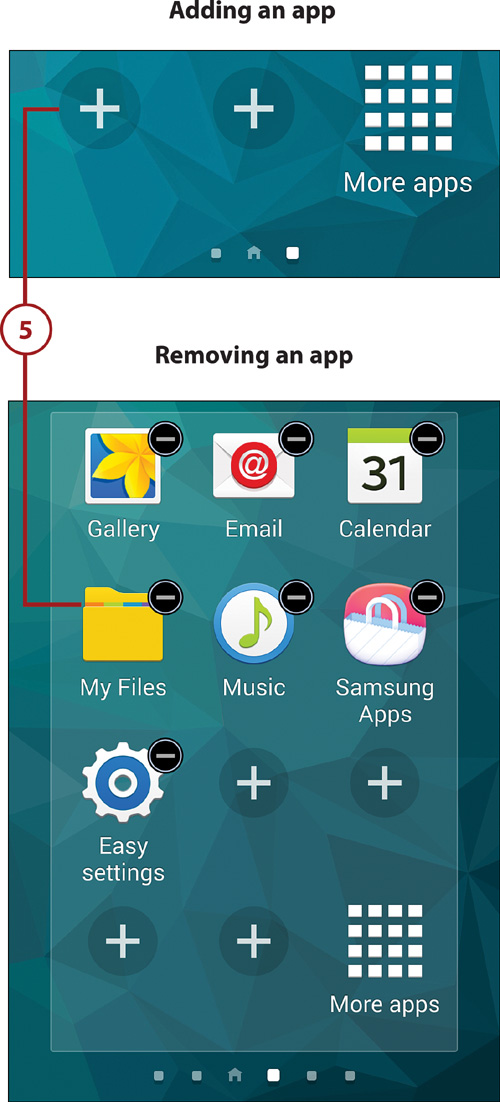
5. To add or edit your Home screen app shortcuts, do either of the following:
• Adding app shortcuts. You can add app shortcuts to the second or third Home screen page—as long as there are empty spots marked with plus (+) placeholders. Tap a placeholder and select an app from the list of all installed apps.
• Removing app shortcuts. Display the Home screen page from which you want to remove one or more app shortcuts, tap the menu icon, and choose Edit. To remove an app shortcut, tap its icon. (App shortcuts that can be removed are marked with a minus (–) symbol.)
Restoring Standard Mode
If you later decide that you’re ready to try Standard mode, tap the Easy Settings icon (or open Settings by another means). Tap the Easy Mode icon, select Standard Mode, and tap Done.
Primary and Other App Shortcuts
Beneath the indicator dots on every Home screen page are icons for Phone, Contacts, Messages, Internet (or Chrome), and Apps. These are known as the primary shortcuts. With the exception of the Apps shortcut, you can remove, reorder, or replace the first four. If, for example, you seldom use Messages, you can replace its shortcut with one for Email, Settings, or another app that you constantly use, such as Angry Birds or Facebook. See “Reposition and Remove Home Screen Items” in Chapter 3 for instructions.
Depending on your carrier, you may see additional app shortcuts above the indicator dots on some Home screen pages. Like the primary shortcuts—as well as other shortcuts that you add to any Home screen page—you can freely remove, reorder, or replace these shortcuts.
Using the Hardware Keys
There are three ever-present hardware keys located directly below the touchscreen: Recent Apps, Home, and Back. When pressed, each key performs a function related to the operating system (when you’re viewing the Home screen) or the app you’re currently using.
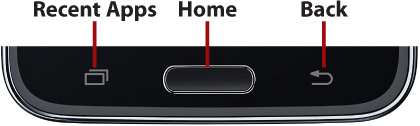
Recent Apps Key
When you press the Recent Apps key, a list of recently run and active apps appears. Tap any app thumbnail to launch or switch to that app. To remove an app from the list, swipe it horizontally off-screen. To remove all items from the list, tap the Clear All icon. Tap the Task Manager icon if you want to force stop one or more running apps (see the “About Force Stop” sidebar in Chapter 20, “Optimizing and Troubleshooting,” for more information).

In previous iterations of the Galaxy S, the first hardware key was the Menu key. To display an app or Home screen’s menu on the S5 (if there is one), tap the three stacked dots—frequently found in the upper-right corner of the screen. This is the universal icon denoting an Android menu. (Note that you can also use the Recent Apps key to open certain menus by pressing and holding the key.)
Home Key
The Home key has multiple functions, depending on whether you’re on the Home screen or using an app. You can also use it in combination with the Power button to take screen shots (as described shortly).
Within an app. Press the Home key to exit the app and return to the most recently viewed Home screen page.
On the Home screen. When you press the Home key while viewing any Home screen page, it displays the main Home screen page—the one marked with the house icon. If you quickly double-press the Home key, S Voice is activated (see Chapter 15, “Using Voice Services,” for information about using S Voice). Finally, with some carriers, pressing and holding the Home key launches a Google app, such as Google Now.
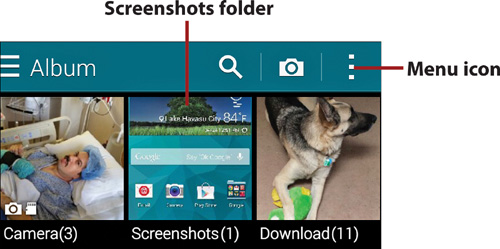
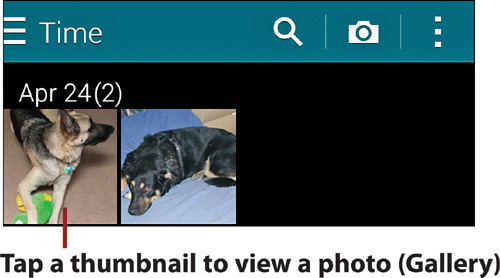
Within an app or on the Home screen. If you simultaneously press and hold the Home key and Power button, the phone performs a screen capture, creating a graphic image of the screen. All captures are saved in the Screenshots folder and can be viewed in Gallery. You can also perform a screen capture by dragging the side of your hand across the screen.
Back Key
You use the Back key within apps to return to the previous screen or—if on the app’s initial screen—to exit to the Home screen.
Within an app. Press the Back key to return to the previous screen. If you press it on the app’s initial screen, you exit the app and return to the most recently viewed Home screen page.
Within Internet and Chrome. Press Back to display the previous web page. The Back key has the same function as pressing Backspace (Windows) or Delete (Mac) when using a web browser.
Within a dialog box or an options menu. Similar to pressing the Escape key in many computer programs, you can press Back to exit a dialog box or options menu without making a choice.
When typing. Press Back to dismiss the onscreen keyboard.
Within the Notification panel. Press Back to close the panel.
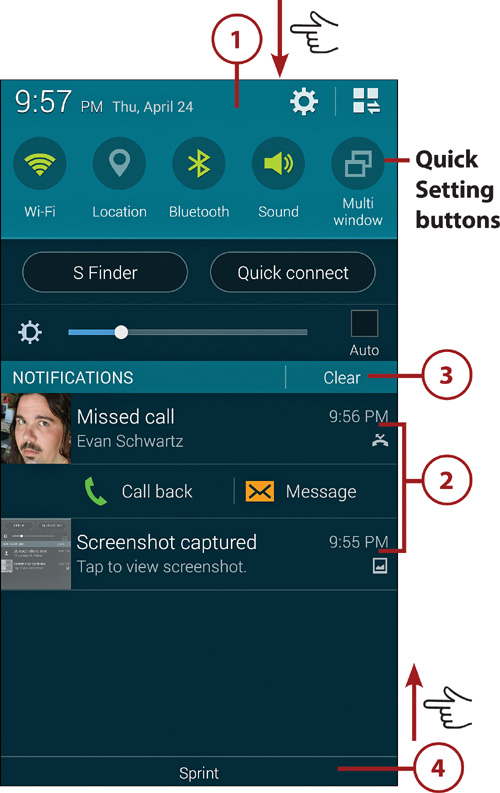
The Notification Panel
When new notifications appear in the Notification bar announcing received email, text messages, software updates, and the like, you can display the Notification panel and optionally respond to or clear the notifications.
1. Open the Notification panel on the Home screen or within most apps by touching the status bar and dragging downward.
2. Tap a notification to respond to or interact with it. For example, tapping a New Email notification launches Email and displays the Inbox. When you respond to a notification, it’s removed from the Notification panel.
3. To remove a notification without responding to it, drag it off the screen to the left or right. To simultaneously remove all notifications, tap the Clear button.
4. To close the Notification panel, touch the gray bar or carrier designation at the bottom of the screen and drag upward. Pressing the Back key also closes the panel.
Interacting with the Touchscreen
Your phone has a touch-sensitive screen that you interact with by tapping, touching, and making other motions with your fingers or hand. In addition, within many apps, the phone can optionally recognize and respond to the angle at which it’s being held or its proximity to nearby objects.
• Tap. To launch an app, open a document, choose a menu command, select an item in a list, activate a button, or type characters on the onscreen keyboard, tap the item lightly with your fingertip. (A tap is equivalent to a mouse click on a computer.)
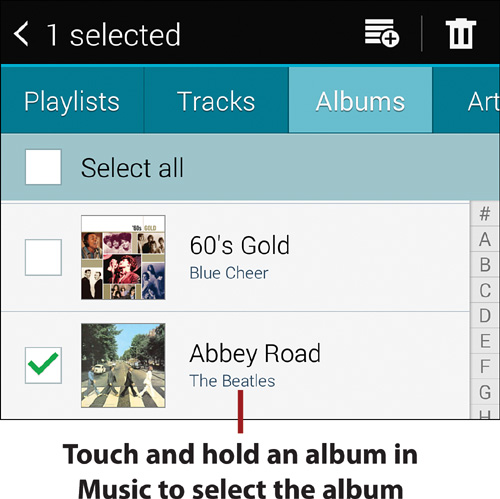
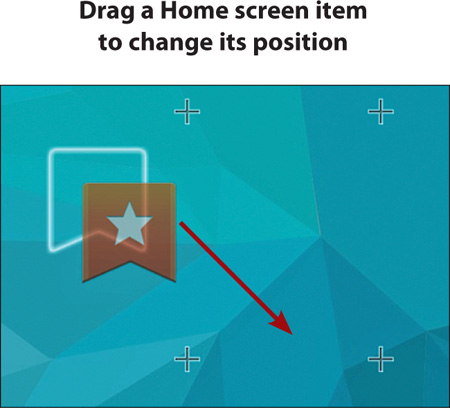
• Touch and hold, press and hold, or long-press. You can interact with some items by touching and holding them. The result depends on the particular item or active app. For example, you can use touch and hold to move or delete a Home screen item, select a word in a text message that you’re composing, or select an item in a list. Long-pressing a few items, such as a link on a web page, causes a contextual menu to appear.
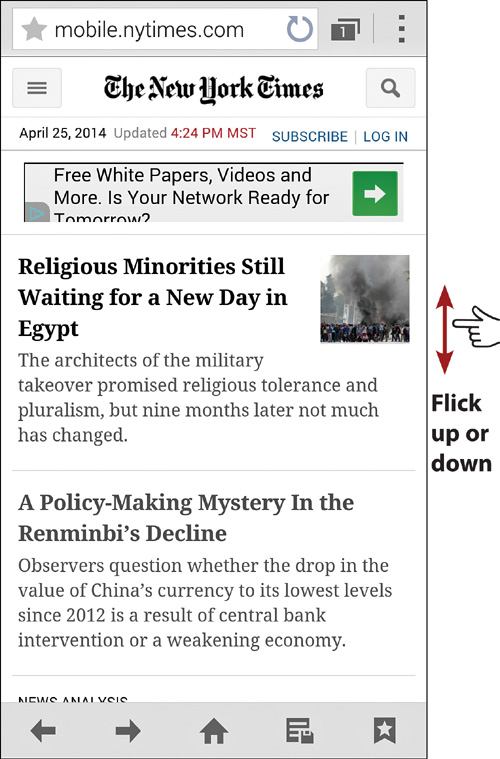
• Flick. Scroll up or down through a lengthy menu, a vertical list of items (such as a message list in Email), or a long web page by making light, quick vertical strokes.
• Swipe. A swipe is the horizontal equivalent of a flick. Swipe to flip through images in a Gallery folder, view different Home screen pages, or move through the Apps and Widgets screen pages.

• Drag. To move an item (such as a widget or app icon on the Home screen), press and hold the item, and then drag. Don’t release it until it’s in the desired position—on the current screen page or a different one.
• Spread/pinch. To zoom in or out (increasing or decreasing the magnification) when viewing a photo or web page, place two fingers on the screen and spread them apart or pinch them together, respectively.
Try a Double-Tap
In certain apps (Gallery, Internet, and Chrome, for example), you can also double-tap the screen to zoom in or out. Spreading and pinching, however, provides more precise control over the amount of magnification.
Rotating the Screen
In many apps, you can rotate the screen to change from portrait to landscape orientation and vice versa. It’s extremely useful when viewing photos in Gallery, when reading web pages, and when using the onscreen keyboard, for example.

In order for the S5 to automatically rotate the screen when you rotate the phone, Screen Rotation must be enabled (its default state). To enable or disable Screen Rotation, tap its button in the Quick Setting buttons or in Settings, Display.
Entering Text
In addition to simply viewing and listening to content on your phone, much of what you do involves entering text. You can enter text using the onscreen keyboard or by speaking into the phone.
Using the onscreen keyboard, there are two methods of typing. You’re familiar with the first in which you tap letter, number, and punctuation keys as you would on a computer keyboard or typewriter. The second uses software called Swype, in which you drag your finger over the keyboard—gliding over the characters needed to spell each word.
Keyboard Variations
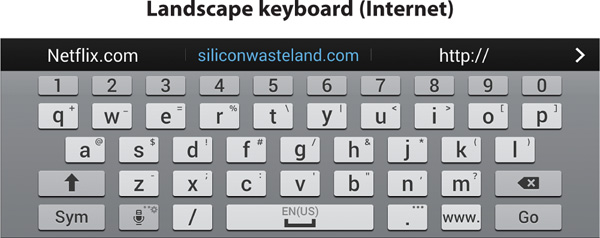
Depending on the current app, you may notice some minor differences among the keyboards. For example, the Internet app’s keyboard has additional keys in its bottom row that make it easier to type URLs.
Use the Keyboard: Tapping
1. Tap to select a text field or box, such as the Internet address box, a password field, or the message area of a text message. The onscreen keyboard appears. A blinking text insertion mark shows where the next typed character will appear.
2. Tap keys to type.
Entering Non-Alphabetic Characters
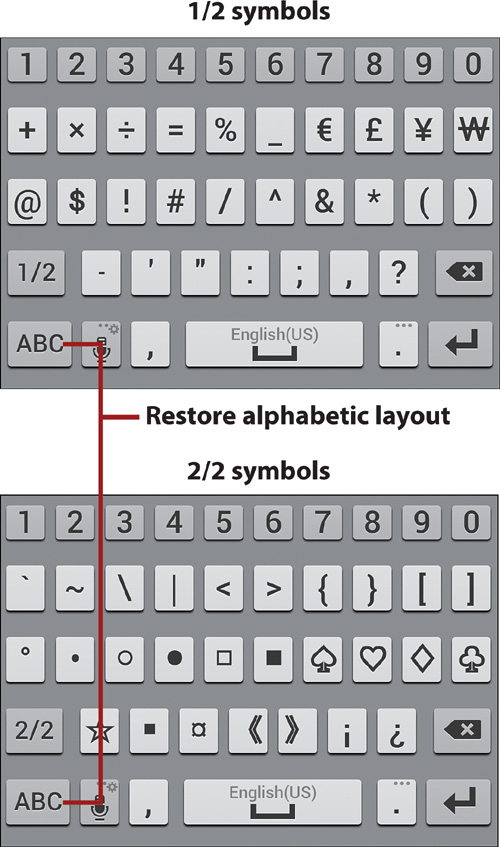
Tap the SYM key. The key above it is now labeled 1/2, and the layout displays numbers, currency symbols, and common punctuation. Tap this key (1/2) to cycle to the symbol (2/2) layout. To return to the alphabetic layout, tap the ABC key.
3. To dismiss or hide the keyboard, perform the action necessary to complete your typing (such as tapping Send) or press the Back key. To make the keyboard reappear after pressing Back, tap in the text box or field again.
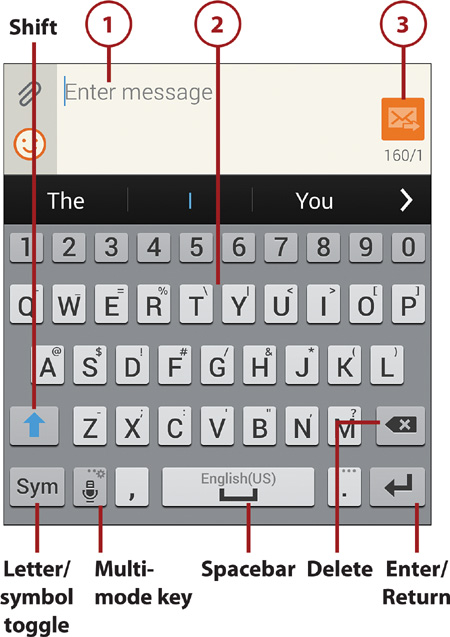
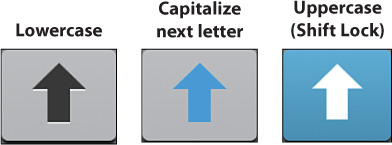
When you begin entering text into a field or are starting a new sentence, the first character is typically capitalized automatically. Subsequent capitalization is determined by the state of the Shift key. Tap the Shift key to toggle it among its three states: lowercase, capitalize next letter only, and capitalize all letters.
Use the Keyboard: Swype
1. Tap to select a text field or box, such as the browser’s address box, a password field, or the message area of a text message. The onscreen keyboard appears. A blinking text insertion mark shows where the next entered character will appear.
2. To type each word, drag over its letters—in order. Complete the word by briefly lifting your finger from the screen and then drag over the letters needed to form the next word. A space is automatically inserted between each pair of words. Tap punctuation where it’s needed.
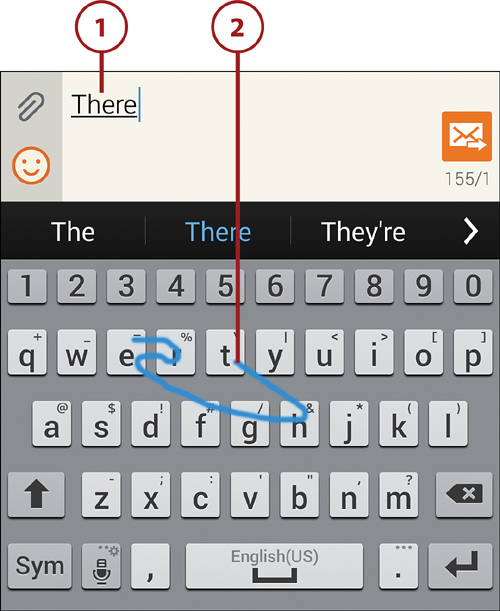
Duplicate Letters
If a letter is repeated in a word, such as l in follow, make a loop over the letter or scribble over it to indicate that it’s repeated.
• Try landscape mode. To use a larger version of the keyboard, simply rotate the phone to landscape orientation. (For this to work, the phone’s auto-rotate feature must be enabled. Open Settings, tap Display, and ensure that Rotate Screen is enabled. Unless you’ve changed the default Quick Setting buttons, you can enable or disable Rotate Screen there, too.)
• Multiple languages. When typing in Samsung Keyboard mode, the active language is shown on the spacebar. If you have more than one language enabled, swipe across the spacebar to switch languages.
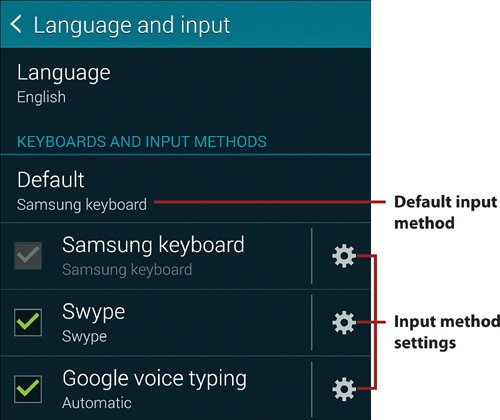
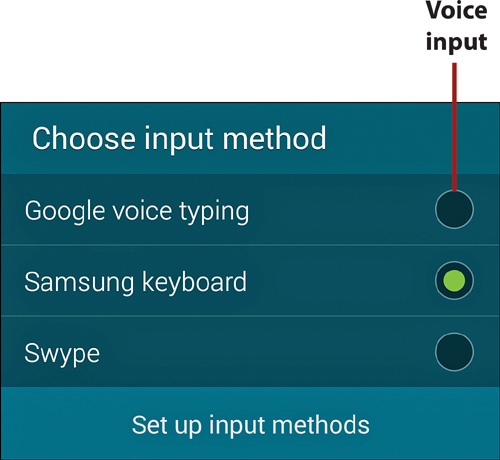
• Change the input method. The phone supports typed or traced text input (Samsung Keyboard and Swype), as well as voice input (Google Voice Typing). To switch input methods while entering text, open the Notification panel, tap Choose Input Method, and select an alternative method in the dialog box that appears.
Why Choose?
When Samsung Keyboard is the input method and the Auto Spacing setting is enabled, you can freely switch between typing and Swype—even within the same sentence.

• Explore the Language and Input settings. By tapping the settings icons in Language and Input settings, you can configure each of the three input methods. In the Samsung Keyboard settings, for instance, you can specify whether to display predictive text and enable the insertion of boilerplate text (My Shortcuts) when you long-press an assigned number key. By tapping Default, you can change the default input method. You can view onscreen help for typing by tapping the Samsung Keyboard settings icon, opening the menu, and choosing Help. For help using Swype, tap the Swype settings icon, Help, How to Swype.
• Change the language. If English isn’t your native or preferred input language, you can select a different one. In the Language and Input settings, tap the Samsung Keyboard settings icon, followed by Select Input Languages. Select a language from the Downloaded Languages list. If the desired language isn’t shown, tap the menu icon, choose Update List, and then download the desired language by tapping its name in the Available Languages list.
• Use Predictive Text. As you type or trace, the phone presents a scrolling list of suggestions (predictive text) for the word it thinks you’re typing. If you see the correct one, tap it to use it as a replacement for the current word. You can also tap the arrow icon—when it’s presented—to view additional replacement words.
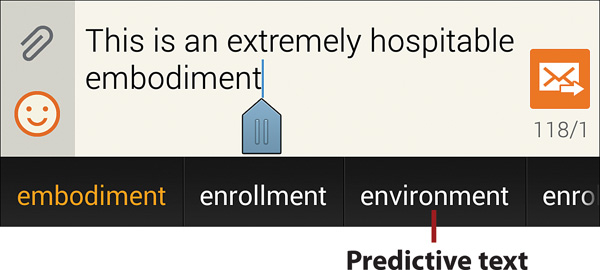
Fine-Tuning Predictive Text
You can improve the predictive text suggestions by allowing your S5 to study what you type in Facebook, Gmail, Twitter, Messages, and Contacts. In settings for the Samsung Keyboard, tap Predictive Text and review the options. If you don’t find predictive text helpful, you can disable it by dragging its slider to the Off position.
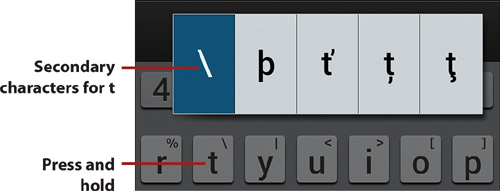
• Character preview. You can type secondary characters (such as the symbols above some letter keys) without leaving the main alphabetic keyboard. If you press and hold any key, its secondary characters, if any, appear. If there’s only one secondary character, release the key to insert the character into your text. Pressing and holding other keys results in a pop-up menu of characters, numbers, and/or symbols for the key. Slide your fingertip onto the one that you want to insert or do nothing to insert the currently highlighted character.
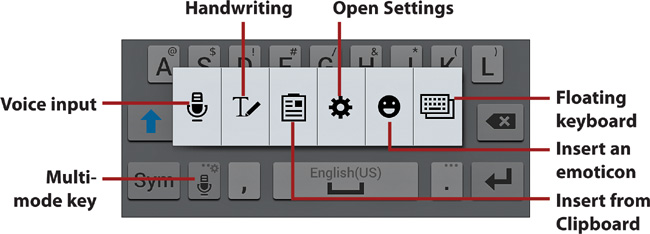
• Other input options. When entering text, you can switch input methods at any time, using any combination that you find convenient. To change methods, press and hold the multi-mode key and select the new input method. Or just tap the key to switch to the input method that’s pictured on the key. Some typical options include voice input, handwriting, inserting material from the Clipboard, normal keyboard, and a floating keyboard that you can reposition by tapping its tab and dragging. (When using the floating keyboard, tap its icon again to revert to the normal keyboard.)
Use Voice Input
If you’re abysmal at using the onscreen keyboard and are unwilling to take the time to master it, voice input (also called voice typing) might be more to your liking. You speak or dictate what you want to type, and it’s translated into text.
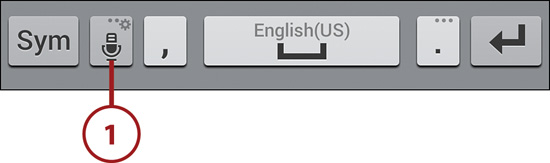
1. To enable voice input, press and hold the multi-mode key and select voice input—the microphone. If the key already displays the microphone, simply tap it.
Switch Using the Notification Panel
As explained earlier in the chapter, you can also switch input methods by opening the Notification panel, tapping Choose Input Method, and selecting Google Voice Typing in the dialog box that appears.
2. A recording indicator appears. Speak the text, saying punctuation (such as comma, period, question mark, and exclamation point) where it’s needed. The text is transcribed as you speak.
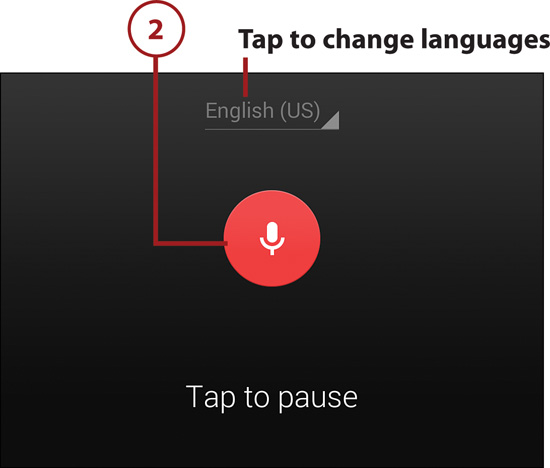
3. When you finish recording, tap the recording icon and then tap the keyboard icon. (After a sufficiently long pause, recording ends automatically.)

Poor Results
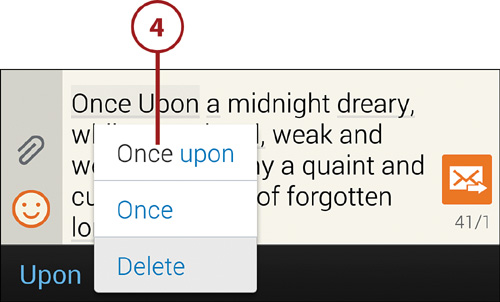
If a transcription is unacceptable, you can reject it by tapping Delete.
4. Any instance of questionable transcription is marked with a faint gray underline. If the underlined text is incorrect, tap it to review possible corrections. You can select a replacement from the suggestions, tap Delete to remove the entire word or text phrase, or dismiss the suggestions by pressing the Back key and then manually edit the text.
Getting Better All the Time
Voice input is great for converting straightforward, common speech to text and every update includes improvements. However, the need for some after-the-fact editing isn’t unusual. To determine if voice input will work for you, test it. Say some normal text and try reading a few sentences from a book or magazine. Whether it’s a winner for you will be determined by how accurate it is and the amount of cleanup you typically need to do.
Editing Text
Typos, incorrect capitalization, missing punctuation, and bad guesses in Swype or voice input are common in entered text. Instead of just tapping Send and hoping your message recipient will know what you mean, you can edit the text by doing any of the following:
• At the blinking text insertion mark, you can type or paste new text or press the Delete key to delete the character to the left.
• To reposition the text insertion mark for editing, tap in the text. If the text insertion mark isn’t positioned correctly, carefully drag the blue marker to the desired spot.
• To select a single word for deletion or replacement, double-tap or long-press the word. To delete it, tap the Delete key; to replace it, type over it.
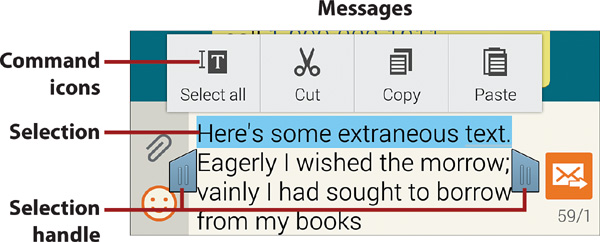
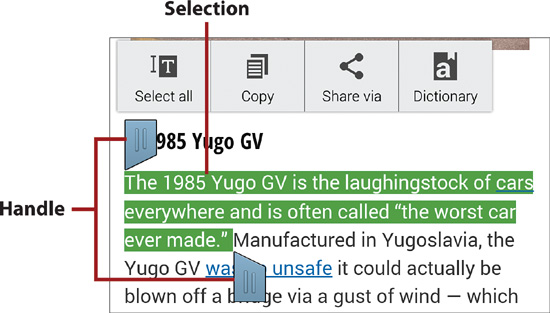
• To select a specific text string (a word, sentence, or paragraph, for instance), start by selecting a word at the beginning or end of the text that you want to select. Drag the selection handles to highlight the desired text. Then select a command from the pop-up menu above the selection (to cut or copy it to the Clipboard, for example), press the Delete key, or overtype the selected text. (Note that the command icons, their appearance, and whether they’re labeled can vary from one app to another. If there are more icons than can be shown at once, they scroll horizontally.)
• To paste the most recently copied or cut text into a text box, set the text insertion mark, tap the blue marker, and then tap Paste in the pop-up that appears.
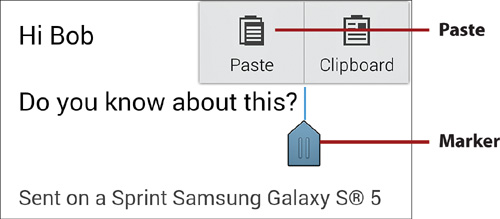
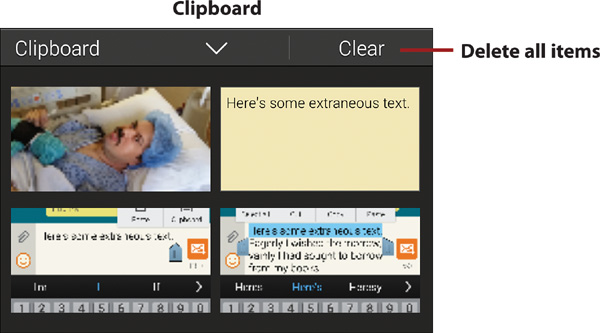
Pasting Other Material
If you select Clipboard from the pop-up menu rather than Paste, you can paste other material—images, for example—that you recently copied or cut. Tap the item that you want to insert. To remove an unwanted item from the Clipboard, press and hold the item, and tap Delete from Clipboard.
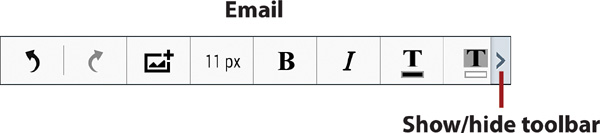
• When entering and editing text in Email, you can tap icons on the formatting toolbar above the message area to insert images, apply character and paragraph formatting, or undo the most recent change.
Copying Text from a Web Page
You can also use editing techniques to copy text from a web page. Press to select the first word, and then drag the handles to select the material to copy. In the toolbar that appears, tap Copy to copy the material so that you can paste it elsewhere or tap Share Via to copy the material directly into a new email, text message, or Google+ post, for example.
Searching for Items on the Phone and Web
Rather than relying on your memory or a lengthy series of taps to find buried Settings, launch apps, open contact records, and so on, you can use the S5 search features to quickly locate material of interest.
Use S Finder
As you type, paste, or speak a search word or phrase, S Finder displays a scrolling list of potential matches arranged by category, such as email messages, contacts, phone calls, and Settings names or sections. Matches can be the names of items or text contained somewhere within the item—in a text message, email, or Word document, for example. And if you know even part of an app’s name, S Finder can double as a program launcher.
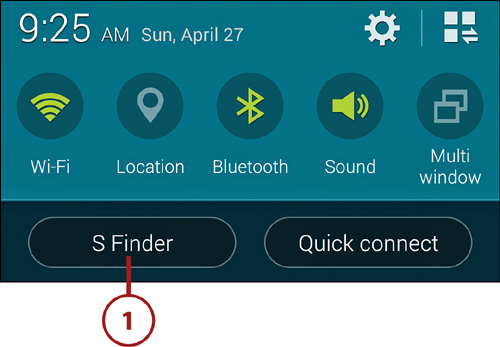
1. Open the Notification panel and tap the S Finder button.
2. A scrolling list of recent searches is shown. To repeat a search, tap its entry and go to Step 4; otherwise, continue with Step 3.
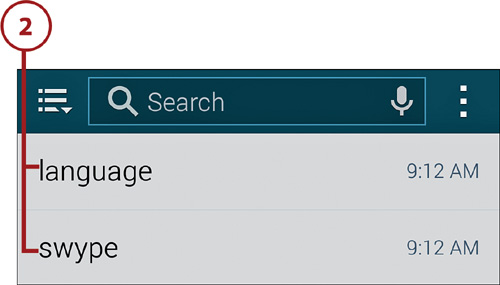
3. Enter a search term or phrase in the text box. As you type, a suggestion list appears. Tap one of the suggestions or continue typing.
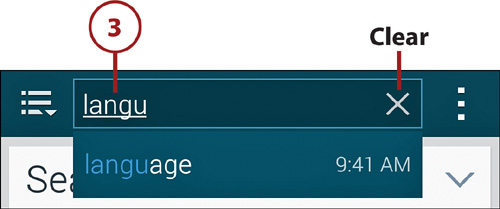
Precision Counts
Potential matches must include your search term or phrase (or a simple variation of it). Searching for privacy, for example, will not consider references to the lock screen to be matches—unless privacy is used as a word in the description or help text.
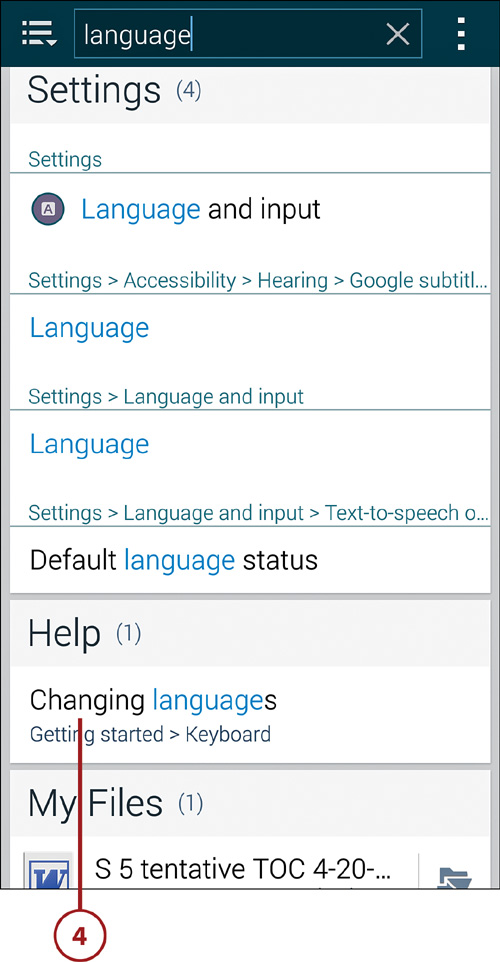
4. Scroll through the various match categories until you find the correct item, and then tap its entry.
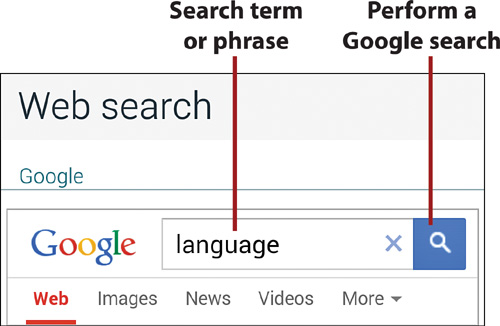
Search the Web
To perform a web search for the term or phrase, scroll to the Web Search section of matches and tap the Search icon.
Search in Settings
Settings categories and options seem to grow exponentially with every major Android release. When you’re searching for a particular setting or option, you can restrict the search to Settings only.
1. Open Settings by tapping its icon in the Notification panel or using one of the other methods discussed in Chapter 1.
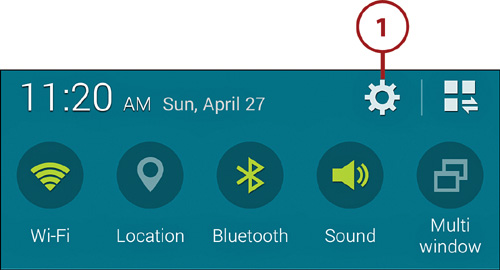
2. Type the search icon at the top of the opening Settings screen.
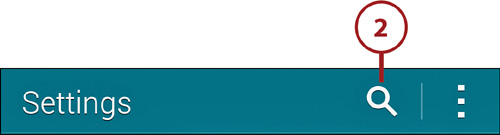
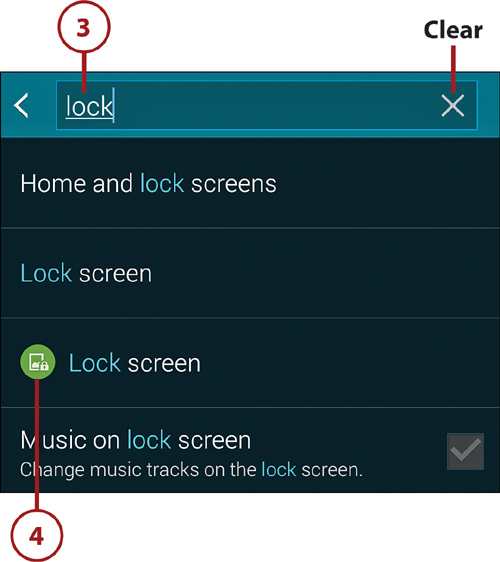
3. Enter your Settings search term or phrase in the text box. Matches are displayed as you type. (Only Settings or options that contain the search term/phrase in their name or description are considered matches.)
4. When you see the desired setting or option, tap its entry to go directly to that Settings screen.
Starting Over
If a search fails, you can try again by tapping the Clear icon (X) and entering new search text.
Use Google Search
You can use Google Search to perform a text-based or voice search of the Web. The first time you use the Google app or the Google Search widget, you’ll be asked to enable Google Now.
Enable Now, Disable Later
If you later decide that Google Now isn’t for you, launch the Google app, tap the menu icon in its lower-right corner, and choose Settings from the menu that appears. Drag the Google Now slider to the Off position. Although Google Now will be disabled, Google Search will continue to function normally.
Text-Based Search
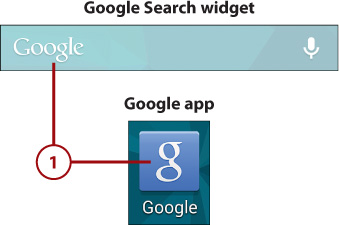
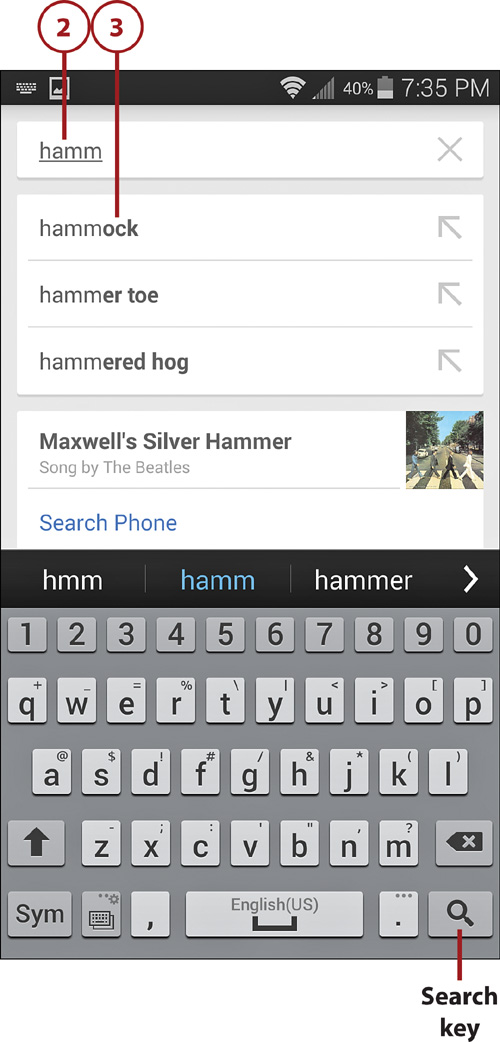
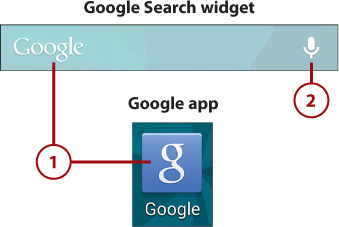
1. Tap in the Google Search widget or tap Apps, Google.
2. Type the search term or phrase in the text box that appears. As you type, potential matches are shown.
3. If you see an appropriate suggestion, tap it to perform that search. Otherwise, continue typing the search term or phrase, and tap the search key when you’re ready to perform the search.
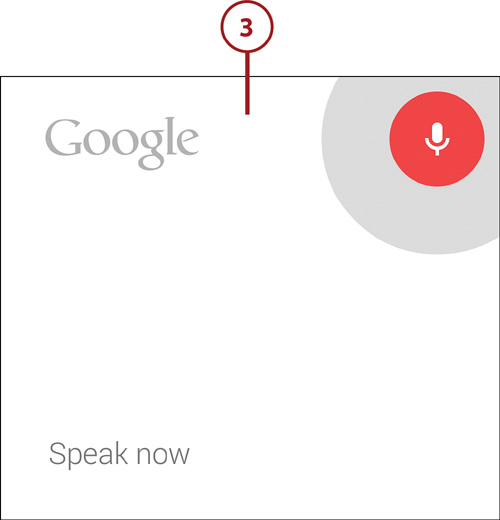
Voice Search
1. Display the Home screen page that contains the Google Search widget, or tap Apps, Google.
2. Initiate a voice search by tapping the microphone icon or by saying “OK, Google.”
3. Speak the search term or phrase. The results are presented as a series of links.