18. Securing the Phone
In this chapter, you learn simple methods for securing your phone from prying eyes and unauthorized use. Topics include the following:
![]() Setting options for the current locking method
Setting options for the current locking method
![]() Unlocking the phone
Unlocking the phone
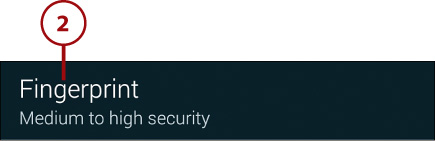
![]() Using Private mode to hide sensitive files
Using Private mode to hide sensitive files
Do you occasionally leave your phone unattended? If you don’t like the idea that someone might use your phone and see everything you’ve stored on it, you can secure it using lock screen and other security settings.
Securing the Lock Screen
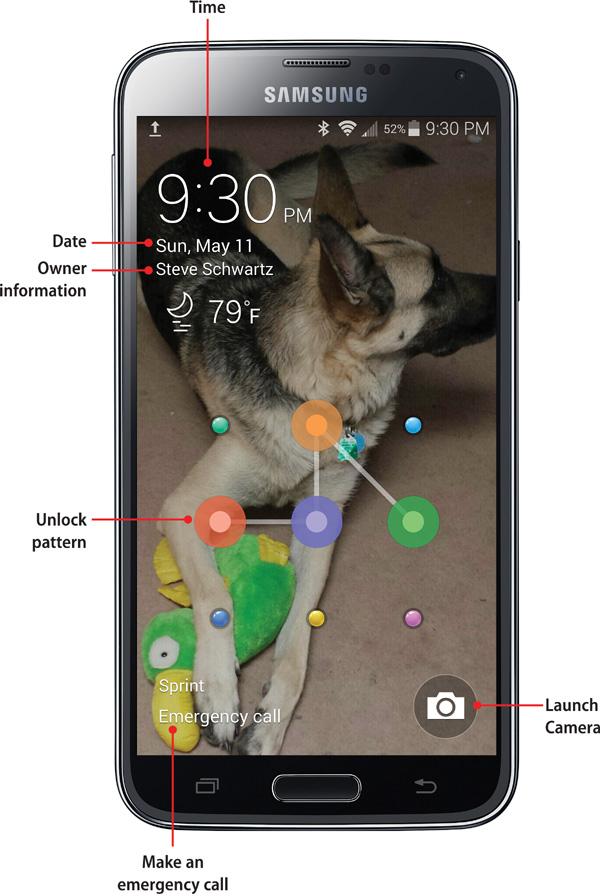
Whenever you turn on the phone or restore it from a darkened state, you normally see the lock screen. Its purpose is twofold. First, when the phone is idle, the lock screen appears, providing a bit of privacy from casual observers. Second, you can secure the phone by requiring that a pattern, PIN, password, or fingerprint scan be supplied to clear the lock screen—rather than simply swiping it away.
As with the Home screen wallpaper, you can customize the lock screen wallpaper by choosing a different image to display (see Chapter 3, “Making the Phone Your Own”).
Change the Screen Locking Method
Use the following general steps whenever you want to review or change the locking method or its settings. Details for setting specific screen locking methods are presented later in this chapter.
1. On the Home screen, tap Apps, followed by Settings.
2. In the Sound and Display or Quick Settings section, tap the Lock Screen icon.
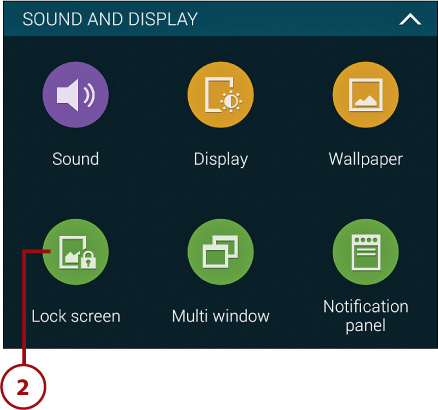
3. Do either of the following:
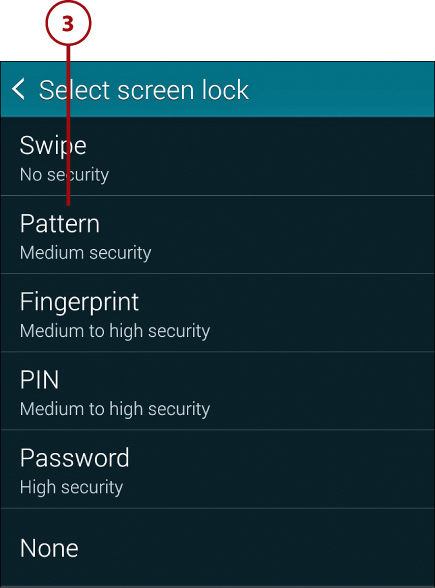
• To change the current screen locking method, tap Screen Lock.
• To set options for the current screen locking method, tap settings in the lower part of this screen. See “Setting Lock Screen Options” for instructions.
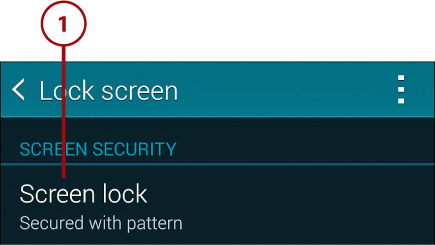
Current Locking Method
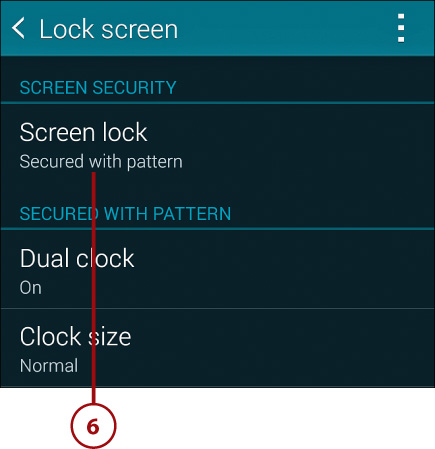
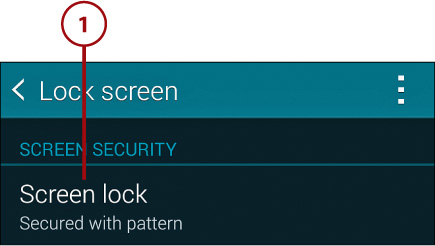
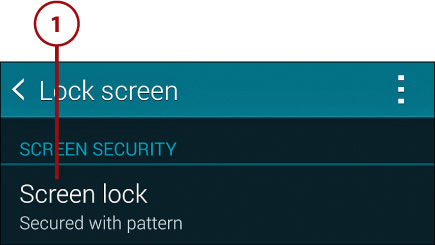
You can always view the current lock setting in the Screen Security section. It’s displayed in the Screen Lock item.
1. Open Settings, tap the Lock Screen icon, and tap Screen Lock.
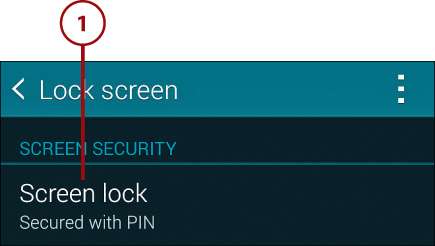
2. If a secure locking method is in use, you’ll be asked to perform the unlock procedure. Otherwise, go to Step 3.
3. Tap Pattern.
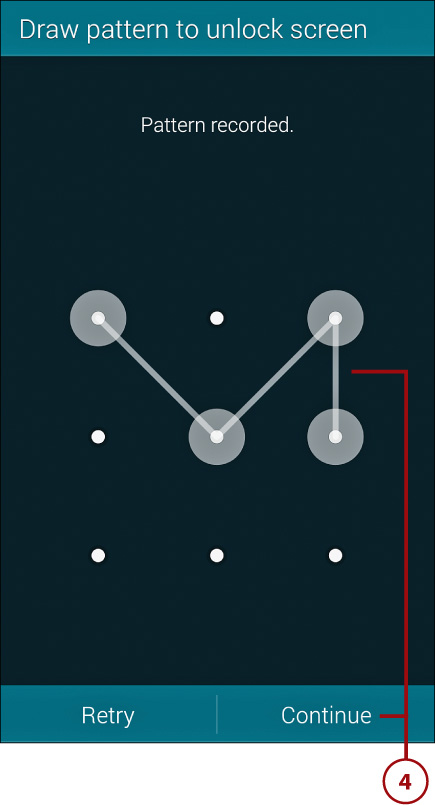
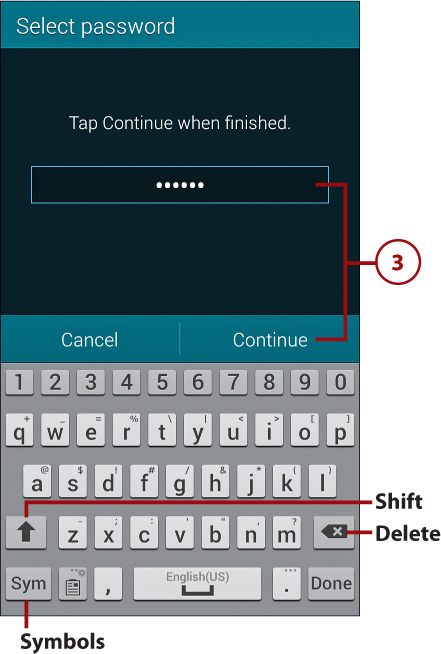
4. In a continuous motion, trace an unlock pattern that connects at least four dots, and then tap Continue. To confirm that you know the pattern, trace it again and tap Confirm.
5. Enter a backup PIN containing at least four digits (to use if you forget the pattern) and tap Continue. To confirm that you know the PIN, reenter it and tap OK.

6. The Lock Screen reappears, displaying your new security method. Review the options in the Secured with Pattern section of the screen (see “Setting Lock Screen Options” for instructions).
Enable Fingerprint Scan
The Home key on the Galaxy S5 doubles as a fingerprint scanner. After teaching the phone to recognize your thumbprint or fingerprint, you can use it as a quick unlocking technique. In addition to using fingerprint recognition as your lock screen method, it can optionally be used to access your Samsung account and as a fast payment verification technique.
1. Open Settings, tap the Lock Screen icon, and tap Screen Lock.
Current Lock Method
If a secure screen lock method is currently in use, you’ll be asked to perform the unlock procedure before continuing.
2. Tap Fingerprint.
3. Read and dismiss the Disclaimer screen, and then register your first fingerprint by repeatedly swiping your thumb or a finger over the Home key in the manner shown. Be sure to keep your thumb or finger flat and centered over the Home key while swiping. You can continue when sufficient successes have been registered.
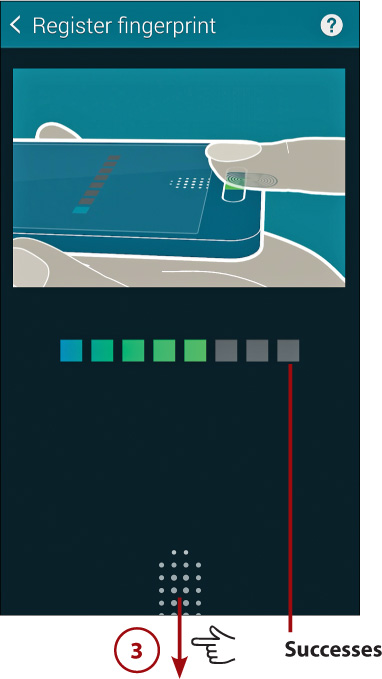
4. Enter a backup password containing at least four characters and tap Continue. Confirm the password by reentering it and tap OK.

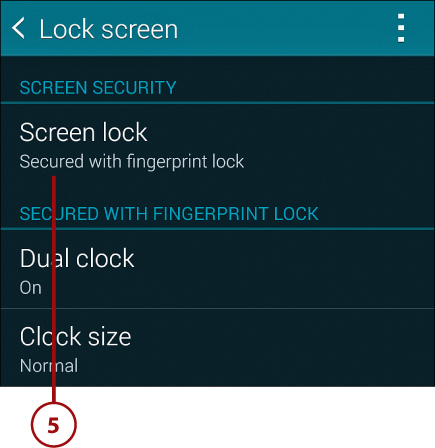
5. The Lock Screen reappears, displaying your new security method. Review the options in the Secured with Fingerprint Lock section of the screen (see “Setting Lock Screen Options” for instructions).
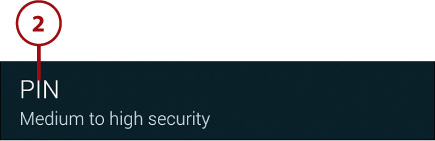
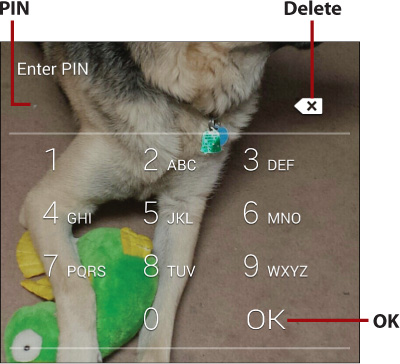
Set a Lock PIN
A PIN is a number of four or more digits that you enter on the onscreen keyboard to unlock the phone.
1. Open Settings, tap the Lock Screen icon, and tap Screen Lock.
Current Lock Method
If a secure screen lock method is currently in use, you’ll be asked to perform the unlock procedure before continuing.
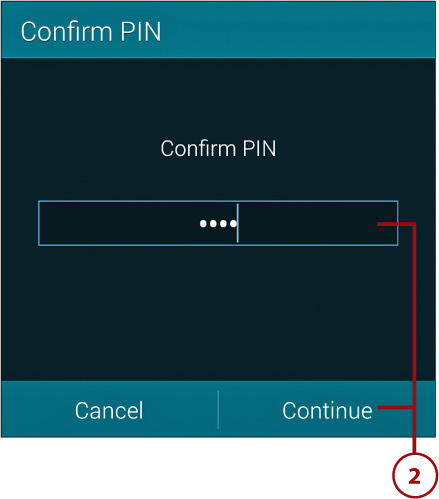
2. Tap PIN.
3. Use the keyboard to enter a PIN of four or more digits, and then tap Continue. To confirm that you know the PIN, reenter it and tap OK.
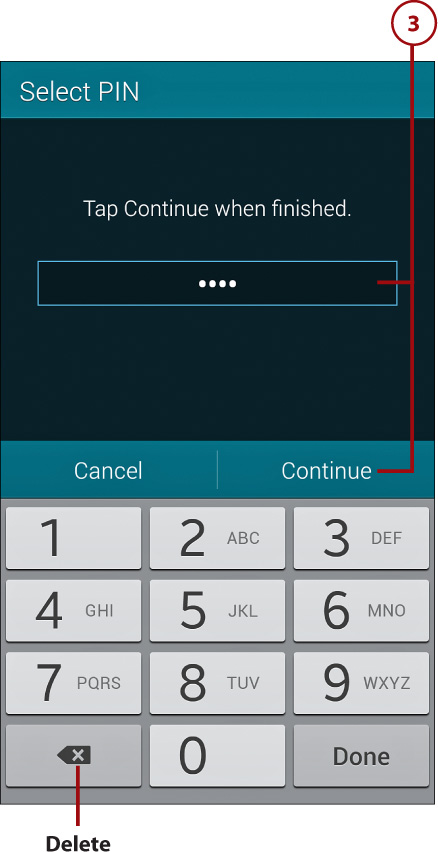
Oops!
If you make a mistake while entering your PIN, you can tap the Delete key to backspace over the incorrect character(s).
4. The Lock Screen reappears, displaying your new security method. Review the options in the Secured with PIN section of the screen (see “Setting Lock Screen Options” for instructions).
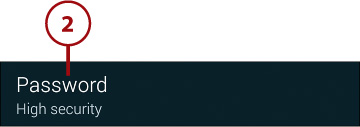
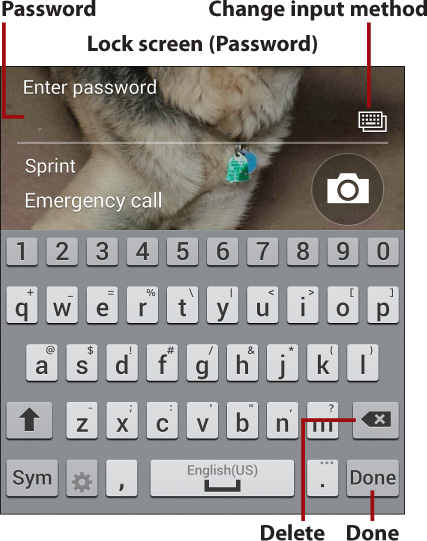
Set a Lock Password
A password is a combination of upper- and lowercase letters, numbers, and special characters that you enter on the onscreen keyboard to unlock the phone.
1. Open Settings, tap the Lock Screen icon, and tap Screen Lock.

Current Lock Method
If a secure screen lock method is currently in use, you’ll be asked to perform the unlock procedure before continuing.
2. Tap Password.
3. Use the keyboard to enter a password containing at least four characters and tap Continue. Confirm the password by reentering it and tap OK.
Letter Case Counts
If your password contains letters, be aware that letter case counts. Knot, knot, and KNOT are different passwords.
Oops!
If you make a mistake while entering your password, you can tap the Delete key to backspace over the incorrect character(s).
4. The Lock Screen reappears, displaying your new security method. Review the options in the Secured with Password section of the screen (see “Setting Lock Screen Options” for instructions).
Set a Non-Secure Unlock Method
If security isn’t an issue for you, you can select Swipe to simply hide the screen or None to dispense with the lock screen altogether.
1. Open Settings, tap the Lock Screen icon, and tap Screen Lock.
Current Lock Method
If a secure screen lock method is currently in use, you’ll be asked to perform the unlock procedure before continuing.
2. Select one of these screen lock methods:
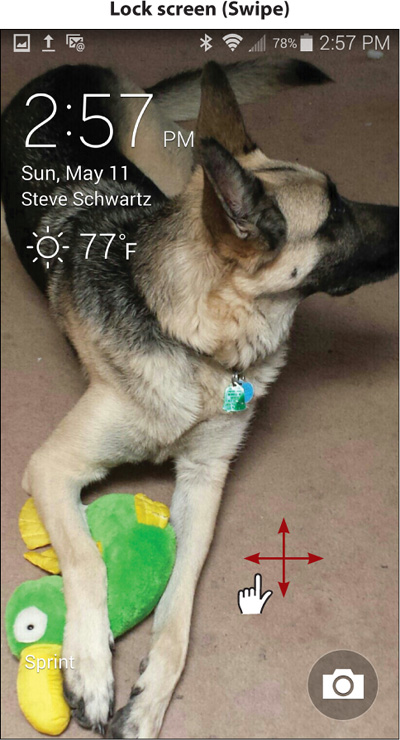
• Swipe. This is the default screen locking method. When restoring from a dark display, the lock screen wallpaper appears. Dismiss it by swiping in any direction.
• None. Select None to make the screen turn black following a screen timeout. When restored, the most recent screen immediately displays.

3. The Lock Screen reappears, displaying your new lock screen method. If you selected Swipe, review the options in the Swipe Options section of the screen (see “Setting Lock Screen Options” for instructions). Because None presents a black lock screen, it has no options.
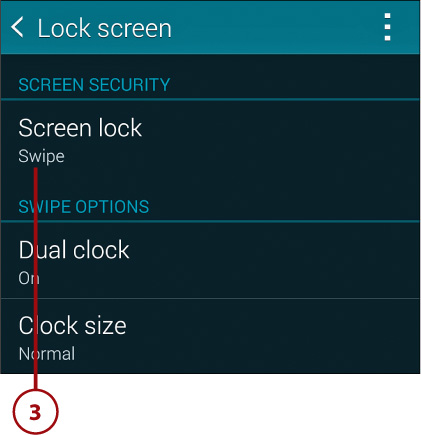
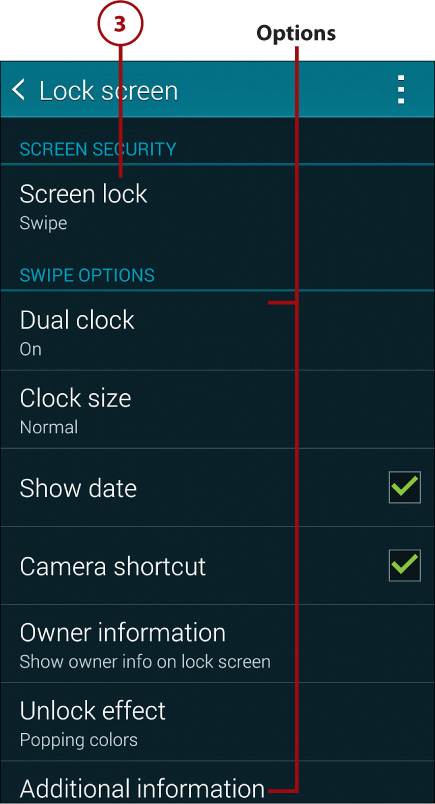
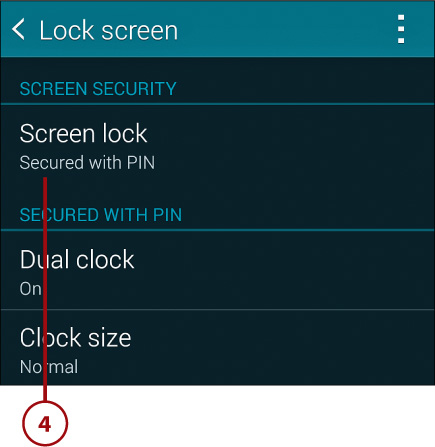
Setting Lock Screen Options
With the exception of None, each screen locking method has options that you can set. To view or change these options, open Settings and tap the Lock Screen icon.
In alphabetical order, these are the options and the locking method(s) to which each option applies:
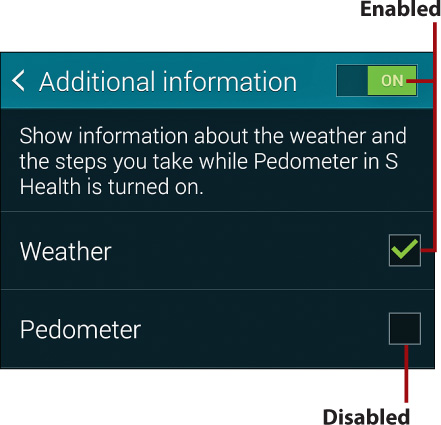
• Additional Information (all). When this option is enabled, the lock screen can show local weather information and the number of steps you’ve taken—when S Health’s pedometer is enabled.
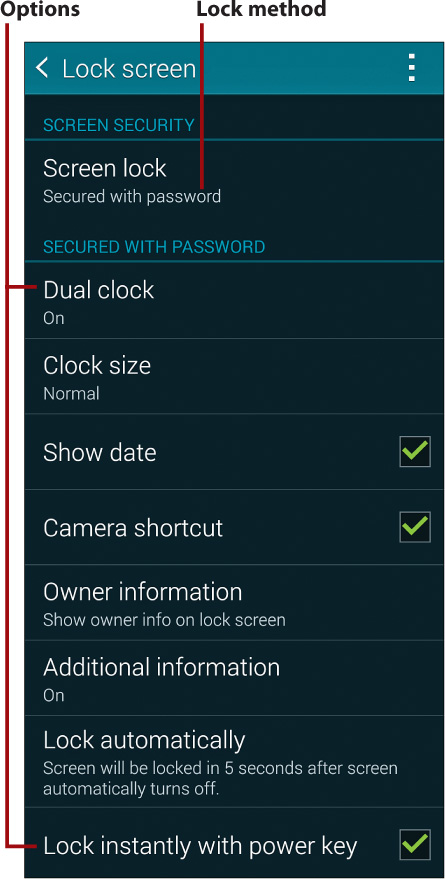
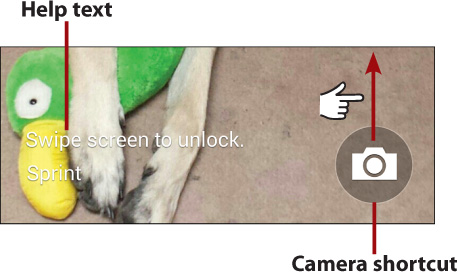
• Camera Shortcut (all). When this option is enabled, a Camera shortcut is displayed in the lower-right corner of the lock screen. Drag it up to go directly from the lock screen to the Camera app.
• Clock Size (all). Tap Clock Size to set the time display to Small, Normal, or Large.
• Dual Clock (all). When this option is enabled and you’re traveling, two clocks are displayed; one shows the local time and the other shows your home time. To specify your home time zone, tap Dual Clock, Set Home City. (When you’re in your Home City time zone, only a single clock with the local time is shown.)
• Help Text (Swipe). When this option is enabled, text is displayed on the lock screen that explains how to dismiss the lock screen.
• Lock Automatically (Password, Pattern, Fingerprint, PIN). This option is what makes it practical to apply a secure locking method. Instead of being asked to perform an unlock every time the lock screen appears, Lock Automatically enables you to specify the length of inactivity (in seconds or minutes) before you’re required to perform your unlocking procedure. If less time has passed, the screen immediately reappears when you wake up the phone—as though None is the screen lock method.
If you’ve also enabled Lock Instantly with Power Key, the Lock Automatically interval is ignored whenever you press the Power key to darken the display.
• Lock Instantly with Power Key (Password, Pattern, Fingerprint, PIN). Rather than waiting for a screen timeout to occur, this option enables you to instantly lock the phone by pressing the Power key.

• Make Pattern Visible (Pattern). When this option is enabled, the traced pattern displays. When disabled, the traced pattern is hidden to prevent others from seeing it.
• Owner Information (all). Add your name or another text string to the lock screen display.
• Pattern Type (Pattern). Set the lock screen dots and drawing colors to Classic (default), Halftone, or Multicolor.
• Show Date (all). Display today’s day and date.

• Unlock Effect (Swipe). Specify the visual effect that occurs whenever your finger approaches or touches the lock screen.
• Vibration Feedback (Pattern). When this option is enabled, the phone vibrates if an incorrect pattern is entered.
Customize Fingerprint Options
In addition to using a fingerprint scan to unlock the phone, you can set options and enable other related capabilities for finger scanning.
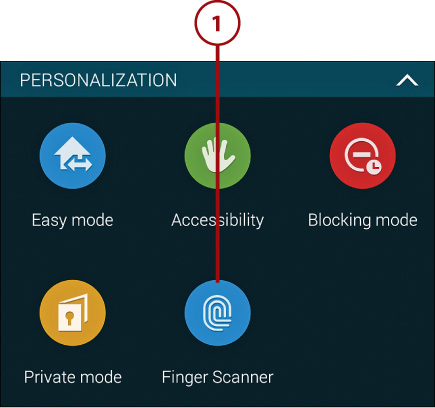
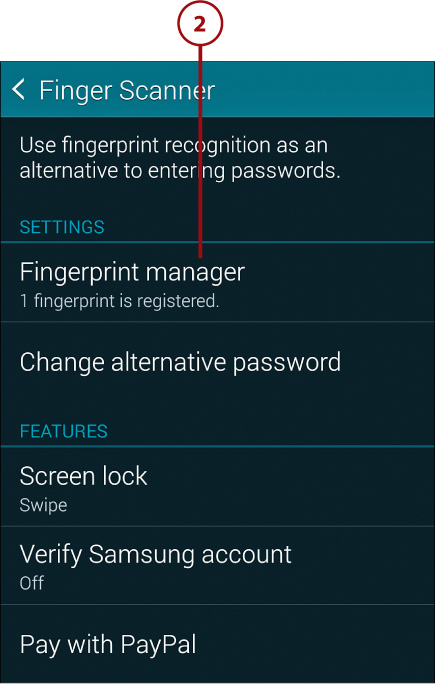
1. Open Settings and tap Finger Scanner (in the Personalization section).
2. Tap Fingerprint Manager to register additional fingers or thumbs (up to the maximum of three) or deregister existing ones. Log in by swiping a registered finger or by entering the alternate password, and then do any of the following:
• Tap the + (plus) icon to register an additional fingerprint.
• To remove one or more registered fingerprints, tap the menu icon and choose Deregister. Select a fingerprint, tap the Trash icon, and confirm the deletion by tapping OK.
• To rename a fingerprint (indicating which digit it is, for example), tap Fingerprint Manager, press and hold the entry you want to rename, and tap the Edit (pencil) icon.
Any Finger Will Do
Whenever a fingerprint scan is requested, you can use any of your registered fingers or thumbs.
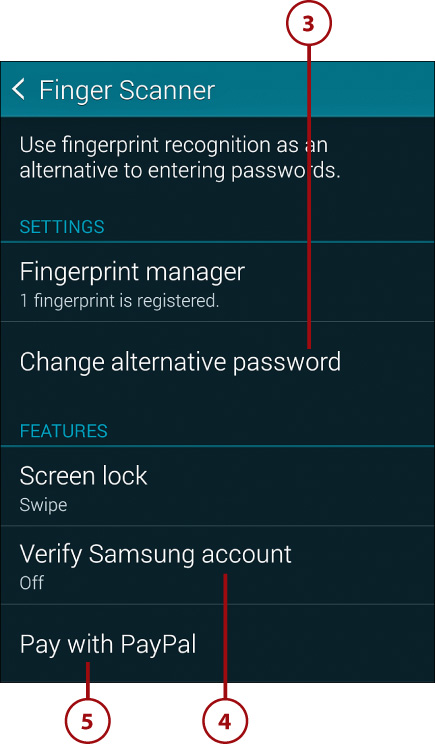
3. Tap Change Alternative Password to replace the backup password with a different one. You must enter the current backup password before you can create a new one.
4. Enable logging into your Samsung account via a fingerprint scan (when making purchases, for example) by tapping Verify Samsung Account and dragging the slider to the On position.
5. If you have or are willing to create a PayPal account (www.paypal.com), you can designate fingerprint scanning as a PayPal purchase authorization method. Tap Pay with PayPal and follow the onscreen instructions.
Showing/Hiding Passwords and PINs
If you’re concerned that people might peek as you enter passwords or PINs, you can disable Make Passwords Visible to obscure the characters as you type. Conversely, when enabled, this setting briefly shows each typed character and then quickly replaces it with a bullet (•).
To change this system setting, open Settings, tap the Security icon (found in the System section), and enable or disable Make Passwords Visible.
Unlocking the Lock Screen
The manner of clearing the lock screen depends on whether you’ve set a secure (PIN, Password, Fingerprint Scan, or Pattern) or an unsecure (Swipe or None) lock method. When the lock screen is cleared, it reveals the Home screen or whatever you were doing when the screen darkened—reading messages in Email, for example.
• Swipe. Use your finger to swipe the lock screen in any direction.
• Pattern. Trace your unlock pattern, connecting dots in the correct sequence. Don’t lift your finger from the screen until you complete the pattern.

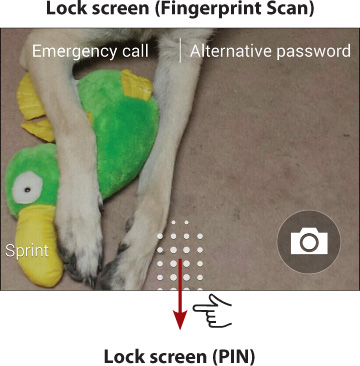
• Fingerprint Scan. Smoothly drag any registered finger or thumb downward over the Home key. If you prefer, you can tap Alternative Password and enter the backup password.
• PIN. Using the keyboard, enter your PIN and tap OK. If you make a mistake while entering the PIN, tap the Delete key to backspace over the incorrect character(s).
• Password. Using the keyboard, enter your password and tap Done. (You can tap the tiny keyboard icon to switch input methods, selecting Samsung Keyboard or Swype.) As previously noted, if the password contains letters, make sure that you use the correct letter case for each one. If you make a mistake while entering the password, tap the Delete key to backspace over the incorrect character(s).
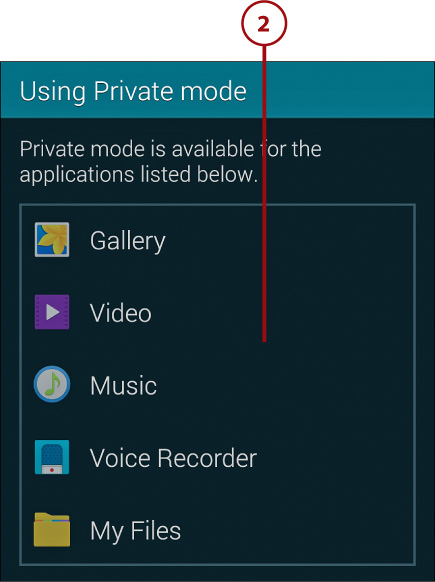
Enabling Private Mode
If your phone contains sensitive or personal material, you can use the new Private mode to make selected files in Gallery, Video, Music, Voice Recorder, and My Files invisible to others. When you first enable Private mode, a folder named Private is created. The folder is visible only when Private mode is active. You can hide files by choosing the Move to Private menu command in any supported app or by launching My Files and manually moving documents into the Private folder.
1. Open Settings and tap the Private Mode icon (in the Personalization section).
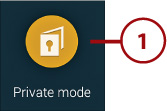
2. Review the instruction screens and set a Private mode unlock method, such as a password.
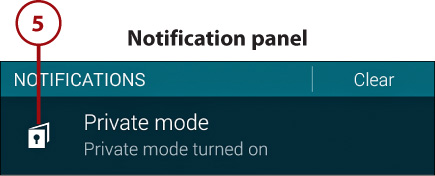
3. Enable Private mode in later sessions by tapping its icon in Settings, tapping the Private Mode slider, and performing the unlock procedure you established in Step 2. The slider is moved to the On position. Whenever Private mode is active, its icon (keyhole) appears in the status bar and a Private Mode item is added to the Notification panel.
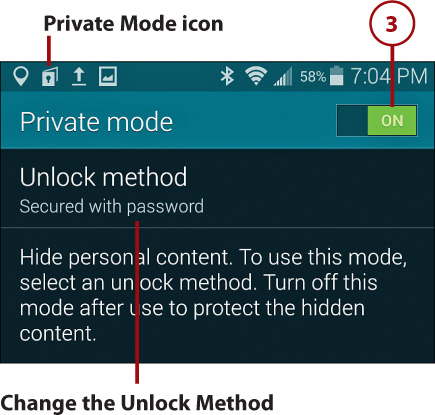
Changing the Unlock Method
To change the unlock method, tap Unlock Method on the Private Mode screen, perform the current unlocking procedure, and select a new method.
4. Whenever Private mode is active, you can add or remove items from Private mode, as well as see all items that you previously marked as private.
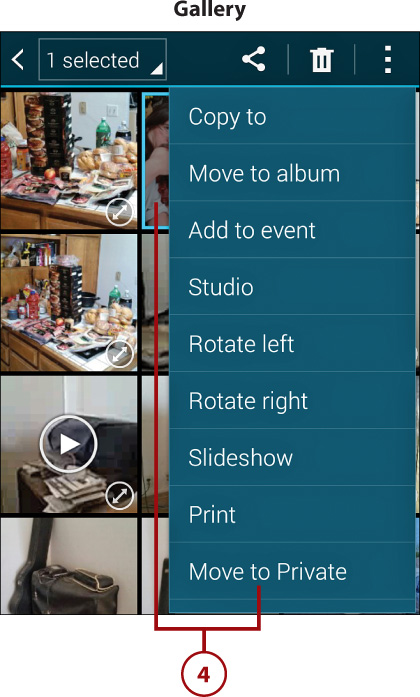
• To make an item private, open Gallery, Video, Music, or Voice Recorder; select one or more items; and tap the menu icon and choose Move to Private. In My Files, you can select any file, open the menu, choose Move, and specify the Private folder as the destination.
Private Designation
Different apps have different methods of designating items as private. In Gallery and My Files, they’re shown in the Private folder. In Video, they’re marked with the tiny keyhole icon.
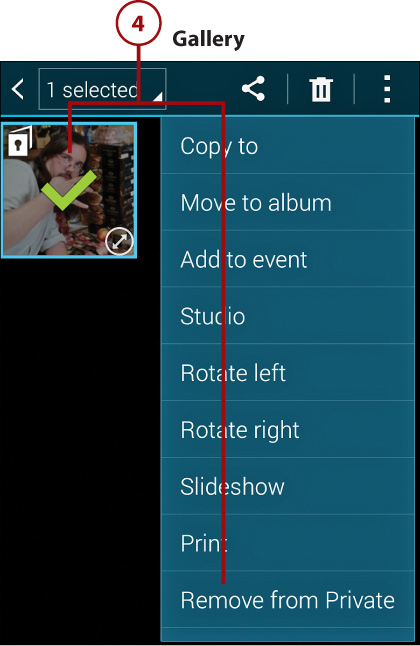
• To remove an item’s Private designation, select the item, tap the menu icon, and choose Remove from Private.
• To view or otherwise use a Private item, open it as you normally do. (Any files that you manually moved into the Private folder in My Files may have to be opened in My Files.) As long as Private mode is enabled, all Private items are readily available to you in the same manner as non-Private items.
5. Hide all Private items by disabling Private mode. Tap its icon in Settings or the Private Mode item in the Notification panel, and then move the Private Mode slider to the Off position. Until you enable Private mode again, all items marked Private are hidden to all users—including you. When you want to view any file that you’ve marked as Private, you must re-enable Private mode.
>>>Go Further: Heightened Security
• Review Security settings by opening Settings and tapping the Security icon. You can encrypt the device and external memory card, and verify apps to prevent installing known malware.
• Consider installing an antivirus app, such as Antivirus Security Free (AVG Mobile Technologies) or Norton Security Antivirus (NortonMobile). Both are available from the Google Play Store and are designed to protect the phone from viruses, malware, and theft.
• Corporate users can install Samsung KNOX 2 (www.samsungknox.com), a business security solution for the Galaxy S5.
• To prepare for the possibility of losing or misplacing your Galaxy S5, visit http://findmymobile.samsung.com for instructions on remotely ringing, locating, locking, or wiping your registered phone. However, some carriers don’t currently support this feature.
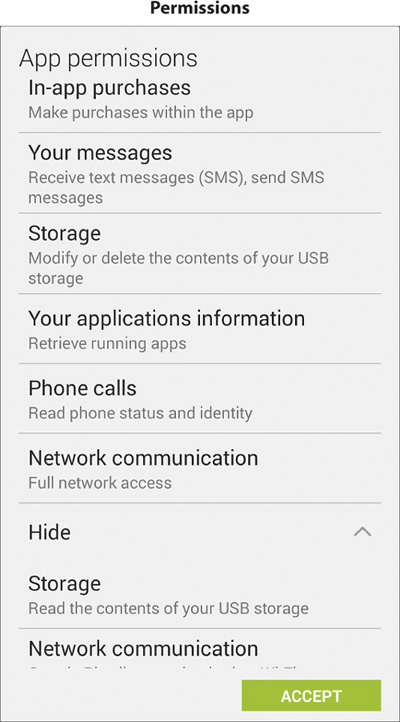
• When you download a new app from the Play Store, a list of permissions appears. (Permissions are activities that the app is requesting your permission to perform whenever it’s active.) Tap any permission entry to get a more thorough description of what it means. If you don’t want to grant the specified permissions, don’t download the app.