3. Networking and Syncing
In this chapter, you find out how to connect your iPad to your local Wi-Fi network. You also see how to sync your iPad with your Mac or Windows computer and with Apple’s iCloud service.
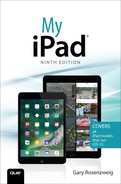
![]() Setting Up Your Wi-Fi Network Connection
Setting Up Your Wi-Fi Network Connection
![]() Viewing Your Mac’s Files with iCloud Drive
Viewing Your Mac’s Files with iCloud Drive
Your iPad connects you to the world. You can surf the Web, view all sorts of information, communicate with friends, and share photos. But first, you must connect your iPad to the Internet. You can do that using a Wi-Fi connection. Some iPads also have the capability to connect to a cellular network.
Setting Up Your Wi-Fi Network Connection
One of the first things you need to do with your iPad is to establish an Internet connection.
Chances are that you did this when you started your iPad for the first time. It should have prompted you to choose from a list of nearby Wi-Fi networks. You might need to do this again if you first used your iPad away from home, or if you need to switch to another Wi-Fi network.
To connect your iPad to a wireless network, follow these steps.
1. Tap the Settings icon on the Home screen.
2. Choose Wi-Fi from the list of settings on the left.
3. Make sure that Wi-Fi is turned on.
4. Tap the item that represents your network. (Tap the blue-circled i button next to each network to customize your network settings.)

I Don’t Have a Wireless Network
If you don’t have a Wi-Fi network but do have high-speed Internet through a telephone or cable provider, you have several options. The first is to call your provider and ask for a new network modem that enables wireless connections. Some providers might upgrade your box for free or a small cost.
Another option is to keep your current box and add a wireless base station of your own, such as the Apple Airport Extreme base station.
5. If the network is protected by a password, you’re asked to enter the password.
6. Tap Join. After you enter the password, your iPad remembers it. If you switch between two locations, like work and home, you are asked to enter the password the first time you use that connection. From that point on, your iPad automatically logs on to each connection as you move around.

>>>Go Further: Setting Up Your Cellular Data Connection
1. Open the Settings app and tap Cellular Data on the left.
2. Turn on Cellular Data. In addition, go into Cellular Data Options and turn on Enable LTE for a faster connection. You can also decide on that screen whether you want to allow data roaming, which could cost more depending on your data plan.
3. Tap this button to sign up for and manage your account, or change your plan.

4. As you use your mobile data, you see the usage numbers change here, which will help you keep tabs on your costs.
5. Depending on your plan, you might also have the option to turn on Personal Hotspot, which turns your iPad into a mobile Wi-Fi network with which other devices can connect.

Working with Wi-Fi and Cellular Data
After you establish a cellular data plan, your iPad should still connect to your Wi-Fi networks when it is in range and use cellular data only when it cannot find a Wi-Fi network. You can also return to Settings and turn on or off Cellular Data to specifically prevent your iPad from using the cellular data network. This is handy when you are completely out of mobile data range but have local Wi-Fi; for instance, you might be on an airplane flight.
Looking at the top-left corner of your iPad’s screen, you can tell which sort of connection you are currently using. You see the Wi-Fi symbol, a fan of four curves, when you are connected to Wi-Fi. If you have a cellular data plan, you see the name of your network next to it, such as “AT&T,” plus a series of bars that show your connection strength. You are using that connection only if the characters “3G,” “4G,” or “LTE” are shown instead of the Wi-Fi symbol.
Syncing with iCloud
When you think of your contacts, calendar events, and email messages, you might be tempted to think of that information as being “on your iPad” or “on your computer.” But today this information is usually in both places, and more. This is referred to as “the cloud”—when the actual location of the information isn’t important as long as it is where you need it, when you need it.
As an iPad user, you have access to several different cloud services, most notably Apple’s system called iCloud. It is a free service that offers email, contacts, calendar, documents, and other types of data stored on Apple’s servers and is automatically synced to your iPad and the other Apple devices you may own.
Or, you could choose to use other cloud services, such as Gmail or Yahoo!, for mail and calendar events. There’s no reason to pick just one. For instance, you can use both iCloud and Gmail on your iPad.
When you use cloud services, you get automatic syncing as long as you have a connection to the Internet. For example, add a contact to your iPad and your iPhone automatically updates to show that new contact. Let’s look at how to set up an iCloud account, or link to one you’ve already created.
Connecting to iCloud
1. Open the Settings app and tap iCloud on the left.
2. If you have never set up an account with Apple before, then tap Create a New Apple ID to set one up. Any account you have with Apple, such as an iTunes account, would be an Apple ID, and you should use that instead of starting a new account.
3. If you already have an Apple ID, even if you have never used iCloud before, enter your ID and password. Apple IDs can be any email address, not just an @iCloud.com email address.

4. Tap Sign In to access your account. If your account has been used only for things like iTunes in the past, you are prompted to set up the new iCloud part of your account.
5. If you think you have used an email address to log on to iTunes or some other Apple service before, but you can’t remember the password, tap Forgot Apple ID or Password to reset your password.

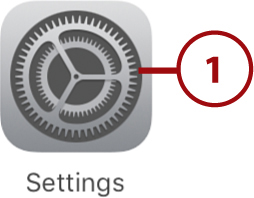
6. You can manage your iCloud Drive storage by tapping the iCloud Drive setting. iCloud Drive is the file and documents storage part of iCloud. For example, your Pages, Numbers, and Keynote documents can be stored on your iCloud Drive. You can then access them on other iOS or OS X devices. Also see the section about iCloud Drive later in the chapter.
7. You can turn photo-related iCloud services, such as Photo Stream and iCloud Photo Library, on or off here. See Chapter 9, “Taking and Editing Photos,” to learn about how photos are stored.
8. You can use your iCloud email on your iPad. This would typically be an @icloud.com email address. These addresses are part of the free iCloud service. If you happen to be using a non-Apple email address as an Apple ID, note that this setting has nothing to do with that email account.
9. If Contacts is on, iCloud stores all your contacts so they automatically sync with the iCloud servers and then to your other Apple devices.
10. Likewise, iCloud can store your calendar events when the Calendars switch is on.
11. Turn on Reminders to have the Reminders app use iCloud to store reminders and automatically sync them with your other devices.
12. Safari can sync over iCloud as well. Things like your bookmarks, tabs, and reading list sync across devices when the Safari switch is on.
13. Turn the Notes switch on so that Notes can also sync over iCloud.
14. You can have your News app preferences sync across your devices. The News app is covered in Chapter 16, “Must-Have Apps.”

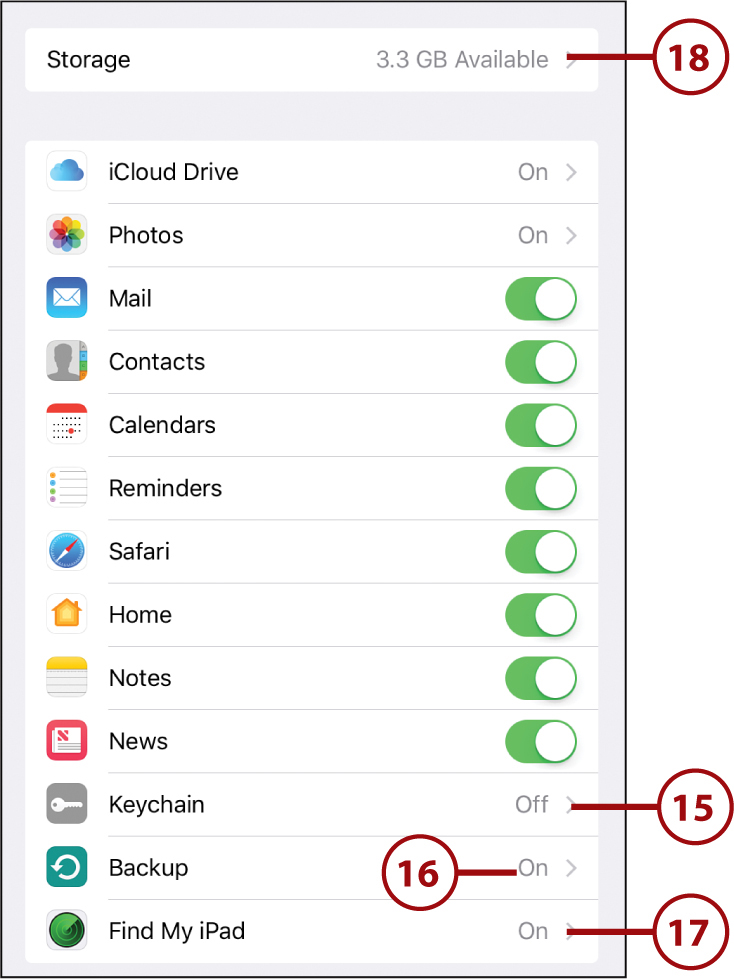
15. iOS allows you to store passwords while using Safari so you don’t need to enter them each time. Syncing these over iCloud means that you can also access these passwords on other Apple devices. Tap Keychain to configure this setting. See “Saving Time with AutoFill” in Chapter 7, “Surfing the Web,” for more details on working with the Keychain.
16. iCloud Backup backs up your settings, documents, photos, and other data to iCloud wirelessly. If your iPad is lost or breaks, you are able to restore your data to a repaired or new iPad. You should use iCloud Backup unless you prefer to back up to your computer via iTunes and do so on a regular basis.
17. Find My iPad is an option that lets you locate your iPad on a map using another Apple device or the iCloud.com website. Be aware that if your Location Services are not on, this feature does not work. See “Using Find My iPad” in Chapter 19, “Maintaining Your iPad and Solving Problems.”
18. You can check to see how much storage space you have remaining in your iCloud account. As of late 2016, Apple provides each iPad user with 5GB of free space. You can purchase more if you find that you have a lot of documents or other data, and 5GB isn’t going to be enough.
Syncing with iTunes
With iCloud, the iPad can be a truly stand-alone device, no desktop computer needed. iCloud is also great for keeping your iPad and your Mac in sync, sharing settings, music, photos, and so on. For most users in 2016 and beyond, syncing via iCloud is all you need. The days of syncing with a cable to your Mac or PC are gone, and it is no longer necessary. That said, there are still some minor advantages to syncing to your computer:
• Each day you sync your iPad, iTunes stores a backup of its content. You can restore all your data from these backups if you lose your iPad. You can do the same with iCloud backup, but it can take a lot longer to restore an iPad because it has to transfer the data across the Internet.
• Syncing with a computer is a good way to get a large number of photos from your collection on your iPad if you aren’t using iCloud Photo Library.
• Syncing is how you get your music stored on your computer onto your iPad if you aren’t using iTunes Match or Apple Music. If you have a large collection of music, you can opt to copy only a selection of it to your iPad at any one time.
You might get a message asking if it is okay to sync your iPad to this computer the first time you connect your iPad and open iTunes. The message won’t reappear after you have connected the iPad to the computer.
After connecting the first time, iTunes should automatically open when you connect your iPad. While connected to your computer, you can always click the Sync button in iTunes to re-sync and apply any changes to the iPad.
You can also choose Sync over Wi-Fi connection in your iPad’s options in iTunes. This allows you to sync when your iPad isn’t connected to the computer by the USB cable. It only needs to be on the same network as your Mac or PC that is running iTunes.
As we look at some of the syncing options for the iPad, the Mac version of iTunes is used as an example. The Windows version of iTunes is similar but not exactly the same.
Syncing Options
After your device is in sync, you can change some general options for your iPad from the Summary screen in iTunes. Most of the options are self-explanatory, such as Open iTunes When This iPad Is Connected.
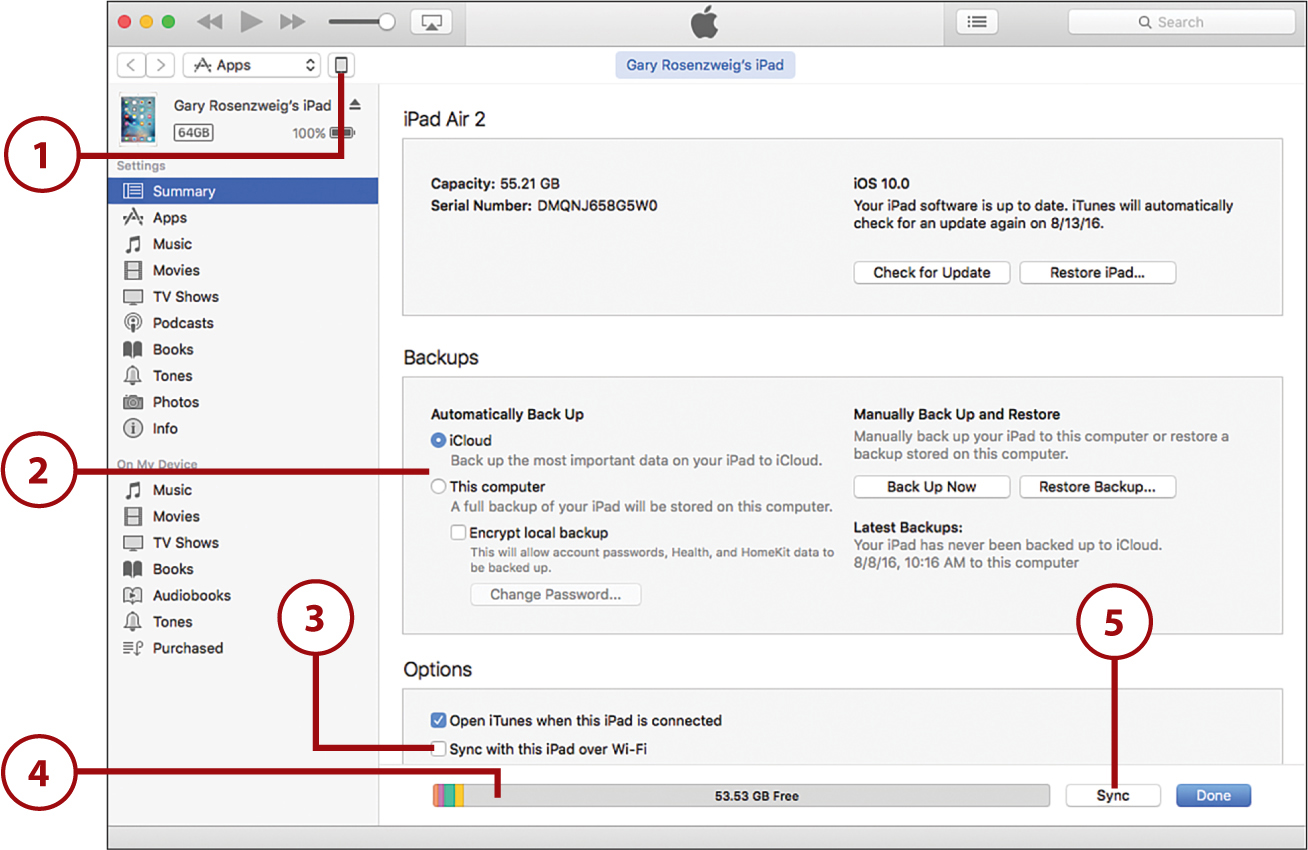
1. Using iTunes 12.2 or newer, look for a button representing your iPad at the top of iTunes. After you select it, the items in the rest of the iTunes window pertain to your iPad, with settings and content categories listed on the left.
2. You can configure your backups. iCloud backups are convenient for those without regular access to a computer, but this uses Internet bandwidth and can be a problem if you have a slow connection. Backing up to your computer is a good option if you regularly sync to your computer anyway.
3. You can set your iPad to connect via Wi-Fi. From then on, you only need to be on the same network as your computer to sync with iTunes.
4. A handy chart of your iPad’s storage is shown.
5. Any changes you make on this screen, or any other iTunes sync screen, require that you click Sync to re-sync with the new settings.
The Manually Manage Music and Videos Option
One option that dramatically changes how your iPad syncs is Manually Manage Music and Videos. This option turns off automatic syncing of music and videos and enables you to simply drag and drop songs and movies from your iTunes library onto the iPad icon on the left. (You might need to scroll down the Summary page to locate this check box if your screen size is too small to show the entire page at once.)
Syncing Music
There are now many ways to listen to music on your iPad. For many people, a streaming service like Apple Music or Spotify has completely replaced the old technique of building a music file library on your computer and then syncing it to your iPad. Chapter 4, “Playing Music and Video,” discusses streaming music in more detail.
If you still want to sync music to your iPad from your computer, then the simple way to do it is to select Entire Music Library in iTunes on your computer. If you have more music than can fit on your iPad, though, you must make some choices. Syncing Movies, TV Shows, Podcasts, Tones (ringtones for messaging and FaceTime), iTunes U, and Books all work in a similar way to syncing music, so you can apply what you learn in these steps to those items as well.
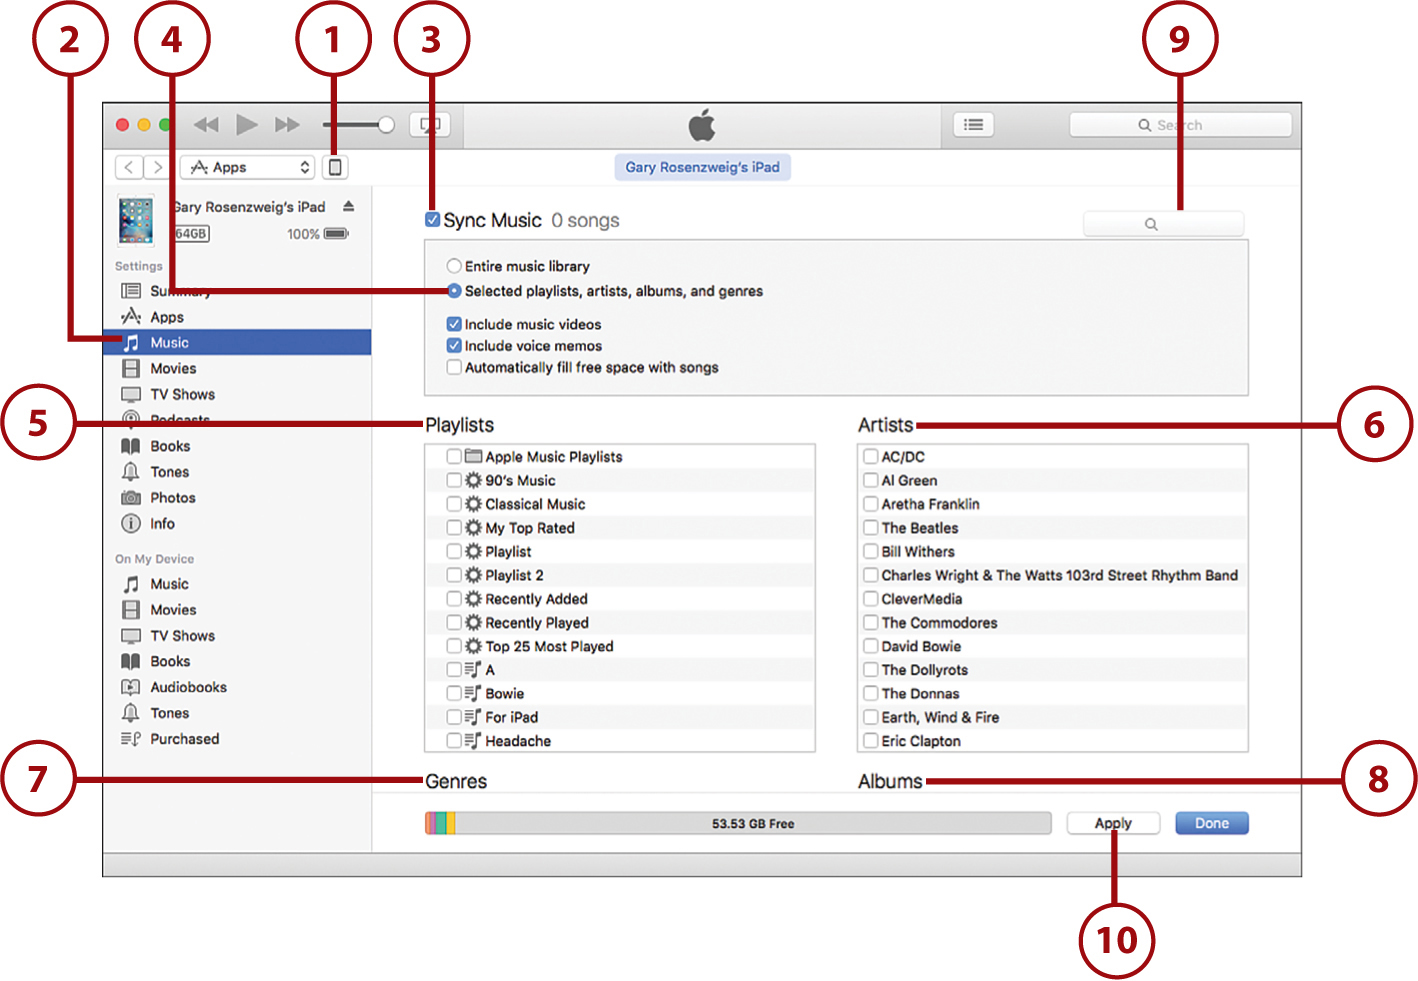
1. Select your iPad at the top of the iTunes window.
2. Click Music under Settings.
3. Select Sync Music, if it isn’t already turned on.
4. Click the Selected Playlists, Artists, Albums, and Genres button.
5. Check off any playlists in the Playlists section that you want to include.
6. Check off any artists for which you want to include every song by that artist.
7. Check off any genres to include in their entirety.
8. Check off any albums you want to include.
9. Use the search box to quickly find specific artists.
10. Click the Apply button if you want to apply the changes now.
One Copy Only
Note that songs are never duplicated on your iPad. For instance, if the same song appears in two playlists and is also by an artist that you have selected to sync, the song only has one copy on your iPad. But it appears in both playlists and under that artist, album, and alphabetical list of all songs.
Syncing Photos
With Apple’s iCloud Photo Library, your iPad automatically shows all your photos without requiring you to do any syncing. iCloud Photo Library is covered in Chapter 9. But if you are not using iCloud Photo Library, then you need to use the older technique of manually syncing photos to your iPad.
The process for syncing photos from your computer to your iPad is very similar to how you move music, videos, and other data to your iPad. So let’s use photos as an example. The steps here are very similar if you want to sync something else, like movies, to your iPad. You would just choose the Movies tab in iTunes instead of the Photos tab.

1. Select your iPad.
2. Choose Photos.
3. Click the check box to indicate that you want to sync photos.
4. You can choose from any applications that are compatible with iTunes and store photos. For instance, on the Mac you can choose the new Photos app or the old iPhoto or Aperture apps, if you have them. You can also simply select a folder to use as the location for your photos. The rest of the steps here assume you are using Photos.
5. Click All Photos and Albums to sync all your photos. Only do this if you have a fairly small collection.
6. Choose Selected Albums to select which albums to sync.
7. You can also have photos taken over a recent period of time automatically sync. For instance, you can have it sync all photos from the past 6 months.
8. Choose which albums you want to sync. Albums are collections of photos, like music playlists, that allow you to compile your favorite or related photos into a group.
9. When you are satisfied with your selections, click Apply to begin the transfer.
No Duplicates
When you sync photos, you get only one copy of each photo, no matter how many times the photo appears in albums, events, and faces. The photos appear in all the right places but take up only one spot in memory on your iPad.
Syncing Everything Else
Music and photos are two out of many types of items you might want to sync between your computer and your iPad. In most cases, if you use iCloud for that type of item, there is no need to ever sync it via iTunes.
If you look in iTunes, you have the ability to sync Info, Apps, Tones, Music, Movies, TV Shows, Podcasts, Books, and Photos. Each has a similar screen to the Music and Photos syncing settings screens. Let’s take a look at each and see why you may or may not want to sync them using iTunes.
• Info: This means syncing Contacts and Calendars. If you use iCloud, this happens automatically as you make changes. There is no need to sync.
• Apps: Because your Mac or PC cannot run iOS apps, these settings in iTunes allow you to keep copies of your apps on your computer so you can restore them to your iPad in case of a problem. But you can also always redownload any app you purchased directly from the App Store, so this isn’t very useful. You can also use the iTunes interface to arrange the apps on your Home screens.
• Tones: This refers to ringtones and sounds used by Messages, FaceTime, and other things where your iPad sends you an audible alert. If you are creative and good with GarageBand on the Mac, you can create ringtones with it and use iTunes to sync these new ringtones to your iPad. You can also download iOS-compatible ringtones, which are .m4r files, and sync them this way.
• Music: If you are using Apple Music or iTunes Match, you don’t need to use iTunes to sync your music. If you don’t have much music, and want to save a few dollars, you can simply sync your music with iTunes on your computer.
• Movies and TV Shows: These two categories are used mainly to sync videos you have purchased in the iTunes Store. However, this also works for other videos you store in iTunes. Videos that are part of your photo collection are synced under Photos.
One thing to keep in mind is that once you purchase a movie or TV show episode, you can always redownload it from Apple later. So if you buy 22 episodes of a TV season and watch them all, you don’t need to keep them on either your iPad or your computer. You can remove those items from iTunes to save some storage space, and then download them again from Apple if you want to watch them again later.
• Podcasts: Thanks to the standalone Podcasts app that comes with your iPad, there’s not much of a need to sync podcasts from your computer to your iPad. You can simply download episodes directly to your iPad. See “Listening to Podcasts” in Chapter 4.
• Books: Books work in much the same way as Movies. When you buy a book from Apple, you can redownload it later. If a book is just text, it is a quick download. If you buy a book on your computer in iBooks, you can easily find it and download it in the iBooks app on your iPad, too. Syncing can also be useful for those who import other types of books into the iBooks library on a Mac, and then want to get them to their iPad later on.
• Photos: As noted earlier, the main reason to sync photos is if you aren’t using iCloud Photo Library and you want to take some recent or favorite albums from your computer and put them on your iPad for viewing.
Sharing with AirDrop
A quick way to get data from your iPad to another iOS device or Mac is using AirDrop. This technique uses Wi-Fi, but instead of going through a Wi-Fi network, it uses your iPad’s Wi-Fi hardware and goes directly from device to device. The devices don’t need to be on the same network—they don’t need to be on any Wi-Fi network at all. They just need to be nearby.
With AirDrop you can share things like photos, contacts, documents, and other kinds of files. If an app has a Share button then most likely it has a way to send some data to another device using AirDrop.
AirDrop requires the latest Wi-Fi hardware in your iPad, but any iPad capable of running iOS 10 should be able to use AirDrop. On a Mac, it requires a very recent model as well, running at least Mac OS X Yosemite. Using AirDrop is pretty straightforward.
Using AirDrop
To use AirDrop, follow these steps:
1. To use AirDrop, make sure you have turned it on. Do this by accessing Control Center. See “Using Notifications and Control Center” in Chapter 1, “Getting Started.” Make sure that it is set to Everyone. Another option is to set it to Contacts Only, which means you can use AirDrop only with devices that have Apple ID email addresses that are in your Contacts.

2. Let’s use the Contacts app as an example. You can share any contact. Just go into that contact and tap Share Contact.
3. In addition to sharing options such as Message and Mail, you see a list of AirDrop-compatible devices that are within range. You see whatever image the user has chosen as a user icon, plus their name. If you do not see your other device, it could be asleep, or have AirDrop disabled, or possibly is not a model that has AirDrop available. Tap the device you want to share with. You see a Waiting message below the icon.
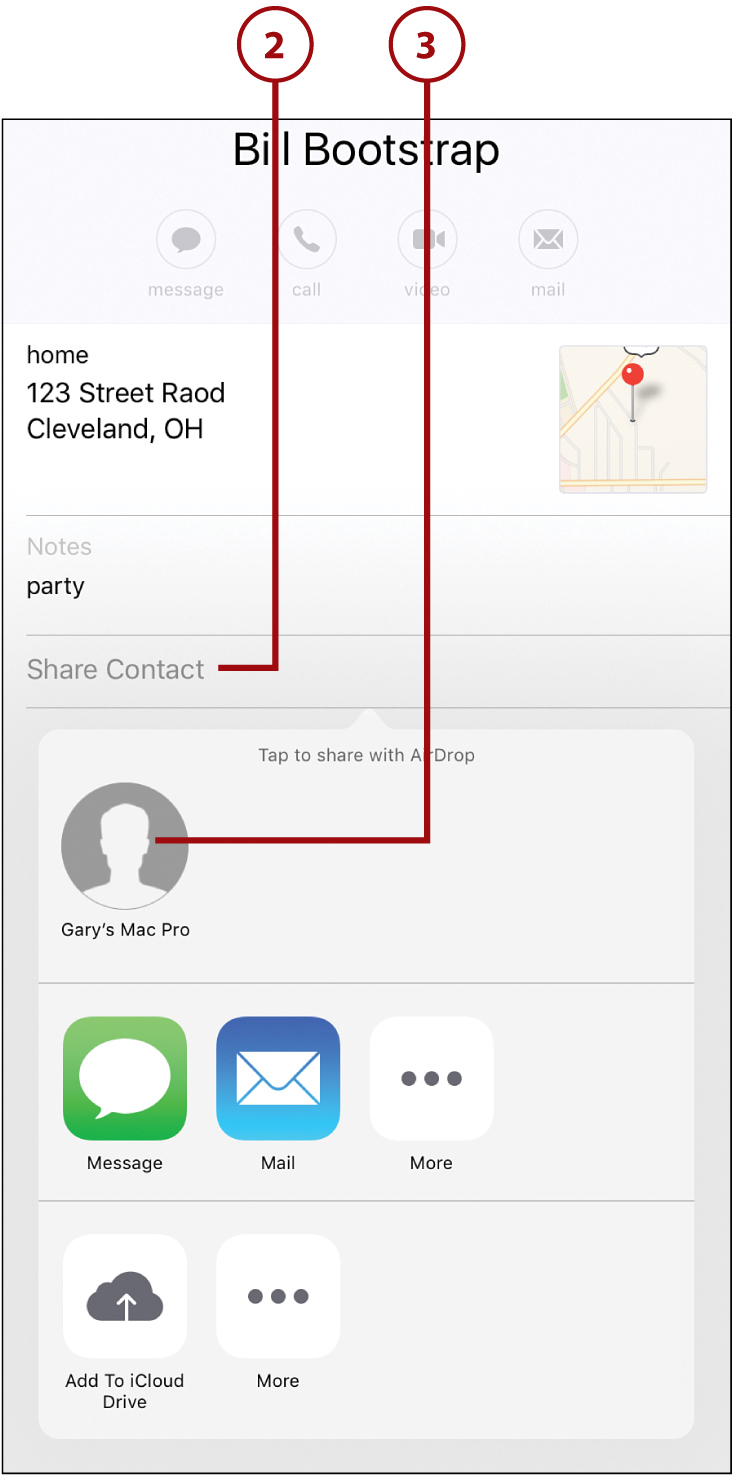
4. The recipient receives an alert asking them to accept the transfer. This example shows what the user sees if they are using a Mac.

Friends Share
The real power of AirDrop is sending between friends. For instance, if you are standing with your iPad next to a friend with an iPhone, you can send her a picture without both of you needing to share a common Wi-Fi network or exchanging email addresses. You just Share, select her for the AirDrop, and she accepts.
Viewing Your Mac’s Files with iCloud Drive
If you are a Mac user, you are probably already familiar with iCloud Drive. This special folder on your Mac enables you to store files in the cloud and access them on your other Macs. It is very useful if you have both a desktop and a laptop Mac.
You can also access your iCloud Drive files on your iPad. If you are using iCloud Drive on your Mac, then you can see all your iCloud Drive files on your iPad. In particular, it gives you access to text files, images, and PDFs, which can all be viewed inside the iCloud Drive app. Other file types can be opened in other apps.
Freely Move Between Machines
If your Mac is running Mac OS Sierra or newer, you can even see your Desktop and Documents folders and their contents in the iCloud Drive app on your iPad. You can easily move between these devices with iCloud Drive and work on the same files. You don’t need to take any manual steps to keep these files in sync; as long as you are connected to the Internet, iCloud takes care of it for you. Just move between your Mac and iPad as you’re working. And if you have an iPhone with iOS 10, then you can bring that into the mix as well.
Accessing Your Files
Here is how to access your iCloud Drive files.
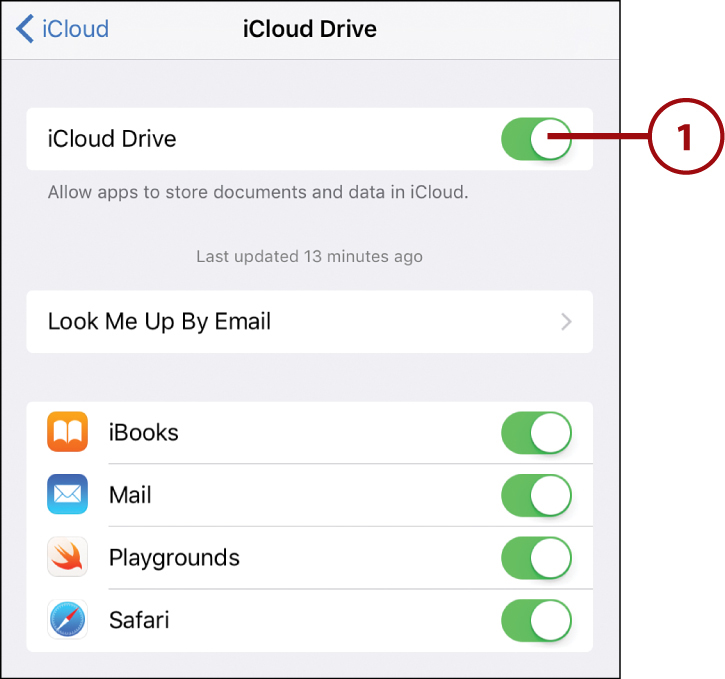
1. Open the Settings app and go to iCloud, iCloud Drive. You see a switch to turn on iCloud Drive access. It should be on by default.
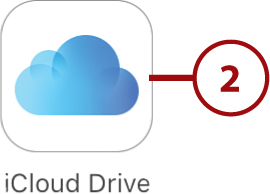
2. Find the iCloud Drive icon on your Home Screen and tap it.
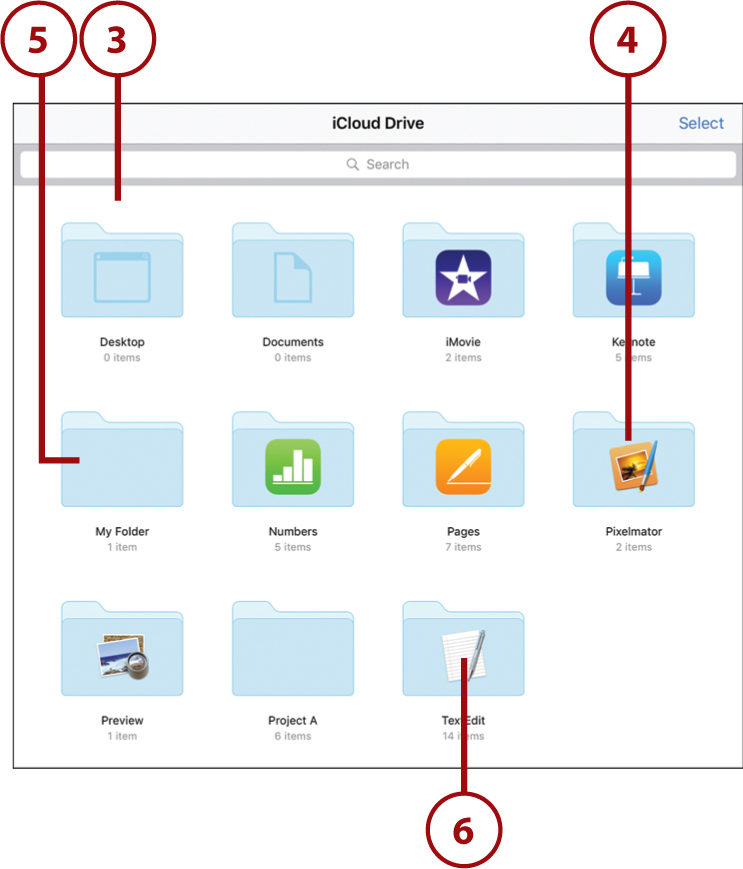
3. The iCloud Drive app shows your iCloud Drive folders. This should match what you see on your Mac in iCloud Drive. You see some special default folders, like the one for Pages.
4. You also see folders created by third-party Mac apps you may have that use iCloud Drive, such as the image editing app Pixelmator.
5. If you have created any general use folders on your iCloud Drive, you see those, too. You can tap them to dig down to the folders and files inside.
6. You also see folders for Mac apps, such as Preview and TextEdit, that have no iPad equivalent. But you can still access the files inside with the iCloud Drive app. As an example, suppose you have a Preview document. You would tap this folder to view the file.
7. The next screen shows a list of files. In this case, there is only one: a PDF file. Tapping it opens the file, if it has a supported app for it.
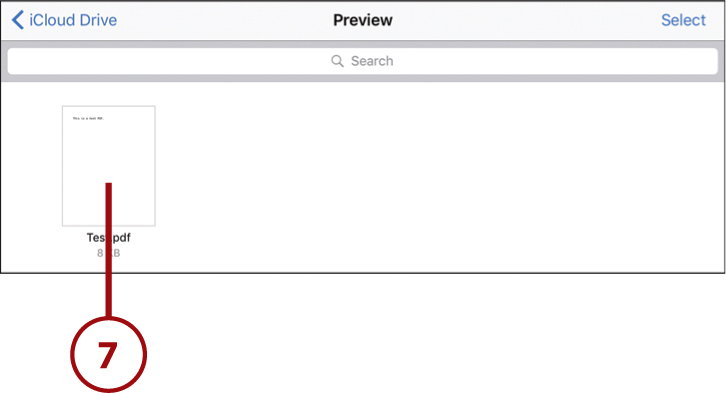
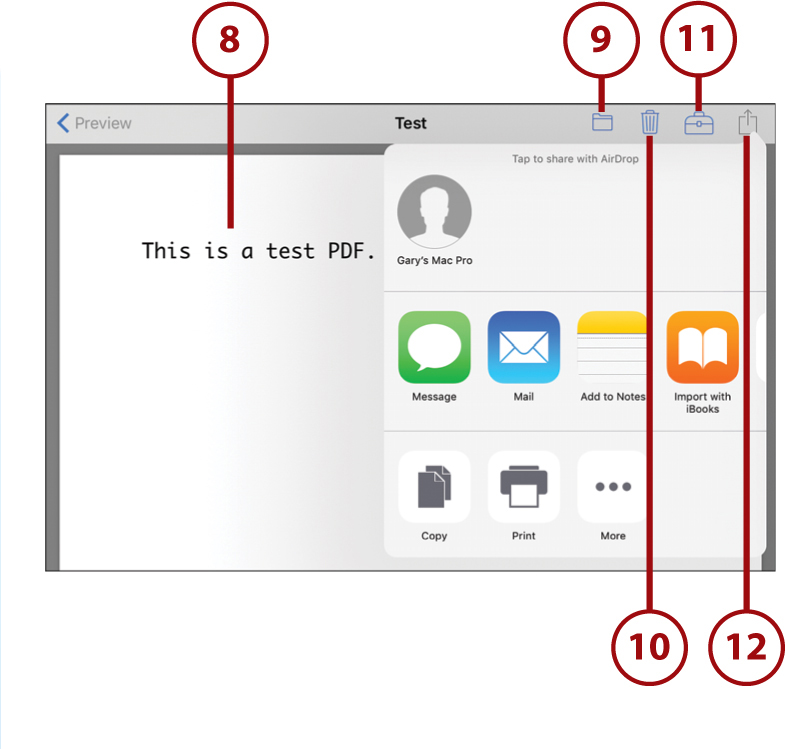
8. Although the iCloud Drive app does not allow you to edit or do much else with PDF files like this one, you can at least view it.
9. You can also move the file to a new location inside your iCloud Drive. This change is reflected on other iOS devices and your Mac.
10. You can also delete the file. This deletes it from iCloud Drive, so it also disappears from your Mac.
11. The toolbox button allows you to annotate PDF files. Other buttons might be visible here when you’re viewing a different type of file.
12. The Share button lets you send the file using Messages, Mail, or AirDrop. You can also open the file in other apps. In this case, a PDF can be opened by iBooks.
Opening Files
The iCloud Drive app acts as a simple viewer for files like PDFs, text files, Word docs, images, and so on. You can use step 12 to open those files in appropriate apps, if you have them installed.