7. Surfing the Web

In this chapter, you learn about Safari, the browser built in to the iPad. You can use it to browse the Web, bookmark web pages, fill in forms, and search the Internet.
![]() Bookmarks, History, and Reading List
Bookmarks, History, and Reading List
The iPad is a beautiful web-surfing device. Its size is perfect for web pages, and your ability to touch the screen lets you interact with content in a way that even a computer typically cannot.
Getting Started with Safari
Undoubtedly, you know how to get to web pages on a computer using a web browser. You use Safari on your iPad in the same way, but the interface is a little different.
At the top of the Safari browser is a toolbar with just a few buttons. In the middle, the largest interface element is the address field. This is where you can type the address (URL) of any web page on the Internet, or enter a search query.
A URL is a Universal Resource Locator. It can be a website name or a specific page in a website. Here are some helpful tips for entering URLs in Safari:
• For most websites, you don’t need to type the “www.” at the beginning. For instance, you can type www.apple.com or apple.com, and both take you to Apple’s home page. You never need to type “http://” either, though occasionally you need to type “https://” to specify that you want to go to a secure web page.
• Instead of typing “.com.” you can tap and hold the period button on the iPad keyboard. You can select .com, .edu, .org, .us, or .net.
Browsing to a URL and Searching
1. Tap the Safari icon on your iPad to launch the browser. Unless you have rearranged your icons, the icon is located at the bottom of the screen, along with your other most commonly used applications.
2. Tap in the field at the top of the screen. This opens the keyboard at the bottom of the screen. If you were already viewing a web page, the address of that page remains in the address field. Otherwise, it will be blank.
Clear the Slate
To clear the field at any time, tap the X button located inside the field all the way to the right.
3. Start typing a search term or a URL such as apple.com or macmost.com.

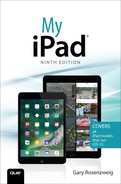
4. The area to the right of where you are typing will fill with a complete address and description, trying to predict the URL you want. You can ignore this and keep typing until you have completed the URL. You can then skip to step 6.
5. As you type, suggestions based on previous pages you have visited and past web searches from other users appear. You might also see suggestions for apps you can install. To go directly to one of these pages, tap the page in the list. Skip to step 7.
Search This Page
Below the Google suggestions in the search suggestions drop-down menu is a list of recent searches and the occurrences of the phrase on the web page you are viewing. Use the latter to find the phrase on the page.
6. Otherwise, tap the Go button on the keyboard when you finish typing. If you typed or selected a URL, you will be taken to that web page.
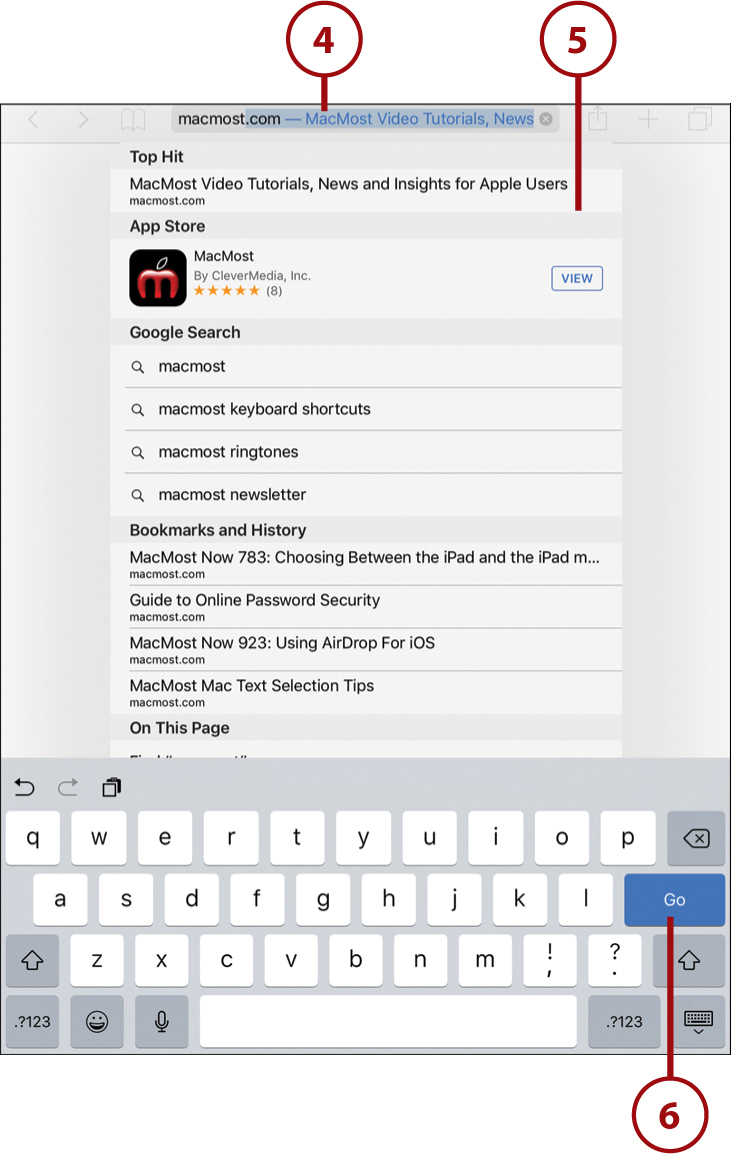
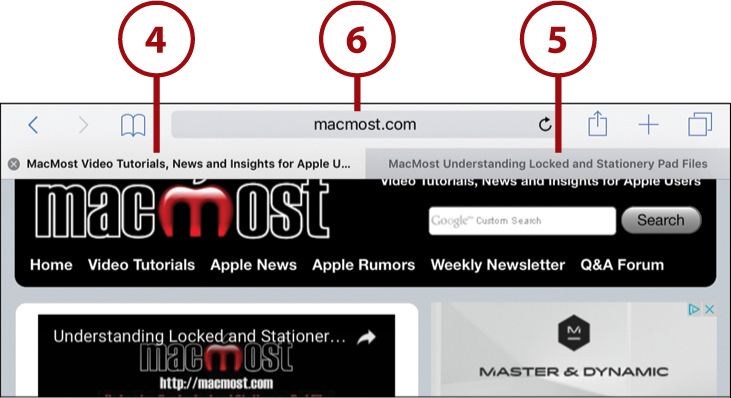
7. Notice that the address field at the top of the screen shows you the domain name for the website you are visiting, but doesn’t display the complete URL of the specific page of that site you are on.
If you typed a search term, or selected a search from the list, the term remains at the top and you get a page of search results.
8. Tap any result to jump to that page.
You can use Siri to search the web, even if you are not currently looking at the Safari screen. Sometimes Siri will also answer general questions by suggesting a web search. The following are some example search phrases you can use:
“Search the web for iPad tutorials.”
“Search for local plumbers.”
“Search for MacMost.com.”
“Search Wikipedia for Paris.”
“Show me some websites about geology.”
“Google Denver news.”
“Search for iPad tutorials on MacMost.com.”
Nothing Special, Please
Some websites present you with a special iPad version of the site. This is not as common as the special iPhone or iPod touch versions that many sites offer. If a website does not look the same on your iPad as it does on your computer, you might want to check to see if there’s a link on the web page to view the standard web version, instead of a special iPad version. You can also tap in the address field in Safari, and then drag down on the list of Favorites that appears to reveal a Request Desktop Site option. This is especially useful if a site has lumped the iPad together with the iPhone and provided a needlessly simplified version.
Viewing Web Pages
Whether you typed in a URL or searched for a web page, after you have one open on your iPad screen, you can control what you view in several ways. You need to know these techniques to view the complete contents of a web page and navigate among web pages.
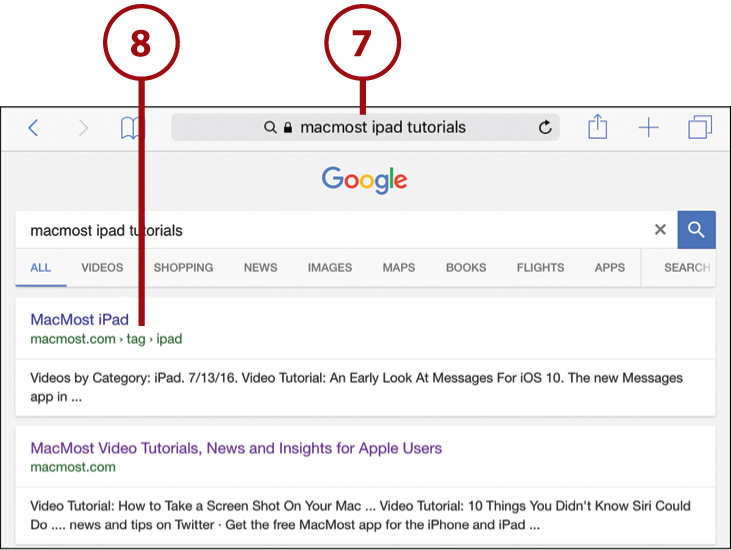
1. Navigate to any web page using either of the two techniques in the previous step-by-step instructions. When you arrive at the page, only the domain name shows at the top.
2. When you are viewing a page, you can touch and drag the page up and down with your finger. As you do so, notice the bar on the right side that gives you an indication of how much of the complete web page you are viewing at one time.
3. To zoom in on an area in the page, touch the screen with two fingers and move your fingers apart (unpinch). You can also move them closer together (pinch) to zoom back out. A double-tap restores the page to normal scaling. This works well on websites made for desktop computers, but mobile sites usually are set to already fit the screen at optimal resolution.
4. You can also double-tap images and paragraphs of text to zoom in to those elements in the web page. A second double-tap zooms back out.
5. While zoomed in, you can also touch and drag left and right to view different parts of the web page. You see a bar at the bottom of the screen when you do this, just like the bar on the right side in step 2.

6. Tap a link to move to another web page from the current web page. Links are usually an underlined or colored piece of text; however, they can also be pictures or button-like images.

Opening Multiple Web Pages with Tabs
Safari on the iPad enables you to open multiple web pages at the same time. You can view only one at a time, but you can hold your place on a page by opening a new tab to look at something on another page.
1. View a web page in Safari that has links to other pages, such as MacMost.com. Instead of tapping on a link, tap and hold on a link until a contextual menu pops up above your finger.
2. Tap Open in New Tab.
3. Alternatively, you can tap the + button at the top of the screen to open a new tab that shows icons linking to the websites you have put in your Favorites.

4. You see two tabs at the top of the screen. The one on the right is in front of the one on the left and represents the visible page. You can tell which tab is the active one—it is in a lighter shade of gray than the others, and the Close Tab button (shown as an X) is visible.
5. You can switch tabs by tapping on the other tab; that tab now appears in front of the one on the right, and the screen area below shows that page.
6. When you enter a new web address, search, or use a bookmark, it changes the page of the current tab, but doesn’t affect the other tab.
7. You can close the current tab by tapping the X button to the left of the tab’s name.
8. Tap the Tabs button at the upper right to see all your tabs presented on one screen.

9. Tap any tab to jump to it.
10. The titles of tabs open on other devices using the same iCloud account are listed. The size of these previews adjusts depending on how many tabs are open. Tap an item in the list to open its page on your iPad.
11. Tap Done to return to the tab you were viewing previously.

Private Browsing
When you use the tabs screen to select which tab to view, you also see a Private button at the top. Tap that and a new tab opens in private browsing mode. Web pages you view in this tab are not stored in your history. In addition, browser cookies are deleted after you close the tab. This does not hide your browsing behavior from your ISP or employer, but it could help you keep the surprise when buying a birthday present for someone who uses the same iPad.
Viewing Articles with Safari Reader
Web pages on the iPad can be vibrant and pretty. But sometimes the website tries to cram so much text and other junk onto a page that it can be painful to read. You can clear away all the clutter to reveal the text of a news article or blog post using the Reader feature.
1. Look for the Reader button in the address field. If it is there, that means you can tap it to switch to Reader mode for this article.

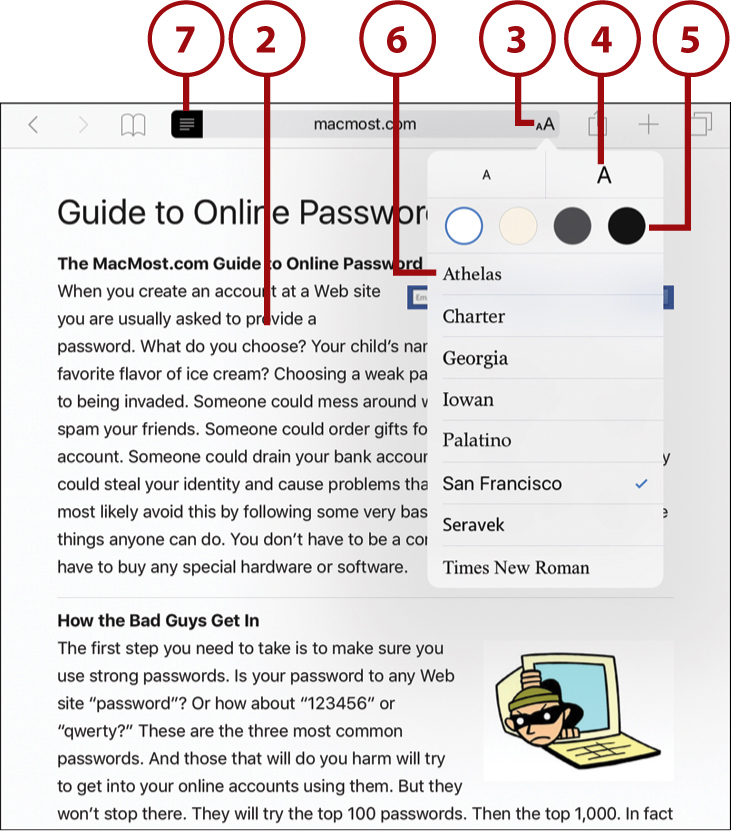
2. In Reader mode, only the text and inline images of the article appear.
3. Tap the text appearance button to view options.
4. Tap the large or small “A” buttons to make the text size larger or smaller.
5. Tap the background color buttons to adjust the background.
6. Tap a font to change to that font.
7. Tap Reader again to return to the regular view of the page.
Bookmarks, History, and Reading List
You can always visit a web page by typing its address in the field at the top of Safari. But the app also has a way for you to get to your most frequently visited sites easily, find a page you recently visited, or save a page to read later.
Using Bookmarks and Favorites
Bookmarks allow you to save the web pages you visit most often and then access them with just a few taps. Favorites are bookmarks that appear at the top of the Safari browser for easier access.
1. Use Safari to navigate to any web page.
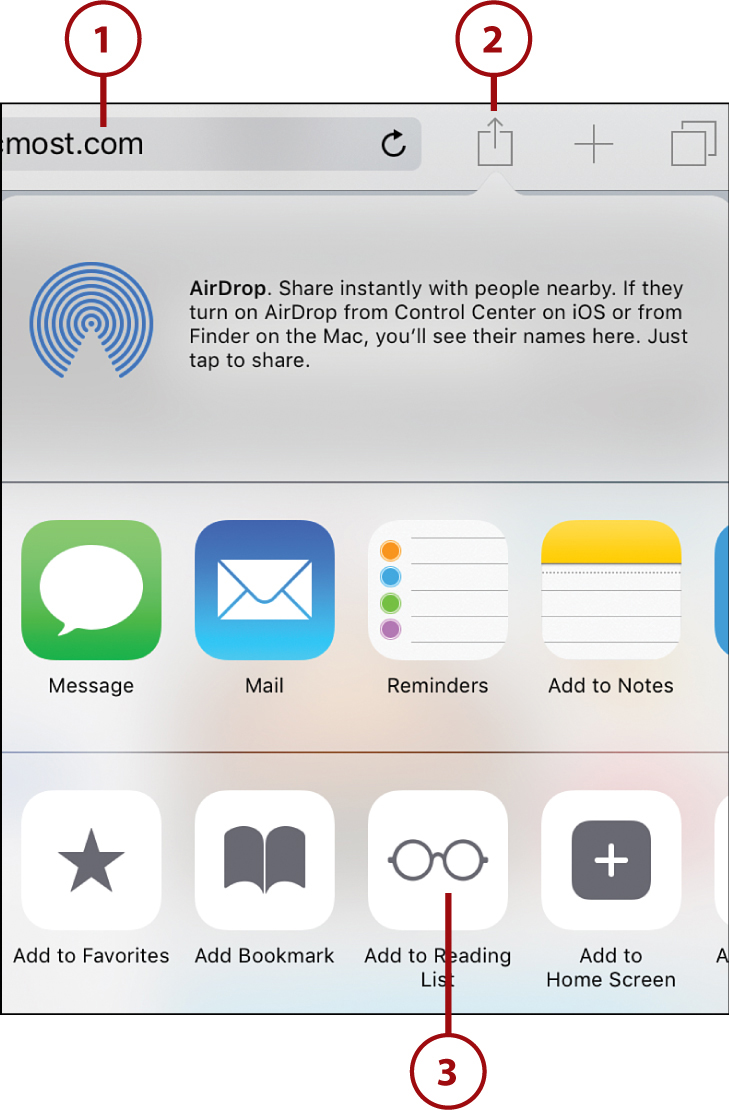
2. Tap the Share button at the top of the screen.
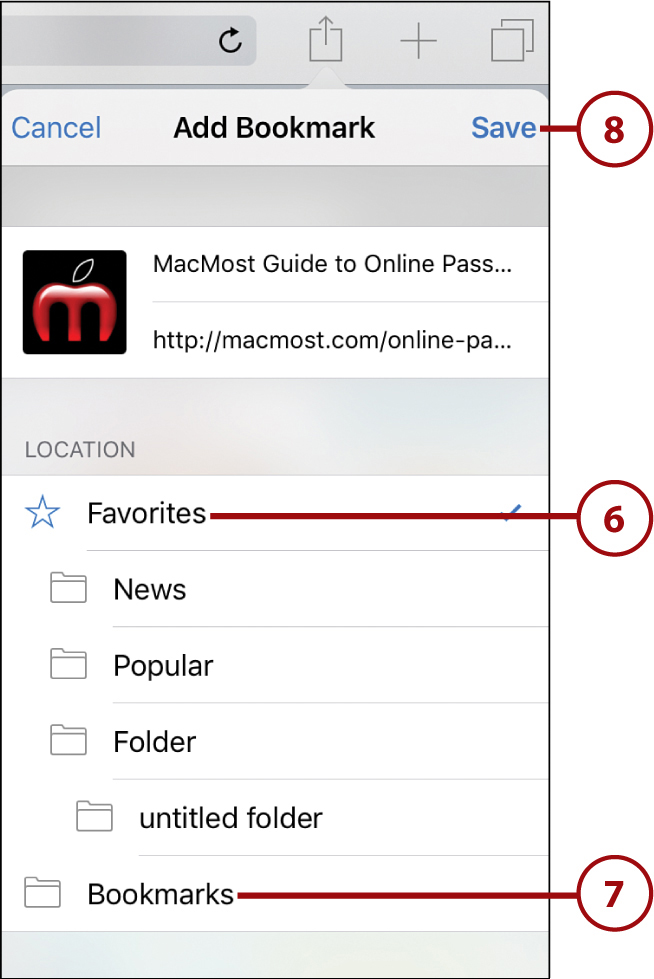
3. Tap Add Bookmark.

4. Edit the title of the bookmark. The official title of the web page is prefilled, but you can use the keyboard to change it. You can tap the X to clear the text and start fresh.
5. Tap a location, such as Favorites, to place the bookmark in a bookmarks folder.

6. You can choose to place the bookmark in Favorites, so it appears at the top of the Safari window where you can easily find it.
7. Or you can put it in Bookmarks, where you can select it from the Bookmarks menu.
8. Tap Save to finish creating the bookmark.
9. To use a bookmark, first tap the Bookmarks button. This opens up a sidebar on the left. In vertical orientation, this sidebar closes when you choose a web page to view. In horizontal orientation, the sidebar stays until you tap the Bookmarks button again.
10. Find the bookmark in the list and tap it to go to that web page.
11. Alternatively, if you put the bookmark in Favorites or another folder, such as in step 6, you have to tap that folder name first to dig down to find the bookmark.

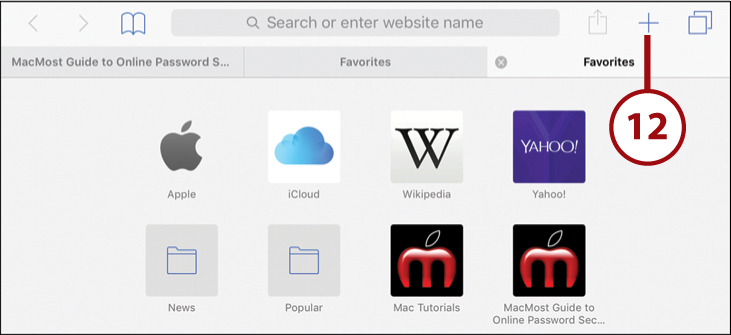
12. When you create a new tab, the bookmarks you put in your Favorites folder appear as icons for quick access to those pages. For more about tabs, see “Opening Multiple Web Pages with Tabs” earlier in this chapter.
Using History
Safari keeps track of which web pages you have visited. You can use this history to find a page you went to earlier today, yesterday, or even several days back.
1. After using Safari to view several pages, tap the Bookmarks button at the top of the screen.
2. Tap the first tab at the top of this menu to view your bookmarks and history folders.
3. If the top of the menu reads History instead of Bookmarks, then you are already viewing your history. Otherwise, tap the History item to go into your history. It is also possible that you have dug down into a bookmarks subfolder. If you see a label with a left-facing blue arrow at the top of the list, tap it to move up a level until you get to the main bookmarks list that includes Favorites and History.
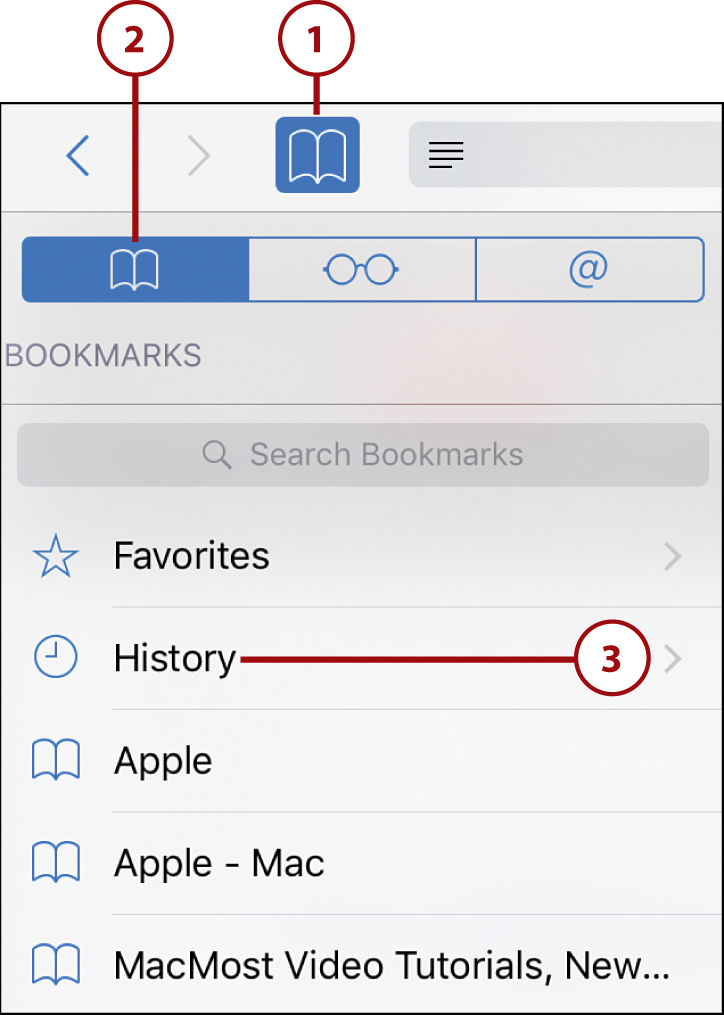
4. Tap any item in the list to jump to that web page.
5. Previous pages you have visited are broken into groups by date.
6. Tap the Clear button if you want to clear out your browsing history. For instance, are you about to hand your iPad to your spouse right after shopping for their birthday present?

History/Bookmarks
Safari treats both history and bookmarks the same. Both are just lists of web pages. Think of your history as a bookmark list of every site you have visited recently. If you think you might need to go to a web page later the same day or this week, you can always use your History instead of creating a new bookmark. Use bookmarks only for truly important pages that you know you’ll need often or later on.
Deleting Your Bookmarks
Adding and using bookmarks is just the start. You eventually need to delete ones you don’t use. Some might link to missing or obsolete pages, or some you simply no longer use.
1. Tap the Bookmarks button at the top of the Safari screen.
2. Navigate to the Bookmarks section of that menu. If the bookmark you want to delete is in a folder, tap that folder to navigate into it so you can see the bookmark.
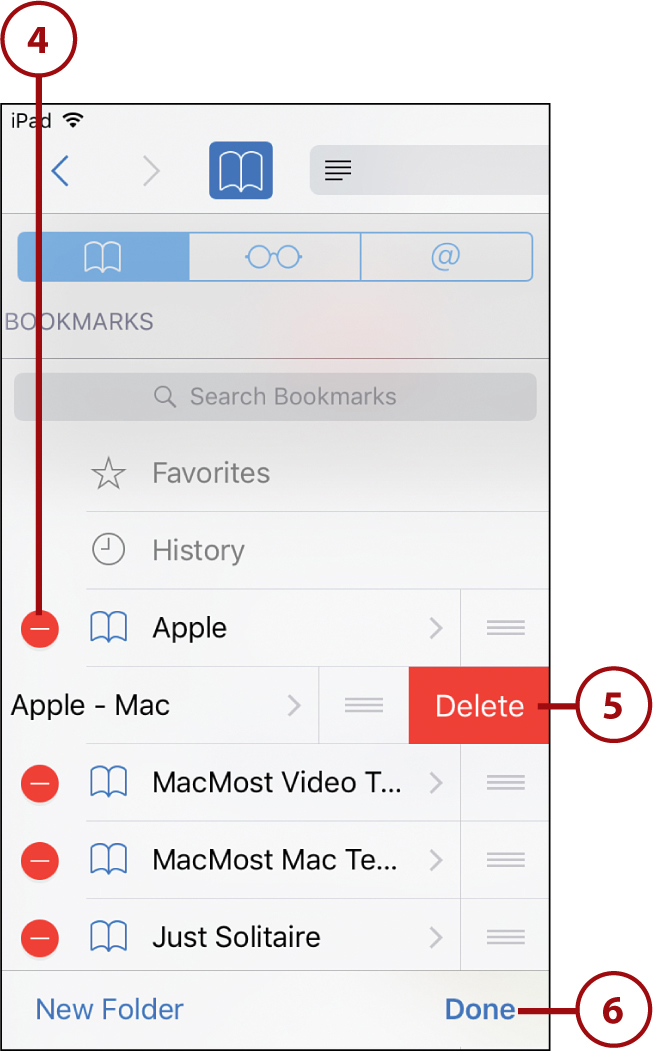
3. Tap Edit.

4. Tap the red – button next to a bookmark.
5. Tap the Delete button to remove the bookmark. The bookmark is instantly deleted.
6. Tap Done when you finish deleting bookmarks.
Sync Your Bookmarks
If you are using iCloud, your bookmarks should sync between all your iOS and Mac devices. Safari on your computer gives you greater control over moving and deleting bookmarks. If you do your wholesale editing on your computer, those changes should be reflected in your iPad’s bookmarks as well.
Creating Home Screen Bookmarks
If a web page is so important to you that you want even faster access to it than via a browser bookmark, you can save it as an icon on your iPad’s Home screen.
1. Use Safari to navigate to any web page.
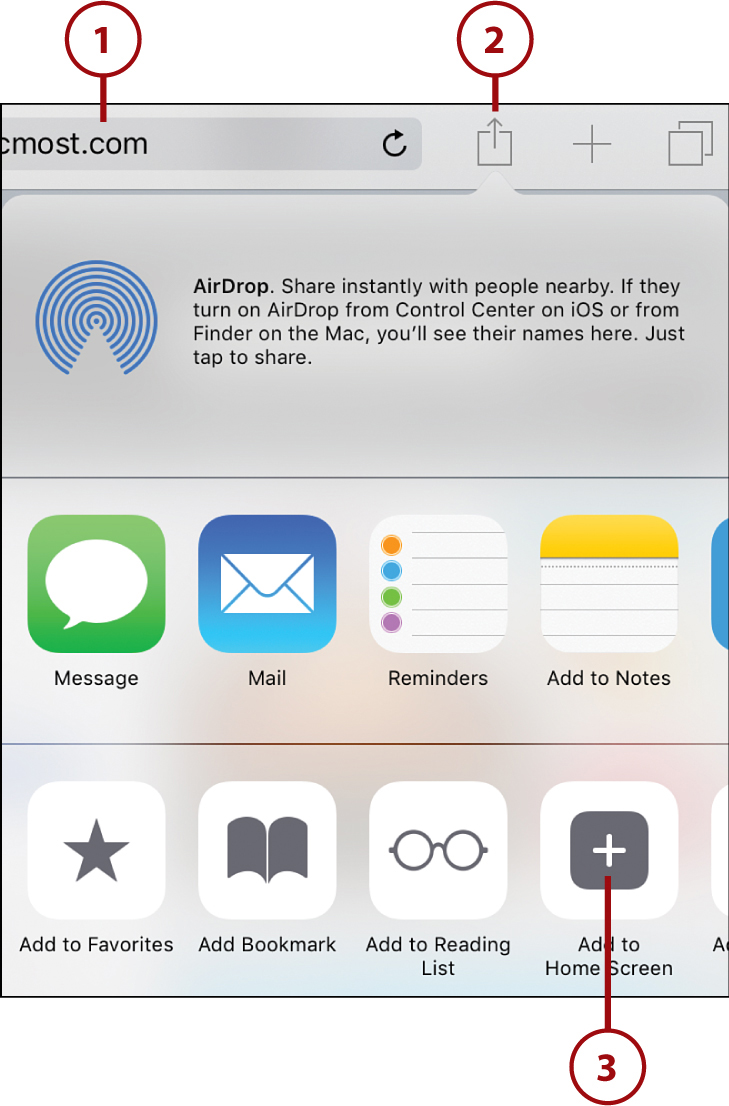
2. Tap the Share button at the top of the screen.
3. Tap Add to Home Screen. Note that the icon shown here changes to use the icon for that website or to a small screen capture of the site.
Managing Home Screen Bookmarks
You can arrange and delete Home screen bookmarks in the same way you work with app icons. See “Arranging Apps on Your iPad” in Chapter 15 for details.
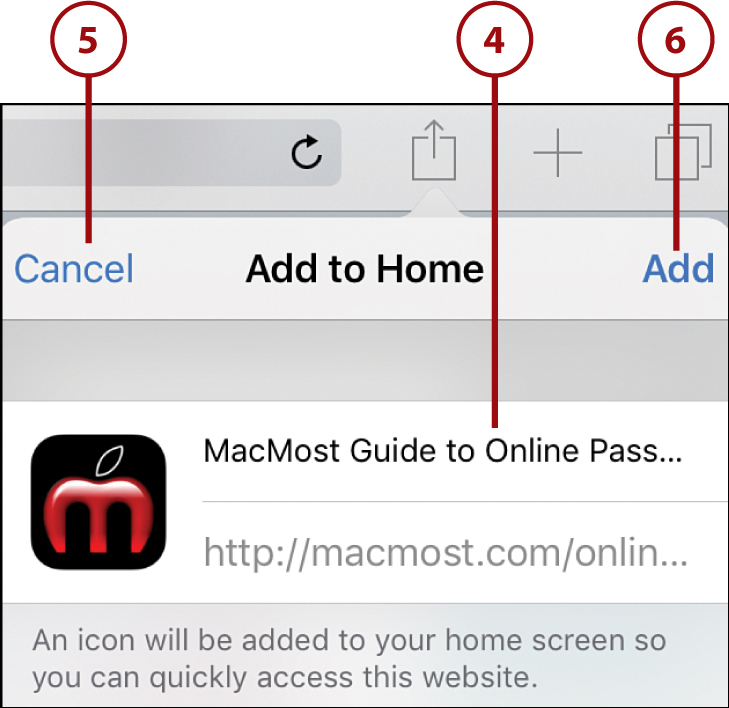
4. You can now edit the name of the page. Most web page titles are too long to display under an icon on the Home screen of the iPad, so edit the name down to as short a title as possible.
5. You can tap Cancel to leave this interface without sending the bookmark to the Home screen.
6. Tap Add to complete adding the icon to the Home screen.
7. Press the Home button to return to your Home screen (not shown).
8. Look for the new icon on your Home screen that represents the bookmark you added. You might need to swipe through the pages of your Home screens to find it. Then, you can move it to any page or into a folder. The icon acts just like the app icons on your Home screen. See “Arranging Apps on Your iPad” in Chapter 15.
Website Icons
The icon for this type of bookmark can come from one of two sources. Web page owners can provide a special iPhone/iPad icon that would be used whenever someone tries to bookmark her page.
However, if no such icon is provided, your iPad takes a screen shot of the web page and shrinks it down to make an icon.
Building a Reading List
Your reading list is similar to bookmarks. You can add a page to your reading list to remember to return to that page later. When you do, it is removed from the Unread section of your reading list, but still appears in the All section.
1. Find an article you want to read later.
2. Tap the Share button.
3. Tap Add to Reading List.
4. Tap the Bookmarks button to see your reading list.
Take it Offline
Pages you add to your reading list are downloaded to your iPad so that you can read them later, when you’re not connected to the Internet.
5. Tap the Reading List button.
6. Tap any item to view the page. Even if you are not connected to the Internet, the page still shows because Safari stored the content when you added the page to the Reading List. You can also swipe left to Delete an item.
7. At the bottom you see either Show All or Show Unread. This lets you switch between the two lists. Show All shows everything in your Reading List. Show Unread does not show items you have already opened from the Reading List.

Reading List Syncing
The Reading List also syncs across your iOS devices and Macs using iCloud. So you can add it on your Mac and then see it appear in your Reading List on your iPad.
Shared Links
In addition to Bookmarks and Reading List, there is a third button that looks like an @ symbol that appears only if you are signed into social media networks like Twitter or Facebook in the Settings app. Here you find shared links. Recently shared links from those networks appear in this list.
Working with Web Forms
The Web isn’t a one-way street. Often you need to interact with web pages, filling in forms or text fields. Doing this on the iPad is similar to doing it on a computer, but with a few key differences.
The keyboard shares screen space with the web page, so when you tap on a field, you bring up the keyboard at the bottom of the screen.
Also, pull-down menus behave differently than they do on a computer. On the iPad, you get a special menu showing you all the options.
Filling in Web Forms
1. Use Safari to navigate to a web page with a form. For demonstration purposes, try one of the pages at http://apple.com/feedback/.
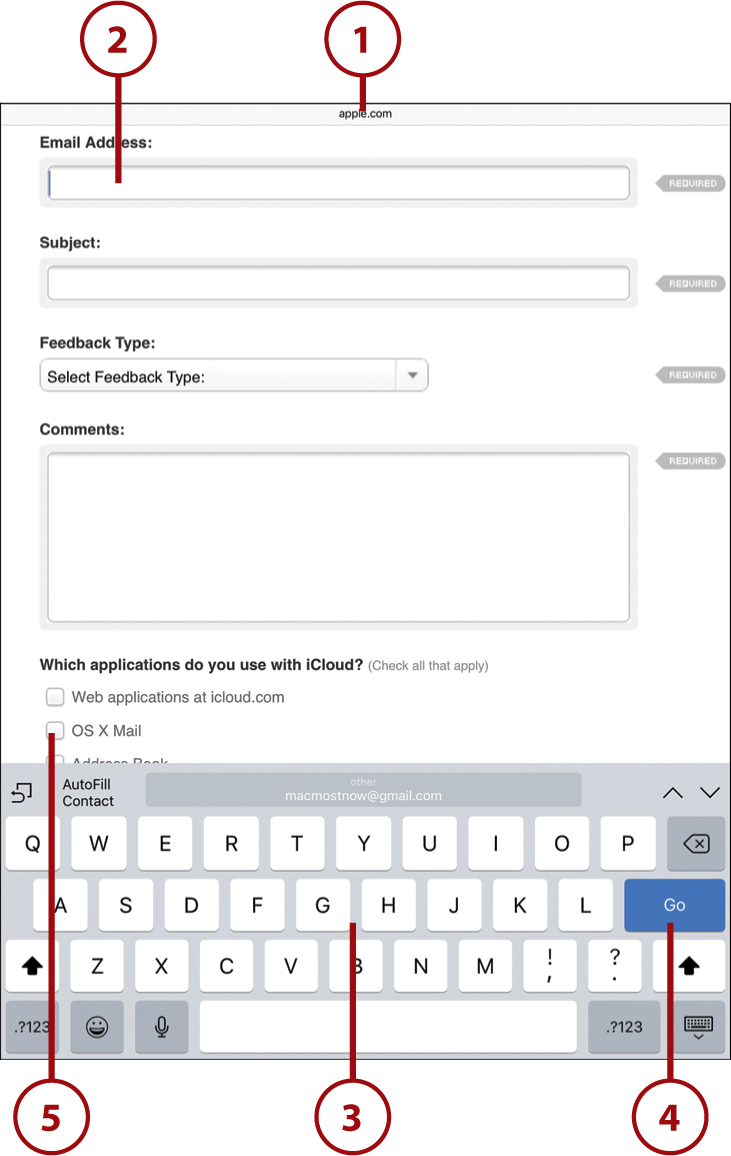
2. Tap a field to type in it. The keyboard appears at the bottom of the screen.
3. Use the keyboard to type text into the field. The features of the keyboard depend on cues from the website. For instance, a site can set a text field to only accept numbers, in which case you see a numeric keyboard instead of a full keyboard.
4. Tap the Go button when you finish filling in all the required fields.
5. Select a check box or radio button by tapping it just as you would use your mouse to click it on your computer.
6. Tap a menu to select an item in a pull-down menu.
7. The special iPad pull-down menu reacts like any other iPad interface. You can tap an item to select it. You can touch and drag up and down to view more selections if the list is long.
8. A check mark appears next to the currently selected item. Tap that item or any other one to select it and dismiss the menu.

Some websites use special menus that they build from scratch, rather than the default HTML menus. When this is the case, you get a menu that looks exactly like the one you get when viewing the web page on a computer. If the web page is well coded, it should work fine on the iPad, though it might be slightly more difficult to make a selection.
Saving Time with AutoFill
When you go to websites and fill out forms, it can be annoying to type basic information like your name and address, or your user ID and password. Furthermore, if you have to type your password every time you visit a site, or even on a daily or weekly basis, this encourages you to use simple, easy-to-guess passwords so you don’t have to type long complex strings of characters.
The Keychain function built into Safari allows you to automatically fill in forms and login prompts. After you enter your information the first time, you never have to do it again for that website.
1. Tap Safari in the Settings app.
2. Tap AutoFill.

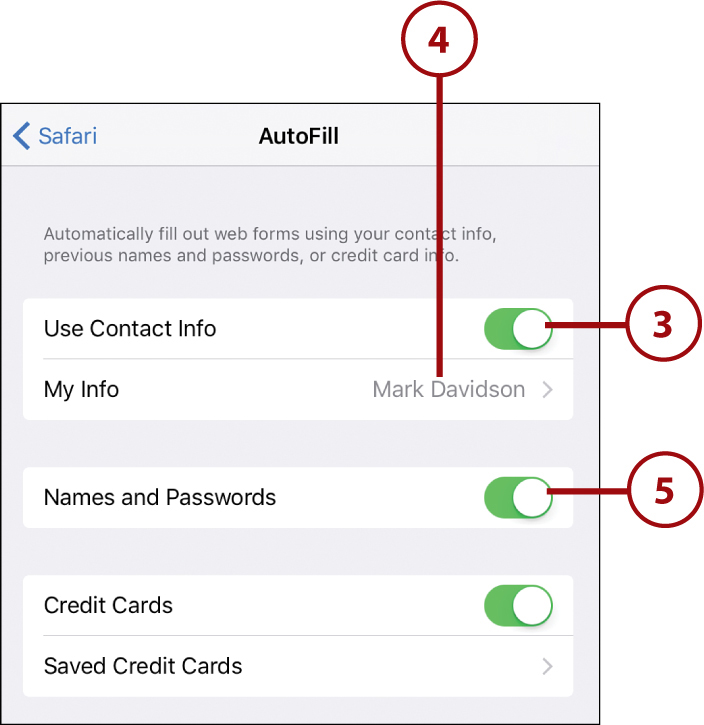
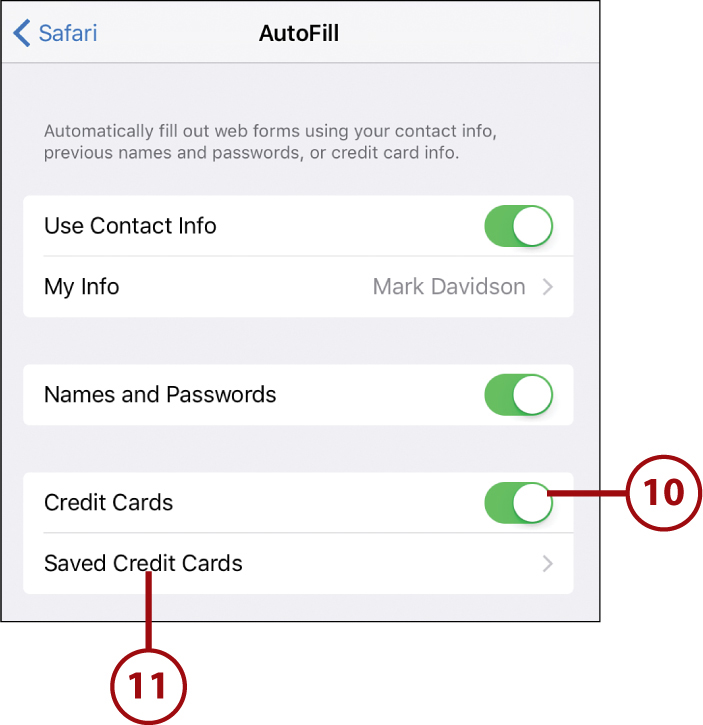
3. Slide the Use Contact Info switch on, if it’s not. Now any time you go to a web page with a form that asks for basics like name, address, or telephone number, AutoFill uses your contact information in the Contacts app to fill those fields automatically.
4. Tap My Info to tell Safari which contact in the Contacts app is you.
5. Slide the Names and Passwords switch on to have Safari remember user IDs and passwords when you log on to websites. As you see in the next section, Safari prompts you each time you enter a new User ID and Password so you can decide the passwords that are saved.
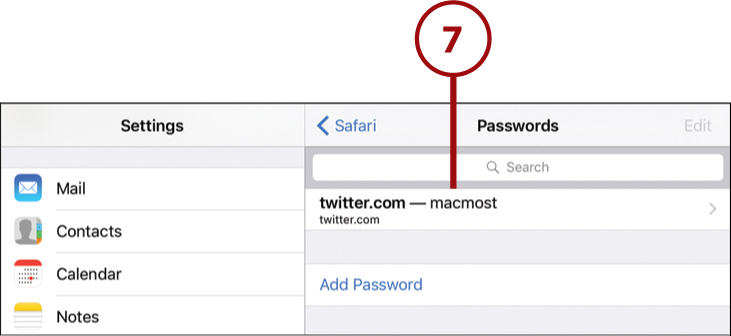
6. After you have visited some sites and saved some passwords, you can access the list of saved passwords by going back to the main Safari settings screen and tapping Passwords.
7. Tap any entry to view the ID, password, and the website it belongs to. This can come in handy if you need to view or copy and paste a password. For instance, you can grab your Amazon password to paste it into the Kindle app.
8. Tap Edit to delete entries.
9. Tap Add Password to manually enter new passwords.

10. Turn on the Credit Cards switch to have Safari remember credit card information.
11. Tap Saved Credit Cards to see a list of your saved credit cards and to add new ones. When you add a credit card, include your name, the card number, the expiration date, and a short description. However, the security code for the card is not saved. Most websites ask you for this even after Safari has autofilled the information it has saved.
Using AutoFill
After you have AutoFill set up, using it is relatively simple. You can use it with a form that asks for basic contact information, or for a login form. The process is the same.
1. Enter an ID or password at a website and tap the Sign In button, or press Return or Go on the virtual keyboard, to sign in.
2. If AutoFill is enabled, you may be prompted by Safari to save the password.
3. Tap Save Password to save the user ID and password.
4. Alternatively, tap Never for This Website to tell Safari that you don’t want to save the password for this site, and not to ask again.
5. Tap Not Now to skip this step for now. This is useful if you have multiple logons for a site and don’t want to save the one you are using at this moment.

6. Log out and then return to the same website.
7. The ID and password are already filled in. The fields turn yellow to show that AutoFill has been used to fill them in.
8. Tap the button used by the site to complete the login.
9. If your ID and password don’t appear at first, look for the Passwords button on top of the keyboard. This button also enables you to select from multiple sets of IDs and passwords if you have more than one account at the site.

Changing Passwords
So what happens if you change passwords for a site? Simply use the keyboard to erase and retype the password when logging into that site the next time. AutoFill will prompt you, asking if you want to save the new password, replacing the old one in its database.