14. Navigating with Maps

In this chapter, you learn to use the Maps app to find locations and get directions.
![]() Searching for Places and Things
Searching for Places and Things
![]() Getting a Better View with Maps Settings
Getting a Better View with Maps Settings
The Maps app is a great way to plan a trip—whether you’re going across the country or to the grocery store. You can search for locations on the map, view satellite images, see optimized driving routes, and even get information and reviews of local businesses.
New! iOS 10 Redesign
The Maps app has undergone a redesign since iOS 9. The new design features more emphasis on searching with a consistent and clean left side overlay that is used for most functions.
1. Tap the Maps app on your Home screen.

2. Type an address or the name of a place in the search field.
3. As you type, you get a list of suggestions. You can tap one of these if you notice it matches your search closely enough.
4. Otherwise, finish typing the address or name and tap the Search button on the on-screen keyboard.

What Can You Search For?
You can search for a specific address. You can also use a general area or the name of a place or person, and Maps does the best it can to locate it. For example, you can try three-letter airport codes, landmark names, street intersections, and building names. The search keeps in mind your current maps view, so if you search for a general area first, such as Denver, CO, and then for a building name, it attempts to find the building in Denver before looking elsewhere in the world.
5. The map shifts to that location and zooms in.
6. Tap the location name to get more information.
7. You see information about the location, such as the telephone number and website. You can click on these to call the location or visit the web page.
8. Tap Directions to get directions to the address.
9. Drag up to reveal more information below.

10. You can see a few reviews from Yelp, or tap Open Yelp to jump to the Yelp app. You are directed to its listing in the App Store if you don’t have it installed.
11. Tap Create New Contact or Add to Existing Contact to add the name, address, phone number, and other information to your Contacts app.
12. Tap Report an Issue to help Apple improve its maps database. If the location happens to be a business you are associated with, and you want to correct some missing or inaccurate information, this is the place to start.
13. Tap the X button to close this information overlay and see more of the map.

Want to quickly center the map on your current location? Tap the GPS button (it looks like a blue arrow) at the top-right corner of the screen. Even if your iPad doesn’t have a GPS receiver, it takes a good guess as to your current location based on the local Wi-Fi networks it can see.
Searching for Places and Things
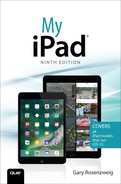
You can also use Maps to search for something that has more than one location. For instance, you could search for restaurants, grocery stores, bars, coffee shops, or even the location of Apple Stores.
1. Start in Maps. You should see the last area you were viewing. If it is not your current location, search for that location or tap the GPS button to go there.
2. Tap the search field and enter the name of a store. Don’t always restrict yourself to specific names such as “Apple store.” You can type in general terms such as “coffee” or “restaurant” to get a broader selection of results.
3. Pins appear on the map for all locations matching the search term in the general area. The locations also appear in a list, with the closest one at the top. Note that the blue dot represents your current location.
4. Tap the name for more information about that location.
The maps database is huge, which means it also contains errors. Sometimes an address is wrong or the information is out of date, so you find yourself in front of a shoe shop instead of your favorite restaurant.
Siri: Finding Map Locations
You can ask Siri to find locations even when you’re not already in the Maps app. A small map displays in the Siri interface, and you can tap it to open the Maps app, centered on that location. Try commands like:
“Where is Coors Field?”
“Show me Broadway and First Avenue on the map.”
“Map 6th and Colorado Boulevard.”
Getting Directions
Say you want to do more than just look at a location on a map—you actually want to go there. Apple Maps can help you with that by giving you turn-by-turn directions you can follow while you drive. Your iPad can even speak them out loud. However, if your iPad is Wi-Fi only, you most likely won’t have a connection while driving. In that case, you can still bring up a list of directions on your iPad before you leave home.
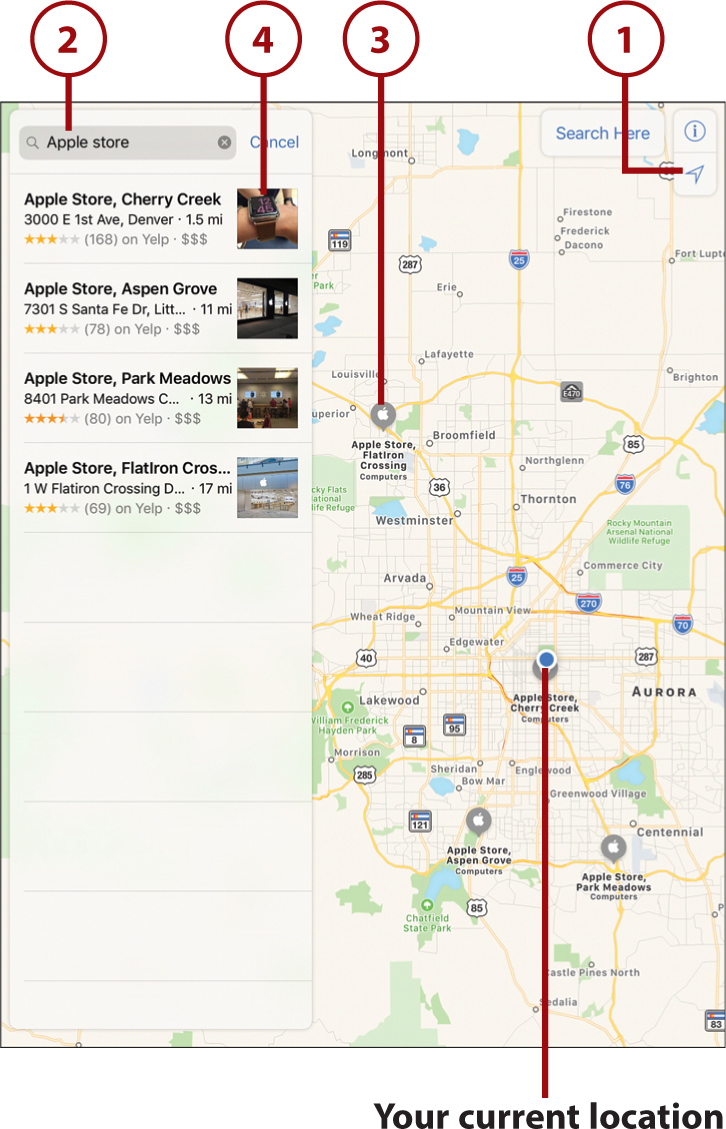
1. After searching for and finding a location, tap the Directions button.
2. At the top of the screen you see a To and a From. Usually the From field is labeled Current Location. You can tap it to search and start your trip from another location.
3. You can edit the From and To fields to change your route start and end points.
4. You can swap these two fields if your directions have you going in the wrong direction.
5. Tap Route to accept the changes and return to the previous screen.
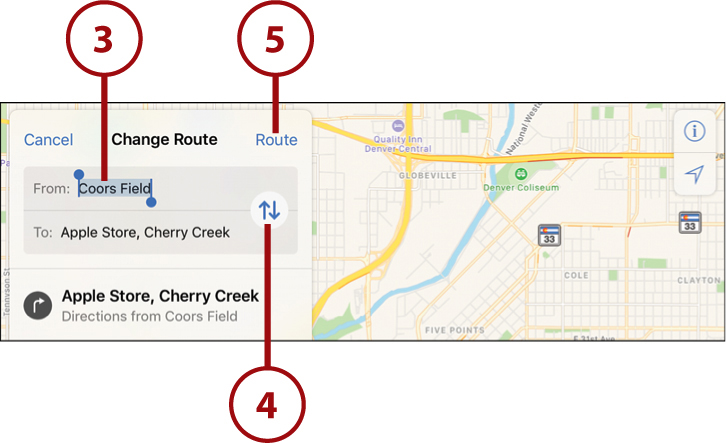
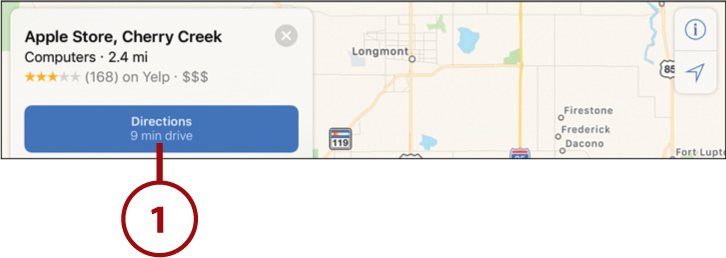
6. Tap Driving Options to change the type of route.
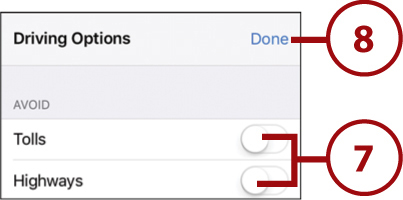
7. Tap to choose to avoid tolls or highways on your route.
8. Tap Done to return to the previous screen.
9. Tap Walk or Transit to switch from driving directions to walking or public transit directions. Apple Maps offers public transit directions only for some cities.
10. Different routes may be shown on the map, and in the list on the left. Tap in the map or on the list to pick one.
11. Tap a Go button to start the turn-by-turn directions. This is only useful if you have a mobile connection to the Internet while you are using your iPad to navigate.
12. Alternatively, tap the Details button to see a list of each step in the journey.
13. Tap the Share button under the list to print the directions, or send them to your iPhone or someone else’s iPhone via AirDrop.

Spoken Turn-By-Turn Directions
For those who have a wireless mobile connection on their iPad, directions become much more useful. You can use your mobile connection as you drive and the Maps app will follow along, updating the steps in your route as you make progress. You even get spoken directions as you approach each turn, so you don’t need to take your eyes off the road.
Siri: Getting Directions
The easiest way to get the Maps app to show you directions is to ask Siri. With or without the Maps app open, try phrases like:
“How do I get to Denver International Airport?”
“Take me to the nearest coffee shop.”
“Plot a course to Colfax Avenue and Colorado Boulevard.”
“Take me home.”
Getting a Better View with Maps Settings
The default mode of Maps shows clean colorful lines, but you can also switch to satellite views, 3D models, and even a 3D photographic view.
Using Satellite View
Satellite view is like the standard map view in that you can search for places and get directions. But you can also get a better sense of what is at a location.
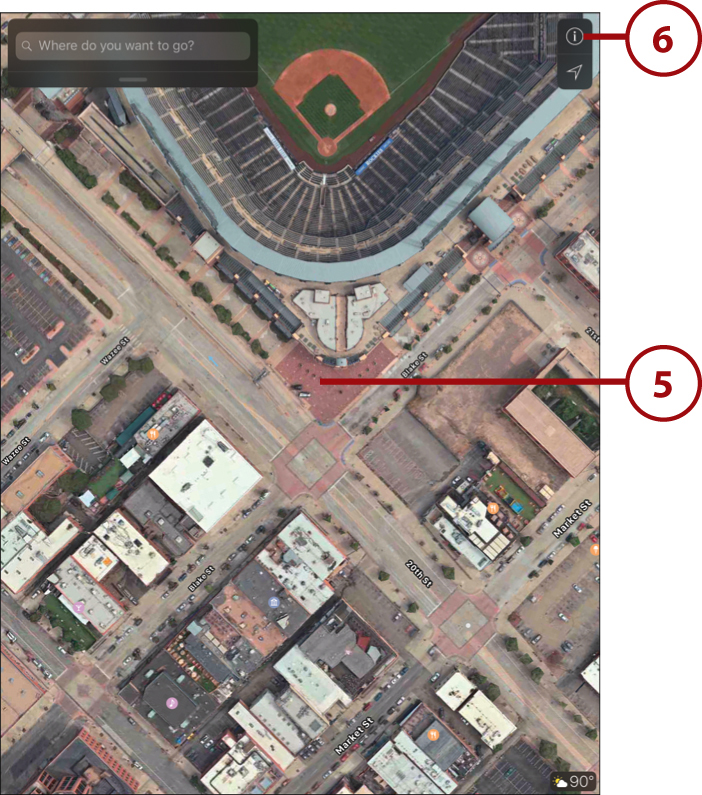
1. In Maps, tap the i button at the top right.
2. Tap Satellite to see a satellite view of your location.
3. Tap the X button to return to the map.

4. Unpinch in the center of the map to zoom in.

5. The closer view helps show you what the streets actually look like.
6. Tap the i button again and then tap Map at the top to return to the regular map view.
Using 3D View
Another way to view a map is with a 3D view. This allows you to see the height and shape of buildings to get a better understanding of the area.
1. Start by looking in Maps using the standard view. Pinch in to be fairly close to the street.
2. Drag up with two fingers to change the viewing angle of the map and initiate 3D view. If the map simply moves instead of switching to 3D, then it probably means you haven’t zoomed in close enough. It could also mean that 3D views aren’t available in this area.

3. The flat top-down view is replaced by a perspective view. Pinch to zoom in closer.
4. Larger buildings in downtown areas are now 3D objects. Use two fingers to rotate the image, and you can see the buildings from all angles.
5. Tap the info button and switch to satellite view.

6. The 3D models are replaced with textured models of buildings and terrain. You can still zoom and rotate in 3D satellite view, even getting so close to the ground that you can virtually move between buildings.
7. Use two fingers and swipe up to tilt the 3D effect for a more horizontal view.
8. Tap to turn off 3D mode and return to standard top-down flat mode.

Although 3D view is great for those of us who live in big cities, it isn’t available for every location. For there to be 3D models and textures, an Apple-hired airplane has to take pictures of your city. They have gotten a lot of the world’s major cities, but not everywhere yet.
Getting Traffic Reports
The Maps app includes a way for you to see up-to-date traffic flow and information.
1. Bring up a map view that shows some highways and major boulevards.
2. Tap the i button.

3. Make sure Traffic is turned on.
4. Tap the X button to close the Maps Settings overlay.

5. The map shows red or yellow lines where traffic is slow.
6. You can also see the locations of accidents or construction sites that are affecting traffic. Tap for details. Other symbols you see represent road closures, police activity, or other things that might affect traffic. You can tap them to see more information.
Siri: Traffic Reports
You can quickly bring up the map with traffic reports turned on by asking Siri:
“What’s the traffic like?”
“What’s the traffic like in San Francisco?”
