8. Communicating with Email and Messaging
In this chapter, you learn how to configure and use the Mail app to correspond using email and how to use the Messaging app to send and receive messages.
![]() Configuring Your iPad for Email
Configuring Your iPad for Email
![]() Expressing Yourself with Messages
Expressing Yourself with Messages
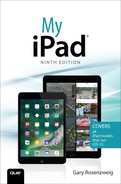
Now that you have an iPad with a battery that seems to last forever, you have no excuse for not replying to emails. You need to be comfortable using the built-in Mail app that enables you to connect with your home or work email using standard protocols such as POP and IMAP. You can even connect with more proprietary systems such as AOL, Exchange, Gmail, and Yahoo! You can also send messages to your friends using Apple’s iMessage system.
Configuring Your iPad for Email
It’s easy to set up your email if you use one of the popular email services like Gmail, Yahoo!, AOL, or Microsoft. But if you use another kind of service, such as the email given to you by your local ISP or the company you work for, you need to enter more detailed information such as server addresses.
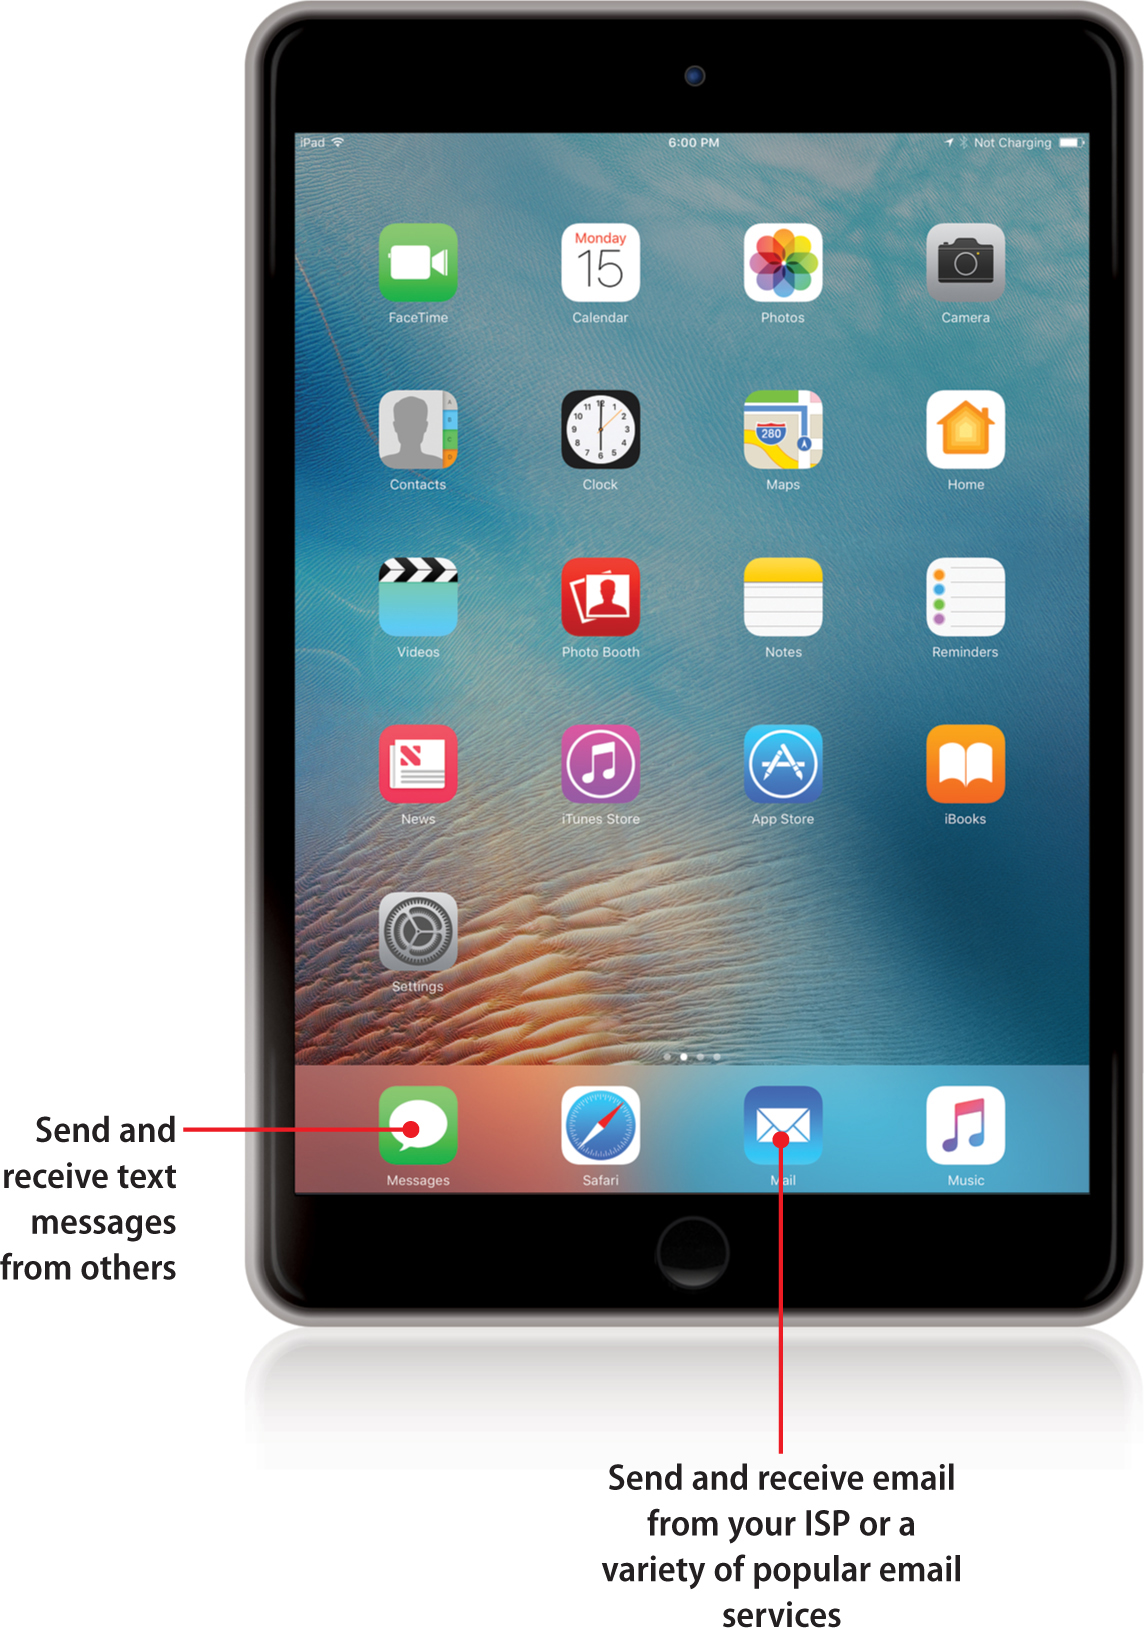
It is possible that your email account has already been set up for you. If you use Apple’s iCloud as your email service, when you answered some questions while setting up your new iPad, you probably already gave your iPad your Apple ID and password and it set up your email automatically. You can use these steps to check to make sure that account is there, or add an additional account from another provider.
If you are using iCloud, Gmail, or any of the other services listed on the Add Account screen, all you really need to do is enter your email address and password. Your iPad sets up the account from those two pieces of information. But if you are using another type of email account, you need to enter several details about your account.
Set Up Your Email Account
1. Tap the Settings icon on your Home screen.
2. Tap Mail.
3. If you are using iCloud and set up your Apple ID when you first started your iPad, you should see your iCloud account listed. If this is your only email account, you don’t need to do anything else. Otherwise, tap here to go to the next screen.

4. Tap Add Account if you have another email account you want to add.
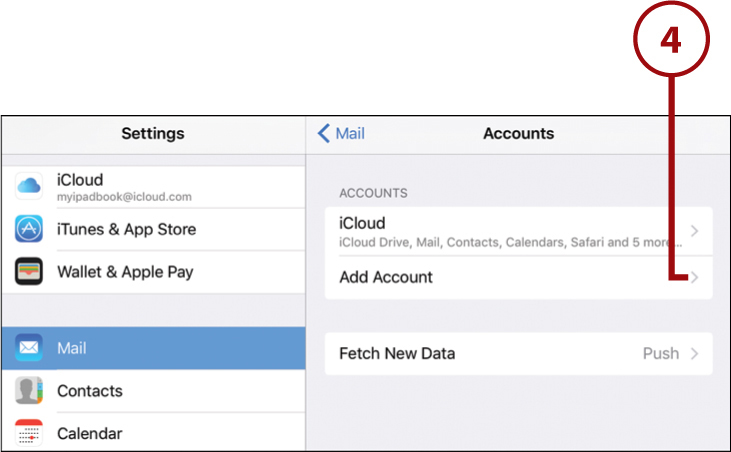
5. If you have an iCloud, Microsoft Exchange, Google, Yahoo! Mail, AOL, or Outlook.com account, tap the corresponding button. This example uses Google for a Gmail account.
Other
If your email account is from a cable or DSL internet provider, or employers (depending on their system), you need to tap Other when setting up your account. Gather information like your ID, password, email server address, and account type (such as POP or IMAP) before starting. Check with your provider’s support department if you get stuck.
6. The next screen varies depending on the service you are using. Here you can see Google’s authentication screen, so if you chose a different type of account, the screens for this step and the next few might look different.
7. Enter your email address. Make sure you enter it perfectly, as this is your ID for logging into this email service.
8. Tap Next to go to the next screen.

9. Enter your password for this email account.
10. Tap Next.

11. The next screen shows you what services the provider offers. For instance, Google’s accounts not only provide email, but also contacts, calendars, and notes. You can leave all these turned on, or turn some off if you prefer not to use a service from that provider on your iPad.
12. Tap Save to continue.

Reading Your Email
You use the Mail app to read your email, which is much easier to navigate and type with your iPad turned horizontally. In horizontal mode, you can see the list of email messages to the left while you view the email message content to the right. In vertical mode, you view only one of these at a time.
1. Tap the Mail app icon on the Home screen.
2. On the left, you see a list of incoming mail. Tap an email in the list to view it.
3. On the right, you see the selected email.
4. If you want to check for new mail, drag the list of email messages down and release. It springs back up and asks the server to see if there are new email messages.
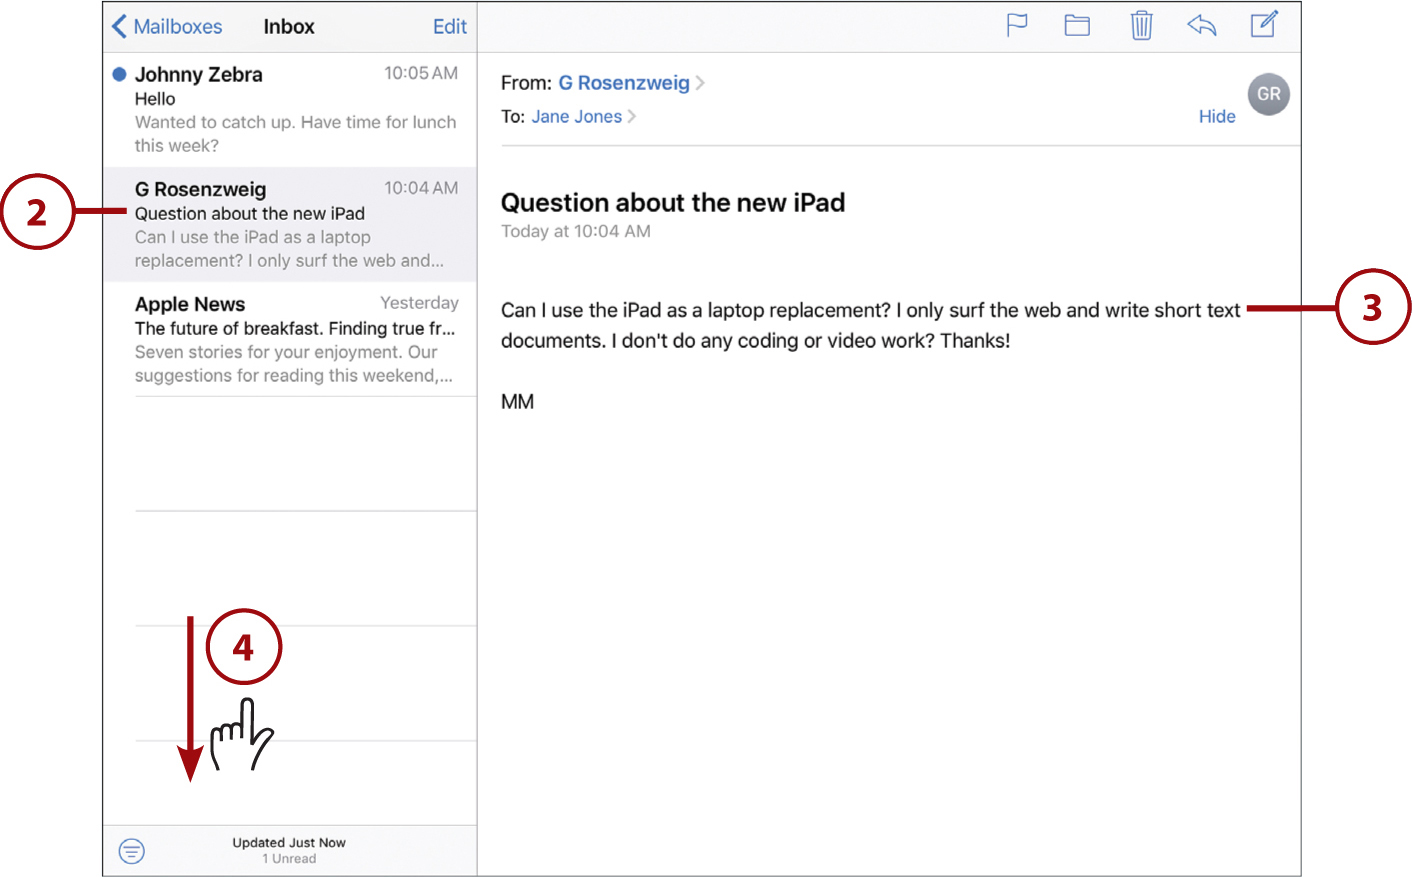
5. Tap the name or email address of the sender.
6. Tap Create New Contact to add the sender to your contacts.
7. Tap Add to Existing Contact to add the email address to a contact you already have in your Contacts app.
8. Tap the Folder button at the top of the email.

9. Tap a folder to move the current email to that folder.

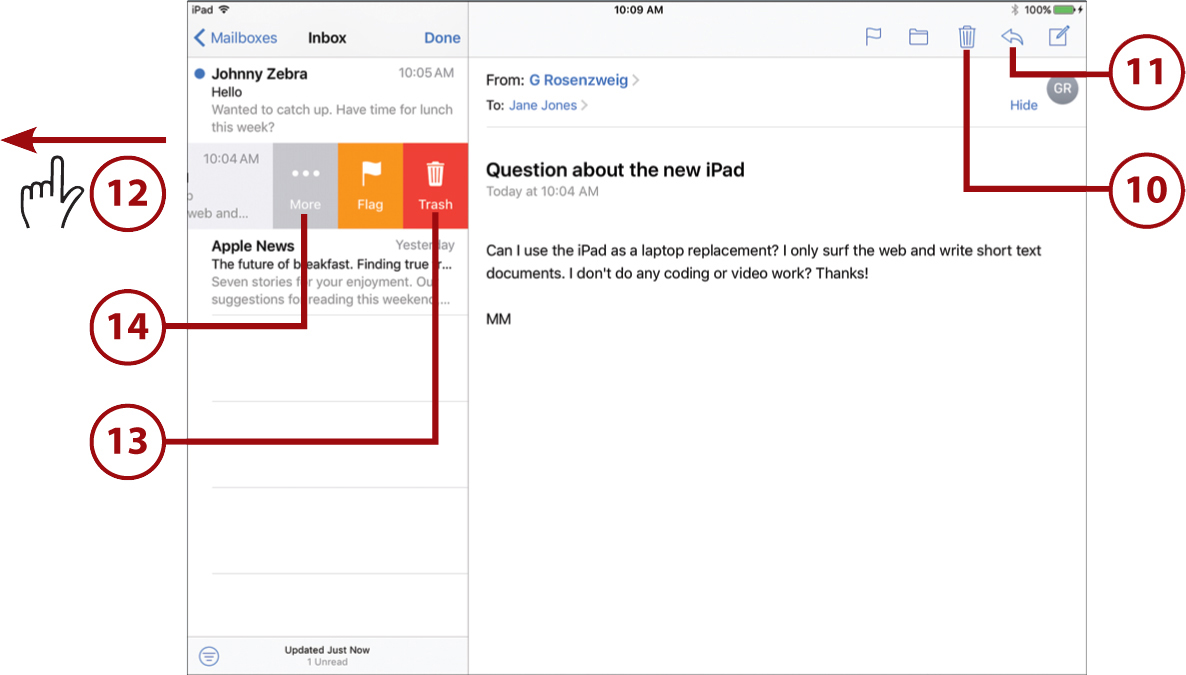
10. Tap the Trash button at the top of the email to send the email directly to the Trash folder.
11. Tap the arrow button at the top of the email to reply or forward the message.
12. If you tap and swipe right to left or left to right across the email in the left sidebar, you get more options. Be careful not to swipe too fast or instead of seeing options, you will quickly put the email in the trash.
13. Options include things like flagging or deleting the email.
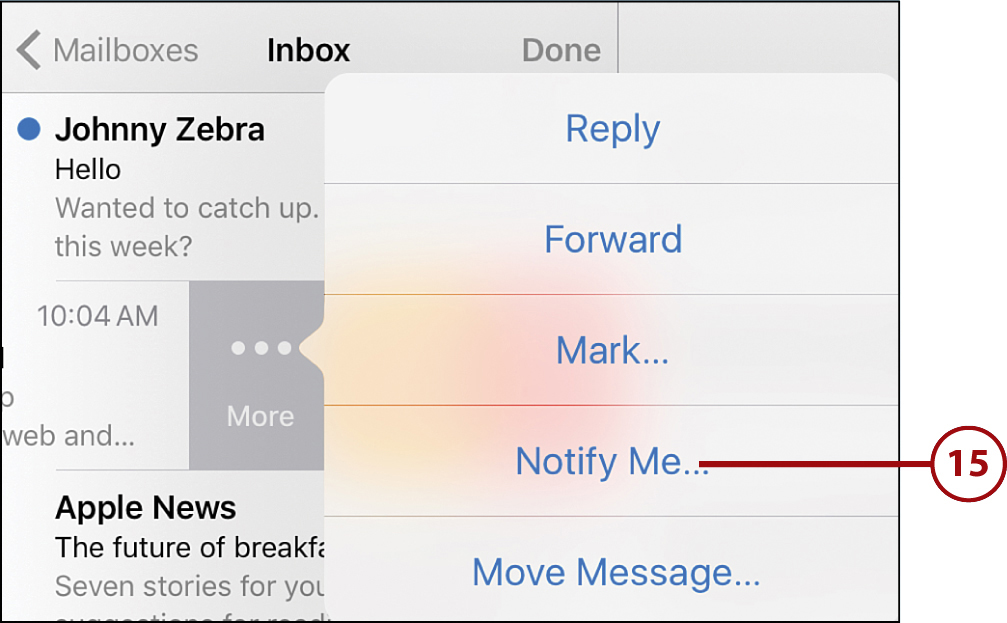
14. Tap More to see a list of other options.
Customization
You can customize this by going to the Settings app, selecting Mail on the left, and then Swipe Options. For instance, you can change the Swipe Right action from the default Mark as Read, to Archive.
15. In addition to actions like Reply and Forward, you can also select Notify Me, which gives you an alert when someone else replies to this email thread (any email with the same title).
If you have more than one email account, you can choose to look at each inbox individually or a single unified inbox that includes emails from all accounts. Just tap the Mailboxes button at the upper-left corner of the screen and choose All Inboxes. You can also choose to look at the inbox of a single account, or dig down into any folder of an account.
How Do You Create Folders?
For most email accounts—particularly IMAP, Gmail, and iCloud accounts—you can create folders using the Mail app. Use the back arrow at the upper-left corner of Mail to back out to the list of inboxes and accounts. Choose an account, then tap the Edit button to see a New Mailbox button at the bottom of the screen.
VIPs
You can make a contact a VIP by tapping Add to VIP when you select the sender’s name in an incoming email. Then, their emails appear in your inbox as normal, but they also appear in the VIP inbox. So if you get a lot of email and want to occasionally focus only on a few very important people instead of everyone, choose your VIP inbox rather than your inbox.
If you are using VIPs with your iCloud email accounts, you’ll see the same VIPs for your Mac and other iOS devices using that iCloud account.
Composing a New Email
Whether you compose a new email or reply to one you received, the process is similar. Let’s take a look at composing one from scratch.
1. In the Mail app, tap the Compose button.
2. Enter an address in the To field.
3. Alternatively, tap the + button to bring up a list of contacts, and choose from there.
4. Tap in the Subject field and type a subject for the email.
5. Tap below the subject field in the body of the email, and type your email message.
6. Tap the Send button.

You can use Siri to send email by asking it to “send an email to” and the name of the recipient. It asks you for a subject and a body to the email, and then Siri displays the email. You can choose to send it or cancel. You can even do the whole thing through Siri by saying something like “Send an email to John Johnson with the subject hello and the body how are you doing.”
Including Images
You can copy and paste inside a Mail message just like you can inside of any text entry area on your iPad. But you can also paste in images! Just copy an image from any source—Photos app, Safari, and so on, and then tap in the email body and select Paste. You can paste in more than one image as well.
Deleting and Moving Emails
While viewing an email message, you can tap the trash can icon and move it to the trash. You can also move a group of emails to a folder or the trash.
1. In the Mail app, go to any mailbox and any subfolder, such as your Inbox.
2. If you are viewing an email, you can delete it by tapping the trash can icon.
3. You can also start the process of deleting an email or several messages by tapping the Edit button.
4. Tap the circles next to each email to select them.
5. Selected emails are added to the middle of the screen in a neat stack.
6. Tap the Trash button to delete the selected emails.
7. Tap the Move button, and the left side of the screen changes to a list of folders. You can select one to move all the emails to that folder.
8. Tap the Cancel button to exit without deleting or moving any emails.

9. Alternatively, you can delete a single email by dragging just slightly right to left across the email in the list. This reveals Trash, Flag, and More buttons. If you drag all the way from the right to the left side of the screen, the Trash button enlarges and fills the space, and then the email is deleted with just this one gesture.
10. Tap the Trash button to delete the email. The More button allows you to reply, forward, flag, move, and perform various other actions on the email.

Oops—How Do I Undelete?
So you just tried to use step 9 to see what those buttons looked like, and you deleted the email by accident? You can always look in your Trash folder to select the email and move it back to the Inbox. But when you give your iPad a quick shake, you’re prompted to undo the deletion.
Where’s the Trash?
If you are just deleting the single email that you happen to be viewing, you can tap the trash can icon at the top. But sometimes that icon isn’t there. Instead, you might see an icon that looks like a file box. This is an Archive button. Some email services, like Gmail, insist that you archive your email instead of deleting it. To facilitate this, they provide a nearly infinite amount of storage space, so you might as well use that Archive button.
What About Spam?
Your iPad has no built-in spam filter. Fortunately, most email servers filter out spam at the server level. Using a service such as Gmail means that you get spam filtering on the server and junk mail automatically goes to the Junk folder, not your Inbox.
1. The Search field is at the top of the email messages list in the left sidebar in the Mail app. It won’t be visible at first. To see it, tap and drag down the messages in the left sidebar.
2. Tap in the Search field.
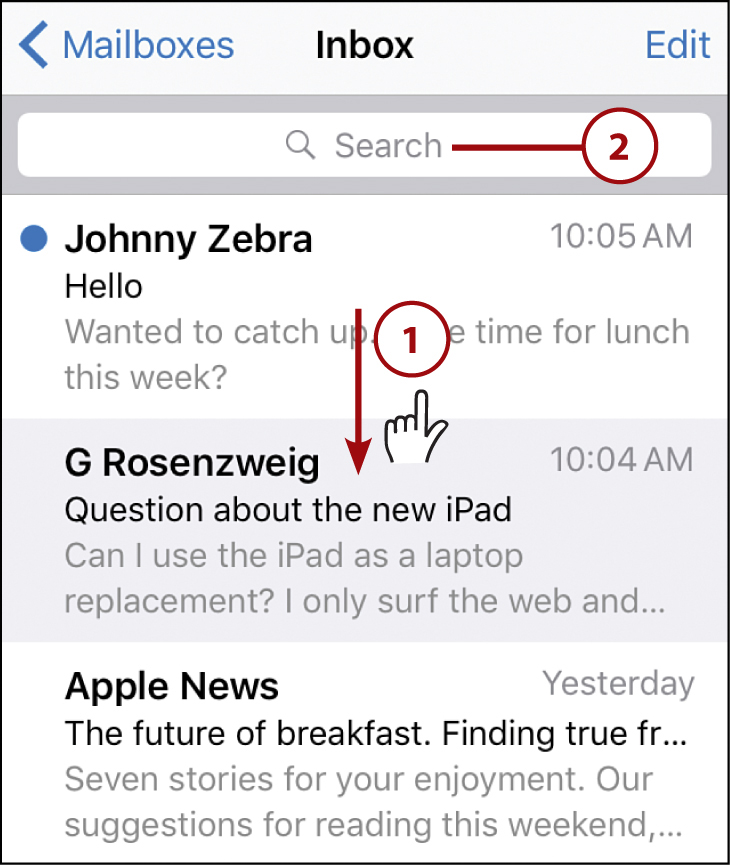
3. Type a search term.
4. You see people and emails in the results. Select an email to view it from the search results.
5. Tap Cancel to exit the search and return to the mailbox you were previously viewing.

Search What?
Searches work on From, To, and Subject fields and the body of the email message. Any messages you have in your inbox pop up right away, but any archived messages or ones stored in folders might or might not appear after a few seconds. The Mail app relies on your email server to return these results. Depending on what type of email server you have, it could take a while. Older results might not appear at all.
Customizing Your Email
You have more settings for email beyond the basic account setup. For instance, you can decide how you want to receive email, using either push delivery or fetch delivery (or manual). There are even more Email settings in the Settings app.
Configuring How You Receive Email
When you receive email, it is either fetched, pushed, or delivered manually when you choose. Fetch checks for email at regular intervals, whereas push receives emails soon after they have arrived at your email service. Depending on what your provider supports, you can choose between these settings.
1. Go to the Settings app and tap Mail.
2. Tap Accounts.

3. Tap Fetch New Data.
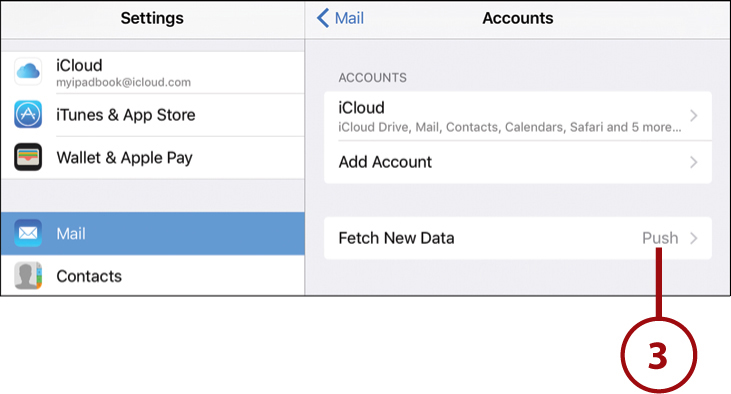
4. Turn on Push to use push email reception, if you use email accounts that can send email via push.
5. Otherwise, select how often you want your iPad to go out to the server and fetch email.
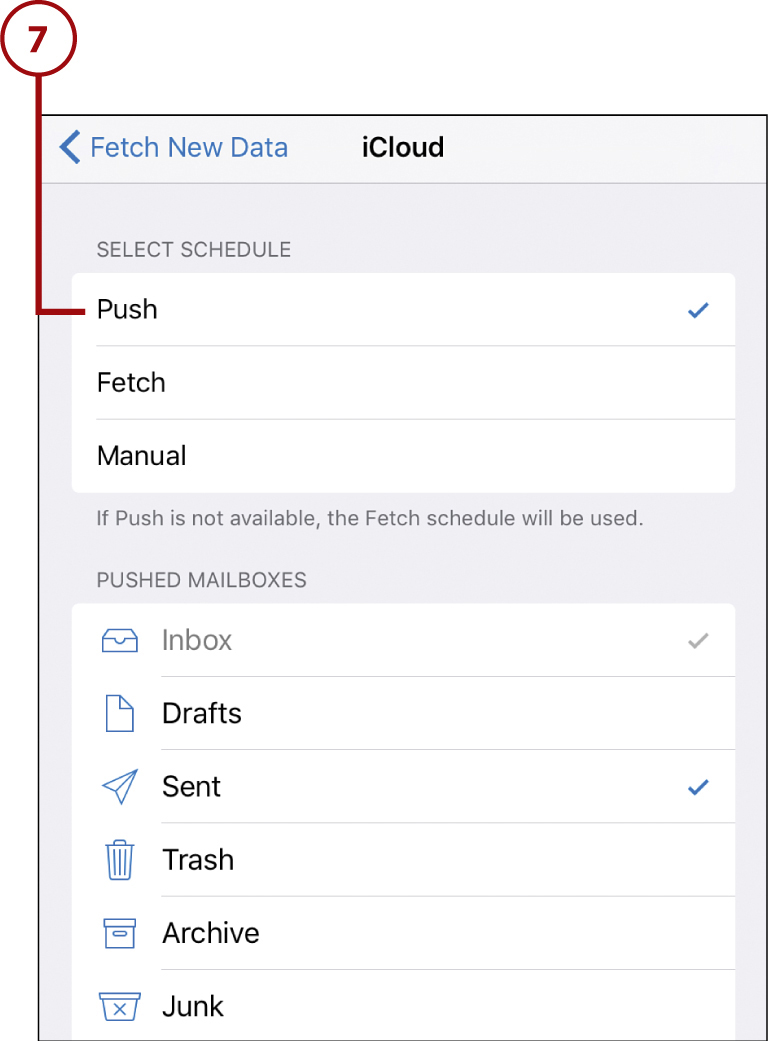
6. Tap one of your email accounts to customize the settings for that particular account. Note that even some subscribed calendars have the ability to be set to push or fetch.

7. For each account, you can set your preferences to Fetch, Manual, or Push if available for that email account. Note that more options exist for some accounts, such as specifying which folders are pushed.
Siri: Checking Email
You can ask Siri for a quick list of new email messages by saying “check my email.” You get a list from within the Siri interface, and you can tap a message to read it in the Mail app. If you say “read me my email,” Siri reads your new messages out loud to you.
Creating a Signature
You can create a signature that appears below your email messages automatically. You do this in the Settings app.
1. In the Settings app, choose Mail.
2. Tap Signature, which is way down in the list on the right.
3. If you have more than one email account set up, you can choose to have one signature for all accounts or a different signature for each account.
4. Type a signature in one of the signature text fields. You don’t need to do anything to save the signature. You can tap the Home button on your iPad to exit Settings if you like.

Styles and Images in Signatures
You can make some text in your signature bold, italic, or underlined by selecting the text and tapping on the selection. In addition to Cut, Copy, and Paste options, you also see a BIU option. Tap that button and you can style the selected text a bit. If you want to include an image in your signature, you can copy that image from another app and paste it in with the text. But try to refrain from pasting a photo or something large, as it might annoy your recipients to get a large image included with every email. A small company logo copied from your company’s website might be more appropriate, although email etiquette points to keeping your signature simple and image-free.
Case-By-Case Signatures
You can have only one signature for each email account. But the signature is placed in the editable area of the email composition field, so you can edit it like the rest of your message.
No Thanks—I’ll Do It Myself
The Manual setting is useful if you don’t want to be disturbed throughout the day as you receive email. These accounts are checked only when you open the Mail app and look at the inbox for that account. Another reason to use Manual is to preserve battery because your iPad won’t use Wi-Fi or your mobile connection as often. You also might want to use Manual if you are concerned about bandwidth, like when you’re traveling internationally and only want to check email when using Wi-Fi.
More Email Settings
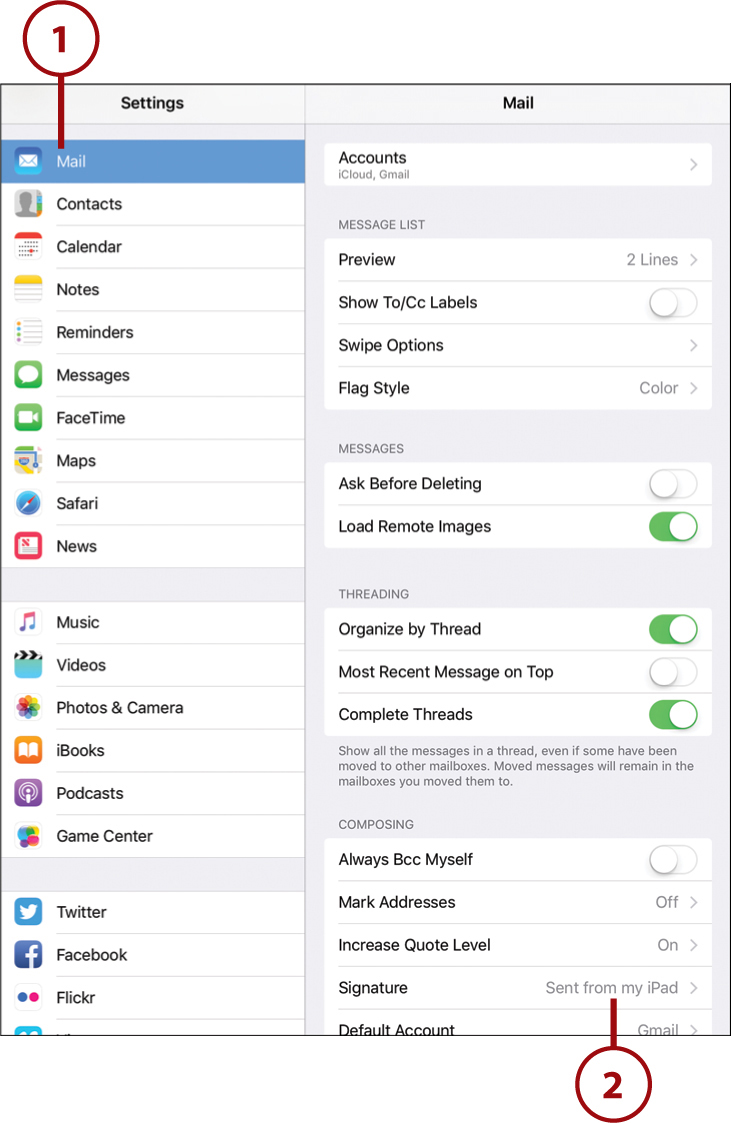
You can change even more email settings in the Settings app. Tap the Settings app on your Home screen, and then tap Mail so we can take a look at some of them.
1. Tap Preview to choose how many lines of email message preview to show when stacking messages up in the list view.
2. Turn Show To/Cc Labels on to view “To” or “Cc” in each email listed so that you know if you were the primary recipient or someone who was just copied on an email to someone else.
3. When viewing email messages in your inbox, you can swipe left or right across the message in the list to take an action. You can set this up here. For instance, you can set a swipe to the right to mark an email as read, or you can set it to archive the message and remove it from the inbox.
4. Turn Ask Before Deleting on to require a confirmation when you tap the trash can icon in Mail.
5. Turn Load Remote Images off so that images referenced in an email but stored on a remote server are not shown in the email body.
6. To group replies to an email under the original message, select Organize by Thread. This is handy when you subscribe to email discussion lists.
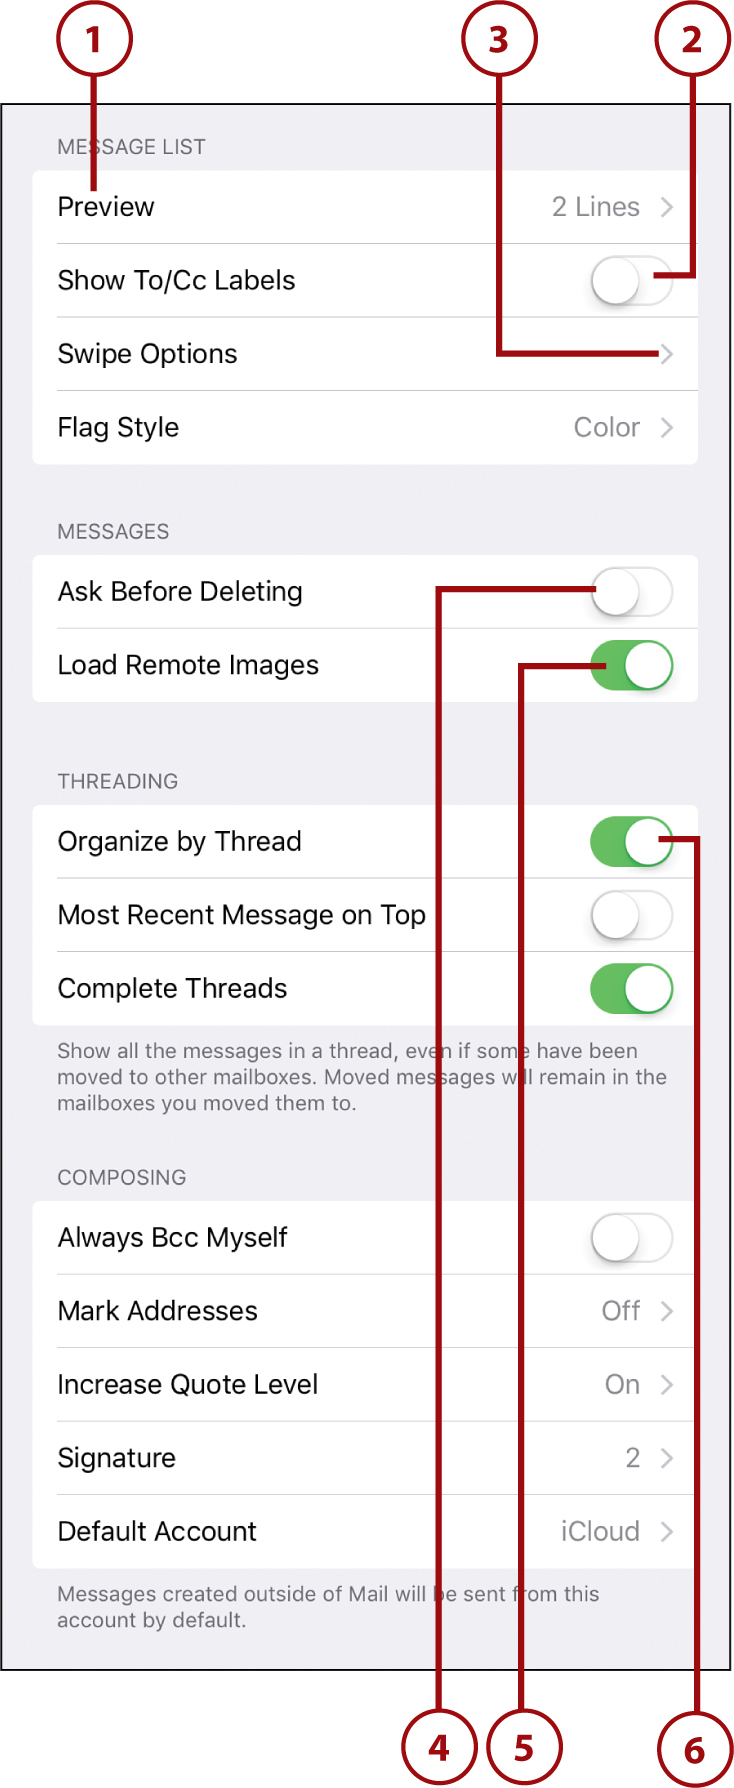
7. Turn Always Bcc Myself on if you want to get a copy of every email you send so that later you can move your copies of emails to your Sent folder on your computer. This might be a good idea if you are using an older email system. Modern email systems like iCloud and Gmail should save your sent emails to the server just like other messages.
8. Choose whether to indent the quoted text from the original email when replying to an email.
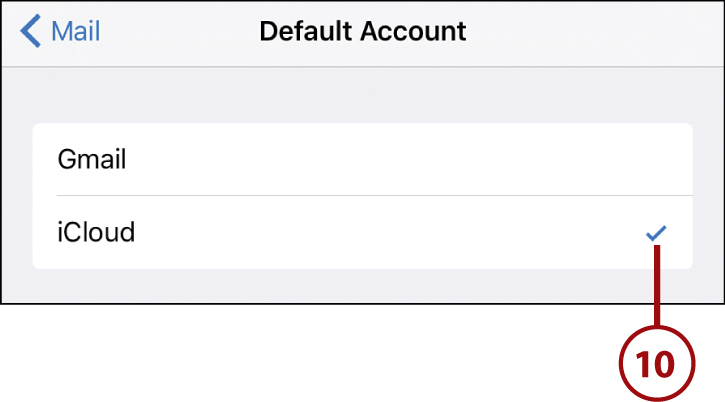
9. Tap Default Account to determine which account is used to send email by default if you have more than one account set up on your iPad.
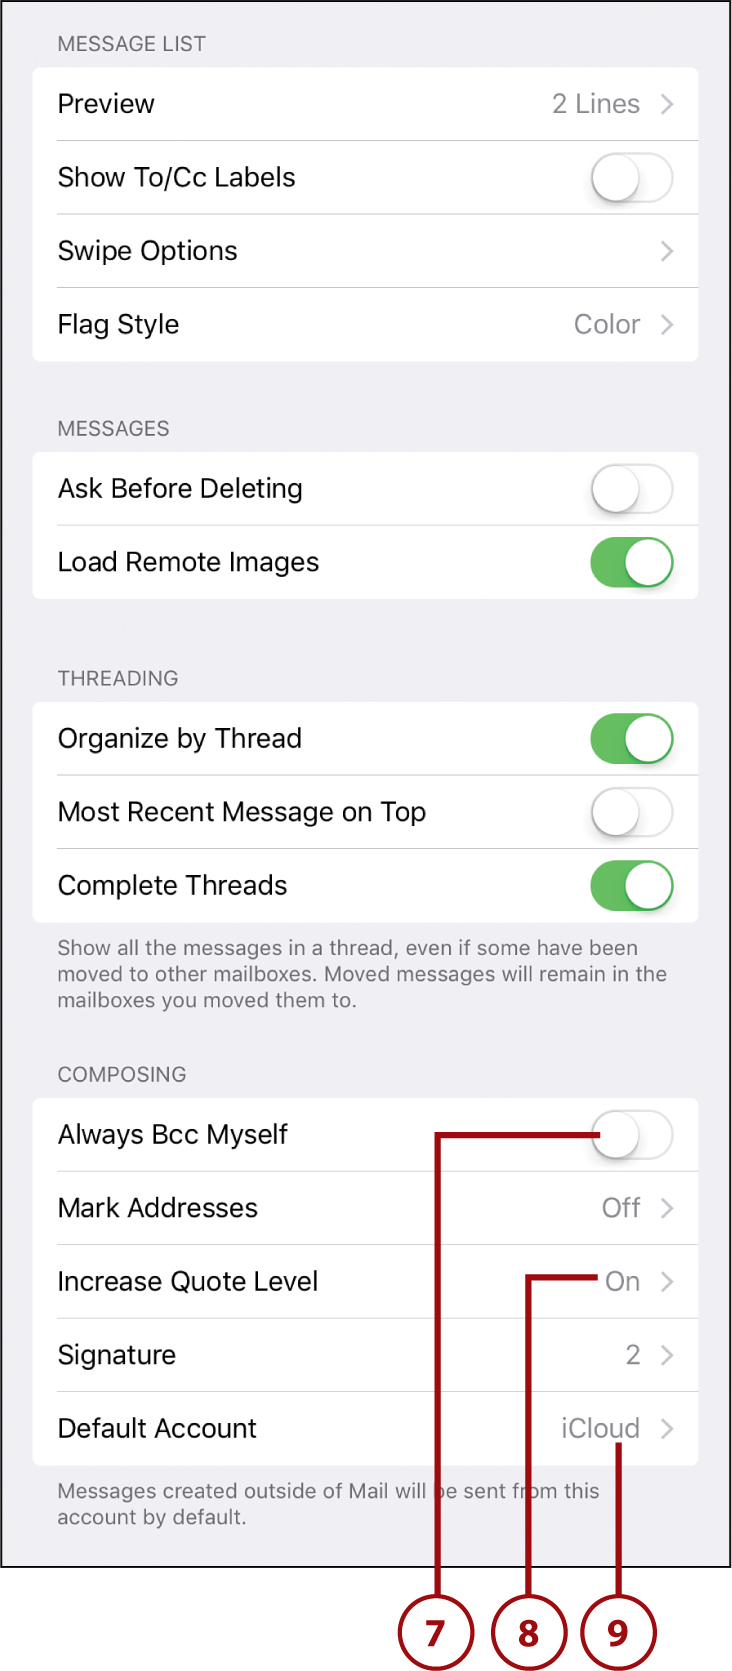
10. In most apps from which you send emails, you can type an email and also change the account you use to send the email. To do this, tap the email address shown next to From and you get a list of all your accounts, including alternate email addresses for each account.
The main reason to not show remote images is bandwidth. If you get an email that has 15 images referenced in it, you need to download a lot of data, and it takes a while for that email to show up completely. However, remote images are often used as ways to indicate whether you have opened and looked at emails. So, turning this off might break some statistics and receipt functionality expected from the sender (including from spammers). Even if you have remote image turned off, you have the option to show them on a case-by-case basis as you view your email.
Working with Messaging
Even though your iPad isn’t a phone, you can send text messages. The catch is that you can only message others who are also using Apple’s iMessage system, which is anyone using iOS 5 or newer with an iPad, iPhone, or iPod touch, as long as they have signed up for the free service. Mac users can also send messages with the iMessage system.
Setting Up Messaging
1. Tap the Settings app icon on your Home screen.
2. You need to be signed into iCloud with your Apple ID to use Messages. If you didn’t do that when you set up your iPad, or when you set up iCloud email, you need to go to the iCloud settings and sign in or create an iCloud account.
3. Tap the Messages settings.
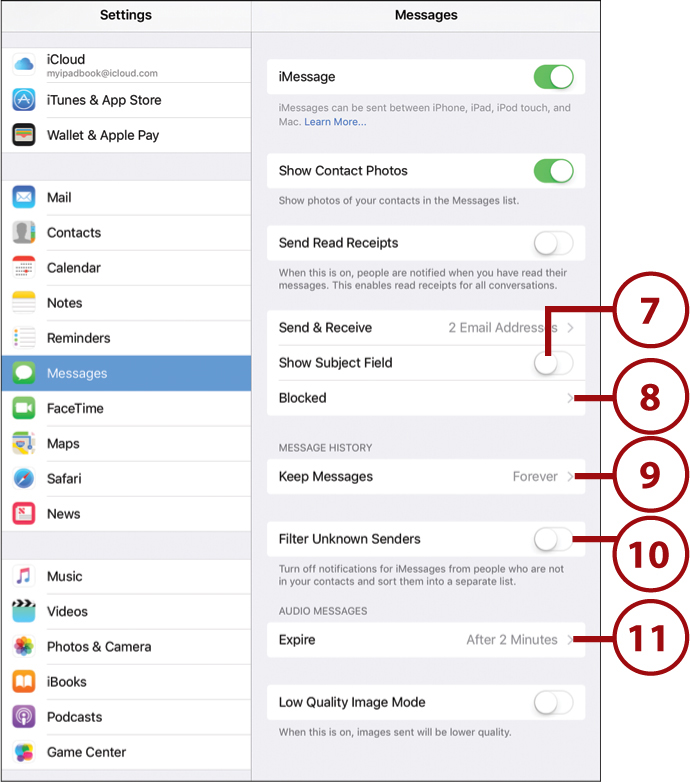
4. Make sure iMessage is turned on.
5. If you turn this option on, when someone sends you a message they also get a notification when you have viewed the message.
6. You can use any valid email address that you own for Messages, even if it is not the same as your Apple ID email address. You can control which email addresses can be used to find you, adding more and removing others.

7. Apple’s iMessage system can include a subject line along with the message, though most people don’t use this.
8. Tap Blocked to add email addresses to block so individuals cannot send you messages.
9. Most people prefer to keep old messages around forever, to refer to them later. Text messages are small, so you don’t have to worry about them using up any noticeable space on your iPad. But your iPad allows you to send audio and video messages as well, which do take up some space. You can choose to have those automatically disappear after you have listened to or viewed them.
10. You can opt to have messages received from senders not in your contacts list to be put in a separate list in the Messages app. You also won’t receive notifications when someone not in your contacts list sends you a message.
11. Set how long to keep audio messages you receive. Typically, you want these to expire soon after you view them so that they don’t fill up your iPad’s storage space.
Blocking Messengers
There is an even easier way to block unwanted messengers when using the Messages app. You can tap the Details button at the upper-right corner of the screen while viewing the conversation in Messages. Then an info button appears. It looks like an i with a circle around it. Tap that and you get additional options. Scroll all the way down in these options until you see the Block This Caller option. Use this and you’ll never get another message from that account again. Better still, audio and FaceTime calls from them are blocked as well.
Conversing with Messages
After you have set up an account with Messages, you can quickly and easily send messages to others. The next time you launch Messages, you go directly to the main screen.
1. Tap the Messages app icon on your home screen.
2. Tap the New Message button at the top of the screen.
3. In a new message, tap in the To field and enter the email address of the recipient. Note that they should already be signed up for iMessage or you will not be able to send them anything. Some iPhone users might use their phone number as their iMessage ID instead of, or in addition to, their email address. As long as the phone number is tied to an iMessage account, you can still converse with them using Messages on your iPad. You can add more than one recipient to start a conversation with a group.
4. If you want to send a picture or video, tap this button. You can choose a picture from your photo library, or take a picture with your iPad’s camera.
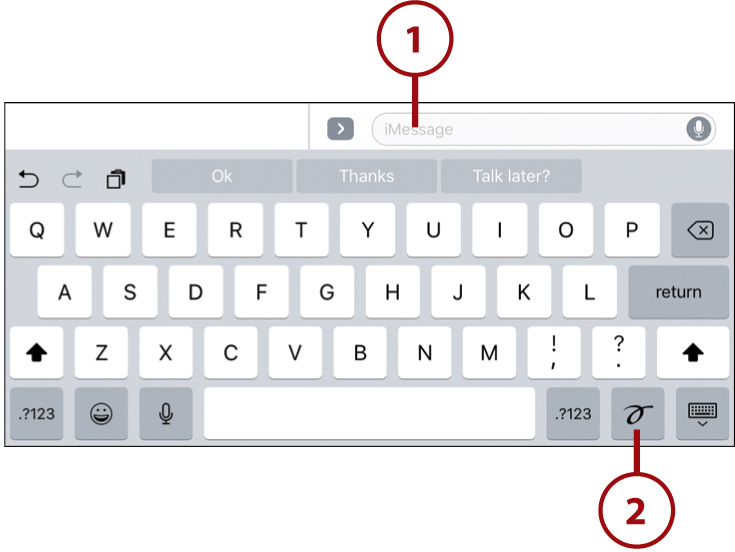
5. Tap the text field above the keyboard to type your message.

6. While you are typing your message, the button to the right side of the text field changes from a microphone to an up arrow. The microphone button can be used to record a voice message instead of typing a text message. When you start typing, the microphone button is replaced with the up arrow, which you can use to send your message when you’re done typing.
Say It; Don’t Text It
If you’d rather the person on the other end hear your voice, or you’re just tired of typing, then use the microphone button in step 6 to record a short audio clip to send. The receiver will be able to play it back.
7. Meanwhile, the three buttons to the left side of the text field compress into one button. Tap it to reveal the camera button and two other special messaging features buttons, which are covered in the next section.

8. The conversation appears as a series of talk bubbles. Your bubbles are on the right.
9. When your friend responds, her comments are on the left side of the conversation panel.
10. A list of conversations appears on the left side of the screen. You can have many going on at the same time, or use this list to look at old conversations.

11. Tap Edit to access buttons to delete old conversations.
12. Tap the info button to do various tasks, such as adding the person to your contacts or starting a FaceTime video chat. You can also send your current location to the people you are messaging, which saves you time if you want to tell someone to meet you at your current location.
13. A small bubble with three dots means that the other party is typing. You see this with other people using Apple’s iMessage system, but if they are using a mobile phone with SMS or if their connection is poor, you might not see these indicators.

Using Emoji in Text Messages
In addition to normal words, text messages also often include little pictures, called emojis. You’re probably familiar with smiling face or heart emojis, but there are actually hundreds of different emoji symbols you can use.
1. Type a message in the Messages app.
2. Switch to the Emoji keyboard by tapping the keyboard switch button. If you have more than the default two keyboards (standard and emoji) active on your iPad, you might need to switch several times to get to the emoji keyboard.

3. Tap an emoji character.
4. The emoji is added to a message just like a normal letter would be.
5. Swipe left and right to reveal more emoji characters.
6. Tap a category button to jump to sections of the emoji character list. For instance, if you want to use the baseball emoji, chances are it is in the sports category.
7. Tap here to find your recently used emojis.
8. You can type spaces and delete without needing to switch back to the regular keyboard.
9. A new feature in iOS 10 highlights words that can be swapped for common emojis. For instance, you can tap the word pizza and it changes to the pizza emoji.
10. Tap to switch back to the regular keyboard.

The Universal Language of Emojis
It is important to realize that emojis are part of a universal set of characters agreed upon by all device makers. So when you send a smiling face from your iPad, someone getting that message on an Android phone will receive a smiling face. The actual drawing of the face may look slightly different, but it should always be similar enough to convey the same idea.
Emoji Skin Tones
Some emojis, like hand gestures and heads, come in a variety of skin tones. To see those, tap and hold an emoji character in the keyboard to see alternative versions in a pop-up. Tap the version you want to send.
Siri: Sending Messages
You can use Siri to send messages. Simply tell Siri something like “Send a text message to Gary,” and Siri responds by asking you what you want to say in your message. Or, you can say something like “Send a message to Gary tell him I’ll meet him after the movie,” and Siri creates the whole message for you. You can review the message before it is sent for truly hands-free operation. When you get a message, you can also ask Siri to “Read me that message,” and you can listen to the message without ever glancing at your iPad’s screen.
Expressing Yourself with Messages New!
The new iOS 10 introduces many new messaging features. You can send special quick replies, drawings, animated GIF images, and even full-screen animations. These special features work with others who are also using iOS 10 on their iPads or iPhones. They also work with Mac users who are using Mac OS Sierra. Other people usually see simplified or static images as a substitute.
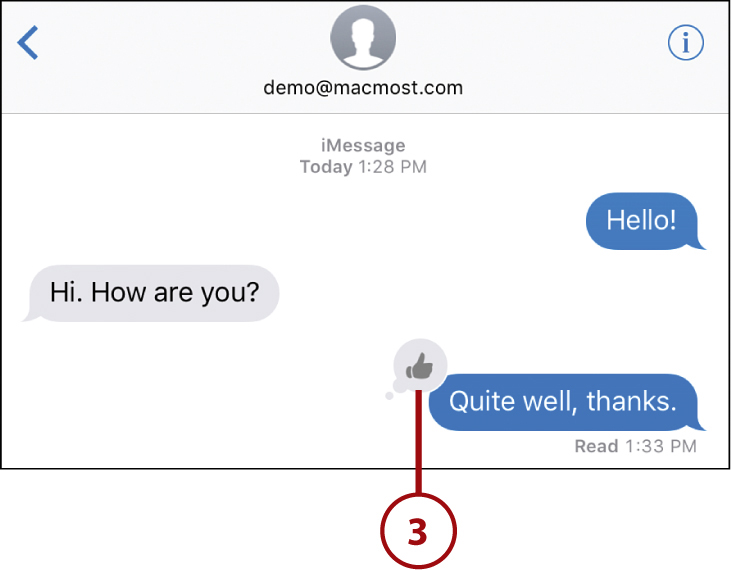
Responding with Tapback Quick Replies
One of the many new features of Messages in iOS 10 is the ability to send quick responses to messages without typing anything. Apple calls this feature “tapback.”
1. Tap and hold a message you have received.
2. A bubble appears above the message so you can tap one of several icons as a response: heart, thumbs up, thumbs down, ha ha, exclamation points, or a question mark.

3. The icon response is added to the original message bubble.
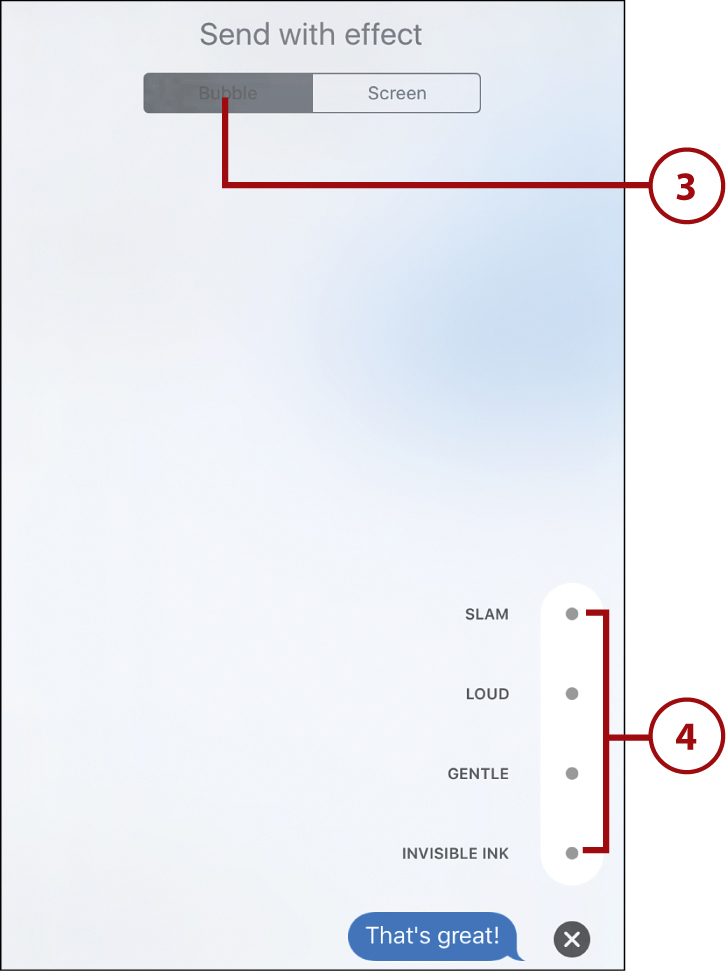
Sending Messages with Bubble Effects
Bubble effects change the way the bubble around the text looks. There are currently four effects.
1. Type a new message.
2. Tap and hold the up arrow button. Holding it for a second is important as a simple tap sends the message right now instead of showing you the bubble effects menu.

3. At the top of the screen you can switch between Bubble and Screen effects. Make sure you have Bubble selected. The next section covers Screen effects.
I Didn’t Mean to Do That!
If you tap and hold the send arrow longer than you mean to, you can tap the X button to dismiss the Bubble effect menu and send the text as normal.
4. Tap one of the four bubble effects to see a preview of how this effect will look with the text you have selected.
5. The bubble animates according to the effect you selected.
6. If you like this effect and want to use it, tap the up arrow button. The message will be sent. Otherwise, tap the X to close the menu.
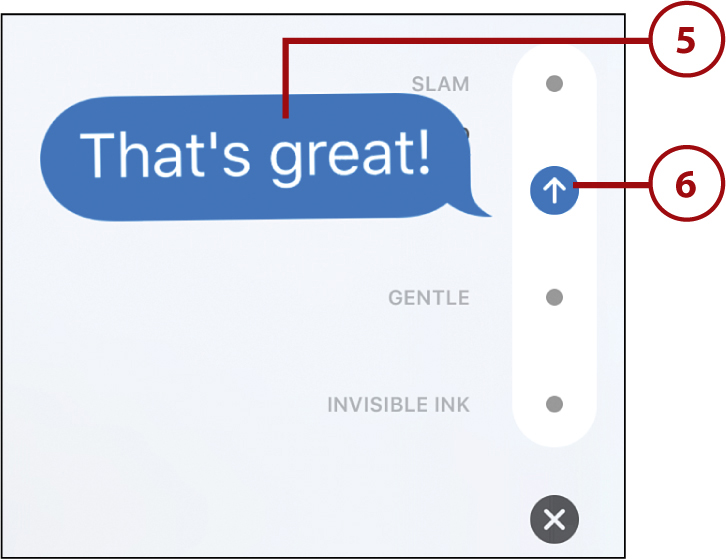
What Do the Effects Do?
It’s hard to describe the animation of the four effects. It’s best that you try them out for yourself the next time you get the chance. The general idea is to use Slam to provide maximum emphasis. Loud and Gentle can be used to relay emotion about the text. For instance, a “Sorry” said with the gentle effect gives the impression of a quiet apology.
The Invisible Ink effect is a little different. The text appears blurred until the receiver taps it. Then it becomes clear before becoming blurred again. This can be used to elicit a feeling of suspense—allowing the receiver to brace themselves before reading good or bad news. Or, it could simply give the receiver a chance to make sure no one is looking over their shoulder before they read the message.
The Invisible Ink effect not only works with plain text message, but also with images. Just attach an image to the same message that you apply the Invisible Ink effect to, and the receiver has to tap the blurred image to reveal it.
Sending Messages with Animations
You can also send one of several full-screen animations with your messages.
1. Type a new message.
2. Tap and hold the up arrow button.

3. Tap Screen effects.
4. Right away the first screen effect, balloons, plays to show you what it looks like. The other four animations are: falling confetti, a laser light coming from behind the message bubble, fireworks, and a flare arching across the screen.
5. Tap and drag right to left to go to the next animation. Note that the five dots at the bottom indicate which animation you are currently viewing. You can drag left to right to go backward through the list.
6. Tap the up arrow button to send the message with the animation.

1. Start a message, but don’t type anything.
2. Tap the sketch button on the virtual keyboard.
3. The keyboard changes to a simple sketchpad. Tap and drag your finger to draw.
4. The undo button makes drawing a lot easier by allowing you to take back your last tap or stroke. You can use this multiple times to remove multiple errant strokes.
5. Tap here or swipe with two fingers to go to another page in this little sketchpad. This comes in handy if you want to try handwriting your message a few times and send only the best one.
6. Tap to resend your recent handwritten notes or sketches.
7. Tap to return to the regular keyboard.
8. When you are happy with your sketch or note, tap the Done button.
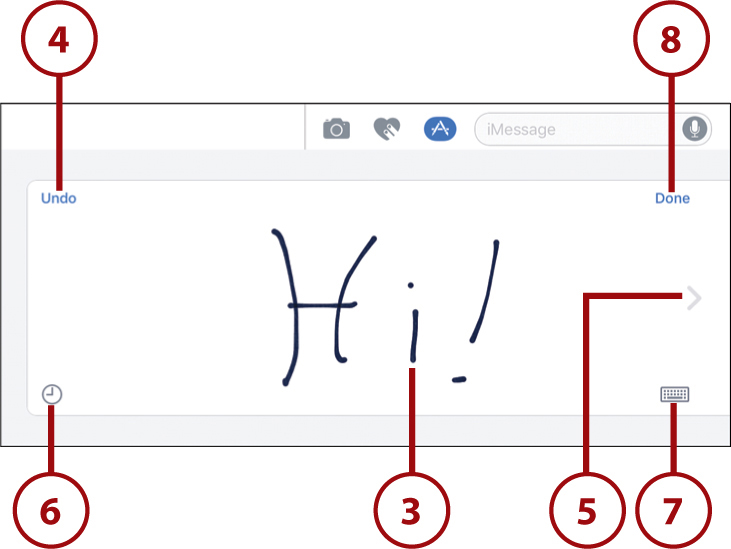
9. You can add text to appear alongside the sketch.
10. Tap the X to cancel the sketch.
11. Once you are happy with the sketch and any accompanying text, tap the up arrow to send it.

Sending Digital Touch Messages
When Apple came out with the Apple Watch, the Messages app on it allowed you to send some special animated messages like kisses and heartbeats. You can now do that in iOS 10’s Messages app.
1. Tap the Digital Touch icon before starting to type a new message.
2. On the right side are some figures that illustrate how to use Digital Touch. Wait a few seconds and another set of figures appears to show more.
3. Tap here to enlarge the drawing canvas.
4. Tap here to select a color for your sketch.
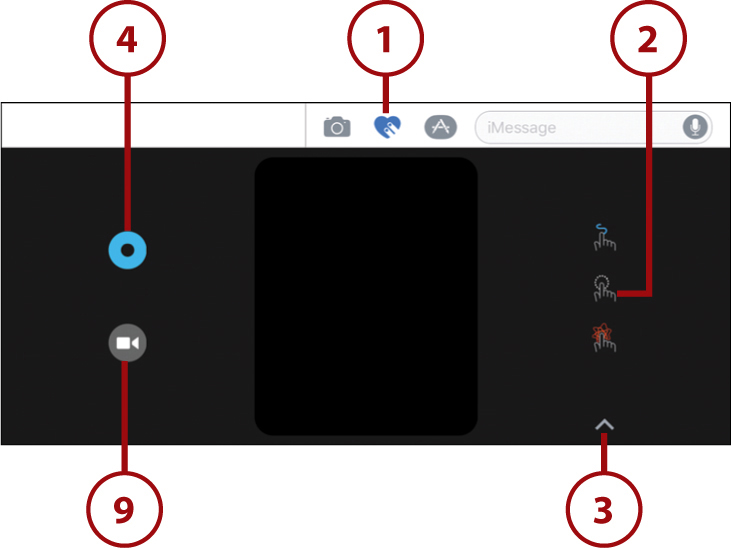
5. Draw in this area by tapping and dragging.
6. Switch colors for each line if you like.
7. Tap the up arrow to send when you are done. What the receiver sees is the sketch re-created in real time with each stroke being drawn one-by-one just as you created it.
8. Tap the X to cancel.
9. Tap the video button to use the camera on your iPhone to record video. Then you can draw over that video in real time to create a combination of video and a sketch.

In addition to drawing, you can tap and hold to create fireball animation, tap with one finger to send a ring animation, tap with two fingers to create a kiss animation, tap with two fingers and hold to create a heartbeat animation, and tap with two fingers and drag down for a broken heart animation.
You can also experiment to create other effects. For instance, tap with two fingers multiple times in different spots to send a parade of kisses. Use the video button in step 9 in combination with the fireball or ring animation. It takes some practice to create good effects, so send some of these digital touch messages back and forth with a friend and have some fun with it while practicing.
Keep or Let Expire?
When you receive a digital touch message, you see a small Keep button under it. If you tap that, the animated message remains in your conversation. If you don’t tap it, the message disappears after a few seconds. This allows you to send and receive these fun messages without worrying about them cluttering up the text conversation.
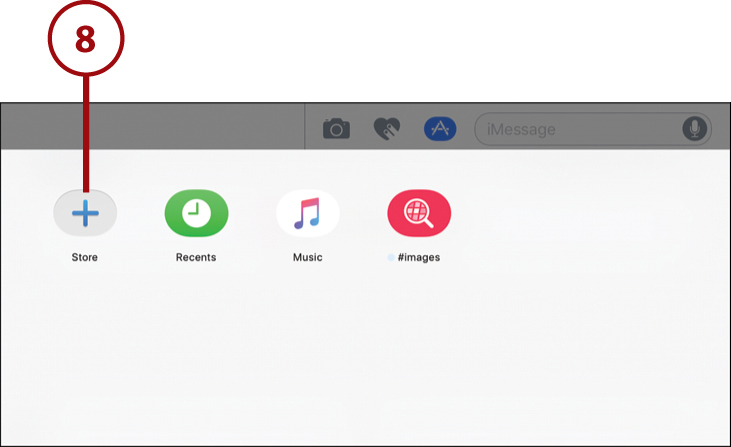
Send Animated GIFs and Other Special Messages
You can also send animated GIFs and special images from Apple and third-party developers.
1. Tap the special apps button before sending a message.
2. Tap #images to send a special image.

3. You’ll see some popular images and animated GIFs. Tap one to send it.
4. You can search for images by topic. For instance, if you want to congratulate someone in a unique way, search for “congratulations” and see what animations come up that you can send them.
5. Swipe left and right to see more. The left-most page of images are those you have recently sent.
6. Tap here to expand this interface to the full screen so you can see more images at once.
7. Tap here to return to the previous screen.

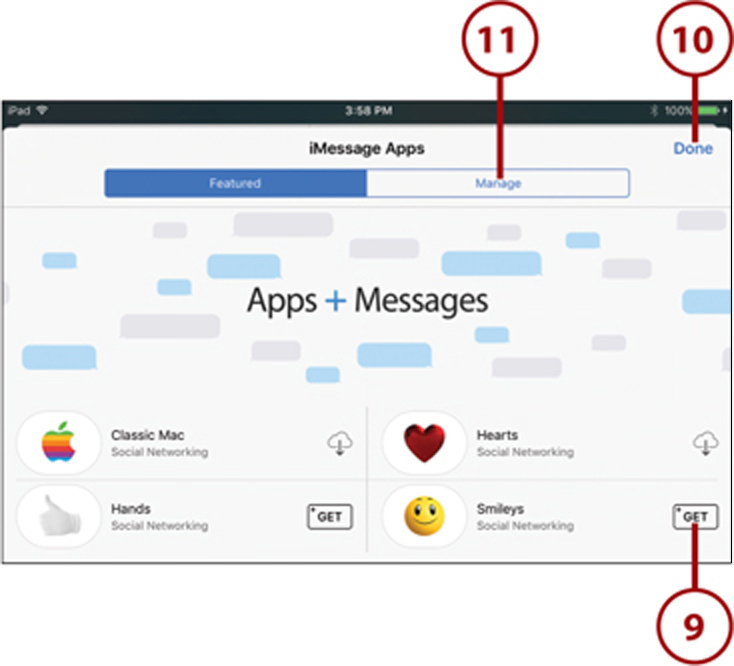
8. On this screen you can use the + button to add more types of special messages through the app store.
9. Tap to add a package of images and other special message types just like you add apps in the App Store.
10. Tap Done to return to the previous screen.
11. Tap Manage to see what you have already installed and disable packages you no longer want.
Notice that most of the special messages you can send are in lists: digital touch, full-screen animations, bubble effects, and so on. This means it is likely that Apple will be adding even more to these lists in the future. So check back from time to time to see if more Messages effects have appeared with iOS 10 updates.