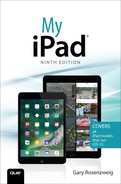
6. Organizing Your Life
In this chapter, you learn how to add and look up contacts and calendar events. You’re also introduced to the Notes and Reminders apps.
Whether you are a well-connected businessperson or just someone who has lots of friends, you can use the iPad to organize your life with the default Contacts, Calendar, Notes, and Reminders apps. Let’s take a close look at some of the things you can do with these apps.
Using the Contacts App
The primary way iPad users store their contacts is to use Apple’s iCloud service. This places your contacts database on Apple’s servers, making them available to you on any iOS device or Mac you use. You can even access them from a PC with Apple’s iCloud.com website. It also keeps all these devices in sync; so any time you add or edit a contact, the change will show up everywhere. The Contacts app on your iPad is how you access and modify your contacts.
1. Tap the Contacts app icon to launch the app.

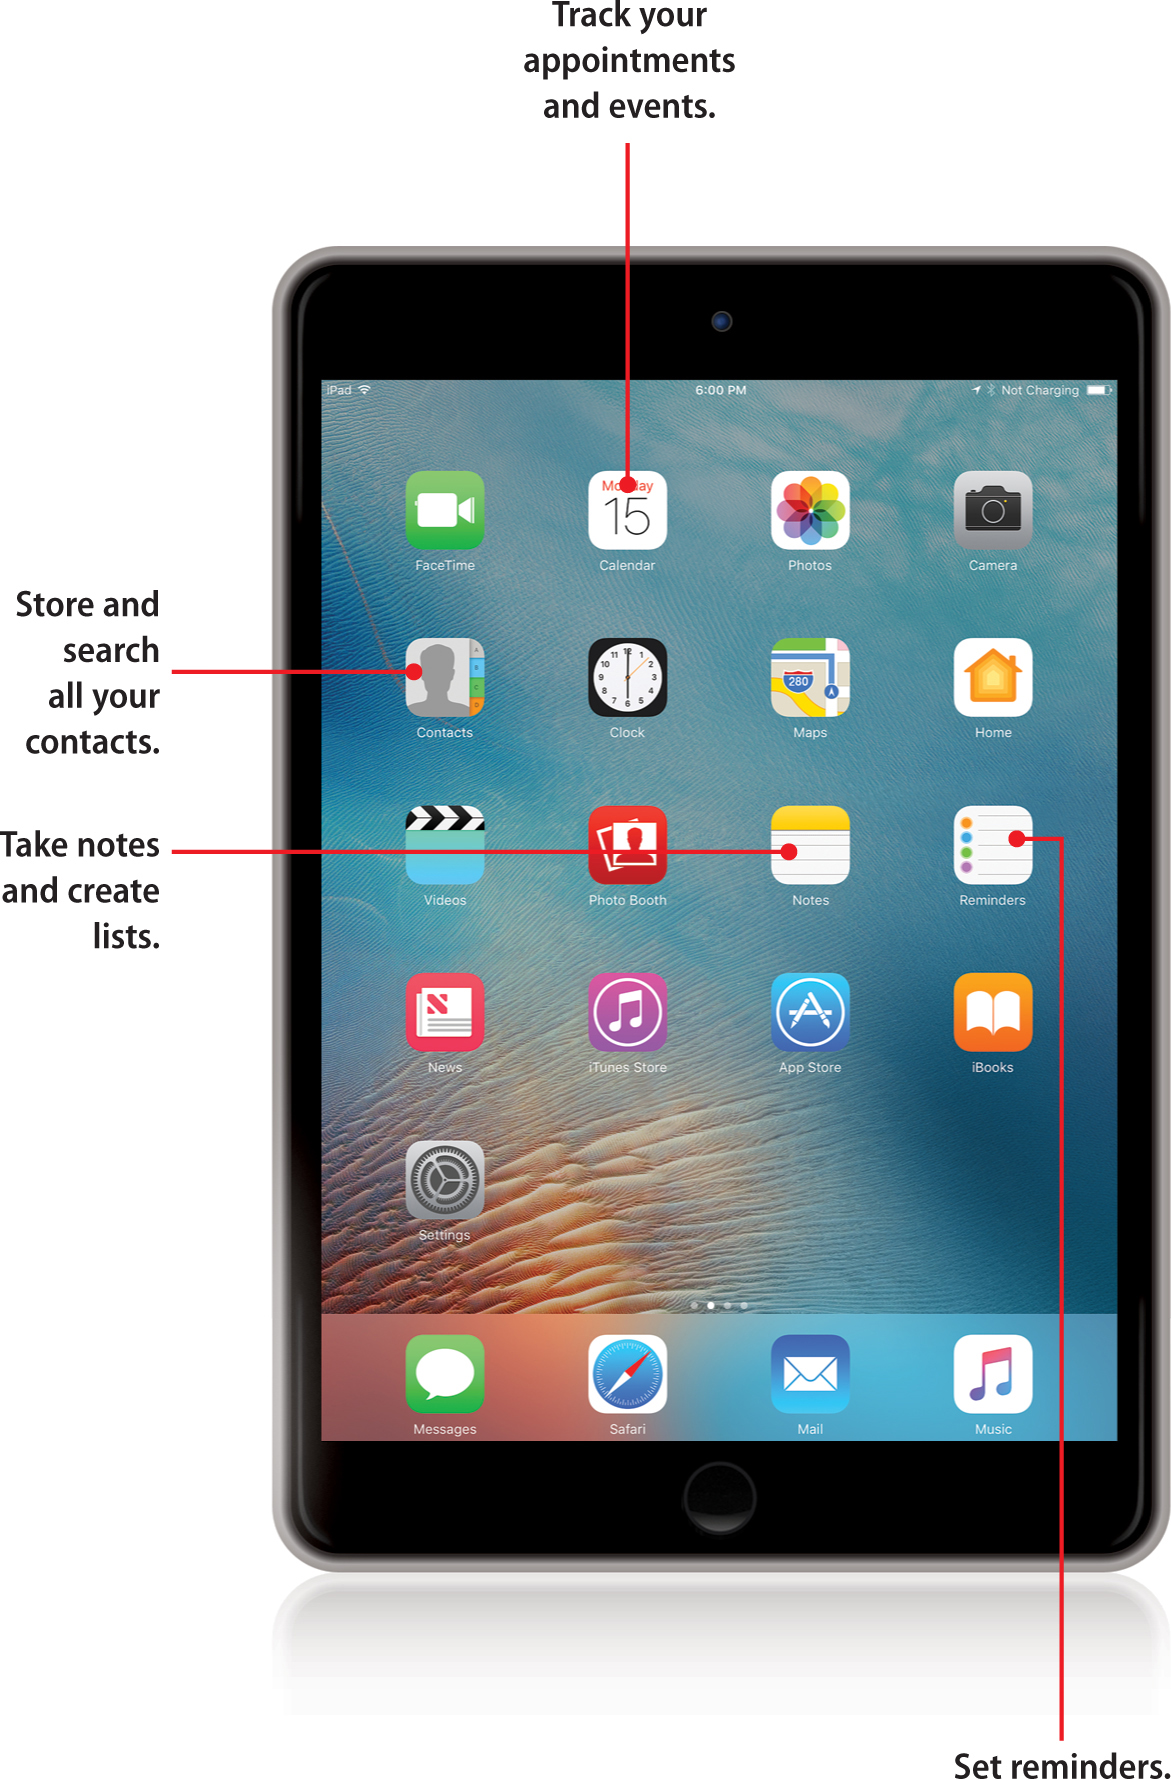
2. Tap the + button near the top of the screen. A New Contact form and keyboard appear.

3. Type the first name of the contact. No need to use Shift to capitalize the name because that happens automatically. Tap the Return key on the keyboard to advance to the next field.
4. Type the last name for the contact. If you are adding a company instead of a person, skip the first and last name fields and use only the company field. The contact will be listed under the company name.
5. To add more information, like a phone number, tap the green + button next to the field name.

No-Worry Formatting
You don’t need to type phone numbers with parentheses or dashes. The iPad formats the number for you.
7. If you ever want to remove some information from the contact, you can use the red – buttons.
8. You can add more than one phone number per contact. When you add a new number, it’s assigned a label such as “work.” You can tap that label and choose another, such as “mobile” or “iPhone,” and so on.
9. Tap Add Photo to add a photo from one of your photo albums or take one right now using your iPad’s camera.
10. You can add one or more email addresses to the contact as well. These will be used in your Mail app when you compose a new message. When writing an email, you only need to type the person’s name, or choose them from a list, instead of typing the full email address.
11. You can add one or more physical addresses for the contact.
12. You can select a specific ringtone for the contact that is used when they call you via FaceTime. You can also set a specific Text tone for Messages.
13. Swipe up to see more fields. You can even add custom fields and notes to a contact.
14. Tap the Done button to finish.
You can set a nickname field in a contact. When you do this, and the contact happens to be yours, Siri will call you by that name. You can also tell Siri: “Call me name” and it will change your nickname field even if you are not in the Contacts app at the moment.
You can also set relationships in your contacts by saying things like “Debby is my wife.”
Searching for a Contact
If you didn’t have a lot of friends before, I’m sure you gained quite a few since you got a new iPad. So how do you search through all those contacts to find the one you want?
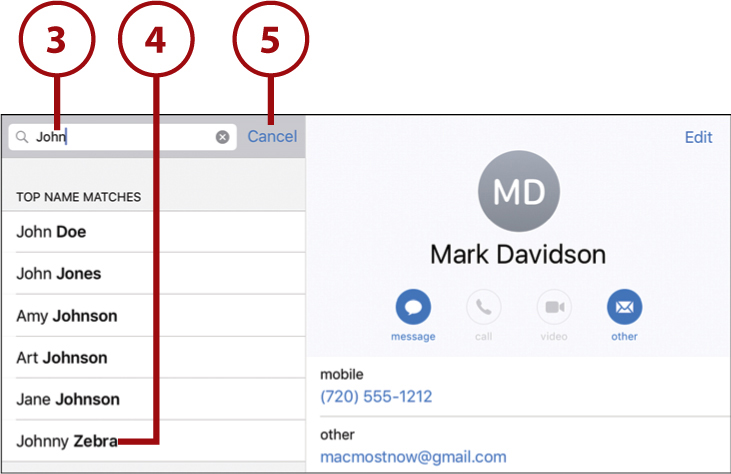
1. Tap the Contacts app icon to launch the app.
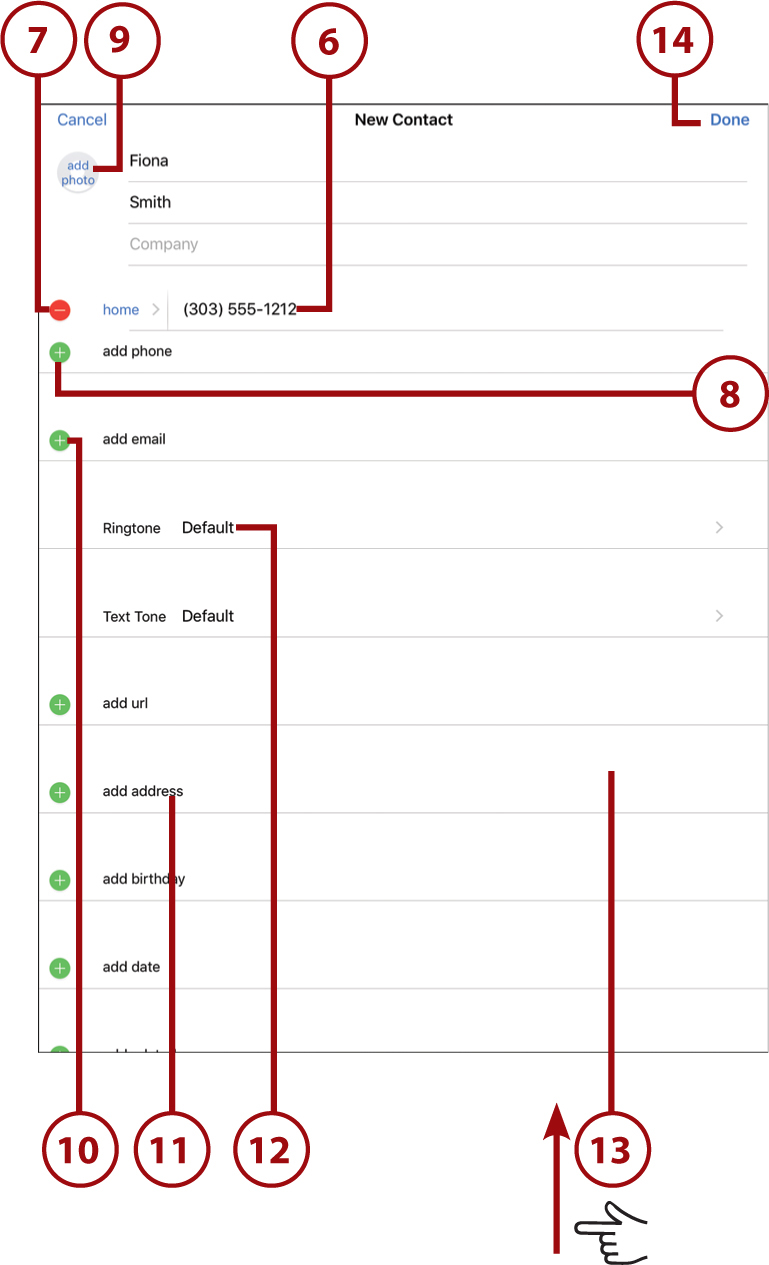
2. Tap in the Search field. A keyboard appears at the bottom of the screen.
Other Ways to Find Contacts
You can also drag (or flick to move quickly) through the contact list to find a name. In addition, the list of letters on the left side of the Contacts app enables you to jump right to that letter in your contacts list.
You can also use Siri to find a contact. Try these phrases:
“Show me John Smith.”
“Show me my contact.”
“Show me my wife.”
3. Start typing the name of the person you are looking for. As soon as you start typing, the app starts making a list of contacts that contain the letters you’ve typed. Keep typing until you narrow down the list of names and spot the one you are looking for.
4. Tap the name to bring up the contact.
5. Tap the Cancel button to dismiss the search.
Working with Contacts
After you have contacts in your iPad, you can do a few things from a contact in the Contacts app.
1. Tap and hold the name to copy it to the clipboard buffer.
2. Tap and hold the phone number to copy it to the clipboard buffer.
3. Tap the phone icon to call the number. Tap the message button to send a text message to the contact using that phone number. You can also tap Send Message near the bottom of the contact. See “Conversing with Messages” in Chapter 8.
4. Tap the FaceTime button to start a video chat with the user, providing they are also on an iOS device (or a Mac) and have set up FaceTime. You can start a FaceTime video call, or tap the phone-like button for an audio-only call.
5. Tap the email address to start composing a new email in the Mail app. You can also tap the email icon.
6. Tap to the right of Notes to add more information without entering Edit mode.
7. Tap Share Contact to send the contact information via a text message, email, or using AirDrop.
8. Start a text message conversation by tapping the message icon or the Send Message line.
9. Tap Edit to enter Edit mode, which gives you the same basic functionality as entering a new contact.

Using the Calendar App
Now that you have people in your Contacts app, you need to schedule some things to do with them.
Calendars, like contacts, are stored using Apple’s iCloud service. So, your calendars will sync over the Internet to your other iOS devices and even your Mac, as long as you use the same iCloud account for each device.
Let’s look at some things you can do with the Calendar app.
Creating a Calendar Event
1. Tap the Calendar app icon on the Home screen.

2. Tap the + button at the upper right.
3. Enter a Title for the event.
4. Enter a Location for the event, or skip this field.
5. Tap the Starts field to bring up a control for setting the starting time.
6. Tap the Ends field to bring up a control for setting the ending time for the event.
7. If the event covers the entire day, or a series of days, then turn on the All-day switch. The Starts and Ends fields change to dates only and don’t include a specific time.
8. Tap Repeat to set an event to repeat every day, week, 2 weeks, month, or year.
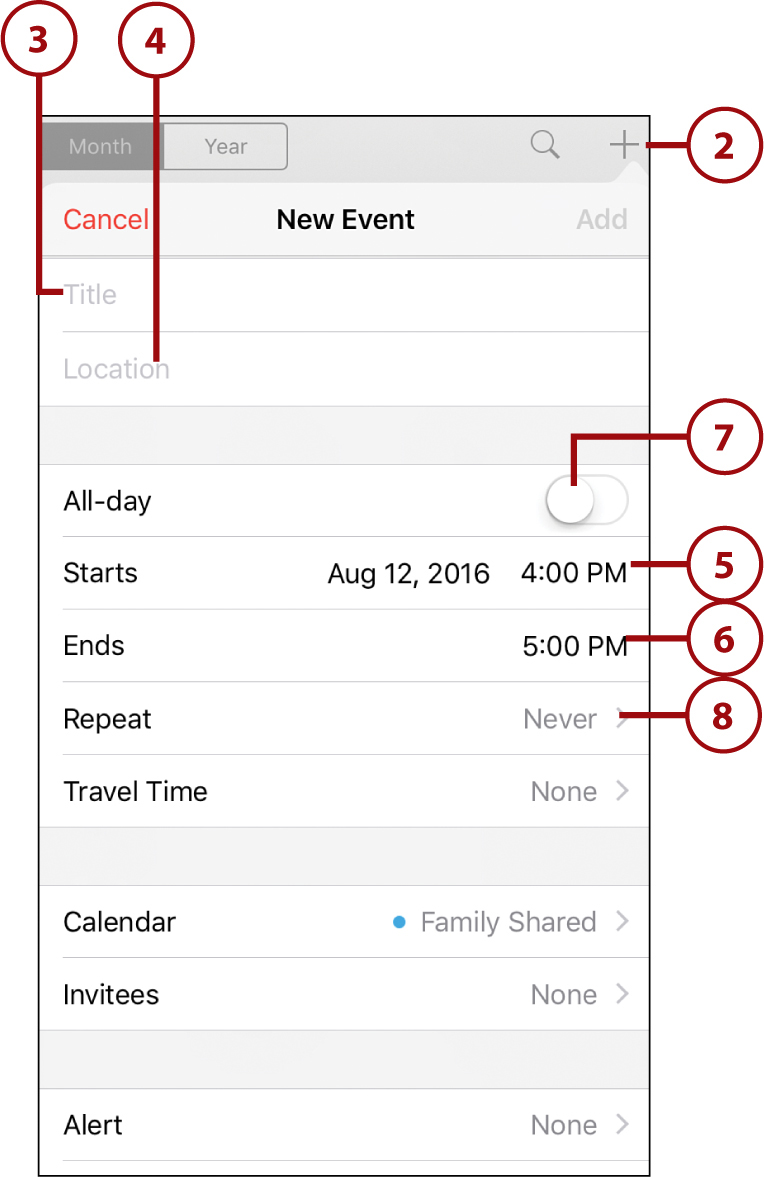
9. Tap Invitees to send an email invitation to another person for this event, if your calendar system allows this. If you and the other person are both using iCloud, they receive a notification of the event and have the option to accept or decline. If they accept, the event is added to their calendar. You are then able to look at your event’s invitation list in this same location and see if they have accepted or declined.
10. Tap Alert to set the time for a notification alert to appear. This can be at the time of the event, or before the event, such as 5 minutes, 15 minutes, or even as much as a week before.
11. In addition, if you set Travel Time, your alert is adjusted so you have enough time to get to the event’s location.
12. Tap Add to complete the event.

Siri: Creating Events
You can use Siri to create new events even when the Calendar app is not on your screen. Here are some examples:
“Schedule a doctor appointment for 3 PM next Wednesday.”
“Set up a meeting with John tomorrow at noon.”
“Cancel my dentist appointment.”
Deleting Events
To delete an event, scroll to the bottom of the event information while editing it to reveal a Delete Event button. This button also appears when you tap the event in any of the Calendar views. There is no real need to delete past events from your calendar—they take up almost no space and could be useful as a record of your past appointments.
Using Calendar Views
There are three main ways to view your calendar: Day, Week, and Month. Let’s take a look at each.
Exploring Day View
The Day view is broken into two halves: the left side shows a timeline from morning until evening. Events are shown as blocks of color in this vertical timeline. The right side shows information for the event selected, if any.
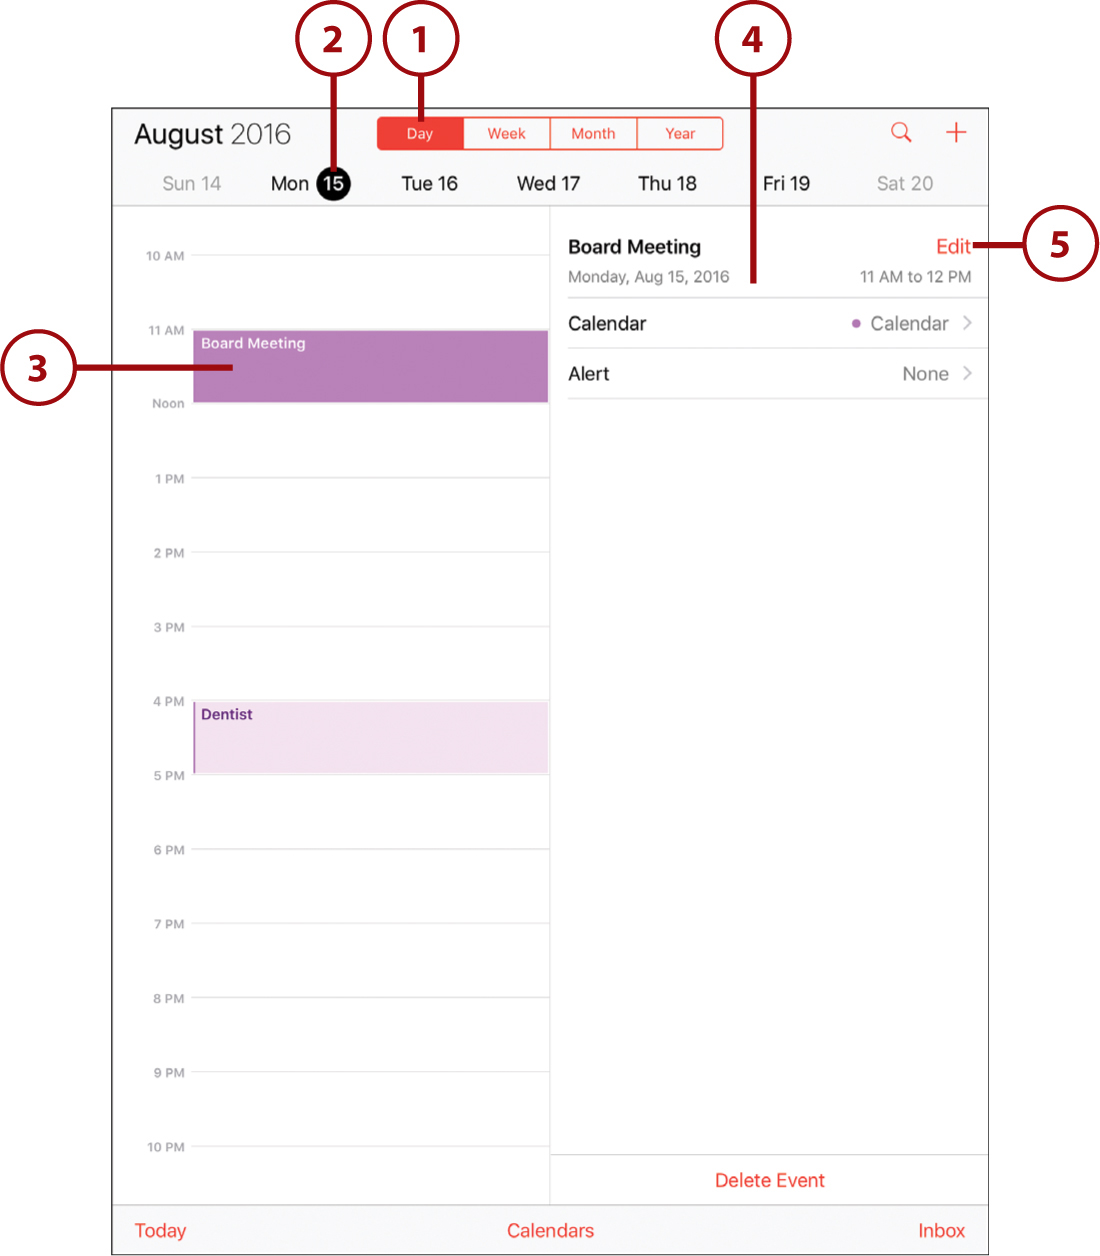
1. Tap Day to enter Day view mode.
2. You can tap any day shown at the top to jump to the list of events for that day. You can also drag left and right to see previous days and upcoming ones.
3. Tap any event shown to view information about that event.
4. The information appears on the right.
5. You can tap Edit to edit that event and change any aspect of it, or delete it.

6. You can drag up and down to view the entire day.
7. Tap Today to jump to the current day, in case you have moved to another day and want to return quickly.
8. Tap Calendars to select which calendars are shown. This is useful if you have set up multiple calendars in iCloud, or have subscribed to public calendars.
9. Tap Inbox to view any invitations you have received via email or messages. You can accept or reject them. Accepted invitations are added to your calendar.
10. Tap + to add a new event.
Year View
There is also a Year view, as you might have guessed because of the Year button at the top of the screen. This shows you 12 very small monthly calendars, with colored-in spaces on days where you have events. You can use this view to quickly navigate to an event in a different week or month. Or, you can use it to see when the days fall in the week.
Exploring Week View
To get a view of all the events for the week, switch to Week view. This gives you seven days across, but less space to preview each event. You can still select and edit events.
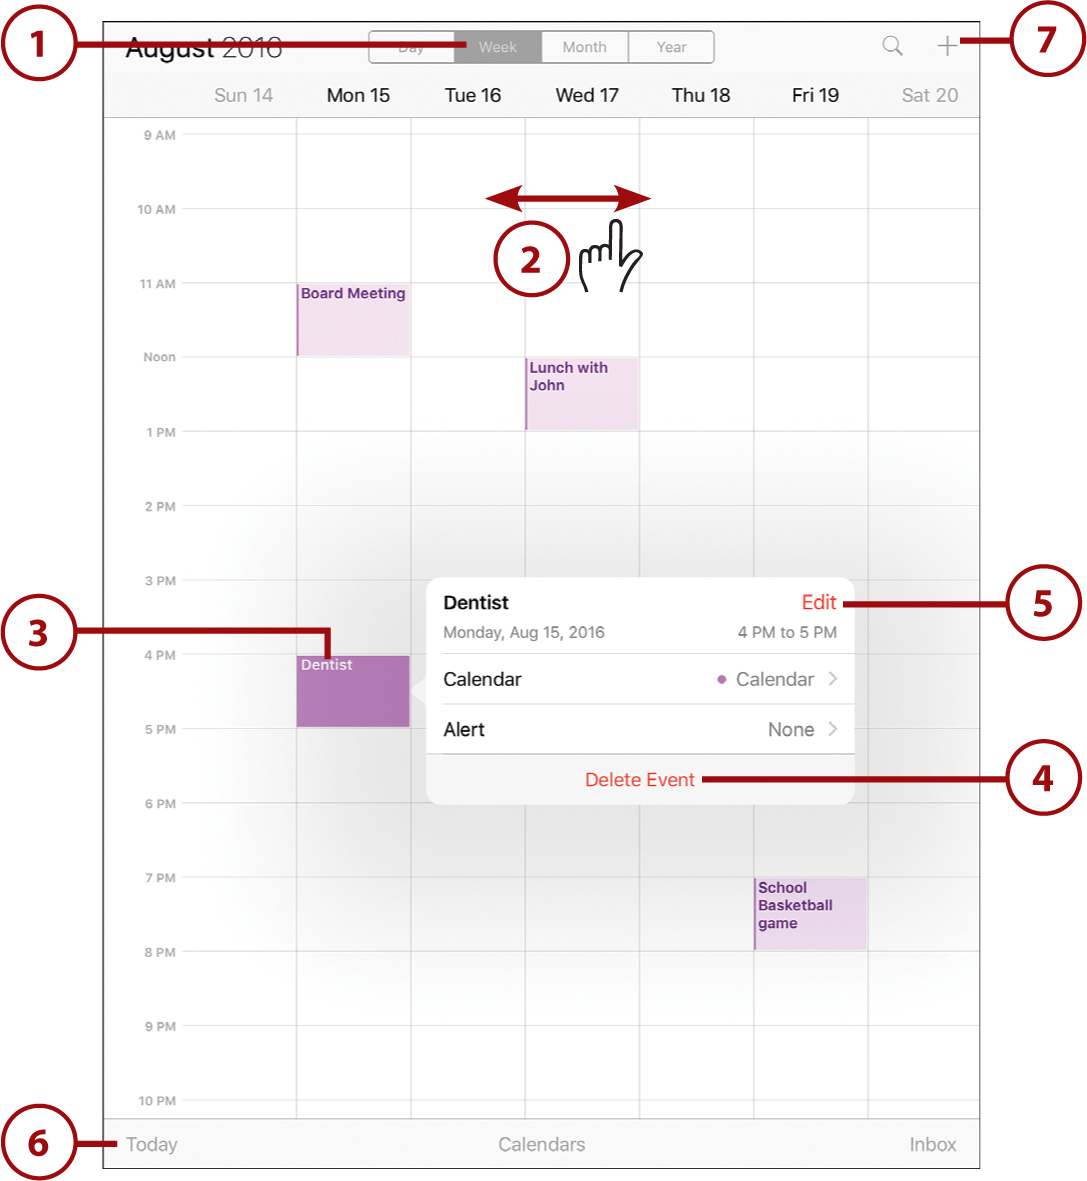
1. Tap Week to go to the Week view.
2. You can move to the previous week or the next by tapping and dragging in any blank part of the calendar. You can also drag vertically to see earlier in the morning or later in the evening.
3. Tap an event to view more information about it.
4. The information appears in a box to the left or right of the event.
5. You can tap Edit to edit the event right here. The familiar editing interface opens in an expanded box while you remain in the Week view.
6. Tap Today if you have navigated away from the current week and want to get back.
7. Tap + to add a new event while remaining in Week view.
Exploring Month View
To see the “big picture,” you may want to use Month view. This gives you a grid of seven days across and six or more weeks vertically. While this view is similar to a monthly calendar, it doesn’t necessarily have to show a single month. It can be used to show any group of six consecutive weeks.
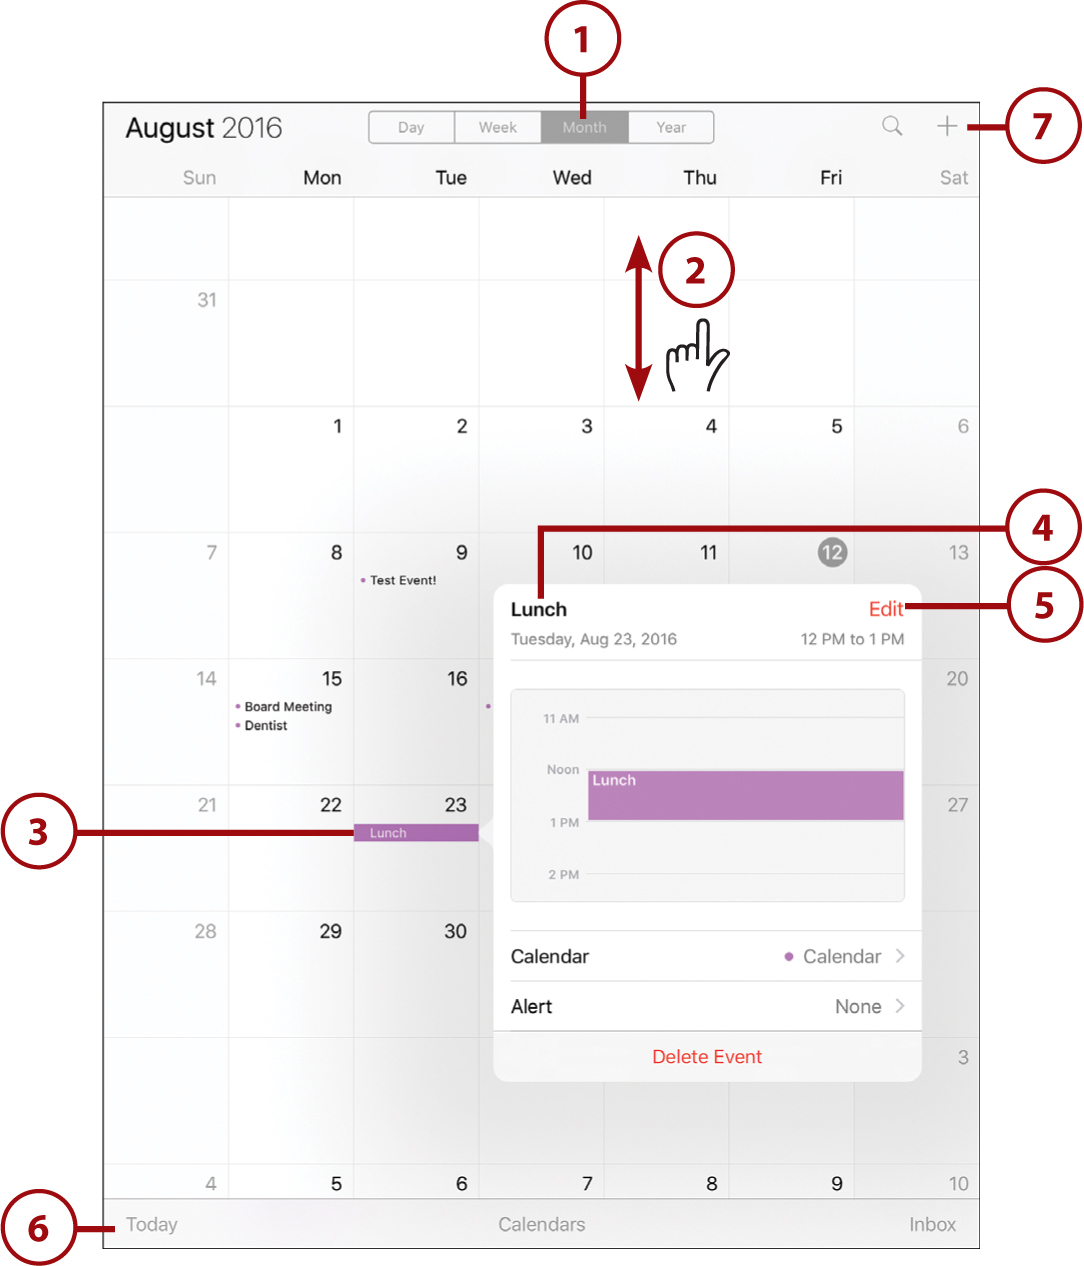
1. Tap Month to enter Month view.
2. While in Month view, you can tap and drag in blank areas to scroll up and down.
3. Tap an event to view more information.
4. The information appears in a box, like in Week view.
5. Tap Edit to edit the information right here in Month view. The editing interface opens inside an enlarged box.
6. Tap Today to return to the current day if you have scrolled away from it.
7. Tap + to add a new event.
You can use Siri to see what events you have coming up.
“What do I have going on tomorrow?”
“What is on my calendar for this week?”
“When is my dentist appointment?”
Creating a Calendar
You may have noticed in the previous tasks that you can select a calendar when you create an event. You can create multiple calendars to organize your events. For instance, you may want to have one for work and one for home.

1. From any calendar view, tap the Calendars button at the bottom center.
2. You can scroll up and down this list and disable or enable calendars by tapping the check marks. A calendar without a check mark is hidden and won’t appear in your views.
3. Tap the information icon to view and change information about a calendar, such as changing the color used as a background for events. You can also share calendars with other iCloud users.
4. Tap Edit to go into editing mode.
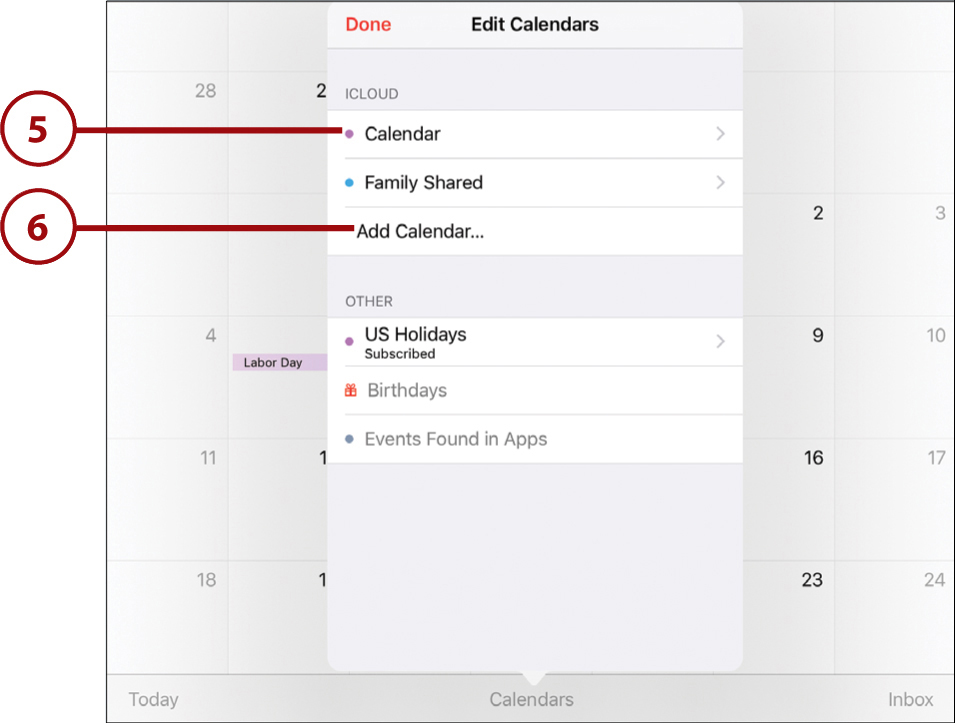
5. In editing mode, you can also select calendars to change their color and which other people they are shared with.
6. Tap Add Calendar to create a new calendar.

7. Give the new Calendar a name.
8. Set the color for the calendar.
9. Tap Done.
You can delete a calendar by following the previous steps 1–4 and then selecting a calendar to edit. Scroll to the bottom below the list of colors and choose Delete Calendar.
Default Calendar
Which calendar is used when you create a new event? You set the default calendar in the Settings app, under Mail, near the bottom of the list of preferences on the right.
Using the Notes App
Another organization app that comes with your iPad is the Notes app. Although this one is much more free-form than the Contacts or Calendar app, it can be useful for keeping quick notes or to-do lists.
2. Notes opens up the note you were previously working on. To type, tap on the screen where you want the insertion point, and a keyboard appears.
What’s in a Name
The filename for a note is just the first line of the note, so get in the habit of putting the title of a note as the first line of text to make finding the note easier.
3. Start a new note by tapping the Compose button at the upper right.
4. View a list of all your notes, and jump to another note, by tapping the Notes button.

5. Tap the name of the note you want to switch to.
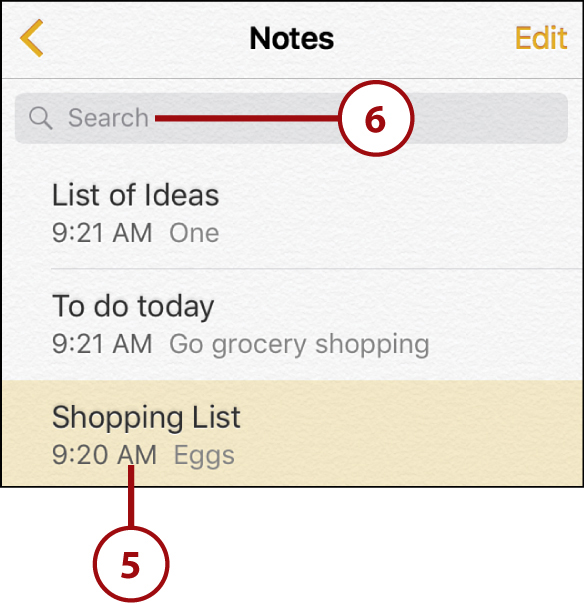
6. Tap and type in the Search field to find text inside of notes. If you don’t see the Search field, tap and drag down on the list of notes to reveal it just above the first note in the list.
7. Turn your iPad to horizontal orientation to have a permanent list of notes on the left. In this view, you don’t need to tap Notes, as you did in step 4, to see the list.
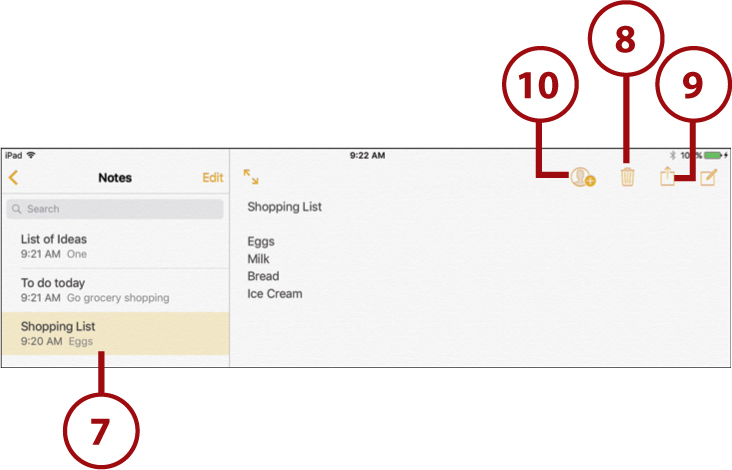
8. Tap the Trash button at the top-right of the screen to delete the note you are viewing.
9. Tap the Share button at the top-right of the screen to share the note in a number of ways. For instance, you can start a new email message in the Mail app using the contents of the note, or print the note using AirPrint.
10. Share a note with someone else who uses iOS 10 or Mac OS Sierra by tapping the Add People button. You then have the choice of inviting another iCloud user via Messages, Mail, Twitter, or Facebook.
Notes Isn’t a Word Processor
You can’t actually use Notes for serious writing. There are only basic styles and no formatting choices. You can’t even change the display font to make it larger. If you need to use your iPad for writing, consider Pages or a third-party word processing app. If you want to make some text bold, italic, or underlined, you can tap and hold a word, adjust the selection, and use the BIU button next to Cut, Copy, and Paste to apply a simple style to the selection.
Notes in the Cloud
Notes are stored on Apple’s iCloud server, just like calendar events and contacts. If you are using the same iCloud account on your Mac, for instance, you should see the notes appear almost instantly on your Mac, synced through iCloud. They also appear on your other iOS devices.
Creating Checklists in Notes
You can already see that Notes is useful for creating lists. Apple has built in a list function to make it even easier to use in this way.
1. Start a new note, or continue typing in an existing one.
2. Tap the checklist button when you want to start a list. You can have text before and after the list; it doesn’t have to be at the top of the note or the only thing in the note.
3. You see an empty circle appear on the line you are typing.
4. Type the first item in the list.
5. Tap Return on the on-screen keyboard and you can continue entering more items, each with an empty circle to its left.
6. Tap the checklist button again when you want to resume typing normal non-list text.
7. You can tap any empty circle in the list to fill it with a check mark.

Notes vs. Reminders
Checklists in Notes are good for things like shopping lists, packing lists, party invitation lists, and so on. For to-do lists, use the Reminders app, which is covered later in this chapter.
Adding Photos and Sketches to Notes
You can also insert photos from your photo library into notes, take photos with the camera, or draw sketches with your finger to include in your notes.
1. Create a new note or use an existing one. Photos and sketches can co-exist with other text in any note.
2. Position the cursor where you want to insert the photo or sketch.
3. Tap the Photo button to choose a photo from your library, or take one with the camera. It is the same way you insert a photo into an email message or text message. You can choose a photo from your library or use the camera interface to take a picture.
4. Tap the sketch button to enter the sketching screen.

5. On this screen, you can draw anything you like using a few simple tools. Select the pen, marker, or pencil tool at the bottom.
6. Select a color. You can swipe from left to right across the colors to see two more sets of colors.
7. Tap and drag your finger to draw.
8. The eraser tool enables you to clear marks you have made.
9. You can use the undo and redo buttons to help draw.
10. Tap Done to return to the note.
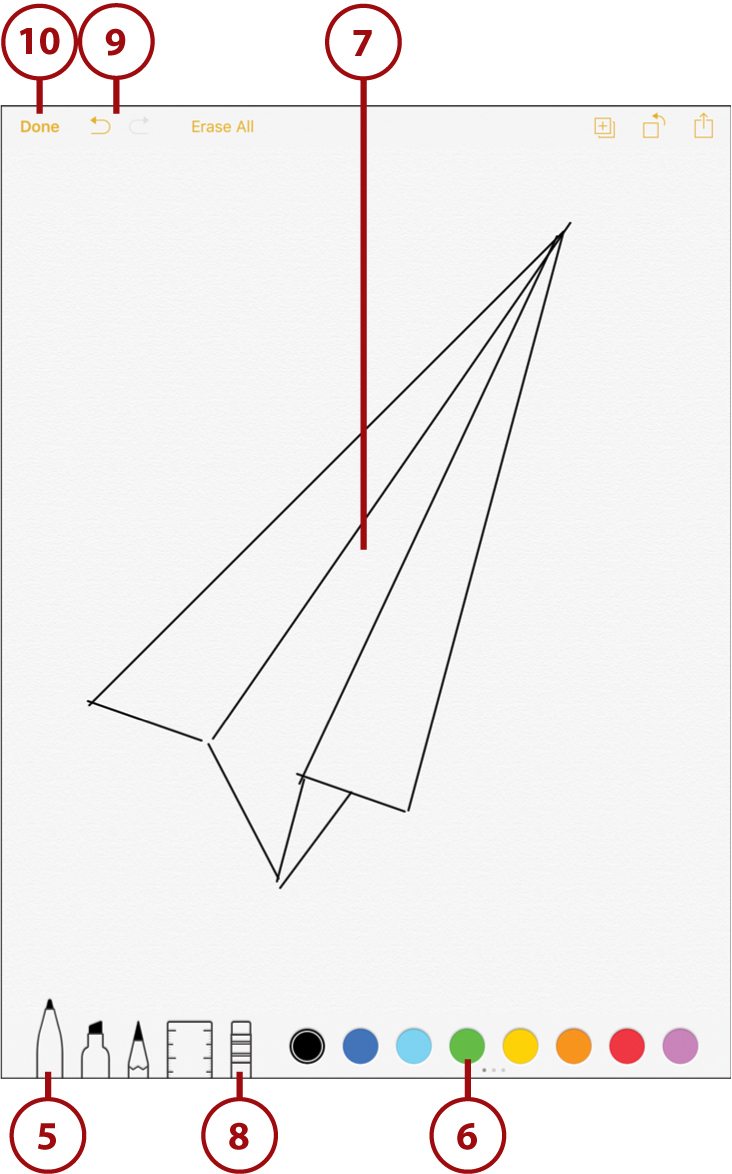
11. The sketch appears in your note. Tap it to return to the sketch screen to edit it. If you tap and hold the sketch instead, you see Cut, Copy, Delete, and Share options.

Multiple Sketches
You can add more than one sketch to a note. If you need to move a sketch to a different location in your note, or to a different note, tap and hold the sketch until you get the Options menu. Then use Cut to remove it and later use Paste to place it elsewhere.
Using the Reminders App
Reminders is a to-do list application available on iPad, iPod touch, iPhone, and Macs. This app is for creating an ongoing list of tasks you need to accomplish or things you need to remember. These reminders can be similar to calendar events with times and alarms. Or, they can be simple items in a list with no time attached to them.
2. Select the list you want to add a new Reminder to.
3. Tap in a new line to create a new reminder.
4. Type the reminder and close the keyboard when done.
5. Tap the i button next to the reminder to bring up the Details dialog. If you don’t see an i button, then tap any reminder item first.

6. Tap here to edit the reminder.
7. Slide the Remind Me on a Day switch to on to set a reminder alert.
8. Set a time for the alert to occur.
9. Add a note to the reminder if you want to include more details.
10. Tap outside of the Details box when you are finished editing the reminder.

Siri: Remind Me
You can create new reminders using Siri like this:
“Remind me to watch Doctor Who tonight at 8 PM.”
“Remind me to pick up milk when I leave work.”
“Remind me to check my stocks every day at 9 AM.”
11. Tap the button next to the reminder when you have completed the task. The item remains in the list temporarily.
12. Tap Add List to add a new reminders list.
13. Tap Show Completed to see completed reminders.
14. You can also search for reminders by typing the title or something from the content.
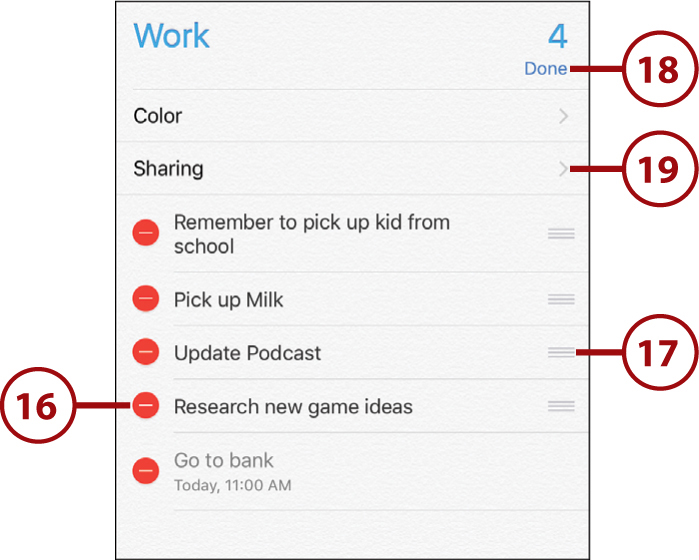
15. Tap Edit to remove reminders.

16. Tap the red – button next to a reminder to delete it.
17. Tap and drag the right side of the reminders to re-order them.
18. Tap Done when you are finished deleting and re-ordering the reminders.
19. You can also share a Reminders list with another iCloud user before leaving editing mode. Tap Sharing, and you can add one or more people from your contacts or manually add people with their Apple ID. Shared Reminders lists will sync items to all people sharing them.
iCloud
Reminders sync by using the iCloud service from Apple. So, they are automatically backed up and should also appear on your Mac in the Reminders app, if you have OS X 10.8 Mountain Lion or newer. And if you use an iPhone, they should appear there as well.
Using the Clock App
The advantage of using an alarm rather than a reminder is that an often-recurring alarm, like your morning wake-up call, or a reminder on when to pick up your child at school, won’t clutter up your Reminders list or calendar.
Setting Clock Alarms
1. Tap the Clock app.
2. The main screen shows up to six clocks in any time zone you want. Tap a clock to have it fill the screen.
3. Tap the + button to add a new clock.
4. Tap Edit to remove or rearrange the clocks.
5. Tap Alarm to view and edit alarms.

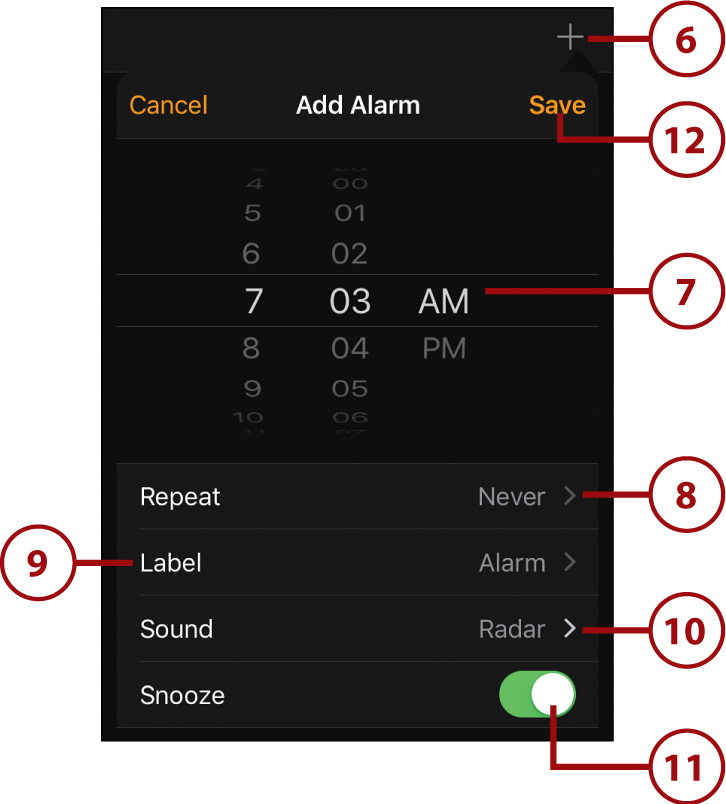
6. To add a new alarm, tap the + button.
7. Select a time for the alarm.
8. Select the days of the week for the alarm. Leaving it set to Never means you just want the alarm to be used once, as you might do if setting an alarm to wake you up early so you can catch a plane the next day. Otherwise, you can select from seven days of the week. So, you can set an alarm for Monday through Friday and leave out the weekend.
9. Tap Label to give the alarm a custom name.
10. Select a sound for the alarm. You can choose from preset sounds or your ringtone collection.
11. Leave the Snooze switch on if you want the ability to use snooze when the alarm goes off.
12. Tap Save to save all your settings and add the alarm.
13. The alarm shows up on the Alarm screen.
14. You can switch off the alarm, while leaving it in the calendar for future use.
15. Tap Edit on an alarm to edit or delete it.
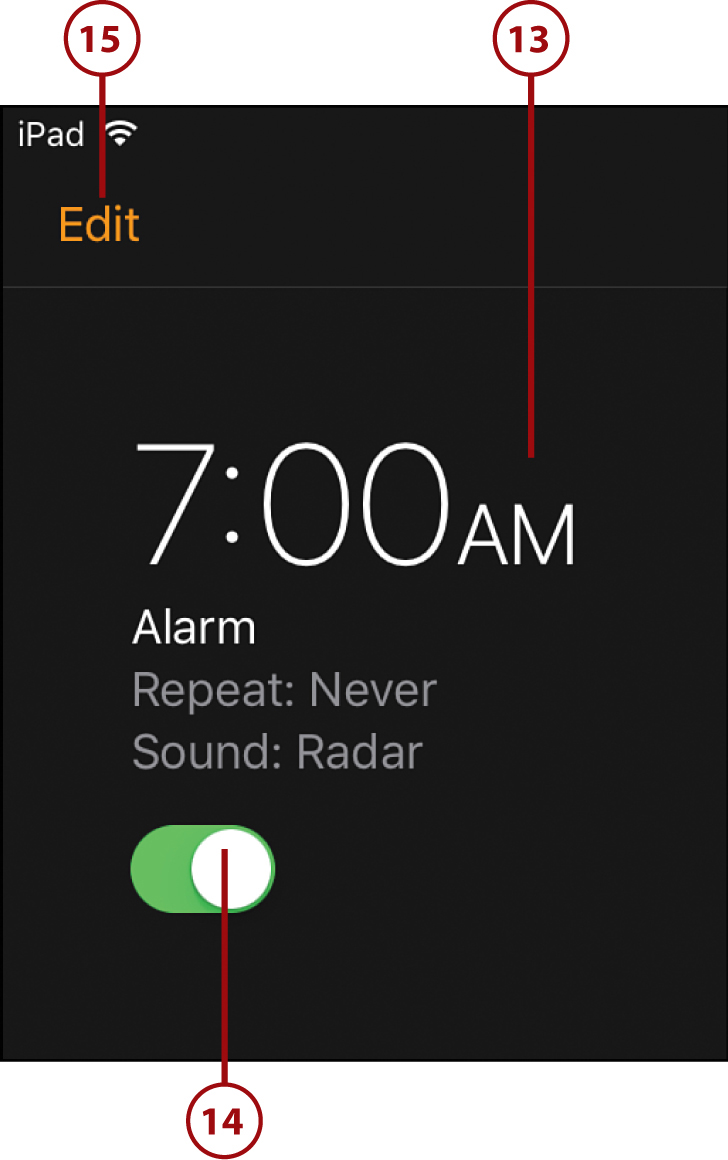
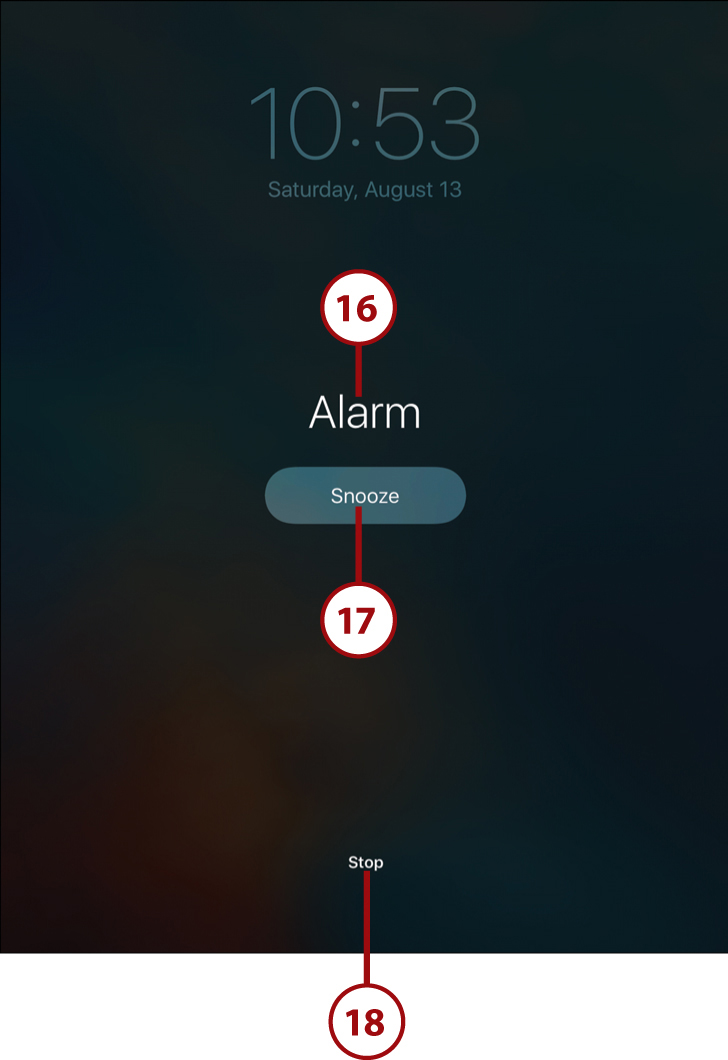
16. The alarm will sound and a message (in the middle of your screen) will appear at the scheduled time. Even if your iPad is sleeping, it will wake up and display a message on the Lock screen.
17. If you’ve enabled snooze, tap the Snooze button to silence the alarm and try again in 9 minutes.
18. Tap here to silence the alarm. If the iPad was awake when the alarm went off, you simply get a button to tap.
Wake Up!
When you set an alarm, it will sound even if you lower your volume to nothing, mute the sound with the side switch or Control Center, and switch into Do Not Disturb mode. This way, you can’t accidentally turn off an alarm just because you wanted to avoid other distractions.
Siri: Create Alarms
You can use Siri to create and delete alarms and even set timers. Try these phrases:
“Set an alarm for weekdays at 9 AM.”
“Create an alarm for tomorrow at 10 AM.”
“Cancel my 9 AM alarm.”
“Turn on my 9 AM alarm.”
“Turn off my 9 AM alarm.”
“Set a timer for 10 minutes.”