1 Getting Started
In this chapter you learn how to perform specific tasks on your iPad to become familiar with the interface.
→ The iPad Buttons and Switches
Before you learn how to perform specific tasks on your iPad, you should become familiar with the interface. If you have used an iPhone or iPod Touch, you already know the basics. But if the iPad is your first touch-screen device, you need to take time to become accustomed to interacting with it.
The iPad Buttons and Switches
The iPad features a Home button, a Wake/Sleep button, a volume control, and a screen rotation lock switch.
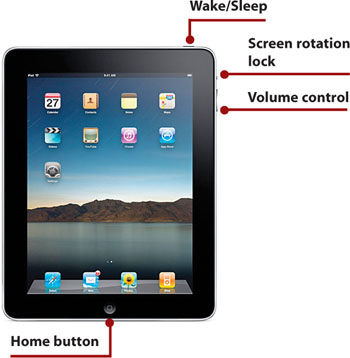
The Home Button
The Home button is probably the most important physical control on the iPad and the one that you will use the most often. Pressing the Home button returns you to the Home screen of the iPad when you are inside of an application, such as Safari or Mail, and you want to get back to your Home screen to launch another app.
Where’s the Quit Button?
Few, if any, apps on the iPad have a way to quit. Instead, think of the Home button as the Quit button. It closes out the current app and returns you to your Home screen.
The Wake/Sleep Button
The primary function of the Wake/Sleep button (sometimes also called the On/Off button) at the top of your iPad is to quickly put it to sleep. Sleeping is different than shutting down. When your iPad is in sleep mode, you can instantly wake it to use it. You can wake up from sleep by pressing the Wake/Sleep button again or pressing the Home button.
The Wake/Sleep button can also be used to shut down your iPad, which you might want to do if you leave your iPad for a long time and want to preserve the battery life.
Press and hold the Wake/Sleep button for a few seconds and it begins to shut down and turn off. Confirm your decision to shut down your iPad using the Slide to Power Off button on the screen.
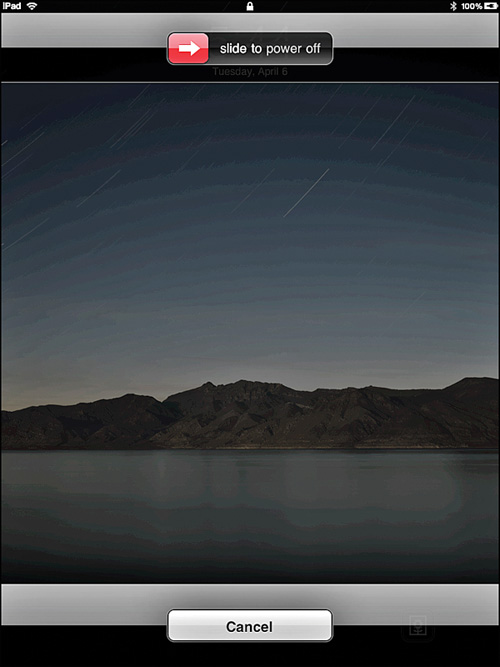
To start up your iPad, press and hold the Wake/Sleep button for a few seconds until you see something appear on the screen.
When Should I Turn Off My iPad?
It is perfectly normal to never turn off your iPad. While in sleep mode, with the screen off, it uses little power. If you can plug it in to power at night or during longer periods when you are not carrying it with you, you don’t need to ever shut it down.
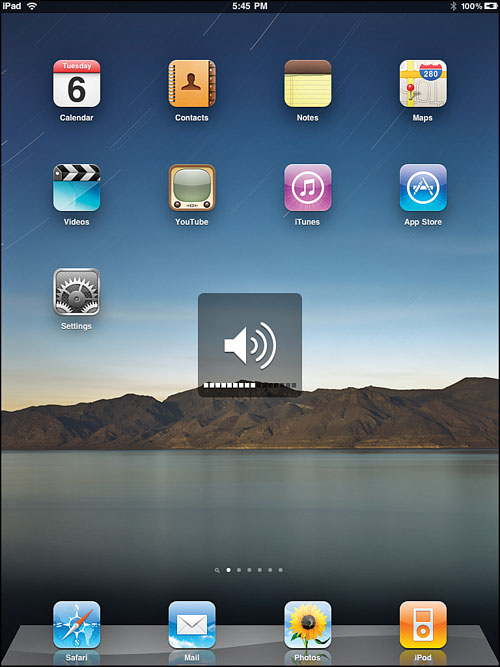
The Volume Control
The volume control on the side of your iPad is actually two buttons: one to turn the volume up, and the other to turn it down.
Your iPad keeps two separate volume settings in memory: one for headphones and one for the internal speakers. If you turn down the volume when using headphones, and then unplug the headphones, the volume changes to reflect the last settings used when headphones were not plugged in, and vice versa. A Speaker icon and a series of rectangles displays on the screen to indicate the level of volume.
The Screen Rotation Lock
Your iPad has two primary screen modes: vertical and horizontal. You can use almost every default app in either orientation. For example, if you find that a web page is too wide to fit on the screen in vertical orientation, you can turn the iPad sideways and the view changes to a horizontal orientation.
When you don’t want your iPad to react to its orientation, slide the iPad screen rotation lock so that you can see the orange dot, which prevents the orientation from changing. When you need to unlock it, just slide the lock off.
This comes in handy in many situations. For instance, if you are reading an e-book in bed or on a sofa while lying on your side, then you may want vertical orientation even though the iPad is lying sideways.
Orientation and Movement
I know I said there were only four physical switches on your iPad, but there is another one: the entire iPad.
Your iPad knows which way it is oriented, and it knows if it is being moved. The simplest indication of this is that it knows whether you hold it vertically with the Home button at the bottom or horizontally with the Home button to one of the sides. Some apps, especially games, use the exact screen orientation of the iPad to guide screen elements and views.
Shake It Up!
One interesting physical gesture you might perform is the “shake.” Because your iPad can sense movement, it can sense when you shake it. Many apps take advantage of this feature and use it to set off an action, such as shuffling songs in the iPod app or erasing a drawing canvas.
Screen Gestures
Who knew just a few years ago that we’d be controlling computing devices with taps, pinches, and flicks rather than drags, key presses, and clicks? Multitouch devices such as the iPhone, iPod Touch, and the iPad have added a new vocabulary to human-computer interaction.
Tapping and Touching
Since there is no mouse, a touch screen has no cursor. When your finger is not on the screen, there is no arrow pointing to anything.
A single, quick touch on the screen is usually called a “tap” or a “touch.” You usually tap an object on the screen to perform an action.
Occasionally you need to double-tap—two quick taps in the same location. For instance, double-tapping an image on a web page zooms in to the image. Another double-tap zooms back out.
Pinching
The screen on the iPad is a multitouch screen, which means it can detect more than one touch at the same time. This capability is used all the time with the pinch gesture.
A pinch (or a pinch in) is when you touch the screen with both your thumb and index finger and move them toward each other in a pinching motion. You can also pinch in reverse, which is sometimes called an “unpinch” or “pinch out.”
An example of when you would use a pinch would be to zoom in and out on a Web page or photograph.
![]()
Dragging and Flicking
If you touch the screen and hold your finger down, you can drag it in any direction along the screen. Often, this action has the effect of moving the content on the screen.
For instance, if you are viewing a long web page and drag up or down, the page will scroll. Sometimes an app will let you drag content left and right as well.

What if you have a long web page or a list of items inside an app? Instead of dragging the length of the screen, lifting your finger up, and moving it to the bottom to drag again, you can “flick.” Flicking is like dragging, but you move quickly and lift your finger off the screen at the last moment so that the content continues to scroll after you have lifted your finger. You can wait for it to stop scrolling or touch the screen to make it stop.
![]()
iPad Screens
Unlike a computer, the iPad screen does only one thing at a time. Let’s go through some of the typical screens you see while getting to know your iPad.
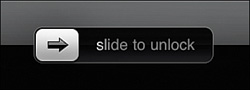
The Lock Screen
The default state of your iPad when you are not using it is the lock screen. This is just a picture with the time at the top and a large slider at the bottom with the words “slide to unlock,” and single button to the right of the slider for launching a picture frame photo slideshow (see Chapter 9, “Viewing Your Photos”).
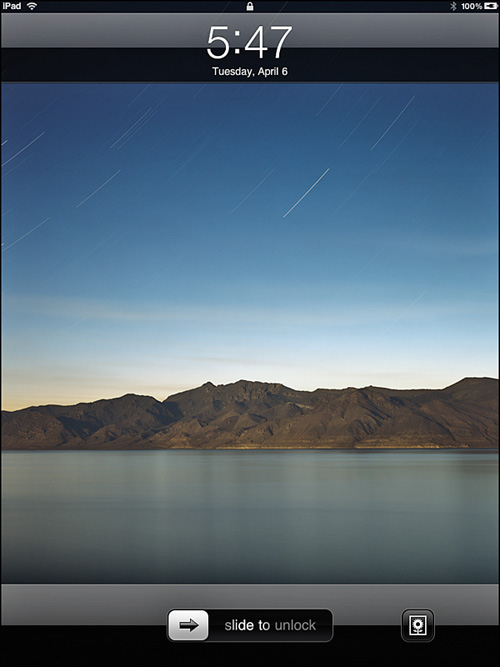
By default you see the lock screen when you wake up your iPad. Sliding the unlock slider takes you to the Home screen or to whichever app you were using when you put the iPad to sleep.
The Home Screen
Think of the Home screen as a single screen but with multiple pages that each features different app icons. At the bottom of the Home screen are app icons that do not change from page to page. The area resembles the Mac OS X Dock.
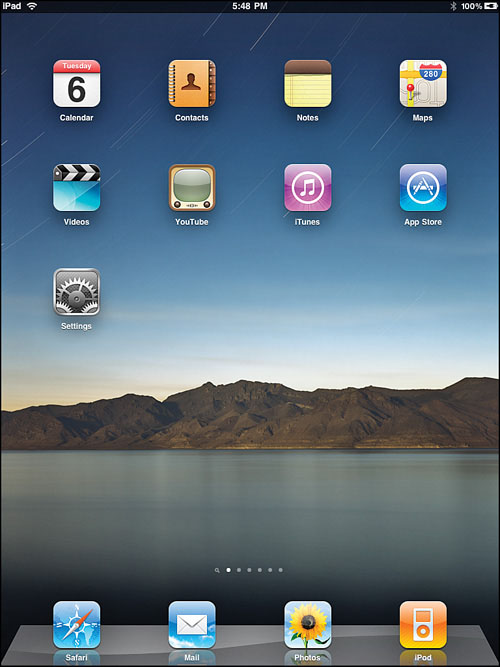
The number of pages on your Home screen depends on how many apps you have. The number of pages you have is indicated by the white dots near the bottom of the screen, just above the bottom icons. The brightest dot represents the page you are currently viewing. You can move between pages on your Home screen by dragging or flicking left or right.
To the left of the dots is a small magnifying glass that represents the search screen. We talk about that in a minute.
An App Screen
When you tap on an app icon on the Home screen, you run that app just like you would run an application on your computer. The app takes over the entire screen.
At this point your screen can look like anything. If you run Safari, for instance, a web page displays. If you run Mail, you see a list of your new email or a single incoming email message.
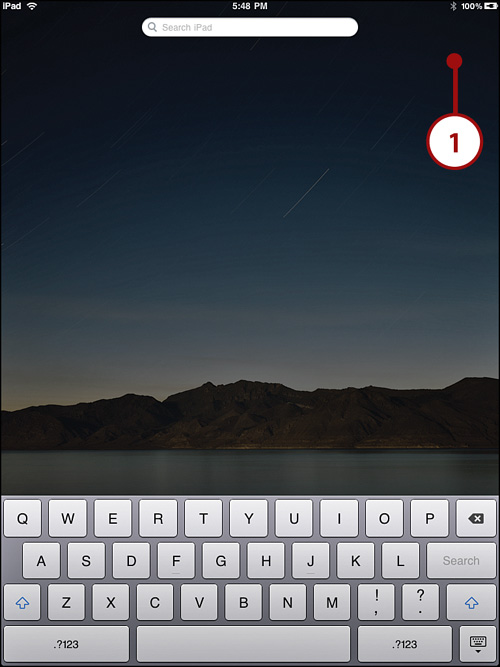
The Search Screen
If you are on your Home screen, looking at page one of your app icons, you can drag to the right to get to the Search screen, which has a Search iPad field at the top and a keyboard at the bottom.

The Settings Screen
One of the apps that you have on your iPad by default is the Settings app. With the Settings app, you can control several basic preferences for your iPad. (See Chapter 2, “Customizing Your iPad,” for more on customizing settings.)
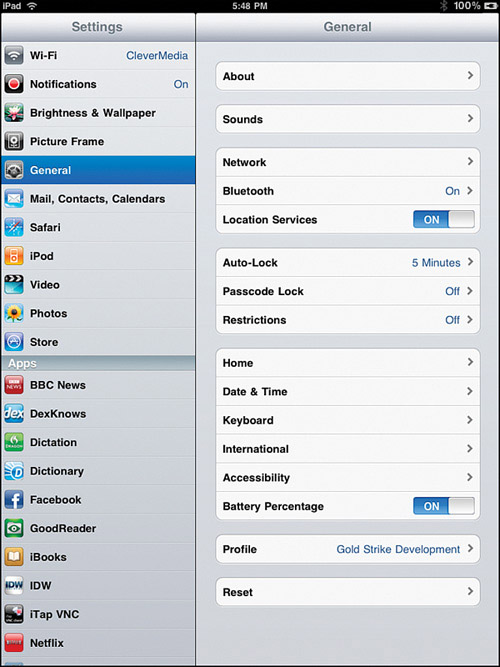
This is really just another app screen, but it is worth singling out as you’ll need it to customize most aspects of your iPad.
Interacting with Your iPad
Now let’s examine the different types of on-screen interface elements, the onscreen keyboard and how to use it, and specialized interactions such as text editing and copy and paste.
Common Interface Elements
Several interface elements are more complex than a simple button. In typical Apple style, these elements are often self-explanatory, but if you have never used an iPhone or iPod Touch before, you might find some that give you pause.
Sliders
A slider is really just a button. But instead of tapping it, you need to tap and drag to the right to indicate that you want to perform the action, which makes it harder to accidentally trigger the action.
The most obvious example is the slider at the bottom of the Lock screen. If there were a button there, it might be too easy to unlock your iPad without realizing it.
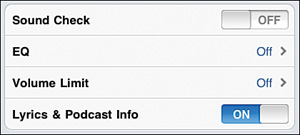
Switches
A switch is also like a simple button, but you need to tap only the switch to activate it. A switch gives you feedback about which state it is in.
For example, switches indicate whether the Sound Check and Lyrics & Podcast Info features of the iPod are on or off. Tapping on either switch changes the position of the switch.
Toolbars
Some apps have a set of buttons in a toolbar at the top of the screen that are general controls. The toolbar might disappear or the buttons might vary depending on the mode of the app. An example of a toolbar is in the iTunes app.
![]()
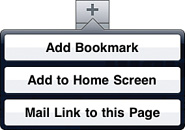
Button Lists
Often tapping a single button in a toolbar brings up more buttons, which are like menus on your Mac or PC. The buttons in the list are usually related. For example, a button in Safari gives you options to Add Bookmark, Add to Home Screen, or Mail Link to This Page.
Tab Bars
Sometimes you see a row of buttons at the bottom of the screen that function similarly to toolbars, but each button represents a different mode for the app. For instance, at the bottom of the YouTube app, you see a Tab bar that you use to switch between various lists of videos: Featured, Top Rated, Most Viewed, Favorites, Subscriptions, My Videos, and History.
![]()
Using the On Screen Keyboard
The interface element you might interact with the most is the on-screen keyboard. It pops up from the bottom of the screen automatically whenever you need to enter some text.

The default keyboard has only letters and the most basic punctuation available. There are two shift keys that enable you to enter uppercase letters. You also have a Backspace key and a Return key.
Is There a Quicker Way to Capitalize?
So to capitalize a word, you tap the Shift key and then type the letter, right? You can. But a faster way is to tap the Shift key; then, without letting your finger off the screen, drag it to the letter and release in a single tap, slide, release action.
You can do the same with numbers and punctuation by tapping the .?123 key and sliding and releasing over the key you want.
To enter numbers and some other punctuation, tap the .?123 key to switch your keyboard into a second mode for numbers and punctuation.
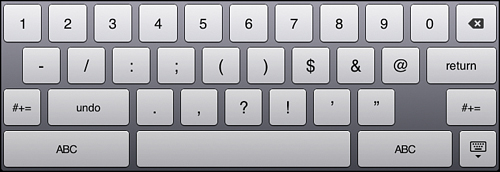
To return to the letters, just tap the ABC key, Or tap the #+= key to go to a third keyboard that includes less frequently used punctuation and symbols.
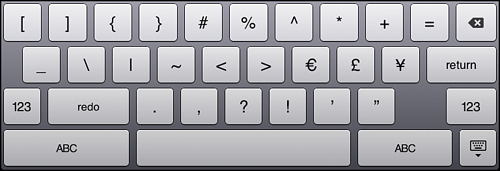
There are other keyboard variations. For instance, if you type in a location that needs a web address, a keyboard that doesn’t have a spacebar appears that instead has commonly used symbols such as colons, slashes, underscores, and even a .com button. Instead of a Return key, you might see an action word like “Search” written on that key when tapping it will perform an action like searching the web. All keyboards include a button at the bottom right that enables you to hide the keyboard if you want to dismiss it.
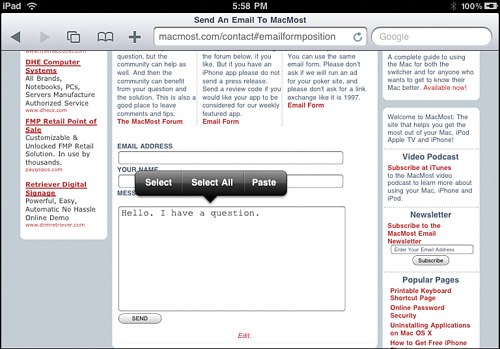
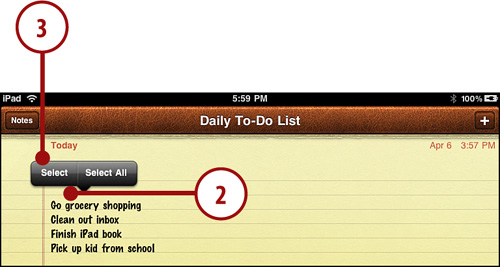
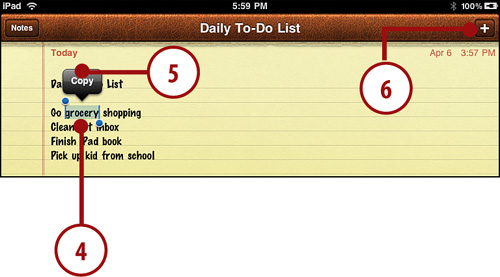
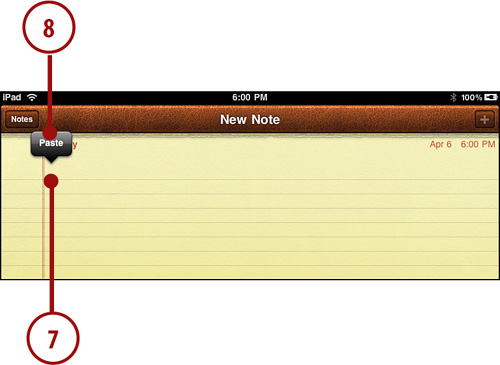
Editing Text
Editing text has its challenges on a touch-screen device. Even though you can just touch any portion of your text on screen, your finger tip is too large for the level of precision you usually get with a computer mouse and cursor. To compensate, Apple developed an editing technique using a magnifying glass area of the screen that you get when you touch and hold over a piece of text.
For example, if you want to enter some text into a field in Safari, touch and hold on the field. A circle of magnification appears with a cursor placed at the exact location you selected.
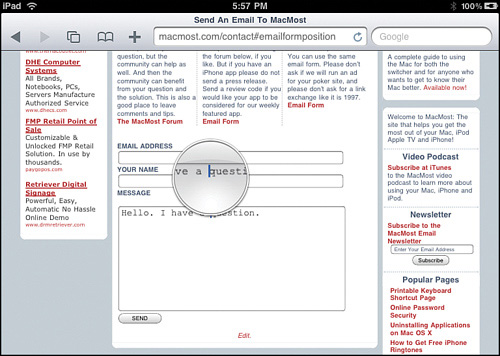
When you find the exact location that you want to indicate, release your finger from the screen. Then a variety of options display, depending on what kind of text you selected, such as Select, Select All, and Paste. You can ignore the options presented and start typing again to insert text at this location.