

In this chapter, you learn how to get going with your iPod touch. The topics include the following:
</feature>The good news is that getting started with an iPod touch is a simple, painless process. You’ve got your hands on one, so it’s time to get going. In this chapter, you get a tour of the iPod touch so you can use its controls and work with its interface quickly and easily. You also learn about installing iPod touch’s required partner, iTunes, which you use to move content onto iPod touch and keep it in sync. Another optional but very valuable partner for iPod touch is Apple’s MobileMe service, which we also take a look at. Last, you learn a bit about how you can get the most out of this book.
You’ll find that an iPod touch is one of the most amazing handheld devices ever because of how well it is designed. It has only a few external features you need to understand. For most of the things you do, you’ll just use your fingers on your iPod touch’s screen (which just seems natural), and the iPod touch provides a consistent interface so you accomplish most tasks with similar steps.
Take a quick look at the iPod touch’s physical controls and ports and learn to understand how you move around its screens.
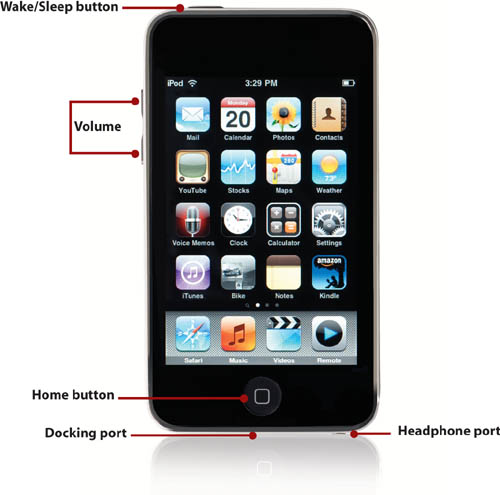
Wake/Sleep button. Press this to lock the iPod touch’s controls and put it to sleep. Press it again to wake the iPod touch from Sleep mode. Note that if you are using the iPod touch to listen to audio when you press this button, the music keeps playing while the iPod touch is locked. If you hold this button down for a few seconds while the iPod touch is on, you’re prompted to shut it down. If the iPod touch is turned off and you press and hold this button for a second or two, it starts up.
Headphone port. Plug the iPod touch’s earbuds into this port.
Docking port. Use this port to connect the iPod touch to a computer using the included USB cable.
Home button. Press this button to move to the all-important Home screens. It can also perform other functions, such as displaying iPod controls or moving into Search mode when you press it twice.
Volume. Press the upper part of the rocker switch to increase volume; press the lower part of the switch to decrease volume.
Apple designed the iPod touch to be touched. (That might have something to do with its name, I suspect.) The previous section describes the only physical controls an iPod touch has; as you saw, there aren’t many. Most of the time, you control your iPod touch by using your fingers on its screen to tap buttons, select items on lists, scroll, zoom, type text, and so on. After you use it a while, you might want everything to work this way because it’s so easy and intuitive.

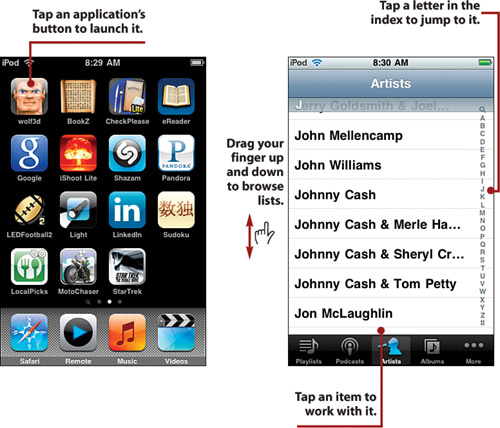
Most iPod touch activities start at the Home screen, which you get to by pressing the Home button located at the bottom of the iPod touch. Along the bottom of the Home screen, you see the toolbar; this toolbar is visible when you view most of the Home screen’s pages so that you have easy access to the buttons it contains (more on the Home screen shortly). Above the toolbar, you see applications on iPod touch that do all sorts of cool things; as you install applications, the number of buttons increases. You can also create bookmarks for websites and store them as buttons on the Home screen. As you add applications and bookmarks, the number of pages of the Home screen increases so you can store them all on it. You can organize the buttons on the pages of the Home screen in anyway you’d like.
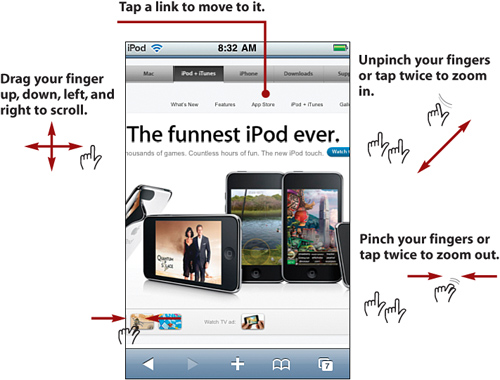
The following figures highlight the major ways you control iPod touch. A tap is just what it sounds like; you gently press a finger to the iPod touch’s screen over the item you want to control and then lift your finger up again. To drag, you place your finger on the screen and move it across the screen without lifting it up. (You don’t need to apply pressure, just contact.) To pinch or unpinch, place two fingers on the screen and drag them together or move them apart.


There are lots of things you do with an iPod touch that require you to type, and iPod touch’s keyboard is pretty amazing. Whenever you need it, whether it’s for emailing, entering a website URL, performing a search, and so on, it pops up automatically.
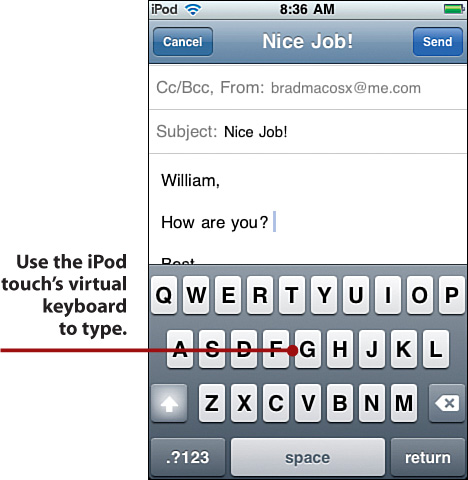
To type, just tap the keys. As you tap each key, the character you tap pops up in a small window so you can see what you entered, which is useful feedback for you. (You also hear audio feedback if you haven’t disabled it.) The keyboard includes all the standard keys you expect. To change from letters to numbers and special characters, just tap the .?123 key. (Tap the ABC key to return to letters.) It also has contextual keys that appear when you need them. For example, when you are entering a website address, the .com key appears so you can enter these four characters with a single tap.
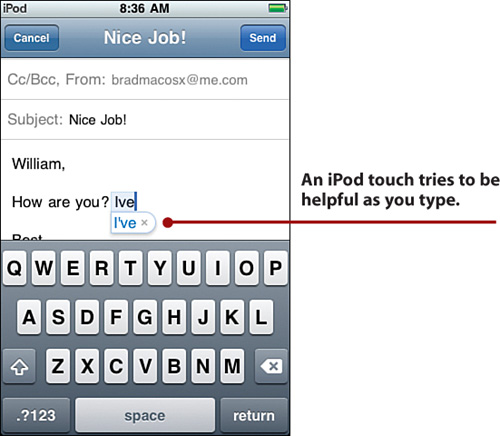
If you type a word that the iPod touch doesn’t recognize, it makes a suggestion about what it thinks is the correct word in a pop-up box. To accept the suggestion, tap the space key. To reject the suggestion, tap the pop-up box to close it and keep what you typed. You can also use this feature for shorthand typing. For example, to type “I’ll” you can simply type “Ill” and iPod touch will suggest “I’ll” which you can accept by tapping the Space key.
iPod touch also attempts to correct the capitalization of what you type as well. It also automatically selects the Cap key when you start a new sentence.

To edit text, tap and hold on the text you want to edit. A magnifying glass icon appears on the screen, and within it you see a magnified view of the location of the cursor. Drag the magnifying glass to where you want to make changes and then lift your finger from the screen; the cursor remains in that location, and you can use the keyboard to make changes to the text or to add text at that location.
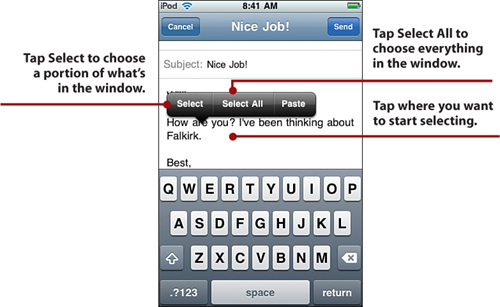
You can also select text or images to copy and paste the selected content into a new location. Tap and hold down briefly where you want to start the selection until the magnifying glass icon appears; then lift your finger off the screen. The Select menu appears. Tap Select to select part of the content on the screen or tap Select All to select everything in the current window.
You see markers indicating where the selection starts and stops. (The iPod touch attempts to select something logical, such as the word or sentence.)

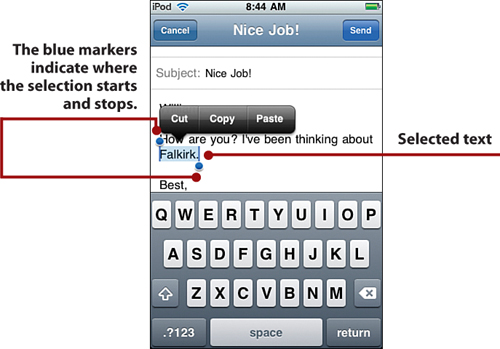
Drag the two markers so the content you want to select is between them; the selected portion is highlighted in blue. As you drag, a magnified view of where the selection marker is appears to help you place it more accurately. When the selection markers are located correctly, lift your finger from the screen. (If you tapped the Select All command, you don’t need to do this because the content you want to copy is already selected.)

Tap Cut to remove the content from the current window or Copy to just copy it.

Move to where you want to paste the content you selected. Tap where you want the content to be pasted; for a more precise location, tap and hold and then use the magnifying glass icon to move to a specific location. Tap Paste.

The content you copied or cut appears where you placed the cursor.

Earlier, you read that the Home screen is the jumping-off point for many of the things you do with your iPod touch because that is where you access the buttons you tap to launch applications, move to website bookmarks you’ve saved there, and configure your iPod touch’s settings.
The Home screen actually has multiple pages. To move to a page, drag to the left to move to later pages or to the right to move to earlier pages. Or tap the dot corresponding to the page you want to move to.
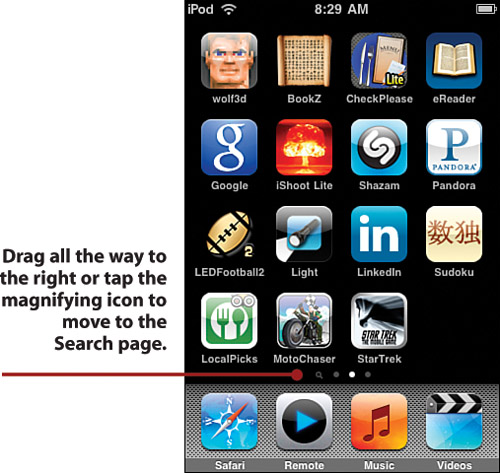
If you move all the way to the “left,” you see the Search page. Using this tool, you can search your iPod touch. The objects you search, such as email, music, and such are determined by settings you can configure. (This is covered in Chapter 14, “Customizing an iPod touch.”)

To perform a search, tap in the Search bar and type. As you type, items that meet your search are shown on the list below the Search bar. When you’re done typing the search term, tap Search.
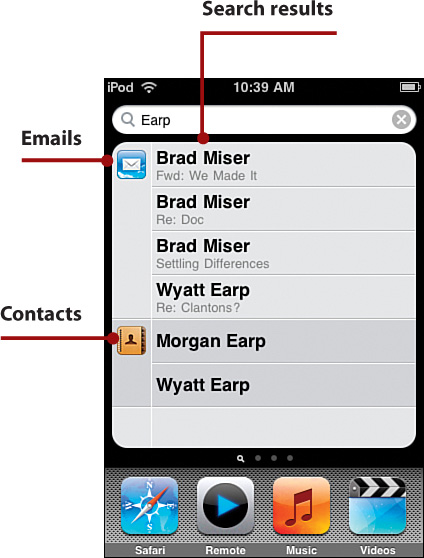
The results are organized into sections, which are indicated by icons along the left edge of the screen, such as email, contacts, and so on. To see the detail of an item, tap it. The results remain so that you can always move back to the results screen to work with other items you found.
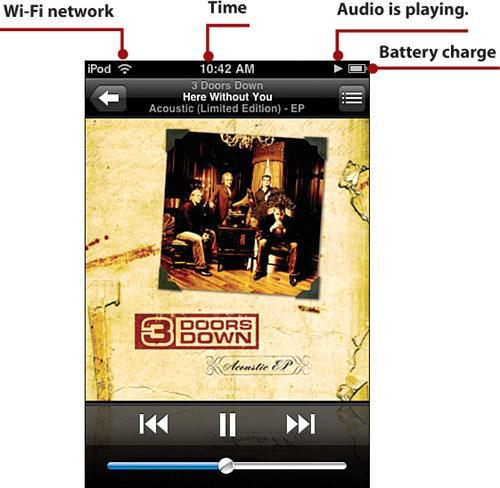
At the top of the screen, you see various icons that provide you with information, such as if you are connected to a Wi-Fi network, the time, the state of iPod touch’s battery, and so on. Keep an eye on this area as you use iPod touch.
When an iPod touch is asleep and you press the Wake/Sleep button or the Home button, the iPod wakes up, and its screen activates; you see the Unlock slider. Drag the slider to the right to unlock iPod touch so that you can work with it. You move to the iPod touch Home screen or to the last screen you were using.

In most cases, you should just put iPod touch to sleep when you aren’t using it instead of shutting it off. It doesn’t use much power when it sleeps, and it wakes up quickly when you want to start using it again. (In fact, you seldom need to turn iPod touch off.)
To change iPod touch’s volume, tap the up or down Volume buttons. If you aren’t on a screen that shows the Volume slider, an icon pops up to show you the relative volume you are setting. When the volume is right, release the volume button.


If you want to turn iPod touch off, press and hold the Wake/Sleep button until the red slider appears at the top of the screen. Drag the slider to the right to shut iPod touch down.
To restart iPod touch, press and hold the Wake/Sleep button until the Apple logo appears on the screen. In a moment, you see iPod touch’s Home screen, and it’s ready for you to use again.
iTunes is the application you use to move content (music, podcasts, movies, and so on) and information (such as email account configurations) onto your iPod touch. You need to download and install iTunes on your computer or make sure that you are using the most current version if it’s already installed. To get started, jump into any of the following sections that apply to your particular situation.
You might find yourself in one of two situations on the iTunes front. If you are a Windows user and have never used iTunes, you have to download and install it, which is covered in the next section. (If iTunes is already installed, skip over that section.) If you’re a Windows or Mac user and already have iTunes installed on your computer, update it to make sure that you are using the latest version; the section titled “Updating iTunes” covers how to do so.
After iTunes is installed and updated, you should get an account at the iTunes Store, which enables you to purchase content or rent movies. As you might guess, there’s a section called “Obtaining an iTunes Store Account” if you don’t already have an account there.
If your PC doesn’t have iTunes installed, perform the following steps.
Open a web browser.
Move to www.apple.com/itunes/download/.
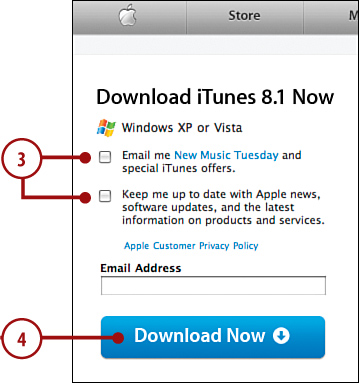
Click Download Now. The installer application starts.
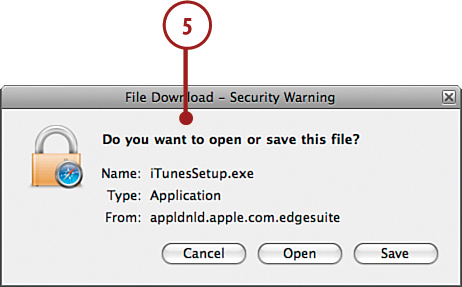
Follow the onscreen instructions to open and the run the installer to install iTunes.
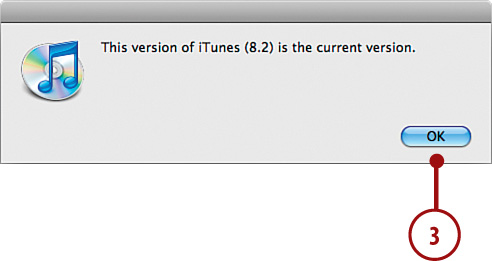
You should check to make sure you are using the most current version of iTunes.
Open iTunes.
On a Windows PC, choose Help, Check for Updates. On a Mac, choose iTunes, Check for Updates. The application checks your version of iTunes against the current version.

If you are using the current version, click OK to clear the dialog telling you so. If you aren’t using the current version, you’re prompted to download and install it. Follow the onscreen instructions to download and install the newer version.
An account on the iTunes Store enables you to purchase audio and video content that is then downloaded to your iTunes Library from where you can move it onto your computer. And you can purchase and download content directly onto your iPod touch as well. Even if you don’t intend to purchase content or rent movies, you need an account to be able to download and install applications for your iPod touch. To obtain and sign into an account, perform the following steps.
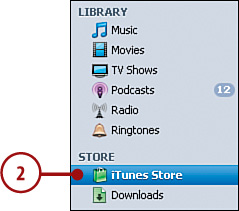
Open iTunes.
Click iTunes Store. You connect to the Internet and move into the iTunes Store.
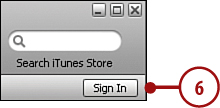
Click Sign In. The Sign In dialog appears. If you see your Apple ID instead of the Sign In button, iTunes is already logged into an iTunes Store account. If the account is yours, skip the rest of these steps. If the account isn’t yours, click the account shown and click Sign Out so that you can create your account.

Click Create New Account. You move to the first screen in the account creation process.

Read the information and follow the onscreen instructions to create an Apple ID. After you complete the steps, you receive your Apple ID and password.

Click the Sign In button.
Enter your Apple ID and password.

Click Sign In. You are logged into your iTunes Store account.
Apple’s MobileMe service provides you with a number of features including online disk space, an email account, an online photo gallery, and more. When it comes to your iPod touch, MobileMe offers one primary benefit, and it is a really good one. With MobileMe, you can keep your contacts, calendar, web favorites, and MobileMe email in sync between computers and your iPod touch wirelessly. Instead of having to connect your iPod touch to a computer to move information over the USB cable, information (such as your email) is moved directly from the Internet onto iPod touch via its Wi-Fi Internet connection. Not only is this easier, but also your information remains much more current on all your devices.
MobileMe works by moving information from a computer or an iPod touch to the MobileMe “cloud” on the Internet. The information is downloaded from the cloud to each device so that all devices have the same information on them.
MobileMe isn’t free. Currently, an individual MobileMe account is $99 per year, while the cost of a family account is about $149 per year. However, you can sign up for a free trial account that is available for 60 days. At the end of that period, you can choose to cancel the account if you don’t find it valuable.
There are three general steps required to use MobileMe with iPod touch. One is to obtain a MobileMe account. The second is to configure MobileMe on your computers; this task is slightly different on Windows PCs or Macs, so you’ll find a section for each kind of computer. The third step is to configure iPod touch to access the information provided by MobileMe; these tasks are described in the relevant chapters but are primarily discussed in Chapter 4, “Configuring and Synchronizing Information on an iPod touch.”
To begin your free trial MobileMe account, follow these steps:
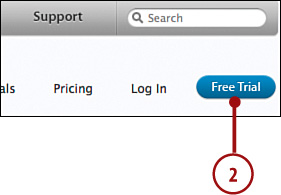
Use a web browser to move to www.apple.com/mobileme/.
Click Free Trial.
Follow the onscreen instructions to obtain your MobileMe account. This involves creating your member name and password and providing contact information and a credit card (which isn’t charged until the end of your free trial period). At the end of the process, you’ll have a MobileMe member name and password. You use this information to access MobileMe services on all your devices.

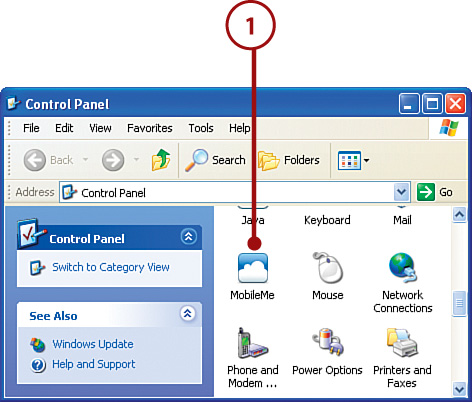
Use the MobileMe control panel to configure MobileMe syncing on a Windows PC.
Open the MobileMe Preferences control panel. (If you don’t have this control panel, you aren’t using the current version of iTunes. Go back to the section called “Updating iTunes” and update your version.)
Enter your MobileMe member name and password.
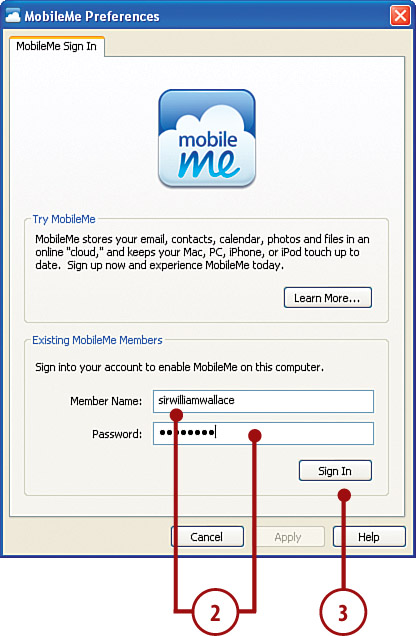
Click Sign In. Your computer connects to your MobileMe account. In the Account Status section, you see information about your account, such as the amount of disk space you have, when the account expires, and so on.
Click the Sync tab.

Check the Sync with MobileMe check box.
On the top drop-down menu, choose how frequently the sync happens. Choose from Hourly, Automatically, and Manually. If you select Manually, you must click the Sync Now button to sync iTunes to your iPod.
If you want your MobileMe contact information to be included in the sync, check the Contacts check box and choose where you want the contact information stored, such as Windows Address Book.

To include MobileMe calendar information in the sync, check the Calendar check box and choose the location of the calendars to be synced from the drop-down list.
To have your bookmarks moved into the MobileMe cloud, check the Bookmarks check box and choose the web browser where the bookmarks you want to sync are maintained (Internet Explorer or Safari).
Click OK. If you selected any option but Manually in step 6, the information you selected is copied from the computer to the MobileMe cloud where you can access it on iPod touch, and the process is repeated according to the schedule you set. If you selected Manually, click the Sync Now button to move the information.
Skip to the section titled “Managing MobileMe Syncs.”
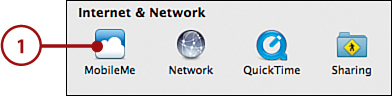
Use the MobileMe pane of the System Preferences application to configure MobileMe syncing on a Mac.
Open the System Preferences application and click the MobileMe icon.
Enter your member name and password.
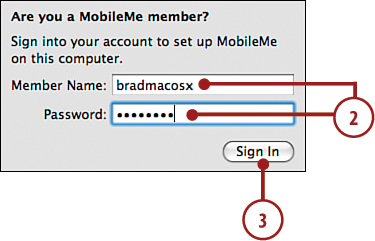
Click Sign In. Your account information is configured, and the MobileMe pane updates to show that you have configured MobileMe.
Click the Sync tab.
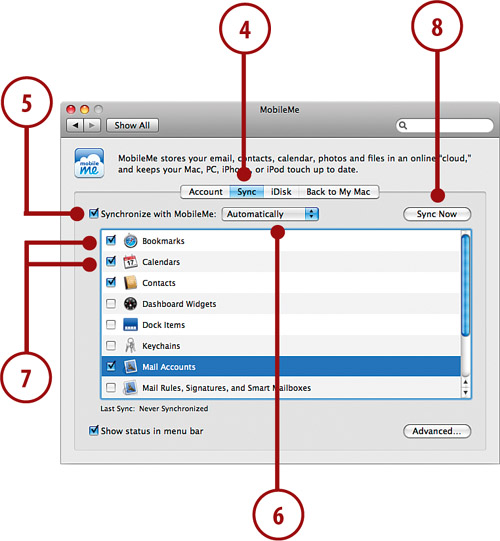
Check the Synchronize with MobileMe check box.
On the pop-up menu, select how you want synchronizations to occur. You can choose Manually to sync manually; choose a time, such as Every Hour, to sync at those times; or choose Automatically to have syncs performed whenever included data changes.
Check the check box next to each item you want to include in the syncs.
Click Sync Now. The information you selected is copied onto the MobileMe cloud where you can access it from iPod touch. Future syncs happen according to the schedule you set, or if you selected Manually, you have to click the Sync Now button whenever you want to sync your information.
As information changes on your iPod touch or on a computer, that information is synced via the MobileMe cloud. When this happens, the differences between the data on each device must be managed. You decide what happens the first time you sync, and you manage the process each time thereafter.
The first time you sync information via MobileMe (or if you reset your sync options), you decide how you want information to be moved. You are prompted via the MobileMe Sync Alert dialog.
At the prompt, choose how you want information to be moved. Choose Merge Data if you want the data on MobileMe to be merged with the information on your computer. Choose Replace Data on Computer to replace the information on your computer with information stored on the MobileMe cloud. Choose Replace Data on MobileMe to have the information on your computer replace the data on the MobileMe cloud. Choose Ignore for Now if you don’t want any action taken.

Click Allow. The sync proceeds.

During syncs, you are prompted when the amount of data changes beyond the limits you set on the MobileMe Preferences control panel or the MobileMe pane of the System Preferences application. For example, you might choose to be notified when more than 5% of the computer’s data will change. When this happens, you see a dialog that enables you to make selections about how data is moved. You can use the controls in this dialog to review the changes and accept or prevent them as you see fit. When you’ve decided, you click the appropriate Sync button to allow the sync to proceed. If these prompts get too annoying, move back to the MobileMe preferences and increase the percentage of data change that triggers a notification or disable the notifications entirely.
This book has been designed to help you transform an iPod touch into your iPod touch by helping you learn to use it easily and quickly. As you can tell, the book relies heavily on pictures to show you how an iPod touch works. It is also task-focused so that you can quickly learn the specific steps to follow to do all the cool things you can do with your iPod touch.
Using an iPod touch involves lots of touching its screen with your fingers. When you need to tap part of the screen, such as a button or keyboard, you see a callout with the step number pointing to where you need to tap. When you need to drag or slide your finger along the screen, such as to browse lists, you see the following icon:
The directions you can drag are indicated with arrows.
To zoom in or zoom out on screens, you unpinch or pinch, respectively, your fingers on the screen. These motions are indicated by the following icons:
When you can drag quickly across the iPod touch’s screen to flip through pages, you see this icon:
When you need to tap twice, such as to zoom out or in, you see the following icon:
When you need to rotate iPod touch, you see this icon:
Sometimes you shake the iPod touch to activate a control. When you do, you see this icon:
Because iTunes and the iPod touch work with both Windows computers and Macs, this book is designed for both platforms as well. When there are significant differences, such as applications you use to store photos, you see task sections devoted to each type of computer. You can safely skip over sections focused on a type of computer you don’t use.