In this chapter, you’ll explore all the audio functionality the iPod touch offers. The topics include the following:
</feature>The primary reason iPods have become such a phenomenon is that they are amazingly powerful devices for listening to all kinds of audio, including music, podcasts (which came into existence because of iPods), audiobooks, and others. After you move audio content onto your iPod touch (learn how to stock your touch with great audio in Chapter 3, “Moving Audio, Video, and Photos onto Your iPod touch”), you can use the iPod touch’s fantastic and fun tools to enjoy that content.
There are two fundamental steps to listening to music and other audio content. First, find the content you want to listen to by using one of the many search options your iPod touch offers. Second, after you find and select what you want to hear, use iPod touch’s playback controls to listen to your heart’s content.
The Cover Flow Browser simulates what it’s like to flip through a stack of CDs; you can quickly peruse your entire music collection to get to the right music for your current mood.
On the Home screen, tap the Music button.
Tap one of the category buttons, such as Playlists, Artists, Songs, or Albums. The Cover Flow Browser shows all of the music stored on your iPod touch no matter which category you choose.


Rotate your iPod touch 90 degrees in either direction, and the Cover Flow Browser appears. Each cover represents an album from which you have at least one song stored on your iPod touch.
To browse your tunes, drag a finger to the right to move ahead in the albums or to the left to move back; the faster you drag, the faster you “flip” through the albums. The album cover that is directly facing you, front and center on the screen is the album in focus, meaning that it’s the one you can explore.

To see the songs on an album, move it into focus and tap its cover or tap the Info button. The Contents screen appears, showing you a list of all the songs on that album.
To browse the list of songs, drag your finger up or down the screen.

To play a song, tap it. The song plays and is marked with a blue Play button arrow on the list of songs. The Play icon appears near the battery icon in the upper-right corner of the screen.
To pause a song, tap the Pause button. The music pauses, and the Play button replaces the Pause button.

To play a different song, tap it.
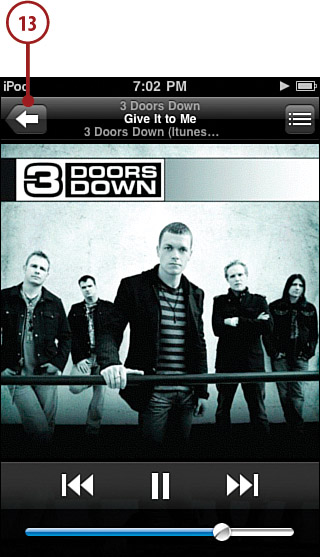
To return to the album’s cover, tap its title information, tap the Info button, or just tap outside of the album cover.
While you’re listening, you can continue browsing to find more music you want to listen to. (When the iPod touch starts playing the next song in the album you are currently playing, the cover for that album jumps back into focus.)

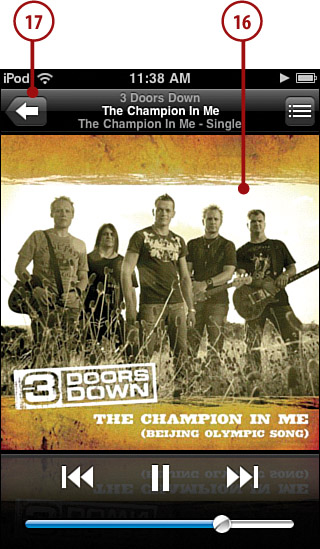
Rotate the iPod touch 90 degrees to see the Now Playing screen.
Use the Now Playing screen to control the music (covered in detail in the “Playing Music” task later in this section).

Finding and listening to music in your iTunes playlists that you moved onto your iPod touch is simple.
On the Home screen, tap the Music button.

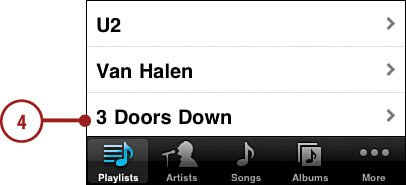
Tap the Playlists button. The list of all playlists on your iPod touch appears.

Slide your finger up and down the list to browse your playlists.
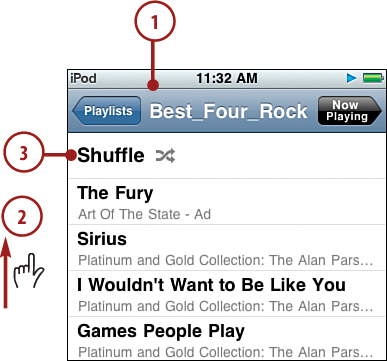
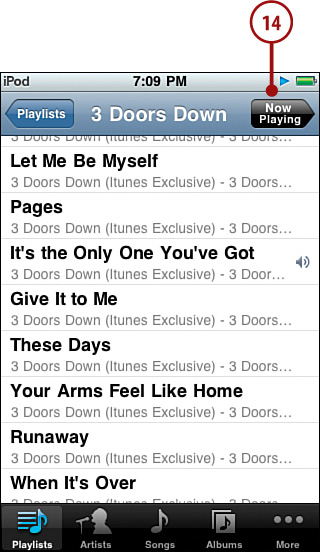
Tap the playlist that you’d like to explore. The list of songs in that playlist appears with the title of the playlist at the top of the screen.
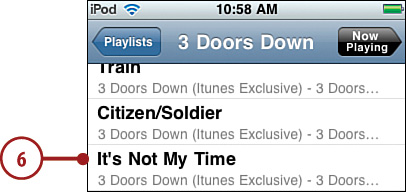
Drag your finger up and down to browse the songs the playlist contains. (You can also search a playlist by browsing up until you see the Search bar; learn how in the section “Searching for Music” later in this chapter.)
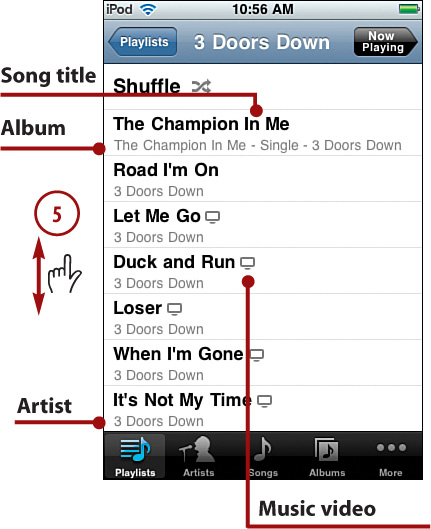
When you find a song you want to listen to, tap it. The song begins to play, and the Now Playing screen appears.
Use the Now Playing screen to control the music (covered in detail in the “Playing Music” section later in this chapter).
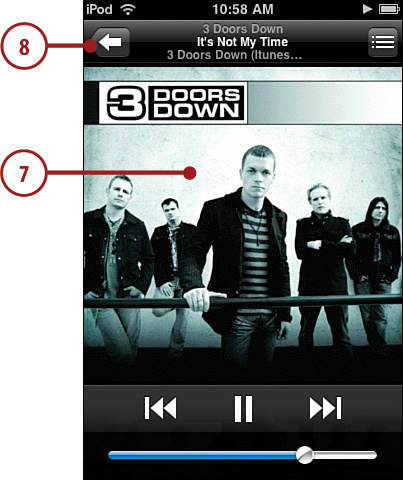
Tap the Return button to move back to the playlist’s screen. (When you are viewing a playlist’s screen, the song currently playing is marked with the speaker icon.)
You can find music on iPod touch by artist.
On the Home screen, tap the Music button.

Tap Artists. The list of all artists whose content is on iPod touch appears. Artists are grouped by the first letter of their first name or by the first letter of the group’s name.
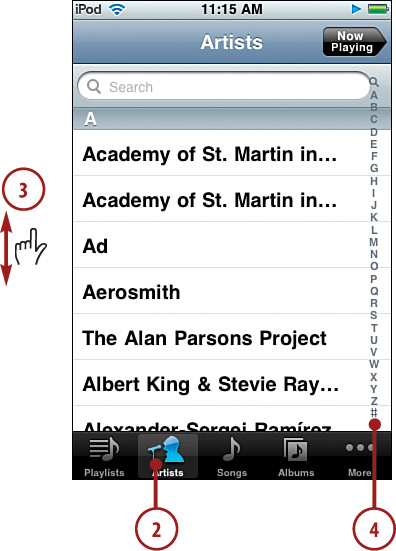
Drag your finger up and down the list to browse all available artists. (At the top of the screen, you see the Search tool by which you can search for specific artists. See “Searching for Music” later in this chapter for more information.)
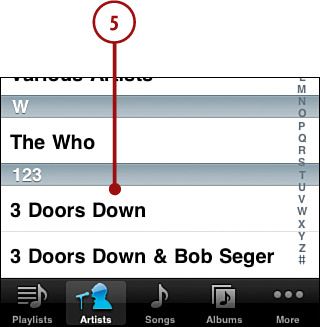
To jump to a specific artist, tap the letter along the right side of the screen for the artist’s or group’s first name; to jump to an artist or group whose name starts with a number, tap # at the bottom of the screen.
Tap an artist whose music you’d like to explore. A list of songs by that artist appears. If you have more that one album by that artist, the songs are organized by album; otherwise, you’ll simply see a list of the songs.
Drag your finger up and down the screen to browse the artist’s albums.

To see the contents of an album, tap it, and the list of contents screen appears with the album’s title at the top of the screen. Or to view all of the songs by the artist, skip to step 13.
Drag your finger up and down the screen to browse all the songs on the selected album.

When you find the song you want to listen to, tap it. The song begins to play, and the Now Playing screen appears.
Use the Now Playing screen to control the music (covered in detail in the “Playing Music” task later in this section).
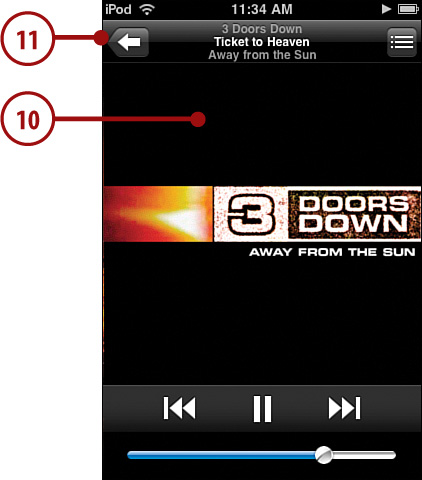
To move back to the album’s screen, tap Return.
To move back to the artist’s screen, tap Return (which is labeled with the artist’s name).

To see all of the songs by the artist, tap All Songs. You see the list of all songs by the artist, organized alphabetically.

Browse the list or tap a letter to move to a song you want to hear.
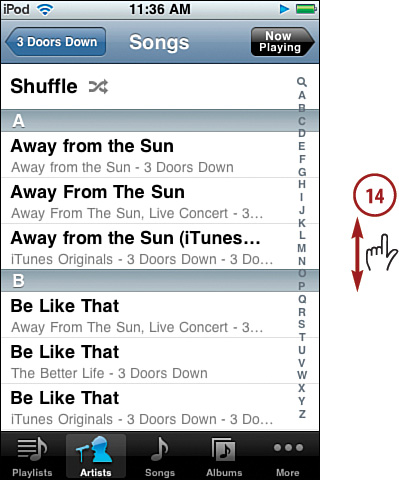
Tap the song you want to hear. The song begins to play, and the Now Playing screen appears.

Use the Now Playing screen to control playback of the music (covered in detail in the “Playing Music” task later in this section).
Tap Return to move back to any of the previous screens to find and play more music.
The More menu shows you all the content categories on iPod touch. You can use this menu to access content when it can’t be found by one of the category buttons at the bottom of the screen.
On the Home screen, tap the Music button.
Tap More. The More screen appears, showing you the content categories on your iPod touch that aren’t shown on the toolbar at the bottom of the screen.

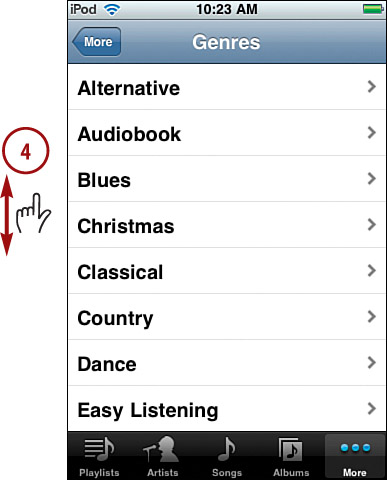
Tap the category in which you are interested, such as Genres. That category’s screen appears.
Browse the category and drill down into its detail to get to songs you want to hear. Browsing categories is similar to browsing playlists, artists, songs, and albums. (If you browse to the top of the screen, you see the Search tool with which you can search in most categories. See “Searching for Music” later in this chapter.)
Browsing is a useful way to find music, but it can be faster to search for specific music in which you are interested. You can search most of the screens that you browse, and when a category has a lot of options, such as Songs, searching can get you where you want to go more quickly than browsing. Here’s how:
Move to a screen you can browse; this example uses the Songs screen, but you can search most screens similarly.

Browse to the top of the screen so you see the Search tool.
Tap in the Search tool. The keyboard appears.
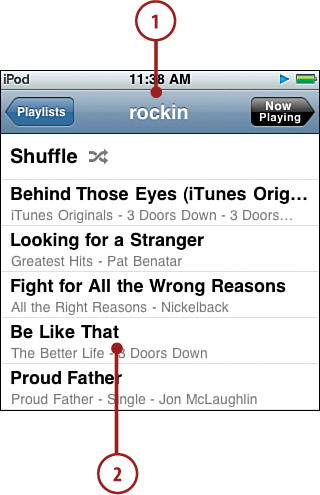
Type the text or numbers for which you want to search. As you type, the items that meet your search criterion are shown; the more you type, the more specific your search becomes. Below the Search tool, you see the results organized into categories, such as Album and Song.
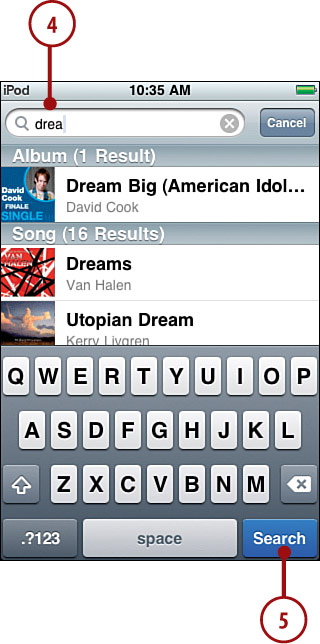
When you think you’ve typed enough to find what you’re looking for, tap Search. The keyboard disappears.
Tap songs or albums to get to the music you want to play.

The Genius feature finds music and builds a playlist based on songs that “go with” a specific song. How the Genius selects songs that “sound good” with other songs is a bit of a secret, but it works amazingly well. You can have the Genius build a playlist for you in a couple of ways and then work with the Genius playlist similar to how you can use the On-the-Go playlist.
Find and play a song using any of the techniques you learned earlier in this chapter if they aren’t onscreen already.

On the Now Playing screen, tap the screen so the Timeline and controls appear.
Tap the Genius button. While the music plays, the Genius playlist is created, and you move to the Genius screen where you see the songs that the Genius selected; the song that is currently playing is at the top of the list and is marked with the Genius icon.
Tap any song on the playlist to start playing it.
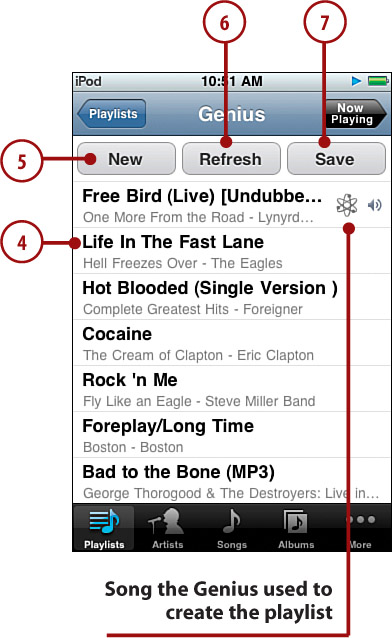
Tap the New button to start a new Genius playlist (see the “Creating a Genius Playlist By Selecting a Song” section in this chapter).
To have the Genius change the playlist, tap Refresh. Songs may be added, and the order in which they are listed may be changed.
To save the playlist, tap Save. The name of the playlist changes from Genius to be the name of the song on which the playlist was based. The New button disappears, and the Delete button appears.
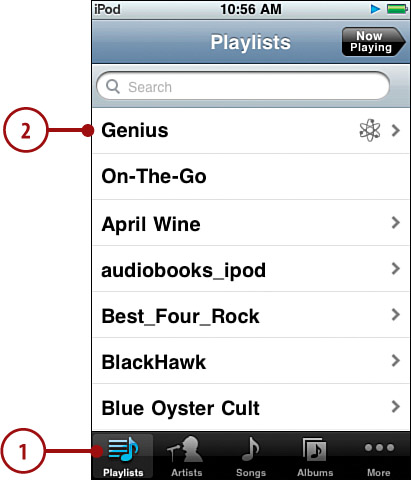
Tap Genius. You see the Genius screen showing the most recent Genius playlist.
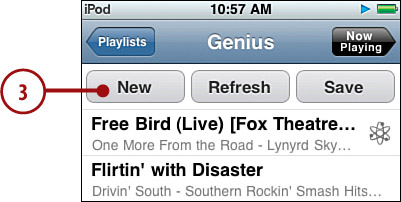
Tap New. The Songs screen appears.
Browse or search for the song on which you want the playlist to be based.

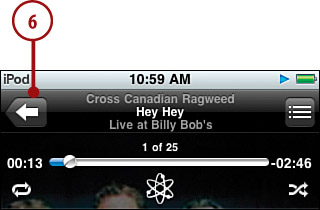
Tap the song on which you want the playlist to be based. The Genius creates the playlist, and it appears briefly on the Genius screen. It starts to play automatically, and you move to the Now Playing screen.
Tap the Return button. You move back to the Genius screen.
Use steps 4 through 7 in the previous task to work with the playlist.
Move to the Playlists screen.
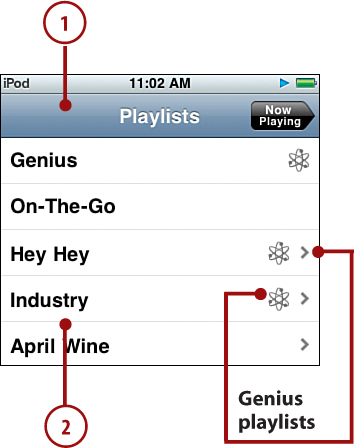
Tap the Genius playlist you want to manage; Genius playlists are named with the name of the song on which they are based, and they have the Genius icon. The Genius playlist’s screen appears.
Tap Refresh. The Genius builds a new playlist based on the same song. The resulting playlist might have the same or different songs, and they might be in a different order. The refreshed playlist replaces the previous version.

This section is a bit of a contrivance because when you shuffle music, you don’t really find it, but rather you rely on your iPod touch to select music “randomly.” There are two ways to shuffle music: You can use the Shuffle option, or your can shake your iPod touch.
Move to a source of songs. There are many ways to do this, such as selecting a playlist, browsing an artist, and so on.
Browse to the top of the screen if you aren’t there already.
Tap Shuffle. Your iPod touch selects a song from the group you were browsing and plays it; you move to the Now Playing screen. After that song plays; the iPod touch selects another one and plays it. This continues until all the songs in the source have played.
Move to a source of songs that you want to shuffle through. There are many ways to do this, such as selecting a playlist, browsing an artist, and so on.
Tap a song. It starts to play, and you move to the Now Playing screen.
Gently shake your iPod touch. A song is selected at random and begins to play. You can shake your iPod touch at any time to move to the next randomly selected song.

As you have seen, the Now Playing screen appears whenever you play music. This screen provides many controls and options for playing music.
Find and play a song or album. The Now Playing screen appears, and you can use its controls.
Tap the Track List view button. The Album Cover view is replaced by the Track List view. Here you see the list of all tracks on the album from which the current song comes, even if you aren’t listening to the album itself (such as when you are listening to a playlist). You see the order of tracks on the album along with their names and playing times.

Drag your finger up and down to browse through the tracks in the album.

Tap a song to play it.
Rate the song currently playing by tapping one of the dots. Stars fill up to the dot you tapped to give the song a star rating between one and five stars.
Tap the Album Cover button. You return to the Album Cover view.
If you don’t see the Timeline bar, tap the album cover once. The Timeline bar appears. (If a song has lyrics, they appear along with the Timeline bar.)
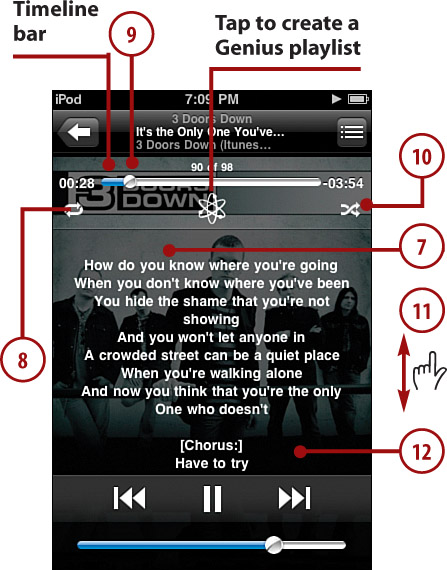
To repeat the current album until you stop playing it, tap the Repeat button. When the album is set to repeat indefinitely, the Repeat button turns blue. To repeat the album one time, tap the Repeat button again. When the album is set to repeat once, the button turns blue and contains a small “1.” To turn off repeat, tap the button again so it is white.
To move ahead or back in the song, drag the Playhead to the right or left.
To play the songs on the album randomly, tap the Shuffle button.
If the song has lyrics, browse up and down the screen to read all the lyrics.
Tap the album cover again. The Timeline bar and lyrics (if there are any) disappear.
Tap the Return button. You move back to the screen from which you selected music to play.
Tap the Now Playing button. You return to the Now Playing screen.
Because you can do so much more on iPod touch than just listen to music, you’ll often be doing something else, such as browsing the web while music is playing. It would be a nuisance to have to move back into the Music functions to perform basic actions, such as pausing music. Fortunately, with the iPod control bar, you don’t have to.
First, configure how you want to activate the control bar.
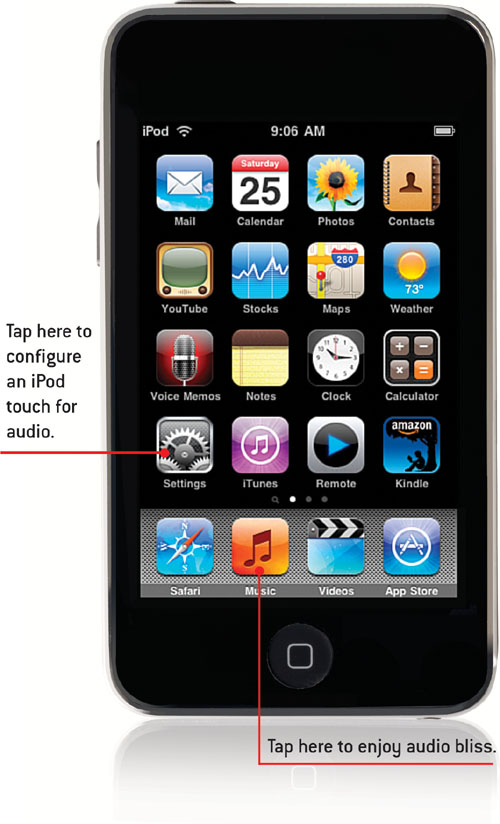
On the Home screen, tap Settings.
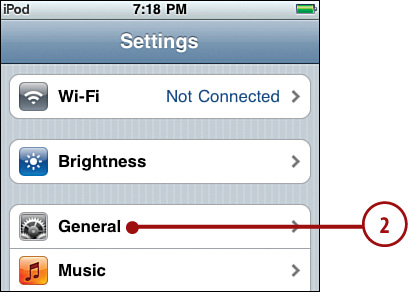
Tap General.
Scroll down until you see the Home option.
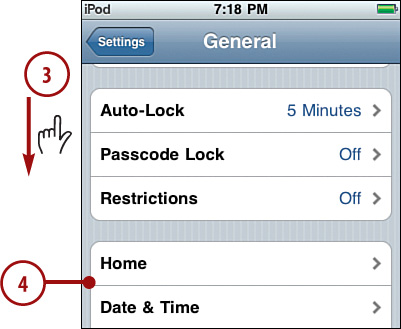
Tap Home.
If you want to move to the playback controls when you press the Home button twice, tap iPod.

To make the iPod control bar active when music is playing, ensure ON shows next to iPod Controls; if not, tap OFF, which turns the function on.
Use the control bar to do the following tasks.
Play music.

Move away from the Music screens, such as by moving back to the Home screen and then opening the web browser.
Tap the Home button twice. The screen you were using fades into the background, and the iPod control bar appears.
Use the controls on the bar to control music.
When you’re done, tap Close. The control bar closes, and you move back to whatever you were doing.
An iPod touch is a great way to listen to your podcasts. Like all other audio functions, you first find the podcast you want to listen to and then use iPod touch’s audio playback controls to hear it.
On the Home screen, tap the Music button.

Tap the More button. The More screen appears, showing you all the content categories on iPod touch.
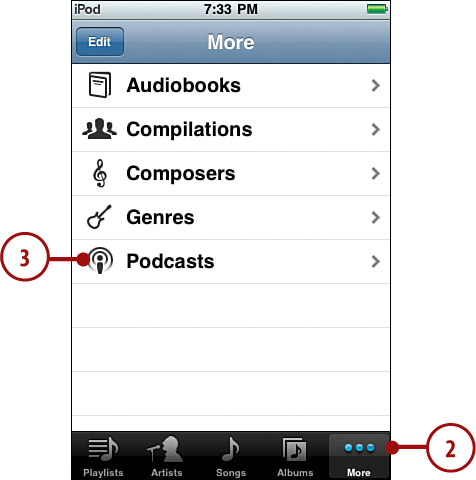
Tap Podcasts. The Podcasts screen appears, showing you the podcasts to which you are subscribed and that have been moved onto iPod touch.
Browse or search for a podcast to which you want to listen.

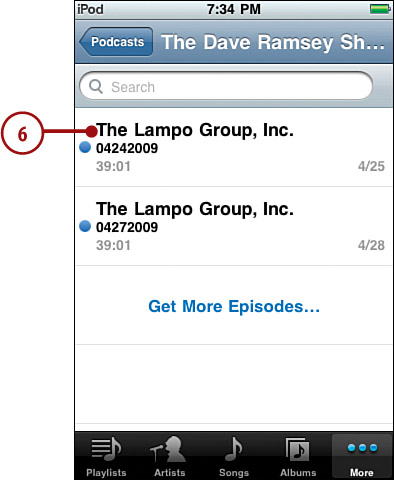
Select a podcast by tapping it. The list of episodes for that podcast is shown; the name of the list screen is the name of the podcast. Podcasts to which you haven’t listened are marked with a blue dot.
Tap the episode you want to hear. The podcast begins to play, and the Now Playing screen appears.
If the Timeline bar isn’t showing, tap the screen. The Timeline bar appears. Some of the controls are the same as for music while there are some that are unique to podcasts.

To repeat the last 30 seconds, tap the Repeat button.
To change the speed at which the podcast plays, tap the 1x button; the podcast plays at twice the normal speed, and the button shows “2x.” Tap it again to play the podcast at one-half speed, and the button shows “1/2x.” Tap the button again to return to normal speed.
Tap the email button to share the episode you are listening to with someone else. When you tap this, a new email message is created. This message contains a link to the podcast that the recipient can click to access it. You address and complete the message and then send it (see Chapter 9, “Emailing” for the steps to send email). The recipient clicks the link to move to the iTunes Store to try out the podcast.
Use the other controls on the Now Playing screen, which work just as they do when you are playing music.
You can use iPod touch as an iPod just fine without performing any of the steps in this section. However, because this book is named My iPod touch, you should explore these options to make iPod touch your own.
The five buttons at the bottom of the Music screen enable you to get to specific content quickly. You can choose four of the buttons that appear on the screen to make accessing content by the categories that are most useful to you even easier and faster.
Move to the More screen.
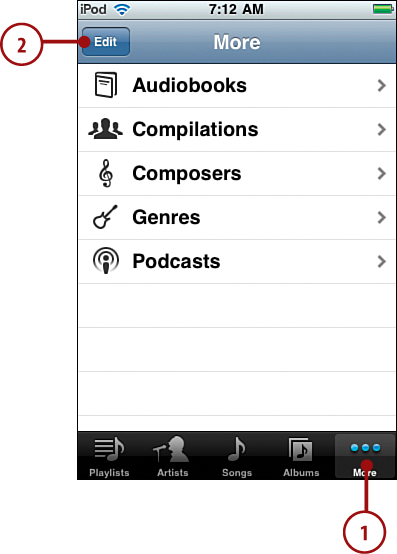
Tap Edit. The Configure screen appears.
Drag the button you want to add to the toolbar to the location of one of the buttons currently there. As you hover over the current button, it lights up to show you that it will be the one replaced when you lift your finger. The button you dragged replaces the button over which you placed it. The original button is moved onto the Configure screen.
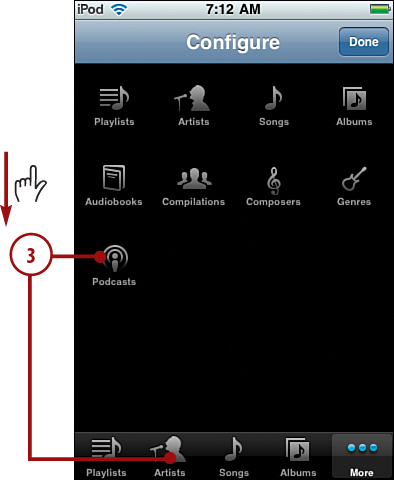
Repeat step 3 until the four buttons you want to be on the toolbar are there. (The fifth button is always the More button.)
Drag the buttons on the toolbar around until they are in the order you want them to be.

Tap the Done button located in the upper-right corner of the screen. The iPod toolbar contains the buttons you placed on it along with the More button.
There are a few Music settings you use to configure various aspects of iPod touch’s audio functionality.
Tap the Home button to move back to iPod touch’s Home.
Tap Settings. The Settings screen appears.

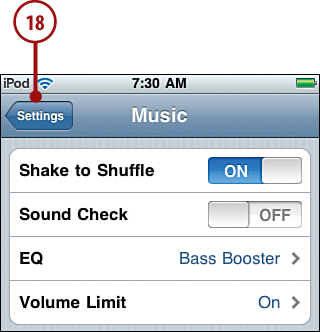
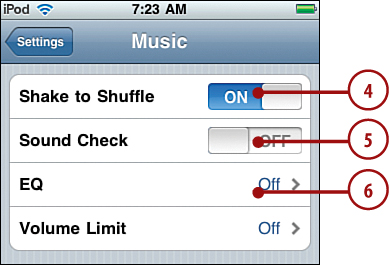
Tap Music. The Music Settings screen appears.

Tap ON next to Shake to Shuffle if you don’t want your iPod touch to shuffle to the next song when you shake it. The status becomes OFF, which means if you shake your iPod touch, songs play in the order they are listed in the source you are playing. Press OFF to enable shuffling by shaking again.
Tap Sound Check if you want iPod touch to attempt to even the volume of the music you play so that all the songs play at about the same relative volume level. Sound Check’s status is indicated by OFF or ON. When you tap the Sound Check button, its status toggles from one to the other.
To set an equalizer, tap the EQ bar. The EQ screen appears.
Scroll the screen to see all of the equalizers available to you.
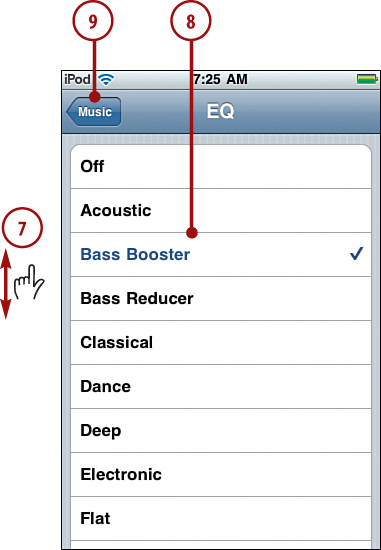
Tap the equalizer you want iPod touch to use when you play music; the current equalizer is indicated by the check mark. To turn the equalizer off, select Off.
Tap Music.
To set a limit to the volume level on iPod touch, tap Volume Limit. The Volume Limit screen appears.

Drag the volume slider to the point that you want the maximum volume level to be.
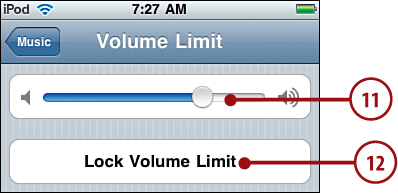
To lock this control so that it can’t be changed without a passcode, tap Lock Volume Limit. The Set Code screen appears.
Tap a four-digit code.
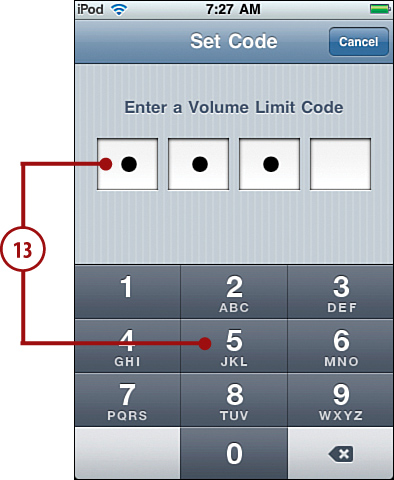
Re-enter the code to confirm it. If the code matches, you return to the Volume Limit screen, and the code is set.
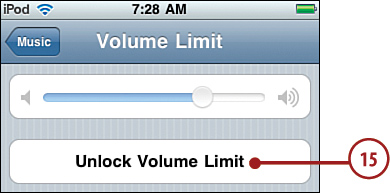
To make changes to a locked volume limit, tap Unlock Volume Limit.
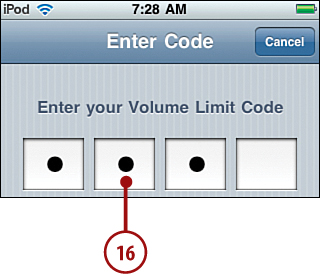
Enter the code. The volume limit is unlocked, and you can change it again.
Tap Music to move back to the Music Settings screen.

Tap Settings to return to the Settings screen.