
2
Builds and Controls
CERTIFICATION OBJECTIVES
• Understanding Free-Form Projects
• Using Version Control Systems
• Working with Build Files and Processes
• Configuring the JDK into the Project
Q&A Self Test
This chapter covers free-form projects, version control system support, Ant integration, and project-specific JDK configuration, which are crucial for using NetBeans on a typical project. The free-form project support enables NetBeans to be adapted to just about any project. Version control systems manage the revision history for projects and provide the necessary infrastructure for multiple developers to work concurrently on a project. NetBeans uses Ant as its build system, and knowledge of how these build files work is critical as a project grows in size and complexity. Lastly, NetBeans supports multiple JDKs, thereby allowing each project to use a different JDK if necessary. These four exam topics cover important infrastructure aspects of the IDE that are crucial to daily workflow.
CERTIFICATION OBJECTIVE:
Understanding Free-Form Projects
Exam Objective 2.1 Describe the characteristics and uses of a free-form project.
NetBeans includes numerous standard project templates to simplify the creation of new applications. These templates are configured with library dependencies, possess a predefined layout, and include an Ant build file. The Ant build file is integrated with NetBeans’ execution, debugging, testing, and profiling features. These templates and their associated wizards enable developers to quickly and easily start new applications with minimal effort. Project templates are selected from File | New Project. Example project templates include Java Application, Java Desktop Application, Web Application, EJB Module, and Enterprise Application Client. However, it is often necessary to create a new NetBeans project from an existing project that has its own code structure and build files. To facilitate importing such projects, NetBeans includes two versatile free-form project templates: Java Free-Form Project and Web Free-Form Application.
The free-form project allows NetBeans to work with just about any Java project that uses Ant for building. Besides using the project’s Ant build file, NetBeans does not require that a free-form project conform to a predefined file layout placement of the source files or of the location of external libraries. NetBeans delegates all build, execution, and Javadoc operations to the project’s Ant file. Thus, clicking Run | Run Main Project invokes the target in the project’s Ant file that launches the application. NetBeans requires the location of source and test files and external libraries necessary to enable code completion and syntax checking.
The two free-form project templates are very similar. Both leverage the project’s existing Ant script and allow the source and test file locations, libraries, and output to be configured. The Web Free-Form Application template is an extension of the Java Free-Form Project template and requires the location of web resources (XHTML/HTML files) as well as of the container libraries (servlet.jar). The IDE delegates all project-related actions, including server deployment, to the project’s Ant script.
The following topics describe how to build and use NetBeans’ free-form project templates:
![]() Creating a Project
Creating a Project
![]() Editing Project Properties
Editing Project Properties
![]() Integrating JUnit
Integrating JUnit
![]() Profiling
Profiling
![]() Debugging
Debugging
Creating a Project
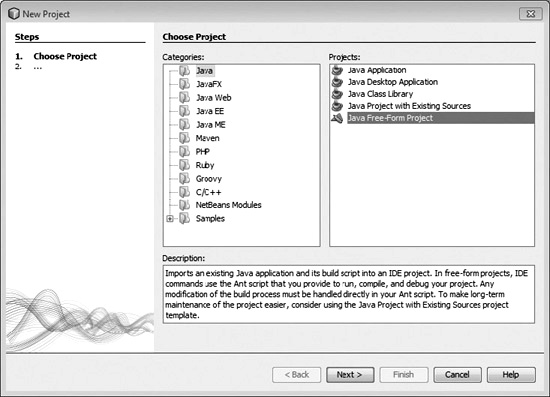
To create a new Java free-form project, choose File | New Project and select Java Free-Form Project. The dialog box depicted in Figure 2-1 appears. The free-form project wizard collects the basic project information necessary to get the project started. Configuring additional actions for profiling and testing individual files must be configured afterwards. Not all of the fields in the wizard are required—fields can be edited subsequently via File | Project Properties, which is covered in the next section.
FIGURE 2-1 Free-Form Project, Step 1
This section uses the MusicCoach application throughout. This application can be downloaded from http://www.cuprak.net/MusicCoach.
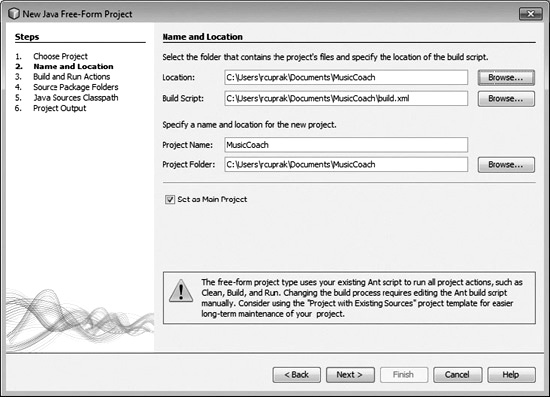
The next step, shown in Figure 2-2, is to select the root directory of the project. This is the directory where all of the project files are stored. NetBeans automatically searches for a build.xml file to use as the build for the project. This screen also prompts for the name of the project and the directory where the NetBeans project folder will be created. The NetBeans project folder can be placed anywhere on the system. By default, NetBeans populates the Project Name using the name of the directory and places the NetBeans project folder under the project root selected above it.
FIGURE 2-2 Free-Form Project, Step 2
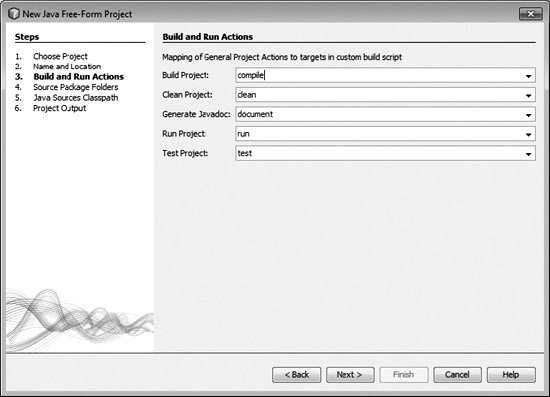
NetBeans drills into the Ant build file to configure the predefined actions. The wizard, shown in Figure 2-3, makes its best attempt at mapping targets in the Ant file to project actions. However, these should be double-checked because NetBeans is just guessing. The target name either can be selected from the list of targets detected in the Ant file or can be typed. Targets can be typed because Ant scripts can be dynamic with import statements and conditional logic. NetBeans may not be able to resolve all Ant file imports until runtime, when Ant variables are evaluated. It is not necessary to populate the actions—this can be done afterwards via File | Project Properties.
FIGURE 2-3 Free-Form Project, Step 3
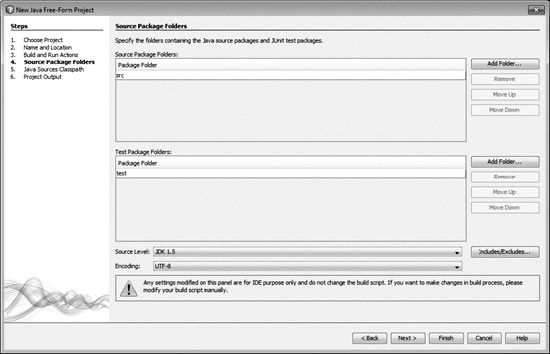
In Step 4, the wizard prompts for the source and test packages as depicted in Figure 2-4. NetBeans again attempts to guess which folders are for each by using common naming patterns—src, test-src, test, and so on. Multiple source code roots can be configured. Choosing Includes/Excludes configures patterns that, respectively, either include or exclude files. By default, NetBeans includes all files under the source directories. The source level and file encoding are also configured. Source level affects editor features such as code completion and syntax checking. For instance, if source level 1.3 is selected, Java 5 classes such as BlockingQueue and language features such as generics are unavailable.
The wizard panel in Figure 2-4 configures the project file encoding. By default, UTF-8 is selected. This setting controls how the IDE interprets character encodings beyond the ASCII character set. Newly created files use this encoding. When NetBeans opens a file, it attempts to use the file encoding declared within the file, project declaration, or the encoding that is being used by the IDE.
FIGURE 2-4 Free-Form Project, Step 4

The Firefox web browser (www.mozilla.com) can be used to determine the encoding of a file. Open the file in the web browser: File | Open File. You can see the encoding by choosing View | Character Encoding. The encoding of the file has a checkmark next to it.
In the next step, shown in Figure 2-5, the Java sources are configured for the IDE.
FIGURE 2-5 Free-Form Project, Step 5
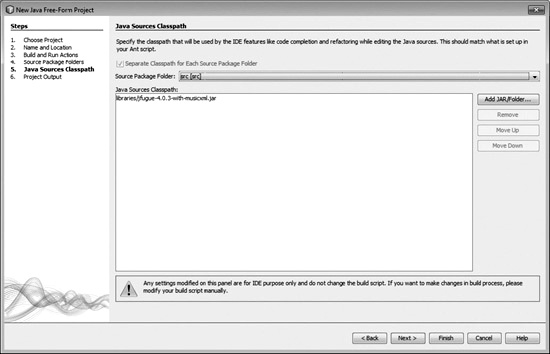
These classpaths are used to support code completion because the IDE delegates all compilation and execution to the project’s Ant file.
The classpath functionality available to a free-form project has significant limitations compared with a standard project. These limitations include:
![]() Source for the libraries cannot be attached.
Source for the libraries cannot be attached.
![]() Javadoc for the libraries cannot be added.
Javadoc for the libraries cannot be added.
![]() JAR files cannot be pulled from global libraries.
JAR files cannot be pulled from global libraries.
![]() A free-form project cannot depend upon another project.
A free-form project cannot depend upon another project.
The exam may also contrast the free-form project with a “Java Project with Existing Sources.” The standard project template and wizard are for instances where the project does not already have an Ant build file or where its Ant file can be easily replaced with the one provided by NetBeans.
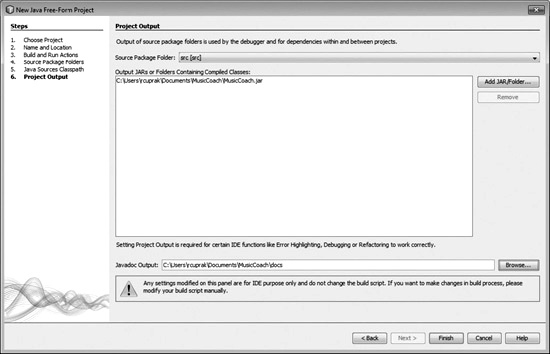
In the last step in the wizard, the output directories for source and test are specified in addition to the output path for Javadoc. This is shown in Figure 2-6. The output JARs are needed to support the debugger and if this project is to be used by another NetBeans standard project. A NetBeans standard project is one that uses an IDE-generated Ant script.
FIGURE 2-6 Free-Form Project, Step 6
The project is very similar to a Java free-form project. The new project wizard is essentially the same with the exception of two new steps: Web Source and Web Sources Classpath. These two additional steps configure web resources and their dependencies. NetBeans uses this information to provide better coding support of the web.xml, faces-config.xml, and code completion, as well as to provide syntax checking in web source files (XHTML/JSP/and so on).
The Web Sources step, shown in Figure 2-7, prompts for several important pieces of information including:
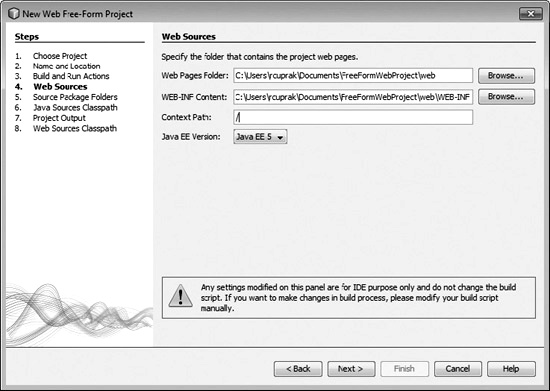
![]() Web Pages Folder Location of JSP/XHTML/HTML pages and graphics
Web Pages Folder Location of JSP/XHTML/HTML pages and graphics
![]() WEB-INF Content Location of standard Java web application settings including web.xml
WEB-INF Content Location of standard Java web application settings including web.xml
![]() Context Path Deployment path of the application—for instance, a wiki might be deployed to http://www.cuprak.net/wiki with “wiki” being the context path
Context Path Deployment path of the application—for instance, a wiki might be deployed to http://www.cuprak.net/wiki with “wiki” being the context path
![]() Java EE Version The version of the Java EE specification being used by the application
Java EE Version The version of the Java EE specification being used by the application
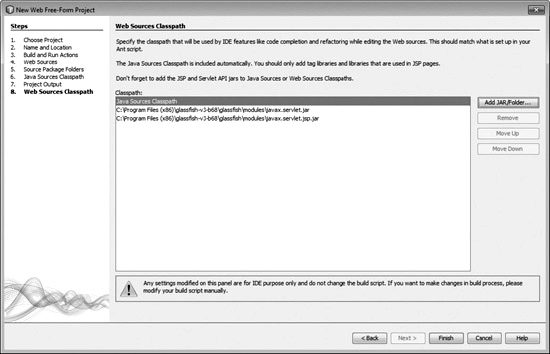
The last step in a free-form web application, depicted in Figure 2-8, prompts for the Web Sources Classpath. This classpath typically includes classes that are used in the JSP/XHTML pages, such as tag libs. If the Servlet API/JSP classes have not already been added to the classpath, they should be added here. As with the Java Sources Classpath, these settings are only used by the IDE to provide its code completion and refactoring features and do not impact how your application is built.
FIGURE 2-8 Web Sources Classpath
Editing Project Properties
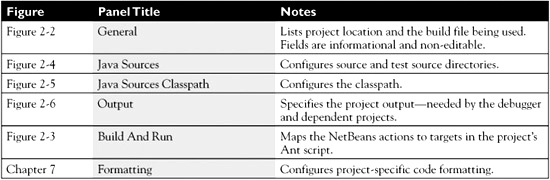
The project settings from the wizard are populated into nbproject/project.xml. After a project has been created, you have two ways to edit the settings. The settings can be edited either directly in the nbproject/project.xml file or via File | Project Properties, which is shown in Figure 2-9. Manual changes to the XML file should only be used as a last resort. If the Project Properties window is opened and closed after changes to project.xml have been made, the changes to project.xml are lost. The Free-Form Project Properties dialog box, shown in Figure 2-9, has six panels that mirror the free-form project wizard (see Table 2-1). The Build And Run tab has an additional table not present in the wizard. By using this table, you can add additional context menus. The content of the label column is used as the name of the menu item. Right-clicking the project root in the Projects or Files window accesses custom menu items.
FIGURE 2-9 Build And Run settings
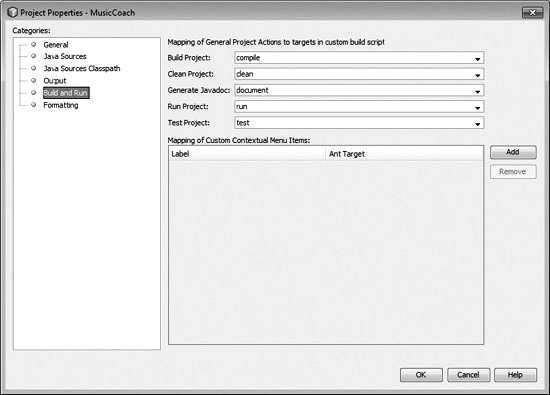
TABLE 2-1 Free-Form Project Properties
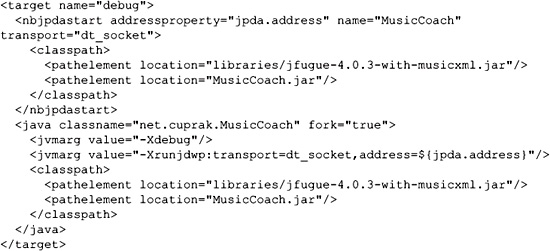
As mentioned previously, Ant target/action mappings are stored in the file nbproject/project.xml. Some changes, such as using multiple Ant files, require direct editing of this file. For example, let’s say that we added a custom context menu to populate the database; however, our load script was stored in a separate Ant file. To incorporate this script, you would need to edit the project.xml file directly, as shown next.
Two sections are of primary interest for the Ant integration: ide-actions and context-menu elements. Following is a sample project.xml file. The ide-actions element maps defined IDE actions to targets in the project’s Ant file. The following predefined actions are available for mapping:
![]() debug Debugs a project
debug Debugs a project
![]() build Builds a project
build Builds a project
![]() run Runs a project
run Runs a project
![]() test Runs tests for a project
test Runs tests for a project
![]() run.single Runs the currently selected file
run.single Runs the currently selected file
![]() debug.single Debugs the currently selected file
debug.single Debugs the currently selected file
![]() compile.single Compiles the currently selected file
compile.single Compiles the currently selected file
![]() test.single Runs the test file for the currently selected file
test.single Runs the test file for the currently selected file
![]() debug.test.single Runs the test file for the currently selected file in the debugger
debug.test.single Runs the test file for the currently selected file in the debugger
![]() debug.fix Runs the Apply Code Changes command on the currently selected file
debug.fix Runs the Apply Code Changes command on the currently selected file
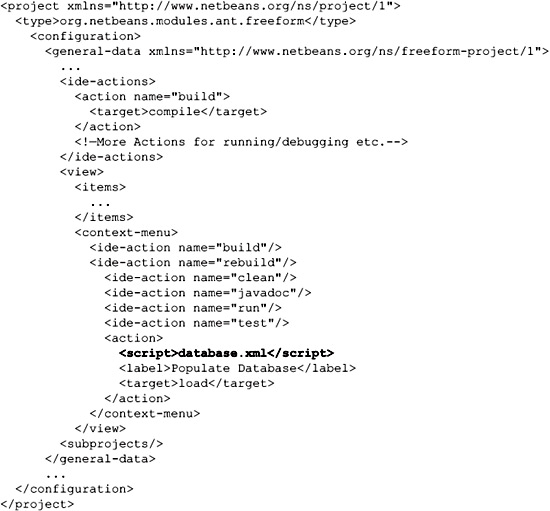
In the context-menu element, new menu items can be added and mapped. In the preceding example, the load target in the Ant script database.xml is mapped to a custom Populate Database menu. This menu appears below the Test menu item in the context menu.
Saving project.xml causes NetBeans to reload the file and repopulate the menus. If the menus are not repopulated, then the file has an error. If NetBeans is restarted and project.xml contains an error, then the project will not be opened by the IDE.
Integrating JUnit
JUnit integration with a free-form project is straightforward and requires only minor changes to the project’s Ant script (build.xml). The following code shows a simple target with the JUnit tasks configured appropriately. The two changes necessary for the JUnit integration are highlighted in bold. These two changes print the output to standard out, which NetBeans then scrapes and parses.
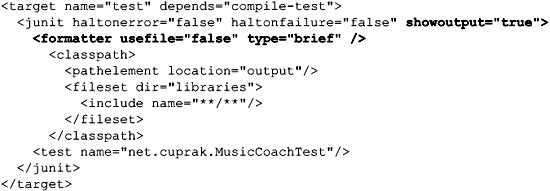
The NetBeans test action is mapped to the test target in the project’s Ant script in the free-form project wizard. It can be altered or reconfigured afterwards via project properties. Right-clicking the root of the project in the Projects window and choosing Test runs the tests.
Profiling
Although profiling is covered in Chapter 10, profiling a free-form project requires some additional setup. The free-form project wizard does not generate the necessary configuration for profiling either a project or a file. Instead, the IDE will prompt for the relevant Ant targets when the Profile | Profile Main Project or Profile | Profile menus are chosen. The targets for profiling should closely mirror the run targets and differ only in having an additional task and parameters to Java. The one exception is a free-form web project as the web container. Tomcat, for example, is launched with profile parameters. A free-form web project thus requires no modifications to the build.xml script.
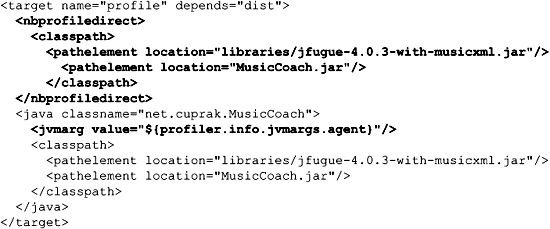
The following code listing is a simple target for profiling the project. It was derived from the run target with the changes necessary for the Profiler highlighted in bold. No other changes were necessary—NetBeans takes care of adding the nbprofile direct task to the classpath.
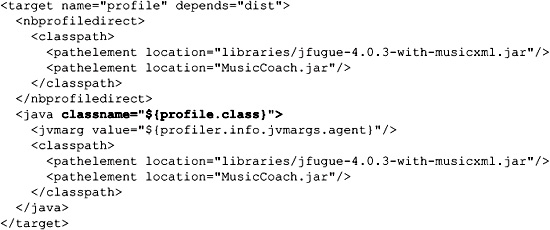
Profiling a single file requires only a minor change to the previous code listing. NetBeans automatically populates the profile.class Ant property. This property contains the name of the class that was selected for profiling. The following code listing reflects this change:
Debugging
As in the case of profiling, debugging also requires some additional work for a free-form project. Since NetBeans is not responsible for compiling or executing, hooks must be added or a build file generated. Adding a hook to an existing debug target in the project’s Ant script requires editing project.xml to map the debug action to the target. Generating a build file will result in NetBeans using the information it has about the project to create a build file, nbproject/ide-targets.xml. This option may not be feasible if the project has a complicated and unique build process.
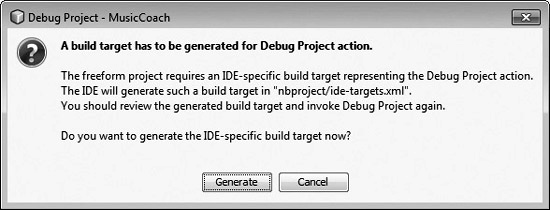
The first time that Debug | Debug Main Project or Debug | Debug File is chosen, the dialog box in Figure 2-10 appears. If a custom Ant target is going to be used, choose Cancel and then set up the project.xml file. If the generated-file approach works, choosing Generate will create the ide-targets.xml file if it doesn’t already exist.
FIGURE 2-10 Configuring debug setup
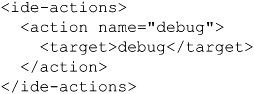
Mapping an existing Ant debug target to the NetBeans debug action requires editing the nbproject/project.xml file. The following code snippet documents the addition:
The Ant tasks should start the NetBeans debugger and also pass a couple of important debugger-related settings to the JVM. When compiling the code, the debug flag should be set to true, otherwise NetBeans is unable to set breakpoints. Following is a simple debug target:
EXERCISE 2-1 Creating a Free-Form Project
In this exercise, you will create a free-form project from an existing code base. A simple example project is provided on the website for the book.
The example code base is a simple application that plays musical notes using JFugue (www.jfugue.org). The project also includes some unit tests that play several scales. The application can be downloaded from http://www.cuprack.net/MusicCoach.
1. Download the MusicCoach application to your hard drive.
2. Run the Ant file contained in the project to generate the output JAR file.
3. Choose File | New Project.
4. Select Java Free-Form Project and click Next.
5. Click the Browse button next to the Location text field. Select the MusicCoach directory on your local hard drive. NetBeans will pre-populate the rest of the fields on the screen. Click Next.
6. In Build And Run Actions, the common NetBeans actions are mapped to Ant targets on this screen. NetBeans does a good job guessing, so no additional work is required.
7. In Source Package Folders, configure the source and test packages. Click Add Folder for each browse to src and test, respectively. Set the Source Level to 1.5 if it isn’t already. Click Next.
8. Java Sources Classpath configures compilation, execution, and testing of the classpath. Add the JFugue JAR file under the lib directory to both the src and test classpaths. The JUnit JAR file in lib should be added to just the test classpath. Click Next.
9. In Project Output, select MusicCoach.jar from the dist directory for src and MusicCoach-test.jar for test. Click Finish.
CERTIFICATION OBJECTIVE:
Using Version Control Systems
Exam Objective 2.2 Demonstrate the ability to work with version control systems and the IDE, in order to determine the following: what VCSs are available, which ones you need an external client for, how to pull sources out of a repository, view changes, and check them back in.
Version control systems (VCSs) are an indispensible development tool. They enable multiple developers to concurrently share, edit, and merge files. VCSs track change history, providing traceability. With traceability, file revisions can be retrieved and compared. File comparison is augmented with metadata, including commit comments, modification dates, and the identity of the responsible or offending developer. Building on traceability, VCSs also support tagging and branching. Tagging and branching enable multiple software releases to be tracked and maintained. With tagging, a specific release can be uniquely labeled and thus be easily retrieved. A branch is a parallel line of development.
For instance, in many development organizations a branch for the current release and upcoming release coexist and undergo parallel development with frequent merges. Disruptive development, such as major refactoring operations or expansive feature additions, is often done on its own branch.
Best practices surrounding the use of version control systems are a topic unto themselves. Many different version control systems—both commercial and open source—are on the market today. Each version control system tackles the problem of revision control with slight differences depending upon the workflow issues that drove their evolution. Version control systems come in two flavors, client/server and distributed. Several of the major version control systems widely used today include:
![]() Subversion (http://subversion.tigris.org/)
Subversion (http://subversion.tigris.org/)
![]() CVS (http://www.nongnu.org/cvs/)
CVS (http://www.nongnu.org/cvs/)
![]() Perforce (http://www.perforce.com/)
Perforce (http://www.perforce.com/)
![]() Git (http://git-scm.com/)
Git (http://git-scm.com/)
![]() Mercurial (http://mercurial.selenic.com/)
Mercurial (http://mercurial.selenic.com/)
![]() Rational ClearCase (http://www-01.ibm.com/software/awdtools/clearcase/)
Rational ClearCase (http://www-01.ibm.com/software/awdtools/clearcase/)
NetBeans is currently preconfigured with support for three version control systems: Subversion, CVS, and Mercurial. NetBeans also has its own built-in version control system for tracking changes between commits, providing a sort of undo/redo support on steroids. The first two version control systems, Subversion and CVS, are the traditional client/server version control systems.
Subversion and CVS are very similar in terms of their operations. Mercurial is a distributed VCS, similar to the more widely used Git VCS. Other version control systems, such as Perforce and ClearCase, are available via the Plugin Manager.
Additional version control systems can be added to NetBeans via the Plugin Manager. The Rational ClearCase VCS can be downloaded from http://versioncontrol.netbeans.org/clearcase/. A plugin for Git is available at http://nbgit.org/. A third-party plugin for Perforce can be downloaded from http://www.wonderly.org/netbeans/.
The exam focuses on the basic operations common to all of the version control systems. When studying for the exam, you do not need to become an expert on each of the version control systems. This means that if you currently use Subversion, you do not need to become an expert on merging or sharing in Mercurial. For the exam, you will need to know how to:
![]() Configure version control support in NetBeans
Configure version control support in NetBeans
![]() Checkout a project from version control
Checkout a project from version control
![]() Checkin changes
Checkin changes
![]() Update files
Update files
![]() View differences/history
View differences/history
Version control operations in NetBeans are conveniently located throughout the IDE. Many operations, such as refactoring, will invoke version control operations.
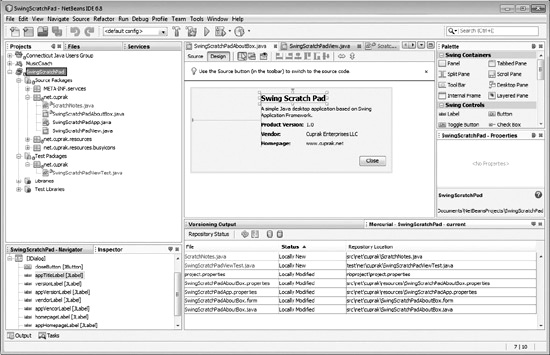
Once a project is associated with a version control system, or checked out from a repository, the context menus in the Projects and Files windows will contain a submenu with the relevant version control operations. Right-clicking a tab for a file also yields the same version control context menu. A versioning window, available by choosing Window | Versioning | <Version Control System>, displays local and remotely changed files.
The main menu through which most developers initially interact with version control support in NetBeans has undergone significant changes starting in NetBeans 6.7—the Versioning menu was renamed to Team. The submenus for CVS, Subversion, Mercurial, and Local History are still present; however, several new menu items were added:
![]() Find Issues Searches the configured issue tracking system for open issues. The issue tracker must be configured first.
Find Issues Searches the configured issue tracking system for open issues. The issue tracker must be configured first.
![]() Report An Issue Reports an issue to the issue tracking system.
Report An Issue Reports an issue to the issue tracking system.
![]() Create Build Job Creates a new job in Hudson, a continuous-integration server.
Create Build Job Creates a new job in Hudson, a continuous-integration server.
The contents of the Team/Versioning menu will change if you have a versioned project opened. Operations for that version control system are populated into the Team/Versioning menu. For instance, if you are working with a Subversion-based project, the Subversion operations will precede the submenus for the other version control systems.
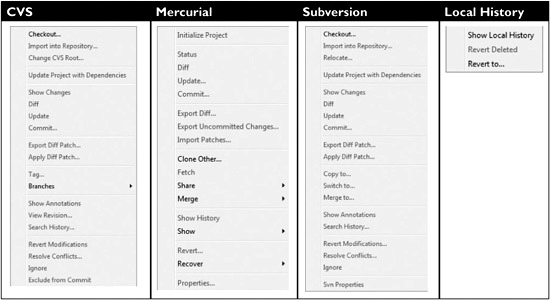
Regardless of the NetBeans version, the Versioning or Team menu will contain four submenus covered on the exam: CVS, Mercurial, Subversion, and Local History. The submenus are shown in Table 2-2.
TABLE 2-2. Version Control Submenus
Depending upon the version control system used, additional configuration and software installation may be necessary. The path to the Mercurial and/or Subversion executables must be configured in Tools | Options | Miscellaneous | Versioning. NetBeans uses the native executables to support these version control systems. Consult Chapter 1 for more information on configuring these paths.
The version control support in NetBeans is a large and complicated topic. Most developers probably use only one version control system on a daily basis. Becoming familiar with the support for three version control systems can be very challenging. To simplify studying, common infrastructure functionality is covered first, before diving into the specific version control systems. Exercises explain how to set up a repository for each version control system. The following topics will be covered:
![]() Visual Feedback
Visual Feedback
![]() File Diff Utility
File Diff Utility
![]() CVS
CVS
![]() Subversion
Subversion
![]() Mercurial
Mercurial
Visual Feedback
Version control support is integrated throughout the NetBeans IDE and especially in the refactoring tools. Once version control support is enabled for a project, NetBeans will perform the relevant file system operations whenever an add, delete, move, or rename operation is performed. The status of the files in a project is communicated via color-coding with the following convention:
![]() Red marks a file as having conflicts.
Red marks a file as having conflicts.
![]() Green marks a new file or a file that is unknown to the version control system.
Green marks a new file or a file that is unknown to the version control system.
![]() Blue marks files that have local changes.
Blue marks files that have local changes.
![]() Gray marks files that are being ignored by the editor.
Gray marks files that are being ignored by the editor.
The color-coding is visible on files in both the Projects and Files windows. The text on editor tabs is also colorized.
In addition to color-coding, NetBeans uses color-coded icons as shown in Figure 2-11. Folders containing either changes or conflicts possess a tiny cylinder badge on the lower right. The cylinder is red if the directory contains a conflict. It is blue if the directory contains either altered files or files scheduled for addition. Using the color-coded cylinders or directories, it is easy to drill down into packages or directories containing changes or conflicts.
FIGURE 2-11 Version control directory icons
File Diff Utility
Before diving into each individual version control system, it is important to understand the diff utility. The file diff utility in NetBeans is a powerful tool for comparing files. The current revision of a file can also be edited with all of NetBeans’ editor features. The diff tool is customized for each of the supported version control systems. The customizations take the form of buttons that invoke custom logic for operations such as merging, committing, refreshing changes, and so on. As in its use by version control support, the diff tool can be used to compare any two files by simply selecting the files in either the Projects or Files window and selecting Tools | Diff from the right-click context menu.
The diff utility is actually two separate utilities, a diff engine for doing the actual comparison and a visualization tool. The engine can be replaced with the Unix diff engine if desired: Tools | Options | Miscellaneous | Diff. Configuration of the diff tool is covered in Chapter 1. The visualization tool graphically compares two files’ color-coded additions and deletions, and provides buttons for navigating the differences.
An example diff appears in Figure 2-12.
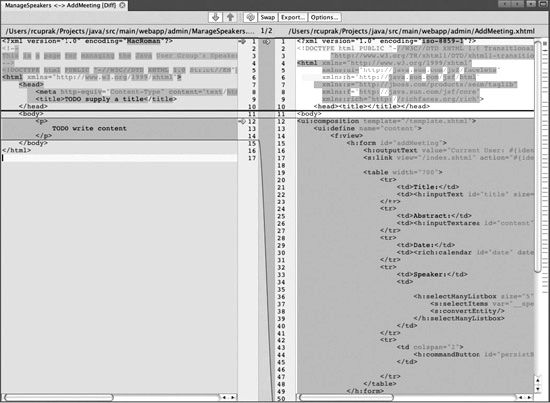
The generic diff utility has six buttons across the top of the window:
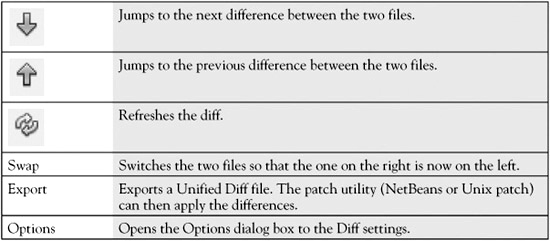
The diff utility highlights text using the following color scheme:
![]() Blue highlighting indicates that content has changed since the earlier revision.
Blue highlighting indicates that content has changed since the earlier revision.
![]() Green highlighting indicates new content that has been inserted/appended.
Green highlighting indicates new content that has been inserted/appended.
![]() Red highlighting indicates lines/text that has been removed since the previous revision.
Red highlighting indicates lines/text that has been removed since the previous revision.
The Diff Viewer also places icons on the area between the two files for manipulating the contents of the current revision. The icons can remove a change, insert a single change, or insert all of the changes from a file. The icons are as follows:

The exam will frequently ask questions about the meaning of an icon or what the color-coding is conveying. Make sure to commit the color scheme to memory and to be familiar with the icons.
CVS
Concurrent Versions System (CVS) is one of the three version control systems supported by NetBeans. NetBeans support of CVS has a long history; it was the first version control system supported by NetBeans. CVS integration runs deep, and unlike either the Subversion or Mercurial integration, the CVS implementation does not require the installation of native binaries.
Although CVS is still used today, developers have been migrating to newer version control systems such as Subversion and Mercurial. Subversion was written to solve many of the CVS technical shortcomings and presents a nearly seamless migration path. Command-line tools for CVS and Subversion are nearly identical. As a result, support for CVS and Subversion in NetBeans is very similar. This simplifies studying for the exam. This section points out differences between the two.
The following topics will be covered in this section:
![]() Importing Projects
Importing Projects
![]() Checking Out a Project
Checking Out a Project
![]() Changing a Project’s Root
Changing a Project’s Root
![]() Showing Changes
Showing Changes
![]() Updating
Updating
![]() Committing
Committing
![]() Tagging and Branching
Tagging and Branching
![]() Show Annotations
Show Annotations
![]() Viewing Revisions
Viewing Revisions
![]() Searching History
Searching History
![]() Reverting
Reverting
![]() Resolving Conflicts
Resolving Conflicts
Importing Projects
You import a new project into CVS by choosing Team | CVS | Import Into Repository to launch the CVS import wizard shown in Figure 2-13. Before you select the menu, the project being imported must already be open in NetBeans. The project cannot already be associated with one of the other version control systems.
FIGURE 2-13 CVS Import, Step 1
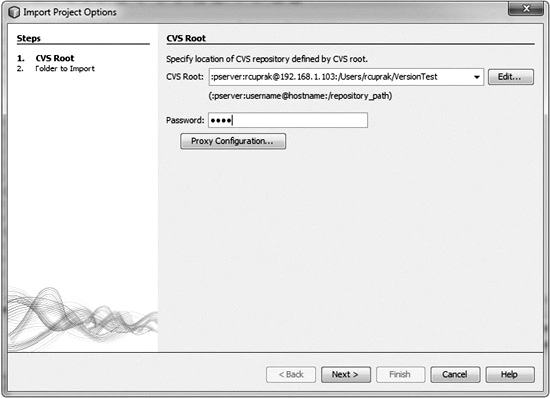
The first panel of the import wizard prompts for the CVS repository connection parameters including the CVS Root and the Password. The value entered for the CVS root depends upon the configuration of the CVS repository. The next section, which covers checking out a project, discusses the format of the CVS root string in more depth. Click the Next button, and NetBeans verifies the connection to the repository.
The second step of the wizard, shown in Figure 2-14, prompts for the following parameters:
FIGURE 2-14 CVS Import, Step 2

![]() Folder To Import Limited to a folder within the project
Folder To Import Limited to a folder within the project
![]() Import Message Message describing the reason for the import
Import Message Message describing the reason for the import
![]() Repository Folder Destination within the repository
Repository Folder Destination within the repository
![]() Checkout After Import Project becomes a working copy after the import
Checkout After Import Project becomes a working copy after the import
If Checkout After Import is not selected, the current project in NetBeans will not be under version control. The project must be subsequently checked out.
Checking Out a Project
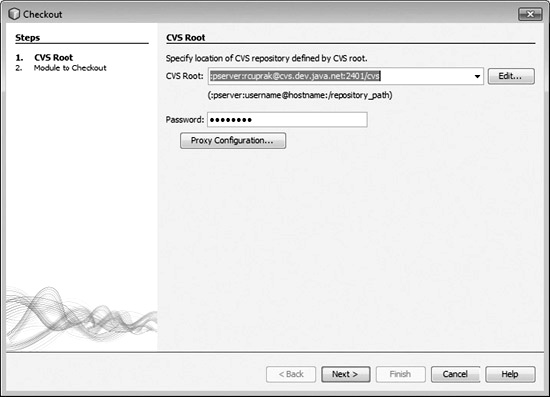
Projects are checked out of CVS by choosing Team | CVS | Checkout. Checking out from CVS is a two-step process. First, you enter the server address and credentials, and a connection is established with the CVS server. Second, you choose a directory in CVS and check it out.
The first dialog box in the checkout CVS wizard, Figure 2-15, prompts for the CVS server settings and credentials. The CVS Root is the connection string used to establish communication with the repository. For your convenience, NetBeans maintains a list of previous CVS roots. The dialog box also prompts for the Password. Proxy server settings can be configured by clicking the Proxy Configuration button. The following CVS root types are supported by NetBeans:
FIGURE 2-15 CVS Checkout—server settings
![]() pserver Connection string format:
pserver Connection string format:
:pserver:username@hostname:/repository_path
![]() ext Connection string format:
ext Connection string format:
:ext:username@hostname:/repository_path
![]() fork Connection string format:
fork Connection string format:
:fork:/repository_path
![]() local Connection string format:
local Connection string format:
:local:/repository_path
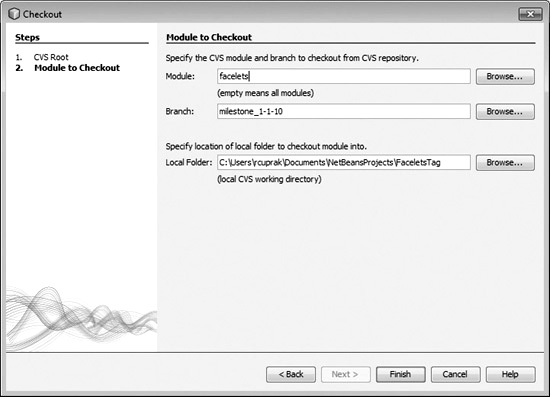
After successfully connecting to the CVS repository, the next step is to pick the Module, Branch, and Local Folder, as shown in Figure 2-16. By clicking the Browse buttons, you can browse for the repository. Once the files are checked out, NetBeans will scan for projects. If one or more projects are detected, NetBeans will ask if they should be opened. If no project is detected, NetBeans will prompt for creating a new project.
FIGURE 2-16 CVS Checkout—selecting a project
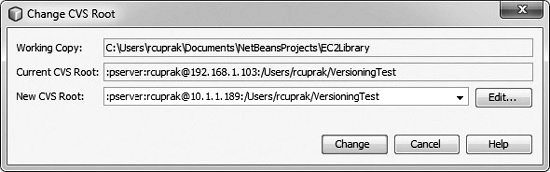
Changing a Project’s Root
NetBeans makes it easy to change a project’s CVS Root in the event that the hostname of the repository or its path changes. Typically, this happens if the CVS repository is moved to a newer machine or is hosted on a machine with an address that frequently changes. Changing the CVS Root can be done by choosing Team | CVS | Change CVS Root. The dialog box in Figure 2-17 appears. The connection type to the server must stay the same; for example, it cannot switch from pserver to ext.
Showing Changes
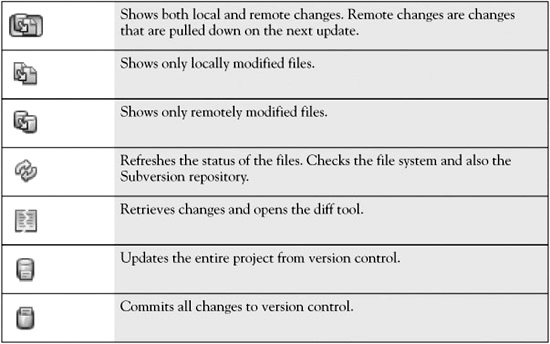
Current changes can be viewed by choosing Team | CVS | Show Changes. Choosing Show Changes opens the CVS window shown in Figure 2-18. This window lists both local and remote file changes. Seven icons are at the top (see Table 2-3).
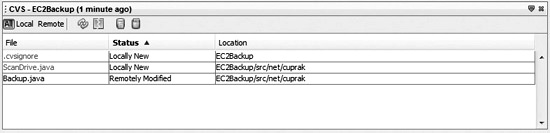
TABLE 2-3 CVS Change Operations

Right-clicking a change row will display a context menu with the following operations:
![]() Open Opens the file in the source editor.
Open Opens the file in the source editor.
![]() Diff Opens the file in the diff tool.
Diff Opens the file in the diff tool.
![]() Update Updates just the selected file.
Update Updates just the selected file.
![]() Commit Commits the selected file.
Commit Commits the selected file.
![]() Conflict Resolved Marks a file as resolved. Choose this when the file conflicts have been manually fixed outside of the NetBeans diff tool.
Conflict Resolved Marks a file as resolved. Choose this when the file conflicts have been manually fixed outside of the NetBeans diff tool.
![]() Show Annotations Displays the commit message, author, date, and revision.
Show Annotations Displays the commit message, author, date, and revision.
![]() Search History Displays a list of the revisions for a file and provides a user interface for searching those revisions.
Search History Displays a list of the revisions for a file and provides a user interface for searching those revisions.
![]() Exclude From Commit Defers committing a file. The file will appear with a strike-though line in the list. Choosing Commit All will not commit the file.
Exclude From Commit Defers committing a file. The file will appear with a strike-though line in the list. Choosing Commit All will not commit the file.
![]() Revert Modifications Reverts to the selected file(s).
Revert Modifications Reverts to the selected file(s).
![]() Ignore Informs the version control system that the file should be ignored.
Ignore Informs the version control system that the file should be ignored.
These same operations are available when viewing changes with Subversion.
Updating
A project is updated by selecting Team | CVS | Update or Team | CVS | Update Project With Dependencies. The latter will also update and retrieve the latest revisions for any project that the current project depends upon. Individual files can also be updated through the use of context menus in the Projects and Files windows. The update operation may result in files being merged, possibly resulting in a conflict.
Committing
You can use one of several different paths to commit code changes to the CVS repository:
![]() Submit an individual file from the Projects or Files window via the context menu CVS | Commit.
Submit an individual file from the Projects or Files window via the context menu CVS | Commit.
![]() Submit a group of files from the Projects or Files window by selecting them and then using the CVS context menu.
Submit a group of files from the Projects or Files window by selecting them and then using the CVS context menu.
![]() Submit an entire project from the Projects or Files window using the CVS context menu or by clicking the root and choosing Team | CVS | Commit.
Submit an entire project from the Projects or Files window using the CVS context menu or by clicking the root and choosing Team | CVS | Commit.
![]() Click the Commit All button in CVS Show Changes (Figure 2-18).
Click the Commit All button in CVS Show Changes (Figure 2-18).

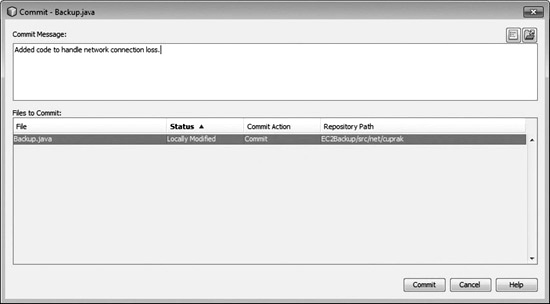
Regardless of the approach taken, the dialog box in Figure 2-20 appears. This dialog box lists the files that are uploaded to the server and prompts you for a descriptive comment. If the files are not up to date, NetBeans will display an error message and abort the operation. An update must then be performed and any conflicts resolved.
FIGURE 2-20 CVS Commit dialog box
You can also exclude files from the commit by choosing Team | CVS | Exclude From Commit.
Tagging and Branching
Tagging and branching are two common CVS operations. Tagging is typically used to mark a specific version of the software—such as for a release or QA build. This enables that exact version to be checked out in the future. Branching is performed when development tasks need to be isolated. For example, a branch might be created for a client so that client modifications can continue in isolation from main feature development. Unlike either Mercurial or Subversion, CVS has explicit tag and branch commands. NetBeans exposes these commands via Team | CVS | Tag and Team | CVS | Branches. The Branches submenu has operations for creating a branch, switching to a branch, or merging from a branch. Choosing Team | CVS | Tag displays the dialog box in Figure 2-21. You can use this dialog box to tag a file or a folder. This dialog box prompts for the name of the tag and has a Browse button for selecting a tag from the repository to add that file to that tag.
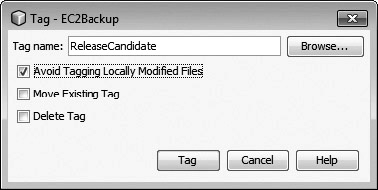
In addition, the dialog box has three checkboxes:
![]() Avoid Tagging Locally Modified Files Ensures that you do not tag files that have not yet been committed
Avoid Tagging Locally Modified Files Ensures that you do not tag files that have not yet been committed
![]() Move Existing Tag Moves the tag and attaches it to the current revision in the working directory
Move Existing Tag Moves the tag and attaches it to the current revision in the working directory
![]() Delete Tag Deletes the tag from the selected file
Delete Tag Deletes the tag from the selected file
You perform the branch operation by selecting Team | CVS | Branch. This displays the dialog box in Figure 2-22, which prompts for a Branch Name and optionally a Tag Name to denote the starting state of the new branch. If the Switch To This Branch Afterwards checkbox is selected, then the working copy is switched over to the branch afterwards.

The other submenus off of Team | CVS | Branches enable you to switch between branches and to perform merges. Merging is beyond the scope of the material covered on the exam.
Show Annotations
The Show Annotations feature pulls the revisions from version control and labels each line/edit in a file with the responsible developer, as shown in Figure 2-23. This feature is invoked via Team | CVS | Show Annotations. Hovering over a developer’s ID shows the revision number and comment. This is an invaluable tool for examining the history of a file and understanding which developer is responsible for which edit.
FIGURE 2-23 CVS Show Annotations
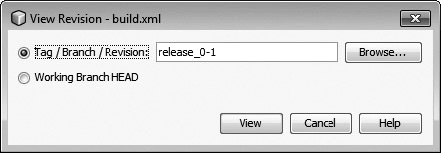
Viewing Revisions
Individual revisions can be retrieved and viewed via Team | CVS | View Revision or via the context menu CVS | View Revision. This displays the dialog box shown in Figure 2-24. The current head or a specific tag or branch can be retrieved and viewed within the editor. The revision retrieved has the @ symbol appended to its name along with the revision/tag. The file retrieved does not overwrite the current instance in the working directory.
Searching History
To search the history of a file, invoke Team | CVS | Search History, or right-click a file and choose CVS | Search History. NetBeans will open a tab, Figure 2-25, with all of the revisions listed. You can view the listed revisions either as a Summary or as a Diff. Using the summary view, it is easy to quickly see who edited the file and when edits were performed. The diff view is a more detailed view for understanding at a granular level each change made between revisions.
FIGURE 2-25 CVS Search History
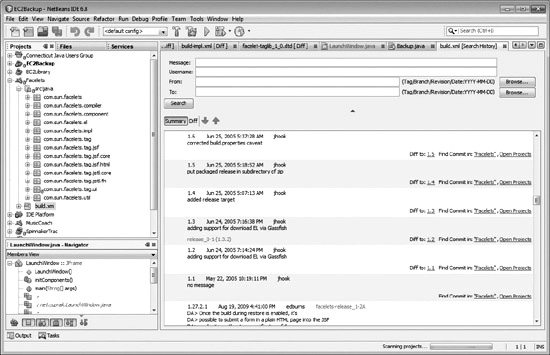
The top panel, above the list of revisions, filters the revision history entries. The history can be filtered according to:
![]() Message contents
Message contents
![]() Username of the developer
Username of the developer
![]() Start and stop dates
Start and stop dates
Reverting
Changes to a file are reverted from either the Team menu or context menu by choosing CVS | Revert Modifications. NetBeans will prompt for confirmation that the file or files should be reverted. Unlike Subversion or Mercurial, CVS requires a connection to the server to perform the operation.
Resolving Conflicts
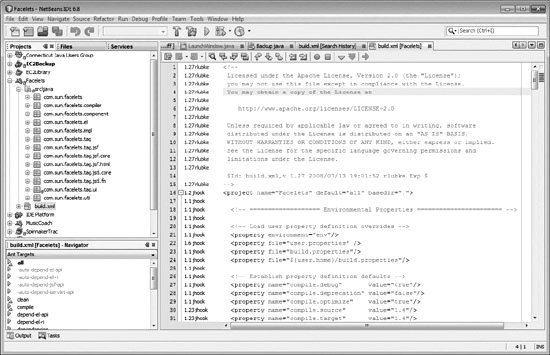
Performing the CVS Update operation can result in conflicts if two developers made competing changes to the same line or lines of code. Before the files can be committed, or in many cases the project compiled, the competing edits must be resolved. When a file contains a conflict, a red exclamation mark is added to the file, and the filename appears in red as depicted in Figure 2-26. In addition, an exclamation mark is added to each folder or directory in the Projects or Files window.
NetBeans provides two approaches to resolving conflicts:
![]() Manually via editing the text directly (Figure 2-26)
Manually via editing the text directly (Figure 2-26)
![]() Graphically using the resolver (Figure 2-27)
Graphically using the resolver (Figure 2-27)
FIGURE 2-26 CVS Resolving conflicts
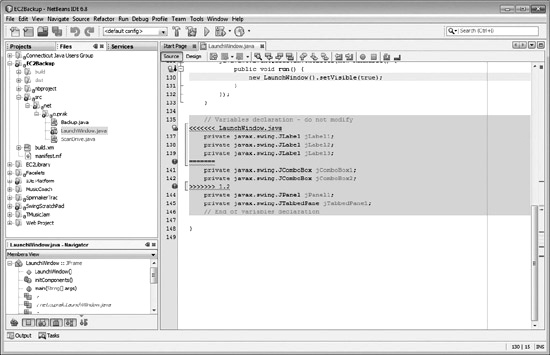
FIGURE 2-27 CVS Conflicts Resolver
The NetBeans Conflicts Resolver displays both revisions side by side and the merged content below them (see Figure 2-27). Conflicts are highlighted in red. Buttons and icons can be used to jump to the next conflict, accept the changes, or to accept the changes and move to the next conflict. After each change, the coloring will change to denote that the conflict has been resolved.
The approach taken largely depends upon the developer’s preference. Using the NetBeans Conflicts Resolver, invoked via Team | CVS | Resolve Conflicts, code changes can be individually accepted or rejected, with NetBeans removing the conflict annotations added by CVS. Manually editing the file is a bit trickier and requires understanding the CVS markup (see Figure 2-26). With CVS markup, the conflicting edits are separated with =======. Preceding the separator, the local code modifications are displayed along with <<<<<<< <File Name>, which marks the start of the conflict. The end of the revision pulled from the repository is terminated with >>>>>>> <revision number>. NetBeans automatically detects when the conflicts have been resolved. Resolved files appear in the standard blue used to mark files with local changes.
Subversion
Subversion (SVN) is a traditional client/server revision control system developed to replace CVS. It is an open source project hosted at Tigris.org (http://subversion.tigris.org) and has recently been accepted as an Apache project (www.apache.org). Subversion was initially developed to be a compelling replacement for CVS and to fix many of the shortcomings that had plagued CVS users. Given this stated design objective, the SVN commands were kept similar to those of CVS. The SVN user experience in NetBeans is very similar to that of CVS.
This section covers Subversion operations as they relate to NetBeans. Subversion is a large and complicated version control system. Entire books have been written on it. Some operations, such as add, remove, and rename, are not covered because they are discussed in the chapter on refactoring. SVN merging is not covered because that is beyond the scope of the exam. The upcoming sections will cover the following topics:
![]() Configuring Subversion
Configuring Subversion
![]() Importing Projects
Importing Projects
![]() Checking Out Projects
Checking Out Projects
![]() Project Relocation
Project Relocation
![]() Showing Changes
Showing Changes
![]() Updating
Updating
![]() Committing Changes
Committing Changes
![]() Resolving Conflicts
Resolving Conflicts
![]() Configuring SVN Properties
Configuring SVN Properties
![]() Branching, Tagging, and Copying
Branching, Tagging, and Copying
Configuring Subversion
Unlike the CVS integration, the Subversion implementation in NetBeans requires the native SVN executables. If Subversion is not installed, the first time an SVN operation is performed, NetBeans will display the dialog box shown in Figure 2-28.
FIGURE 2-28 Subversion binaries
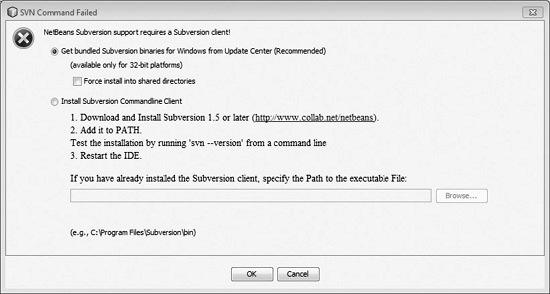
The binaries can either be downloaded and installed automatically via the Update Center or manually installed. Manually downloading the Subversion binaries is a good choice if you are also going to use Subversion from the command line.
NetBeans 6.8 requires Subversion 1.5 or greater. If you are using another Subversion client that is an older version, be very careful. New Subversion clients automatically upgrade a working copy. For instance, if you are using both NetBeans and Eclipse on a project and Eclipse is using Subversion 1.4, the NetBeans 1.5 Subversion client will upgrade the project. This will break the Subversion integration in Eclipse unless you upgrade. If you download and install Subversion 1.6 and run update, you will break the NetBeans Subversion support.
On Windows it may be necessary to install additional software for accessing remote Subversion repositories. If the remote repository is accessed via an ssh tunnel (svn+ssh), plink must be downloaded from the PuTTY website (http://www.chiark.greenend.org.uk/~sgtatham/putty/) and installed. PuTTY is a client secure shell (SSH) implementation. The plink executable provides command-line access to the backend. Depending upon Windows security settings, it is a good idea to run plink from the command prompt, cmd.exe, first. This verifies that the plink application was downloaded correctly, is compatible with the Windows version, and clears any security constraints for Internet downloaded applications. Secure shell implementations are preinstalled on Solaris, Linux, and Mac OS X—no additional setup is required on these platforms.
Importing Projects
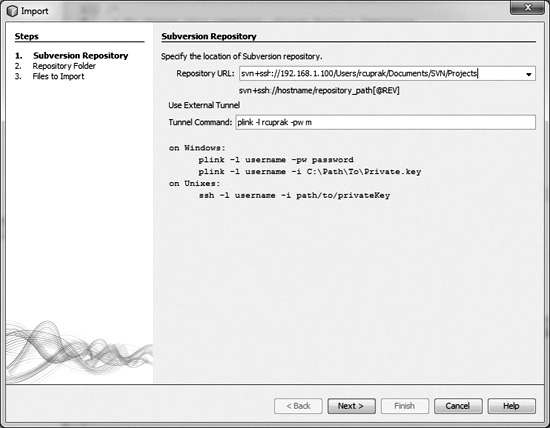
A new project is imported into Subversion by choosing Team | Subversion | Import Into Repository. This will display the Import dialog box in Figure 2-29 for Windows. The Tunnel Command is necessary only if secure shell (ssh) is being used to connect to the server. The Repository URL is the remote address and path of the Subversion repository. A terminal window may flash briefly if ssh is being used.
FIGURE 2-29 Subversion Import, Step 1
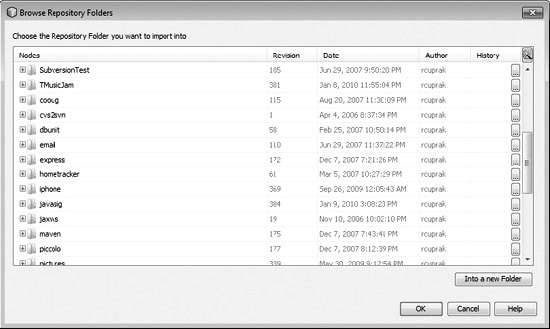
The next step for importing a project is to specify the folder name, pick the location within Subversion, and to enter a commit comment as shown in Figure 2-30. Clicking the Browse button displays a dialog box similar to a file browser, depicted in Figure 2-31. If you are following the standard Subversion layout with a trunk, tags, and branch directories, you must use the Into A New Folder button to create the required folders.
FIGURE 2-30 Subversion Import, Step 2
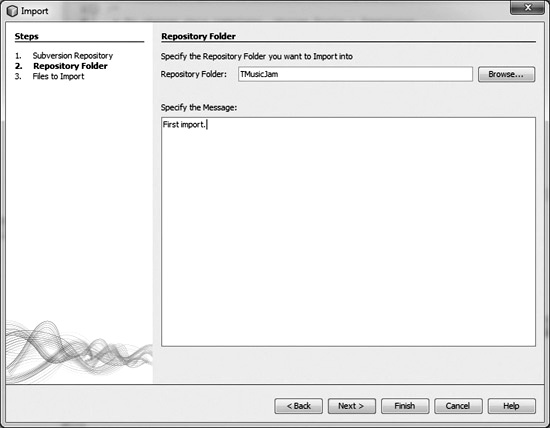
FIGURE 2-31 Subversion Import: repository browser
Clicking the Finish button displays a confirmation screen (see Figure 2-32). This final step gives you control over the files being added to version control. An import action for each file can be set:
FIGURE 2-32 Subversion Import: Confirmation
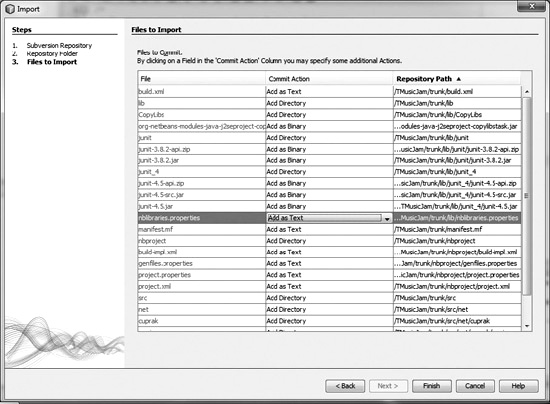
![]() Add As Text
Add As Text
![]() Add As Binary
Add As Binary
![]() Add As Directory
Add As Directory
![]() Exclude From Commit
Exclude From Commit
Adding a file as text or binary dictates the MIME type that is used. Directories can either be added or excluded. Once the Finish button is clicked, the files are added and committed to version control. The current project will become a working copy.
Checking Out Projects
Projects are checked out by choosing Team | Subversion | Checkout. In Windows, the displayed dialog box is the same one shown in Figure 2-29, except for the window title. Other platforms may vary and also query for a Certificate File, Passphrase fields, and Proxy Configuration.
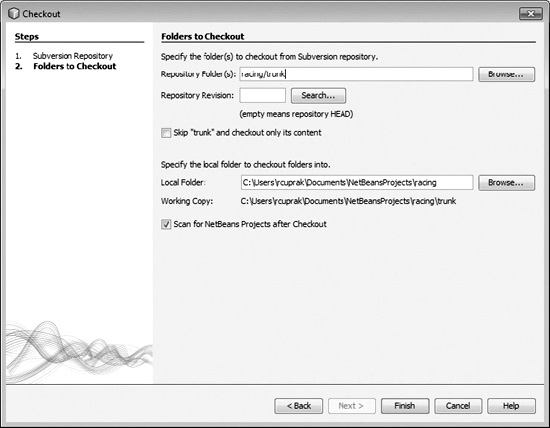
In the subsequent dialog box shown in Figure 2-33, the Subversion Repository Folder, Repository Revision, and Local Folder can be selected. If a folder name differing from the folder name in Subversion is desired, select Skip <Directory> And Checkout Only Its Content, and specify a Local Folder to store the project. It is not required that the directory being checked out, or any of its subdirectories, contain a NetBeans project. NetBeans will prompt after the checkout to create a project; creating a project is optional. If the checked-out directory contains a NetBeans project, NetBeans will open the project in the IDE.
FIGURE 2-33 Subversion Checkout
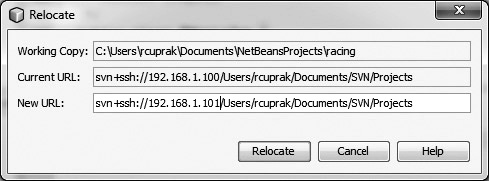
Project Relocation
The current NetBeans project can be “relocated” by choosing Team | Subversion | Relocate. An example of project relocation is shown in Figure 2-34. Relocating enables changing the URL to the repository. Under the hood, NetBeans is running svn switch –relocate with the old and new paths. This is extremely useful if the Subversion repository is hosted on a machine with a dynamic address. Each repository has a Universally Unique Identifier (UUID), a unique identifier, so it isn’t possible to switch to a completely unrelated Subversion repository.
Showing Changes
Selecting Team | Subversion | Show Changes will open the Subversion window shown in Figure 2-35. Opening this window causes NetBeans to check with the Subversion repository for changed files. The window lists local and remote file changes. Operations appear across the top of the table. This interface is basically the same as CVS with just slightly differing icons. Available operations include:
Right-clicking a change row will display a context menu with the following operations:
![]() Open Opens the file in the source editor.
Open Opens the file in the source editor.
![]() Diff Opens the file in the diff tool.
Diff Opens the file in the diff tool.
![]() Update Updates just the selected file.
Update Updates just the selected file.
![]() Commit Commits the selected file.
Commit Commits the selected file.
![]() Conflict Resolved Marks a file as resolved. Choose when the file conflicts have been manually fixed outside of the NetBeans diff tool.
Conflict Resolved Marks a file as resolved. Choose when the file conflicts have been manually fixed outside of the NetBeans diff tool.
![]() Show Annotations Displays the commit message, author, date, and revision.
Show Annotations Displays the commit message, author, date, and revision.
![]() Search History Displays a list of the revisions for a file and provides a user interface for searching those revisions.
Search History Displays a list of the revisions for a file and provides a user interface for searching those revisions.
![]() Exclude From Commit Defers committing a file. The file will appear with a strike-through in the list. Choosing Commit All will not commit the file.
Exclude From Commit Defers committing a file. The file will appear with a strike-through in the list. Choosing Commit All will not commit the file.
![]() Revert Modifications Reverts to the selected file(s).
Revert Modifications Reverts to the selected file(s).
![]() Ignore Informs the version control system that the file should be ignored.
Ignore Informs the version control system that the file should be ignored.
These operations are essentially the same across all version control systems covered on the exam.
Searching History
To search the history of a file, invoke Team | Subversion | Search History, or right-click on a file and choose Subversion | Search History. The search functionality has the same capabilities as the CVS search support. NetBeans will open a tab depicted in Figure 2-36 with the revisions listed in chronological order. The listed revisions can be either summarized or viewed as a diff. Using the summary view it is easy to quickly see who edited the file and when edits were performed. The diff view is a more detailed view for understanding at a granular level each change made between revisions.
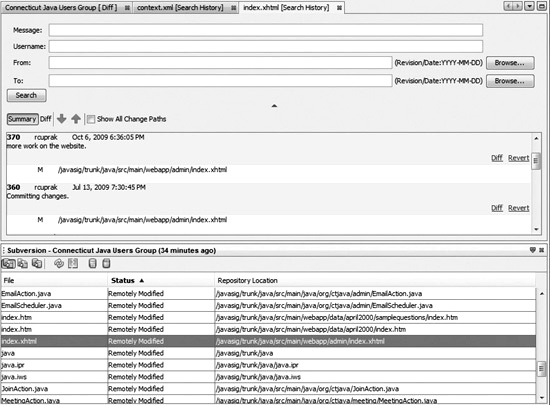
The top panel, above the list of revisions, filters the revision history entries. The history can be filtered according to:
![]() Message contents
Message contents
![]() Username of the developer
Username of the developer
![]() Start and stop dates
Start and stop dates
Updating
Updating is a simple task with the Subversion integration. Select the project root in either the Projects or Files windows, and choose Team | Subversion | Update to pull down the latest file changes from Subversion. If you want only certain directories to be updated, right-clicking and choosing Subversion | Update will update only files under the selected directory. To view changes before they are applied, choose Team | Subversion | Show Changes to see what updates are going to be downloaded from the server.
NetBeans projects can depend upon other NetBeans projects. Choosing Team | Subversion | Update Project With Dependencies not only will execute an update on the current project, but also will invoke update on parent projects. Projects that depend upon this project will not be updated, however.
Committing Changes
Committing a file to Subversion can be done practically anywhere in the application where you can right-click a file. The Commit dialog box is shown in Figure 2-37. A file can be committed from the Projects or Files window, or by right-clicking its editor tab and choosing Subversion | Commit.
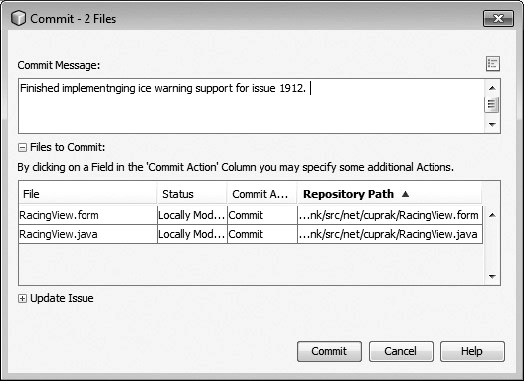
Single or multiple files can be selected. It is a good idea to provide a comment for the commit describing the changes that were made to the file. The files to be committed appear in the list following the commit comment. Although not shown in the figure, spinning open the Update Issue group enables tying the commit to an issue.
Resolving Conflicts
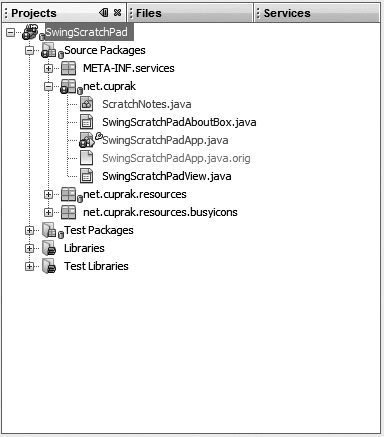
Invariably conflicts arise when working on files. Suppose two developers edit the same file and also the same block of code concurrently. While Subversion will try its best to merge the files, it isn’t always successful. When Subversion is unsuccessful, the name will appear red, and a red badge will appear on its parent folders and also on the project node. Three gray files will also appear in the Files window. Three files are created:
![]() The original file before any changes were made. This file has the oldest revision number.
The original file before any changes were made. This file has the oldest revision number.
![]() Your changes file has the .mine file extension.
Your changes file has the .mine file extension.
![]() The other developer’s changes file has the newest revision number.
The other developer’s changes file has the newest revision number.
You have two options when resolving a merge conflict:
![]() Use the NetBeans graphical utility to select one set of changes.
Use the NetBeans graphical utility to select one set of changes.
![]() Manually edit the file.
Manually edit the file.
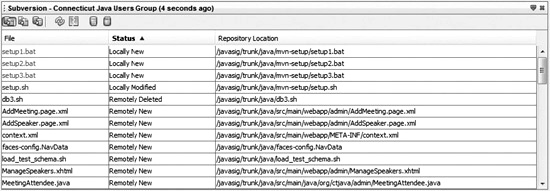
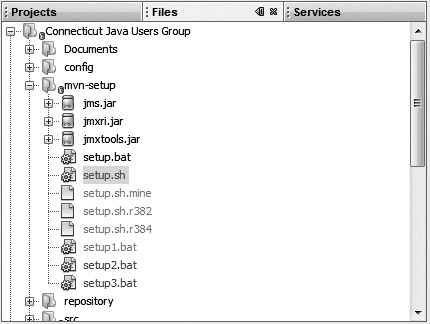
Figure 2-38 is an example of conflicts in setup.sh. In the figure, the red badge appears on the folder (here, mvn-setup) containing the conflict and on all of the parent folders (in this figure, Connecticut Java Users Group). The name of the file with the conflicts appears in red (setup.sh). The three other files appear below it. Note that setup1.bat appears gray because it is an ignored file as do the files containing the conflict revisions.
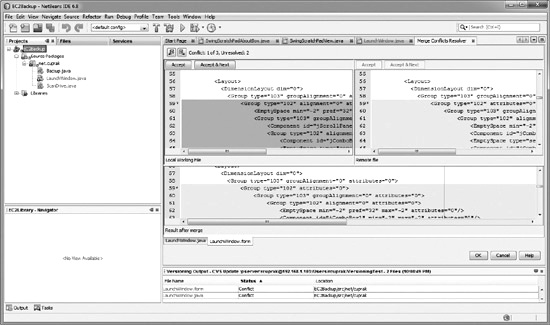
Right-clicking the file and choosing Resolve Conflicts opens the tab appearing in Figure 2-39. Three panels are on this tab. The left panel is the local working copy. The panel at right contains the remote copy. The panel on the bottom contains the final merged changes. The conflicts are highlighted in red. Using this interface, you can select which changes you want to keep for each conflict. The icons ![]() navigate between the conflicts. Clicking the Accept button accepts the changes in the panel below it. Clicking the Accept & Next button accepts the changes and moves to the next conflict. Accepted changes will appear green, whereas rejected changes will appear blue. Once the conflicts are resolved, click OK to apply the changes. The three files containing the different revisions are removed.
navigate between the conflicts. Clicking the Accept button accepts the changes in the panel below it. Clicking the Accept & Next button accepts the changes and moves to the next conflict. Accepted changes will appear green, whereas rejected changes will appear blue. Once the conflicts are resolved, click OK to apply the changes. The three files containing the different revisions are removed.
FIGURE 2-39 NetBeans Conflicts Resolver

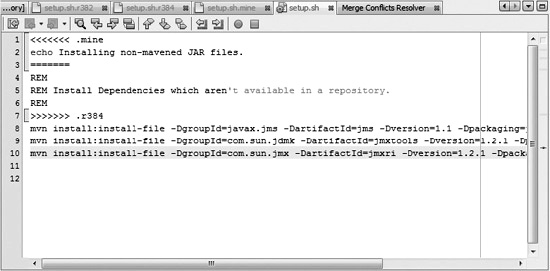
Double-clicking setup.bat opens it in a tab that displays the raw output from Subversion shown in Figure 2-40. The green highlighting along the left side marks material added to the file.
FIGURE 2-40 Conflict file content
Configuring SVN Properties
Subversion supports metadata on files and directories. The metadata is a list of properties and values. Both the property and value are free-form text. SVN properties are versioned. You can add new properties—for instance, add a description field for image files—or use built-in properties. One common built-in property is svn:needs-lock, which is used to enable SVN locking. SVN locking limits a file to being edited by only one developer at a time. NetBeans does not currently honor SVN locking.
Figure 2-41 is the Svn Properties dialog box displayed when selecting a file and choosing Team | Subversion | Svn Properties. Once a property name and value are entered, the Add button becomes enabled, allowing the property to be saved.
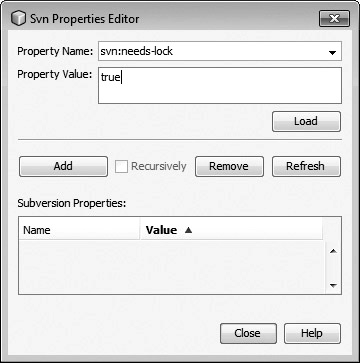
If SVN properties are being edited on a directory, the Recursively checkbox is enabled. Selecting Recursively will apply the property to all subdirectories and files. Selecting the property and choosing Remove can remove a property.
Branching, Tagging, and Copying
Subversion does not have explicit operations for tagging or branching like CVS. Instead it uses copying; to branch or tag, a directory is copied to a new location with a descriptive name. Unlike CVS, Subversion supports versioning of directories. The refactoring tools inside NetBeans automatically leverage Subversion’s copying support whenever a package is moved or a file is copied to another location. To copy a file or directory, right-click and choose Subversion | Copy To or Team | Subversion | Copy To. NetBeans displays the dialog box in Figure 2-42.
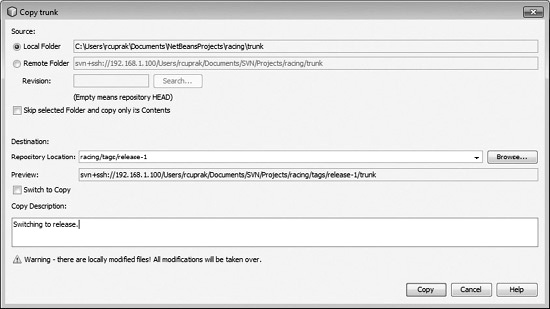
When copying a file/directory in Subversion, you select the source and the destination. The source can either be a local or remote directory/file. If the file/directory is remote, a revision number can be selected. If no revision number is selected, HEAD is assumed. Clicking the Browse button displays the NetBeans Subversion file browser that can be used to select the destination. The destination can also be manually typed. It is considered a good practice to enter a reason for the copy.
Once the Copy button is clicked, the copy is performed and committed to Subversion. If the goal is to also switch the project (local working copy), then Switch To Copy should be selected.
EXERCISE 2-2 Checking Out a Subversion Project
In this exercise, you are going to checkout a project from the Subversion repository on java.net. The SwingX library is an excellent source of Swing components and is used in the next chapter on Java SE Desktop Applications.
To checkout a project from the Subversion repository on java.net:
1. Get a login ID for java.net (http://java.net). A login ID is required for checking out source code from Subversion. The java.net project site hosts open source Java projects.
2. Choose Team | Subversion | Checkout.
3. For the repository URL, enter: https://swingx.dev.java.net/svn/swingx/trunk
4. Enter your username/password in the relevant fields and click Next.
5. For the Folders To Checkout, check “Skip ‘trunk’ and checkout only its content.”
6. Append/SwingX to the end of the path in the Local Folder.
7. Click Finish to checkout the project.
NetBeans will now checkout the project and automatically open the NetBeans project provided by the SwingX team. Note, the Reference Problems dialog box will appear because the SwingX NetBeans project file has dependencies on other projects that were not checked out.
8. As a further exercise, browse through other java.net projects and try checking them out.
Mercurial
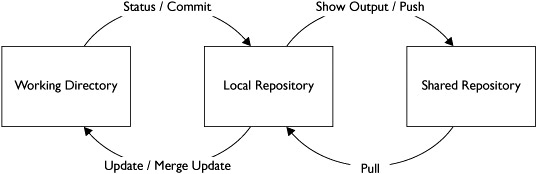
Mercurial is an open-source distributed version control system. Unlike with either Subversion or CVS, the entire repository is duplicated on each machine. Each developer has a clone of the repository and is thus effectively working off a fork. As a result, there are some fairly significant workflow differences between Mercurial and CVS or Subversion. First, unlike CVS or Subversion, Mercurial has no checkout operation. The analogous operation is cloning, where you clone the parent repository. Second, when you commit files, you are checking them back in to your copy of the repository. Changes can be pushed or pulled to another repository. Changes can be pushed or pulled to any clone—not just the repository that was cloned. Thus, working with Mercurial is similar to always working on your own branch in CVS or Subversion.
The typical Mercurial workflow is depicted in Figure 2-43. Both the working directory and local repository reside on the local machine, typically under the same directory root. Files are edited in the working directory and committed to the local repository. From the local repository, changes can be pushed or pulled to other shared repositories. An example of a shared repository is the NetBeans project (http://hg.netbeans.org/main). The local repository contains the complete revision history. Subversion keeps only the original files (last update) in the .svn directory, whereas CVS has only working copies. Many operations that require a remote connection in either CVS or Subversion are local operations with Mercurial.
FIGURE 2-43 Mercurial workflow (http://wiki.netbeans.org/HgNetBeansSources)
Mercurial is used by many large projects including NetBeans, OpenJDK, OpenSolaris, and Mozilla. Using the Mercurial support in NetBeans, it is possible to clone the NetBeans source tree and to begin modifying the IDE.
Since you are working with your own copy of the repository, you can commit your changes. With CVS and Subversion this would not be possible unless you were involved with the project and had commit permissions.
The following topics will be covered in this section:
![]() Configuring Mercurial
Configuring Mercurial
![]() Initializing a New Project
Initializing a New Project
![]() Cloning
Cloning
![]() Committing Changes
Committing Changes
![]() Updating
Updating
![]() Reverting Changes
Reverting Changes
![]() Showing Changes
Showing Changes
Configuring Mercurial
The Mercurial support in NetBeans requires the native Mercurial binaries. These can be downloaded from the Mercurial website (http://mercurial.selenic.com/), which provides installers for all of the major platforms including Windows, Solaris, Mac OS X, and Linux. Graphical installers are provided for Windows and Mac OS X; package utilities are used for the other platforms. Mercurial does require Python, which is a separate install.
Once Mercurial is installed and added to the PATH environment variable, NetBeans should auto-detect its presence, and no further setup is required. The Windows installer for Mercurial can optionally set up the PATH environment variable. The path to Mercurial binaries can also be configured in the options dialog box, Tools | Options | Miscellaneous | Versioning. If the path for some reason is not set, the Mercurial executable is named hg.exe, and the typical path to it is C:Program Files (x86)Mercurial.
Initializing a New Project
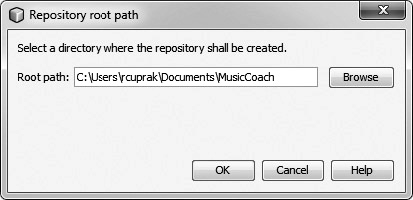
Initializing a new project is analogous to importing a project in either Subversion or CVS. To initialize a project, select the top-level node of the project in the Projects window and choose Team | Mercurial | Initialize Project. This will display the dialog box shown in Figure 2-44. This dialog box is prompting for the local Mercurial repository directory. If the default values are accepted, the Mercurial repository directory, .hg, is placed in the project directory. After initializing the project, the files should be committed by choosing Team | Mercurial | Commit.
FIGURE 2-44 Initializing Mercurial project
Cloning
Cloning an external repository is equivalent to checking out a project in the Subversion or CVS version control systems. Cloned projects can originate either from a remote repository or from an existing NetBeans project that is being stored in a Mercurial repository and is opened in the IDE. Cloning an existing IDE project is a painless technique to create a branch that is instantly available. You can clone an existing project by choosing Team | Mercurial | Clone – [Project Name]. NetBeans will prompt for the source repository, name, and destination.
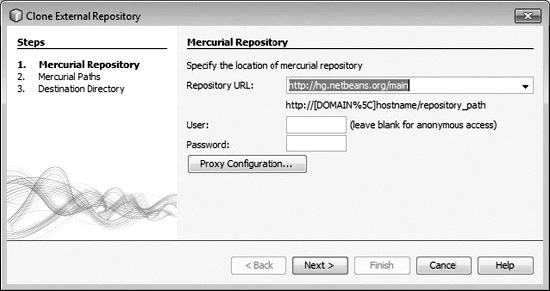
Cloning a remote project is more involved than cloning a local project. To clone a remote project, choose Team | Mercurial | Clone Other. This displays the dialog box in Figure 2-45. The first step to cloning a repository is to specify the Repository URL along with a User name and Password if required. The valid URL formats are
FIGURE 2-45 Mercurial Clone, Step 1
![]() local/filesystem/path[#revision]
local/filesystem/path[#revision]
![]() file://local/filesystem/path[#revision]
file://local/filesystem/path[#revision]
![]() http://[user[:pass]@host[:port]/[path][#revision]
http://[user[:pass]@host[:port]/[path][#revision]
![]() https://[user[:pass]@host[:port]/[path][#revision]
https://[user[:pass]@host[:port]/[path][#revision]
![]() ssh://[user[:pass]@host[:port]/[path][#revision]
ssh://[user[:pass]@host[:port]/[path][#revision]
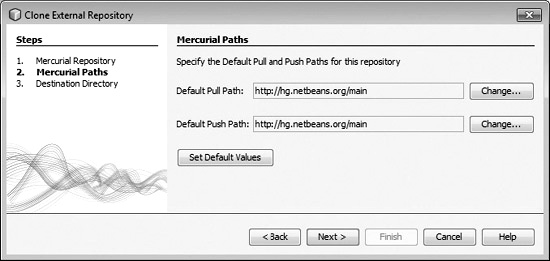
The next panel in the wizard, shown in Figure 2-46, defines the pull and push paths. The pull path defines the repository path to pull changes from when choosing Mercurial | Share Pull from default. The push path is the path to which changes are pushed when selecting Team | Mercurial | Share | Push to default.
FIGURE 2-46 Mercurial Clone, Step 2
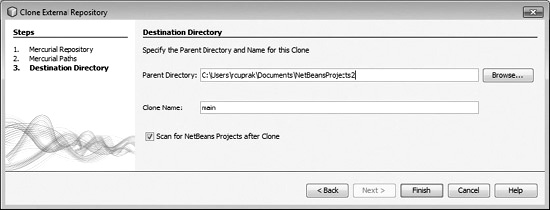
The last step in the cloning process, shown in Figure 2-47, prompts for the Parent Directory where the cloned project is to be placed. A Clone Name also is required. NetBeans can optionally scan the repository and open any NetBeans projects.
FIGURE 2-47 Mercurial Clone, Step 3
Committing Changes
A big difference between CVS and Subversion versus Mercurial is in the commit process. Under both the context menu and main Mercurial menu is a Commit menu item. The two menus also have Push To Default and Push Other menu items. The workflow is shown in Figure 2-43. Changes are first committed to the local repository. Committing creates a new changeset. Once changes are committed to the local repository, they can then be pushed to the original repository used to clone this repository or to another repository. You can also share changes by having other developers pull from the repository.
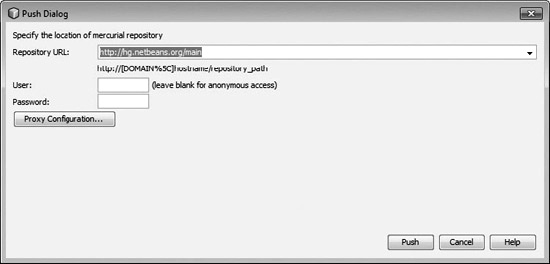
The Commit dialog box depicted in Figure 2-48 is similar to the commit dialog boxes of both Subversion and CVS. It lists the files to be committed along with a comment and can optionally update the issue tracker. The Push Dialog, shown in Figure 2-49, is invoked via Team | Mercurial | Share | Push To Other. It will prompt for the remote server and credentials.
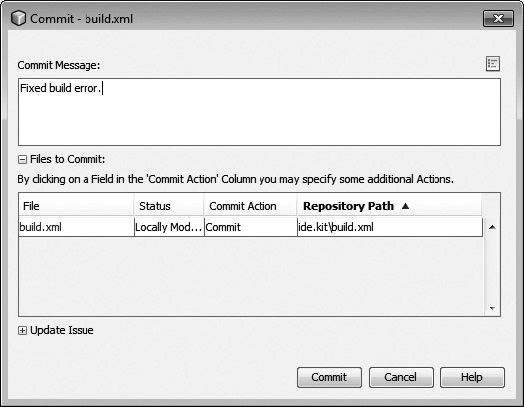
FIGURE 2-49 Mercurial Push Dialog
Updating
Updating in Mercurial involves pulling changesets from another repository. The changes are pulled from the remote repository into the current repository. An update must then be performed to synchronize the working directory with the local repository. NetBeans automatically performs the update when a pull is performed. This is analogous to a CVS update. Changes can be pulled from either the default repository or from another repository. The menu operations involved are invoked from Team | Mercurial | Share | Pull From Default or Pull From Other. The Mercurial update command can be invoked separately via Team | Mercurial Update.
Related to updating is fetch: Team | Mercurial | Fetch. This pulls changes from the shared repository, updates the local working directory, merges the changes, and if successful, commits the changes back to the local repository. This simplifies the workflow by combining several Mercurial commands.
Reverting Changes
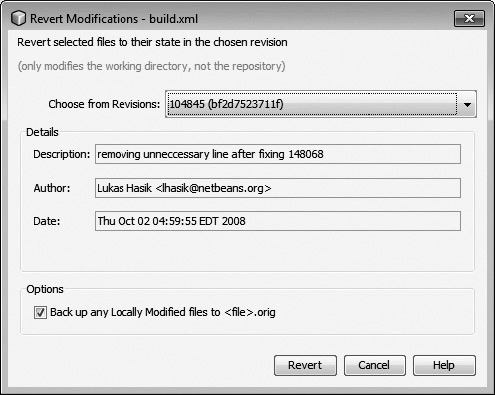
Reverting files in Mercurial is similar to reverting in Subversion and CVS. Choose Team | Mercurial | Revert to revert a file. This will display the Revert Modifications dialog box shown in Figure 2-50. Using this dialog box, you can select the revision. Selecting a revision displays information about it including the commit message, author, and date. Additionally, the file can be backed up.
Showing Changes
Changes can be viewed by choosing Team | Mercurial | Status. This will open the Mercurial status window shown in Figure 2-51. This window lists the pending changes. The interface is basically the same as in CVS (look back at Figure 2-18), except there is no filtering for local and remote changes.
Right-clicking a change row will display a context menu with the following operations:
![]() Open Opens the file in the source editor.
Open Opens the file in the source editor.
![]() Diff Opens the file in the diff tool.
Diff Opens the file in the diff tool.
![]() Update Updates just the selected file.
Update Updates just the selected file.
![]() Commit Commits the selected file to the local repository.
Commit Commits the selected file to the local repository.
![]() Mark As Resolved Marks a file as resolved. Choose when the file conflicts have been manually fixed outside of the NetBeans diff tool.
Mark As Resolved Marks a file as resolved. Choose when the file conflicts have been manually fixed outside of the NetBeans diff tool.
![]() Show Annotations Displays the commit message, author, date, and revision.
Show Annotations Displays the commit message, author, date, and revision.
![]() Revert Modifications Reverts to the selected file(s).
Revert Modifications Reverts to the selected file(s).
![]() Exclude From Commit Defers committing a file. The file will appear with a strike-through in the list. Choosing Commit All will not commit the file.
Exclude From Commit Defers committing a file. The file will appear with a strike-through in the list. Choosing Commit All will not commit the file.
EXERCISE 2-3 Creating a Mercurial Project and Cloning
In this exercise, you create a new project and import the project into a Mercurial repository. You then clone the project and experiment with pushing and pulling.
1. Create a new Java Desktop Application by choosing File | New Project | Java Desktop Application.
2. Create a couple of source code files, and drop some widgets onto the main panel.
3. Import the project into a Mercurial repository by choosing Team | Mercurial | Initialize Project.
4. Accept the root path suggested by the IDE.
5. Commit your changes by choosing Team | Mercurial | Commit. Enter a comment and select Commit.
6. Clone the project. Choose Team | Clone [Project Name].
7. Accept the suggested defaults. The Clone Name field specifies the name of the new clone. Choose Clone to clone the project. NetBeans will open the clone in a new project.
8. In the original project, make some additional changes to the main panel, and commit to the Mercurial repository.
9. Select the cloned project in the Projects window. Choose Team | Mercurial | Share | Pull From Default.
10. Confirm that the code changes were pulled from the original project.
11. Experiment with making conflicting changes.
Local History
Version control systems such as CVS, Mercurial, Subversion, Perforce, and so on are great for tracking code history and maintaining an audit trail. Code history, when combined with a diff tool, is an indispensible means for understanding where changes have been made. Changes can easily be reverted with a click of a button, allowing developers to experiment with making complex code changes without bad consequences. In many ways a version control system is a powerful undo/redo system—one that can be used throughout the day. Changes to code are constantly being made, evaluated, and rolled backed. Version control systems have one major weakness; it is the responsibility of the developer to commit changes. Many times changes cannot be committed for a period of time—the feature might be incomplete, buggy, or the developer might take an extended vacation. NetBeans bridges these shortcomings with its Local History system.
The Local History version control system integration in NetBeans is not a full-fledged version control system. It cannot be used to share changes between developers, so it isn’t a replacement for CVS, Subversion, or Mercurial. Unlike full-fledged version control systems, Local History lacks an explicit commit. Instead, it tracks all changes, no matter how small, over a period of time each time you save a file. By default, it tracks changes for seven days and is configurable in Tools | Options | Miscellaneous | Versioning | Local History. The time limit mitigates the footprint of the history on disk. Most of the history consists of routine changes/experimentation with no value. For example, adding a temporary debug statement and then fixing the formatting of that statement is not a useful edit that anyone would care about in six months. Local History is the undo/redo support with the façade of the version control system integration.
The local history submenu, Team | Local History, has three menu items:
![]() Show Local History Views changes made to the current file.
Show Local History Views changes made to the current file.
![]() Revert Deleted Recovers a deleted file.
Revert Deleted Recovers a deleted file.
![]() Revert To Reverts to a previous editing state.
Revert To Reverts to a previous editing state.
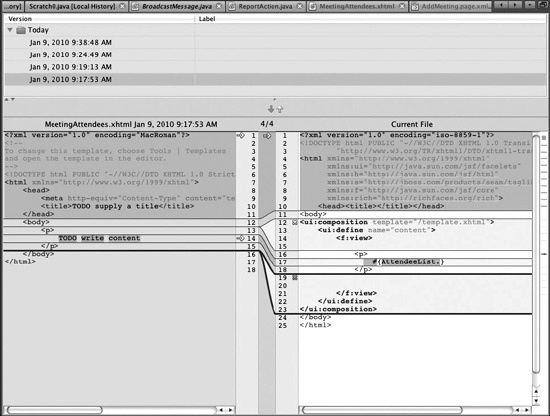
The Show Local History menu opens a new tab in NetBeans showing the history of the current file. This is shown in Figure 2-52. The top panel of the tab contains a list of the revisions ordered by timestamp along with a label. The bottom panel is a file diff with the selected row revision on the left and the current revision on the right. The following actions can be performed:
FIGURE 2-52 Show Local History
![]() Labeling A revision can be labeled by clicking a label cell and entering text.
Labeling A revision can be labeled by clicking a label cell and entering text.
![]() Filtering Right-clicking the label column displays a context menu for filtering the labels.
Filtering Right-clicking the label column displays a context menu for filtering the labels.
![]() Reverting Right-click a revision and select Revert From History to revert the file to the selected revision.
Reverting Right-click a revision and select Revert From History to revert the file to the selected revision.
![]() Deleting Right-click a revision and select Delete From History to purge a revision.
Deleting Right-click a revision and select Delete From History to purge a revision.
The Revert Deleted menu reverts deleted files/directories. Although Revert Deleted is available from the Team | Local History menu, it is more intuitive to right-click the directory containing the deleted item. Revert Deleted will undelete all files and directories in the local history. Most importantly, this functionality is only available to files created and deleted in NetBeans. If the file is created and deleted outside of NetBeans, this functionality may not work.
The Revert To menu displays the dialog box shown in Figure 2-53 for the current file containing the list of local revisions. The file can be reverted by selecting a revision from the list and clicking Revert. If it turns out that the operation was undesirable, it can always be undone by digging back into the local history. Note: reverting creates a new revision, which means that undoing a revert operation requires reverting back to a previous reversion.
FIGURE 2-53 Local history revert
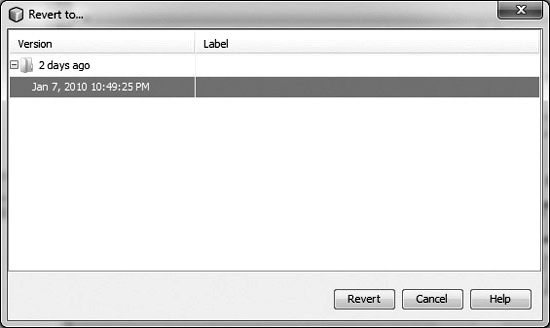
Version control support in NetBeans is an expansive topic. The Scenario & Solution will quickly test what you’ve learned.
SCENARIO & SOLUTION

EXERCISE 2-4 Experimenting with Local History
In this exercise, you will repeatedly edit a file and then selectively revert your changes.
1. Open a scratch Java Application project for experimenting. This is a project that contains nothing valuable and that you can delete after this exercise.
2. Switch to the Files window.
3. Open the nbproject directory.
4. Double-click project.properties to edit it.
5. Randomly change the values of a couple of properties throughout the file.
6. Save the file.
7. Remove some properties from the file.
8. Save the file.
9. Add a couple of new properties to the file.
10. Right-click the file’s tab and select Local History | Show Local History.
11. Click each one of the revisions to compare with the current revision.
12. Add or remove content in the current file.
CERTIFICATION OBJECTIVE:
Working with Build Files and Processes
Exam Objective 2.3 Describe the ways in which you can change the build process for a standard project, such as configuring project properties and modifying the project’s Ant build script.
NetBeans 6.8 supports two build systems: Ant (ant.apache.org) and Maven (maven.apache.org). Both are open source and Apache projects. Ant is a cross-platform general-purpose build tool. It uses an XML file format and can easily be extended with plugins. You can think of it as Java’s Make. Maven is also a build tool, but takes a more expansive view of the build process. It tracks and manages the dependency graph of a project. For instance, a specific version of Hibernate has a multitude of dependencies—those dependencies in turn depend on other projects ad infinitum. Maven also has predefined life cycles and project layouts. Contrasting the build systems, Ant is free form whereas Maven is highly structured.
NetBeans provides excellent support for both build systems. The certification exam, which targets NetBeans 6.1, focuses exclusively on Apache Ant. NetBeans has had excellent Ant integration for many years—it is the build system used by the IDE in its standard projects. Early on, the NetBeans team realized the value of Ant over a proprietary build system, and a conscious decision was made not to reinvent the wheel. The NetBeans Ant support makes it easy for developers to customize the build process. In the previous section, we examined the NetBeans free-form project support. The free-form project support enables NetBeans to easily work with existing projects without forcing a re-architecting to make the project IDE compatible. In this section, we review the structure and extension points of the Ant files used by NetBeans standard projects.
To facilitate development, NetBeans ships with numerous predefined project templates. These are instantiated through project wizards via File | New Project. The Java projects groups, specifically Java, Java Web, Java EE, and NetBeans Modules, all use Ant as their build system. With the exception of the Java Free-Form Project and Web Free-Form Application, NetBeans provides a predefined set of Ant build scripts. The IDE is prewired for these Ant scripts—meaning that the run action is preconfigured to invoke the Ant target, and so on. Additionally, the classpath can be manipulated in the editor, and no changes to the build system are required. The goal, as is the case with Maven, is to simplify the development process and let the developer focus on writing code and not a build system.
One caveat regarding the project templates—Ant is used for Java projects; however, NetBeans supports many other technologies including PHP, Ruby, and C++. These other project types do not use Ant as their build system. They use the build system typically used by those technologies. For instance, the C++ projects use the make utility.
Chapter 1 covered the basic configuration of the Ant integration, including configuring Ant version, classpath, verbosity, and properties. This section splits up and covers the following topics:
![]() Project Structure
Project Structure
![]() Running Targets
Running Targets
![]() Customizing Ant Scripts
Customizing Ant Scripts
Project Structure
Integral to understanding the build process and how to customize it is understanding the structure of a standard NetBeans project. A standard NetBeans project refers to a template that “offers the highest integration with the IDE’s support of certain technologies” to quote the online documentation. A standard project template can be thought of as an application skeleton; the infrastructure code is in place, and there is a defined layout. The developer can just begin writing code and click Run. The developer is not worried about constructing the classpath for execution or the parameters necessary to launch the application for debugging or profiling. The IDE controls the project layout and maintains the classpath at a granular level—compile, run, compile test, run test. As a result, the IDE is able to simplify the development process. Unlike the free-form project, the menus are prebound. Individual unit tests can be run without diving into project.xml.
NetBeans includes numerous project templates. Depending upon the plugins activated, the File | New Project dialog box can be filled. However, NetBeans has only four types of standard Java projects:
![]() Java SE Applications
Java SE Applications
![]() Java Web
Java Web
![]() Java EE Applications
Java EE Applications
![]() NetBeans Modules
NetBeans Modules
While each of the project types is slightly different in terms of layout and build targets, they all share a common set of files and directories:
![]() src Contains the source files for the project.
src Contains the source files for the project.
![]() test Contains the test files for the project.
test Contains the test files for the project.
![]() build.xml Contains customized build changes. This file is invoked by the IDE. It imports build-impl.xml.
build.xml Contains customized build changes. This file is invoked by the IDE. It imports build-impl.xml.
![]() dist Contains the output of the build.
dist Contains the output of the build.
![]() nbproject NetBeans project directory—contains metadata for the project.
nbproject NetBeans project directory—contains metadata for the project.
![]() project.properties Config settings for the project. These properties are shared between users.
project.properties Config settings for the project. These properties are shared between users.
![]() genfiles.properties Tracks changes in IDE-generated files. Never edit this file.
genfiles.properties Tracks changes in IDE-generated files. Never edit this file.
![]() build-impl.xml Contains the core build targets, which can be overridden in build.xml. This file should never be edited.
build-impl.xml Contains the core build targets, which can be overridden in build.xml. This file should never be edited.
![]() private Directory contains settings for only the current user. This directory should not be checked in to version control.
private Directory contains settings for only the current user. This directory should not be checked in to version control.
![]() private.properties Properties for the current user/local machine.
private.properties Properties for the current user/local machine.
![]()
For the exam, make sure to memorize the difference between build.xml and build-impl.xml. Also, just because a file is in nbproject doesn’t mean it cannot be edited. However, under no circumstances should you edit build-impl.xml and genfiles.properties.
The main Ant build script for a project is build.xml. For a new project, this file is empty—targets are imported from build-impl.xml. The build-impl.xml should never be modified. While the IDE does not prevent you from editing this file, the IDE might overwrite this file. Right-clicking build.xml and choosing Run Target or Debug Target runs targets in this file. Targets in build-impl.xml can also be directly run in the same manner. Menus such as Run | Run Main Project and Debug | Debug Main Project are mapped to targets in build.xml.
When an Ant target is executed, either through a menu or via a context menu, NetBeans will automatically display an Output window as shown in Figure 2-54. The Output window enables you to view standard out and standard error from the Ant script. Application output will also appear in this window.

Running Targets
You can invoke Ant targets multiple ways from within NetBeans. Targets such as run can be explicitly invoked via the context menu on the Ant file or by invoking an IDE action such as Run | Run Main Project from a menu. Ant targets can also be invoked from the command line. From the command line, typing ant will cause the build.xml file to be loaded and the default target to be executed. The default target will compile the project’s sources, generate the Javadoc, and finally run the unit tests.
The Ant scripts generated by NetBeans do not require a NetBeans installation on the computer for the basic operations such as compiling, running, and testing. However, certain targets pertaining to debugging and profiling require NetBeans because they are useless without the IDE. Targets that require the IDE are development related and are not part of the basic build/deploy/test life cycle. The ability to use the scripts independently of the IDE was a conscious design decision. This allows a project to standardize on a single build solution. Building is not segregated into “building in the IDE” or “building by the official project scripts.” All maintenance of the project, such as management of external libraries, can therefore take place in the IDE.
The Ant targets that can be executed from the command line vary depending upon the project type. Table 2-4 lists targets that can be executed from the command line for Java SE and Java Web projects. Java Web and EJB applications possess targets for deploying to servers. The Ant files generated by NetBeans follow a standard naming pattern for their targets. Targets prefixed with a dash (–) should not be invoked directly. These targets are part of a larger sequence of targets. Targets without a dash can often be run independently as long as they don’t tie in to a specific IDE feature such as debugging a single file or profiling.
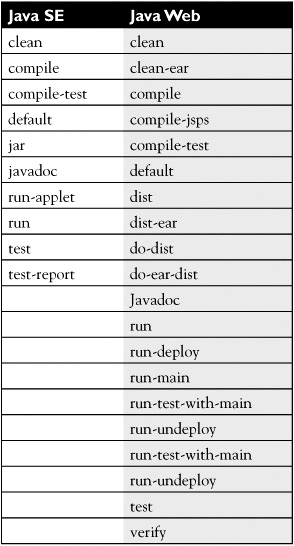
Customizing Ant Scripts
The NetBeans Ant scripts generated by the project wizards contain hooks for adding custom extensions and behaviors. The hooks allow the build process to be customized for the particular project. Each project has its own sets of requirements outside the functionality implemented in code. Some common tasks that require changes to the build system include:
![]() Obfuscating generated byte code
Obfuscating generated byte code
![]() Digitally signing output
Digitally signing output
![]() Calculating unit test coverage
Calculating unit test coverage
![]() Launching a third-party installer application to generate an installer
Launching a third-party installer application to generate an installer
![]() Generating Java sources from an XML file prior to invoking the compiler
Generating Java sources from an XML file prior to invoking the compiler
![]() Starting a server on a remote box prior to running unit tests
Starting a server on a remote box prior to running unit tests
![]() Incrementing a build number and storing the result back into version control
Incrementing a build number and storing the result back into version control
However, editing the project’s build file should only be done when it is appropriate and the functionality is not already available in NetBeans. For instance, editing the build.xml file to inject a new library to the compile step would be a bad idea. First, NetBeans already provides a mechanism for managing libraries, and secondly, code completion for the library would not be available in the editor. When evaluating whether a change to the build system is necessary, first check to see if NetBeans already has an easier and intuitive way to accomplish the same thing.
NetBeans provides clear and well-documented hooks for adding customizations to the build file. The customization can participate in the IDE build cycle or extend it for use in integration build servers such as Hudson, CruiseControl, and so on. Four approaches may be taken when customizing a project’s build:
![]() Implement pre-/post-targets to perform tasks either before or after a specific life-cycle stage like compile, run, test, and so on.
Implement pre-/post-targets to perform tasks either before or after a specific life-cycle stage like compile, run, test, and so on.
![]() Override an existing Ant target to completely replace its functionality.
Override an existing Ant target to completely replace its functionality.
![]() Change settings passed to the compiler/debugger/and so on, in project.properties.
Change settings passed to the compiler/debugger/and so on, in project.properties.
![]() Add new targets to the build file for project-specific tasks.
Add new targets to the build file for project-specific tasks.
When a project is generated, a build.xml file is placed at the root of the project directory. This file is initially empty. However, it imports nbproject/build-impl.xml, which has nearly 100 targets. These targets perform operations ranging from cleaning the output directories to compiling and generating Javadoc. NetBeans binds to the targets in build-impl.xml. Customization should be made to the build.xml. As mentioned previously, nbproject/build-impl.xml should not be altered.
NetBeans provides hooks for inserting operations into the build process. These hooks are listed in Table 2-5. The hooks are divided into five sections: initialization, compilation, JUnit compilation, jar, and clean. With these hooks you can perform operations before and after the main action; for example, –pre-compile and –post-compile. These hooks are empty targets in the build-impl.xml file. Other targets can be overridden, but care must be taken to maintain expected functionality.
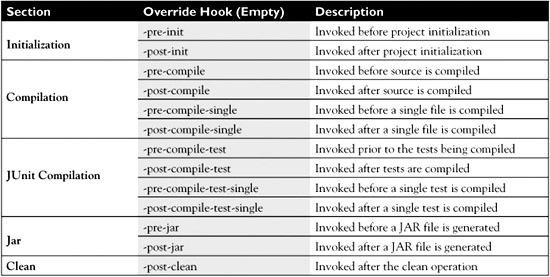
Troubleshooting Ant script files can be very challenging. Many developers tackle build problems with copious echo statements that are used for tracking variable values and execution progress. However, the NetBeans debugger can debug Ant scripts. Its powerful debugger allows you to see what is going on in the script and to step through it.
Custom properties to be used by the build script can be stored in two locations—either in project.properties or in nbproject/private/private.properties. The only difference between these two files is that private.properties is user specific and is not checked in to version control. That makes this file ideal for storing settings specific to a user or machine. The project.properties file stores lots of settings for the build including the classpath, parameters passed to javac, and so on. This is where settings from File | Project Properties are stored.
EXERCISE 2-5 Creating a Free-Form Project
In this exercise, you will customize build.xml and add properties to both project.properties and private.properties.
1. Create a new Java Application by choosing File | New Project | Java Application.
2. Switch to the Files window, and double-click build.xml under the project.
3. Add the following content to build.xml:
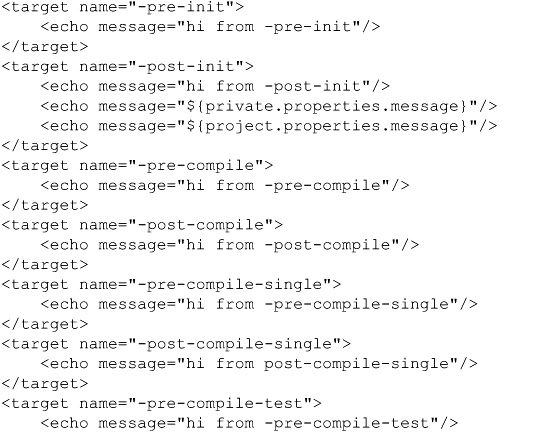
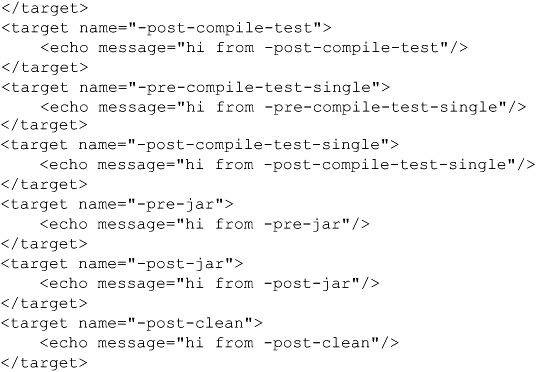
4. Add the following line to project.properties: project.properties.message=Hi from project properties
5. Add the following line to private.properties: private.properties.message=Hi from private properties!
6. Right-click build.xml and choose Run Target | default.
7. What happens if the contents of –post-init and –pre-init are swapped?
8. In what order are the targets executed?
9. Set a breakpoint in –post-init, and step through the build process.
CERTIFICATION OBJECTIVE:
Configuring the JDK into the Project
Exam Objective 2.4 Configure your project to compile against and run on a specific version of the JDK.
The last section of Chapter 1 covered the steps necessary to add or remove JDKs in NetBeans. This section will cover the steps necessary to make a project compile and run against a specific version of the JDK. As mentioned in Chapter 1, each project can be configured with its own JDK. Projects are independent of the JDK/JRE being used to run NetBeans. This is very important, because Java applications often must support older JRE versions or bugs fixed in legacy applications still in production.
The JDK for a project is configured in the Project Properties dialog box shown in Figure 2-55. This dialog box is displayed by choosing File | Project Properties | Libraries. The JDK is chosen from the Java Platform drop-down list. Clicking the Manage Platforms button brings up the configuration screens described in Chapter 1. This JDK selection determines three things:
FIGURE 2-55 Project Properties: Libraries
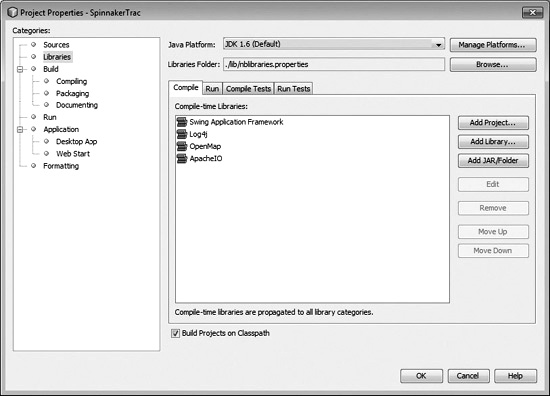
![]() JRE used to run/debug/profile
JRE used to run/debug/profile
![]() JRE used for code completion/syntax checking
JRE used for code completion/syntax checking
![]() JRE used to execute unit tests
JRE used to execute unit tests
The JDK set on a project affects the source/binary level for a project. This is set on File | Project Properties | Sources. An example of this operation is depicted in Figure 2-56. The source/binary level can never be greater than the source/binary level of the JDK. For example, if JDK 1.3 is selected for a project, the source level cannot be 1.5. When changing the JDK, NetBeans will automatically warn you and change the source/binary level if necessary.
FIGURE 2-56 Project Properties: Sources
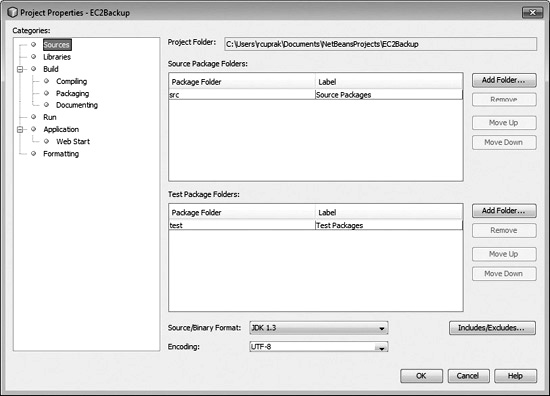
Changing the JDK raises an interesting issue: how is the code actually compiled? Surprisingly, the selected JDK’s javac is not used for compilation. Instead, it is the javac of the JDK being used to run Ant that is employed. The source/binary level controls the byte code that is emitted by the compiler.
![]()
The source/binary level is not reflexive. While the JDK selected for a project determines the maximum version allowed for the source/binary setting, the reverse is not true. A JDK version of 1.6 and a 1.3 source/binary is a valid configuration combination.
EXERCISE 2-6 Back in Time to an Older JDK
In this exercise, you create a new project using JDK 1.6 and then switch the project over to JDK 1.3 to see the effect. This exercise assumes that you are running Java 6.
1. Download and install JDK 1.3 from java.sun.com. Finding JDK 1.3 might be a challenge, but it is still available.
2. Launch NetBeans and create a new Java Application: File | New Project | Java Application.
3. In the main method of the application add the following code: System.out.println("Java version: " + System.getProperty("java.version"));
4. Run the application and verify that it prints 1.6.
5. Choose File | Project Properties | Libraries.
6. Click Manage Platforms and configure JDK 1.3 as in Chapter 1. Click Close when you’re done.
7. Select JDK 1.3 for the project. NetBeans will immediately warn that it is changing the source/binary level to 1.3. Click OK to accept the changes.
8. Run the project again and verify that it now prints 1.3.
CERTIFICATION SUMMARY
This chapter covered four important feature sets of NetBeans—free-form project, version control, Ant build files, and per-project JDK configuration. By studying this chapter, you are now able to:
1. Create a new NetBeans project using the free-form template.
2. Name the supported version control systems and perform the following tasks:
![]() Import a project to a repository.
Import a project to a repository.
![]() Checkout a project from a repository.
Checkout a project from a repository.
![]() Update a file or files.
Update a file or files.
![]() Commit changes to a repository.
Commit changes to a repository.
![]() Resolve merge conflicts and view file/directory history.
Resolve merge conflicts and view file/directory history.
![]() View the current status of the project.
View the current status of the project.
3. Alter and extend the build process.
4. Change the JDK for a project and understand the interplay between source level and the JDK.
These are important IDE skills to master, and you will interact with these core features of the IDE on a daily basis. At this point, you should be an expert on creating projects and maintaining projects as well as versioning them. The stage is set for building applications in the next chapter.
 TWO-MINUTE DRILL
Understanding Free-Form Projects
![]() The free-form template enables NetBeans to work with just about any Java project regardless of layout.
The free-form template enables NetBeans to work with just about any Java project regardless of layout.
![]() There are two types of free-form projects:
There are two types of free-form projects:
![]() Java Free-Form Project
Java Free-Form Project
![]() Web Free-Form Application
Web Free-Form Application
![]() The project’s Ant build file is leveraged and integrated into menus.
The project’s Ant build file is leveraged and integrated into menus.
![]() The classpath property is used for code editing and syntax checking—not for compiling or execution.
The classpath property is used for code editing and syntax checking—not for compiling or execution.
![]() A Web Free-Form project requires additional configuration for web sources and web configuration files.
A Web Free-Form project requires additional configuration for web sources and web configuration files.
![]() The nbproject/project.xml file contains project settings including the mapping of IDE actions to Ant targets. NetBeans can generate an nbproject/ide-targets.xml file to support debugging.
The nbproject/project.xml file contains project settings including the mapping of IDE actions to Ant targets. NetBeans can generate an nbproject/ide-targets.xml file to support debugging.
![]() JUnit integration requires simple changes to the Ant target so that the output does not go to a file.
JUnit integration requires simple changes to the Ant target so that the output does not go to a file.
![]() The Profiler and Debug IDE actions require custom Ant targets that are specific to NetBeans.
The Profiler and Debug IDE actions require custom Ant targets that are specific to NetBeans.
Using Version Control Systems
![]() Three version control systems are supported by default: Subversion, Mercurial, and CVS.
Three version control systems are supported by default: Subversion, Mercurial, and CVS.
![]() Additional version control systems can be installed via the Plugin Manager.
Additional version control systems can be installed via the Plugin Manager.
![]() NetBeans requires the binary executables be installed and configured in Tools | Options | Miscellaneous | Versioning for Subversion and Mercurial.
NetBeans requires the binary executables be installed and configured in Tools | Options | Miscellaneous | Versioning for Subversion and Mercurial.
![]() Version control operations are accessed via the Team menu.
Version control operations are accessed via the Team menu.
![]() Version control operations are available via the context menu (right-click menu) for files in the Projects and Files windows as well as on the editor tab titles.
Version control operations are available via the context menu (right-click menu) for files in the Projects and Files windows as well as on the editor tab titles.
![]() Local history takes a snapshot of a file every time it is saved.
Local history takes a snapshot of a file every time it is saved.
![]() Local history records add/delete operations performed by the editor.
Local history records add/delete operations performed by the editor.
Working with Build Files and Processes
![]() Changes and additions to the build process are made to the build.xml file at the root of the project.
Changes and additions to the build process are made to the build.xml file at the root of the project.
![]() nbproject/build-impl.xml contains the core infrastructure Ant targets and should never be edited.
nbproject/build-impl.xml contains the core infrastructure Ant targets and should never be edited.
![]() build.xml imports nbproject/build-impl.xml.
build.xml imports nbproject/build-impl.xml.
![]() nbproject/project.xml is the main project file and can be edited, but those edits are overwritten by the project properties editor.
nbproject/project.xml is the main project file and can be edited, but those edits are overwritten by the project properties editor.
![]() nbproject/project.properties contains properties used to configure the Ant script. While this file can be edited, it rarely needs to be.
nbproject/project.properties contains properties used to configure the Ant script. While this file can be edited, it rarely needs to be.
![]() nbproject/private contains settings for the current user and should not be added to version control.
nbproject/private contains settings for the current user and should not be added to version control.
![]() Ant targets are invoked either from the menus/context menus (Run | Run Main Project, and so on) or by choosing Run Target/Debug Target.
Ant targets are invoked either from the menus/context menus (Run | Run Main Project, and so on) or by choosing Run Target/Debug Target.
![]() private/project.properties contains local Ant file parameters.
private/project.properties contains local Ant file parameters.
![]() NetBeans provides empty targets to facilitate hooking into the build system. Review Table 2-5.
NetBeans provides empty targets to facilitate hooking into the build system. Review Table 2-5.
![]() build.xml can be run from the command line outside of the IDE.
build.xml can be run from the command line outside of the IDE.
![]() Targets names prefixed with a dash (–) are part of a build sequence and should not be run independently.
Targets names prefixed with a dash (–) are part of a build sequence and should not be run independently.
Configuring the JDK into the Project
![]() Each project can be associated with a different JDK.
Each project can be associated with a different JDK.
![]() JDK settings for a project are configured by File | Project Properties | Libraries.
JDK settings for a project are configured by File | Project Properties | Libraries.
![]() The source/binary level in File | Project Properties | Sources controls the byte code emitted.
The source/binary level in File | Project Properties | Sources controls the byte code emitted.
![]() The source/binary level maximum value is determined by the JDK selected for a project.
The source/binary level maximum value is determined by the JDK selected for a project.
![]() The actual JDK used for compiling a project is the one used to launch Ant.
The actual JDK used for compiling a project is the one used to launch Ant.
![]() The source/binary level controls the value passed into the –source parameter of javac.
The source/binary level controls the value passed into the –source parameter of javac.
SELF TEST
The following questions will help you measure your understanding of the material presented in this chapter. Read all the choices carefully because there might be more than one correct answer. Choose all correct answers for each question.
Understanding Free-Form Projects
1. A NetBeans project needs to be created for an existing code base that possesses its own unique code structure and Ant build file. Which project template should be used?
A. Java Application
B. Java Desktop Application
C. Java Project With Existing Sources
D. Java Free-Form Project
2. In a free-form project, which of the following settings cannot be configured in the IDE?
A. Java Development Kit (JDK)
B. Multiple source roots
C. JUnit integration
D. Source code for external libraries
3. What is the difference between the “Java Free-Form Project” and a “Java Project With Existing Sources”?
A. There are no differences between the two project types.
B. Java Free-Form Project uses its own Ant build file, not one provided by NetBeans.
C. Java Project With Existing Sources uses its own Ant build file, not one provided by NetBeans.
D. NetBeans generates a custom Ant file for a Java Free-Form Project.
4. A project team has made the decision to switch from another IDE to NetBeans. The project is large and complicated, with its own Ant build file and Eclipse project file. Which is the most expedient and supported path to get up and running with NetBeans?
A. Create a new NetBeans project using the Java Application project template. Reorganize the existing sources to match the layout required by the new project.
B. Use the Java Free-Form Project template.
C. Choose File | Open Project and select the project’s Ant script. NetBeans will then analyze the Ant script and create a NetBeans free-form project.
D. Create a pom.xml file (Maven) for the project, and use the Maven project support in NetBeans.
Using Version Control Systems
5. Which version control systems does NetBeans support?
A. Subversion
B. Mercurial
C. CVS
D. All of the above
6. NetBeans requires native executables for which of the following version control systems?
A. CVS, Subversion
B. Subversion, Mercurial
C. CVS, Mercurial
D. None
7. When a new Java class is added to a project, what happens regarding version control integration?
A. The class is automatically scheduled for addition (svn add/cvs add) and appears colored green in the Projects window.
B. The new class wizard prompts for whether the class should be added to version control. If Yes is chosen, the class is scheduled for addition, and the file icon appears red in the Projects window.
C. Nothing.
D. The filename is colored red in the Projects window until the add operation is invoked by right-clicking the file.
8. When checking out a directory from version control, must the directory contain a NetBeans project?
A. No, but a subfolder must contain a NetBeans project.
B. Yes, the directory must contain a NetBeans project.
C. No, NetBeans prompts for creating a project after the checkout.
9. A Subversion update is performed resulting in a conflict. How can this conflict be resolved?
A. Right-click the file and select Subversion | Resolve Conflicts. Use the graphical Conflicts Resolver to merge the file.
B. Double-click the file and manually fix the conflicts.
C. Right-click the file and select Subversion | Merge Changes. Use the graphical merge utility to resolve the conflicts.
D. A and B
Working with Build Files and Processes
10. A NetBeans project is being added to a Perforce repository using a separate Perforce utility outside of NetBeans. Which files or directories should not be added to the repository?
A. nbproject/private
B. build.xml
C. nbproject/build-impl.xml
D. nbproject/project.xml
11. A job for a NetBeans project is being set up on a continuous integration server. The continuous integration server will checkout the project frequently from version control and do a test build. What Ant script should the continuous integration server use to build the project?
A. nbproject/build.xml
B. nbproject/build-impl.xml
C. nbproject/project.xml
D. build.xml
12. Prior to packaging, a code obfuscator needs to be run on the classes. Which Ant target should be added to build.xml and include this logic?
A. –post-init
B. –pre-compile
C. compile
D. –post-compile
13. A web project has added a target to the project’s Ant file to deploy the web application to a remote QA environment. The QA environment requires unique credentials for each developer. Where should these credentials be stored?
A. project.xml
B. nbproject/project.properties
C. nbproject/private/private.properties
D. build.xml
Configuring the JDK into the Project
14. NetBeans is launched using JDK 1.6. The JDK for a project is set to 1.3 with a source level of 1.2. Which JDK instance is used to run Ant?
A. 1.3
B. 1.4
C. 1.5
D. 1.6
15. The source/binary setting in Project Properties controls what aspect of the project?
A. JDK used to run the project.
B. Byte code emitted by the compiler.
C. javac implementation used to compile the code.
D. Both A and C.
SELF TEST ANSWERS
Understanding Free-Form Projects
1. A NetBeans project needs to be created for an existing code base that possesses its own unique code structure and Ant build file. Which project template should be used?
A. Java Application
B. Java Desktop Application
C. Java Project With Existing Sources
D. Java Free-Form Project
![]() D. Java Free-Form Project—this project type leverages an existing Ant file and source code layout.
D. Java Free-Form Project—this project type leverages an existing Ant file and source code layout.
![]() A, B, and C are incorrect. A is incorrect because the source code of the project would have to be reorganized. B is incorrect because the source code of the project would have to be reorganized. C is incorrect because the Java Project With Existing Sources uses an existing tree but uses a NetBeans generated build script.
A, B, and C are incorrect. A is incorrect because the source code of the project would have to be reorganized. B is incorrect because the source code of the project would have to be reorganized. C is incorrect because the Java Project With Existing Sources uses an existing tree but uses a NetBeans generated build script.
2. In a free-form project, which of the following settings cannot be configured in the IDE?
A. Java Development Kit (JDK)
B. Multiple source roots
C. JUnit integration
D. Source code for external libraries
![]() A. The JDK used by Ant is the one that is used by the project.
A. The JDK used by Ant is the one that is used by the project.
![]() B, C, and D are incorrect. B is incorrect because multiple source roots can be configured. C is incorrect because JUnit with custom Ant files is supported. D is incorrect because source code can be configured for external libraries in a free-form project.
B, C, and D are incorrect. B is incorrect because multiple source roots can be configured. C is incorrect because JUnit with custom Ant files is supported. D is incorrect because source code can be configured for external libraries in a free-form project.
3. What is the difference between the “Java Free-Form Project” and a “Java Project With Existing Sources”?
A. There are no differences between the two project types.
B. Java Free-Form Project uses its own Ant build file, not one provided by NetBeans.
C. Java Project With Existing Sources uses its own Ant build file, not one provided by NetBeans.
D. NetBeans generates a custom Ant file for a Java Free-Form Project.
![]() B. Java Free-Form Projects use the project’s existing build.xml file—not one provided by NetBeans.
B. Java Free-Form Projects use the project’s existing build.xml file—not one provided by NetBeans.
![]() A, C, and D are incorrect. A is incorrect because there are differences between these project templates. Specifically NetBeans generates an Ant build file for a “project with existing sources.” C is incorrect because NetBeans provides a build.xml file for a project with sources. D is incorrect because NetBeans generates an Ant file for a project with existing sources and not for a free-form project.
A, C, and D are incorrect. A is incorrect because there are differences between these project templates. Specifically NetBeans generates an Ant build file for a “project with existing sources.” C is incorrect because NetBeans provides a build.xml file for a project with sources. D is incorrect because NetBeans generates an Ant file for a project with existing sources and not for a free-form project.
4. A project team has made the decision to switch from another IDE to NetBeans. The project is large and complicated, with its own Ant build file and Eclipse project file. Which is the most expedient and supported path to get up and running with NetBeans?
A. Create a new NetBeans project using the Java Application project template. Reorganize the existing sources to match the layout required by the new project.
B. Use the Java Free-Form Project template.
C. Choose File | Open Project and select the project’s Ant script. NetBeans will then analyze the Ant script and create a NetBeans free-form project.
D. Create a pom.xml file (Maven) for the project, and use the Maven project support in NetBeans.
![]() B is correct since the project uses a custom layout and its own Ant script.
B is correct since the project uses a custom layout and its own Ant script.
![]() A, C, and D are incorrect. A is incorrect because reorganizing the source code is a lot of work and complicates tracing file history in version control. C is incorrect because NetBeans does not reverse engineer a project from its Ant script. D is incorrect because this is more work than A because it requires tracking down all of the dependencies and possibly restructuring the project.
A, C, and D are incorrect. A is incorrect because reorganizing the source code is a lot of work and complicates tracing file history in version control. C is incorrect because NetBeans does not reverse engineer a project from its Ant script. D is incorrect because this is more work than A because it requires tracking down all of the dependencies and possibly restructuring the project.
Using Version Control Systems
5. Which version control systems does NetBeans support?
A. Subversion
B. Mercurial
C. CVS
D. All of the above
![]() D. All of the version control systems listed are supported by NetBeans out of the box.
D. All of the version control systems listed are supported by NetBeans out of the box.
![]() A, B, and C are incorrect because not just one but all are supported.
A, B, and C are incorrect because not just one but all are supported.
6. NetBeans requires native executables for which of the following version control systems?
A. CVS, Subversion
B. Subversion, Mercurial
C. CVS, Mercurial
D. None
![]() B. NetBeans requires the native executables for Mercurial and Subversion.
B. NetBeans requires the native executables for Mercurial and Subversion.
![]() A, C, and D are incorrect. A is incorrect because NetBeans does not use the native CVS binaries. C is incorrect for the same reason as A; CVS libraries are not required. D is incorrect because NetBeans requires the executables for both Subversion and Mercurial.
A, C, and D are incorrect. A is incorrect because NetBeans does not use the native CVS binaries. C is incorrect for the same reason as A; CVS libraries are not required. D is incorrect because NetBeans requires the executables for both Subversion and Mercurial.
7. When a new Java class is added to a project, what happens regarding version control integration?
A. The class is automatically scheduled for addition (svn add/cvs add) and appears colored green in the Projects window.
B. The new class wizard prompts for whether the class should be added to version control. If Yes is chosen, the class is scheduled for addition, and the file icon appears red in the Projects window.
C. Nothing.
D. The filename is colored red in the Projects window until the add operation is invoked by right-clicking the file.
![]() A. NetBeans automatically schedules the file for addition to version control. New files scheduled for addition are colored green in the Projects window.
A. NetBeans automatically schedules the file for addition to version control. New files scheduled for addition are colored green in the Projects window.
![]() B, C, and D are incorrect. B is incorrect because NetBeans does not prompt for whether the file should be added to Subversion. Also, files scheduled for addition are colored green and not red. C is incorrect because files are automatically added to version control. D is incorrect; the user does not have to do anything to get a new file added to version control.
B, C, and D are incorrect. B is incorrect because NetBeans does not prompt for whether the file should be added to Subversion. Also, files scheduled for addition are colored green and not red. C is incorrect because files are automatically added to version control. D is incorrect; the user does not have to do anything to get a new file added to version control.
8. When checking out a directory from version control, must the directory contain a NetBeans project?
A. No, but a subfolder must contain a NetBeans project.
B. Yes, the directory must contain a NetBeans project.
C. No, NetBeans prompts for creating a project after the checkout.
![]() C. NetBeans does not require that a directory being checked out, nor any of its subdirectories, possess a NetBeans project. NetBeans will prompt to create a project afterwards; however, that is optional.
C. NetBeans does not require that a directory being checked out, nor any of its subdirectories, possess a NetBeans project. NetBeans will prompt to create a project afterwards; however, that is optional.
![]() A and B are incorrect because NetBeans does not require the presence of a NetBeans project.
A and B are incorrect because NetBeans does not require the presence of a NetBeans project.
9. A Subversion update is performed resulting in a conflict. How can this conflict be resolved?
A. Right-click the file and select Subversion | Resolve Conflicts. Use the graphical Conflicts Resolver to merge the file.
B. Double-click the file and manually fix the conflicts.
C. Right-click the file and select Subversion | Merge Changes. Use the graphical merge utility to resolve the conflicts.
D. A and B
![]() D. Both A and B are methods used to resolve conflicts.
D. Both A and B are methods used to resolve conflicts.
![]() A and B and C are incorrect. A is incorrect because this method will resolve conflicts. B is incorrect because this method will resolve conflicts. C is incorrect because merging deals with integrating changes between folders/brances.
A and B and C are incorrect. A is incorrect because this method will resolve conflicts. B is incorrect because this method will resolve conflicts. C is incorrect because merging deals with integrating changes between folders/brances.
Working with Build Files and Processes
10. A NetBeans project is being added to a Perforce repository using a separate Perforce utility outside of NetBeans. Which files or directories should not be added to the repository?
A. nbproject/private
B. build.xml
C. nbproject/build-impl.xml
D. nbproject/project.xml
![]() A. The private directory contains files for the current user/local machine. This is where settings that are not to be shared are stored.
A. The private directory contains files for the current user/local machine. This is where settings that are not to be shared are stored.
![]() B, C, and D are incorrect. B is incorrect because build.xml is the Ant file for the project. C is incorrect because build-impl.xml is used by build.xml and provides most of the target definitions. D is incorrect because project.xml defines the project.
B, C, and D are incorrect. B is incorrect because build.xml is the Ant file for the project. C is incorrect because build-impl.xml is used by build.xml and provides most of the target definitions. D is incorrect because project.xml defines the project.
11. A job for a NetBeans project is being set up on a continuous integration server. The continuous integration server will checkout the project frequently from version control and do a test build. What Ant script should the continuous integration server use to build the project?
A. nbproject/build.xml
B. nbproject/build-impl.xml
C. nbproject/project.xml
D. build.xml
![]() D. The build.xml file in the project directory is the one that is used to build the project.
D. The build.xml file in the project directory is the one that is used to build the project.
![]() A, B, and C are incorrect. A is incorrect because nbproject/build.xml does not exist. B is incorrect because build-impl.xml does contain the targets used to build the project, but they are often overridden in build.xml. C is incorrect; project.xml is the project file.
A, B, and C are incorrect. A is incorrect because nbproject/build.xml does not exist. B is incorrect because build-impl.xml does contain the targets used to build the project, but they are often overridden in build.xml. C is incorrect; project.xml is the project file.
12. Prior to packaging, a code obfuscator needs to be run on the classes. Which Ant target should be added to build.xml and include this logic?
A. –post-init
B. –pre-compile
C. compile
D. –post-compile
![]() D. Obfuscation is performed after the compile.
D. Obfuscation is performed after the compile.
![]() A and B are incorrect because –post-init is invoked before the project has been compiled. C is incorrect because overriding the compile would require a significant amount of work for no benefit.
A and B are incorrect because –post-init is invoked before the project has been compiled. C is incorrect because overriding the compile would require a significant amount of work for no benefit.
13. A web project has added a target to the project’s Ant file to deploy the web application to a remote QA environment. The QA environment requires unique credentials for each developer. Where should these credentials be stored?
A. project.xml
B. nbproject/project.properties
C. nbproject/private/private.properties
D. build.xml
![]() C is the correct answer. nbproject/private/private.properties does not get checked into version control and is used to pass properties into the build.xml script.
C is the correct answer. nbproject/private/private.properties does not get checked into version control and is used to pass properties into the build.xml script.
![]() A, B, and D are incorrect. A is incorrect because project.xml does not store properties for the build process. B is incorrect because nbproject/project.properties is shared among developers. D is incorrect because build.xml is shared among developers.
A, B, and D are incorrect. A is incorrect because project.xml does not store properties for the build process. B is incorrect because nbproject/project.properties is shared among developers. D is incorrect because build.xml is shared among developers.
Configuring the JDK into the Project
14. NetBeans is launched using JDK 1.6. The JDK for a project is set to 1.3 with a source level of 1.2. Which JDK instance is used to run Ant?
A. 1.3
B. 1.4
C. 1.5
D. 1.6
![]() D is the correct answer because the implementation is being provided and run under the JDK being used to run NetBeans.
D is the correct answer because the implementation is being provided and run under the JDK being used to run NetBeans.
![]() A, B, and C are incorrect because the JDK set for a project does not control the JDK used to launch an Ant file.
A, B, and C are incorrect because the JDK set for a project does not control the JDK used to launch an Ant file.
15. The source/binary setting in Project Properties controls what aspect of the project?
A. JDK used to run the project.
B. Byte code emitted by the compiler.
C. javac implementation used to compile the code.
D. Both A and C.
![]() B. Source/Binary setting is used to formulate the –source flag passed to the compiler.
B. Source/Binary setting is used to formulate the –source flag passed to the compiler.
![]() A, C, and D are incorrect. A is incorrect because the source/binary level does not control which JDK is used. C is incorrect because specific javac executables are not tracked or used by NetBeans. D is incorrect because A and C are both incorrect.
A, C, and D are incorrect. A is incorrect because the source/binary level does not control which JDK is used. C is incorrect because specific javac executables are not tracked or used by NetBeans. D is incorrect because A and C are both incorrect.