
5
Database Connectivity
CERTIFICATION OBJECTIVES
• Working with Databases in the IDE
Q&A Self Test
Relational databases are major components of many business systems. To maintain the databases, database vendors provide tools to assist in the design, development, implementation, and administration of databases within their business systems. Many of these tools provide visual support, as does MySQL Workbench in the designing of tables. For database administrators, these tools are often a must. However, for application developers, a lighter tool base usually suffices. The NetBeans Database Explorer supplies such primary support. Through the Database Explorer, users can perform various basic tasks such as registering JDBC (Java Database Connectivity) database drivers, connecting to databases, managing tables and views, performing SQL commands, and saving schemas.
The exam primarily focuses on using the Database Explorer, SQL Editor, and associated functionality. Therefore, this chapter will prepare you to use these tools. As a developer, you will find that with the use of these resources, you may not need to use administrative consoles outside of the IDE for database-related activities. Once you have completed this chapter, you will have all the knowledge needed to score well on questions related to working with the Database Explorer.
CERTIFICATION OBJECTIVE: Working with Databases in the IDE
Exam Objective 1.5 Demonstrate knowledge of working with databases in the IDE, including registering new database connections and tables running SQL scripts.
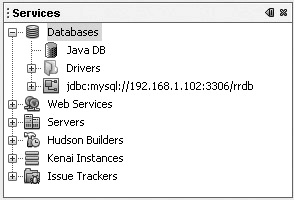
In the Services window of the IDE is a Databases node. This node and all its subnodes are considered the Database Explorer, as shown in Figure 5-1. The Services window also contains Web Services, Servers, Hudson Builders, Kenai Instances, and Issue Trackers nodes, but they do not directly relate to the database module and are not covered in this chapter. Actually, the only other node covered on the exam is the Servers tab, and it is covered in Chapter 4.
![]()
The java.net hosted development site and community will be subsuming the Kenai project because they are similar in nature. Also note that the integration of kenai.com with NetBeans was initially done in version 6.7 of the IDE, so Kenai will not be referenced on the exam.
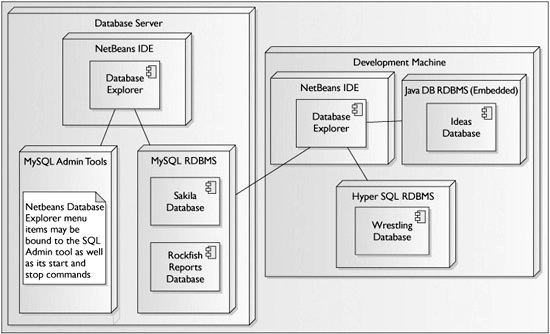
The Database Explorer is the primary module of the NetBeans IDE that provides support for working with databases. Figure 5-2 provides a quick look at the different databases that will interface with the Database Explorer throughout this chapter.
FIGURE 5-2 Database Explorer databases used in this chapter
The IDE provides other means for database support as well, such as capturing database schemas in XML format through the New File wizard (Persistence | Database Schema). You can view captured schemas in the Projects window. To meet the objective of working with databases in the IDE, the Database Explorer and SQL Editor of the IDE are covered in detail throughout this chapter. As such, we will look at the following IDE elements:
![]() Database Explorer
Database Explorer
![]() Database Support Components
Database Support Components
Database Explorer
The Database Explorer allows you to interface with databases through the IDE. This section discusses the various means of establishing database connections with the Database Explorer including registering JDBC drivers, connecting to databases, and viewing current connections. The Database Explorer also interfaces closely with database support components such as the SQL Editor and Table Viewer. These items are detailed in the next section:
![]() JDBC Driver Registrations
JDBC Driver Registrations
![]() JDBC-Supported Database Connections
JDBC-Supported Database Connections
![]() Java DB Connections
Java DB Connections
JDBC Driver Registrations
Registering JDBC drivers allows the IDE to connect to databases from within the IDE. NetBeans 6.8 comes with a few drivers already registered: Java DB (Embedded), Java DB (Network), JDBC-ODBC (Open Database Connectivity) bridge, MySQL (Connector/J driver), and PostgreSQL. These registered drivers are listed under the Drivers node in the Database Explorer. The Drivers node is the place for adding, removing, and configuring JDBC drivers.
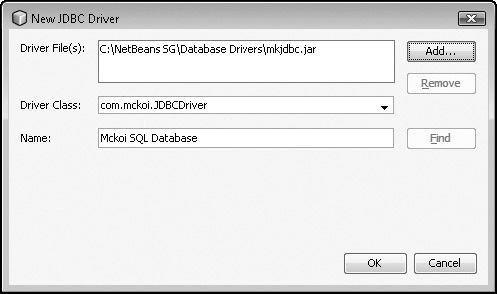
Creating a Driver Registration If you need a driver that is not registered, you can perform the registration by right-clicking the Drivers node and selecting New Drivers. A New JDBC Driver window (see Figure 5-3) opens. Fill in the Driver File(s), Driver Class, and Name boxes. An example of registering the Mckoi SQL JDBC database driver is shown in Figure 5-3. You can obtain the driver from the Mckoi website: www.mckoi.com/.
FIGURE 5-3 Registering the Mckoi JDBC driver
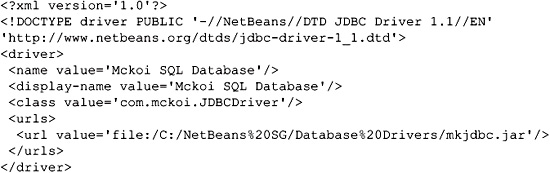
Registering a driver simply creates a template to be used later when establishing a connection. The registry is saved in an XML file in .netbeans/[version]/config/Databases/JDBCDrivers. The com_mckoi_JDBCDriver.xml file is shown here:
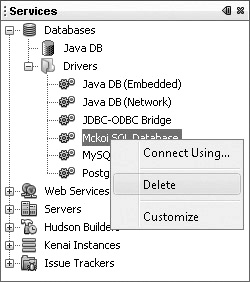
Removing a Driver Registration Removing driver registrations is easy; just right-click the registered driver and select Delete, as shown in Figure 5-4.
FIGURE 5-4 Deleting driver registrations
Configuring a Driver Registration Driver registration settings can be configured by right-clicking the driver name and selecting the Customize menu item. The same New JDBC Driver window opens as when you created the initial registration. Make the desired changes and select OK.
EXERCISE 5-1 Registering a JDBC Driver
In this exercise, you register a JDBC driver with the IDE. The HyperSQL database driver is used with this exercise, but you can use a different driver and database. Table 2 in the bonus appendix entitled "NetBeans Database Integration," available for download from McGraw-Hill Professional's Media Center site (see Appendix E), can help you select a different database driver if desired.
1. Retrieve the hsqldb.jar file from the HyperSQL download site: http://sourceforge.net/projects/hsqldb/files/. Note: The file is currently included in the HyperSQL Database Engine project ZIP file (that is, hsqldb-[version].zip).
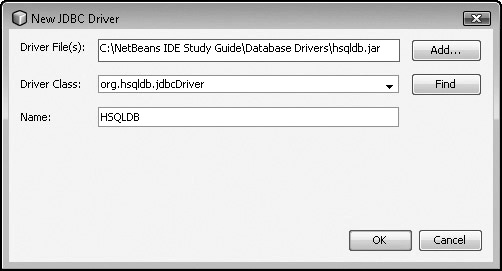
2. In the Database Explorer, select Drivers | New Driver. The New JDBC Driver dialog box appears.
3. Add the driver file you downloaded to the Driver File(s) box. For the HyperSQL database, find this file at hsqldblibhsqldb.jar.
4. Select the driver’s entry class from the Driver Class drop-down list. It should be org.hsqldb.jdbcDriver.
5. Enter HSQLDB for the driver’s name and click OK.
6. Verify that the HSQLDB driver is located in the driver list under the Drivers node.
7. Bonus: Install the HyperSQL database, create a wrestling-themed database, and connect to it.
Deep Database Integration
If you create a Java Desktop Application, you can select a Database Application that creates a basic CRUD (Create, Read, Update, Delete) form (Swing) for editing a database. Additional screens can be added for other tables with Master/Detail Sample Form. This database functionality is much more than just a light viewer for running queries or changing table structures. NetBeans can introspect database tables for both web and Swing forms, and so on. The database integration runs deep in the IDE and adds significant value to development.
For instance, if you are creating a new class, several templates leverage this integration:
![]() Swing GUI Forms Master/Detail Sample Form
Swing GUI Forms Master/Detail Sample Form
![]() Persistence Entity Class, Entity Class from Database, JPA Controller Classes from Entity Classes, Persistence Unit, Database Schema
Persistence Entity Class, Entity Class from Database, JPA Controller Classes from Entity Classes, Persistence Unit, Database Schema
![]() Hibernate Hibernate Configuration wizard, Hibernate Mapping wizard, Hibernate Mapping Files and POJOs from Database, HibernateUtil.java
Hibernate Hibernate Configuration wizard, Hibernate Mapping wizard, Hibernate Mapping Files and POJOs from Database, HibernateUtil.java
JDBC-Supported Database Connections
The Database Explorer can connect to JDBC-supported databases in the IDE when the appropriate database driver is registered. You first need to create a database connection; then you can work with that connection to perform various tasks.
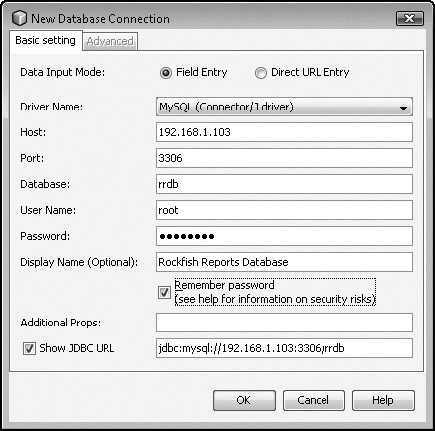
Creating a Database Connection The New Database Connection dialog box lets you create a new connection to a database. You can invoke this dialog box either by right-clicking the Databases node and selecting New Connection, or by right-clicking a driver registration node under the Drivers node and selecting Connect Using. The JDBC URL for different drivers may have various formats. Because the JDBC URL format is well defined for Java DB, PostgreSQL, and MySQL drivers, the wizard provides a Data Input Mode of Field Entry for establishing these connections, as shown in Figure 5-5. Note that when the Show JDBC URL checkbox is selected, the URL is adjusted as the fields are added. If you do not know the JDBC URL or field attributes for a specific connection, get it from the vendor. The basic JDBC URL is in the format jdbc:[DATABASE_ID]://[IP_ADDRESS]:[PORT]/[DATABASE_NAME].
FIGURE 5-5 New Database Connection dialog box
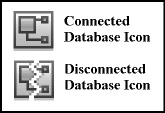
Using a Connection to a Database Different icons are used to show whether databases are connected, as shown in Figure 5-6. These icons appear next to databases in the Database Explorer.
FIGURE 5-6 Database connection status icons
Right-clicking the Database node displays six menu items. These menu items let you execute commands and set properties for database connections:
![]() Connect Connects a database to the IDE
Connect Connects a database to the IDE
![]() Disconnect Disconnects a database from the IDE
Disconnect Disconnects a database from the IDE
![]() Execute Command Opens the SQL Editor for the context connection
Execute Command Opens the SQL Editor for the context connection
![]() Refresh Refreshes information in subnodes of the connection
Refresh Refreshes information in subnodes of the connection
![]() Delete Deletes a disconnected database
Delete Deletes a disconnected database
![]() Properties Opens a table displaying properties of the database
Properties Opens a table displaying properties of the database
Subnodes of the database connections let you interact with database tables, views, and procedures. These subnodes and their features are covered later in the chapter.
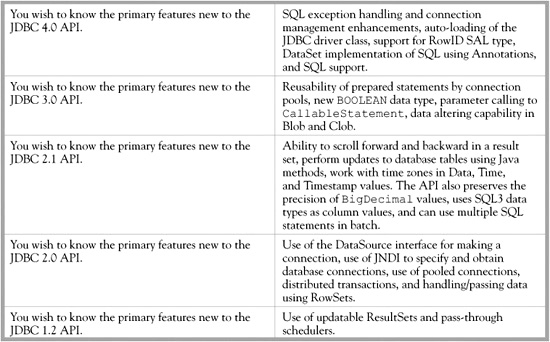
The latest version of the API is JDBC 4.0. The Scenario & Solution details its latest features, which may provide functionality missing from earlier drivers.
Java DB Connections
The Java DB database server is an open source implementation of the Apache Derby database that is supported by Oracle. It is 100 percent Java, CDC, SQL, and JDBC compliant. It is fully transactional and secure. Java DB has a small footprint of approximately 2.5MB. It is available in both embedded and traditional server modes. The NetBeans Database Explorer has the ability to connect and interface with the Java DB database.
SCENARIO & SOLUTION
Enabling the Java DB Database Server The Java DB database server is automatically registered with the IDE. This is because it is bundled with the JDK, and NetBeans knows to look for its presence. In addition to automatic registration, a Java DB node is available immediately under the Databases node of the Database Explorer. The Java DB node has four context-menu items that can be seen after right-clicking: Start Server, Stop Server, Create Database, and Properties. To use a preexisting installation of Java DB or Apache Derby, update the installation and database locations in the Java DB Properties dialog box invoked by the Properties menu item.
Creating a Java DB Connection Connecting to an existing Java DB can be done by right-clicking the Databases node and selecting New Connection. Two driver name options are related to the Java DB database: Embedded and Network. The embedded driver is used when the application accesses the database from only one JVM. The network driver is used when the database needs to be accessed from various JVMs over a network.
The Java DB URL format is
![]()
To create a new Java DB database, right-click the Java DB node and select Create Database. From the Create Java DB Database dialog box, you need to specify only the database name, username, and password. When creating a Java DB database with the name “Ideas,” the following URL automatically is established:
![]()
Right-clicking the Java DB Databases node displays the same menu items as other database connections do: Connect, Disconnect, Execute Command, Refresh, Delete, and Properties.
Database Support Components
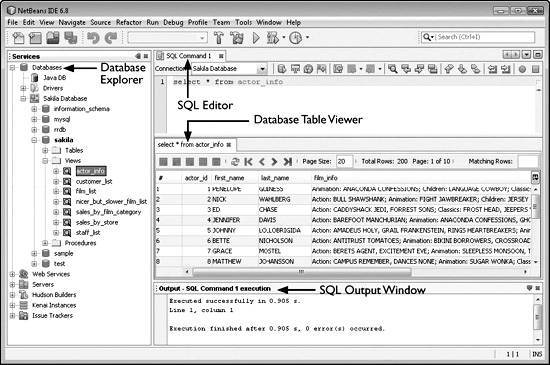
The SQL Editor provides a direct means of sending commands to the JDBC-supported database. The SQL Editor has various toolbars and a Table Viewer. It directs status output to the Output window and also receives commands from the Database Explorer. The SQL Editor and related components are shown in Figure 5-7. The MySQL Sakila sample database (see the bonus appendix entitled "NetBeans Database Integration" available for download from the Media Center) is used for screenshots throughout this chapter. This section discusses each database-support component.
FIGURE 5-7 NetBeans SQL Editor
INSIDE THE EXAM
MySQL Server Integration
When the NetBeans IDE detects a MySQL server running or installed on the local machine, a MySQL Server node appears under the Databases node of the Database Explorer. If you don’t have MySQL on your machine, you won’t see the MySQL Server node.
Right-clicking the MySQL Server node brings up nine menu items: Create Database, Start, Stop, Connect, Disconnect, Delete, Refresh, Run Administration Tool, and Properties.
The Create Database menu item lets you create a new database or set up a sample database. The Properties menu item lets you bind the appropriate SQL Server commands to the Start, Stop, and Run Administration Tool menu items. The Connect and Disconnect menu items respectively connect and disconnect the IDE from the MySQL database server. The Delete menu item removes the MySQL Server node. The Refresh menu item refreshes the list of databases on the server.
![]() SQL Editor
SQL Editor
![]() Table Viewer
Table Viewer
![]() Output Window
Output Window
![]() Database Explorer Integration
Database Explorer Integration
SQL Editor
The SQL Editor executes commands against registered and connected JDBC-supported databases. The SQL Editor has a Connection combo box at its top left that lets you set which database is associated with the editor. The toolbar associated with the SQL Editor is separated into six sections. Each section provides value-added features to the SQL Editor. The Scenario & Solution explores these features.
SCENARIO & SOLUTION
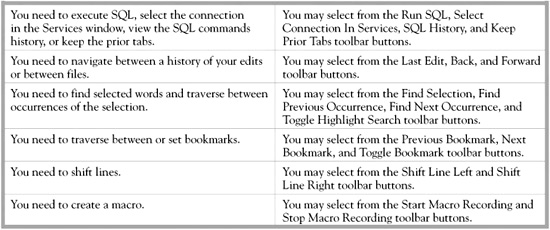
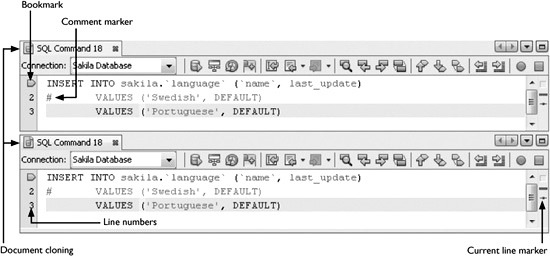
In addition to the previously mentioned SQL Editor features from the toolbars, the SQL Editor has many of the same features as other NetBeans IDE source editors, such as line numbers, current line marker, bookmarking, comment support, and document cloning. These features are shown in Figure 5-8.
FIGURE 5-8 SQL Editor features
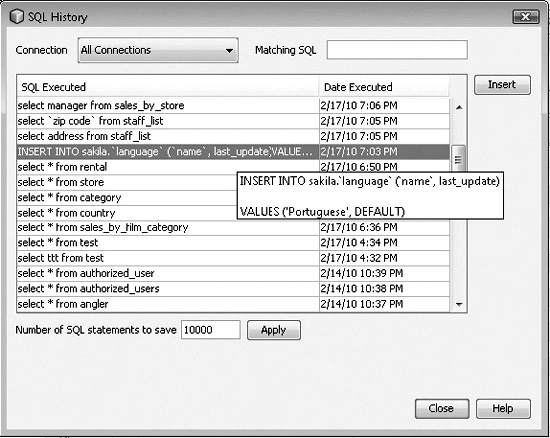
The features listed in the Scenario & Solution section are intuitive, and your best bet is to try each one at least a couple of times. The SQL History dialog box displays a nice presentation of the history of recent SQL commands, as shown in Figure 5-9.
EXERCISE 5-2 Interfacing with the Sakila Database Through the Database Explorer
In this exercise, you use the Database Explorer to perform various tasks on the MySQL Sakila sample database. You need to have MySQL installed and be connected to the Sakila database. You can install the Sakila sample database from the plugin located in the Plugin Manager, as shown next:
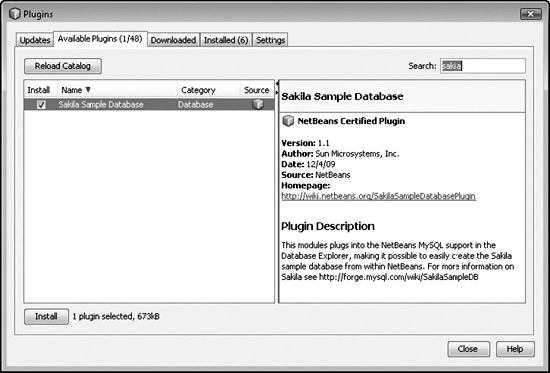
A six-minute NetBeans screencast on database improvements implemented since NetBeans IDE 6.5 can be found here: http://netbeans.org/kb/docs/ide/database-improvements-screencast.html.
Let’s now perform some actions on the database:
1. Modify and save the last name of an actor/actress in the actor table. This can be done by using the table and toolbar buttons without directly entering SQL into the editor.
2. Insert a new member of the staff into the staff table. This can be done by using the table and toolbar buttons without directly entering SQL into the editor.
3. View the contents of the film table.
4. Execute the nicer_but_slower_film_list view.
5. Grab the table definition of the rental table.
6. Create a new table, delete it, and recreate it.
Table Viewer
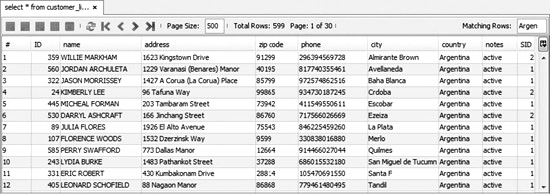
The SQL Table Viewer displays tables (for example, ResultSets) returned by SQL commands. Figure 5-10 displays the customer_list view of the Sakila database in the Table Viewer.
FIGURE 5-10 Sakila customer_list view
The Table Viewer has various features:
![]() Record manipulation Toolbar buttons to insert and delete records, commit changes, and cancel records are available. There is also a button for truncating the table. These buttons are enabled only for modifiable records and/or tables.
Record manipulation Toolbar buttons to insert and delete records, commit changes, and cancel records are available. There is also a button for truncating the table. These buttons are enabled only for modifiable records and/or tables.
![]() Pagination The table is paginated based on an input value for the page size. The Page Size corresponds to the number of records displayed on a page. There are icons to refresh the page, go to the first page, go to the previous page, go to the next page, and go to the last page. The total number of rows (records) is displayed. The current page relative to the total pages is displayed.
Pagination The table is paginated based on an input value for the page size. The Page Size corresponds to the number of records displayed on a page. There are icons to refresh the page, go to the first page, go to the previous page, go to the next page, and go to the last page. The total number of rows (records) is displayed. The current page relative to the total pages is displayed.
![]() Matching rows filter The table has a character-string filter based on the selected input in the Matching Rows edit box. Only the records with matching strings will be displayed.
Matching rows filter The table has a character-string filter based on the selected input in the Matching Rows edit box. Only the records with matching strings will be displayed.
![]() Column sorting Records are sorted by table columns when clicking the column title names. Sorting is based on the current page size view and not the entire set of data.
Column sorting Records are sorted by table columns when clicking the column title names. Sorting is based on the current page size view and not the entire set of data.
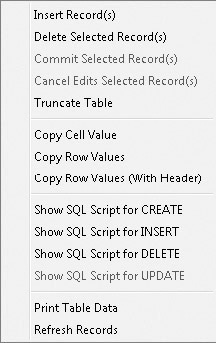
The record manipulation features are also available along with other self-describing commands when you right-click to open the context menu. This is shown in Figure 5-11.
FIGURE 5-11 Table Viewer context menu
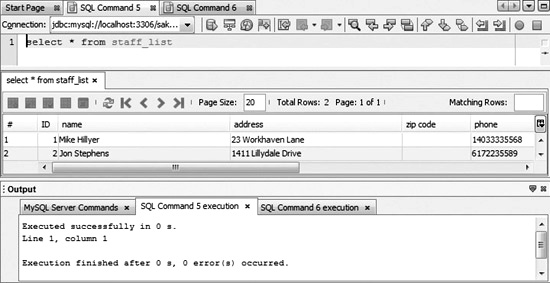
Output Window
SQL Command Execution windows are opened in the Output window with information related to the commands executed from the SQL Editor Input window. They are always in pairs, with a reference number starting at 1. For example, the SQL Command 5 window corresponds with the SQL Command 5 Execution window, as shown in Figure 5-12. The next set of windows includes the number 6, and so forth. The SQL Command Execution window displays the positive and negative results of the SQL Editor commands.
Right-clicking the Output window reveals a context menu with the following items: Copy, Paste, Find, Find Next, Find Previous, Filter, Wrap Text, Larger Font, Smaller Font, Choose Font, Save As, Clear, and Close.

Database debug mode can be enabled or disabled by right-clicking the Databases node and selecting the appropriate menu item (Enable Debug or Disable Debug). Debug mode lists SQL statements in the Output window that are not displayed in the SQL Editor window. For example, creating or deleting tables from a database node in the Services window shows corresponding SQL statements in the Output window, but only when the debug mode is enabled.
Database Explorer Integration
Every integrated database has Tables, Views, and Procedures nodes in the Database Explorer. Right-clicking the node opens a context menu with the following commands:
![]() Tables node Create Table, Recreate Table, Execute Command, Refresh
Tables node Create Table, Recreate Table, Execute Command, Refresh
![]() Views node Create View, Execute Command, Refresh
Views node Create View, Execute Command, Refresh
![]() Procedures node Execute Command, Refresh
Procedures node Execute Command, Refresh
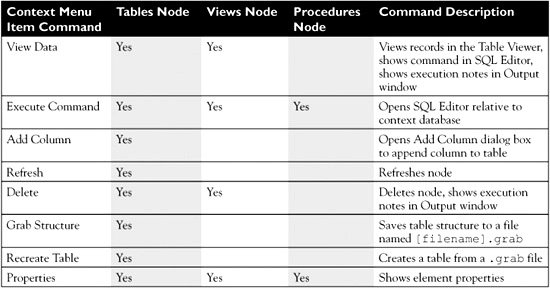
The Execute Command menu item invokes the SQL Editor relative to the context database. The Refresh menu item updates the node. The Create Table item provides a dialog box for the creation of a new table, and Create View does the same for a view. The Recreate Table menu item creates a table from a .grab file that was captured through the relative menu item of the actual table node. Table 5-1 shows this command (Grab Structure) and all of the others relative to right-clicking a table, view, or procedure node.
TABLE 5-1 Database Explorer Context Menus
Consider using LiquiBase (www.liquibase.org) for database change management. LiquiBase is an open source, database-independent library for tracking, managing, and applying database changes.
CERTIFICATION SUMMARY
This chapter covered the NetBeans Database Explorer. Its only database-related certification objective requires familiarity with driver registration and working with database tables as well as other features of database integration. All of these features are accessed through the Database Explorer.
The first half of this chapter covered topics related to database connectivity. These topics included JDBC driver registration, establishing JDBC-supported and Java DB database connections, as well as integration with MySQL utilities. Again, all of this was done through the Database Explorer.
We moved on to discuss working with the databases once a connection is established. We used the SQL Editor to execute SQL commands. We explored interfacing with databases and the SQL Editor through tables, views, and procedures.
You should now be able to connect to, interact with, and capture details about databases, all while working with the Database Explorer and SQL Editor.
 TWO-MINUTE DRILL
Working with Databases in the IDE
![]() The Database Explorer contains features such as establishing and viewing database connections, adding database drivers, interacting with database structures, working with SQL statements, and migrating schemas.
The Database Explorer contains features such as establishing and viewing database connections, adding database drivers, interacting with database structures, working with SQL statements, and migrating schemas.
![]() Java DB is a database with a small footprint supported by Oracle. It is bundled with the JDK. Java DB drivers are automatically registered in the Database Explorer.
Java DB is a database with a small footprint supported by Oracle. It is bundled with the JDK. Java DB drivers are automatically registered in the Database Explorer.
![]() MySQL is an open source relational database. A MySQL node is automatically established in the Database Explorer if the IDE detects its installation.
MySQL is an open source relational database. A MySQL node is automatically established in the Database Explorer if the IDE detects its installation.
![]() The IDE can register any JDBC driver via the New JDBC Driver dialog box.
The IDE can register any JDBC driver via the New JDBC Driver dialog box.
![]() Java DB, MySQL, PostgreSQL, and JDBC-ODBC bridge JDBC drivers are registered by default in the core IDE.
Java DB, MySQL, PostgreSQL, and JDBC-ODBC bridge JDBC drivers are registered by default in the core IDE.
![]() Each table node has subnodes for Tables, Views, and Procedures.
Each table node has subnodes for Tables, Views, and Procedures.
![]() The IDE provides means to create, recreate, view, modify, and delete tables.
The IDE provides means to create, recreate, view, modify, and delete tables.
![]() Table definitions can be saved. This is done by right-clicking the table and selecting Grab Structure.
Table definitions can be saved. This is done by right-clicking the table and selecting Grab Structure.
![]() The IDE can capture database schemas through the New File wizard. The Persistence Category and Database Schema must be selected in the wizard along with the database URL. The database must also be running at the time of the capture.
The IDE can capture database schemas through the New File wizard. The Persistence Category and Database Schema must be selected in the wizard along with the database URL. The database must also be running at the time of the capture.
![]() The SQL Editor executes commands against a connected database.
The SQL Editor executes commands against a connected database.
![]() Commands in the SQL Editor can be run by pressing CTRL-SHIFT-E.
Commands in the SQL Editor can be run by pressing CTRL-SHIFT-E.
![]() The SQL Editor primary toolbar has four buttons. These buttons can execute SQL commands, select connections in the Services window, list SQL history, and keep prior tabs open.
The SQL Editor primary toolbar has four buttons. These buttons can execute SQL commands, select connections in the Services window, list SQL history, and keep prior tabs open.
![]() Database debug mode can be enabled to list various SQL statements in the Output window.
Database debug mode can be enabled to list various SQL statements in the Output window.
SELF TEST
The following questions will help you measure your understanding of the material presented in this chapter. Read all the choices carefully because there might be more than one correct answer. Choose all correct answers for each question.
Working with Databases in the IDE
1. What is the root node of the Database Explorer in the Services window?
A. Databases
B. Drivers
C. Java DB
D. Database Explorer
2. Consider the following illustration. How is the New JDBC Driver dialog box invoked?
A. Right-click the Databases node and choose New Driver.
B. Right-click the Drivers node and choose New Driver.
C. Choose Tools | JDBC Drivers | New Driver.
D. Press CTRL-ALT-D.
3. If NetBeans detects an installation of MySQL on the local machine, a MySQL node will appear under the Databases node that provides additional MySQL support.
A. True
B. False
4. When the Database Explorer’s debug mode is enabled, the various SQL statements can be viewed in which window?
A. Services
B. Databases
C. Test Results
D. Output
5. When grabbing a table structure (that is, right-click [table] | Grab Structure), what is the file extension applied to the file that is created with the table definition?
A. .grab
B. .table
C. .tbx
D. .structure
6. Three nodes exist for each database node in the Database Explorer. Select the three that apply.
A. Tables
B. Views
C. Procedures
D. Stored Procedures
7. In the SQL History dialog box, what is the maximum number of SQL statements that can be saved?
A. 10
B. 100
C. 10,000
D. 1,000,000
8. What are the tooltips associated with the icons in the SQL Editor’s toolbar? Select all that apply.
A. Run SQL
B. Select Connection In Services
C. SQL History
D. SQL Diff
E. Keep Prior Tabs
9. Consider the following illustration. When adding a column to a table, what constraints can be applied? Select all that apply.
A. Primary Key, Unique, and Index
B. Unique, Null, and Index
C. Null
D. Primary Key, Unique, Null, and Index
10. Captured database schemas are visible in what window?
A. Projects
B. Tasks
C. Output
D. Navigator
11. Captured database schemas are saved in what file format?
A. Binary format
B. Dataset format
C. Serialized file format
D. XML format
SELF TEST ANSWERS
Working with Databases in the IDE
1. What is the root node of the Database Explorer in the Services window?
A. Databases
B. Drivers
C. Java DB
D. Database Explorer
![]() A. Databases is the base node of the Database Explorer in the Services window.
A. Databases is the base node of the Database Explorer in the Services window.
![]() B, C, and D are incorrect. B is incorrect because Drivers is not the base node of the Database Explorer. Drivers is a folder under the Databases node. C is incorrect because Java DB is not the base node of the Database Explorer. Java DB is a database node under the Databases node. D is incorrect because Database Explorer is not a node.
B, C, and D are incorrect. B is incorrect because Drivers is not the base node of the Database Explorer. Drivers is a folder under the Databases node. C is incorrect because Java DB is not the base node of the Database Explorer. Java DB is a database node under the Databases node. D is incorrect because Database Explorer is not a node.
2. Consider the following illustration. How is the New JDBC Driver dialog box invoked?
A. Right-click the Databases node and choose New Driver.
B. Right-click the Drivers node and choose New Driver.
C. Choose Tools | JDBC Drivers | New Driver.
D. Press CTRL-ALT-D.
![]() B. The New JDBC Driver dialog box is invoked by right-clicking the Drivers node and choosing New Driver.
B. The New JDBC Driver dialog box is invoked by right-clicking the Drivers node and choosing New Driver.
![]() A, C, and D are incorrect. A is incorrect because no New Driver menu item is associated with the Databases node. C is incorrect because there is no Tools | JDBC Drivers menu item. D is incorrect because CTRL-ALT-D does not open the New JDBC Driver dialog box.
A, C, and D are incorrect. A is incorrect because no New Driver menu item is associated with the Databases node. C is incorrect because there is no Tools | JDBC Drivers menu item. D is incorrect because CTRL-ALT-D does not open the New JDBC Driver dialog box.
3. If NetBeans detects an installation of MySQL on the local machine, a MySQL node will appear under the Databases node that provides additional MySQL support.
A. True
B. False
![]() A. This is a true statement. If NetBeans detects an installation of MySQL on the local machine, a MySQL node will appear under the Databases node, that provides additional MySQL support.
A. This is a true statement. If NetBeans detects an installation of MySQL on the local machine, a MySQL node will appear under the Databases node, that provides additional MySQL support.
4. When the Database Explorer’s debug mode is enabled, the various SQL statements can be viewed in which window?
A. Services
B. Databases
C. Test Results
D. Output
![]() D. The Output window displays the log of various SQL statements when the Database Explorer’s debug mode is enabled.
D. The Output window displays the log of various SQL statements when the Database Explorer’s debug mode is enabled.
![]() A, B, and C are incorrect. A is incorrect because the Services window does not display the log of SQL statements. B is incorrect because there is no Databases window. C is incorrect because the Test Results window does not display the log of SQL statements.
A, B, and C are incorrect. A is incorrect because the Services window does not display the log of SQL statements. B is incorrect because there is no Databases window. C is incorrect because the Test Results window does not display the log of SQL statements.
5. When grabbing a table structure (that is, right-click [table] | Grab Structure), what is the file extension applied to the file that is created with the table definition?
A. .grab
B. .table
C. .tbx
D. .structure
![]() A. The file extension .grab is used for table definition files.
A. The file extension .grab is used for table definition files.
![]() B, C, and D are incorrect. B is incorrect because the .table file extension is not used for table definition files. C is incorrect because the .tbx file extension is not used for table definition files. D is incorrect because the .structure file extension is not used for table definition files.
B, C, and D are incorrect. B is incorrect because the .table file extension is not used for table definition files. C is incorrect because the .tbx file extension is not used for table definition files. D is incorrect because the .structure file extension is not used for table definition files.
6. Three nodes exist for each database node in the Database Explorer. Select the three that apply.
A. Tables
B. Views
C. Procedures
D. Stored Procedures
![]() A, B, and C. Each database node has subnodes for Tables, Views, and Procedures.
A, B, and C. Each database node has subnodes for Tables, Views, and Procedures.
![]() D is incorrect because the node used for stored procedures is called Procedures and not Stored Procedures.
D is incorrect because the node used for stored procedures is called Procedures and not Stored Procedures.
7. In the SQL History dialog box, what is the maximum number of SQL statements that can be saved?
A. 10
B. 100
C. 10,000
D. 1,000,000
![]() C. The maximum number of SQL statements that can be saved (as configurable in the SQL History dialog box) is 10,000.
C. The maximum number of SQL statements that can be saved (as configurable in the SQL History dialog box) is 10,000.
![]() A, B, and D are incorrect. A is incorrect because 10 is not the maximum number of SQL statements that can be saved. B is incorrect because 100 is not the maximum number of SQL statements that can be saved. D is incorrect because 1,000,000 is not the maximum number of SQL statements that can be saved.
A, B, and D are incorrect. A is incorrect because 10 is not the maximum number of SQL statements that can be saved. B is incorrect because 100 is not the maximum number of SQL statements that can be saved. D is incorrect because 1,000,000 is not the maximum number of SQL statements that can be saved.
8. What are the tooltips associated with the icons in the SQL Editor’s toolbar? Select all that apply.
A. Run SQL
B. Select Connection In Services
C. SQL History
D. SQL Diff
E. Keep Prior Tabs
![]() A, B, C, and E. Four icons exist in the SQL Editor’s primary toolbar. The associated tooltips are Run SQL, Select Connection In Services, SQL History, and Keep Prior Tabs.
A, B, C, and E. Four icons exist in the SQL Editor’s primary toolbar. The associated tooltips are Run SQL, Select Connection In Services, SQL History, and Keep Prior Tabs.
![]() D is incorrect because no icon has a SQL Diff tooltip.
D is incorrect because no icon has a SQL Diff tooltip.
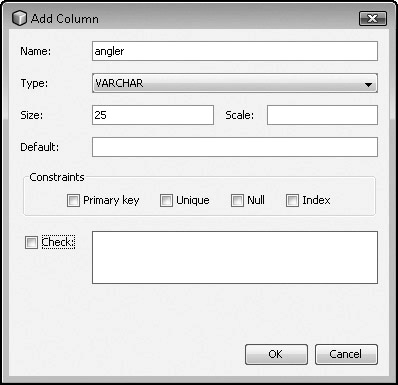
9. Consider the following illustration. When adding a column to a table, what constraints can be applied? Select all that apply.
A. Primary Key, Unique, and Index
B. Unique, Null, and Index
C. Null
D. Primary Key, Unique, Null, and Index
![]() A, B, and C. Valid checkboxes that can be selected together include (A) Primary Key, Unique, and Index; (B) Unique, Null, and Index; and (C) Null.
A, B, and C. Valid checkboxes that can be selected together include (A) Primary Key, Unique, and Index; (B) Unique, Null, and Index; and (C) Null.
![]() D is incorrect because the dialog box will not allow the Primary Key checkbox to be selected along with the Null checkbox.
D is incorrect because the dialog box will not allow the Primary Key checkbox to be selected along with the Null checkbox.
10. Captured database schemas are visible in what window?
A. Projects
B. Tasks
C. Output
D. Navigator
![]() A. Captured database schemas are visible in the Projects window.
A. Captured database schemas are visible in the Projects window.
![]() B, C, and D are incorrect. B is incorrect because captured database schemas are not visible in the Tasks window. C is incorrect because captured database schemas are not visible in the Output window. D is incorrect because captured database schemas are not visible in the Navigator window.
B, C, and D are incorrect. B is incorrect because captured database schemas are not visible in the Tasks window. C is incorrect because captured database schemas are not visible in the Output window. D is incorrect because captured database schemas are not visible in the Navigator window.
11. Captured database schemas are saved in what file format?
A. Binary format
B. Dataset format
C. Serialized file format
D. XML format
![]() D. Captured database schemas are saved in XML format.
D. Captured database schemas are saved in XML format.
![]() A, B, and C are incorrect. A is incorrect because captured database schemas are not saved in binary format. B is incorrect because captured database schemas are not saved in dataset format. C is incorrect because captured database schemas are not saved in serialized file format.
A, B, and C are incorrect. A is incorrect because captured database schemas are not saved in binary format. B is incorrect because captured database schemas are not saved in dataset format. C is incorrect because captured database schemas are not saved in serialized file format.