
1
General Configurations
CERTIFICATION OBJECTIVES
• Configuring IDE Functionality
• Working with Configuration Files and Directories
• Debugging with External Libraries
Q&A Self Test
Congratulations on deciding to learn and master the NetBeans Integrated Development Environment (IDE), an incredibly powerful development tool. NetBeans not only helps you get your job done faster, but also improves your understanding of code and your software architecture skills.
Tool proficiency is just as important as development language competency. Too often developers muddle along with only a rudimentary grasp of their tools, digging deeper only when confronted with an intractable problem in production. Undoubtedly many developers’ first exposure to the NetBeans profiling tool is after a production server has repeatedly run out of memory, and the initial solution of increasing the Java heap size has backfired.
This book contains detailed explanations of the features in NetBeans and comprehensive practice test questions. Additional practice exam questions are available for download. The discussions in this book are tied back to real job situations that have confronted the authors. By the end of this book you will not only be a master of NetBeans but also a master troubleshooter able to leverage this powerful tool.
NetBeans has come a long way since 2004, when Sun released version 4.0 to mark a gigantic leap forward for the world-class Java IDE. In fact, NetBeans has become an application platform. NetBeans provides excellent support for developing solutions using Grails, C, C++, JavaScript, Groovy, Python, and PHP among others. The breadth of the features in NetBeans is daunting. Since version 6.0, the features in the core IDE have mushroomed. The test, however, focuses on the core of the IDE and on developing Java-based applications.
This chapter focuses on the core tasks of configuring the IDE, to familiarize you with the Options window and all of its settings. You will also learn about the IDE directories, including their layout and purpose. In addition, you will master defining external libraries and configuring Java Development Kits (JDKs) for development. These skills will serve as your foundation for exploring NetBeans further.
CERTIFICATION OBJECTIVE:
Configuring IDE Functionality
Exam Objective 1.1 Demonstrate the ability to configure the functionality available in the IDE including using, enabling, and disabling functionality and using the Plugin Manager.
The NetBeans certification exam typically devotes several questions to IDE configuration and the Plugin Manager. Success on these questions is contingent on having an excellent working knowledge of the Options window and also of the Plugin Manager. The exam asks very specific questions about these features and the content of the screens. This objective is split into two sections:
![]() Options Window
Options Window
![]() Plugin Manager
Plugin Manager
Options Window
The NetBeans Options window, shown in Figure 1-1, configures most aspects of the IDE. This window configures global IDE settings and is not project specific. To open the Options window, choose Tools | Options. On Macintosh OS X (Mac OS X), choose NetBeans | Preferences. The Preferences dialog box has a row of icons going across the top for the different logical configuration groups. Configuration changes are saved back to the .netbeans/6.X directory found under a user’s home directory. If different versions of NetBeans have been installed, a different directory with the version number appears under the .netbeans directory. Deleting the configuration directory before launching NetBeans resets the IDE to its default settings.
FIGURE 1-1 NetBeans Options window
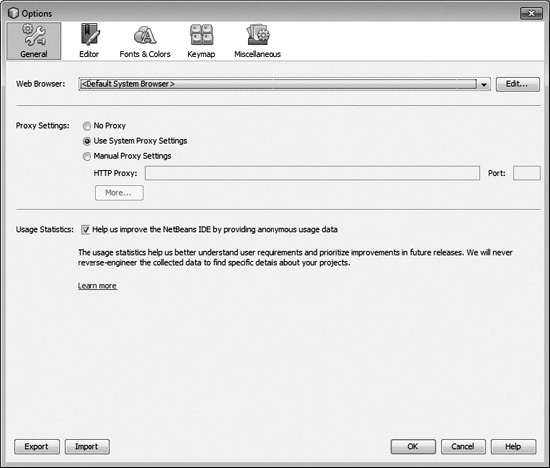
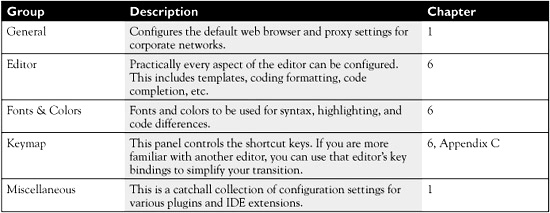
Table 1-1 lists the different configuration groups whose icons appear across the top of the Options window, a brief description of each group, and the chapter where it is covered. This chapter focuses on configuration settings not covered in other sections of this book, specifically the General and Miscellaneous groups. Syntax highlighting and key bindings are covered in Chapter 6 along with the source editor.
TABLE 1-1 Options Window Configuration Groups
When you click a group icon at the top of the Options window, its content panel appears. Often the content panel contains tabs with a multitude of settings. Changes are applied only after you click the OK button.
Two important buttons are at the bottom of the Options window: Export and Import. The Export button opens the dialog box in Figure 1-2 to save selected configuration settings out to a ZIP file, which you can reimport into the IDE using the Import button. This makes it possible to easily share IDE configurations among members of a development team and it works across platforms.
FIGURE 1-2 NetBeans options export dialog box
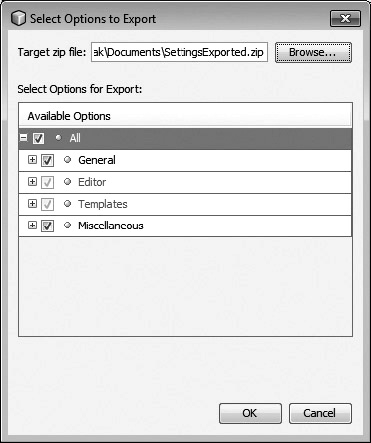
For instance, many companies have strict coding conventions that dictate tab sizes, brace placement, file templates, and so on. The import/export functionality provides a simple mechanism to propagate these conventions among the group without laborious documentation and setup instructions. NetBeans keeps track of changes that differ from the default settings. NetBeans exports settings only if changes have been made. Thus, settings that have not changed appear disabled in the Export dialog box.
General
The General configuration group appearing in Figure 1-1 is one of the simplest panels in the Options window. From this group, three things can be configured:
![]() Web Browser
Web Browser
![]() Proxy Settings
Proxy Settings
![]() Usage Statistics
Usage Statistics
The default web browser for the NetBeans IDE can be selected from the Web Browser drop-down list. You can use the selected web browser for previewing the output from web applications, as well for viewing IDE documentation and links. On the Windows platform, two options are available by default: <Default System Browser> and Internet Explorer. If Firefox is installed, it also appears on the list.
Click the Edit button to configure additional web browsers. The Default System Browser selection uses the default browser as configured for your operating environment (for Windows this is configured in the Control Panel). Selecting Internet Explorer sets the browser as Internet Explorer (IE), regardless of the default browser.
The Proxy Settings primarily pertain to corporate environments where network traffic is routed through a firewall. You have three options:
![]() No Proxy Choose this option for direct connection to the Internet with no outgoing traffic filtering.
No Proxy Choose this option for direct connection to the Internet with no outgoing traffic filtering.
![]() Use System Proxy Settings Under most circumstances this option suffices.
Use System Proxy Settings Under most circumstances this option suffices.
![]() Manual Proxy Settings Use this option to configure proxy username/passwords, SOCKS proxy, and hosts to exclude from a proxy. The Advanced Proxy Options dialog box is depicted in Figure 1-3.
Manual Proxy Settings Use this option to configure proxy username/passwords, SOCKS proxy, and hosts to exclude from a proxy. The Advanced Proxy Options dialog box is depicted in Figure 1-3.
FIGURE 1-3 NetBeans proxy server settings
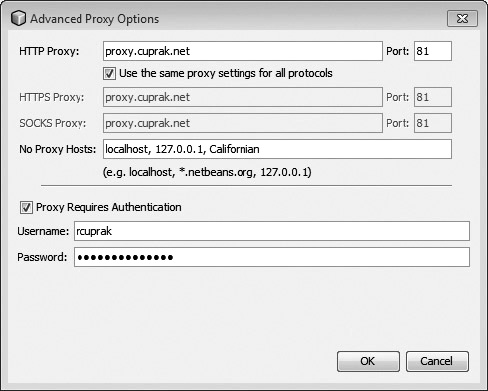
Proxy settings are company specific. The proxy settings affect solely the IDE; external tools including Maven may need to be configured separately. Proxy server settings are not propagated to child processes. So if you are writing an application that accesses external resources, you have to write your own code to handle configuration of the proxy server.
The third group on the General panel is Usage Statistics. It is highly unlikely that this will be covered on the exam. Enabling this feature by selecting the checkbox sends feature usage information to the NetBeans developers.
Miscellaneous
The Miscellaneous group is a collection of other features and plugins that can be configured in the IDE. This configuration group continues to grow with each release of NetBeans. NetBeans 6.8 contains the following tabs:
![]() Ant Apache Ant configuration settings including Ant version as well as classpath.
Ant Apache Ant configuration settings including Ant version as well as classpath.
![]() Appearance Look-and-feel settings for the IDE.
Appearance Look-and-feel settings for the IDE.
![]() Diff File comparison settings such as ignoring whitespace/line endings.
Diff File comparison settings such as ignoring whitespace/line endings.
![]() Files Settings for file extensions and Multipurpose Internet Mail Extensions (MIME) type handling.
Files Settings for file extensions and Multipurpose Internet Mail Extensions (MIME) type handling.
![]() GUI Builder Settings related to the user interface (UI) of the GUI Builder.
GUI Builder Settings related to the user interface (UI) of the GUI Builder.
![]() Issue Tracking Settings for connecting to Bugzilla.
Issue Tracking Settings for connecting to Bugzilla.
![]() Java Debugger Basic configuration of the debugger including exception filters.
Java Debugger Basic configuration of the debugger including exception filters.
![]() JavaScript Settings controlling the editing and testing of JavaScript.
JavaScript Settings controlling the editing and testing of JavaScript.
![]() Maven Settings pertaining to Maven.
Maven Settings pertaining to Maven.
![]() Profiler Settings related to the Profiler.
Profiler Settings related to the Profiler.
![]() Tasks Patterns that show up in the Tasks panel.
Tasks Patterns that show up in the Tasks panel.
![]() Versioning Configuration of the different version-control systems.
Versioning Configuration of the different version-control systems.
Ant
The first tab in the Miscellaneous group configures Ant. Ant is a common Java build system that NetBeans uses under the hood to compile, run, and test code. It is analogous to the Make tool commonly used in the C/C++ world. However, it uses an easy-to-read Extensible Markup Language (XML) file format. You extend Ant by writing new subclasses.
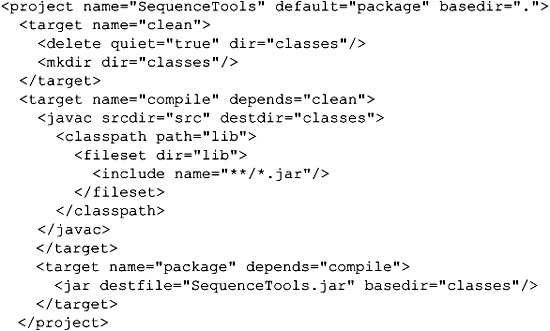
To give you a flavor of Ant, an example Ant file follows. In this listing we create a clean directory in which we build, compile, and package the classes into a JAR file. We can see two of the basic building blocks of an Ant file—a target and a task. A target contains a list of tasks such as compiling classes, manipulating the file system, and launching external programs. Specifying dependencies upon previous targets controls the order of target execution. You can invoke a target from the command line by passing the target name as a parameter to the Ant executable, or invoke the entire set of tasks by invoking the Ant executable without any parameters. The website http://ant.apache.org provides an excellent source of documentation on Ant, as well as references to related books.
As mentioned previously, NetBeans uses Ant under the hood as its build system. If you are creating a new NetBeans project from one of its templates, NetBeans automatically generates the Ant build file for you. If you already have a mature project with its own Ant build files and directory structure, you can use the Free Form Project wizard to integrate your existing project’s build file into NetBeans. Chapter 2 contains a detailed discussion of NetBeans Ant files. The Ant panel provides an interface for configuring:
![]() File system location of the Ant executable and resources
File system location of the Ant executable and resources
![]() Interaction between NetBeans and Ant’s external process
Interaction between NetBeans and Ant’s external process
![]() Extensions to Ant’s class path
Extensions to Ant’s class path
![]() Additional Ant environment properties
Additional Ant environment properties
Figure 1-4 shows the contents of this panel. The Ant Home setting allows you to pick the version of Ant to be used by NetBeans. Projects sometimes have requirements for specific versions of Ant on which their build process has been validated. Take care in selecting significantly older or newer versions of Ant, as compatibility issues with NetBeans may arise. NetBeans does not have the ability to configure the version of Ant used on a project-by-project basis. Information about the version of Ant being used appears below the Ant Home field.
FIGURE 1-4 NetBeans Options window: Ant

The next set of checkboxes under Ant Home controls several important features of the Ant integration. The first option, Save All Modified Files Before Running Ant, saves all unsaved documents prior to running an Ant task. Since Ant is used to build, run, and test code, clearing this checkbox means that you have to explicitly save your changes in order for them to take effect when compiling, running, testing, and so on. The Reuse Output Tabs From Finished Processes option reduces clutter by recycling the Output tab. If the checkbox is cleared, a new tab is created each time an Ant target is invoked. The third option, Always Show Output, causes NetBeans to switch to the Output tab when an Ant task is invoked.
The Verbosity Level controls the output from the build process. You can choose Quiet, Normal, Verbose, or Debug. The quiet mode displays only output generated by your application. The verbose and debug modes output copious amounts of information including classpaths, working directories, VM parameters, and so on. The latter two are indispensable when troubleshooting problems with custom Ant tasks.
The Classpath list box provides a mechanism for adding additional Ant tasks to Ant. Many of the optional Ant tasks have external library requirements that must be added to the classpath. Adding libraries to Ant in this Options window makes the Ant task available to all projects in NetBeans. For instance, the svn Ant tasks from SvnAnt (http://subclipse.tigris.org/svnant.html) require five external libraries. If these libraries are missing, Ant will report the error: “Problem: failed to create task or type svn.”
The Properties text area is used to enter system properties that configure Ant’s core classes or that can be consumed by Ant build files. Examples of built-in parameters that you can change can be found in Ant’s online documentation (http://ant.apache.org/manual/running.html). For instance, the URLs for SvnAnt could be defined in this field.
Appearance
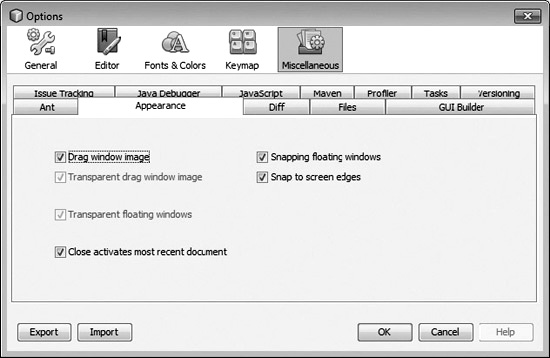
The Appearance tab, shown in Figure 1-5, controls several user interface–related settings. Depending upon features available on your Java Development Kit (JDK) and operating system (OS) platform, any of the first three checkboxes may be disabled. The first three checkboxes are
FIGURE 1-5 NetBeans Options window: Appearance
![]() Drag Window Image
Drag Window Image
![]() Transparent Drag Window Image
Transparent Drag Window Image
![]() Transparent Floating Windows
Transparent Floating Windows
These checkboxes control the overall NetBeans appearance. When the Drag Window Image option is on, NetBeans displays an image of a panel (such as Tasks, Properties, or Projects) during a drag. With this option off, you see only a red outline. If you are working on an older computer or your project is taxing the computer resources, disabling this feature can improve the NetBeans responsiveness. The Transparent Drag Window Image option makes an undocked window transparent as you drag it. The Transparent Floating Windows option, added in NetBeans 6.1, does the same for floating windows (undocked windows). Making windows transparent during dragging helps when undocked and floating windows overlap each other. These last two features cannot be enabled on Mac OS X, Linux, or OpenSolaris, and although they appear checked, they are not supported on these platforms.
The Close Activates Most Recent Document option switches focus to the previously viewed document when you close the frontmost document. If this is not enabled, closing a document causes the document to the right to become selected. The last two options, Snapping Floating Windows and Snap To Screen Edges, constrain the position of floating windows as you drag them.
Diff
The Diff panel in Figure 1-6 configures the file difference engine used to compare files. Performing file comparisons (see Chapter 2) is heavily leveraged by version control integration. By default, NetBeans uses its built-in diff engine. NetBeans can also use the command-line diff utility available on POSIX (Portable Operating System Interface for Unix)-based systems such as Red Hat Linux, Solaris, and Mac OS X. The Unix diff tool is much more powerful than the NetBeans engine in terms of features and is possibly faster when working with large files. The diff engine generates output that NetBeans then uses to render in the file comparison window.
FIGURE 1-6 NetBeans Options window: Diff
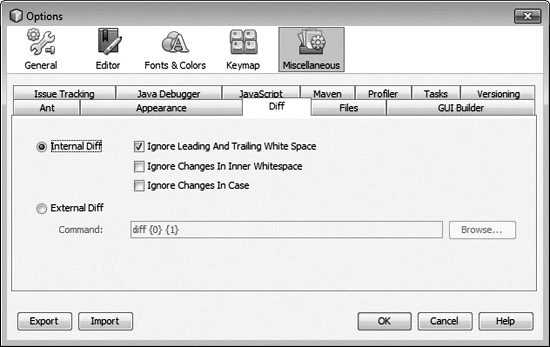
The internal diff engine supports three configuration parameters:
![]() Ignore Leading And Trailing White Space Ignores whitespace (tabs/space) at the beginning and end of a line. For example, if you converted a file that uses tabs for indenting to spaces, checking this would show only real code changes.
Ignore Leading And Trailing White Space Ignores whitespace (tabs/space) at the beginning and end of a line. For example, if you converted a file that uses tabs for indenting to spaces, checking this would show only real code changes.
![]() Ignore Changes In Inner Whitespace Ignores changes to whitespace within a line. For instance, some developers like to include spaces within parentheses, as in (_int_a_), where an underscore represents a space.
Ignore Changes In Inner Whitespace Ignores changes to whitespace within a line. For instance, some developers like to include spaces within parentheses, as in (_int_a_), where an underscore represents a space.
![]() Ignore Changes In Case Ignores capitalization modifications.
Ignore Changes In Case Ignores capitalization modifications.
The file system location of the external diff engine (Unix diff command) can be selected by clicking the Browse button. On Unix systems the diff command is normally on the path, so browsing for it is unnecessary. On a Windows system with Unix environment installed such as Cygwin (http://www.cygwin.com/), you must select the executable. Parameters to diff follow the path to the executable. The {0} and {1} parameters must be present because they are placeholders representing the files being compared.
Files
The Files tab in Figure 1-7 is used to configure file associations and file exclusions. In this tab file extensions such as .java/.xhtml are mapped to MIME types. MIME types, define the type of the file, and NetBeans uses the MIME types to determine which editor should be used to open a file. For example, the .xhtml file extension is mapped to the MIME type HTML files (text/html), which opens the NetBeans HTML editor. Switching the MIME type to plain/text would cause XHTML files to be opened in NetBeans’ text editor.
FIGURE 1-7 NetBeans Options window: Files
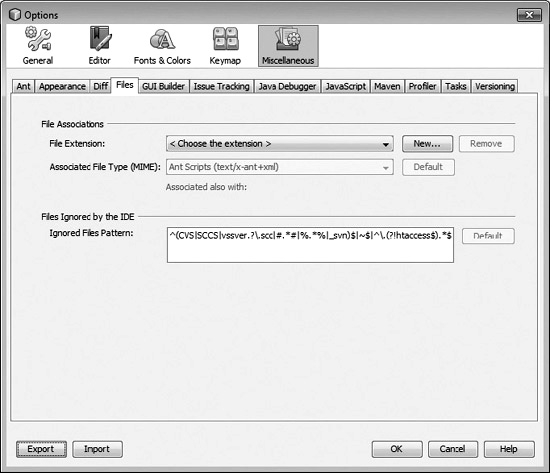
This tab can also be used to configure new file extensions and to associate them with a MIME type and hence an editor. For example, if your application used the extension .config for application-specific XML configuration files, you would add the file extension by clicking the New button and then selecting the MIME type XML File text/xml. Files with the .config extension would then open in NetBeans’ XML editor. If you inadvertently change the MIME type on a file extension, clicking the Default button reverts your change.
This tab also can be used to configure files or directories that NetBeans ignores. Files ignored by NetBeans do not appear in the Files or Projects windows. These files won’t be indexed or searched. For example, a global find/replace would break the version-control system integration files found in .svn/CVS directories. By default, NetBeans also ignores the Unix hidden directories that start with a period. The ignored-files pattern takes a POSIX regular expression.
GUI Builder
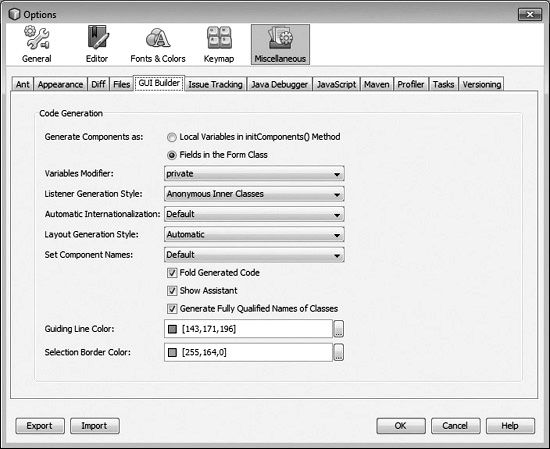
NetBeans includes the powerful GUI Builder for designing and constructing Swing user interfaces. It supports most of the built-in Java layouts, such as GridBag and FlowLayout among others, and also adds an intuitive free-form layout. NetBeans goes a step further and also integrates Beans Binding (JSR 295) to shuttle values back and forth between the GUI controls (JTextFields, JRadioButtons) and the domain model. Under the hood, the NetBeans GUI Builder generates the copious amount of Java code necessary to construct a user interface that supports internationalization and can adapt to changing platform appearances. The GUI Builder is covered in Chapter 3; this section discusses configuration of this feature shown in Figure 1-8. For a more in-depth understanding of the GUI Builder refer to Chapter 3. The following features of the GUI Builder can be configured:
FIGURE 1-8 NetBeans Options window: GUI Builder
![]() Location of component declaration
Location of component declaration
![]() Access modifiers
Access modifiers
![]() Listener generation style
Listener generation style
![]() Internationalization (i18n)
Internationalization (i18n)
![]() Layout generation
Layout generation
![]() Setting of a component’s name
Setting of a component’s name
![]() Qualified name usage
Qualified name usage

JSR 295 Beans Binding (https://beansbinding.dev.java.net/) is a framework for binding user interface components directly to the data model. This saves significant amounts of time because large amounts of UI code are usually devoted to setting and retrieving values on Swing components. NetBeans integrates extensively with Beans Binding.
The Generate Components As radio button group controls whether a class variable (field) is created for each component dropped onto a screen. For example, if a JTextField is dropped onto a screen, then a member variable for that JTextField is created in the class if “Fields in the Form Class” is selected. If “Local Variables in initComponents() Method” is chosen, the component is instantiated and accessible only within the initComponents() method of the form. In this case other methods in the form class cannot access the components. Lack of a class variable isn’t a limitation if SwingBindings is being utilized to its fullest potential.
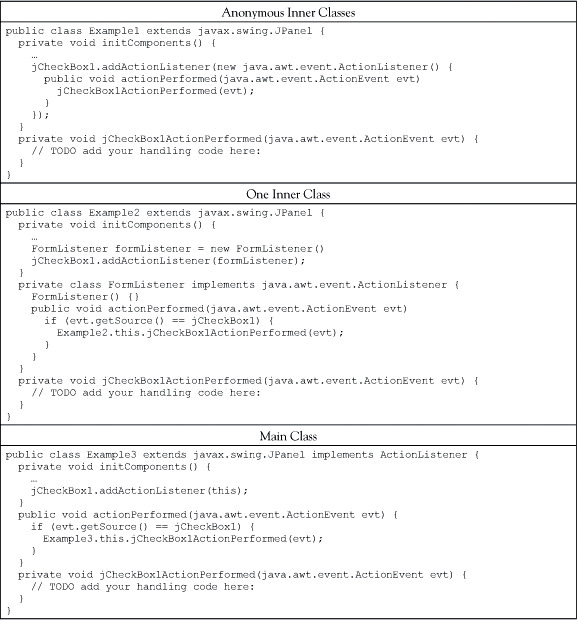
If a component is generated as a field in the form class, the Variables Modifier option comes into play. This drop-down list controls whether the field is declared as default, private, protected, or public. The Listener Generation Style option determines how the listener logic is implemented. A number of different listeners can be registered for each Swing component, such as ActionListener, FocusListener, MouseListener, and so on. These listeners are on the Events tab in the Properties window. Three different options are available. The complexity of the form determines which of the three options should be selected. The options are documented in Table 1-2 with sample code. In all cases, a method on the form’s class is created to handle the listener.
TABLE 1-2 Listener Generation Style
The Automatic Internationalization option controls whether text is automatically added to a resource bundle. For example, if a JLabel is dropped on a screen with automatic internationalization enabled, text typed into the GUI Builder is automatically inserted into the resource bundle. It is much easier to internationalize an application from the beginning than to retrofit it afterwards. Enabling automatic internationalization will pay dividends in the future.
The Layout Generation Style controls how GroupLayout code is generated. GroupLayout is a new layout manager that was integrated into Java 6. However, it can also be used in pre–Java 6 with the addition of an external library (Swing Layout Extensions library). There are three options: Automatic, Standard Java 6 Code, and Swing Layout Extensions Library. If the project is configured for Java 5, using Automatic results in the project using the Swing Layout Extensions library. The explicit Swing Layout Extensions Library option is for projects that are also deployed to Java 5 environments.
The Set Component Names option determines whether to set the name property of a Swing component. The java.awt.Component class possesses a name property. Setting a component’s name is useful if the component tree is manipulated or interrogated from code. Automated GUI testing tools often require that the component name be set. It is also useful when debugging Swing GUIs and pinpointing the component that fired a specific event.
The GUI Builder tab also includes three checkboxes:
![]() Fold Generated Code Code generated in design mode is automatically folded when switching to the source mode. Thus, the only code that is expanded is code that you can edit.
Fold Generated Code Code generated in design mode is automatically folded when switching to the source mode. Thus, the only code that is expanded is code that you can edit.
![]() Show Assistant Enables the GUI assistant. The assistant appears in a bar above the GUI designer but below the toolbar.
Show Assistant Enables the GUI assistant. The assistant appears in a bar above the GUI designer but below the toolbar.
![]() Generate Fully Qualified Names Of Classes Components are declared/instantiated without imports. If this option is checked, then you see javax.swing.JTextField instead of JTextField in the generated source.
Generate Fully Qualified Names Of Classes Components are declared/instantiated without imports. If this option is checked, then you see javax.swing.JTextField instead of JTextField in the generated source.
The last two settings, Guiding Line Color and Selection Border Color, control the colors in the GUI editor. The first option controls the color of the guiding lines to help you align components with other components. The second option determines the color of a control’s border when it is selected.
Issue Tracking
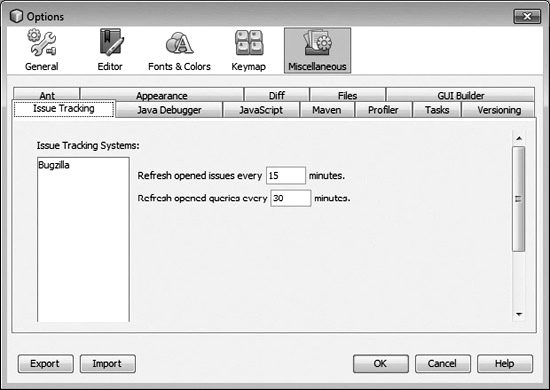
NetBeans integrates with the Bugzilla issue tracking system. Using this integration you can see information such as which issues have been assigned to you. Issue-tracking systems are added and removed by right-clicking the Issue Trackers item in the Services window. The Issue Tracking tab in the Options window, depicted in Figure 1-9, configures the frequency with which NetBeans connects and refreshes the list of open items. At this time, NetBeans only supports Bugzilla—undoubtedly more issue-tracking systems will be added in the future.
FIGURE 1-9 NetBeans Options window: Issue Tracking
Java Debugger
The Java Debugger tab in Figure 1-10 configures the basic behavior of the debugger in NetBeans. Tweaking these settings can simplify the troubleshooting of those intractable problems that often crop up at the last minute. The NetBeans debugger is covered in depth in Chapter 9. This Java Debugger tab divides the configuration of the debugger into three categories:
FIGURE 1-10 NetBeans Options window: Java Debugger
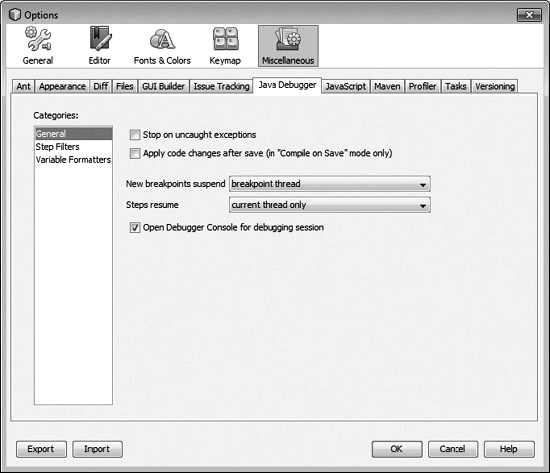
![]() General Miscellaneous settings
General Miscellaneous settings
![]() Step Filters Control when the debugger should step into code
Step Filters Control when the debugger should step into code
![]() Variable Formatters Format the display of variables to make them more readable
Variable Formatters Format the display of variables to make them more readable
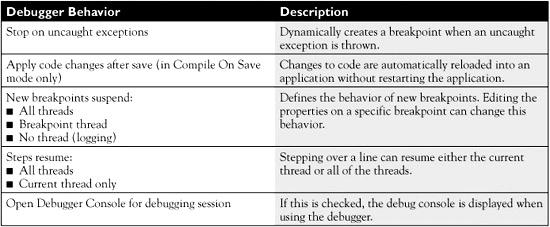
The first category, General, configures several key behaviors of the debugger. These are outlined in Table 1-3.
TABLE 1-3 Debugger General Category
The second Java Debugger category, Step Filters, shown in Figure 1-11, controls what methods you do not want NetBeans stepping into. You can block stepping into with the following method types:
FIGURE 1-11 NetBeans Options window: Java Debugger Step Filters
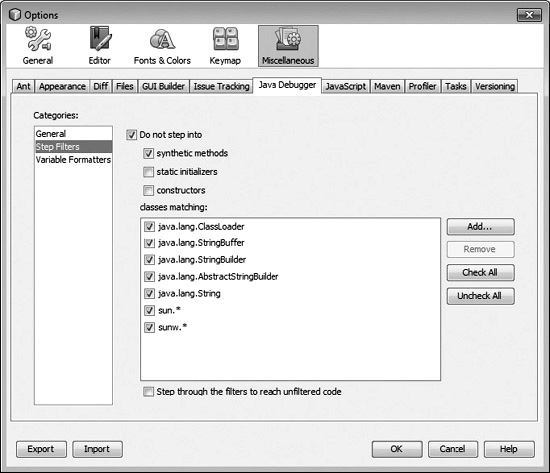
![]() Synthetic methods Methods generated by the compiler
Synthetic methods Methods generated by the compiler
![]() Static initializers A block of code that executes when a class is loaded. It can be used to initialize static variables.
Static initializers A block of code that executes when a class is loaded. It can be used to initialize static variables.
![]() Constructors A method that is executed when a class is created.
Constructors A method that is executed when a class is created.
Disabling method stepping can also be done by class name. By default, NetBeans does not step into the following classes:
![]() java.lang.ClassLoader
java.lang.ClassLoader
![]() java.lang.StringBuffer
java.lang.StringBuffer
![]() java.lang.StringBuilder
java.lang.StringBuilder
![]() java.lang.AbstractStringBuilder
java.lang.AbstractStringBuilder
![]() sun.*
sun.*
![]() sunw.*
sunw.*
Additional classes can be added to this list. Choosing the “Step through the filters to reach unfiltered code” option steps into the next class available that isn’t in the filtered list.
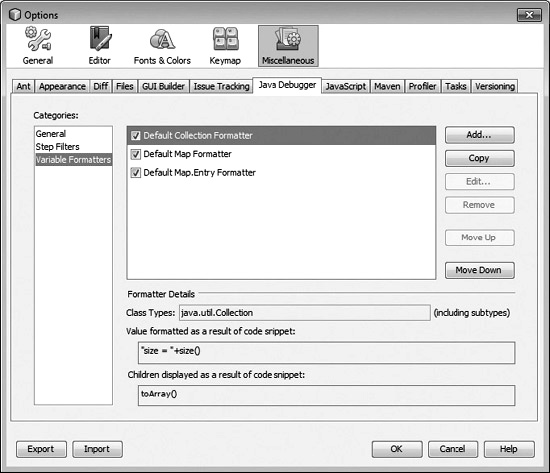
The last category on the Java Debugger tab, shown in Figure 1-12, is the Variable Formatters. This is useful when viewing complex data types in the debugger. For example, in the debugger when you browse a Map type, you expect to see keys and their values, not the internal data structures of a HashMap. NetBeans ships with the following variable formatters:
FIGURE 1-12 NetBeans Options window: Variable Formatters
![]() Default Collection Formatter
Default Collection Formatter
![]() Default Map Formatter
Default Map Formatter
![]() Default Map.Entry Formatter
Default Map.Entry Formatter
Clicking either the Add or Copy button can create new formatters. This displays a dialog box where a code snippet is entered to format a specific data type specified using a fully qualified class name.
JavaScript
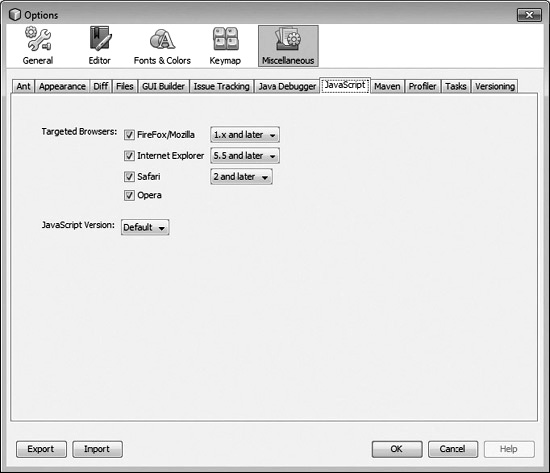
NetBeans provides an excellent editor and debugger for JavaScript. At the heart of any Ajax-enabled website is JavaScript, which has traditionally been hard to debug. The configuration tab in Figure 1-13 lists the various browsers supported by NetBeans and whether they are enabled. Also, the minimum JavaScript version supported per browser can be chosen. The default JavaScript version, regardless of browser, can also be configured.
FIGURE 1-13 NetBeans Options window: JavaScript
Maven
Maven is a project management tool that not only compiles code but also handles packaging and dependency management. More information on Maven can be found on Maven’s official website: http://maven.apache.org. Maven integration wasn’t available in NetBeans 6.1, so it won’t be on the current exam. However, Maven is growing quickly in popularity, and with each release of NetBeans it is more tightly integrated. At some point in the future it will likely be added to the exam. Current releases of NetBeans can now use the Maven POM (Project Object Model) file as a substitute for the NetBeans project files. Since many open source projects such as Apache Tomcat use Maven for their build system, it is now easy to dive into these projects and expend minimal effort setting up a development environment.
Maven excels at managing dependencies. Add the open source object/relational mapping tool Hibernate (www.hibernate.org), and Maven downloads the myriad of dependencies. It tracks the dependencies of the dependencies and can warn of conflicts. Using Maven, the version of each dependency is known, and the dependency graph can be traced and understood. Maven helps bring sanity to the task of tracking and managing an application’s dependencies. Maven also provides a common project structure.
Maven standardizes many of the operations and functions that integrated development environments try to address and control. The major IDEs including NetBeans, Oracle JDeveloper, Eclipse, and IntelliJ IDEA all provide their own interfaces for managing dependencies, building projects, and packaging the output. Maven standardizes these operations and introduces the concept of repositories where dependencies can be published and queried. Using Maven to define projects greatly simplifies the task of sharing projects with other IDEs.
NetBeans integration with Maven has been improving with each release. NetBeans comes with Maven 3.0 built in. The Maven configuration tab in Figure 1-14 configures the integration. On this panel the following items can be configured:
FIGURE 1-14 NetBeans Options window: Maven
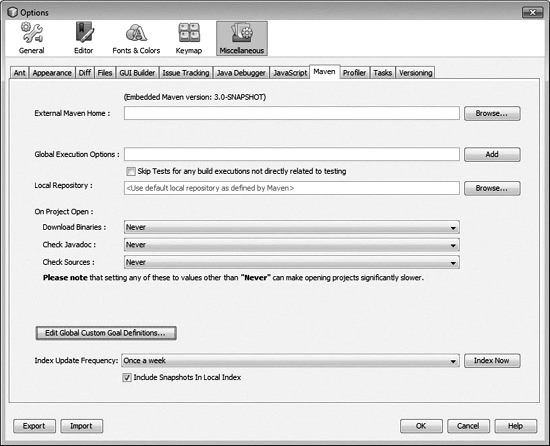
![]() External Maven Home Just as NetBeans can be configured to use a different version of Ant, it also can be configured to use a different version of Maven. NetBeans searches the PATH environment variable on startup and uses the system-specific version if available.
External Maven Home Just as NetBeans can be configured to use a different version of Ant, it also can be configured to use a different version of Maven. NetBeans searches the PATH environment variable on startup and uses the system-specific version if available.
![]() Global Execution Options Clicking the Add button provides a list of valid options. Additional options can be entered directly into the list.
Global Execution Options Clicking the Add button provides a list of valid options. Additional options can be entered directly into the list.
![]() Skip Tests For Any Build Executions Not Directly Related To Testing Checking this causes NetBeans to pass the parameter -Dmaven.test.skip=true when running the mvn command.
Skip Tests For Any Build Executions Not Directly Related To Testing Checking this causes NetBeans to pass the parameter -Dmaven.test.skip=true when running the mvn command.
![]() Local Repository NetBeans uses the default local repository as configured by the Maven installation.
Local Repository NetBeans uses the default local repository as configured by the Maven installation.
![]() On Project Open Contains three drop-down boxes that configure the default behavior when NetBeans opens a Maven project. NetBeans can attempt to download project binaries, a Javadoc of dependencies, and sources of dependencies when a project is opened. Depending on the size of the project and network connection, these three settings can have a significant performance impact.
On Project Open Contains three drop-down boxes that configure the default behavior when NetBeans opens a Maven project. NetBeans can attempt to download project binaries, a Javadoc of dependencies, and sources of dependencies when a project is opened. Depending on the size of the project and network connection, these three settings can have a significant performance impact.
![]() Index Update Frequency Controls the interval with which NetBeans polls the Maven repositories for updates.
Index Update Frequency Controls the interval with which NetBeans polls the Maven repositories for updates.
![]() Include Snapshots In Local Index Specifies whether the index of the repository includes snapshot artifacts.
Include Snapshots In Local Index Specifies whether the index of the repository includes snapshot artifacts.
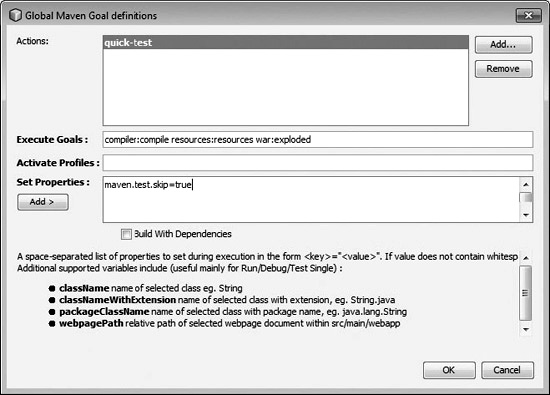
The Edit Global Custom Goal Definitions button opens a dialog box, shown in Figure 1-15, where custom Maven goals can be defined. These can then be executed from the Custom menu when right-clicking the project in the Project window. In Figure 1-15, we create a quick-test menu option under the Custom menu in the Project window. Clicking this menu item executes three Maven goals. Profiles and properties can also be passed in as a part of the custom action. These are advanced Maven configuration options.
FIGURE 1-15 NetBeans Options window: Maven goal definitions
Profiler
NetBeans includes an excellent code profiler that is covered in Chapter 10. The NetBeans code profiler can be used to profile the current project or remote applications running on another machine. The Profiler is an invaluable tool for tracking down memory leaks and inefficient code. Since the Profiler is tightly integrated into the IDE, profiling is easy to do on a daily basis. NetBeans provides HeapWalker, which searches memory dumps for potential memory leaks. A common misconception is that garbage collection obviates the need to manage memory and references.
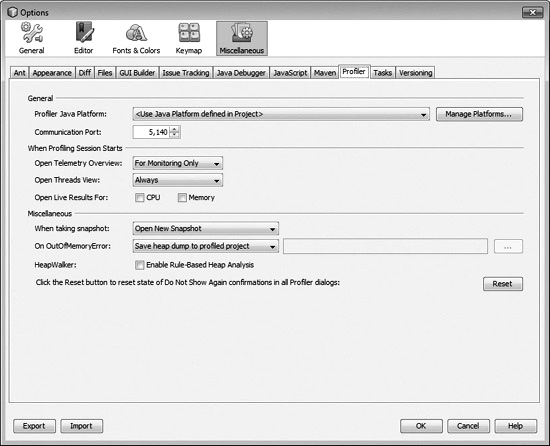
The NetBeans Profiler is configured on the Profiler tab as shown in Figure 1-16. It is divided into three sections:
FIGURE 1-16 NetBeans Options window: Profiler
![]() General
General
![]() When Profiling Session Starts
When Profiling Session Starts
![]() Miscellaneous
Miscellaneous
General The General section configures both the JDK to be used when profiling and the communication port. The specified JDK is used to run the application being profiled if it is local. To configure additional JDKs, click the Manage Platforms button. The port setting specifies the Transmission Control Protocol (TCP) port the target JVM should listen on.
When Profiling Session Starts The section When Profiling Session Starts configures when the telemetry overview and threads view windows are opened. They can be opened Always, For Monitoring Only, or Never. The last setting configures when the Live Results window is opened, which can be for central processing unit (CPU) and/or memory profiling.
Miscellaneous This section controls four separate pieces of profiler functionality. The first field, When Taking Snapshot, configures the behavior when a snapshot is generated. Its three options are self-explanatory:
![]() Open New Snapshot
Open New Snapshot
![]() Save New Snapshot
Save New Snapshot
![]() Open And Save New Snapshot
Open And Save New Snapshot
The next setting, On OutOfMemoryError, controls what the Profiler does when a java.lang.OutOfMemoryError is thrown. The Profiler has four On OutOfMemoryError options:
![]() Do Nothing
Do Nothing
![]() Save Heap Dump To Profiled Project
Save Heap Dump To Profiled Project
![]() Save Heap Dump To Temporary Directory
Save Heap Dump To Temporary Directory
![]() Save Heap Dump To <File Chosen By Browser>
Save Heap Dump To <File Chosen By Browser>
If the Enable Rule-Based Heap Analysis checkbox is checked, NetBeans analyzes a heap snapshot by using HeapWalker to locate memory leaks. The Reset button reverts the Do Not Show Again checkboxes in dialog boxes.
Tasks
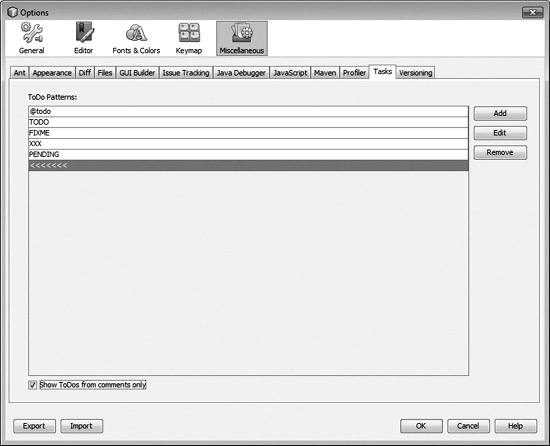
The Tasks tab in Figure 1-17 configures the patterns that NetBeans uses to search code and comments for ToDo notes. These ToDo notes are displayed in the Tasks tab along with the file and location. Double-clicking a ToDo in the Tasks tab causes NetBeans to open the source code file and to place the cursor on the ToDo. Tasks are a handy way to keep daily track of work in progress—for instance, to record at the end of the day where you left off or to record some bit of functionality that must wait for a less hurried day. If Show ToDos From Comments Only is selected, only patterns in comments are pulled into the Tasks tab. Thus, the following would not be flagged:
FIGURE 1-17 NetBeans Options window: Tasks
![]()
Versioning
NetBeans ships with integrated support for three version-control systems including Concurrent Versions System (CVS), Mercurial, and Subversion. NetBeans also includes a local version control system, Local History, which tracks code changes for a limited period. The Versioning tab, depicted in Figure 1-18, configures the integration with these different systems.
FIGURE 1-18 NetBeans Options window: CVS
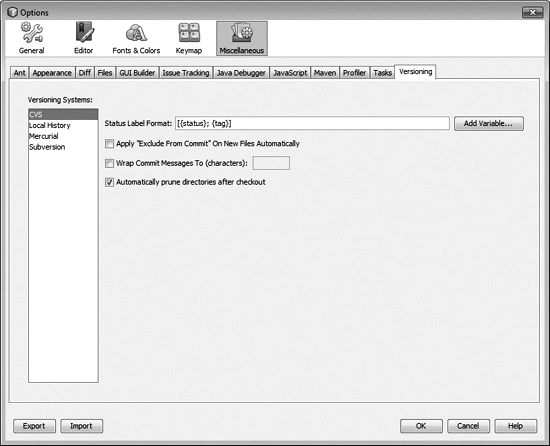
CVS is an open source revision-control system that has been around for a long time. It is the first version-control system that appears in the list. Settings that can be configured include:
![]() Status Label Format Defines the status label shown beside the file in the CVS window
Status Label Format Defines the status label shown beside the file in the CVS window
![]() Apply “Exclude From Commit” On New Files Automatically Excludes new files from automatically being committed to the server
Apply “Exclude From Commit” On New Files Automatically Excludes new files from automatically being committed to the server
![]() Wrap Commit Messages To Wraps commit messages to the specified length
Wrap Commit Messages To Wraps commit messages to the specified length
![]() Automatically Prune Directories After Checkout Deletes empty directories after an update or checkout operation
Automatically Prune Directories After Checkout Deletes empty directories after an update or checkout operation
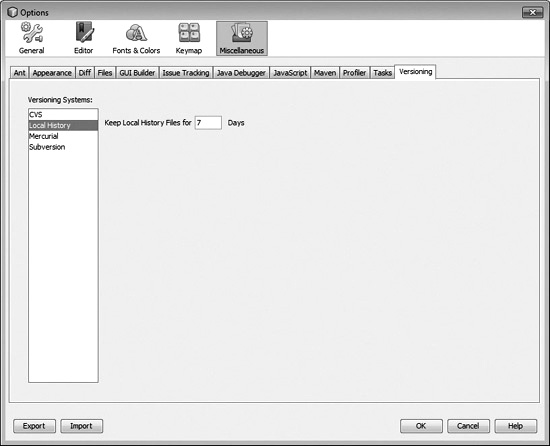
The Local History feature comes in handy when you accidently delete code or want to revert changes you made recently that weren’t committed to one of the other version-control systems. Local History has one configuration parameter, and that is the number of days the history is cached. The configuration of this feature is shown in Figure 1-19.
FIGURE 1-19 NetBeans Options window: Local History
Mercurial is an open source distributed version control. For more information on Mercurial check out its website for additional documentation: http://mercurial.selenic.com. It is the source control system used by the NetBeans project, and as a result it is well integrated into NetBeans. If you intend to examine the NetBeans code, you need to learn more about Mercurial. Before using Mercurial in NetBeans, Mercurial must be downloaded and installed on your computer. The Mercurial panel, shown in Figure 1-20, configures the following settings:
FIGURE 1-20 NetBeans Options window: Mercurial
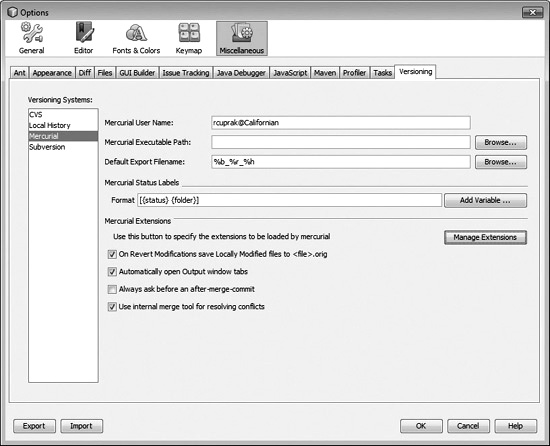
![]() Mercurial User Name
Mercurial User Name
![]() Mercurial Executable Path
Mercurial Executable Path
![]() Default Export Filename
Default Export Filename
![]() Mercurial Status Labels
Mercurial Status Labels
![]() Mercurial Extensions
Mercurial Extensions
The exam does not delve into these settings.
Subversion is another key open source version-control system that NetBeans supports. It was written as a replacement for CVS. More information on Subversion can be found at http://subversion.tigris.org. As with Mercurial integration, NetBeans requires that the native Subversion binaries be installed on the computer. The panel for configuring NetBeans’ Subversion support is shown in Figure 1-21 and has the following settings:
FIGURE 1-21 NetBeans Options window: Subversion
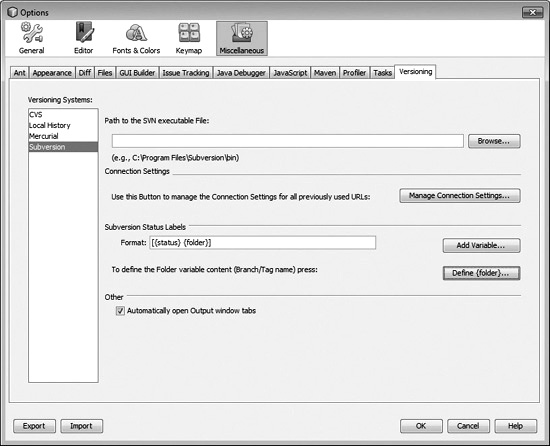
![]() Path To The SVN Executable File Path to the svn.exe file. NetBeans automatically detects the path to Subversion in some environments.
Path To The SVN Executable File Path to the svn.exe file. NetBeans automatically detects the path to Subversion in some environments.
![]() Subversion Status Labels | Format Informational label to be displayed next to files in the Subversion window.
Subversion Status Labels | Format Informational label to be displayed next to files in the Subversion window.
![]() Automatically Open Output Window Tabs Causes the Subversion window to be automatically displayed when an SVN operation is performed.
Automatically Open Output Window Tabs Causes the Subversion window to be automatically displayed when an SVN operation is performed.
Additionally, the “Define {folder}” button can be used to define the naming pattern for branches and tags. The Manage Connection Settings button is used to manage the list of repositories NetBeans has previously connected.
Plugin Manager
The NetBeans IDE can easily be extended and upgraded with the Plugin Manager. Although NetBeans started out as a Java IDE, it has followed the same trajectory as Eclipse and has evolved into a general-purpose tool and application platform. Early in the development, the NetBeans development team had the foresight to modularize the IDE while also delivering a tightly integrated solution. The NetBeans IDE is really just a prepackaged collection of plugins. Starting in NetBeans 6.8, when the IDE first loads, it now prompts for feature activation.
Thus, a C++ developer can elect to activate only C++ plugins. Demonstrating the power of this plugin architecture, entire applications have been written using the NetBeans Platform. These applications are completely unrelated to software development. The Plugin Manager administers the plugins and provides a clean and intuitive interface.
The Plugin Manager in Figure 1-22 is opened from Tools | Plugins. The window may take some time to load because the Plugin Manager connects to one or more remote update centers to check for new plugins as well as for updates to existing ones. Plugins, or “modules” in the older terminology, can be pulled either from remote update centers or from the local file system. Plugins that have been downloaded usually have the file extension .nbm for “NetBeans modules.” NBM files are JAR/ZIP archives. The plugins are usually signed with a certificate, and NetBeans warns if the certificate is invalid or cannot be verified. The Plugin Manager has five tabs:
![]() Updates Lists updates for plugins presently installed
Updates Lists updates for plugins presently installed
![]() Available Plugins Lists plugins from the registered update centers that can be installed
Available Plugins Lists plugins from the registered update centers that can be installed
![]() Downloaded Lists plugins that have been manually downloaded
Downloaded Lists plugins that have been manually downloaded
![]() Installed Shows current list of installed plugins
Installed Shows current list of installed plugins
![]() Settings Manages the list of update centers and basic update settings
Settings Manages the list of update centers and basic update settings
Updates
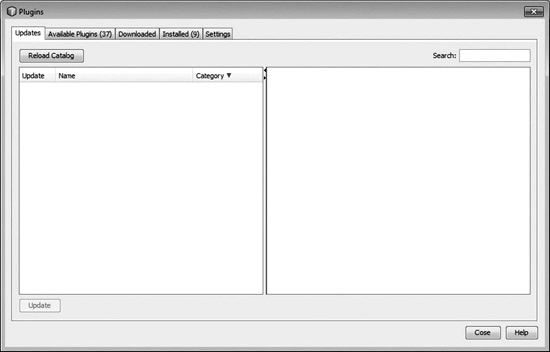
The Updates tab appearing in Figure 1-22 lists the available updates for plugins already installed. Clicking the Reload Catalog button forces a check of the update centers. The list box on the left displays the list of available updates. Clicking an update populates the panel on the right with a description of the update. First check the update and then click the Update button to apply updates.
FIGURE 1-22 NetBeans Plugin Manager: Updates
Available Plugins
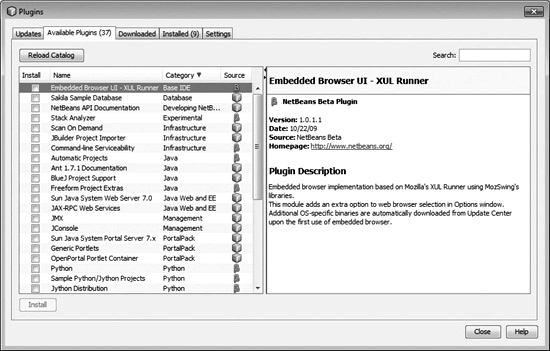
The Available Plugins tab in Figure 1-23 lists all of the uninstalled plugins from the configured update centers. The left pane displays the plugin Name, Category, and Source. Sources are configured on the Settings tab; each source has its own icon. Clicking an update displays more information in the right pane including the version, date of release, source name, description, and home page for additional information. Plugins are installed by choosing the checkbox next to the plugin and clicking the Install button. A wizard displays the license and prompts the user to confirm that they have read it. This is done for each selected plugin. Once a plugin is installed, it disappears from this list. To force an update of the plugin catalog, click Reload Catalog.
FIGURE 1-23 NetBeans Plugin Manager: Available Plugins
Downloaded
The Downloaded tab in Figure 1-24 contains the plugins that were manually downloaded. Clicking the Add Plugins button displays a file browser for selecting a downloaded plugin in the file system. Adding a plugin to this list does not actually install it; this just makes the plugin available for installation. The Install button installs the plugin and activates it. To summarize, the sequence for using a manually downloaded plugin is twofold:
FIGURE 1-24 NetBeans Plugin Manager: Downloaded
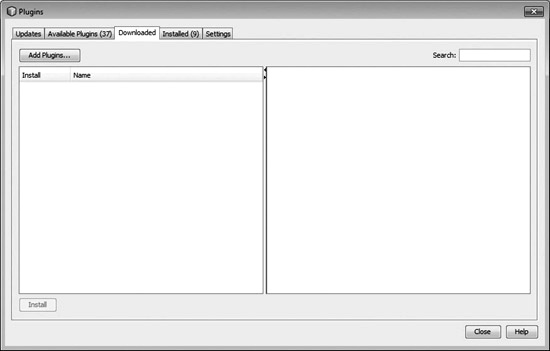
1. Download and add the plugin on the Downloaded tab.
2. Click the Install button to install the plugin and activate it.
The two-step process allows you to review the metadata in the description panel prior to installing and activating the plugin.
Installed
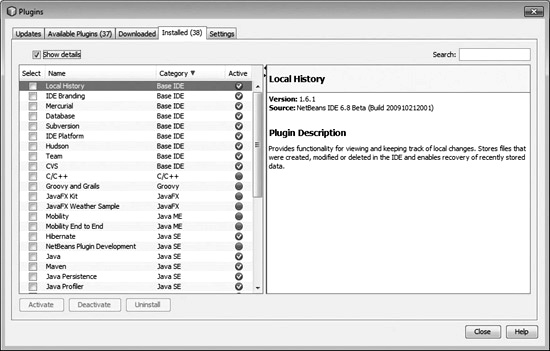
The Installed tab in Figure 1-25 lists all of the plugins that have been either installed from an update center or downloaded manually and added via the Downloaded tab. The Installed tab:
FIGURE 1-25 NetBeans Plugin Manager: Installed
![]() Lists all plugins currently installed
Lists all plugins currently installed
![]() Lists the current status of the plugins installed
Lists the current status of the plugins installed
![]() Can activate or deactivate a plugin
Can activate or deactivate a plugin
![]() Can deactivate or uninstall a plugin
Can deactivate or uninstall a plugin
To activate, deactivate, or uninstall a plugin, the plugin must first be selected in the list by selecting its checkbox. The Search box filters the list of installed plugins. Note: the search functionality is available on all of the tabs except Settings.
The Show Details checkbox toggles between macro features and the plugins that compose those features. Highlighting a plugin row displays information about the plugin in the right-hand pane. The pane provides key information on a plugin including:
![]() Plugin version
Plugin version
![]() Source of the plugin
Source of the plugin
There is a subtle difference between deactivating and uninstalling a plugin. Deactivating a plugin simply turns the plugin off, so NetBeans loads only plugin metadata to display in the Plugin Manager. When a plugin is uninstalled, it is completely removed from NetBeans and deleted from the file system. Once a plugin is removed, the only way to use it again is to download and install it—either manually or through an update center.
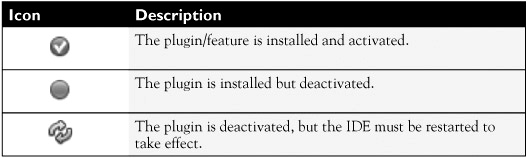
The Plugin Manager displays the status of plugins with several different icons listed in Table 1-4. Deactivating some plugins requires restarting NetBeans. The Plugin Manager gives you the option of restarting immediately or deferring. If restarting is deferred, the plugins cannot be reactivated until NetBeans is restarted.
TABLE 1-4 Installed Plugin Icon Descriptions
Settings
The Settings tab in Figure 1-26 configures several key features of the Plugin Manager including:
FIGURE 1-26 NetBeans Plugin Manager: Settings
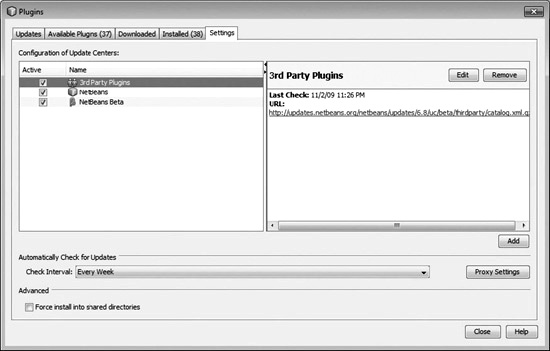
![]() Update centers
Update centers
![]() Auto-update check interval
Auto-update check interval
![]() Proxy servers
Proxy servers
![]() Shared plugin directory
Shared plugin directory
The left panel lists the update centers. Each update center can be deactivated by clearing the Active checkbox. Deactivating an update center stops NetBeans from polling the update center for updates or downloading the list of available plugins. The three buttons Edit, Remove, and Add manage the update center list.
The Check Interval drop-down list specifies the gap between checks for updates. NetBeans can poll for updates on Startup, Every Day, Every Week, Every Two Weeks, Every Month, or Never. Next to this drop-down list, a button configures the proxy settings. This brings up the General configuration tab (Tools | Options | General).
The NetBeans Plugin Portal (http://plugins.netbeans.org) is an excellent source of information on plugins. It contains invaluable reviews from other users and some documentation. If you develop your own plugin, you can easily promote it here.
By default, plugins are installed into the NetBeans user directory under a user’s home directory. Plugins downloaded and installed in this directory are not available to other users on the computer. Plugins can be shared between users by selecting Force Install Into Shared Directories. Shared plugins are installed under the NetBeans installation directory in extras/module. To install plugins in the shared directory, you must be running NetBeans under an account with administrative permissions.
![]()
Note that unlike the Options window, the Plugin Manager window only has a Close button. This means that plugin updates, installs, deactivations, and uninstalls happen immediately, as soon as you click the button. Also note that some plugins may require that you restart NetBeans for the changes to take effect.
The following Scenario & Solution will help solidify your understanding of the NetBeans Plugin Manager.
SCENARIO & SOLUTION

EXERCISE 1-1 Installing the Sun SPOT NetBeans Plugin
The Sun Labs group at Sun Microsystems developed an innovative embedded platform, Sun SPOT (http://www.sunspotworld.com/), which has the Java Virtual Machine (JVM) running directly on hardware. SunSpots can be wired up to motors, sensors, lights, and so on, and can communicate with each other wirelessly. Many exciting home robotics projects have been built with them. To facilitate development, Sun has provided a NetBeans plugin. The NetBeans plugin comes with a user interface for monitoring the SunSpots as well as project templates and additional tools. In this exercise, you install this plugin. This exercise does not require a SunSpot kit.
1. Open the Plugin Manager and add an update center for the SunSpot plugin: Name: Sun Spot World
URL: http://www.sunspotworld.com/NB6/updates.xml
2. Switch to the Available Plugins tab.
3. Search for “SunSpot” and checkmark the following plugins:
a. SpotRenameRefactoring
b. Sun SPOTs Info
c. SunSpotHostApplicationTemplate
d. SunSpotApplicationTemplate
e. SPOTModulesUpdateCenter
4. Click Install and accept the licenses. Note the SunSpot plugins are not signed.
5. Select File | New Project | Java | Sun SPOT Application to create a new SunSpot application.
CERTIFICATION OBJECTIVE:
Working with Configuration Files and Directories
Exam Objective 1.2 Explain the purpose of the user directory and the netbeans.conf file and how these can be used to configure the IDE.
The NetBeans user directory and netbeans.conf file are integral to the functioning of NetBeans and very important to understand. A NetBeans user directory is created for every user that runs NetBeans. NetBeans stores configuration settings, plugins, and so on in this directory. The NetBeans user directory is located under a user’s home directory and is named .netbeans. The netbeans.conf file is a configuration file that is consulted prior to launching the IDE. It is used to determine the JDK, the default location of a user’s NetBeans directory, to set system properties including heap space, and so on. There can be two netbeans.conf files, one under the installation directory in etc or another in a NetBeans user’s directory to customize the settings for a particular user.
![]()
The exam may ask specific questions about how to cleanly uninstall NetBeans, uninstall a specific NetBeans version, or how to wipe clean changes made to an installation. It is important to remember that simply reinstalling the same version of NetBeans may not fix or revert a configuration change that has been saved to the NetBeans user directory. A NetBeans uninstaller cannot fix this problem. NetBeans may be installed on a network share, and thus the user directories are spread out over a network and on multiple machines.
The NetBeans user directory is named .netbeans and is created under a user’s home directory the first time NetBeans is run. The location of a user’s home directory varies by operating system. On Windows 7 the NetBeans user directory appears under C:Users<username>.netbeans. On Windows XP it probably is C:Documents and Settings<username>.netbeans. On Mac OS X it is /Users/<username>/.netbeans. Many different permutations are possible depending upon the prerogatives of the IT department and the computing environment. Under the .netbeans directory, a separate directory for each version of NetBeans is created. Thus, multiple versions of NetBeans can be run simultaneously on the same computer.
The NetBeans-specific directories beneath the NetBeans user directory store user-specific configuration settings, installed plugins, cache files, and log output. For instance, the startup log can be found under .netbeans/<version>/var/log/messages. Plugins, formerly known as modules, are downloaded to .netbeans/<version>/modules. Cache files, which include the local history, are stored under .netbeans/<version>/var/cache. The exam tests at a high level; it is not necessary to be an expert on every configuration and cache file in this directory.
While multiple instances of NetBeans can be run on the same computer, it can be dangerous to share projects between these versions. A newer version of NetBeans upgrades an older project, possibly causing problems when launching the older version of NetBeans.
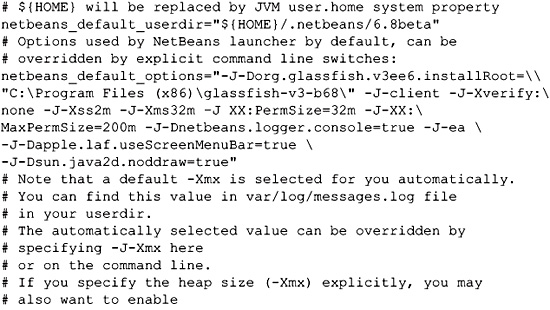
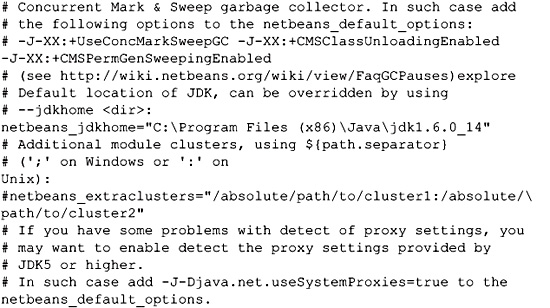
The netbeans.conf file plays an integral role in NetBeans startup. As mentioned earlier, there can be two netbeans.conf files. The global netbeans.conf is found in the installation directory under etc. On a Windows 7 installation the netbeans.conf file is found in Program Files (x86)NetBeans 6.8etc etbeans.conf. On Mac OS X the file is slightly harder to find: /Applications/NetBeans/NetBeans 6.8.app/Contents/Resources/NetBeans/etc/netbeans.conf. A user-specific netbeans.conf file gets stored under <user home directory>/.netbeans/<netbeans version>/etc/netbeans.conf. The settings in the user-specific netbeans.conf file override the global file.
The netbeans.conf file controls the JDK used to launch NetBeans. Separate JDK/JREs (Java Runtime Environments) can be used for projects regardless of this setting. Command-line parameters to NetBeans and the JVM are also specified in this file. For instance, in large projects it is often necessary to set the Java heap size. Following is an example NetBeans 6.8 global configuration file:
EXERCISE 1-2 Changing the Default Java Heap Size
Large NetBeans projects have the potential to cause out of memory errors (java.lang.OutOfMemoryErrors). NetBeans indexes project files in order to provide code completion and precompile syntax checking. These features come at a hefty price. Once the memory telemetry monitor in NetBeans 6.8 shows a razor-thin margin and forcing garbage collection isn’t improving performance, it is time to increase the Java heap space. The memory telemetry monitor can be displayed by choosing View | Toolbars | Memory.
1. Navigate to the netbeans.conf file in your installation directory.
2. Add –J-Xmx400m to the netbeans_default_options property.
3. Restart NetBeans.
4. Verify that the parameter was passed to the JVM; search <user home>/.netbeans/<NetBeans version>var/log/messages.log for –Xmx400.
CERTIFICATION OBJECTIVE:
Debugging with External Libraries
Exam Objective 1.4 Describe how to integrate external libraries in the IDE and use them in coding and debugging your project.
NetBeans provides powerful support for external library management. The IDE tracks classpath dependencies and constructs the appropriate classpaths for compilation, testing, and execution. This is important since as the Java ecosystem has vastly expanded, so has the number of dependencies for the typical Java application. Managing large sets of dependencies is not a trivial task and is one of the key reasons for using an advanced IDE such as NetBeans. Each dependency in turn has its own list of dependencies. It isn’t uncommon for a Java application to include dozens of JAR files and possibly platform-specific native libraries. These dependencies must be efficiently tracked, shared, and debugged. The IDE leverages its knowledge of a project’s libraries to provide support for robust code completion, error detection, code refactoring, and supportive pop-ups that display the documentation for a given method, parameter, or class. Thus, a developer should rarely click compile to discover that a dependency is missing, a class wasn’t imported, or a parameter of an invalid type was passed to a method.
Before diving into the material for this objective, it is important to first define what is meant by an external library dependency in NetBeans. An external library dependency is either a single JAR file, collection of JAR files, or nested directory of classes and shared libraries. Shared libraries are native code libraries accessed via JNI. A project may also depend upon other projects; this topic is discussed further in project configuration. Common examples of external libraries include log4j, Hibernate, JavaServer Faces (JSF), and SwingX. If you are accessing the parallel or serial port, you might use the RXTX library (http://users.frii.com/jarvi/rxtx/) that includes native shared libraries for Windows, Linux, and Mac OS X. Once the RXTX JAR files and shared libraries are added as a library dependency to a project, code in the project may use RXTX classes to talk to serial and parallel ports. When an external library is added to a project, NetBeans indexes the library and all of its class files to provide auto-completion and error checking to make your life easier while editing.
When adding libraries to a NetBeans project, consider the following:
![]() Will the libraries be shared across multiple projects?
Will the libraries be shared across multiple projects?
![]() Will each project get its own copy of the libraries?
Will each project get its own copy of the libraries?
![]() Should a library be divided into interfaces and implementation?
Should a library be divided into interfaces and implementation?
These issues are important to consider. Sharing libraries across multiple projects helps to ensure project consistency. It reduces the chances that one project will end up with a slightly older or newer version of a library such as log4j or Hibernate. Configuring each project so that it gets a copy of a library simplifies development when multiple developers are involved and where project dependencies change over time. Storing external libraries with projects eases integration with continuous integration tools such as Hudson and CruiseControl. Splitting libraries into interface and implementation libraries forces the use of interfaces during development. For example, if you are using JPA, you obviously want to keep JPA implementation separate and available only at runtime so that you don’t inadvertently import Hibernate or TopLink classes directly.
The following topics will be covered for this objective:
![]() Classpath types
Classpath types
![]() Library Manager
Library Manager
![]() Project libraries
Project libraries
![]() Library documentation and source
Library documentation and source
![]() Library sharing
Library sharing
Classpath Types
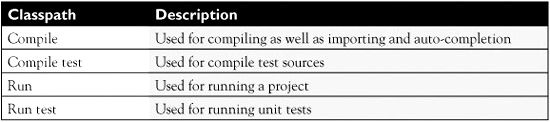
Most projects have at least two distinct classpaths (Table 1-5)—a compile/runtime classpath and a test classpath. The test classpath usually includes a unit testing framework such as JUnit, TestNG, or jMock, the test code itself, and possibly mock objects and test-specific configuration files. The compile/runtime classpath is used to compile and run the application. The test dependencies are kept separate so that they are not distributed with the application. The distinction between classpaths is a developer best practice/convention. This distinction is not enforced by the Java language or runtime.
In NetBeans, upwards of four classpaths for a Java project (Table 1-5) can be configured. These are not four independent classpaths. The compile classpath is the root classpath. The remaining three classpaths add further dependencies to the compile classpath. The compile classpath is used not only for compiling the project but also for auto-completion in the editor. Only classes added to the compile classpath are available in the editor unless you are working with test sources. The compile test classpath is used for compiling test source code files. External test libraries are added to the compile test classpath. External libraries added to the compile test classpath can only be utilized from test source code files.
The run and run test classpaths contain external dependencies that are only available at runtime. For instance, if you were using JPA (Java Persistence API), you would place the JPA interfaces in the compile classpath and the implementation classes (Hibernate/TopLink) into the run classpath. This would ensure that you do not accidently import the Hibernate classes directly, thus circumventing the standard JPA interfaces. Whenever possible it is always best to code to interfaces.
Library Manager
There are two user interfaces in NetBeans for configuring external libraries. Project-specific library configuration is done via the Project Properties dialog box. By right-clicking the Libraries or Test Libraries nodes in a project, you can access this dialog box. Defining libraries for use across multiple projects or any of the open projects is the province of the Library Manager, depicted in Figure 1-27. The Library Manager can be opened by choosing Tools | Libraries.
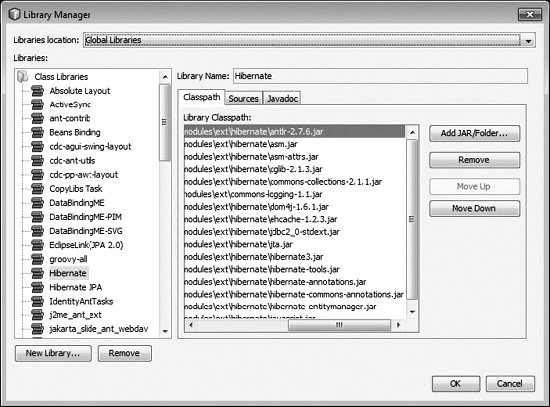
The user interface for the Library Manager can be split into three parts, as shown in the Library Manager window:
![]() Libraries Location This drop-down list selects a library set to be displayed/edited.
Libraries Location This drop-down list selects a library set to be displayed/edited.
![]() Libraries This box lists the libraries in the current project or global repository. In NetBeans 6.8, libraries are grouped into either Class Libraries or Server Libraries.
Libraries This box lists the libraries in the current project or global repository. In NetBeans 6.8, libraries are grouped into either Class Libraries or Server Libraries.
![]() Classpath tab This panel displays the contents of the library selected in the Libraries list.
Classpath tab This panel displays the contents of the library selected in the Libraries list.
The Libraries Location list contains the library locations for each project appearing in the Projects tab and includes Global Libraries. The Library Classpath box displays the full path for each library, leaving you to make the leap from path to project. Only projects that have a libraries folder defined appear in this box. The next section on project properties explains this further. The Libraries Location list always has at least one entry, Global Libraries. Global libraries are libraries that can be shared and used between multiple projects. Global libraries also encompass libraries provided by IDE plugins. For instance, the Sun Microsystems Sun SPOT plugin adds two libraries, SPOTlib and SPOTlibHost.
Despite the name, global libraries are not stored in a central location on the file system. Take care when defining a new library, because the IDE does not copy the JAR files or folders to a safe location within a directory controlled by the IDE. It is very easy to delete the library files out from under the IDE. Projects that depend on global libraries that have been corrupted fail to either build or run. For instance, if the library were a JPA persistence implementation added to the run classpath, the project would compile but fail to run due to the missing JPA implementation. Global libraries are not managed in a version-control system nor can they be shared. They are local to the machine on which they are set up, unless a network share is used. Global libraries back many of the project templates in NetBeans such as the Enterprise application, EJB module, Grails application, and so on.
The Libraries list on the left of the window shows all of the libraries for the selected library location. The libraries are grouped into Class Libraries and Server Libraries in NetBeans 6.8. Clicking a library, such Beans Binding, displays the composition of the library in the panel on the right. Only one library can be selected at a time. Libraries are ordered alphabetically. At the bottom of the Library Manager are two buttons, New Library and Remove. Clicking New Library displays a modal dialog box prompting for the name of the new library and the type of the library: Class or Server. The new library is immediately created and selected. The Remove button deletes a library. At this time the Remove button does not confirm the request to delete a library—it immediately deletes the selected library. The only way to roll back changes in the Library Manager dialog box is to select Cancel.
The main panel, at right, displays the contents of the library including the library classpath, library sources, and library Javadoc. JAR files and directories of class and share libraries are added to the library classpath. The full path to the library is displayed in the Library Classpath list box. The order of the libraries added is important, because the Java interpreter and compiler observe this order when resolving dependencies. Buttons on the right allow dependencies to be reordered.
Adding source and Javadoc JARs to a library is optional. However, the extra time spent configuring source and documentation definitely pays dividends during development. Most open source libraries, such as log4j, are distributed with their documentation and source. Adding source documentation allows you to drill into the code in NetBeans. Once source code has been attached to a library, you can delve into classes and methods by CTRL-clicking or placing the cursor on the item of interest and selecting Navigate | Go To Source. If the library was compiled with the debug flag, then you can also see the values of the instance variables.
Project Libraries
To access project libraries, as shown in Figure 1-28, right-click the top-level node of a project in the Project window and select Properties. In the Project Properties dialog box in the Categories box, select the Libraries category. Using this dialog box, libraries can be pulled in from several different sources including global libraries and other projects, and new libraries can also be defined. The Java platform and library storage directory can be selected in this dialog box and will be discussed later in this chapter. This dialog box has tabs for the four different classpaths: Compile, Run, Compile Tests, and Run Tests. Each of these tabs has seven buttons along the right side of the dialog box:
FIGURE 1-28 NetBeans project libraries

![]() Add Project Adds another NetBeans project as a dependency
Add Project Adds another NetBeans project as a dependency
![]() Add Library Adds a global library as a project dependency
Add Library Adds a global library as a project dependency
![]() Add JAR/Folder Adds an individual JAR or folder of class files to a project
Add JAR/Folder Adds an individual JAR or folder of class files to a project
![]() Edit Edits an existing classpath entry
Edit Edits an existing classpath entry
![]() Remove Removes a classpath entry
Remove Removes a classpath entry
![]() Move Up Moves a classpath entry up in the ordering
Move Up Moves a classpath entry up in the ordering
![]() Move Down Moves a classpath entry down in the ordering
Move Down Moves a classpath entry down in the ordering
Using the Add Project button, other NetBeans projects can be added as a dependency. Only the output of another project (its JAR files) is added to the classpath. The checkbox at the bottom of the screen, Build Project On Classpath, causes project dependencies to be built when the current project is compiled. Dividing a project into multiple pieces is a good approach to modularizing code. This allows pieces of the system to be built independently and fosters good overall design. Alternatively, NetBeans projects can be created for external libraries if the sources are available.
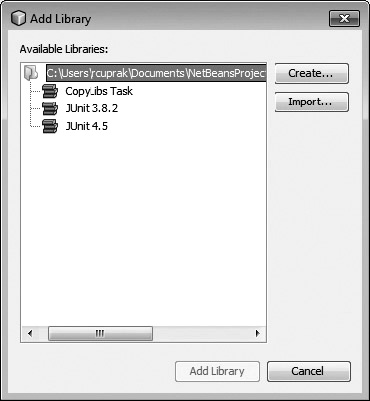
The Add Library button opens two different dialog boxes, shown in Figure 1-29 and Figure 1-30, depending upon whether a project-specific libraries folder has been configured. A project-specific libraries folder is discussed in the next section; dependencies are copied into and are stored with the project. If a project-specific library directory is not configured, then the Add Library dialog box shown in Figure 1-29 prompts for a global library. It has a button to create a new global library that displays a dialog box similar to the one in Figure 1-27. The new global library can be managed afterward via the Library Manager. When a project-specific library directory is configured, the dialog box in Figure 1-30 is displayed. From this dialog box, libraries that have already been imported to the project may be added. Generally the libraries in this list match the libraries already added to the project, with the exception of libraries that have been removed. The Import button in this dialog box copies a global library into this project. The Add JAR/Folder button opens a standard file chooser to select either a folder or a JAR file to be added to the classpath. If a libraries folder is configured, the selected JAR files will be copied to the folder. Selecting a folder to be added to the classpath is useful for directories of class files or directories containing shared libraries (DLLs).
FIGURE 1-29 NetBeans Add Library: global libraries
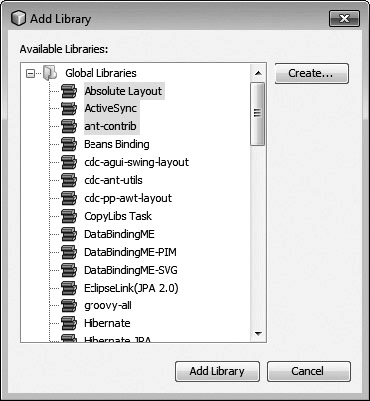
FIGURE 1-30 NetBeans Add Library: project libraries
![]()
The exam focuses a significant amount of attention on the free-form project type. Free-form projects will be covered in Chapter 2. In a free-form project all of the hooks into the NetBeans project must be defined. This gives NetBeans the freedom to edit existing projects with their own structure and build system without imposing any structural requirements. If a free-form project is to be used as a project dependency, its output must be configured first in its Project Properties dialog box. If you don’t do this, nothing will be added to the classpath.
The Edit button edits an existing library. Using this button you can attach sources and Javadoc as well as add/remove JAR dependencies. If the libraries aren’t being stored with the project, the changes are made to the global libraries. The Remove button removes the library.
The Move Up and Move Down buttons reorder the library dependencies. Dependency ordering is important because it influences what class is picked up by the ClassLoader when multiple copies of the class are on the classpath. Generally it isn’t a good idea to have multiple copies of a class on the classpath or to have multiple copies of a library. Depending on classpath, ordering for behavior creates a maintenance nightmare.
Library Sharing
One of the key technical aspects that has been glossed over thus far is the location of the external libraries in relation to the project. By default, when adding JARs and libraries to a project, the files are left in their current location. This can cause problems when sharing projects. The paths to the libraries and JAR files are specific to a developer’s machine. In Figure 1-28, the Project Properties library contains a Libraries Folder setting. By clicking the Browse button, you can select a directory in which libraries for the project are stored. The reference to this directory can be either relative to the project or absolute. The directory doesn’t have to be under the root of the project. In fact, the libraries directory could be on a network share. If the libraries directory is on a network share, then an absolute path can be used, allowing the project to be stored anywhere on the computer, providing that all developers use a common mount point for the shared library. If the libraries directory is under the root of the project—in a lib directory, for instance—then a relative path should be used.
Once a libraries folder has been selected, all external libraries for a project are stored in this directory. Any existing library dependencies are copied into it. There is no undoing this operation. Once a libraries folder is selected and the changes are committed by clicking the OK button, you cannot go back.
NetBeans creates an nblibraries.properties file in the libraries directory. The contents of this file are shown in Figure 1-31. This file configures the project libraries. Each library is stored in its own directory.
FIGURE 1-31 NetBeans nblibraries.properties

EXERCISE 1-3 Configure a Global Library and Import
Apache Commons IO is an open source library that provides numerous input/output utility classes and methods. Useful utilities in this package include routines for copying directories, deleting directories, writing a Java String to a file, and so on. In this exercise, you create a new global library for Apache Commons IO using the Library Manager and add it to a project. You also configure the source and Javadoc for this library to facilitate development and debugging.
1. Download the Apache IO binary from the Apache Jakarta website: http://commons.apache.org/downloads/download_io.cgi
2. In NetBeans select Tools | Library.
3. Select New Library.
4. Name the new library ApacheIO and set its type as Class Libraries.
5. Add content to the new library:
a. On the Classpath tab, click Add JAR/Folder and add the commons-io<version>.jar file.
b. On the Sources tab, click Add JAR/Folder and add the commons-io<version>-sources.jar file.
c. On the Javadoc tab, click Add JAR/Folder and add the commons-io<version>-javadoc.jar file.
6. Right-click the project in the Projects window and select Properties. In the Categories panel, select Libraries.
7. Browse for a libraries folder. Create a new folder under your project and name it lib. Set the path to be relative. Libraries will now be stored locally with the project and can be checked into version control and shared among developers. If you zip up the project and send it to someone else, it now has all of the required dependencies.
8. On the Compile tab, select Add Library. This displays the Add Library dialog box shown in Figure 1-30. Click Import and from the list of Global Libraries, select the ApacheIO library you created previously and click Import. With ApacheIO selected in the Add Library dialog box, click Add Library to add it to the project.
9. Click OK to confirm the changes to the Project Properties.
10. Create a new class ApacheIOTest with the following content:
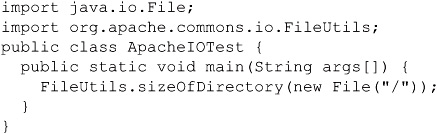
11. To view the Javadoc for FileUtils, click FileUtils and press CTRL-SHIFT-SPACEBAR. The Javadoc for this class should appear in a little window.
12. To view the source of the sizeOfDirectory method, CTRL-click sizeOfDirectory. A new tab opens in the editor with the source of the method.
13. To debug this new library, set a breakpoint on FileUtils.sizeOfDirectory(...) and choose Debug | Debug File.
14. The debugger will stop on the line; click “step-into,” which brings you once again to the source of the FileUtils.sizeOfDirectory(...) method.
Using the steps outlined in this exercise you can now debug just about any open source project. This skill is extremely valuable when troubleshooting or trying to understand how an external library works.
CERTIFICATION OBJECTIVE:
Developing with the JDK
Exam Objective 1.6 Describe how to integrate and use different versions of the JDK in the IDE for coding, debugging, and viewing Javadoc documentation.
A developer using NetBeans is not tied to using the version of JDK used to run NetBeans. This is an important distinction to understand. Upgrading to a new version of NetBeans does not require nor necessitate a transition to a newer JDK/JRE. Java was first released in 1995, and major enhancements have been made to the language, runtime, and supporting class library every couple of years. With each release, bugs are fixed, hopefully fewer new bugs are introduced, and new features are added. The reasons for using a different version of Java are many and diverse. Moving a large application to a newer version of Java requires extensive testing. Older code sometimes had to work around bugs in Java, or it inadvertently or intentionally exploited bugs. Often other tools such as application containers or external libraries dictate the version of Java used. Alternatively, NetBeans may be used with newer versions of Java to experiment with upcoming features and changes, or to evaluate the impact that a migration might have on a project. Note that the NetBeans editor might not be able to leverage the newer JDK features, however.
In addition to working with older or newer versions of Java, you can use alternative JDK implementations including:
![]() OpenJDK (http://openjdk.java.net/) A complete, open source implementation of the JDK.
OpenJDK (http://openjdk.java.net/) A complete, open source implementation of the JDK.
![]() JRockit (http://www.oracle.com/technology/products/jrockit/index.html) A high-performance JDK used in a server environment
JRockit (http://www.oracle.com/technology/products/jrockit/index.html) A high-performance JDK used in a server environment
![]() IBM® WebSphere® Real Time (http://www-01.ibm.com/software/webservers/realtime/) A real-time JDK
IBM® WebSphere® Real Time (http://www-01.ibm.com/software/webservers/realtime/) A real-time JDK
Sun Microsystems licenses Java to other companies that in turn implement the language specification. Apple Computer licenses the language specification and implements Java for the Macintosh platform. Several of the implementations mentioned earlier target high-availability or read-time environments.
In addition to registering Java Standard Edition JDKs, you can also register Java Micro Edition JDKs. If you are developing for the embedded world for devices such as cell phones, set-top boxes, printers, and other embedded devices, you would use a Java ME SDK. These are configured into NetBeans the same way as Java SE SDKs.
Integrating new Java versions is a straightforward process. In NetBeans parlance, the different Java versions are referred to as Java platforms. To add/remove Java platforms, select Tools | Java Platforms. This displays the Java Platform Manager shown in Figure 1-32. Using this window, you can register Java SE and Java ME platforms with the Add Platform and Remove buttons. The Platforms list along the left shows the registered JDKs. Clicking a JDK displays information about the JDK in the panel on the right. The panel has three tabs: Classes, Sources, and Javadoc. The contents of the Classes tab cannot be changed; however, sources and Javadoc can be attached on the subsequent tabs. Older JDKs, such as 1.3, require a separate download for the Javadoc.
FIGURE 1-32 NetBeans Java Platform Manager

After the Java platforms have been configured, configure the Java platform for a project by opening the project’s properties (File | Project Properties) and selecting the Libraries category as depicted in Figure 1-28. The list of available Java platforms appears in the Java Platform drop-down list. The Manage Platforms button at right provides another shortcut to accessing the Java Platform Manager.
The source and binary format do not necessarily have to be in sync with the Java platform configured for a project. For instance, you can use JDK 1.6 to generate binaries that are compatible with JDK 1.3. This setting is configured on the bottom of the Sources category in Project Properties. Take care: this doesn’t prevent you from using new JDK classes not present in the older JDK.
After the JDK has been changed for a project, debugging and viewing Javadoc comments is no different from any other external library. CTRL-clicking a built-in class such as String will take you to its source. Javadoc will appear for methods when using auto-completion or when using the key shortcut CTRL-SHIFT-SPACEBAR. The local variables are not available when stepping into the JDK since the JDK was not compiled with the source flag.
The exam will provide troubleshooting scenarios and expect you to be able to diagnose and solve common problems arising from configuration and deployment. For instance, the exam may present a situation where an application compiled in NetBeans fails to run on a test machine with the following error:
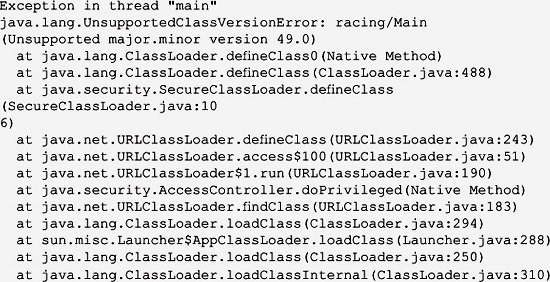
In this particular case, the application was compiled with Java 6 in NetBeans and deployed on a machine with an older version of the JRE (1.3). The project can either be switched back to using the 1.3 JDK, or the source/binary format can be set to 1.3.
EXERCISE 1-4 Configuring a Second JDK
In this exercise, you are going to configure the Java 5 (JDK 1.5) with NetBeans. Many applications still use Java 5. The steps used in this exercise work with other JSDK releases as well. This exercise will work on Linux and Windows; Mac OS X provides preinstalled copies of the JDK under /System/Library/Frameworks/JavaVM.framework/Versions.
1. Download the Java 5.0 JDK from http://java.sun.com. Java 5 can be found on the Previous Releases page. The exact download link continues to change and now requires registration.
2. Run the JDK 5 installer.
3. Launch NetBeans.
4. Select Tools | Java Platforms to display the Java Platform Manager window and click Add Platform.
5. Browse and select the JDK 1.5 directory as shown next:
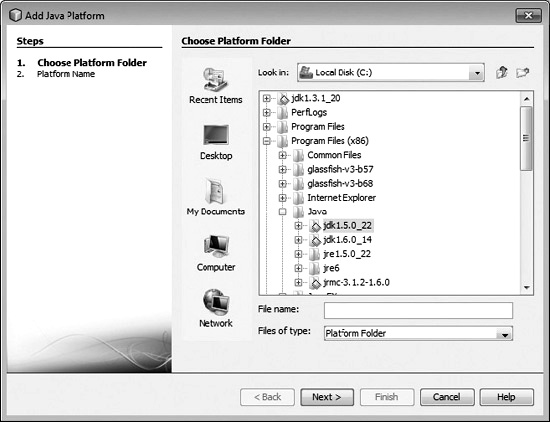
6. Name the platform and click Finish to complete adding the JDK:
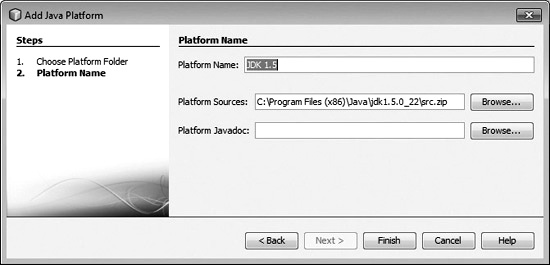
7. The JDK should now appear in the Platforms list of the Java Platform Manager window, as shown next. It is ready to be used in a project.
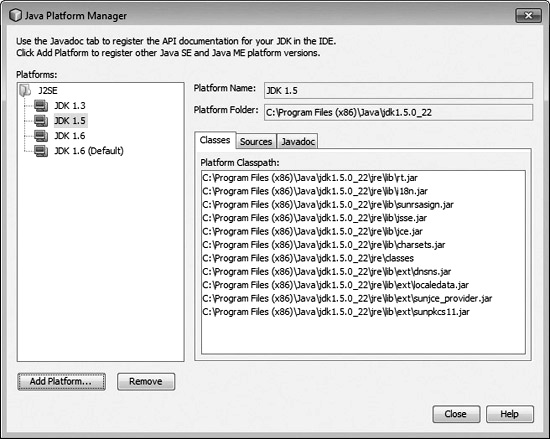
8. Change the JDK of the main project by selecting File | Project Properties and clicking the Libraries category.
9. Select JDK 1.5 from the Java Platforms box.
10. Click OK—the project is now using Java 5.
CERTIFICATION SUMMARY
This chapter focused on NetBeans configuration ranging from IDE user settings to configuration files, external libraries, and Java Development Kits (JDKs). Starting out with configuration provides a firm base on which to delve further into the IDE.
 TWO-MINUTE DRILL
Configuring IDE Functionality
![]() NetBeans is configured from the Options window by selecting Tools | Options.
NetBeans is configured from the Options window by selecting Tools | Options.
![]() Changes are applied by clicking the OK button in the Options window.
Changes are applied by clicking the OK button in the Options window.
![]() Configuration settings can be exported and imported.
Configuration settings can be exported and imported.
![]() The top-level configuration panels are General, Editor, Fonts & Colors, Keymap, and Miscellaneous.
The top-level configuration panels are General, Editor, Fonts & Colors, Keymap, and Miscellaneous.
![]() The Miscellaneous configuration group configures the following features: Ant, Appearance, Diff, Files, GUI Builder, Issue Tracker, Java Debugger, JavaScript, Maven, Profiler, Tasks, and Versioning.
The Miscellaneous configuration group configures the following features: Ant, Appearance, Diff, Files, GUI Builder, Issue Tracker, Java Debugger, JavaScript, Maven, Profiler, Tasks, and Versioning.
![]() Ant features that can be configured include Ant home, classpath, and verbosity.
Ant features that can be configured include Ant home, classpath, and verbosity.
![]() Appearance tab controls the docking behavior of NetBeans windows such as Projects, Files, Services, and so on.
Appearance tab controls the docking behavior of NetBeans windows such as Projects, Files, Services, and so on.
![]() Diff tab configures the file diff support including ignoring trailing whitespace, inner whitespace, and changes in case. An external diff engine can also be configured.
Diff tab configures the file diff support including ignoring trailing whitespace, inner whitespace, and changes in case. An external diff engine can also be configured.
![]() Files tab associates file extensions with MIME types. This determines which file editor will be used for a specific file extension.
Files tab associates file extensions with MIME types. This determines which file editor will be used for a specific file extension.
![]() GUI Builder tab configures GUI Builder code generation.
GUI Builder tab configures GUI Builder code generation.
![]() Issue Tracking tab configures refresh rates for Bugzilla.
Issue Tracking tab configures refresh rates for Bugzilla.
![]() Java Debugger tab configures thread suspension, step filters, and default variable formatters.
Java Debugger tab configures thread suspension, step filters, and default variable formatters.
![]() JavaScript tab configures targeted browsers for testing JavaScript code.
JavaScript tab configures targeted browsers for testing JavaScript code.
![]() Maven tab configures Maven home, local repository, custom goal definitions, and index update frequency.
Maven tab configures Maven home, local repository, custom goal definitions, and index update frequency.
![]() Java Profiler tab configures profiler platform, communication port, actions to perform when starting a profiling session, and what to do on an OutOfMemoryError.
Java Profiler tab configures profiler platform, communication port, actions to perform when starting a profiling session, and what to do on an OutOfMemoryError.
![]() Tasks tab configures text patterns to be tracked in the Task window.
Tasks tab configures text patterns to be tracked in the Task window.
![]() Version tab configures the version-control system as well as the local history settings.
Version tab configures the version-control system as well as the local history settings.
![]() The Plugin Manager extends NetBeans.
The Plugin Manager extends NetBeans.
![]() Plugins can be loaded either from an update site or from the local disk.
Plugins can be loaded either from an update site or from the local disk.
![]() Plugin changes are applied immediately.
Plugin changes are applied immediately.
![]() Clicking Install or Update immediately installs and activates a plugin.
Clicking Install or Update immediately installs and activates a plugin.
Working with Configuration Files and Directories
![]() Each NetBeans user has a NetBeans user directory,. netbeans, in their home directory.
Each NetBeans user has a NetBeans user directory,. netbeans, in their home directory.
![]() The NetBeans user directory stores user preferences, cache, logs, and local file history.
The NetBeans user directory stores user preferences, cache, logs, and local file history.
![]() The netbeans.conf file, found under the installation directory, configures the JVM to be used by NetBeans, heap settings, JVM parameters, and the default location and name of the NetBeans user directory.
The netbeans.conf file, found under the installation directory, configures the JVM to be used by NetBeans, heap settings, JVM parameters, and the default location and name of the NetBeans user directory.
![]() netbeans.conf can be overridden for a user by placing a netbeans.conf file in a user’s NetBeans user directory.
netbeans.conf can be overridden for a user by placing a netbeans.conf file in a user’s NetBeans user directory.
Debugging with External Libraries
![]() External libraries can be added to the Library Manager to be shared among projects or directly to a project.
External libraries can be added to the Library Manager to be shared among projects or directly to a project.
![]() Global libraries are managed from Tools | Libraries.
Global libraries are managed from Tools | Libraries.
![]() Project-specific library configuration is managed from File | Project Properties | Libraries.
Project-specific library configuration is managed from File | Project Properties | Libraries.
![]() External libraries can be configured with sources and Javadoc to facilitate debugging.
External libraries can be configured with sources and Javadoc to facilitate debugging.
![]() JAR files can be ordered to control the order in which the classloader locates classes.
JAR files can be ordered to control the order in which the classloader locates classes.
![]() Libraries can be added to four classpaths: Compile, Run, Compile Tests, and Run Tests.
Libraries can be added to four classpaths: Compile, Run, Compile Tests, and Run Tests.
![]() Configuring a libraries folder for a project triggers the IDE to store all external libraries for a project under a common directory structure.
Configuring a libraries folder for a project triggers the IDE to store all external libraries for a project under a common directory structure.
Developing with the JDK
![]() Multiple Java SE and Java ME JDKs can be registered with NetBeans.
Multiple Java SE and Java ME JDKs can be registered with NetBeans.
![]() Each project can be configured to use a specific SDK.
Each project can be configured to use a specific SDK.
![]() Sources and Javadoc can be attached to the SDK to facilitate debugging and development.
Sources and Javadoc can be attached to the SDK to facilitate debugging and development.
![]() Java Platforms are managed from Tools | Java Platforms.
Java Platforms are managed from Tools | Java Platforms.
SELF TEST
The following questions will help you measure your understanding of the material presented in this chapter. Read all the choices carefully because there might be more than one correct answer. Choose all correct answers for each question.
Configuring IDE Functionality
1. A project imported as a free-form project requires a specific version of Ant in order to build. Where would this be configured?
A. Select File | Project Properties | Build | Compiling, and change the path to the required version of Ant.
B. Configure the PATH and ANT_HOME environment variables.
C. Edit the build.properties in the NetBeans user directory.
D. Select Tools | Options | Miscellaneous | Ant, and change the default Ant directory.
2. An application uses the .config file extension for its XML configuration files. By default, NetBeans opens this file in its text editor. How can the developer configure NetBeans to always open the file using the XML editor?
A. NetBeans will auto-detect the file type and use the appropriate file editor.
B. Right-click the file and set the file MIME type.
C. Configure a MIME type for the file in Tools | Options | Miscellaneous | Files.
D. Add the .xml extension to the end of the file.
3. A developer doesn’t want to step into the static initializer of classes while debugging. How can the developer disable this feature?
A. This feature cannot be disabled.
B. Set breakpoints in the constructors and run to the breakpoints instead of stepping into the constructor.
C. Enable the step filter for static initializers by selecting the checkbox in File | Project Properties | Debug.
D. Enable the step filter for static initializers by selecting the checkbox in Tools | Options | Miscellaneous | Debugger.
4. After installing a plugin in NetBeans, when does it become available?
A. Once the plugin has been activated on the Installed tab of the Plugin Manager.
B. Only after Apply has been clicked in Plugin Manager dialog box.
C. Only after the IDE has been restarted.
D. Unless the plugin specifically requests a restart of NetBeans, it is available as soon as it is installed.
5. On a remote system the default profiling port is already occupied by another process. Where can the TCP port be configured?
A. Set the jpda.port property in the netbeans.conf file.
B. Change the JPDA port setting in File | Project Properties | Profiler.
C. Use the shared memory connector instead to connect to the remote process. Configure the remote process to use the shared memory connector.
D. Change the port in Tools | Options | Miscellaneous | Profiler.
Working with Configuration Files and Directories
6. A developer is working on a large project with thousands of files. NetBeans has been running into heap problems trying to index the project. How can the developer increase the available heap size for NetBeans?
A. Right-click the Java executable in Explorer and increase the size property.
B. Right-click the NetBeans icon in Explorer and increase the heap size property.
C. Change the default heap size in Tools | Options | General and restart NetBeans.
D. Edit the netbeans.conf file and add –J-Xmx400m to netbeans_default_options.
7. After playing around with the settings in the Options window, a developer wants to revert NetBeans back to its original factory default settings. How can this be accomplished?
A. Delete the NetBeans user directory.
B. Open up regedit on Windows, search for nodes with NetBeans as the text, and delete.
C. Click the Revert button in Tools | Options to revert NetBeans to its initial state.
D. Uninstall NetBeans and then reinstall it.
8. A developer installs a new JDK and wants to run NetBeans using this JDK. How does this developer go about running NetBeans with a different JDK?
A. NetBeans ships with its own JDK, and this cannot be changed without breaking the IDE.
B. Change the netbeans_jdkhome property in the netbeans.conf file to point to the correct JDK.
C. Change the JAVA_HOME and PATH environment variables to point to the new JDK.
D. Uninstall the current JDK and install the JDK to be used with NetBeans.
Debugging with External Libraries
9. A developer checks a new project into version control. Another developer checks out the project, but is unable to compile or run the project due to missing dependencies. The paths in the project are specific to the original developer’s machine. What should the original developer do to remedy the situation?
A. Define shared libraries in the Library Manager for these dependencies, and then commit the project to version control.
B. Define global libraries in the Library Manager for these dependencies, and then commit the project file to version control.
C. Use absolute paths when adding library dependencies.
D. Configure a libraries folder in File | Project Properties | Libraries and recommit the project.
10. The Java Persistence API (JPA) provides an abstract interface for object-relational mapping tools such as Hibernate and TopLink. If a user codes to only the JPA interfaces, then they can easily switch between JPA providers without having to recompile their code, and the code remains vendor agnostic. In which classpath should the JPA vendor libraries be added so that the code the developers write doesn’t accidentally import vendor-specific classes?
A. Compile
B. Run
C. Compile Tests
D. Run Tests
11. While troubleshooting a bug in some code, a developer needs to step into an open source library to figure out what it is doing. How can the developer debug the external library?
A. NetBeans will automatically decompile the external library, allowing the developer to step into it.
B. The external library needs to be compiled with debug flags.
C. The developer needs to add the sources from the open source project to his project and then recompile.
D. The developer should attach the source directory for the open source project to the JAR file in File | Project Properties | Library Or Tools | Libraries depending on the project and library configuration of the project.
Developing with the JDK
12. An old project requires JDK 1.3 to compile and run. NetBeans 6.8 is being used and was installed with JDK 1.6. How can the old project be compiled and run?
A. Download and install JDK 1.3. Update the PATH and JAVA_HOME environment variables to point to 1.3.
B. Download and use NetBeans 3.1 and open the project.
C. NetBeans cannot be used with a JDK other than 1.6.
D. Download and install JDK 1.3. In NetBeans, select Tools | Java Platforms and register the 1.3 JDK. In Project Properties for the project, select the 1.3 JDK.
13. Which of the following SDKs cannot be registered as a Java Platform?
A. JRE 6
B. JDK 1.3
C. Java ME 3.0
D. JRockit JDK 3.0
SELF TEST ANSWERS
Configuring IDE Functionality
1. A project imported as a free-form project requires a specific version of Ant in order to build. Where would this be configured?
A. Select File | Project Properties | Build | Compiling, and change the path to the required version of Ant.
B. Configure the PATH and ANT_HOME environment variables.
C. Edit the build.properties in the NetBeans user directory.
D. Select Tools | Options | Miscellaneous | Ant, and change the default Ant directory.
![]() D. The path to Ant is configured in the Options window.
D. The path to Ant is configured in the Options window.
![]() A, B, and C are incorrect. A is incorrect because Ant isn’t configured on a project-by-project basis. B is incorrect because NetBeans does not consult environment variables in order to locate Ant. C is incorrect because build.properties doesn’t configure Ant’s location.
A, B, and C are incorrect. A is incorrect because Ant isn’t configured on a project-by-project basis. B is incorrect because NetBeans does not consult environment variables in order to locate Ant. C is incorrect because build.properties doesn’t configure Ant’s location.
2. An application uses the .config file extension for its XML configuration files. By default, NetBeans opens this file in its text editor. How can the developer configure NetBeans to always open the file using the XML editor?
A. NetBeans will auto-detect the file type and use the appropriate file editor.
B. Right-click the file and set the file MIME type.
C. Configure a MIME type for the file in Tools | Options | Miscellaneous | Files.
D. Add the .xml extension to the end of the file.
![]() C. File associations are configured in Tools | Options | Miscellaneous | Files.
C. File associations are configured in Tools | Options | Miscellaneous | Files.
![]() A, B, and D are incorrect. A is incorrect because NetBeans does not attempt to guess at the content type of a file. B is incorrect because there is no option to set the MIME type by right-clicking. D is incorrect because changing the file extension is not necessary.
A, B, and D are incorrect. A is incorrect because NetBeans does not attempt to guess at the content type of a file. B is incorrect because there is no option to set the MIME type by right-clicking. D is incorrect because changing the file extension is not necessary.
3. A developer doesn’t want to step into the static initializer of classes while debugging. How can the developer disable this feature?
A. This feature cannot be disabled.
B. Set breakpoints in the constructors and run to the breakpoints instead of stepping into the constructor.
C. Enable the step filter for static initializers by selecting the checkbox in File | Project Properties | Debug.
D. Enable the step filter for static initializers by selecting the checkbox in Tools | Options | Miscellaneous | Debugger.
![]() D. Stepping into static initializers can be disabled in Tools | Options | Miscellaneous | Debugger.
D. Stepping into static initializers can be disabled in Tools | Options | Miscellaneous | Debugger.
![]() A, B, and C are incorrect. A is incorrect because stepping into static initializers can be disabled. B is onerous and places an unneeded burden on the developer. C is incorrect because debugger settings are not configured on a per-project basis.
A, B, and C are incorrect. A is incorrect because stepping into static initializers can be disabled. B is onerous and places an unneeded burden on the developer. C is incorrect because debugger settings are not configured on a per-project basis.
4. After installing a plugin in NetBeans, when does it become available?
A. Once the plugin has been activated on the Installed tab of the Plugin Manager.
B. Only after Apply has been clicked in Plugin Manager dialog box.
C. Only after the IDE has been restarted.
D. Unless the plugin specifically requests a restart of NetBeans, it is available as soon as it is installed.
![]() D. Unless the plugin specifically requests a restart of NetBeans, it is active as soon as it is installed.
D. Unless the plugin specifically requests a restart of NetBeans, it is active as soon as it is installed.
![]() A, B, and C are incorrect. A is incorrect because a plugin does not need to be activated after it is installed. B is incorrect because the Plugin Manager does not have an Apply button. C is incorrect because NetBeans does not need to be restarted unless the plugin specifically requests the operation.
A, B, and C are incorrect. A is incorrect because a plugin does not need to be activated after it is installed. B is incorrect because the Plugin Manager does not have an Apply button. C is incorrect because NetBeans does not need to be restarted unless the plugin specifically requests the operation.
5. On a remote system the default profiling port is already occupied by another process. Where can the TCP port be configured?
A. Set the jpda.port property in the netbeans.conf file.
B. Change the JPDA port setting in File | Project Properties | Profiler.
C. Use the shared memory connector instead to connect to the remote process. Configure the remote process to use the shared memory connector.
D. Change the port in Tools | Options | Miscellaneous | Profiler.
![]() D. The default port for the Profiler is configured in the Options window.
D. The default port for the Profiler is configured in the Options window.
![]() A, B, and C are incorrect. A is incorrect because netbeans.conf configures the startup parameters of NetBeans, not the Profiler. B is incorrect because profiler settings are not configured in Project Properties. C is incorrect because the Profiler uses TCP ports for communication.
A, B, and C are incorrect. A is incorrect because netbeans.conf configures the startup parameters of NetBeans, not the Profiler. B is incorrect because profiler settings are not configured in Project Properties. C is incorrect because the Profiler uses TCP ports for communication.
Working with Configuration Files and Directories
6. A developer is working on a large project with thousands of files. NetBeans has been running into heap problems trying to index the project. How can the developer increase the available heap size for NetBeans?
A. Right-click the Java executable in Explorer and increase the size property.
B. Right-click the NetBeans icon in Explorer and increase the heap size property.
C. Change the default heap size in Tools | Options | General and restart NetBeans.
D. Edit the netbeans.conf file and add –J-Xmx400m to netbeans_default_options.
![]() D. The loader prior to instantiating NetBeans consults the NetBeans config file.
D. The loader prior to instantiating NetBeans consults the NetBeans config file.
![]() A, B, and C are incorrect. A is incorrect because the Java heap size is not changed by right-clicking java.exe and editing a property. B is incorrect because you cannot edit the heap properties of NetBeans in Windows Explorer or in the Finder on Mac OS X. C is incorrect because the heap settings cannot be configured within NetBeans.
A, B, and C are incorrect. A is incorrect because the Java heap size is not changed by right-clicking java.exe and editing a property. B is incorrect because you cannot edit the heap properties of NetBeans in Windows Explorer or in the Finder on Mac OS X. C is incorrect because the heap settings cannot be configured within NetBeans.
7. After playing around with the settings in the Options window, a developer wants to revert NetBeans back to its original factory default settings. How can this be accomplished?
A. Delete the NetBeans user directory.
B. Open up regedit on Windows, search for nodes with NetBeans as the text, and delete.
C. Click the Revert button in Tools | Options to revert NetBeans to its initial state.
D. Uninstall NetBeans and then reinstall it.
![]() A. Deleting the NetBeans user directory will delete all user preferences.
A. Deleting the NetBeans user directory will delete all user preferences.
![]() B, C, and D are incorrect. B is incorrect because settings for NetBeans are not stored in the registry. C is incorrect because there is no Revert button. D is incorrect because reinstalling will not clear the NetBeans user directory.
B, C, and D are incorrect. B is incorrect because settings for NetBeans are not stored in the registry. C is incorrect because there is no Revert button. D is incorrect because reinstalling will not clear the NetBeans user directory.
8. A developer installs a new JDK and wants to run NetBeans using this JDK. How does this developer go about running NetBeans with a different JDK?
A. NetBeans ships with its own JDK, and this cannot be changed without breaking the IDE.
B. Change the netbeans_jdkhome property in the netbeans.conf file to point to the correct JDK.
C. Change the JAVA_HOME and PATH environment variables to point to the new JDK.
D. Uninstall the current JDK and install the JDK to be used with NetBeans.
![]() B. Setting the netbeans_jdkhome property in the netbeans.conf file does change the JDK.
B. Setting the netbeans_jdkhome property in the netbeans.conf file does change the JDK.
![]() A, C, and D are incorrect. A is incorrect because NetBeans can be run on different versions of Java including Java 5 and 6. C is incorrect because NetBeans uses the value stored in the netbeans_jdkhome property that is specified in the netbeans.conf file. D is incorrect as this will not change the paths specified in the netbeans.conf file.
A, C, and D are incorrect. A is incorrect because NetBeans can be run on different versions of Java including Java 5 and 6. C is incorrect because NetBeans uses the value stored in the netbeans_jdkhome property that is specified in the netbeans.conf file. D is incorrect as this will not change the paths specified in the netbeans.conf file.
Debugging with External Libraries
9. A developer checks a new project into version control. Another developer checks out the project, but is unable to compile or run the project due to missing dependencies. The paths in the project are specific to the original developer’s machine. What should the original developer do to remedy the situation?
A. Define shared libraries in the Library Manager for these dependencies, and then commit the project to version control.
B. Define global libraries in the Library Manager for these dependencies, and then commit the project file to version control.
C. Use absolute paths when adding library dependencies.
D. Configure a libraries folder in File | Project Properties | Libraries and recommit the project.
![]() D. Creating a libraries directory under the project and committing it to version control will enable other developers to easily check out the project.
D. Creating a libraries directory under the project and committing it to version control will enable other developers to easily check out the project.
![]() A, B, and C are incorrect. A is incorrect because there is no shared library feature. B is incorrect because global libraries are local to a developer’s machine. C isn’t a solution because absolute paths won’t help the developers if they don’t have the libraries.
A, B, and C are incorrect. A is incorrect because there is no shared library feature. B is incorrect because global libraries are local to a developer’s machine. C isn’t a solution because absolute paths won’t help the developers if they don’t have the libraries.
10. The Java Persistence API (JPA) provides an abstract interface for object-relational mapping tools such as Hibernate and TopLink. If a user codes to only the JPA interfaces, then they can easily switch between JPA providers without having to recompile their code, and the code remains vendor agnostic. In which classpath should the JPA vendor libraries be added so that the code the developers write doesn’t accidentally import vendor-specific classes?
A. Compile
B. Run
C. Compile Tests
D. Run Tests
![]() B. The libraries should be put into the run classpath. Libraries put into the run classpath are available during execution and testing but not in the editor.
B. The libraries should be put into the run classpath. Libraries put into the run classpath are available during execution and testing but not in the editor.
![]() A, C, and D are incorrect. Choice A is incorrect because adding the libraries to the compile classpath would allow developers to directly import vendor-specific classes, thereby defeating the purpose of coding to JPA interfaces. Choices C and D are incorrect because these are test targets.
A, C, and D are incorrect. Choice A is incorrect because adding the libraries to the compile classpath would allow developers to directly import vendor-specific classes, thereby defeating the purpose of coding to JPA interfaces. Choices C and D are incorrect because these are test targets.
11. While troubleshooting a bug in some code, a developer needs to step into an open source library to figure out what it is doing. How can the developer debug the external library?
A. NetBeans will automatically decompile the external library, allowing the developer to step into it.
B. The external library needs to be compiled with debug flags.
C. The developer needs to add the sources from the open source project to his project and then recompile.
D. The developer should attach the source directory for the open source project to the JAR file in File | Project Properties | Library Or Tools | Libraries depending on the project and library configuration of the project.
![]() D. The developer should attach the source directory for the open source project to the JAR file in File | Project Properties | Library or Tools | Libraries depending on the project and library configuration of the project.
D. The developer should attach the source directory for the open source project to the JAR file in File | Project Properties | Library or Tools | Libraries depending on the project and library configuration of the project.
![]() A, B, and C are incorrect. A is incorrect because NetBeans does not decompile source code. B is incorrect because debug symbols have nothing to do with viewing the source. While C might technically work, it would completely defeat the library management tools in NetBeans.
A, B, and C are incorrect. A is incorrect because NetBeans does not decompile source code. B is incorrect because debug symbols have nothing to do with viewing the source. While C might technically work, it would completely defeat the library management tools in NetBeans.
Developing with the JDK
12. An old project requires JDK 1.3 to compile and run. NetBeans 6.8 is being used and was installed with JDK 1.6. How can the old project be compiled and run?
A. Download and install JDK 1.3. Update the PATH and JAVA_HOME environment variables to point to 1.3.
B. Download and use NetBeans 3.1 and open the project.
C. NetBeans cannot be used with a JDK other than 1.6.
D. Download and install JDK 1.3. In NetBeans, select Tools | Java Platforms and register the 1.3 JDK. In Project Properties for the project, select the 1.3 JDK.
![]() D. Download and install JDK 1.3. In NetBeans, select Tools | Java Platforms and register the 1.3 JDK. In Project Properties for the project, select the 1.3 JDK. These steps are the same for all JDKs.
D. Download and install JDK 1.3. In NetBeans, select Tools | Java Platforms and register the 1.3 JDK. In Project Properties for the project, select the 1.3 JDK. These steps are the same for all JDKs.
![]() A, B, and C are incorrect. A is incorrect because NetBeans does not consult the operation system path. B is incorrect because NetBeans is not tied to supporting only specific versions of Java. C is incorrect because NetBeans can most certainly be used with other versions of the JDK.
A, B, and C are incorrect. A is incorrect because NetBeans does not consult the operation system path. B is incorrect because NetBeans is not tied to supporting only specific versions of Java. C is incorrect because NetBeans can most certainly be used with other versions of the JDK.
13. Which of the following SDKs cannot be registered as a Java Platform?
A. JRE 6
B. JDK 1.3
C. Java ME 3.0
D. JRockit JDK 3.0
![]() A. A JRE cannot be configured as a Java Platform because it is meant for running Java applications and lacks compiler tools.
A. A JRE cannot be configured as a Java Platform because it is meant for running Java applications and lacks compiler tools.
![]() B, C, and D are incorrect. Any JDK, even non-Sun JDKs, can be configured as a Java Platform in NetBeans.
B, C, and D are incorrect. Any JDK, even non-Sun JDKs, can be configured as a Java Platform in NetBeans.