CHAPTER 6
Working with Light
The most important factor in photography is light; without it, your camera is rendered useless. You need light to make the exposure that results in an image. Whether the light is recorded to silver halide emulsion on a piece of film or to the CMOS sensor on your Nikon D7000, you can't make a photograph without it.
Not only is light necessary to make an exposure, but also it has different qualities that can impact the outcome of your image. Light can be soft and diffuse or hard and directional, and it can also affect the color of your images. The ability to control light is crucial. When there is not enough light to capture the image you're after, you can employ alternative sources of light, such as flash, to achieve the effect you're after.

Controlling the light allows you to set the tone of the image.
Natural Light
Though it is by far the easiest type of light to find, natural light is sometimes the most difficult to work with because it comes from the sun, is often unpredictable, and can change from minute to minute. A lot of times I hear people say, “Wow, it's such a nice, sunny day; what a perfect day to take pictures.” But unfortunately this is not often the case. A bright day when the sun is high in the sky presents many obstacles.
First, you have serious contrast issues on a sun-drenched day. Oftentimes, the digital sensor doesn't have the latitude to capture the whole scene effectively. For example, it is nearly impossible to capture detail in the shadows while keeping the highlights from blowing out or going completely white.
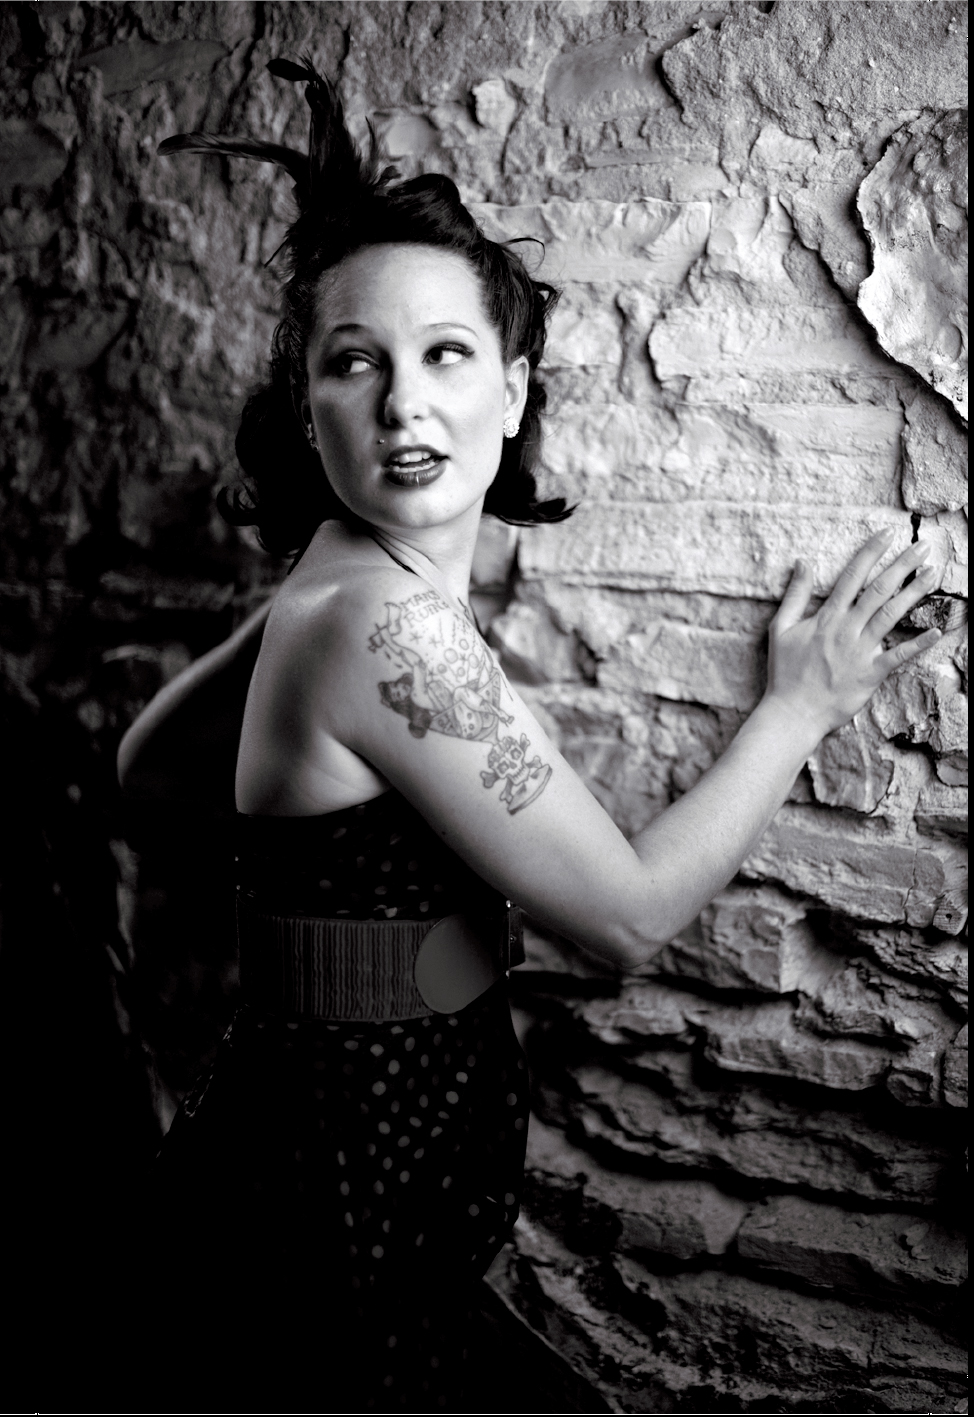
Fortunately, if you want to use natural light, it isn't necessary to stand in direct sunlight at noon. You can get desirable lighting effects when working with natural light in many ways, as shown in Figure 6.1. Here are a few examples:
- Use fill flash. You can use the flash as a secondary light source (not as your main light) to fill in the shadows and reduce contrast.
- Try window lighting. Believe it or not, one of the best ways to use natural light is to go indoors. Seating your model next to a window provides a beautiful soft light that is very flattering. A lot of professional food photographers use window light. It can be used to light almost any subject softly and evenly.
- Find some shade. The shade of a tree or the overhang of an awning or porch can block the bright sunlight while still giving you plenty of diffuse light with which to light your subject.
- Take advantage of the clouds. A cloudy day softens the light, allowing you to take portraits outside without worrying about harsh shadows and too much contrast. Even if it's only partly cloudy, you can wait for a cloud to pass over the sun before taking your shot.
- Use a modifier. Use a reflector to reduce the shadows or a diffusion panel to block the direct sun from your subject.
Continuous Light
Continuous lighting is just what it sounds like: a light source that is constant. It is by far the easiest type of lighting to work with. Unlike natural light, continuous light is consistent and predictable. Even when using a strobe with modeling lights, you sometimes have to estimate what the final lighting will look like. With continuous lighting, you can see the actual effects the lighting has on your subjects, and can modify and change the lighting before you even press the Shutter Release button.
Continuous lights are an affordable alternative to studio strobes. Because the light is constant and consistent, the learning curve is also not as steep. With strobes, you need to experiment with the exposure or use a flash meter. With continuous lights, you can use the Matrix meter on the D7000 to yield excellent results.
Here are a few of the more common continuous light options:
- Incandescent. Incandescent, or tungsten, lights are the most common type of lights. Thomas Edison invented this type of light. Your typical light bulb is a tungsten lamp. With tungsten lamps, an electrical current runs through a tungsten filament, heating it and causing it to emit light. This type of continuous lighting is the source of the name hot lights.
- Halogen. Halogen lights, which are much brighter than typical tungsten lights, are actually very similar. They are considered a type of incandescent light. Halogen lights also employ a tungsten filament, but include a halogen vapor in the gas inside the lamp. The color temperature of halogen lamps is higher than the color temperature of standard tungsten lamps.
- Fluorescent. Fluorescent lighting, which most of you are familiar with, is everywhere these days. It is in the majority of office buildings, stores, and even in your own house. In a fluorescent lamp, electrical energy changes a small amount of mercury into a gas. The electrons collide with the mercury gas atoms, causing them to release photons, which in turn cause the phosphor coating inside the lamp to glow. Because this reaction doesn't create much heat, fluorescent lamps are much cooler and more energy efficient than tungsten and halogen lamps. These lights are commonly used in lighting for television production.
- HMI. HMI, or Hydrargyrum Medium-Arc Iodide, lamps are probably the most expensive type of continuous lighting. The motion picture industry uses this type because of its consistent color temperature and the fact that it runs cooler than a tungsten lamp with the same power rating. These lamps operate by releasing an arc of electricity in an atmosphere of mercury vapor and halogenides.
Incandescent and halogen
Although incandescent and halogen lights make it easier to see what you're photographing and cost less, there are quite a few drawbacks to using these lights for serious photography work. First, they are hot. When a model has to sit under lamps for any length of time, she may get hot and uncomfortable. This is also a problem with food photography. It can cause your food to change consistency or even sweat; for example, this happens to cheese that has been refrigerated. On the other hand, it can help keep hot food looking fresh and hot.
Second, although incandescent lights appear to be very bright to you and your subject, they actually produce less light than a standard flash unit. For example, a 200-watt tungsten light and a 200-watt-second strobe use the same amount of electricity per second, so they should be equally bright, right? Wrong. Because the flash discharges all 200 watts of energy in a fraction of a second, the flash is actually much, much brighter. Why does this matter? Because when you need a fast shutter speed or a small aperture, the strobe can give you more light in a shorter time. An SB-600 gives you about 30 watt-seconds of light at full power. To get an equivalent amount of light at the maximum sync speed of 1/250 second from a tungsten light, you would need a 7500-watt lamp. Of course, if your subject is static, you don't need to use a fast shutter speed; in this case, you can use one 30-watt light bulb for a 1-second exposure or a 60-watt lamp for a 1/2-second exposure.
Other disadvantages of using incandescent lights include
- Color temperature inconsistency. The color temperature of the lamps changes as your household current varies and as the lamps get more and more use. The color temperature may be inconsistent from manufacturer to manufacturer and may even vary within the same types of bulbs.
- Light modifiers are more expensive. Because most continuous lights are hot, modifiers such as softboxes need to be made to withstand the heat; this makes them more expensive than the standard equipment intended to be used for strobes.
- Short lamp life. Incandescent lights tend to have a shorter life than flash tubes, so you'll have to replace them more often.
Although incandescent lights have quite a few disadvantages, they are by far the most affordable type of lights you can buy. Many photographers who are starting out use inexpensive work lights they can buy at any hardware store for less than $10. These lights use a standard light bulb and often have a reflector to direct the light; they also come with a clamp you can use to attach them to a stand or anything else you have handy that might be stable.
Halogen work lamps, also readily available at any hardware store, offer a higher light output than a standard light, generally speaking. The downside is they are very hot, and the larger lights can be a bit unwieldy. You also may have to come up with some creative ways to get the lights in the position you want. Some halogen work lamps come complete with a tripod stand. If you can afford it, I recommend buying these; they're easier to set up and less of an aggravation in the long run. The single halogen work lamps that are usually designed to sit on a table or some other support are readily available for less than $20; the double halogen work lamps with two 500-watt lights and a 6-foot tripod stand usually cost less than $40.
If you're really serious about lighting with hot lights, you may want to invest in a photographic hot-light kit. These kits are widely available from any photography or video store. They usually come with lights, light stands, and sometimes light modifiers such as umbrellas or softboxes for diffusing the light for a softer look. The kits can be relatively inexpensive, with two lights, two stands, and two umbrellas for around $100. Or you can buy much more elaborate setups ranging in price up to $2,000. I've searched the Internet for these kits and have found the best deals are on eBay.
Fluorescent
Fluorescent lights have a lot of advantages over incandescent lights: They run at much lower temperatures and use much less electricity than standard incandescent lights. Fluorescent lights are also a much softer light source than incandescent lights.
In the past, fluorescent lights weren't considered viable for photographic applications because they cast a sickly green light on the subject. Today, most fluorescent lamps for use in photography are color corrected to match both daylight and incandescent lights. Also, given white balance is adjustable in the camera or in Photoshop with RAW files, using fluorescents has become much easier because you don't have to worry about color-correcting filters and special films.
These days, because more people are using fluorescent lights, light modifiers are more readily available. They allow you to control the light to make it softer or harder and directional or diffused.
Fluorescent light kits are readily available through most photography stores and online. These kits are a little more expensive than the incandescent light kits — an average two-light kit with light stands, reflectors, and bulbs costs about $160. Fluorescent kits aren't usually equipped with umbrellas or softboxes because the light is already fairly soft. You can buy these kinds of accessories and there are kits available that come with softboxes and umbrellas, although they cost significantly more.
Unfortunately, there aren't many low-cost alternatives to buying a fluorescent light kit. The only real option is to use the clamp light I mentioned in the section about incandescent light and fit it with a fluorescent bulb that has a standard bulb base on it. These types of fluorescent bulbs are readily available at any store that sells light bulbs.
HMI
HMI (Hydrargyrum Medium-Arc Iodide), a type of continuous light, is primarily used in the motion picture industry. HMI lamps burn extremely bright and are much more efficient than standard incandescent, halogen, or fluorescent lights. The light emitted is equal in color temperature to that of daylight.
Although I include them here for general information, these kits are usually too cost-prohibitive for use in average still-photography applications. A one-light kit with a 24-watt light can start at more than $1,000. An 18,000-watt kit can cost more than $30,000.
D7000 Flash Basics
A major advantage of the Nikon D7000 is the fact that it has a built-in flash for quick use in low-light situations. Even better is the fact that Nikon has additional flashes called Speedlights that are much more powerful and versatile than the smaller built-in flash.
Nikon Speedlights are dedicated flash units, meaning they are built specifically for use with the Nikon camera system and offer much more functionality than a nondedicated flash. A nondedicated flash is a flash made by a third-party manufacturer; the flashes usually don't offer fully automated flash features. There are, however, some non-Nikon flashes that use Nikon's i-TTL flash-metering system. The i-TTL system allows the flash to operate automatically, usually resulting in a perfect exposure, without you having to do any calculations.
Achieving proper exposures
If you are new to using an external Speedlight flash, exposure can seem confusing when you first attempt to use it. There are a lot of settings you need to know, and there are different formulas you can use to get the right exposure. Once you understand the numbers and where to plug them in, using the Speedlight becomes quite easy.
If you are using your Speedlight in i-TTL mode, the calculations you would otherwise do manually are done for you, but it's always good to know how to achieve the same results if you don't have the technology to rely on, and to understand how to work with the numbers. When you know these calculations, you can use any flash and get excellent results.
Three main components go into making a properly exposed flash photograph: Guide Number (GN), aperture, and distance. If one of these elements is changed, another one must be changed proportionally to keep the exposure consistent. The following sections cover each element and how to put them together.
Guide Number
The first component in the equation for determining proper flash exposure is the Guide Number (GN), which is a numeric value that represents the amount of light emitted by the flash. You can find the GN for your specific Speedlight in the owner's manual. The GN changes with the ISO sensitivity to which your camera is set. For example, the GN for a Speedlight at ISO 400 is greater than the GN for the same Speedlight at ISO 100 (because of the increased sensitivity of the sensor). The GN also differs depending on the Speedlight's zoom setting. The owner's manual has a table that breaks down the GNs according to the flash output setting and the zoom range selected on the Speedlight.
![]() If you plan to do a lot of manual flash exposures, I suggest making a copy of the GN table from the owner's manual and keeping it in your camera bag with the flash.
If you plan to do a lot of manual flash exposures, I suggest making a copy of the GN table from the owner's manual and keeping it in your camera bag with the flash.
Aperture
The second component in the flash exposure equation is the aperture setting. As you already know, the wider the aperture, the more light that falls on the sensor. Using a wider aperture allows you to use a lower power setting (such as 1/4 when in Manual mode) on your flash; or if you're using the automatic i-TTL mode, the camera fires the flash using less power.
Distance
The third component in the flash exposure equation is the distance from the light source to the subject. The closer the light is to your subject, the more light falls on it. Conversely, the farther away the light source is, the less illumination your subject receives. This is important because if you set your Speedlight to a certain output, you can still achieve a proper exposure by moving the Speedlight closer or farther away as needed.
GN / Distance = Aperture
Here's where the GN, aperture, and distance all come together. The basic formula allows you to take the GN and divide it by the distance to determine the aperture at which you need to shoot. You can change this equation to find out what you want to know specifically:
- GN / D = A. If you know the GN of the flash and the distance of the flash from the subject, you can determine the aperture to use to achieve the proper exposure.
- A / GN = D. If you know the aperture you want to use and the GN of the flash, you can determine the distance to place your flash from the subject.
- A × D = GN. If you already have the right exposure, you can take your aperture setting and multiply it by the distance of the flash from the subject to determine the approximate GN of the flash.
Flash Exposure Compensation (FEC)
When you're photographing subjects using flash, whether you're using an external Speedlight or the built-in flash on your D7000, there may be times when the flash causes your principal subject to appear too light or too dark. This usually occurs in difficult lighting situations, especially when you use TTL metering. Your camera's meter can be fooled into thinking the subject needs more or less light than it actually does. This can happen when the background is very bright or very dark, or when the subject is off in the distance or very small in the frame.
Flash Exposure Compensation (FEC) allows you to manually adjust the flash output while still retaining TTL readings so your flash exposure is at least in the ballpark. With the D7000, you can vary the output of your built-in flash's TTL setting (or your own manual setting) from –3 Exposure Value (EV) to +1 EV. This means if your flash exposure is too bright, you can adjust it down 3 full stops under the original setting. Or if the image seems underexposed or too dark, you can adjust it to be brighter by 1 full stop. Additionally, the D7000 allows you to fine-tune how much exposure compensation is applied by letting you set the FEC incrementally in either 1/3, 1/2, or 1 stop of light.
To adjust the FEC when using the built-in flash, press and hold the flash pop-up/FEC button and rotate the Sub-command dial. The amount of FEC being applied is displayed on the LCD control panel and the viewfinder.
![]() FEC is not reset when the camera is turned off, so be sure to dial the FEC back to 0 when you are finished.
FEC is not reset when the camera is turned off, so be sure to dial the FEC back to 0 when you are finished.
Fill flash
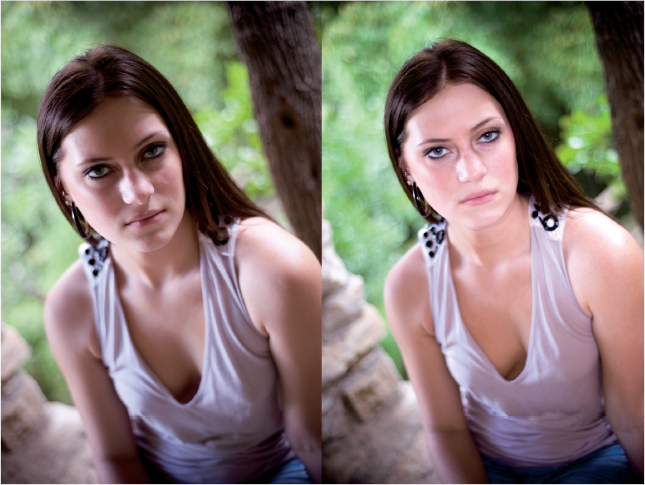
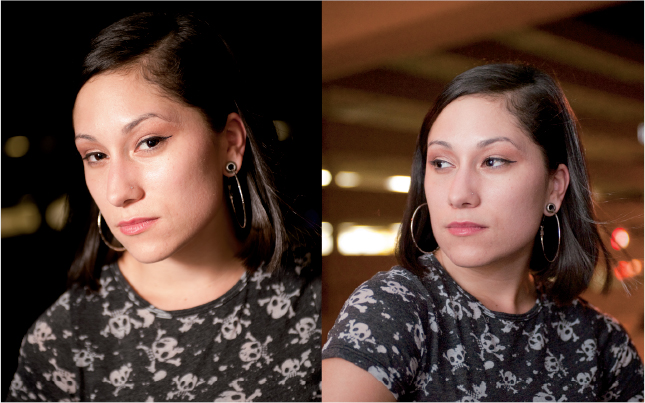
Fill flash is a handy flash technique that allows you to use your Speedlight as a secondary light source to fill in the shadows rather than as the main light source; hence the term fill flash. Fill flash is used mainly in outdoor photography when the sun is very bright, creating deep shadows and bright highlights that result in an image with very high contrast and a wide tonal range. Using fill flash enables you to reduce the contrast of the image by filling in the dark shadows, thus allowing you to see more detail in the image. Figure 6.2 shows two portraits, one taken without flash and one taken with fill flash.
6.2 A picture taken without flash on the left and a picture with fill flash on the right
You also may want to use fill flash when your subject is backlit (lit from behind). When the subject is backlit, the camera's meter automatically tries to expose for the bright part of the image that is behind your subject. This results in a properly exposed background while your subject is underexposed and dark. However, if you use the spot meter to obtain the proper exposure on your subject, the background will be overexposed and blown out. Ideally, fill flash provides an amount of light on your subject that is equal to the ambient light of the background. This brings sufficient detail to both the subject and the background, resulting in a properly and evenly exposed image.
All of Nikon's dSLR cameras offer i-TTL BL (Nikon calls this Balanced Fill-Flash) or, in layman's terms, automatic fill flash, with both the built-in flash and the detachable Speedlights: the SB-900, SB-800, SB-700, SB-600, and SB-400. When you use a Speedlight, the camera automatically sets the flash to fill flash (as long as you're not in Spot metering mode). This is a very handy feature because it allows you to concentrate on composition and not worry about your flash settings. If you decide that you don't want to use the i-TTL BL option, you can set the camera's metering mode to Spot metering, or if you are using an SB-900, SB-800, SB-700 or SB-600, you simply press the Speedlight's Mode button.
One of the easiest ways to improve your flash photography is to use a flash diffuser. These are simple devices that fit over or are placed in front of the flash head. As the name implies, a diffuser diffuses, or softens, the light. This helps to avoid that annoying dark black shadow that often appears next to your subject when you take photos using direct flash. There are a lot of different types of diffusers that range in price from $10 to $60. The type of diffuser I use depends on which flash I'm using. When using the built-in flash, I use a LumiQuest Soft Screen that I picked up at my local camera store for about $12. When using the SB-900 or SB-800, I use the diffusers that were included with them, and for the SB-600, I use a Sto-Fen Omni-Bounce. I've tried other diffusers, particularly the Gary Fong Lightsphere, and found it too bulky. It's no better than the smaller diffusers that are easier to store in your camera bag.
I almost never use a flash or Speedlight without a diffuser unless I am specifically aiming for a scene that has very hard and directional light. If you use the built-in flash a lot, I recommend always using a diffuser. I cannot stress this point enough. It makes a huge difference in image quality.
Of course, if you don't own an additional i-TTL-dedicated Speedlight or you'd rather control your flash manually, you can still use fill flash. It's actually a pretty simple process that can vastly improve your images when you use it in the right situations.
To execute a manual fill flash, follow these steps:
- Use the camera's light meter to determine the proper exposure for the background or ambient light. A typical exposure for a sunny day is 1/125 second at f/16 with an ISO of 100. Be sure not to set the shutter speed higher than the rated sync speed of 1/250 second.
- Determine the flash exposure. Using the GN / D = A formula, find the setting that you need to properly expose the subject with the flash.
- Set the flash output. Setting the output of the Speedlight 1/3 to 2/3 stops under what your calculations are is the key to proper fill flash and allows the flash exposure to be less noticeable while filling in the shadows or lighting your backlit subject. This makes your images look more natural, as if a flash didn't light them, which is the ultimate goal of fill flash.
Bounce flash
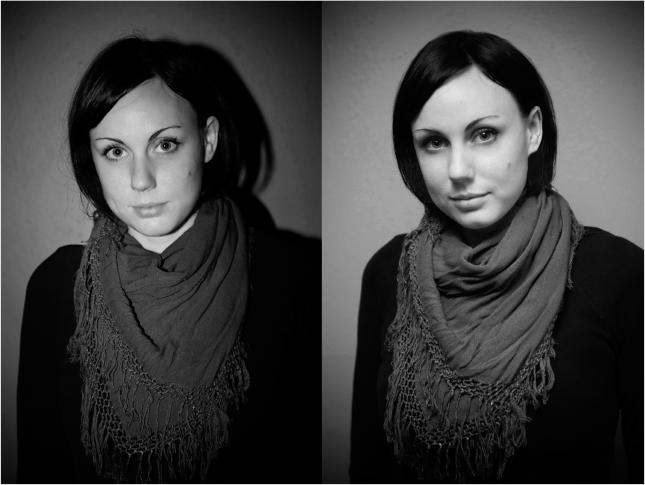
One of the easiest ways to improve your flash pictures is to use bounce flash. Bounce flash is a technique in which the light from the flash unit is bounced off of the ceiling or off of a wall onto the subject to diffuse the light, resulting in a more evenly lit image. To do this, your flash must have a head that swivels and tilts. Most flashes made within the last 10 years have this feature, but some may not. Figure 6.3 shows a picture taken with straight flash and a picture taken with bounced flash.
When you attempt bounce flash, you want to get as much light from the flash onto your subject as you can. To do this, you need to first look at the placement of the subject and then adjust the angle of the flash head appropriately. Consider the height of the ceiling or distance from the surface you intend to bounce the light from to the subject.
Unfortunately, not all ceilings are useful for bouncing flash. For example, the ceiling in my studio is corrugated metal with iron crossbeams. If I attempt to bounce flash from it, it makes little or no difference to the image because the light doesn't reflect evenly and scatters in different directions. In a situation where the ceiling is not usable, you can position the subject next to a wall and swivel the flash head in the direction of the wall and bounce it from there. To bounce the flash at the correct angle, remember the angle of incidence equals the angle of reflection, or the angle at which the light hits a flat surface is the same angle that it's reflected.
You want to aim the flash head at such an angle that the flash isn't going to bounce in behind the subject so it is poorly lit. You want to be sure that the light is bounced so that it falls onto your subject. When the subject is very close to you, you need to have your flash head positioned at a more obtuse angle than when the subject is farther away. I recommend positioning the subject at least 10 feet away and setting the angle of the flash head at 45° for a typical height ceiling of about 8 to 10 feet.
An important pitfall to be aware of when bouncing flash is that the reflected light picks up and transmits the color of the surface from which it is bounced. This means if you bounce light off a red surface, your subject will have a reddish tint to it. The best approach is to avoid bouncing light off of surfaces that are brightly colored, and stick with bouncing light from a neutral-colored surface. White surfaces tend to work the best because they reflect more light and don't add any color. Neutral gray surfaces also work well, although you can lose a little light given there is less reflectivity.
Unfortunately, you can't do bounce flash with the built-in flash on the D7000; you need an external Speedlight such as an SB-900, SB-800, SB-700, SB-600, or SB-400.
6.3 A picture taken with straight flash on the left and bounced flash on the right
Flash Exposure Modes
Flashes have different modes that determine how they receive the information on setting the exposure. However, be aware that, depending on the Speedlight or flash you are using, some flash modes may not be available.
i-TTL and i-TTL BL
The D7000 determines the proper flash exposure automatically by using Nikon's proprietary i-TTL (intelligent Through-the-Lens) system. The camera gets most of the metering information from monitor preflashes emitted from the Speedlight. These preflashes are emitted almost simultaneously with the main flash so it looks as if the flash has only fired once. The camera also uses data from the lens, such as distance information and f-stop values, to help determine the proper flash exposure.
Additionally, two types of i-TTL flash metering are available for the D7000: Standard i-TTL flash and i-TTL Balanced Fill-Flash (BL). With Standard i-TTL flash, the camera determines the exposure for the subject only and doesn't take the background lighting into account. With i-TTL BL mode, the camera attempts to balance the light from the flash with the ambient light to produce a more natural-looking image.
When you use the built-in flash on the D7000, the default mode is i-TTL BL. To switch the flash to Standard i-TTL, the camera must be switched to Spot metering.
The Standard i-TTL and i-TTL BL flash modes are available with Nikon's current Speedlight lineup, including the SB-900, SB-700, SB-600, SB-400, and the R1C1 macro flash kit, as well as the recently discontinued SB-800.
Manual
When you set your Speedlight (either the built-in or accessory flash) to full Manual mode, you must adjust the settings yourself. The best way to figure out the settings is by using a handheld flash meter or by using the GN / D = A formula I discussed previously.
Auto
With Speedlights that offer the Auto mode (sometimes referred to as Non-TTL Auto Flash), such as the SB-900 and SB-800, you decide the exposure setting. These flashes usually have a sensor on the front of them that detects the light reflected back from the subject. When the flash determines enough light has been produced to make the exposure, it automatically stops the flash tube from emitting any more light.
When using this mode, you need to be aware of the limitations of the flash you are using. If the flash doesn't have a high GN or the subject is too far away, you may need to open the aperture. Conversely, if the flash is too powerful or the subject is very close, you may need to stop the aperture down a bit.
![]() When you use Auto mode with a non-Nikon flash, be sure not to set the shutter speed on the D7000 higher than the rated sync speed, which is 1/250 second. If you do, the image will not be completely exposed.
When you use Auto mode with a non-Nikon flash, be sure not to set the shutter speed on the D7000 higher than the rated sync speed, which is 1/250 second. If you do, the image will not be completely exposed.
Auto Aperture
Some flashes, such as the SB-900 and SB-800, also offer Auto Aperture Flash mode. In this mode, you decide which aperture is best suited for the subject you are photographing, and the flash determines how much light to add to the exposure.
Guide Number distance priority
In the Guide Number distance priority mode available with the SB-800 and SB-900, the flash controls the output according to aperture and subject distance. You manually enter the distance and f-stop value into the flash unit and then select the f-stop with the camera. The flash output remains the same if you change the aperture. You can use this mode when you know the distance from the camera to the subject.
![]() Changing the aperture or the distance to the subject after entering the setting on the flash can cause improper exposures.
Changing the aperture or the distance to the subject after entering the setting on the flash can cause improper exposures.
Repeating flash
When in Repeating flash mode, the flash fires repeatedly like a strobe light during a single exposure, as shown in Figure 6.4. You must manually determine the proper flash output you need to light your subject using the formula to get the correct aperture (GN / D = A), and then you decide the frequency (Hz) and the number of times you want the flash to fire. The slower the shutter speed, the more flashes you can capture. For this reason, I recommend only using this mode in low-light situations because the ambient light tends to overexpose the image. Use this mode to create a multiple exposure-type image.
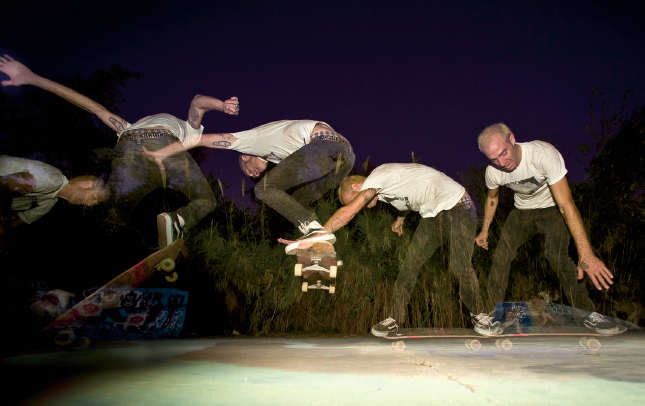
6.4 An image shot using Repeating flash
To determine the correct shutter speed, use this simple formula: Shutter speed = number of flashes per frame / Hz. For example, if you want the flash to fire 10 times with a frequency of 40 Hz (40 times per second), divide 10 by 40, which gives you .25 or 1/4 second.
Flash Sync Modes
Flash sync modes control how the flash operates in conjunction with your D7000. These modes work with both the built-in Speedlight and accessory Speedlights, such as the SB-900, SB-800, SB-600, and so on. These modes allow you to choose when the flash fires, either at the beginning of the exposure or at the end, and they also allow you to keep the shutter open for longer periods, enabling you to capture more ambient light in low-light situations.
Sync speed
Before getting into the different sync modes, you need to understand sync speed. The sync speed is the fastest shutter speed that can be used while achieving a full flash exposure. This means if you set your shutter speed at a speed faster than the rated sync speed of the camera, you don't get a full exposure and end up with a partially underexposed image. With the D7000, you can't actually set the shutter speed above the rated sync speed of 1/250 second when using a dedicated flash because the camera won't let you (unless you're using Auto FP High-Speed Sync; more on that later). This means you don't need to worry about having partially black images when using a Speedlight. But if you're using a studio strobe or a third-party flash, this may be of concern.
Limited sync speeds exist because of the way shutters in modern cameras work. As you already know, the shutter controls the amount of time the light is allowed to reach the imaging sensor. All dSLR cameras have a focal plane shutter. This shutter is located directly in front of the focal plane, which is essentially on the sensor. The focal plane shutter has two shutter curtains that travel vertically in front of the sensor to control the time the light can enter through the lens. At slower shutter speeds, the front curtain covering the sensor moves away, exposing the sensor to light for a set amount of time. When the exposure has been made, the second curtain then moves in to block the light, thus ending the exposure.
Although the D7000 has a top-rated sync speed of 1/250 second, Nikon has built in a convenient option in Custom Settings menu e1 (CSM e1) that allows you to use flash at shutter speeds faster than the rated sync speed. This is called Auto FP High-Speed Sync (the FP stands for focal plane, as in the shutter). Setting CSM e1 to Auto FP allows you to shoot the built-in flash at 1/320 second and other compatible Speedlights (SB-900, SB-800, SB-700, and SB-600) to a maximum of 1/8000 second. Earlier, I said that the sensor must be fully exposed to receive the full flash exposure and that's limited to 1/250 second, so how on earth does Auto FP flash work?
It's pretty simple actually: Instead of firing one single pop, the flash fires multiple times as the shutter curtain travels across the focal plane of the sensor (hence the Auto FP). The only drawback is that your flash power, or GN, is diminished, so you may need to take this into consideration when doing manual flash calculations.
Auto FP is a useful feature. It's mainly used when shooting in brightly lit scenes using fill flash. An example is shooting a portrait outdoors at high noon; of course, the light is very high in contrast and you want to use fill flash, but you also require a wide aperture to blur out the background. At the sync speed 1/250 second, ISO 200, your aperture needs to be at f/16. If you open your aperture to f/4, you then need a shutter speed of 1/8000 second. This is possible using Auto FP.
At shutter speeds faster than 1/250, the second curtain of the shutter starts closing before the first curtain has exposed the sensor completely. This means the sensor is actually exposed by a slit that travels the length of the sensor. This allows your camera to have extremely fast shutter speeds, but limits the flash sync speed because the entire sensor must be exposed to the flash at once to achieve a full exposure.
![]() The built-in flash on the D7000 only uses Auto FP up to 1/320 second.
The built-in flash on the D7000 only uses Auto FP up to 1/320 second.
Front-Curtain Sync
Front-Curtain Sync is the default sync mode for your camera whether you are using the built-in flash, one of Nikon's dedicated Speedlights, or a third-party accessory flash. With Front-Curtain Sync, the flash is fired as soon as the shutter's front curtain fully opens. This mode works well with most general flash applications.
One thing worth mentioning about Front-Curtain Sync is that although it works well when you're using relatively fast shutter speeds, when the shutter is slowed down (also known as dragging the shutter in flash photography), especially when you're photographing moving subjects, your images have an unnatural-looking blur in front of them. Ambient light reflecting off of the moving subject creates this.
When doing flash photography at slow speeds, your camera is actually recording two exposures: the flash exposure and the ambient light. When you're using a fast shutter speed, the ambient light usually isn't bright enough to have an effect on the image. When you slow down the shutter speed substantially, it allows the ambient light to be recorded to the sensor, causing ghosting. Ghosting is a partial exposure that is usually fairly transparent looking on the image.
In Figure 6.5, ghosting causes a trail to appear in front of the subject because the flash freezes the initial movement of the subject. Because the subject is still moving, the ambient light records it as a blur that appears in front of the subject, creating the illusion that it's moving backward. To counteract this problem, you can use a Rear-Curtain Sync mode, which I explain later.
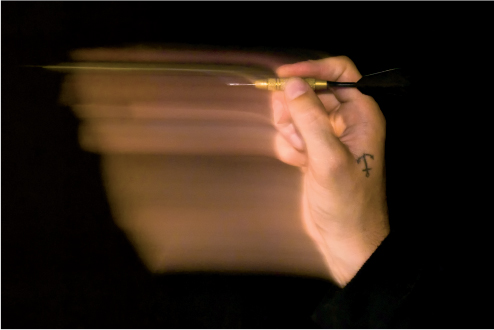
6.5 A shot using Front-Curtain Sync with a shutter speed of 1 second. Notice that the flash freezes the hand during the beginning of the exposure and the trail caused by the ambient exposure appears in the front, causing the hand to look like it's moving backward.
Red-Eye Reduction
We've all seen red-eye in a picture at one time or another — that unholy red glare emanating from the subject's eyes that is caused by light reflecting off the retina. Fortunately, the D7000 offers a Red-Eye Reduction mode. When this mode is activated, the camera either fires some preflashes (when using an accessory Speedlight) or turns on the AF-assist illuminator (when using the built-in flash), which cause the pupils of the subject's eyes to contract. This stops the light from the flash from reflecting off of the retina and reduces or eliminates the red-eye effect. This mode is useful when you're taking portraits or snapshots of people or pets with little light available.
Slow Sync
Sometimes when you're using a flash at night, especially when the background is very dark, the subject is lit but appears to be in a black hole, as shown on the left in Figure 6.6. Slow Sync mode helps take care of this problem. In Slow Sync mode, the camera allows you to set a longer shutter speed (up to 30 seconds) to capture the ambient light of the background, as shown on the right in Figure 6.6. Your subject and the background are lit, so you can achieve a more natural-looking photograph.
6.6 These two images show the difference between straight flash at night (left) and slow sync (right).
![]() When you use Slow Sync, be sure the subject stays still for the whole exposure to avoid ghosting. Of course, you can use ghosting creatively.
When you use Slow Sync, be sure the subject stays still for the whole exposure to avoid ghosting. Of course, you can use ghosting creatively.
Rear-Curtain Sync
When using Rear-Curtain Sync, the camera fires the flash just before the rear curtain of the shutter starts moving. This mode is useful when you're taking flash photographs of moving subjects. Rear-curtain sync allows you to more accurately portray the motion of the subject by causing a motion blur trail behind the subject rather in front of it, as is the case with Front-Curtain Sync. Rear-Curtain Sync is used in conjunction with Slow Sync.
![]() Rear-Curtain Sync is available in all exposure modes (P, S, A, and M), Rear-Curtain Slow Sync is only available when in P or A mode.
Rear-Curtain Sync is available in all exposure modes (P, S, A, and M), Rear-Curtain Slow Sync is only available when in P or A mode.
6.7 A picture taken using Rear-Curtain Sync
Understanding the Creative Lighting System
Nikon introduced the Creative Lighting System (CLS) in 2004. In simple terms, it is a system designed to enable you to use Nikon Speedlights off-camera. This allows you to position the Speedlights wherever you want and control the direction of light to make the subject appear exactly how you want. The Nikon CLS enables you to achieve creative lighting scenarios similar to what you would achieve with expensive and much larger studio strobes. You can do it wirelessly with the benefit of full i-TTL metering. To take advantage of the Nikon CLS, you need the D7000 (or a CLS-compatible Nikon camera) and at least one SB-900, SB-800, SB-700, SB-R200, or SB-600 Speedlight. With the CLS, there is no more mucking about with huge power packs and heavy strobe heads on heavy-duty stands, with cables and wires running all over the place.
The Nikon CLS is not a lighting system in and of itself, but is comprised of many different pieces you can add to your system as you see fit (or your budget allows). The first and foremost piece of the equation is your camera.
The Nikon CLS is basically a communication system that allows the camera, the commander, and the remote units to share information regarding exposure.
A commander, which is also called a master, is the flash that controls external Speedlights. Remote units, which are sometimes referred to as slaves, are the external flash units the commander controls remotely. Communications between the commander and the remote units are accomplished by using pulse modulation. Pulse modulation is a term that means the commanding Speedlight fires rapid bursts of light in a specific order. The pulses of light are used to convey information to the remote group, which interprets the bursts of light as coded information.
Firing the commander tells the other Speedlights in the system when and at what power to fire. The built-in flash on the DX can act as a commander. Using an SB-700, SB-800, or SB-900 Speedlight or an SU-800 Commander as a master allows you to control three separate groups of remote flashes and gives you an extended range.
Using the built-in Speedlight as a commander, you can only control two groups of external Speedlights and have a limited range on how far the camera can be from the remote flashes.
This is how CLS works in a nutshell:
- The commander unit sends out instructions to the remote groups to fire a series of monitor preflashes to determine the exposure level. The camera's i-TTL metering sensor reads the preflashes from all the remote groups and takes a reading of the ambient light.
- The camera tells the commander unit the proper exposure readings for each group of remote Speedlights. When the shutter is released, the commander, via pulse modulation, relays the information to each group of remote Speedlights.
- The remote units fire at the output specified by the camera's i-TTL meter, and the shutter closes.
All these calculations happen in a fraction of a second as soon as you press the Shutter Release button. It appears to the naked eye as if the flash just fires once. There is no waiting for the camera and the Speedlights to do the calculations.
Given the ease of use and the portability of the Nikon CLS, I highly recommend purchasing at least one (if not two) SB-900, SB-800, SB-700, or SB-600 Speedlights to add to your setup. With this system, you can produce almost any type of lighting pattern you want, and it can definitely get you on the road to creating more professional-looking images.
For a definitive and in-depth look into the Nikon CLS, read the Nikon Creative Lighting System Digital Field Guide, 2nd Edition (Wiley, 2009).
Using the Built-In Flash
The built-in Speedlight on the D7000 is a handy little flash that's great for taking casual snapshots. Although it lacks the versatility of the bigger external flashes, the built-in flash is always there when you need it and requires no extra batteries because the camera's battery powers it. Activate it by pressing the flash pop-up button on the top left of the camera (as you would hold it for shooting) near the built-in flash.
The built-in flash is set to i-TTL mode by default in the menu (i-TTL appears as TTL in the menu), although you can choose to set it to Manual mode (you set the output). You can also set it to Repeating flash (RPT) or Commander mode, which allows you to use it to control up to two separate groups of remote Speedlights.
And you can use it with all the sync modes your camera offers: Front-Curtain Sync, Rear-Curtain Sync, Slow Sync, and Red-Eye Reduction. To change the sync mode, press the Flash mode button located just below the Flash pop-up button. Rotating the Main Command dial while pressing the Flash mode button changes the mode. The selected mode appears in the LCD control panel.
You can also apply exposure compensation by pressing the Flash mode button and rotating the Sub-command dial.
One of the best features of the built-in flash is that you can use it to wirelessly control remote units using the CLS. To take advantage of this feature, you need at least one SB-600, SB-700, SB-800, SB-900, or SB-R200. Follow these steps to use the built-in flash in Commander mode:
- Press the Menu button and use the Multi-selector to navigate to the Custom Settings menu.
- Use the Multi-selector to highlight CSM e Bracketing/flash, and then press the Multi-selector right to enter the CSM e menu.
- Use the Multi-selector to highlight CSM e3 Flash cntrl for built-in flash, and then press the Multi-selector right to view flash control options.
- Press the Multi-selector up or down to choose Commander mode, and then press the Multi-selector right to view settings.
- Press the Multi-selector up or down to choose a flash mode for the built-in flash. You can choose M, TTL, or -. The last option (-) allows the flash to control the remotes without adding additional exposure.
- Press the Multi-selector right to highlight the exposure compensation setting. Press the Multi-selector up or down to apply exposure compensation if desired. If the built-in flash is set to -, this option is not available.
- Use the Multi-selector to set the mode for Group A. You can choose TTL, AA, M, or -. Press the Multi-selector right to highlight exposure compensation. Press the Multi-selector up or down to apply exposure compensation if desired. Repeat this process for Group B.
- Use the Multi-selector to highlight the Channel setting. You can choose from channels 1 to 4. These channels can be changed if you are shooting in the same area as another photographer using CLS. If you are both on the same channel, you will trigger each other's Speedlights. If you use CLS alone, it makes no difference which channel you choose.
- Press the OK button. If this button is not pressed, no changes are applied.
When you use wireless CLS, be sure that your remote Speedlights are set to the proper groups and channel. If the remotes aren't properly set, they will not fire.
Light Modifiers
When you set up a photographic shot, in essence, you are building a scene using light. For some images, you may want a hard light that is very directional; for others, a soft, diffused light works better. Light modifiers allow you to control the light so you can direct it where you need it, give it the quality the image calls for, and even add color or texture to the image. There are many different kinds of diffusers. Here's a list of the most common ones:
- Umbrella. The photographic umbrella is used to soften the light of a flash. You can either shoot through the umbrella or bounce the light from the inside of the umbrella depending on the type of umbrella you have. Umbrellas are very portable and make a great addition to any Speedlight setup.
- Softbox. These also soften the light and come in a myriad of sizes, from huge 8-foot softboxes to small 6-inch versions that fit right over your Speedlight mounted on the camera.
- Reflector. This is probably the handiest modifier you can have. You can use it to reflect natural light onto your subject or you can use it to bounce light from your Speedlight onto the subject, making it softer. Some can act as diffusion material to soften direct sunlight. They come in a variety of sizes from 2 to 6 feet and fold up into a small portable size. I recommend that every photographer have at least a small reflector in his alternate camera bag.
- Parabolic reflectors. Most light sources come equipped with a parabolic reflector. They usually range from 6 to 10 inches in circumference, although you can buy larger ones. Without a reflector, the light from the bare bulb, whether it's a flash tube or an incandescent, scatters and lacks direction, resulting in the loss of usable light. The reflector focuses the light into a more specific area, actually increasing the amount of usable light by 1 or 2 stops. Parabolic reflectors are commonly used in conjunction with other light modifiers, including umbrellas, barn doors, and grids. When you use an umbrella, you should always use a reflector to direct the light into the umbrella, which diffuses the light. Using only a reflector gives the light a very hard quality that results in a lot of contrast.
- Barn doors. Barn doors are used to control the direction of light and to block stray light from entering the lens, which can result in lens flare. Blocking the light is also known as flagging. Barn doors are normally attached to the reflector and come in two types — 4-leaf and 2-leaf. Barn doors consist of panels that are attached to hinges, which allow you to open and close the doors to let light out or keep it in. Typically, barn doors are used when you want a hard light source to shine on a specific area of the subject but you don't want any stray light striking other parts of the subject or the camera lens.
- Grids. Grids, also known as grid spots or honeycombs, are used to create a light similar to a spotlight. A grid is a round disc with a honeycomb-shaped screen inside of it. When the light shines through it, it is focused to a particular degree, giving you a tight circle of light with a distinct falloff at the edges. There are different types of grids that control the spread of light. They run from a 5° grid to a 60° grid. The 5° grid has very small holes and is deep, so the light is focused down to a small bright spot. The higher the degree of the grid spot, the more spread out the spot becomes. Grids fit inside of the reflector, just in front of the lamp or flash tube. They are great to use as hair lights and to add a spot of light on the background to help the subject stand out.
- Snoots. A snoot creates a spotlightlike effect similar to the grid. A snoot is shaped like a funnel and it kind of works that way, too, funneling light into a specific area of the scene. The snoot usually has a brighter spot effect than a grid does, and fits directly over the flash head.
- Gobos. A gobo can be anything that goes between the light source and the subject or background, often to create a pattern or simulate a specific light source, such as a window. It is usually attached to a stand and placed a few feet in front of the light source. A common technique in film noir-type photography is to place venetian blinds between a light and the background to simulate sunlight shining through the blinds of the office window of a private eye. You can make gobos or purchase them from a photographic supply house.