
Chapter 5
Specifying Image Size and Quality
IN THIS CHAPTER
![]() Setting image size and quality
Setting image size and quality
![]() Shooting RAW
Shooting RAW
![]() Naming your images
Naming your images
![]() Managing your image files
Managing your image files
Your Nikon D780 captures images with a resolution of 24.5 megapixels, which is humongous, ginormous, or any other adjective you prefer to indicate something that’s really, really big. The good news : This gives you a tremendous amount of flexibility. You can print images as large as 25.2 x 16.8 inches at the camera’s native resolution of 240 pixels per inch (ppi). Think of the possibilities of decorating your house with your photographs! The bad news : The large file size takes up lots of room on your memory cards and lots of room on your computer hard drive. Fortunately, you can specify different sizes by using camera menu options if you have memory cards and hard drives with small capacities.
In addition to concerning yourself with image size, you also need to consider the file format. Your camera can capture images in the RAW or JPEG format. When you capture images in the RAW format, you must process them in some kind of software (such as Nikon Capture NX-D, Adobe Photoshop, or Adobe Lightroom), sort of like a digital darkroom. The RAW format gives you a tremendous amount of flexibility.
If you capture images in the JPEG format, the camera does the processing for you. Think of JPEGs as the digital equivalent of a Polaroid image. You get instant gratification, but you can’t do much with the image except crop it and perform minimal image editing. If you capture images in the JPEG format, you also have to think about image quality. The setting you choose determines the image quality and the file size.
If you’re new to digital photography, file format, image size, and quality may seem a tad overwhelming. But, hey, don’t worry — in this chapter, I show you how to specify image size, image quality, and a whole lot more.
Understanding Image Size and Quality
Your camera can capture large images. The default option captures images at a size that most photographers — except professionals — won’t ever need or use. But before you specify sizes, you need to understand the relationship between the image size and the resolution. The default image size your camera can capture measures 6,048 x 4,024 pixels, which translates to 24.5 megapixels. The default resolution for your camera is 240 ppi. So, the default image size and resolution equate to an image size of 25.2 x 16.8 inches.
If you’re going to edit your images with software and then print them, you need to factor this into the choices you make when specifying image size and quality. You can get high-quality prints with the 240 ppi default resolution. However, some online printers prefer 300 ppi. If you’re capturing images that will only be displayed on a website and will never be printed, you can get by with a much smaller image and a resolution of 72 or 96 ppi. When you use images on the web or in a blog post, you’ll rarely need one that’s wider than 640 pixels for your personal WordPress blog, but you may need a different size if submitting images to someone else’s blog. So, if you’re shooting images that will only be displayed on the web, you can specify a smaller image size, as shown in the following sections. You can resample images to a higher or lower resolution with third-party software, such as Adobe Photoshop, Adobe Photoshop Elements, or Adobe Lightroom.
The default image size is great if you’re printing images and have gobs of space on your hard drive and a pocket full of 32GB memory cards. However, if your storage capacity is at a premium or you’re running out of room on your last memory card with no computer readily available to download to, it’s important to know how to change image size and quality, a task I show you how to do in the upcoming sections.
Specifying Image Format, Size, and Quality
Your Nikon D780 has many options that determine the dimensions, image format, quality, and file size. You can choose from two image formats: JPEG and NEF (RAW).
 NEF is just Nikon’s RAW file format. When you download the images to your computer, they’ll have a
 .nef filename extension (as opposed to JPEG images, which have a .jpg or .jpeg filename extension).
There are three different size options for each image format and six quality options for the JPEG image format. You can capture both formats simultaneously when you shoot an image, or choose either format. If you're shooting with two cards in the camera, you have different options, which I discuss in Chapter 9.
Your decisions regarding format, image size, and quality determine the crispness of the resulting images, the file size, and the amount of flexibility you have when editing your images. To give you an idea of the difference in file sizes, you’ll end up with a file size of 7.2MB when you capture the largest size image using the JPEG format with Fine quality compared to a file size of approximately 29MB when you capture the same size image using the NEF (RAW) format.
 I explain the differences between the two formats in the earlier “JPEG or RAW? Which is right for you?” sidebar.
One of the first decisions you make regarding your images is the file format. You can capture JPEG or NEF (RAW) images. When you choose the file format, you also specify the image size. If you choose the JPEG format, you specify the quality as well. You even have an option to capture both formats simultaneously, and have other options if you shoot with two cards (see Chapter 9). If you’re curious about the difference between the formats, check out the “JPEG or RAW? Which is right for you?” sidebar in this chapter.
To specify the image quality, follow these steps:
- Press the MENU button.
-
Press the down arrow on the multi selector to navigate to the Photo Shooting menu (the icon looks like a camera), and then press the left arrow on the multi selector.
The Photo Shooting menu is highlighted.
-
Press the right arrow on the multi selector to view the Photo Shooting menu options, and then press the down arrow on the multi selector to select Image Quality.

FIGURE 5-1: Click the command to see the Image Quality options.
The currently selected Image Quality is displayed next to Image Quality (see Figure 5-1).
-
Press the right arrow on the multi selector.
The tilting monitor refreshes and displays the Image Quality options (see Figure 5-2).
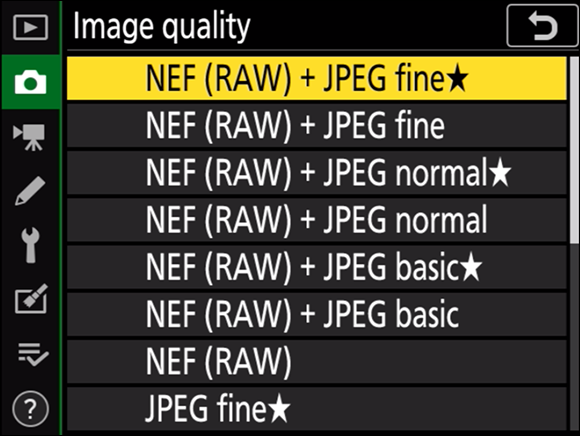
FIGURE 5-2: Choose an Image Quality option.
-
Press the down arrow on the multi selector to select one of the following Image Quality options:
- NEF (RAW) + JPEG fine ★: Creates a RAW file and a JPEG file with an image quality of fine. In this format, the camera creates a JPEG image that prioritizes image quality.
- NEF (RAW) + JPEG fine: Creates a RAW file and a JPEG file with an image quality of fine. In this format, the camera creates a JPEG image that prioritizes file size.
- NEF (RAW) + JPEG normal ★: Creates a RAW file and a JPEG file with an image quality of normal. In this format, the camera creates a JPEG image that prioritizes image quality.
- NEF (RAW) + JPEG normal: Creates a RAW file and a JPEG file with an image quality of normal. In this format, the camera creates a JPEG image that prioritizes file size.
- NEF(RAW) + JPEG basic ★: Creates a RAW file and a JPEG file with an image quality of basic. In this format, the camera creates a JPEG image that prioritizes image quality.
- NEF (RAW) + JPEG basic: Creates a RAW file and a JPEG file with an image quality of basic. In this format, the camera creates a JPEG image that prioritizes file size.
- NEF (RAW): Creates only a RAW file.
- JPEG fine ★: Creates only a JPEG file with an image quality of fine. The resulting JPEG file prioritizes image quality.
- JPEG fine: Creates only a JPEG file with an image quality of fine. The resulting JPEG file prioritizes file size.
- JPEG normal ★: Creates only a JPEG file with an image quality of normal. The resulting JPEG file prioritizes image quality.
- JPEG normal: Creates only a JPEG file with an image quality of normal. The resulting JPEG file prioritizes file size.
- JPEG basic ★: Creates only a JPEG file with an image quality of basic. The resulting JPEG file prioritizes image quality.
- JPEG basic: Creates only a JPEG file with an image quality of basic. The resulting JPEG file prioritizes file size.
Note that fine is the best image quality, normal is a midrange image quality, and basic is the lowest image quality. -
Press OK.
Images will be created using the specified quality until you return to this menu and choose a different option.
After specifying image quality, your next step is to specify image size. Follow these steps:
- Press the MENU button.
-
Press the down arrow on the multi selector to navigate to the Photo Shooting menu (the icon looks like a camera), and then press the left arrow on the multi selector.
The Photo Shooting menu is highlighted.
-
Press the right arrow on the multi selector to view the Photo Shooting menu options, and then press the down arrow on the multi selector to select Image Size.
- Press the right arrow on the multi selector to view the different image size options (see Figure 5-4).
The currently selected Image Size is displayed next to Image Size (see Figure 5-3).
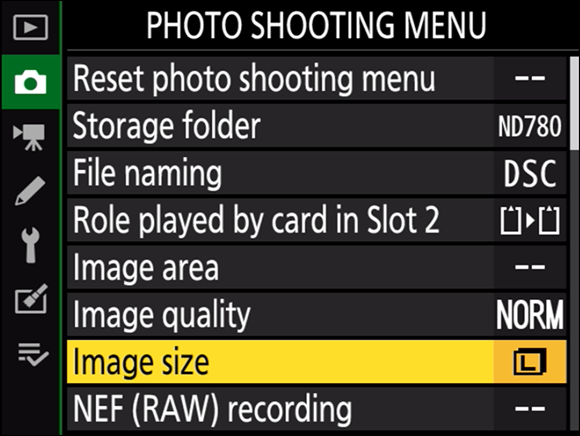
FIGURE 5-3: The Image Size menu command.
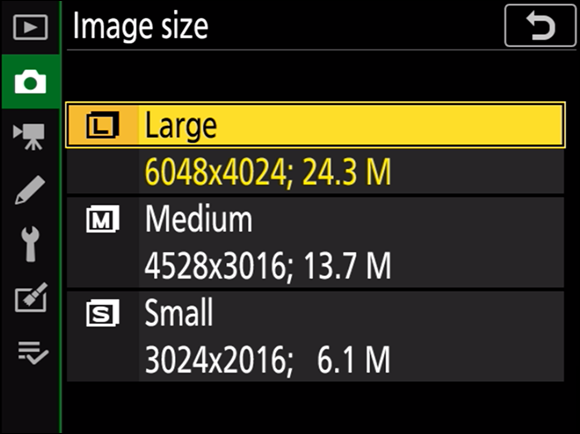
FIGURE 5-4: Choosing an image size.
- Press the down arrow on the multi selector to select one of the following options:
- Large: Creates a 6,048-x-4,024-pixel image.
- Medium: Creates a 4,528-x-3,016-pixel image.
- Small: Creates a 3,024-x-2,016-pixel image.
-
Press OK.
Images will be created using the specified size until you return to this menu and choose a different option.
Choosing an Image Area
Your camera has multiple options regarding the area of the sensor that is used to capture images. The default format has an aspect ratio of 3:2, the same as the sensor. But you can change the image area based on the type of photograph you’re creating. If you’re photographing a beautiful landscape, you can choose the Panorama setting. Creating headshots for a passport? Choose the 1:1 format.
To choose an image area, follow these steps:
- Press the MENU button.
-
Press the down arrow on the multi selector to navigate to the Photo Shooting menu (the icon looks like a camera), and then press the left arrow on the multi selector.
The Photo Shooting menu is highlighted.
- Press the right arrow on the multi selector to view the Photo Shooting menu options, and then press the down arrow on the multi selector to select Image Area (see Figure 5-5).
-
Press the right arrow on the multi selector to view the different Image Area options.
The tilting monitor refreshes and displays the Image Area options. Choose Image Area is selected by default (see Figure 5-6).
- Press the right arrow on the multi selector to display the different options (see Figure 5-7).
- Use the multi selector to select one of the following Image Area options:
- FX (36x24): Images are recorded using the entire sensor, with an aspect ratio of 3:2.
- DX (24x16): Images are recorded using an area of the sensor equivalent to that of a Nikon DX camera, which has a smaller sensor. The aspect ratio is still 3:2. This is the equivalent of a cropped frame sensor with a focal length multiplier of 1.5. In other words, if you choose this image area option and you shoot with a 100mm lens, it’s the equivalent of shooting with a 150mm lens.
- 1:1 (24x24): Images are recorded with a 1:1 (square) aspect ratio.
- 16:9 (36x20): Images are recorded with a 16:9 aspect ratio.
-
Press OK.
The specified image area will be used for all images you create until you return to this menu and choose another option.
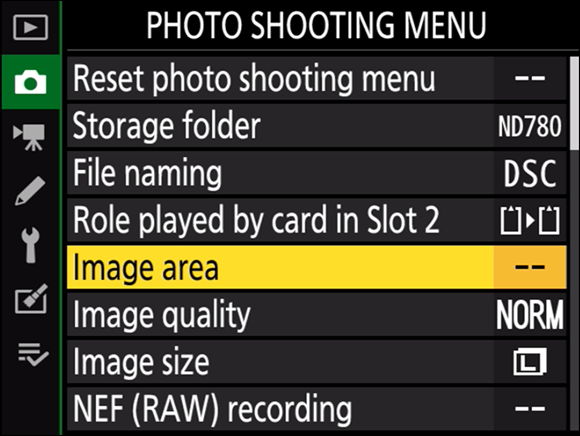
FIGURE 5-5: Choosing Image area options.

FIGURE 5-6: Displaying the desired Image Area options.

FIGURE 5-7: See your Image Area options.
After choosing an image area, you’re returned to the previous menu choices. At this stage, you can press the shutter-release button and continue shooting, but there are two other important options on the Image Area menu.
If you choose the DX option, and you’re shooting with a lens manufactured for a DX camera Auto DX crop is enabled by default. I suggest you accept the default option.
If you use an image area other than FX, I suggest you add a viewfinder mask, which will help you compose images. When you add a viewfinder mask, a red mask appears in the viewfinder that shows you which part of what you’re seeing in the viewfinder will appear in the final image. To add a viewfinder mask, follow these steps:
-
Repeat the previous steps to choose an image area.
After you choose an image area, you’re returned to the first Image Area menu.
-
Press the down arrow on the multi selector to highlight Viewfinder Mask Display (see Figure 5-8), and then press the right arrow on the multi selector.
The Viewfinder Mask Display Options appear (see Figure 5-9).
-
Press the down arrow on the multi selector to highlight ON, and then press OK.
The mask for the image area you specified appears in the viewfinder until you revisit this menu and choose OFF. The mask is a red overlay outside of the area the camera will use to capture the image. In other words, everything that isn’t masked will be in the resulting image.
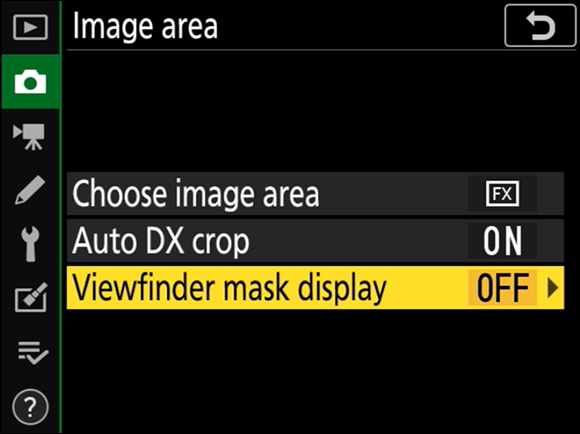
FIGURE 5-8: This option displays a mask in the viewfinder.
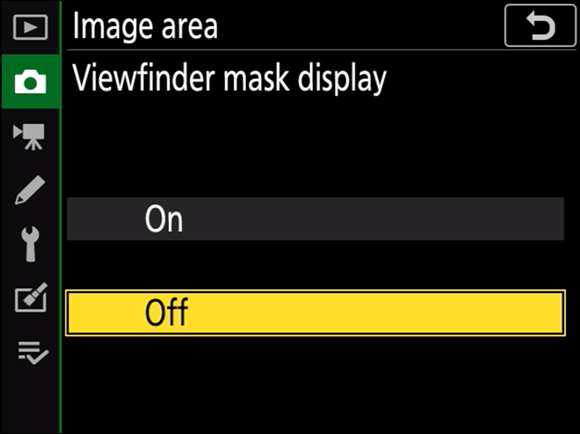
FIGURE 5-9: Choose a Viewfinder Mask Display option.
The ability to change image area on the fly gives you yet another creative tool for your photography arsenal. Figure 5-10 shows a landscape photographed with the 16:9 (36x20) Image Area option.

FIGURE 5-10: Shooting a landscape with the 16:9 (36x20) image area.
Specifying a Bit Depth
I shoot NEF (RAW), because it gives me more latitude with the images I create. Occasionally, I shoot images using one of the Picture Controls or one of the options from the EFCT mode, but primarily, I’m a RAW shooter. And one thing I love about the Nikon is the fact that I can specify the bit depth of the NEF (RAW) image, which determines the resulting file sizes of the images I capture. To get the smallest RAW file possible, specify that your NEF (RAW) images are 12-bit compressed files.
To specify bit depth, follow these steps:
- Press the MENU button.
-
Press the down arrow on the multi selector to navigate to the Photo Shooting menu (the icon looks like a camera), and then press the left arrow on the multi selector.
The Photo Shooting icon is highlighted.
- Press the right arrow on the multi selector to view the Photo Shooting menu options, and then press the down arrow on the multi selector to highlight NEF (RAW) Recording (see Figure 5-11).

FIGURE 5-11: The NEF (RAW) Recording menu.
-
Press the right arrow on the multi selector to display the NEF (RAW) Recording options (see Figure 5-12).
The NEF (RAW) Compression option is selected by default.
-
Press the right arrow on the multi selector to change NEF (RAW) Compression.
The tilting monitor refreshes and the NEF (RAW) Compression options are displayed (see Figure 5-13).
- Use the up arrow or down arrow on the multi selector to select one of the following compression options:
- Lossless Compressed: NEF (RAW) files are compressed using a lossless algorithm. The resulting file size is approximately 20 percent to 40 percent smaller than uncompressed files. This setting gives you the best-quality image and it’s what I use.
- Compressed: NEF (RAW) files are compressed. The resulting file size is approximately 35 percent to 55 percent smaller than uncompressed files.
-
After choosing your desired option, press OK.
The option will be applied to all images until you visit this menu again and choose a different option. After choosing an option, the previous menu is displayed.
-
If it isn’t already selected, use the down arrow on the multi selector to highlight NEF (RAW) Bit Depth (see Figure 5-14) and press the right arrow on the multi selector.
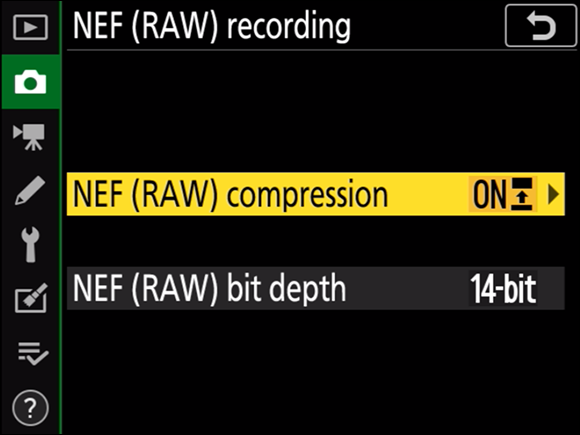
FIGURE 5-12: Specifying NEF (RAW) Recording options.

FIGURE 5-13: To compress or not to compress.

FIGURE 5-14: Change NEF (RAW) bit depth.
The NEF (RAW) bit depth options are displayed (see Figure 5-15).
- Press the up arrow or down arrow on the multi selector to choose one of the following options:
- 12 Bit: NEF (RAW) images are captured with a bit depth of 12 bits.
- 14 Bit: NEF (RAW) images are captured with a bit depth of 14 bits. These images have more color data at the expense of a larger file size. This is the option I use because of the additional color data, which is useful when I edit my images.
-
Press OK.
The specified bit depth will be applied to all RAW images you create until you visit this menu again and choose a different option.
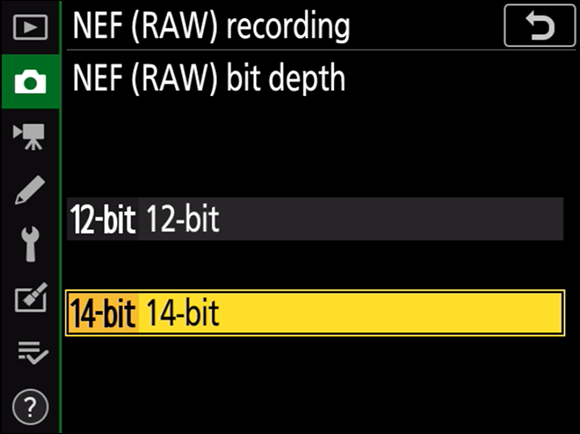
FIGURE 5-15: Choose one of these bit depth options.
Comparing Image Formats and File Sizes
When you capture images with a large image size, the file size is bigger and the images take up more room on your memory card. The image format also enters into the equation, and if you choose to capture images with the JPEG format, the image quality is a factor. Photographers also like to know the maximum number of images they can capture on a card. The number of images depends on the image format, dimensions, and quality, which equates to the file size. When you capture smaller images in the JPEG format that have been compressed to normal or basic quality, the file size is considerably smaller, so the maximum number of images you can capture before the card is filled is greater.
Table 5-1 shows you how many images you can fit on a 32GB card for each available image format. The table is based on choosing FX for the image area and capturing images with an ISO of 100. This table is only for reference. Your mileage may vary based on the subject matter and ISO speed setting you’re using.
TABLE 5-1 How Many Images Fit on a 32GB Card
|
Image Format |
Image Size |
File Size |
Number of Shots |
|
JPEG fine |
Large |
9.8MB |
3,200 |
|
JPEG fine |
Medium |
6.7MB |
6,000 |
|
JPEG fine |
Small |
4.1MB |
11,200 |
|
JPEG normal |
Large |
6.6MB |
7,000 |
|
JPEG normal |
Medium |
4.0MB |
11,700 |
|
JPEG normal |
Small |
2.2MB |
21,900 |
|
JPEG basic |
Large |
2.3MB |
13,700 |
|
JPEG basic |
Medium |
1.7MB |
21,900 |
|
JPEG basic |
Small |
1.2MB |
40,100 |
|
NEF (RAW), lossless compression, 14 bit |
Large |
27.7MB |
1,400 |
|
NEF (RAW), lossless compression, 12 bit |
Large |
21.7MB |
1200 |
|
NEF (RAW), compressed, 14 bit |
Large |
24.1MB |
1,500 |
|
NEF (RAW), compressed, 12 bit |
Large |
19.4MB |
1,800 |
Managing Image Files
By default, your images are numbered continuously until 9999 and then the file number is reset to 0001. Your images are also stored in a single folder on your memory card. You can, however, create folders in which to store your images and then change the file-numbering method. I show you how in the following sections.
Creating folders
By default, your camera creates the 100ND780 folder on your memory card where images are stored. You can, however, create as many folders as you want. A folder can hold a maximum of 9,999 images. When you exceed the maximum allowable images in a folder, a new one is created automatically. You can have a maximum of 999 folders on a card. Organizing your work in folders is a good idea if you work with large memory cards and want to store images from multiple shoots in separate folders.
The following steps show you how to create your first new folder: 101ND780. To create a folder, follow these steps:
- Press the MENU button.
-
Press the down arrow on the multi selector to navigate to the Photo Shooting menu (the icon looks like a camera), and then press the left arrow on the multi selector.
The Photo Shooting menu is highlighted.
-
Press the right arrow on the multi selector to view the Photo Shooting menu options, press the down arrow on the multi selector to highlight Storage Folder (see Figure 5-16), and then press the right arrow on the multi selector.
The Storage Folder options are displayed (see Figure 5-17).
-
Use the multi selector to highlight the Select Folder by Number option and then press the right arrow on the multi selector.
The Select Folder by Number screen appears and the number is selected by default (see Figure 5-18).
-
Press the down arrow on the multi selector to select a folder number and then press OK.
To create your first new folder, press the down arrow on the multi selector to select 1.
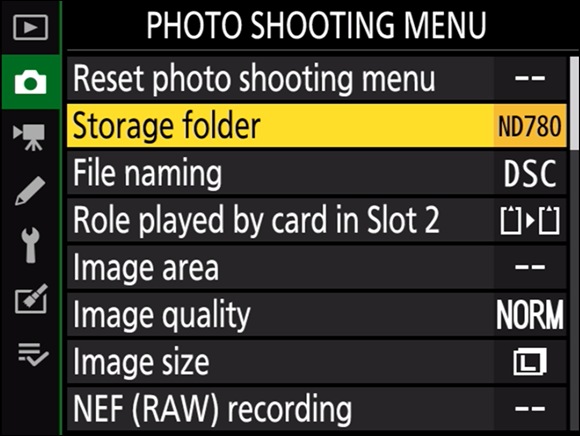
FIGURE 5-16: The Storage Folder menu option.
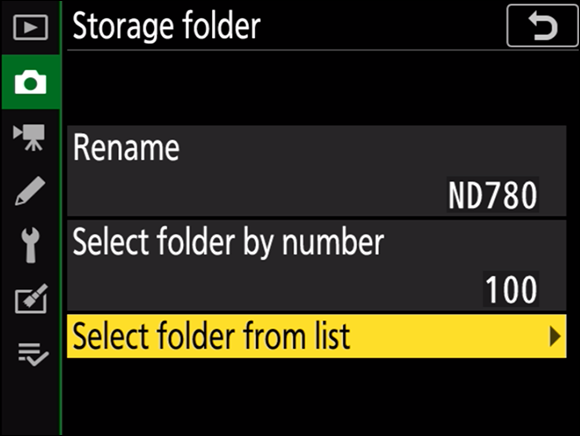
FIGURE 5-17: Choose one of these Storage Folder options.
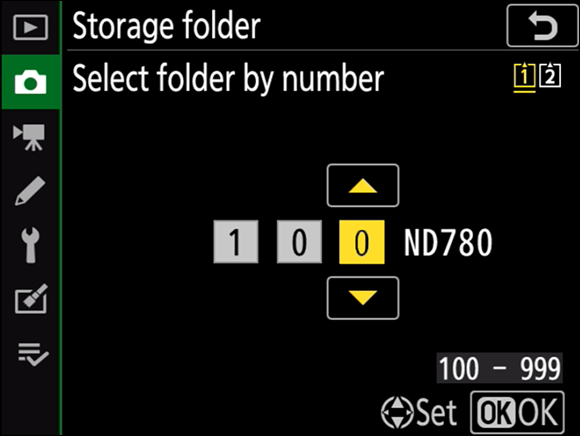
FIGURE 5-18: The Select Folder by Number screen.
After you’ve created a new folder, it’s ready to accept images. To store images in a different folder, follow Steps 1 through 3 and choose the Select Folder from List option; then select the folder in which you want to store the images.
There is also an option to rename folders. You cannot rename an existing folder, but you can choose a new name to be assigned to new folders.
Setting file numbering
The files you create are numbered from 0001 to 9999. When you create a new folder, or insert a new card, by default, file numbering continues from the last number used. If desired, you can change the file number sequence using a custom setting.
To change the file numbering sequence, follow these steps:
- Press the MENU button.
- Press the down arrow on the multi selector to navigate to the Custom Settings menu (the icon looks like a pencil), and then press the left arrow on the multi selector to highlight the menu.
- Press the right arrow on the multi selector to display the Custom Settings menu commands, and then press the down arrow on the multi selector to select the File Number Sequence option (see Figure 5-19).
-
Press the right arrow on the multi selector.
The File Number Sequence options are displayed (see Figure 5-20).
- Use the multi selector to select one of the following options:
- On: File numbering continues from the last number used.
- Off: File numbering starts from 001 when you create a new folder or insert a new memory card. This option is useful if you rename and renumber your images when you import them to your computer.
- Reset: If the current folder is empty, file numbering is reset to 0001. If there are images in the current folder, the next image you create will be assigned the next number. When you create a new folder or insert a new memory card, file numbering continues from the last number used.
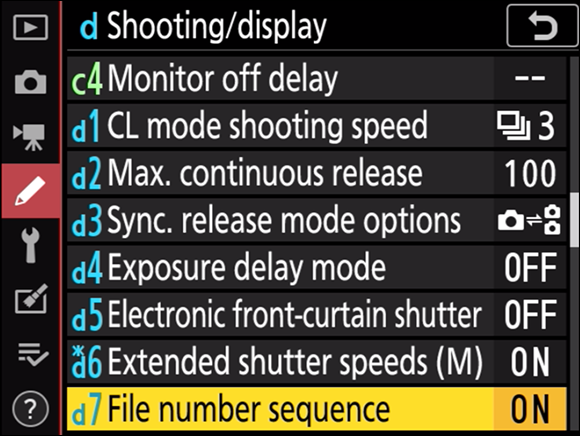
FIGURE 5-19: Use this menu option to change the file number sequence.
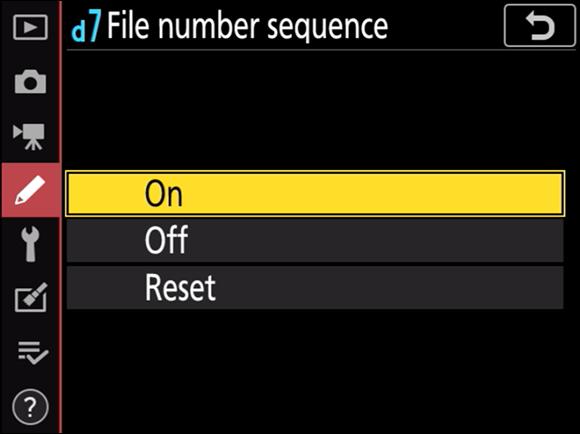
FIGURE 5-20: Choose one of these File Number Sequence options.
-
Press OK.
The next images you create will conform to the File Number Sequence option chosen until you revisit this menu and choose a different option.
Naming images
Each image you create uses the DSC prefix, followed by a four digit number using the default file-naming sequence, or one you choose (see the preceding section) followed by .nef (if you shoot RAW) or .jpg (if you shoot JPEG). You can change the prefix to suit your needs. For example, if you’re part of a team that photographs events like weddings, you can change the prefix to your initials.
To change the names of images you create with your camera, follow these steps:
- Press the MENU button.
-
Press the down arrow on the multi selector to navigate to the Photo Shooting menu (the icon looks like a camera), and then press the left arrow on the multi selector.
The Photo Shooting menu is highlighted.
- Press the right arrow on the multi selector to display the Photo Shooting menu.
-
Press the down arrow on the multi selector to navigate to the File Naming option (see Figure 5-21) and then press the right arrow on the multi selector.
The tilting monitor refreshes, and the File Naming menu (see Figure 5-22) is displayed. Note that File Naming is the only option you can change. The references to sRGB and Adobe RGB show you how the files will be named if you choose one of those color spaces.

FIGURE 5-21: Use this menu option to change file names.

FIGURE 5-22: Use the camera keyboard to enter a new name for your images.
-
Press the right arrow on the multi selector.
The keyboard appears (see Figure 5-23).
-
Enter the new name for your images.
For more information about using the keyboard, see Chapter 4.
-
Press the zoom in/QUAL button to finish creating the new name.
The next images you create will be named with the new prefix until you revisit this menu and enter a new filename.
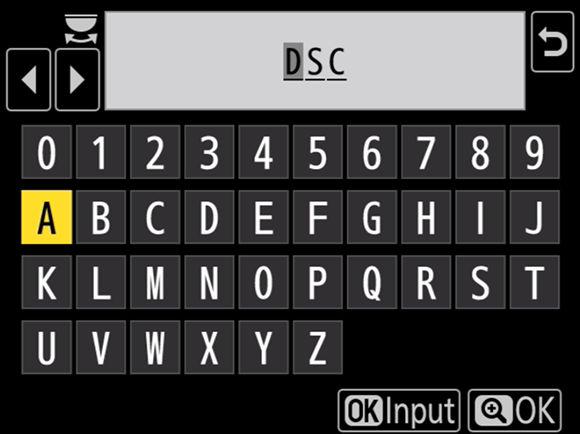
FIGURE 5-23: Enter the new name for your images.