
Chapter 7
Creating Images with Live View
IN THIS CHAPTER
![]() Creating images with live view
Creating images with live view
![]() Choosing an autofocus area in live view
Choosing an autofocus area in live view
![]() Using the framing grid
Using the framing grid
![]() Working with the live view i menu
Working with the live view i menu
![]() Taking pictures using touch controls
Taking pictures using touch controls
![]() Customizing your live view options
Customizing your live view options
If you like, you can use the tilting monitor to compose your pictures. This way of shooting has some definite advantages. For example, you can place the camera close to the ground and compose an image through the monitor, or you can hold the camera over your head to do the same. Your Nikon D780 has a tilting monitor, which makes it even easier to compose images from unique vantage points with live view.
Live view adds lots of benefits to shooting, but it has a few disadvantages, too. First, when you shoot in live view mode, the battery life diminishes. Also, to shoot using live view, you hold the camera in front of you at arm’s length, which, unless you work out at the gym five days a week, can be a bit tiring. Because of this, many people use tripods when shooting images and recording movies using live view.
In addition to taking great pictures in live view mode, you can also capture high-definition (HD) movies (see Chapter 8). In this chapter, I show you how to take pictures and more using live view.
Using Live View to Create Images
To take pictures using live view, follow these steps:
-
Press the release mode dial lock release, and then rotate the mode dial to the desired shooting mode.
For more information about shooting modes, see Chapter 9.
 Unless you’ve used live view before, shoot in Auto mode until you’re familiar with live view. In Auto mode, the camera makes all the decisions.
 -
Rotate the live view selector to live view photography.
It’s the icon that looks like a camera (see Figure 7-1).
-
Press the live view button.
The mirror locks up and what you see on the LCD monitor is what you get when you take a picture.
-
Move the camera to compose the picture.
If you’re using a zoom lens, hold the camera steady with one hand, and rotate the lens with the other.
 If you’re shooting with a long zoom lens, it will be difficult to hold the camera and use the zoom control at the same time. In situations like this, a tripod is your best friend.
 -
Press the shutter-release button halfway.
The camera focuses, and the focus point used to achieve focus is displayed in green. If the camera is unable to focus, the focus point will flash red.
-
Press the shutter-release button fully.
The monitor turns off momentarily, and the camera captures the image.
-
When you’re finished taking pictures, press the live view button.
The mirror locks down and the tilting monitor turns off.
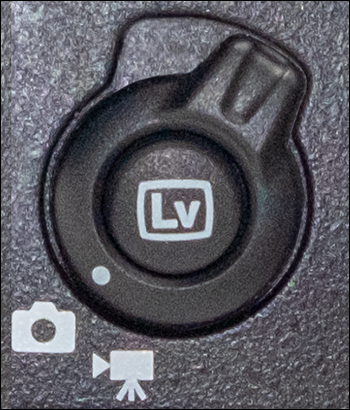
FIGURE 7-1: Set the live view selector to live view photography.
Due to the fact that the live view takes a toll on the battery, I recommend carrying an extra battery when shooting in this mode.
When shooting in live view, you may see some anomalies on the tilting monitor. Moving subjects may appear distorted and you may notice bright spots on the monitor. Any distortions you notice on the monitor will not show up in the final picture.
When shooting in live view, use the eyepiece cap that shipped with your camera to prevent stray light from entering the viewfinder. If you left your eyepiece cap at home, use a dark piece of paper or a dark piece of cloth as a makeshift eyepiece cap.
 When shooting in live view mode, don’t point the camera at the sun. Doing so may damage the camera’s internal circuitry.
Choosing a Live View AF-Area Mode
When you create images with your camera, the default autofocus (AF) mode is AF-A (automatic), which means the camera switches from AF-S (single AF) when you photograph a stationary subject, or AF-C (continuous AF) when you photograph a moving object. You have other AF options (see Chapter 10).
In this section, I show you how to choose an AF-area mode to suit your working preference and subject matter. When you shoot in live view, you have six AF-area modes to choose from. To choose an AF-area mode when creating images or recording movies in live view mode, press and hold the AF-mode button, rotate the sub-command dial, and then choose one of the following options:
- Pinpoint AF: This is the smallest AF point available. This option is only available when you choose AF-S for the AF mode when shooting still photography. This option is recommended for shooting things like buildings, products, and close-ups, as well as for macro photography. The icon for pinpoint AF is a small unfilled rectangle with PIN underneath.
- Single-point AF: Choose this option for a larger AF point when shooting stationary subject matter. The icon for single-point AF is an unfilled rectangle.
- Wide-area AF (S): This option is similar to single-point AF, but the camera focuses on a slightly larger area. Use this option for stationary objects that are hard to focus with single-point AF. If more than one subject is in the AF point, the camera assigns focus priority to the nearest subject. The icon for wide-area AF (S) is an unfilled rectangle with WIDE-S underneath.
- Wide-area AF (L): This option is similar to wide-area AF (S), but it uses a larger area for focusing. This option is used for photographing stationary objects. If more than one subject is in the AF point, the camera assigns focus priority to the nearest subject. The icon for wide-area AF (L) is an unfilled rectangle with WIDE-L underneath.
- Dynamic-area AF: With this option, the camera focuses on a single AF point selected by the user. If the subject move away from the AF point, the camera uses information from surrounding focus points to achieve focus. This option is ideal for photographing athletes and other subjects who are difficult to photograph using single-point AF. This option is only available when the AF-A or AF-C mode is selected. The icon for dynamic-area AF is a rectangle with square dots above, below, and to the left and right of the rectangle.
- Auto-area AF: With this option, if you frame a person for a portrait, an amber point appears on the subject’s face indicating the focus point. If your subject is close to the camera, and the camera detects eyes, an amber point appears around one of the subject’s eyes. The icon for auto-area AF is a filled rectangle.
Choose wide-area AF (S) or wide-area AF (L) when making movies where you pan or tilt the camera.
Using the Live View Framing Grid
When shooting in live view, you can display a framing grid on the tilting monitor. A framing grid is useful when shooting objects with vertical or horizontal edges, such as buildings. It’s also useful for creating landscape images with a level horizon line. Use the lines on the framing grid to align vertical and/or horizontal lines on objects within the frame.
To enable the live view framing grid, follow these steps:
- Press the MENU button to display the camera menus, and then use the multi selector to navigate to the Custom Settings menu.
-
Press the left arrow on the multi selector.
The icon is highlighted.
- Press the right arrow on the multi selector to place the cursor inside the Custom Settings menu and press the down arrow on the multi selector to highlight the d10: Framing Grid Display command (see Figure 7-2).
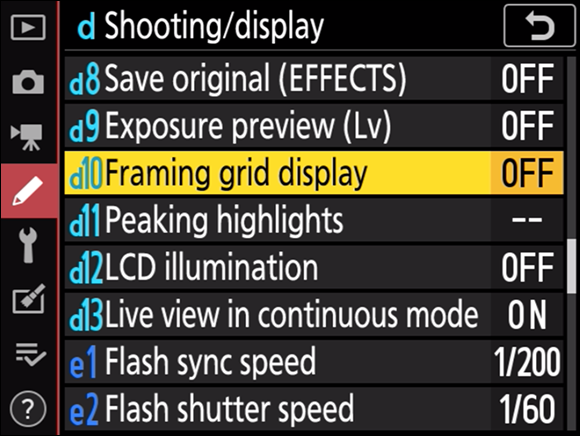
FIGURE 7-2: Displaying a framing grid when shooting live view.
- Press the right arrow on the multi selector to display the options (see Figure 7-3).
-
Select On and then press OK.
A framing grid is displayed when shooting live view (see Figure 7-4) and in your viewfinder.

FIGURE 7-3: Select On to enable the framing grid.
Using the Live View i Menu
The live view i menu (shown in Figure 7-5) gives you the ability to quickly change frequently used settings. The i menu displays on the tilting monitor when you press the i button.
You can change the following settings using the live view i menu:
- Set Picture Control: Select the Picture Control you use to create the image (see Chapter 4).
- Image Quality: Select the image quality used to create the image (see Chapter 5).
- Flash Mode: Select the flash mode used with a supported Nikon Speedlight (see Chapter 11).
- Wi-Fi Connection: Connect to a local Wi-Fi network (see Chapter 10).
- Autofocus Mode: Select your desired autofocus mode (see Chapter 10).

FIGURE 7-4: Use the framing grid to help compose your images.

FIGURE 7-5: The live view i menu.
- Negative Digitizer: Digitize film negatives with your camera. The Negative Digitizer is beyond the scope of this book, but you can learn more about it in the Nikon D780 Reference Manual, which came with your camera.
- White Balance: Specify the white balance setting used to capture images (see Chapter 11).
- Image Size: Specify the size of the images you create (see Chapter 5).
- Metering: Select the metering mode used to create images (see Chapter 9).
- Active D-Lighting: Enable Active D-Lighting (see Chapter 12).
- AF-Area Mode: Select the AF-area mode (see “Choosing a Live View AF-Area Mode,” earlier in this chapter).
- Exposure Review: Display a histogram when shooting in live view.
To change a setting using the live view i menu, follow these steps:
-
Press the i button.
The live view still photography i menu appears on the tilting monitor.
- Use the multi selector to highlight the desired setting.
-
Press OK to see the options.
Figure 7-6 shows the options for the image quality.
- Rotate the main command dial to select an option.
-
Press OK.
The option you chose is now in effect, and you’re returned to the i menu.
- Press the shutter-release button halfway to exit the i menu.

FIGURE 7-6: The live view i menu option for setting image quality.
You can customize the live view i menu to suit your working preference. When you press the i button, the i menu appears on your tilting monitor. To modify the setting for each position of the live view i menu, follow these steps:
- Press the MENU button to display the camera menus, and then use the multi selector to navigate to the Custom Settings menu.
-
Press the left arrow on the multi selector.
The icon is highlighted.
- Press the right arrow on the multi selector to place the cursor inside the Custom Settings menu, and then press the down arrow on the multi selector to select f2 Customize i Menu (Lv) (see Figure 7-7).
-
Press the right arrow on the multi selector to display the Customize i Menu (Lv) options.
The tilting monitor refreshes and displays the i menu (Lv) icons.
- Use the multi selector to navigate to the position you want to modify (see Figure 7-8).
-
Press OK.
The available options are displayed on the tilting monitor (see Figure 7-9).
-
Press the down arrow on the multi selector to navigate to the desired option and press OK.
The option for that position of the i menu is now modified to suit your working preference.
- Repeat Steps 5 through 7 to modify other i menu settings.
- Press the MENU button to save the changes and return to the previous menu, or press the shutter-release button halfway to save the changes and resume shooting.

FIGURE 7-7: The Customize i Menu (Lv) command.

FIGURE 7-8: Choosing a setting to modify.
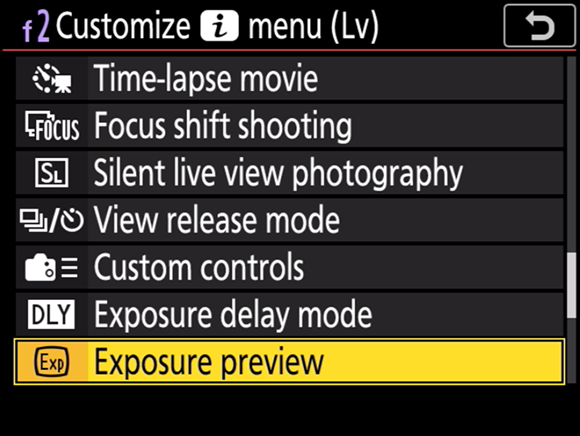
FIGURE 7-9: Modifying a setting for a position on the i menu.
Creating Pictures with Touch Controls
When you create images or movies using live view, you can focus by touching and release the shutter by touching the tilting monitor. These options free you from having to use the shutter-release button to focus and take a picture.
By default, touch controls are enabled for shooting and playback. In Chapter 6, I show you how to enable touch controls for playback only. If you haven’t changed the default options, you can focus and shoot using touch controls, as shown in this section.
To focus and release the shutter by touch, follow these steps:
- Rotate the live view selector to the icon that looks like a camera.
-
Press the live view button (see Figure 7-10).
The mirror locks up and the view captured by the lens appears on the tilting monitor.
- Compose the image.
-
Touch the part of the screen that contains the focal point of your image to achieve focus.
For example, if you’re photographing a person, touch the eye.
-
Remove your finger from the tilting monitor.
The shutter releases and the camera processes an image.
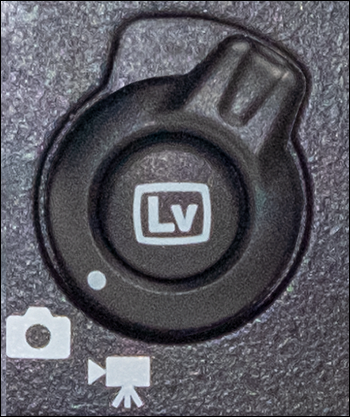
FIGURE 7-10: Press the live view button to enable live view mode.
While shooting in live view, touch the icon that looks like a hand with a pointing forefinger to modify touch control settings.
Making Live View Work for You
Live view is a great option for creating images and recording movies. The default live view settings work well for many photographers, but you can explore other options, as I show you in the upcoming sections.
Displaying shooting information
When you create images in live view, you have easy access to shooting information and the virtual horizon. To access different screens of information, press the Info button. You have four displays at your disposal:
- Complete shooting information: The first time you press the Info button, you see a screen (see Figure 7-11) that displays the following:
- Autofocus area
- Whether face detection is enabled
- Picture Control
- White balance
- Image area and size
- Exposure information
- ISO
- Battery life
- Simplified shooting information: The second time you press the Info button, you see a simplified screen (see Figure 7-12), which displays the following:
- Shooting mode
- Exposure information
- Battery life
- ISO
- Histogram: The third time you press the Info button, a histogram is displayed (see Figure 7-13) when you shoot in programmed auto (P), shutter-priority auto (S), aperture-priority auto (A), or manual (M) mode. To display this screen, you must first choose On for the Custom Setting menu command d9: Exposure Preview (Lv) command.

FIGURE 7-11: All the shooting information.
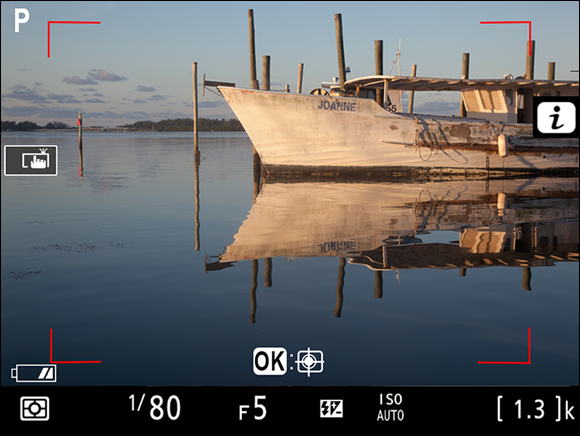
FIGURE 7-12: Shooting information simplified.
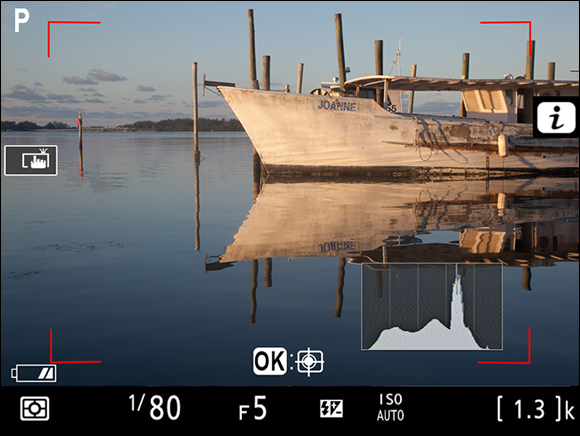
FIGURE 7-13: Displaying the histogram.
- Virtual horizon: The fourth time you press the Info button, the virtual horizon appears on the tilting monitor (see Figure 7-14), which enables you to visually level the camera.

FIGURE 7-14: Using the virtual horizon.
The display screens are identical when you record a movie, with the exception of the first screen, which displays the movie frame size, frame rate, and minutes remaining.
Using zoom preview
When you shoot in live view, you can quickly cut to the chase and see what certain parts of the scene you’re about to photograph look like by using zoom preview. When you use zoom preview, you can zoom in on the view the lens is currently pointed at, and then scroll to different areas.
To use zoom preview, follow these steps:
-
Rotate the live view selector to live view photography or movie live view, and then press the live view button.
I know that seems obvious, especially because this is a chapter on live view, but my editor says I need to cover the bases.
-
Press the zoom in/QUAL button to zoom in.
Each time you press the button, the level of magnification increases.
When you increase magnification in live view mode, a navigation window appears in the lower-right side of the display. Inside the window is a gray area, which indicates the part of the scene you’ve zoomed to. - Use the multi selector to scroll to parts of the frame that are not visible in the monitor.
Exploring other useful live view options
Live view photography can be the bee’s knees for certain picture-taking situations. And the fact that you can touch the tilting monitor to focus and take a picture makes live view a handy option for many photographers.
The following list shows some useful options when shooting in live view.
-
Auto-area AF face/eye detection: When shooting with auto-area AF, you can enable face and eye detection from the Custom Settings menu. The menu option is a5: Auto-Area AF Face/Eye Detection. The default option is On, but you can choose one of the following options:
- Face and eye detection on
- Face detection on
- Off to disable face and eye detection
When either of these options is enabled, and the camera detects faces or eyes, an amber-colored focus point appears around the subject’s face or eyes.
- Flicker reduction: Enable flicker reduction if you notice flickering or banding on the tilting monitor when the scene you’re photographing is lit with fluorescent, mercury vapor, or sodium lamps. You find the flicker reduction command on the photo shooting menu.
-
Focus peaking: When you create close-up photographs of subjects like jewelry, antiques, and other small objects (macro photography) or shoot in low-light conditions, you may have to resort to manual focus (see Chapter 4). When you focus manually, you can enable focus peaking, which places a colored outline around objects that are in focus.
To enable focus peaking, go to the Custom Settings menu and enable d11: Peaking Highlights. When you choose this option, you can specify sensitivity (high, standard, or low) and choose the following peaking highlight colors: red, yellow, blue, or white. Choose a color that is different than the subject matter you’re photographing.
-
Low-light AF: If your camera is having a difficult time achieving focus in low-light conditions, and you don’t want to focus manually, this option may work for you if you’re shooting with AF-S mode. You find the low-light AF command on the Custom Settings menu.
You can only use low-light AF when shooting still photography. It isn’t available when shooting in Auto, when using special effects mode, when creating a time-lapse movie, or during interval-timer photography.
- Silent live view photography: When you’re shooting an event where you need to be as unobtrusive as possible (like a wedding), you can enable the electronic shutter. With this option, the shutter is muted, and the camera is relatively quiet when the shutter-release button is pressed. You find the silent live view photography option in the photo shooting menu. When you enable silent live view photography, the number of frames you can capture per second is fewer than when shooting in continuous low speed (CL) or continuous high speed (CH) release mode.