
Chapter 8
Recording Movies with Live View
IN THIS CHAPTER
![]() Recording movies with your Nikon D780
Recording movies with your Nikon D780
![]() Kicking your movie making up a notch
Kicking your movie making up a notch
In addition to being an excellent camera for still photography, your Nikon D780 is a superb video camera. You can create movies automatically, or drill down and use settings to create high-definition (HD) video. You can specify video quality, frame rate, file format, and much more.
In this chapter, I show you everything you ever wanted to know about creating videos on your D780 but were afraid to ask. I explain the settings used to create squeaky-clean video for the Internet or for viewing on your TV monitor. In addition, I share some tips for creating better movies. If you want to be the next Steven Spielberg, read on.
Making Movies with Your Camera
With your Nikon D780, you hold in your hands (or your camera bag!) a tool that allows you to make amazing movies — the kinds of movies you pay big bucks to see in movie theaters! In the following sections, I show you how to capture video and perform other movie-shooting tasks with your camera.
Recording movies
Recording movies on your Nikon D780 is easy: Flip a switch, push a button, and you’re recording. You see the whole movie unfold on the tilting monitor. When you’ve finished your candidate for next year’s Academy Awards, push the button again to stop recording. You can preview the movie on the tilting monitor to decide whether you want to keep it.
When recording movies in Auto mode, the camera automatically determines the aperture, shutter speed, and ISO based on the current ambient lighting conditions. If you need to record a movie quickly without mucking with a bunch of settings, this option is for you. Think of this as the equivalent of a point-and-shoot camera.
To quickly record a movie using your D780, follow these steps:
-
Press the mode dial lock release, and rotate the mode dial to Auto.
The camera automatically chooses the optimal settings for the subject matter and lighting conditions.
 You can also shoot movies in shutter-priority auto (S) mode, where you set the shutter speed and ISO and the camera provides the aperture, or aperture-priority auto (A) mode, where you provide the aperture and ISO and the camera automatically sets the shutter speed. And finally, you can shoot in manual (M) mode, where you set the ISO, shutter speed, and aperture. All these modes are similar to shooting still pictures in modes other than Auto (see Chapter 9).
 - Rotate the live view selector to movie live view (the icon looks like a movie camera shown), as shown in Figure 8-1.
-
Press the live view button.
The mirror locks up, and the view captured by the lens appears on the monitor.
-
Press the movie-record button (the red button near the power switch).
A recording indicator appears in the monitor. A time remaining indicator also appears in the monitor.
-
To stop recording, press the movie-record button again.
The camera stops capturing video.
-
Press the live view button.
You exit live view.
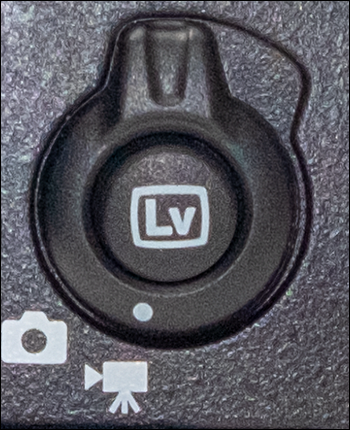
FIGURE 8-1: Press this button to enable live view.
A movie is a collection of still images that are compiled into the file format you specify and then played back. If you’ve ever created stick figures on a pad of paper, and then flipped through the pages to see them move, this is similar to what happens when you create a movie with your camera.
 To capture a JPEG image while recording a movie, press the shutter-release button.
When shooting video set the ISO sensitivity to auto ISO. When you choose this option and create a video in a place with different brightness values, the camera automatically adjusts the ISO to compensate for different lighting as you pan the camera. This ensures sharp, blur-free video.
Displaying video shooting information
When recording video, you can display a lot of shooting information, a little shooting information, or no shooting information. You can display the aperture and shutter speed, battery information, exposure compensation scale, autofocus mode, and much more, depending on which information screen you access.
To view information when recording movies, press the Info button. You have four displays at your disposal:
- Complete shooting information: The first time you press the Info button, you see a screen that displays the following:
- Shooting mode
- AF-area mode
- Active D-Lighting
- White balance mode
- Image area
- Frame size and rate
- Time (total amount of time that can be recorded, which counts down after you press the shutter-release button)
- Attenuator mode
- Audio mode
- Audio amplitude indicators
- Battery life
- Metering mode
- Shutter speed
- Aperture
- ISO
- Simplified shooting information: The second time you press the Info button, you see a simplified screen, which displays the following:
- Shooting mode
- Battery life
- Metering mode
- Shutter speed
- Aperture
- ISO
- Histogram: The third time you press the Info button, a histogram is displayed. To display this screen, you must first choose On for the Custom Setting menu command d9: Exposure Preview (Lv).
- Virtual horizon: The fourth time you press the Info button, the virtual horizon appears on the tilting monitor, which enables you to visually level the camera.
Using the movie i menu
The movie i menu (see Figure 8-2) gives you the ability to quickly change frequently used settings. The i menu appears when you press the i button. You can change the following settings using the movie i menu:
- Set Picture Control: Select the Picture Control you use to create the image.
- Frame Size and Rate/Image Quality: Select the frame size, frame rate, and image quality used to create movies.
- Wind Noise Reduction: Enable wind noise reduction.
- Wi-Fi Connection: Connect to a local network (see Chapter 10).

FIGURE 8-2: The movie i menu.
- Autofocus Mode: Select your desired autofocus mode (see Chapter 10).
- Destination: Specify which memory card your movies will be stored on.
- White Balance: Specify which white balance mode will be used when creating a movie.
- Microphone Sensitivity: Specify microphone sensitivity to suit current conditions (see “Changing audio recording options,” later in this chapter).
- Metering: Specify the metering mode (see Chapter 9).
- Active D-Lighting: Enable Active D-Lighting (see Chapter 12).
- AF-Area Mode: Select the AF-area mode.
- Electronic VR: Enable electronic vibration reduction.
To change a setting using the movie i menu, follow these steps:
-
Press the i button.
The movie i menu appears on the monitor (refer to Figure 8-2).
- Use the multi selector to highlight the desired setting.
- Press OK to see the options.
- Rotate the main command dial to select an option.
-
Press OK.
The option you chose is now in effect, and you’re returned to the i menu.
- Press the shutter-release button halfway to exit the i menu.
 You can modify the movie i menu by using the g1: Customize i Menu command in the Custom Settings menu. The technique is the same as I show you for modifying the live view still photograph i menu in Chapter 7.
Changing video dimensions and frame rate
Your camera can capture high-definition video with dimensions of up to 3,840 x 2,160 pixels and a frame rate up to 120 fps. You can modify the video dimensions and frame rate to suit your intended destination. To change video dimensions and frame rate, follow these steps:
-
Press the MENU button.
The camera menus appear on the tilting monitor.
- Press the down arrow on the multi selector to select the Movie Shooting menu, and then press the left arrow on the multi selector to highlight the icon.
- Press the right arrow on the multi selector to place the cursor inside the menu, and then press the down arrow on the multi selector to highlight Frame Size/Frame Rate (see Figure 8-3).
-
Press the right arrow on the multi selector to display the Frame Size/Frame Rate options (see Figure 8-4).
There are many options from which to choose. In most cases, a setting of “1920x1080; 30p” will yield excellent results. If you’re a newcomer to video, I suggest you use that option.

FIGURE 8-3: The Frame Size/Frame Rate command.
I discuss frame rates in the “Understanding frame rates” sidebar, later in this chapter.
-
Press the down arrow on the multi selector to select the desired frame size and frame rate and then press OK.
Movies will be recorded with the specified frame size and frame rate.
After you choose an option, the amount of recording time is displayed on the monitor when you enable live view and move the live view selector to movie live view. This is the maximum duration for a movie with the specified frame size and frame rate.
The maximum duration for a movie recorded with a frame size of 3,840 x 2,160 pixels and a frame rate of 24p, 25p, 30p, 100p, or 120p or a frame size of 1,920 x 1,080 pixels and a frame rate of 24p, 25p, 30p, 50p, or 60p is 29 minutes and 56 seconds. If you choose a frame size of 1,920 x 1,080 pixels and a frame rate of 30p x 4, 25p x 4, or 24p x 4 (these frame rates are for slow-motion movies), the maximum duration of the movie is 3 minutes.
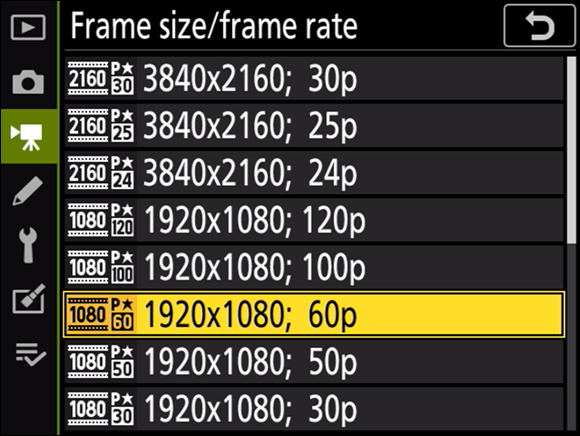
FIGURE 8-4: Choosing the frame size and frame rate of your movie.
To create a slow-motion movie, choose one of the following:
- 1920x1080; 30p x 4
- 1920x1080; 25p x 4
- 1920x1080; 24p x 5
When you choose one of the slow-motion options, the camera records the video at a higher frame rate but processes the video so that it plays back at a lower frame rate. For example, if you choose “1920x1080; 30p x 4,” the camera records the footage at 120 frames per second (fps), but when it’s played back, the frame rate is 30 fps, which slows everything way down.
You can access the frame size and frame rate settings from the movie i menu.
Choosing the movie quality
In addition to specifying the frame size and frame rate, you can specify the quality of the movie. The quality of the movie determines the bit rate and file size. To specify movie quality, follow these steps:
-
Press the MENU button.
The camera menus appear on the monitor.
- Press the down arrow on the multi selector to select the Movie Shooting menu, and then press the left arrow on the multi selector to highlight the icon.
- Press the right arrow on the multi selector to place the cursor inside the menu, and then press the down arrow on the multi selector to highlight Movie Quality (see Figure 8-5).
-
Press the right arrow on the multi selector to display the Movie Quality options (see Figure 8-6) and choose one of the following:
- High quality: Choose this option for movies you’re going to play on a TV monitor. These files will be larger than movies recorded at normal quality.
- Normal: Choose this option for movies you’re going to upload to the Internet.
Movies with a frame size of 3,840 x 2,160 pixels will only be recorded at high quality. If you try to choose normal for that frame size, the option will not be available. -
Press OK.
Movies will be recorded at the specified quality until you revisit this menu and choose a different option.
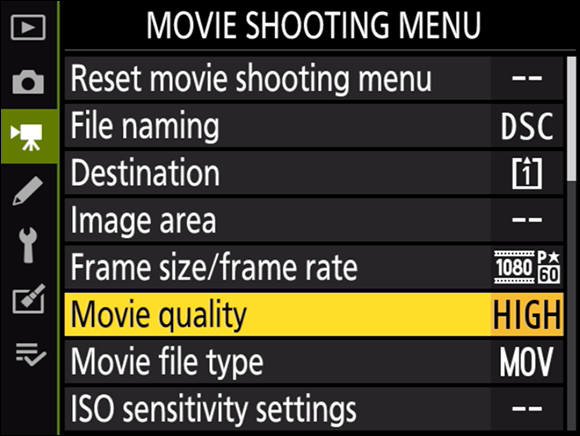
FIGURE 8-5: Specifying movie quality.
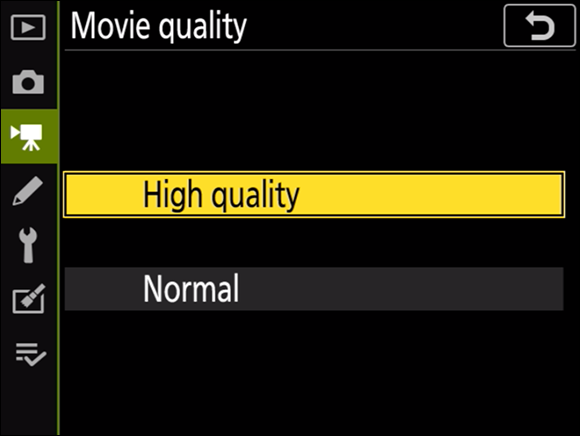
FIGURE 8-6: Choosing the desired movie quality.
The frame size and frame rate, combined with the movie quality, determine the maximum bit rate, in megabits per second (Mbps), that the movie is recorded with. A higher bit rate means better quality at the expense of a larger file size.
Choosing the movie file format
When you record a movie with your D780, you have two file formats from which to choose. One format is readymade for uploading to the web or YouTube and the other is ideal if you want to edit the movie using third-party software like Adobe Premiere.
To specify the movie file format, follow these steps:
-
Press the MENU button.
The camera menus appear on the tilting monitor.
- Press the down arrow on the multi selector to select the Movie Shooting menu, and then press the left arrow on the multi selector to highlight the icon.
- Press the right arrow on the multi selector to place the cursor inside the menu, and then press the down arrow on the multi selector to highlight Movie File Type (see Figure 8-7).
- Press the right arrow on the multi selector to display the file type options (see Figure 8-8) and choose one of the following:
- MOV: Choose this file type if you want to edit the movie.
- MP4: Choose this file type if you’re going to upload the movie to the Internet.
-
Press OK.
Movies will be recorded in the specified file type.
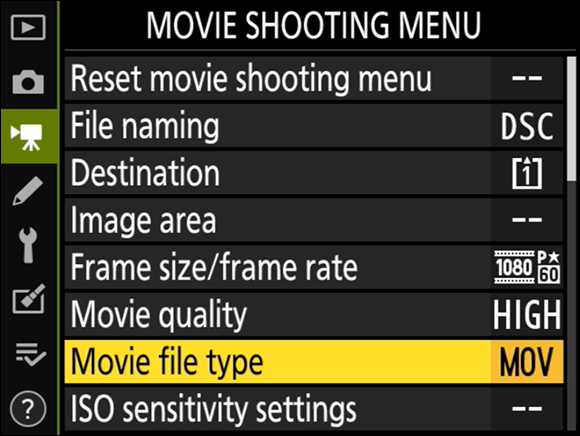
FIGURE 8-7: Choosing the desired file type.
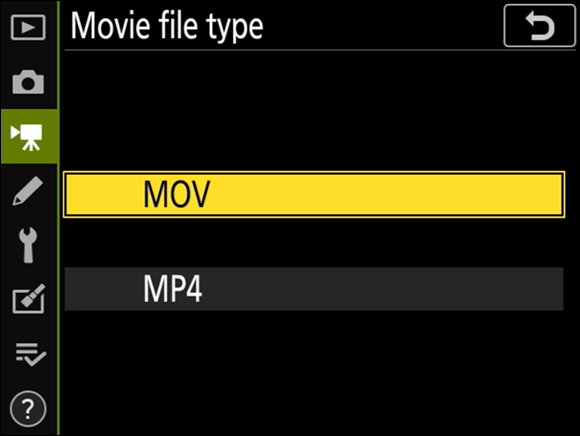
FIGURE 8-8: Choose MOV or MP4.
Changing audio recording options
When you record video with your Nikon D780, you record audio as well. You can change the recording level, disable audio, and enable a wind filter and a sound attenuator. And you thought those little holes in the front of the camera were just a dinky microphone!
To beef up the audio in your movies, follow these steps:
-
Press the MENU button.
The camera menus appear on the tilting monitor.
- Press the down arrow on the multi selector to select the Movie Shooting menu, and then press the left arrow on the multi selector to highlight the icon.
- Press the right arrow on the multi selector to place the cursor inside the menu, and then press the down arrow on the multi selector to highlight one of the following options:
-
Attenuator: This option enables you to record in loud environments by reducing microphone gain. This prevents audio distortion. Your options are to enable or disable this feature.
If you enable this option to record in an environment with loud noises, remember to disable the option when you record in a normal environment. - Frequency Response: This command has two options, wide and vocal range. I recommend using the default wide option, unless you’re creating instructional videos.
- Headphone Volume: This command enables you to increase or decrease the volume of audio sent to an external headphone connected to the camera.
-
Microphone Sensitivity: This command enables you to let the camera automatically set the microphone volume to the current environment. With this option, you may notice a fluctuation in volume if you’re recording an event or subject that is silent for periods and then talks.
I suggest you choose the manual option, which enables you to adjust the sensitivity from 1 to 20 with the multi selector up and down arrows. When you do this, you have two meters that show the amplitude for the left and right channels. Adjust the gain (think microphone sensitivity) so that the meters bounce to 12 or slightly higher on the scale, but don’t go into the red. If you see red when the volume is the loudest, choose a lower value. Your other option is to disable the camera microphone. - Wind Noise Reduction: This command lets you enable the camera’s wind noise reduction option, which is probably adequate for a gentle breeze but not so much for a strong wind. If you’re in a really strong wind, your best option is an external microphone with a windshield (a piece of foam rubber that fits snugly over the microphone).
-
- Follow the prompts to enable the command and then press the shutter-release button halfway to resume shooting or recording video.
If you use your camera to record events for clients, or you record a lot of video and want the best audio quality possible, consider purchasing an external microphone that will plug into the camera audio port and slide into the camera’s accessory shoe.
If you purchase an external microphone for your camera, make sure it comes with a foam windscreen.
Choosing a Picture Control
When you record a video in Auto mode, you can let the camera make all the decisions for you, which is the easy way out. However, if you’re a creative videographer, you can choose a Picture Control to create a unique video.
Here’s how you do it:
-
Press the MENU button.
The camera menus appear on the tilting monitor.
- Press the down arrow on the multi selector to select the Movie Shooting menu, and then press the left arrow on the multi selector to highlight the icon.
- Press the right arrow on the multi selector to place the cursor inside the menu, and then press the down arrow on the multi selector to highlight Set Picture Control (see Figure 8-9).
-
Press the right arrow on the multi selector.
The Picture Control options appear on your monitor (see Figure 8-10).
-
Press the down arrow on the multi selector to choose the desired Picture Control.
By default, the camera uses the same Picture Control as specified in Photo Settings, but you can choose a different one for video. All the other Picture Control options are also available.

FIGURE 8-9: Use a Picture Control to spice up your video.
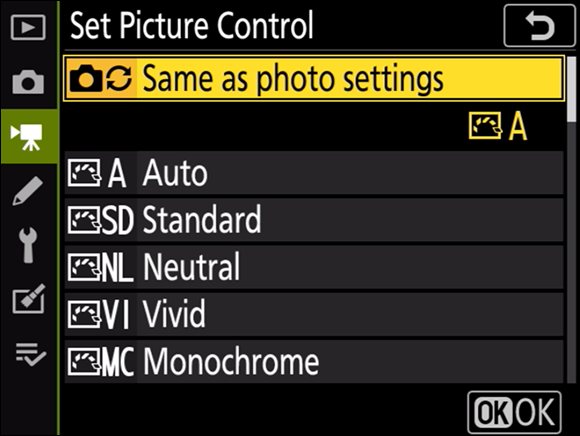
FIGURE 8-10: Create a cool video by using a Picture Control.
-
Press OK.
The Picture Control is used for future videos until you choose a different option.
Reducing flicker
If you shoot scenes or subjects illuminated by sodium lamps, mercury lamps, or fluorescent lamps, you may notice some flickering due to the nature of the light sources.
Always record 15 or 20 seconds of video as a test, just to make sure the end product will be satisfactory. If you notice flickering in your test video, you can reduce the amount by following these steps:
-
Press the MENU button.
The camera menus appear on the tilting monitor.
- Press the down arrow on the multi selector to select the Movie Shooting menu, and then press the left arrow on the multi selector to highlight the icon.
- Press the right arrow on the multi selector to place the cursor inside the menu, and then press the down arrow on the multi selector to highlight Flicker Reduction (see Figure 8-11).
-
Press the right arrow on the multi selector.
The Flicker Reduction options appear on your monitor (see Figure 8-12).

FIGURE 8-11: The flicker Rx.
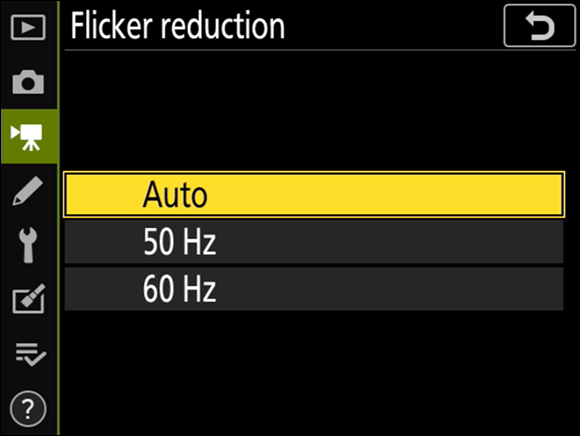
FIGURE 8-12: Choosing a Flicker Reduction option.
-
Choose the desired option.
Auto is the default option. If that doesn’t do the trick, choose the option that matches the frequency (50 HZ or 60 HZ) of the local power supply.
-
Press OK.
Flicker Reduction is now in effect.
Using Active D-Lighting
If you’re recording video in an area with dark shadows and bright highlights, your camera may have a hard time compensating for the vast difference in brightness. Fortunately, your camera has an option that will bring out the details in shadow areas known as Active D-Lighting. If the shadow areas in your test video don’t have enough details, here’s how to compensate for it:
-
Press the MENU button.
The camera menus appear on the monitor.
- Press the down arrow on the multi selector to select the Movie Shooting menu, and then press the left arrow on the multi selector to highlight the icon.
- Press the right arrow on the multi selector to place the cursor inside the menu, and then press the down arrow on the multi selector to highlight Active D-Lighting (see Figure 8-13).
-
Press the right arrow on the multi selector.
The Active D-Lighting options appear on your monitor (see Figure 8-14).
-
Choose the desired option.
I recommend starting with normal and recording a few seconds of video. If the video still isn’t satisfactory, choose a different setting.
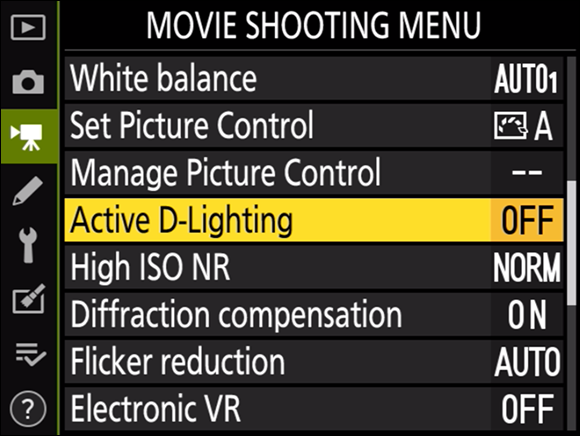
FIGURE 8-13: Using Active D-Lighting to brighten the shadows.
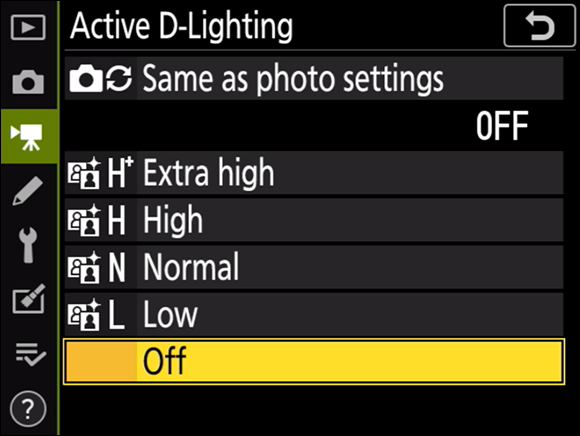
FIGURE 8-14: Choosing an Active D-Lighting option.
-
Press OK and then press the shutter-release button halfway.
You’re ready to record more video.
Making the Best Movies You Can
Your camera captures awesome video. I’ve used my Nikon D780 to capture some beautiful video from nearby beaches. When winter arrives here in Florida, where I live, I’ll send a copy of the video to my relatives who live north of the Mason-Dixon Line to show them how the other half lives. I’ve also seen some awesome videos on the web that were shot with this camera.
Here are a few tips for making your movies even better:
- For the best results, consider purchasing a high speed UDMA card that writes data at a speed of 120MB per second.
- If you’re shooting in aperture-priority auto (A) mode or shutter-priority auto (S) mode, make sure the shutter speed is faster than the chosen frame rate. You get the best results if the shutter speed is twice the frame rate, or as close as you can get to the frame rate. For example, if the frame rate is 30 fps, make sure the shutter speed is 1/60 of a second.
- Don’t point the camera directly at the sun when shooting video. Doing so can damage the camera sensor.
- Mount the camera on a tripod. It’s hard to hold a camera steady for a long time while recording video. If your tripod has a pan head, you’re in business.
- Pan slowly. If you pan too fast, your video will look amateurish.
- If you plan on doing a lot of video recording with your camera, consider purchasing a device that steadies the camera (such as a Steadicam) while you move. You can find these at your favorite camera retailer that also sells video equipment. A less expensive alternative to steady your camera is a DJI gimble.
- You get better quality audio if you use an external microphone. You can purchase an external microphone that will plug into the port on the side of your camera that slides into the camera’s accessory shoe. In addition to capturing better-quality audio, an external microphone doesn’t pick up camera operating noises.
- Remember to push the live view button when you’re finished recording. Otherwise, you get several minutes of very choppy video as you move to the next scene. Worst-case scenario, you capture video of your feet shuffling on the sidewalk.