
Chapter 9
Getting the Most from Your Camera
IN THIS CHAPTER
![]() Using two memory cards
Using two memory cards
![]() Decoding camera metering
Decoding camera metering
![]() Working with the still photography i menu
Working with the still photography i menu
![]() Choosing the ideal exposure mode
Choosing the ideal exposure mode
![]() Playing with long exposures
Playing with long exposures
![]() Changing the camera’s exposure
Changing the camera’s exposure
![]() Setting a shutter-release mode
Setting a shutter-release mode
Your camera has a plethora of features that are designed to enable you to capture stunning images. If you’re a geek photographer like me, who likes having complete control over every aspect of your photography, you’ll love the features I show you in this chapter.
Shooting with Two Cards
The fact that your camera has two memory card slots gives you a tremendous amount of flexibility. You can
- Use the second memory card as overflow when you fill up the first card with images. You can never have too much memory!
- Use the second memory card for backup. Here, the images are written to both cards. That way, if one of the memory cards fails, you still have all the images on the other card. This option is useful if you’re photographing an assignment for a client, or creating images you could never replace if the card in Slot 1 failed.
- Store different image formats on each card. Here, RAW images are saved on Card 1 and JPEG versions of those same images are saved in Slot 2. This option is wonderful if, for example, you’re shooting a wedding and you want to post images online immediately. You can use the JPEG images for a web gallery where your client can review images and pick their favorites. When someone orders images from your online gallery, you can edit the RAW images to perfection in your favorite image-editing application.
To specify how your camera writes images to two cards, follow these steps:
-
Press the MENU button.
The camera menus appear on the tilting monitor.
- Press the down arrow on the multi selector to select the Photo Shooting menu, and then press the left arrow on the multi selector to highlight the icon.
- Press the right arrow on the multi selector to place the cursor inside the menu, and then press the down arrow on the multi selector to highlight Role Played by Card in Slot 2 (see Figure 9-1).
-
Press the right arrow on the multi selector.
The options for the role played by the card in Slot 2 are displayed (see Figure 9-2).
- Choose one of the following options:
- Overflow: The camera saves images to the card in Slot 2 when the card in Slot 1 is full.
- Backup: The camera saves each image to the card in Slot 1, and backs up each image to the card in Slot 2.
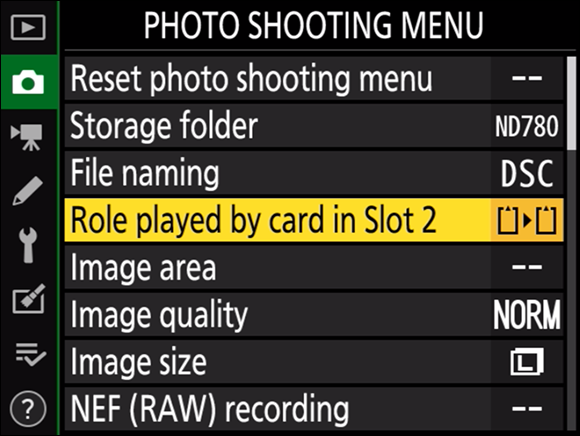
FIGURE 9-1: Choosing what the card in Slot 2 is used for.

FIGURE 9-2: The options for the card in Slot 2.
- RAW Slot 1 – JPEG Slot 2: When you choose NEF (RAW) + JPEG as the setting for capturing images, the RAW images are saved to the card in Slot 1, and the JPEG images are saved to the card in Slot 2.
-
Press OK and then press the shutter-release button halfway.
You’re returned to shooting mode.
Understanding Metering
Your camera’s metering device examines the scene and determines which shutter speed and f-stop combination will yield a properly exposed image. The camera can choose a fast shutter speed and large aperture, or a slow shutter speed and small aperture.
When you take pictures in Auto mode, the camera makes both decisions for you. But you’re much smarter than the processor inside your camera. If you take control of the reins and supply one piece of the puzzle, the camera will supply the rest. When you’re taking certain types of pictures, it makes sense to use aperture-priority auto (A) mode and determine which f-stop will be best for what you’re photographing. In other scenarios, it makes more sense to use shutter-priority auto (S) mode and choose the shutter speed. When you do either, the camera meters the available light and fills in the other part of the exposure equation. The metering mode you choose determines whether the camera uses the entire frame or what part of the frame it uses to meter available light.
Understanding how exposure works in the camera
Your D780 exposes images the same way film cameras did. Light enters the camera through the lens and is recorded on the sensor. The amount of time the shutter is open and the amount of light entering the camera determines whether the resulting image is too dark, too bright, or properly exposed.
The duration of the exposure is the shutter speed. Your camera has a shutter speed range from as long as 30 seconds to as fast as 1/8000 second. A fast shutter speed stops action, and a slow shutter speed leaves the shutter open for a long time to record images in low-light situations. You can also use a slow shutter speeds for special effects.
 You can increase the shutter speed up to 900 seconds (15 minutes) if you specify this duration in the d6: Extended Shutter Speeds (M) area of the Custom Settings menu.
The aperture is the opening in the lens that lets light into the camera when the shutter opens. You can change the aperture diameter to let in a lot of light or a little light. The f-stop value determines the size of the aperture. A low f-stop value (large aperture) lets a lot of light into the camera, and a high f-stop value (small aperture) lets a small amount of light into the camera. Depending on the lens you’re using, the f-stop range can be from f/1.2, which sends huge gobs of light into the camera, to f/32, which lets a miniscule splash of light into the camera. The f-stop also determines the depth of field, a concept I explain in “Controlling depth of field,” later in this chapter.
The duration of the exposure (shutter speed) and aperture (f-stop value) combination determines the exposure. For each lighting scenario you encounter, several different combinations render a perfectly exposed photograph. Use different combinations for different types of photography. The camera’s metering device examines the scene and determines which shutter speed and f-stop combination will yield a properly exposed image. The camera can choose a fast shutter speed and large aperture, or a slow shutter speed and small aperture.
Choosing a metering mode
The metering mode you choose depends on your subject matter. You may choose one metering mode for photographing landscapes and architecture, another mode for photographing bright subjects surrounding by darkness (for example, a singer in a stage spotlight), and yet another metering mode for scenes with bright highlights.
To set the camera metering mode, follow these steps:
- Press and hold the zoom out/metering button (see Figure 9-3).
-
Rotate the main command dial to choose one of the following options:
- Matrix metering: Use this metering mode to create natural-looking images when the scene you’re photographing is evenly lit. This metering mode is great for photographing landscapes and architecture.
- Center-weighted metering: Use this metering mode when your center of interest is in the middle of the frame.
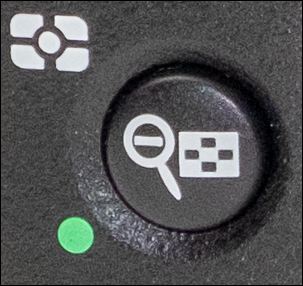
FIGURE 9-3: The zoom out/metering button.
- Spot metering: This metering mode meters a small area of the frame. Use this metering mode when your subject is brighter or darker than the background, to properly expose your subject.
- Highlight-weighted metering: Use this metering mode when you need to preserve detail in the highlights (for example, when photographing a singer illuminated by spotlights on a stage).
The metering mode is displayed in the viewfinder and on the control panel. Figure 9-4 shows the icons for the different metering modes.
-
Release the zoom out/metering button.
You’re ready to create images with the specified metering mode.
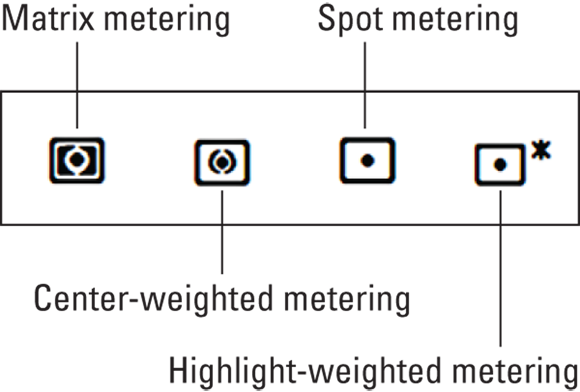
FIGURE 9-4: Choosing a metering mode.
 In most instances, matrix metering should be your go-to mode. If upon reviewing an image, the results are unsatisfactory, switch to a different metering mode.
You can also choose a metering mode using the still photography i menu. I discuss the still photography i menu in the “Using the Still Photography i Menu” section of this chapter.
Using the Still Photography i Menu
The still photography i menu (see Figure 9-5) gives you the ability to quickly change frequently used settings. The i menu appears on the tilting monitor when you press the i button. You can change the following settings using the still photography i menu:
- Set Picture Control: Choose the Picture Control you use to create images (see Chapter 4).
- Image Quality: Choose the image quality used to create images (see Chapter 5).
- Flash Mode: Choose the Flash Mode used with a supported Nikon Speedlight (see Chapter 11).
- Wi-Fi Connection: Connect to a local Wi-Fi network (see Chapter 10).
- Autofocus Mode: Choose the desired autofocus mode (see Chapter 10).
- Choose Image Area: Choose the desired image area (see Chapter 5).
- White Balance: Specify the White Balance setting used to capture images (see Chapter 11).
- Image Size: Specify the size of the images you create (see Chapter 5).
- Metering: Choose the metering mode used to create images (see “Choosing a metering mode,” earlier in this chapter).
- Active D-Lighting: Enable Active D-Lighting (see Chapter 12).
- AF-Area Mode: Choose the AF-area mode (see Chapter 10).
- Custom Controls: Assign the role played by buttons such as the AF-ON button.
To change a setting using the still photography i menu, follow these steps:
-
Press the i button.
The still photography i menu appears on the tilting monitor (see Figure 9-5).
- Use the multi selector to highlight the desired setting.
-
Press OK to see the options.
Figure 9-6 shows the options for Image Quality.
- Rotate the main command dial to select an option.
-
Press OK.
You’re returned to the i menu.
- Press the shutter-release button halfway to exit the i menu.
FIGURE 9-5: The still photography i menu.
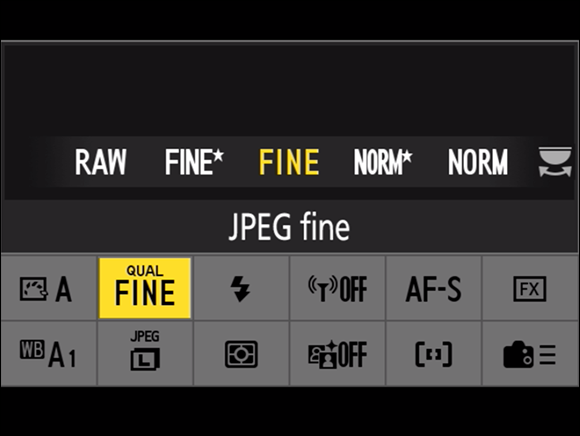
FIGURE 9-6: The still photography i menu options for Image Quality.
You can customize the still photography i menu to suit your working preference. When you press the i button, the i menu appears on your tilting monitor. You have access to 12 settings you can change. You can modify the setting for each position of the still photography i menu as follows:
- Press the MENU button to display the camera menus, and then press the down arrow on the multi selector to navigate to the Custom Settings menu.
-
Press the left arrow on the multi selector.
The icon is highlighted.
- Press the right arrow on the multi selector to place the cursor inside the Custom Settings menu, and then press the down arrow on the multi selector to select f1: Customize i Menu (see Figure 9-7).
-
Press the right arrow on the multi selector to display the Customize i Menu options.
The tilting monitor refreshes and displays the i menu icons.
- Use the multi selector to navigate to the position you want to modify (see Figure 9-8).
-
Press OK.
The available options are displayed on the tilting monitor (see Figure 9-9).
-
Press the down arrow on the multi selector to navigate to the desired option and press OK.
The option for that position of the i menu is now modified to suit your working preference.
- Repeat Steps 5 through 7 to modify other i menu settings.
- Press the MENU button to save the changes and return to the previous menu, or press the shutter-release button halfway to save the changes and resume shooting.
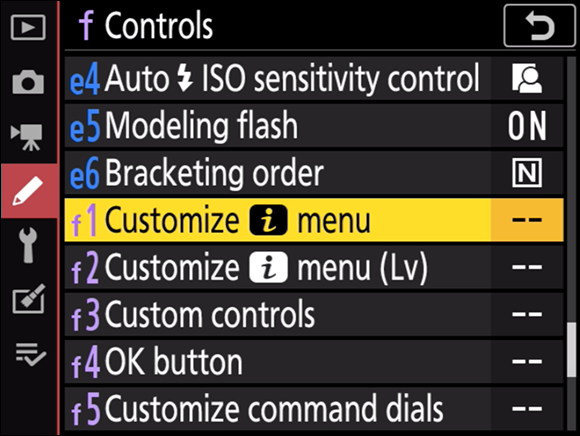
FIGURE 9-7: The Customize i Menu command.
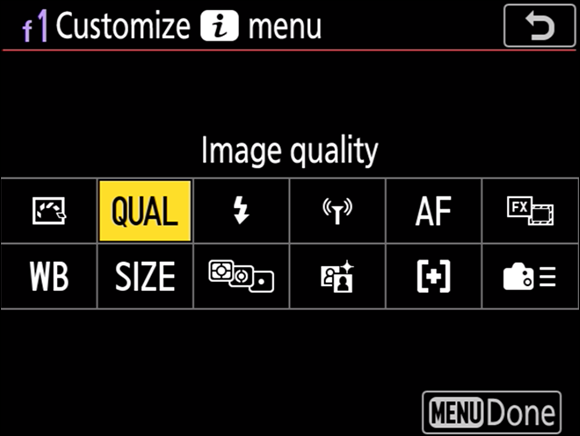
FIGURE 9-8: Choosing a setting to modify.

FIGURE 9-9: Modifying an i menu setting.
Choosing an Exposure Mode
You’re reading this chapter because you’re ready to take the training wheels off and take matters into your own hands. Auto mode works well in many instances, but there are times when you need to be creative and control depth of field or freeze an object moving faster than a speeding bullet. When these situations occur, you should choose an exposure mode that yields the result you’re looking for. My favorite exposure mode is aperture-priority auto (A). The following sections describe each exposure mode and give you tips on when to use each.
Using programmed auto (P) mode
When you take pictures with the programmed auto (P) mode, the camera determines the shutter speed and aperture (f-stop value) that yields a properly exposed image for the lighting conditions. This may sound identical to Auto mode, but P mode, you can change the shutter speed and aperture to suit the scene or subject you’re photographing.
To take pictures in programmed auto (P) mode, follow these steps:
- Press the mode dial lock release and then rotate the mode dial to P (see Figure 9-10).
-
Press the ISO button and rotate the main command dial to change the ISO sensitivity to the desired setting.
A higher ISO makes the camera’s sensor more sensitive to light, which is ideal when you’re photographing in dim light or at night. For more information on changing the ISO, turn to Chapter 10.
-
Press the shutter-release button halfway to achieve focus.
The white dot on the left side of the viewfinder appears when the camera achieves focus. If you see a flashing right or left arrow, the camera can’t achieve focus and you must manually focus the camera.

FIGURE 9-10: Rotating the mode dial to P.
-
Check the shutter speed and aperture.
You can use the viewfinder or tilting control panel (see Figure 9-11) to check the shutter speed and aperture. If the combination will cause the image to be overexposed, the exposure indicator on the control panel and in the viewfinder will show a vertical line to the right of center. If the image is underexposed, the exposure indicator on the control panel and in the viewfinder will show a vertical line to the left of center.
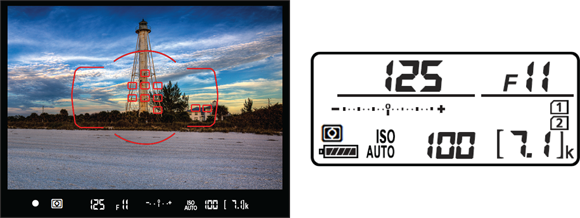
FIGURE 9-11: Check the shutter speed and aperture.
-
Press the shutter-release button fully to take the picture.
The image displays almost immediately on your tilting monitor.
You can shift the exposure and choose a different shutter speed and aperture combination. Use this option when you want to shoot with a faster shutter speed to freeze action or a different aperture to control depth of field. This is known as flexible program mode. To shift the flexible program mode, follow these steps:
-
Follow Steps 1 through 3 of the preceding instructions and then press the shutter-release button halfway.
The camera achieves focus.
-
Rotate the main command dial.
As you rotate the dial, different shutter speed and aperture combinations appear on the control panel and in the viewfinder. If you’re trying to freeze a fast-moving object, rotate the main command dial until a fast shutter speed appears. If depth of field is your goal, rotate the main command dial until a large aperture (low f-stop value) appears for a shallow depth of field, or until a small aperture (high f-stop value) appears for a large depth of field.
-
When you see the desired combination of shutter speed and aperture, press the shutter-release button fully to take the picture.
The image appears almost immediately on your tilting monitor.
Using aperture-priority auto (A) mode
If you like to photograph landscapes, aperture-priority auto (A) mode is right up your alley. When you take pictures using aperture-priority auto (A) mode, you choose the desired f-stop and the camera supplies the correct shutter speed to achieve a properly exposed image. A large aperture (small f-stop value) lets a lot of light into the camera, and a small aperture (large f-stop value) lets a small amount of light into the camera. The benefit of shooting in A mode is that you have complete control over the depth of field (see “Controlling depth of field,” later in this chapter). You also have access to all the other options, such as setting the ISO, choosing a Picture Control when shooting in JPEG mode, choosing an AF mode or a release mode, and so on.
To take pictures with aperture-priority auto (A) mode, follow these steps:
- Press the mode dial lock release and then rotate the mode dial to A (see Figure 9-12).
-
Press the ISO button and then rotate the main command dial to change the ISO to the desired setting.
A higher ISO makes the camera sensor more sensitive to light, which is ideal when you’re photographing in dim light or at night. For more information on changing ISO, see Chapter 10.
-
Rotate the sub-command dial to select the desired f-stop.
As you change the aperture, the camera calculates the proper shutter speed to achieve a properly exposed image. The change appears on the control panel and in the viewfinder. As you rotate the main command dial, monitor the shutter speed in the viewfinder (see Figure 9-13). If the combination will cause the image to be overexposed, the exposure indicator on the control panel and in the viewfinder will show a vertical line to the right of center. If the image is underexposed, the exposure indicator on the control panel and in the viewfinder will show a vertical line to the left of center.

FIGURE 9-12: Rotating the mode dial to A.
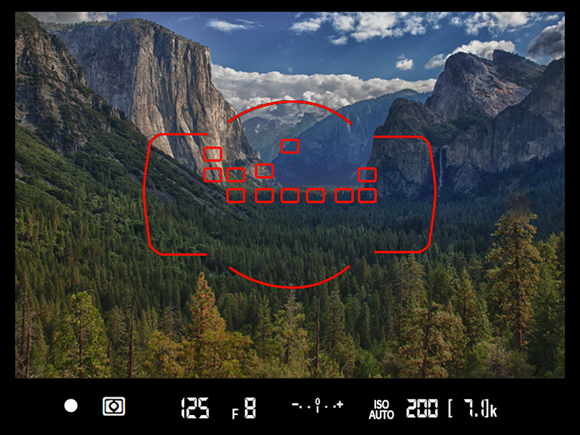
FIGURE 9-13: Make sure the shutter speed is fast enough for a blur-free picture.
-
Press the shutter-release button halfway to achieve focus.
A white dot appears in the viewfinder when the camera achieves focus.
-
Press the shutter-release button fully to take the picture.
The image appears on your tilting monitor almost immediately.
Controlling depth of field
Depth of field is how much of your image looks sharp and is in apparent focus in front of and behind your subject. When you’re taking pictures of landscapes on a bright sunny day, you likely want a depth of field that produces an image in which you can see the details for miles and miles…. If you’re taking portraits, where the person matters more than what’s in front of or behind her, you want to have a very shallow depth of field in which your subject is in sharp focus but the foreground and background are a pleasant out-of-focus blur.
You control the depth of field in an image by selecting the f-stop in aperture-priority auto (A) mode and letting the camera do the math to determine which shutter speed will yield a properly exposed image. You get a limited depth of field when using a small f-stop value (large aperture), which lets a lot of light into the camera. A fast lens with a smaller aperture lets you shoot at a faster shutter speed. A fast lens:
- Has an f-stop value of f/2.8 or smaller
- Gives you the capability to shoot in low-light conditions
- Gives you a wonderfully shallow depth of field
When shooting at a lens’s smallest f-stop value, you’re letting the most amount of light into the camera, which is known as shooting “wide open.” The lens you use also determines how large the depth of field will be for a given f-stop. At the same f-stop, a wide-angle lens has a greater depth of field than a telephoto lens does. When you’re photographing a landscape, the ideal recipe is a wide-angle lens and a small aperture (large f-stop value). When you’re shooting a portrait of someone, you want a shallow depth of field. Therefore, a telephoto lens with a focal length that is 85mm to 120mm with a large aperture (small f-stop value) is the ideal solution.
Figure 9-14 shows two pictures of the same subject. The first image was shot with an exposure of 1/640 second at f/1.8, and the second image was shot with an exposure of 1/80 second at f/10. In both cases, I focused on the subject. Notice how much more of the image shot at f/10 is in focus. The detail of the flowers in the second shot distracts the viewer’s attention from the subject. The first image has a shallow depth of field that draws the viewer’s attention to the subject.

FIGURE 9-14: The f-stop you choose determines the depth of field.
Using depth-of-field preview
When you compose a scene through your viewfinder, the camera aperture is wide open, which means you have no idea how much depth of field you’ll have in the resulting image. You can preview the depth of field for a selected f-stop by pressing the Pv button on your camera, which closes the aperture to the f-stop you use to take the picture.
To preview depth of field, follow these steps:
-
Compose the picture and choose the desired f-stop in aperture-priority auto (A) mode.
See “Using aperture-priority auto (A) mode,” earlier in this chapter if you need help.
-
Press the shutter-release button halfway to achieve focus.
A white dot appears on the left side of the viewfinder when the camera focuses on your subject.
-
Press the Pv button (see Figure 9-15).
The button is conveniently located on the front right side of the camera near the sub-command dial when your camera is pointed toward your subject. You can easily locate the button by feel.
When you press the button, the image in the viewfinder may become dim, especially when you’re using a small aperture (large f-stop number) that doesn’t let a lot of light into the camera. Don’t worry — the camera chooses the proper shutter speed to compensate for the f-stop you select, resulting in a perfectly exposed image.

FIGURE 9-15: The Pv button.
When you use depth-of-field preview, pay attention to how much of the image is in apparent focus in front of and behind your subject. To see what the depth of field looks like with different f-stops, select what you think is the optimal f-stop for the scene you’re photographing. Then press the shutter-release button halfway to achieve focus, as I outline earlier, and then rotate the main command dial to choose different f-stop values.
As long as you hold down the Pv button while you’re choosing different f-stops, you can see the effect each f-stop has on the depth of field. I know, it’s a bit of a juggling act, but given some practice, you’ll get the hang of it. The alternative is to take several pictures of the subject with different f-stops and keep the one you like best.
Using shutter-priority auto (S) mode
When your goal is to accentuate an object’s motion, choose shutter-priority auto (S) mode. When you take pictures in shutter-priority auto (S) mode, you choose the shutter speed and the camera supplies the proper f-stop value to properly expose the scene. Your camera has a shutter speed range from 30 seconds to 1/8000 second. When you choose a slow shutter speed, the shutter is open for a long time. When you choose a fast shutter speed, the shutter is open for a short duration and you can freeze action.
You can increase the shutter speed up to 900 seconds (15 minutes) if you specify this duration in the d6: Extended Shutter Speeds (M) area of the Custom Settings menu.
To take pictures in shutter-priority auto (S) mode, follow these steps:
- Press the mode dial lock release and then rotate the mode dial to S (see Figure 9-16).
-
Rotate the main command dial to choose the desired shutter speed.
As you change the shutter speed, the camera determines the proper f-stop to achieve a properly exposed image. If you notice that the shutter speed is too slow for a blur-free picture, you have to put the camera on a tripod or increase the ISO sensitivity setting. If the combination of shutter speed and aperture will cause the image to be overexposed, the exposure indicator on the control panel and in the viewfinder will show a vertical line to the right of center. If the image is underexposed, the exposure indicator on the control panel and in the viewfinder will show a vertical line to the left of center.
-
Press the ISO button and then rotate the main command dial to change the ISO to the desired setting.
Choose an ISO that enables you to achieve the desired shutter speed. For more information on changing ISO, see Chapter 10.
-
Press the shutter-release button halfway to achieve focus.
A white dot appears in the left side of the viewfinder. If you see a flashing left or right arrow, the camera can’t achieve focus. If this occurs, switch the lens to manual focus and twist the focusing barrel until your subject snaps into focus. Figure 9-17 shows the viewfinder when working in shutter-priority auto (S) mode.
-
Press the shutter-release button fully to take the picture.
The image appears on your tilting monitor almost immediately.
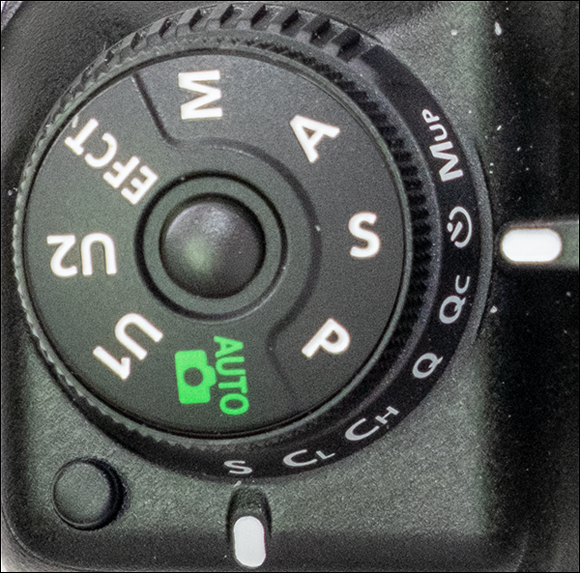
FIGURE 9-16: Rotating the mode dial to shoot in shutter-priority auto (S) mode.

FIGURE 9-17: Adjusting the shutter speed.
Shutter-priority auto (S) mode is the way to go whenever you need to stop action or show the grace of an athlete in motion. You’d use shutter-priority auto (S) mode in lots of scenarios. Figure 9-18 shows the effects you can achieve with different shutter speeds. The image on the left was photographed with a slow shutter speed, and the image on the right was photographed with a fast shutter speed to freeze the action. For more information on using shutter-priority auto (S) mode when photographing sporting events, check out Chapter 13.
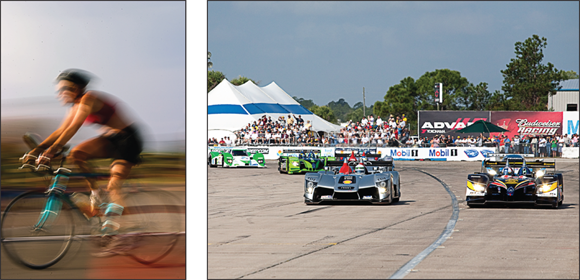
FIGURE 9-18: A tale of two shutter speeds.
Using manual (M) mode
You can also manually expose your images. When you choose manual (M) mode, you supply the f-stop value and the shutter speed. You can choose from several combinations to properly expose the image for the lighting conditions. Your camera meter gives you some assistance to select the right f-stop and shutter speed combination to properly expose the image. (For a refresher on how your camera determines exposure, check out “Understanding how exposure works in the camera” earlier in this chapter.)
To manually expose your images, follow these steps:
- Press the mode dial lock release button and then rotate the mode dial to M (see Figure 9-19).
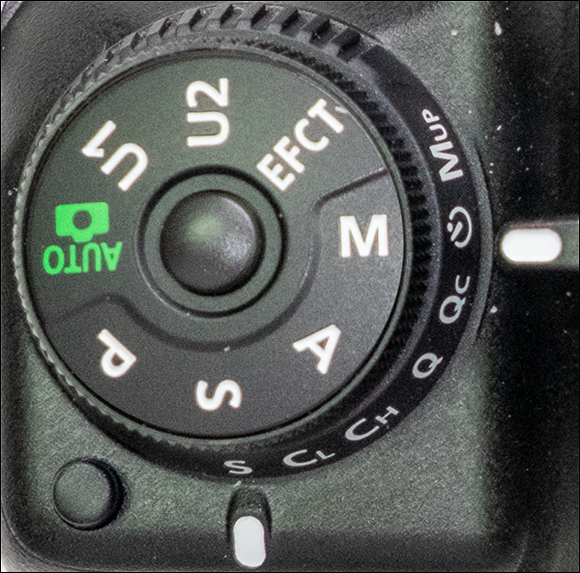
FIGURE 9-19: Manually exposing the image.
-
Rotate the main command dial to set the shutter speed.
The shutter speed determines how long the shutter stays open. A slow shutter speed is perfect for a scene with low light. A fast shutter speed freezes action. As you change the shutter speed, review the exposure indicator on the control panel or, if you have the shutter-release button pressed halfway, in the viewfinder.
When the exposure is correct for the lighting conditions, the exposure level mark aligns with the center of the scale. Figure 9-20 shows the exposure indicator as seen in the control panel. If the exposure level mark is to the right of center, the image will be overexposed. If the exposure level mark is to the left of center, the image will be underexposed. Of course, you’re in control. You may want to intentionally overexpose or underexpose for special effects. For example, if you slightly underexpose the image, the colors will be more saturated. You can also monitor exposure in the viewfinder using the scale on the right side of the viewfinder.
-
Rotate the sub-command dial to set the f-stop value.
The f-stop value determines how much light enters the camera. A small f-stop value, such as f/2.8, lets a lot of light into the camera and also gives you a shallow depth of field. A large f-stop value lets a small amount of light into the camera and gives you a large depth of field. As you change the f-stop value, review the exposure indicator on the control panel or, if you have the shutter-release button pressed halfway, in the viewfinder. When the exposure is correct for the lighting conditions, the exposure level mark aligns with the center of the scale. If the exposure level mark is to the right of the center, the image will be overexposed. If the exposure level mark is to the left of center, the image will be underexposed.
-
Press the shutter-release button halfway to achieve focus.
A white dot appears in the left side of the viewfinder when the camera has achieved focus. If you see a flashing left and right arrow, the camera cannot achieve focus and must be focused manually.
- Press the shutter-release button fully to take the picture.
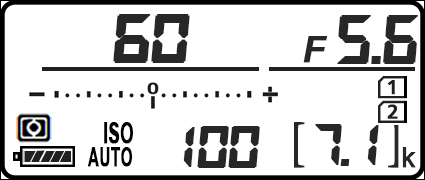
FIGURE 9-20: Monitor the exposure on the control panel.
Introducing EFCT mode
There’s one setting on the mode dial that may leave you scratching your head, especially if you’ve never used a Nikon camera before, and that’s the EFCT mode (known as Effects on older Nikon cameras). The EFCT mode is only available when you shoot in JPEG format. But if you like to create special effects quickly, the EFCT mode is for you.
For example, if you want to create a picture that looks like a graphic illustration, you’ll find a mode that suits your creative bent after rotating the mode dial to EFCT. I show you how to create images using the EFCT mode in Chapter 12.
Creating Long Exposures Using Manual Mode
Instead of freezing motion, photographing subjects with a long exposure creates a dreamy image where the motion of the subject is accentuated. You may want to create images with long exposures when shooting subjects like waterfalls. Long exposures are also wonderful for creating images of city freeways at night; the long exposure captures a colorful image of a ribbon of car headlights on one side of the freeway and taillights on the other.
In the following sections, I show you how to shoot long exposures and how to enable noise reduction for long exposures.
Shooting long exposures
When you want to create a long exposure, you have two options: a time exposure or a bulb exposure. You create long exposures while shooting in manual (M) mode. Follow these steps:
- Mount the camera on a tripod.
-
Compose the image and focus the camera.
You can use manual focus or use a single AF point for focus. If you use the single AF point, press the shutter-release button halfway to achieve focus. When focus is achieved, continue to hold the shutter-release button halfway and then rotate the focus selector lock to L to lock the focus before removing your finger from the shutter-release button.
-
Place the eyepiece cap over the eyepiece.
This prevents stray light from reaching the sensor through the eyepiece.
- Press and hold the mode dial lock release and rotate the mode dial to M (see Figure 9-21).
-
Rotate the main command dial to select one of the following options: bulb or time.
Rotate the dial until you see bulb or time (designated by --) on the control panel. The image on the left in Figure 9-22 shows the control panel when shooting a bulb exposure, and the image on the right shows the control panel when shooting a time exposure.
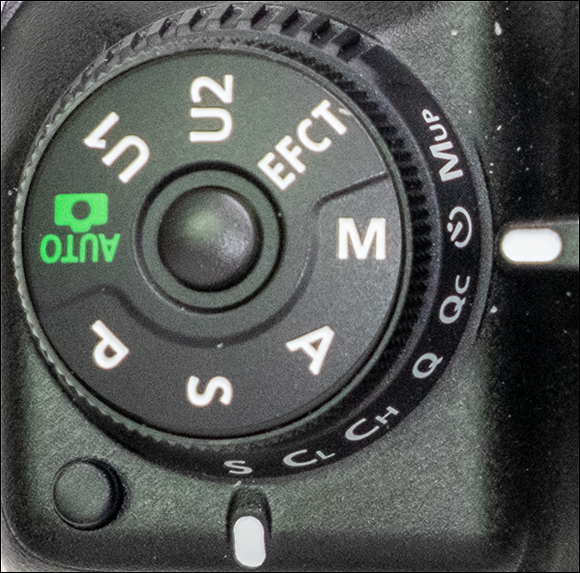
FIGURE 9-21: Choose manual (M) mode to shoot a long exposure.

FIGURE 9-22: Shooting a long exposure with bulb (left) or time (right).
-
Release the shutter.
If you choose bulb, the shutter releases when you press the shutter-release button. When shooting bulb, you hold the shutter open until the exposure is complete.
If you choose time, the shutter releases when you press and release the shutter-release button.
-
Close the shutter.
If you choose bulb, the shutter closes when you take your finger off the shutter-release button.
If you choose time, the shutter closes when you press the shutter-release button a second time.
If you’re shooting long exposures without a remote release, time is your best option. Use the self-timer to delay the release of the shutter to minimize any operator-induced blur. When you release the shutter to end the exposure, press the shutter-release button gently.
Figure 9-23 shows you the type of photograph you can create when shooting a long exposure with the bulb or time shutter option. This image is a 15-second time exposure. Notice the headlight and taillight trails.
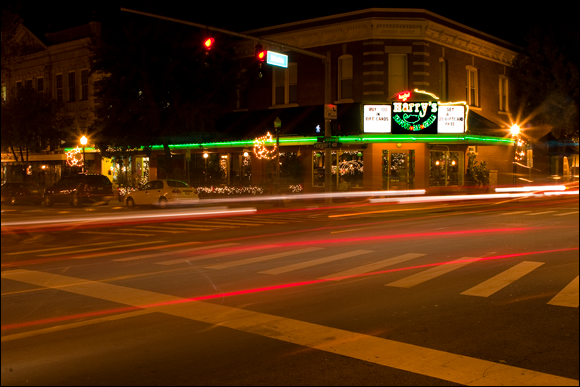
FIGURE 9-23: Create a wonderfully abstract image with a long exposure.
When shooting long exposures, I recommend you use a remote release to open and close the shutter.
By default, the longest exposure your D780 can capture is 30 seconds when shooting bulb or time. However, you can increase this by using the d6: Extended Shutter Speeds (M) option from the Custom Settings menu. You can increase the maximum exposure to 60 seconds, 90 seconds, 120 seconds, 180 seconds, 240 seconds, 300 seconds, 480 seconds, 600 seconds, 720 seconds, or 900 seconds.
Enabling long-exposure noise reduction
When you shoot long exposures, digital noise is a fact of life. If the images you capture using long exposures have areas of dark shadows, the noise is most noticeable in that tonal range. You may also notice areas of fog and bright lights in images captured with long exposures.
You can reduce this problem by following these steps:
-
Press the MENU button.
The camera menus appear on the tilting monitor.
- Press the down arrow on the multi selector to select the Photo Shooting menu, and then press the left arrow on the multi selector to highlight the icon.
- Press the down arrow on the multi selector to highlight Long Exposure NR (see Figure 9-24).
-
Press the right arrow on the multi selector.
The long-exposure noise reduction options appear on the tilting monitor (see Figure 9-25).
-
Press the down arrow on the multi selector to highlight On, and then press OK.
Long-exposure noise reduction will be applied to image captures with long exposures.
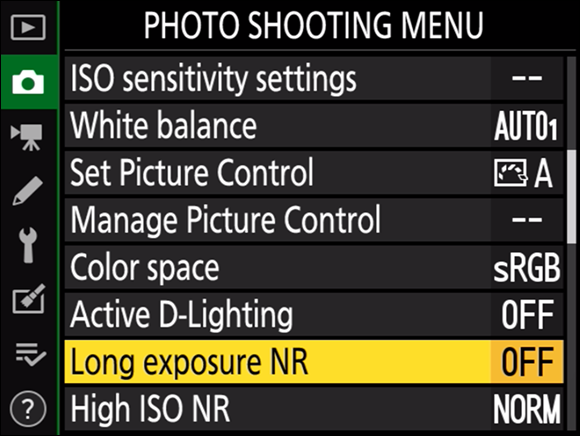
FIGURE 9-24: The Long Exposure NR command.
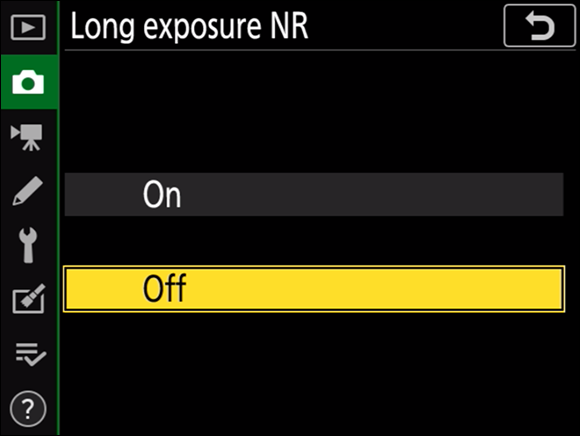
FIGURE 9-25: Choose On to enable long-exposure noise reduction.
Long-exposure noise reduction is applied after you release the shutter. This takes some time, roughly double the time it normally takes to process an image. While the image is processing, you see Job nr flashing on the control panel and in the viewfinder. You won’t be able to take additional pictures until the processing is complete. If you turn off the camera before the processing is finished, the image will be saved but noise reduction won’t be applied.
Modifying Camera Exposure
Your camera has a built-in metering device that automatically determines the proper shutter speed and aperture to create a perfectly exposed image for most lighting scenarios. However, sometimes you need to modify the exposure to suit the current lighting conditions. Modify camera exposure for individual shots, or hedge your bets and create several exposures of each shot.
Using exposure compensation
When your camera gets the exposure right, it’s a wonderful thing. Sometimes, however, the camera doesn’t get it right. When you review an image on the camera’s tilting monitor and it’s not exposed to suit your taste, you can compensate manually by increasing or decreasing exposure.
To manually compensate for camera exposure, follow these steps:
-
Press the mode dial lock release, and choose P, A, or S from the mode dial (see Figure 9-26).
 Exposure compensation is available only when you take pictures in programmed auto (P) mode, aperture-priority auto (A) mode, or shutter-priority auto (S) mode.
 -
Press the shutter-release button halfway.
The camera meters the scene.
-
Press the exposure compensation button (see Figure 9-27) and rotate the main command dial while looking in the viewfinder or at the control panel.
Rotate the dial clockwise to decrease exposure or counterclockwise to increase exposure. As you rotate the dial, you see the exposure indicator in the viewfinder and on the control panel move, which shows you the amount of exposure compensation you’re applying (see Figure 9-28).
- Press the shutter-release button fully to take the picture.
-
To cancel exposure compensation, press and hold the exposure compensation button, and then rotate the main command dial until the exposure indicator is in the center of the exposure compensation scale.
You see the exposure compensation scale in the viewfinder and on the control panel.

FIGURE 9-26: Use exposure compensation with these shooting modes.
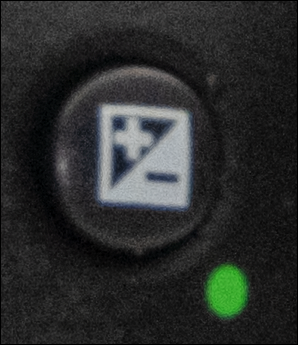
FIGURE 9-27: The exposure compensation button.
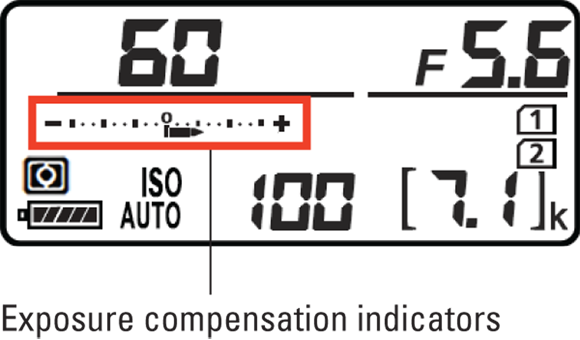
FIGURE 9-28: Using exposure compensation.
Bracketing exposure
When you’re photographing an important event, properly exposed images are a must. Many photographers get lazy and don’t feel they need to get it right in the camera when they have programs like Adobe Photoshop or Adobe Lightroom. But you get much better results when you process an image that’s been exposed correctly. Professional photographers bracket their exposures when they photograph important events or places they may never visit again.
When you bracket an exposure, you take at least three pictures: one with the exposure as metered by the camera, one with exposure that’s been decreased, and one with exposure that’s been increased. You can bracket up to ±15 exposure value (EV) in ⅓ EV increments. Bracketing is only available in P, A, S, or M modes. You can also determine the number of frames that are bracketed.
To bracket your exposures, follow these steps:
-
Press and hold the BKT button on the left side of the camera when pointed toward your subject (see Figure 9-29) and then rotate the main command dial to specify the number of images in the bracketing sequence.
As you rotate the dial, the number of frames appears on the control panel.
-
Press and hold the BKT button, and then rotate the sub-command dial to specify the bracketing increment.
Each time you rotate the dial, you increase the increment by ⅓ EV. If you choose an EV of 2 or 3, the maximum number of shots is 5. If you specify 7 or 9 in Step 1, the number of exposures is automatically set to 5. The number of frames and EV brackets are displayed on the control panel, and BKT appears in the viewfinder (see Figure 9-30).
-
Compose the image and press the shutter-release button halfway.
A white dot appears on the left side of the viewfinder when focus is achieved.

FIGURE 9-29: Use this button to start a bracketing sequence.
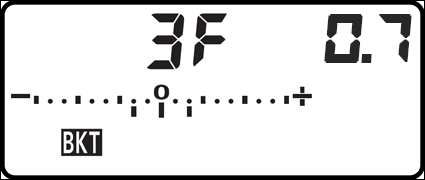
FIGURE 9-30: Determining the number of frames in the sequence.
-
Press the shutter-release button fully.
The camera creates the number of images specified. For example, if you bracket five frames, the camera captures one image with standard exposure, two images with decreased exposure, and two images with increased exposure.
To determine the start of a bracketing sequence, place your hand in front of the lens and take a picture before you take the first picture in the sequence. Do the same after you capture the last image for the bracketing sequence. When you edit the images, the photo of your hand designates the start and end of the sequence, which is useful if you’re using the image sequence to create a high dynamic range (HDR) image using third-party software.
Most third-party image-editing software will automatically align a set of bracketed exposures when merging them to an HDR image. However, for the best results, I recommend you place the camera on a tripod when bracketing exposure.
You can use Custom Menu Settings b1: EV Steps for Exposure Cntrl to change the EV value of each image bracketed from the default ⅓ EV to higher values. I recommend you stick with the default ⅓ EV, though, and not visit this option.
Locking focus and exposure
You can also lock focus and exposure on a specific part of the frame, which is handy when you want a specific part of the frame exposed correctly. For example, recently I was photographing a beautiful sunset. The camera meter averaged the exposure for the scene, and the image ended up with blown-out highlights around the sun and clouds that weren’t as dark and colorful as I saw them. To compensate for this, I locked exposure on the blue sky, and the picture turned out perfectly.
To lock exposure, follow these steps:
-
Press the AF-mode button (see Figure 9-31), rotate the main command dial, and choose AF-S.
Your camera now has a single autofocus point in the middle of the frame.
- Use the multi selector to move the autofocus point over the area of the frame where you want to lock focus and exposure.
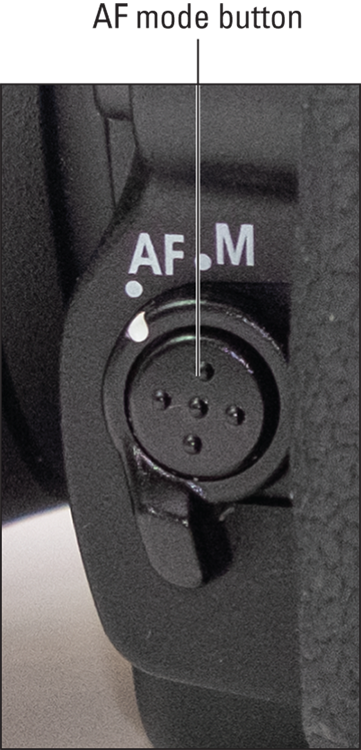
FIGURE 9-31: Switching to AF-S mode.
-
Press the AE-L/AF-L button (see Figure 9-32).
The AE-L icon appears in the viewfinder.
-
Press the shutter-release button halfway to achieve focus.
A white dot in the viewfinder tells you that the camera has achieved focus.
- Press the shutter-release button fully to take the picture.
Choosing a Shutter-Release Mode
When you press the shutter-release button, the shutter opens once and captures an image. However, when photographing some subjects, such as sports, you may want to capture a sequence of images. If you’re photographing a wedding, you may want to capture multiple images when pressing the shutter-release button, but do it as quietly as possible.
You can change release modes by doing the following:
-
Press and hold the release mode dial lock release (see Figure 9-33).
This unlocks the release mode dial.
- Rotate the release mode dial (see Figure 9-33), and choose one of the following options:
- S (single frame): With this option the camera captures a single frame when you press the shutter-release button.
- CL (continuous low speed): With this option, you press and hold the shutter-release button to capture up to 3 frames per second (fps).
- CH (continuous high speed): With this option, you press and hold the shutter-release button to capture up to 7 fps.

FIGURE 9-32: Use this button to lock exposure and focus.

FIGURE 9-33: Choosing the shutter-release mode.
- Q (quiet shutter-release): With this mode, the camera captures a single frame when you press the shutter-release button, and the camera noise is reduced.
- QC (quiet continuous shutter-release): With this mode, you press and hold the shutter-release button to capture up to 3 fps, and the camera noise is reduced.
- Self-timer: Capture images with the self-timer (see Chapter 4).
- Mup (mirror up): With this option, the mirror is raised to minimize blur caused by camera operation. This option is useful when shooting long exposures. When you choose this release option, you press the shutter-release button halfway to achieve focus, press the shutter-release button fully to raise the mirror, and then press the shutter-release button fully again to take the picture. The mirror lowers after the camera captures the image.
Release the shutter-release button to stop capturing images in CL, CH, or QC mode.
The maximum number of images you can capture when shooting in one of the continuous modes (also known as burst photography) is 100 frames.
When you choose On for Silent Live View Photography in the Photo Shooting menu and enable live view photography while shooting RAW, the frame rate at which you can capture images shooting with the CH (continuous high speed) release option varies depending on the bit-depth option you choose: If you choose 14-bit, you can capture up to 8 fps; if you choose 12-bit, you can capture up to 12 fps.