
Chapter 12
Creating Special Effects and Other Delights
IN THIS CHAPTER
![]() Using the special effect modes
Using the special effect modes
![]() Making a sequence of images
Making a sequence of images
![]() Using Active D-Lighting
Using Active D-Lighting
![]() Creating HDR images
Creating HDR images
![]() Creating time-lapse movies
Creating time-lapse movies
![]() Creating multiple images over a period of time
Creating multiple images over a period of time
Creating images can be downright addicting. It’s like potato chips — you can’t eat just one. The great thing about being addicted to creating lots of images is that you don’t end up having to buy a new wardrobe or go on a diet. The great thing about your Nikon D780 is that you can create traditional images, or you can take a walk on the wild side and let your creative inner child run amuck and create images using EFCT mode. In addition to still photography with special effects, you can create time-lapse movies, create high dynamic range (HDR) images, and more.
If you’re the kind of person who didn’t draw within the lines in school, this chapter will be right up your alley!
Creating Images Using EFCT Mode
You have a tool that enables you to create compelling images. To use this tool, you rotate the mode dial to EFCT. In EFCT mode, you have the following special effects available:
- Night vision: Create monochrome images in dim lighting conditions using a high ISO sensitivity.
- Super vivid: Capture vibrant images with increased contrast and saturation.
- Pop: Create pictures with increased saturation.
- Photo illustration: Create images that look like posters.
- Toy camera effect: Create images that appear to have been created with a toy camera. Objects in images created with this mode have bright outlines and increased saturation.
- Miniature effect: Create images that look like photographs of models of cities and dioramas you see in a museum.
- Selective color: Create a black-and-white image with selective color (for example, a black-and-white photo of a city scene with selective color to show a bright red Ferrari).
- Silhouette: Create images of subjects that are in silhouette against a bright background.
- High key: Create bright images of scenes with blazing light. The resulting images appear to be filled with light.
- Low key: Create a moody image with dark tones and colors.
In the following sections, I show you how to create images with these modes. In some cases, you can adjust the effects when shooting in live view. When this is the case, I show you how to do it. Other EFCT modes cannot be adjusted. When this is the case, I suggest subject matter suitable for that mode. But the fact that you’re reading this chapter means you’re a creative kind of photographer, so throw caution to the wind and experiment with any type of subject matter that suits your fancy when exploring these modes.
 When you create images using one of the EFCT modes, you create a JPEG image. If you shoot NEF (RAW) + JPEG, the camera creates a JPEG image only. However, you can capture a NEF (RAW) image of the scene as well. I show you how to do this in the upcoming “Creating an EFCT image and a RAW negative.”
Using the EFCT modes
Any of the modes discussed in the following sections have a similar beginning. So I won’t bore you with repetitive instructions. In the following sections, I show you specific instructions for selected modes; when the modes can’t be adjusted, I suggest subject matter for the mode.
To create an image using one of the EFCT modes, follow these steps:
- Press the mode dial release lock, and then rotate the mode dial to EFCT (see Figure 12-1).
-
Rotate the main command dial to choose the desired option.
The icons for each mode are shown in Figure 12-2.
- Compose the scene and take the picture.

FIGURE 12-1: The EFCT modes are accessed here.
Some of the EFCT modes have settings you can adjust in live view. Night vison, super vivid, silhouette, high key, low key, and pop are self-explanatory. The only option you have with selective color is three eyedroppers, which you use to determine which colors appear in an otherwise black-and-white image.
Experiment with the modes during your picture-taking walkabouts. Some of the effects have adjustable options. I show you which modes you can adjust in the following sections.
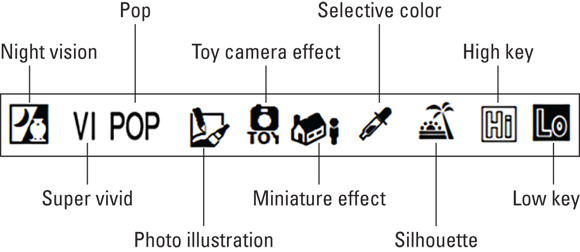
FIGURE 12-2: Choose the desired EFCT mode.
Creating a photo illustration
If you’re like me, you can create a great image, but you can’t draw a straight line. Fear not, intrepid photographer! Your camera enables you to create a photo illustration of your favorite scene. You can adjust the effect when shooting in live view.
To create a photo illustration, follow these steps:
- Select photo illustration from the EFCT mode.
-
Press the live view button.
The tilting monitor refreshes showing the view captured by the lens.
-
Press OK.
The options you can adjust are displayed on the tilting monitor.
-
If desired, adjust the outline thickness (see Figure 12-3).
Press the left arrow on the multi selector to make the outlines thinner or the right arrow on the multi selector to make the outlines thicker.
-
Press OK.
The adjusted effects will be applied to the image.
-
Compose the image and take the picture.
Figure 12-4 shows an image created with the photo illustration effect.

FIGURE 12-3: Adjusting the outline thickness.
Turning your D780 into a toy camera
The toy camera effect is another option for creating a cool image. The resulting image looks similar to images created with some of the early Lensbaby optics (www.lensbaby.com), albeit a tad sharper.
To create an image using the toy camera effect, follow these steps:
- Select toy camera from the EFCT mode.
-
Press the live view button.
The tilting monitor refreshes showing the view captured by the lens.
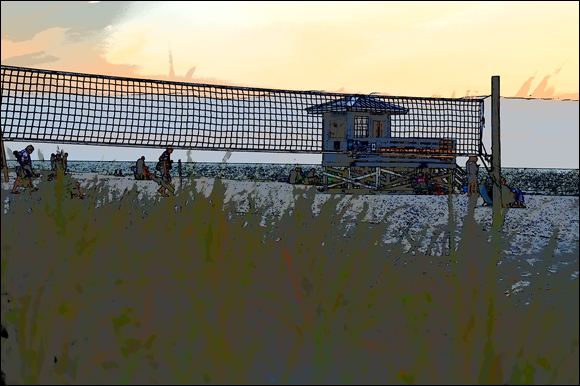
FIGURE 12-4: Creating images with the photo illustration effect.
-
Press OK.
The options you can adjust are displayed on the tilting monitor (see Figure 12-5).
-
If desired, adjust Vividness.
Press the left arrow on the multi selector to make the image less vivid or the right arrow on the multi selector to make the image more vivid.
-
If desired, adjust Vignetting.
Press the left arrow on the multi selector to decrease the size of the vignette or the right arrow on the multi selector to increase the size of the vignette.
-
Press OK.
The changes will be applied when you create the image.
-
Compose the image and take the picture.
Figure 12-6 shows an image created with the toy camera effect.

FIGURE 12-5: Adjusting the options.

FIGURE 12-6: Creating images with the toy camera effect.
Playing with miniatures
If you photograph cityscapes from a tall building using the miniature effect, cars and people look like toys or models. When you use this effect, you determine which part of the scene is in sharp focus. This is the slice of focus. The area surrounding the slice of focus is slightly blurred. The slice of focus can be vertical or horizontal.
To create an image using the miniature effect:
- Select miniature from the EFCT mode.
-
If desired, press the live view button.
The miniature effect has options you can adjust when creating an image with this mode in live view.
- Use the multi selector arrows to place the autofocus point.
-
Press OK.
The miniature effects options are displayed on your tilting monitor.
-
Use the multi selector arrows to choose the position of the area of the image that will be in focus.
This is actually a slice of focus. Press the left arrow on the multi selector or the right arrow on the multi selector to orient the slice of focus vertically or horizontally.
-
Use the multi selector arrows to specify the size of the slice of focus (see Figure 12-7).
Press the up arrow on the multi selector or the down arrow on the multi selector to specify the size of the slice of focus.
-
Press OK.
The orientation and size of the slice of focus are set for this image.
-
Press the shutter-release button halfway to achieve focus, and then press the shutter-release button fully to take the picture.
Figure 12-8 shows an image created using the miniature effect.

FIGURE 12-7: Specifying the orientation and size of the slice of focus.
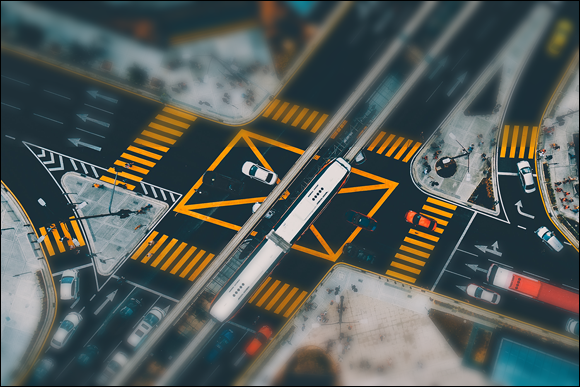
FIGURE 12-8: Creating an image with the miniature effect.
Creating an EFCT image and a RAW negative
When you create special effects, there may be times you want to keep a RAW file of the original scene. You can do this when you create images using the following EFCT modes:
- Night vision
- Super vivid
- Pop
- Photo illustration
- Toy camera effect
- Miniature effect
- Selective color
This is a great option when you use one of the previously listed EFCT modes to create an image of an event that may never happen again.
To create an NEF (RAW) file and a JPEG file of a special effect, follow these steps:
-
Press the MENU button.
The camera menus appear on the tilting monitor.
- Press the down arrow on the multi selector to highlight the Custom Settings menu, and then press the left arrow on the multi selector to highlight the icon.
- Press the right arrow on the multi selector to place the cursor inside the menu, and then press the down arrow on the multi selector to highlight d8: Save Original (EFFECTS), as shown in Figure 12-9.
-
Press the right arrow on the multi selector.
The Save Original (EFFECTS) options appear on your tilting monitor (see Figure 12-10).
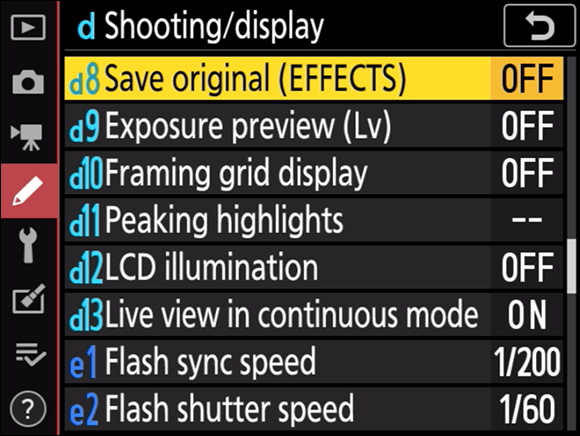
FIGURE 12-9: The d8: Save Original (EFFECTS) command.
-
Press the up arrow on the multi selector to highlight On and press OK.
When you create an image using the night vision, super vivid, pop, photo illustration, toy camera effect, miniature effect, or selective color effect, the camera saves a JPEG file with the effect applied, and an unprocessed NEF (RAW) file.
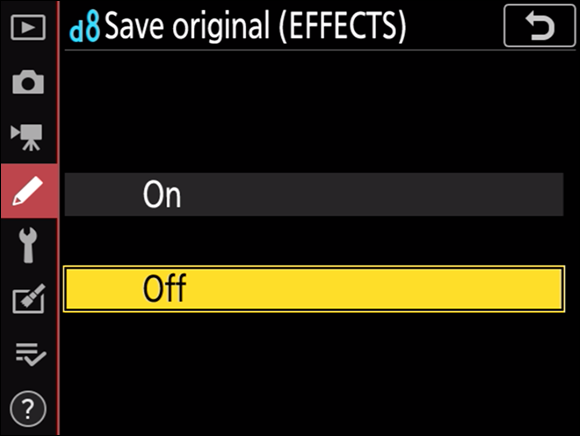
FIGURE 12-10: The Save Original (EFFECTS) options.
Creating special effects movies
Creating movies using one of the EFCT modes is another way to create compelling entertainment. Your camera is capable of capturing 4K video in a wide variety of frame rates (see Chapter 8). Moviemaking is fun, and if you’re an out-of-the-box kind of photographer, you can create interesting and unique movies using the EFCT modes. When you create movies, you do so in live view mode (see Chapter 8). And as I show you in this chapter, you can modify many of the EFCT modes in live view. The possibilities are only limited by your imagination.
If you’re creating movies at dusk or creating a video scene of a city, try using the EFCT night vision mode to create your masterpiece. Other options for creating compelling videos of a city are the EFCT super vivid, pop, toy camera effect, or miniature effect modes. Put your camera on a tripod and create a video of a busy intersection using the EFCT miniature effect mode. Another idea is to create a video of people at sunset with their back to the sun using the EFCT silhouette mode. Create a video of a performer in the spotlight using the EFCT high key mode, or create a video of a dark stormy night using the EFCT low key mode.
When you create a movie using the EFCT photo illustration mode, it looks more like a slide show.
 Movies created using the EFCT miniature effect mode play back at a high speed. For example, if you record 15 minutes of video using the miniature effect mode, the duration of the processed movie is 1 minute.
Creating a Sequence of Images
If you shoot using the CL (continuous low speed) or CH (continuous high speed) release mode while using one of the EFCT modes, you create a sequence of images. The number of frames per second the camera can capture while using photo illustration or miniature effect will be slower than normal. After creating a sequence of images and downloading them to your computer, you can use third-party software to combine the frames into a single document, and then create a compelling slide show. Some software, such as Adobe Photoshop, enables you to zoom in or out on a frame and move the frame, which, when compiled, creates a slide show with the Ken Burns effect.
Image sequences are effective ways to show change over time. You can record a sequence of images of an athlete in motion, a party in progress, a chef cooking, and so on. If you create an image sequence where a person or object moves, focus is important. If you shoot your special effect image sequence using live view, consider using the AF-C (continuous autofocus) mode and using the Dynamic-area AF mode discussed in Chapter 7. If you use one of the EFCT modes that does not have adjustable options in live view, and you shoot through the viewfinder, use the AF-C autofocus mode and the dynamic-area AF mode with 9 points (see Chapter 10). When creating a movie using the EFCT photo illustration mode, you must focus manually.
If you’re photographing a static scene that changes over time, such as traffic moving through a busy intersection, mount the camera on a tripod. You can remotely release the shutter or use the CL or CH release mode to capture multiple images. If you choose CL or CH, you can capture up to 100 images when pressing the shutter-release button. Depending on the amount of movement that occurs when you capture the sequence, you can combine the images to create a movie that looks like a Keystone Cops comedy. Add some interesting background music, and you can create a slide show or movie to entertain friends or clients.
Creating Slow-Motion Movies
You’ve probably seen movies where slow-motion clips have been added for dramatic effect. A classic use of slow motion is the final scene of Bonnie and Clyde. If you’re too young to remember that movie, perhaps you’ve seen Hard Boiled (1991) or Dredd (2012). When you create a slow-motion movie using one of the frame rates discussed in the following section, the camera records the video at a frame rate four times faster than the frame rate the processed movie is played back at. For example, when you choose the 1920 x 1080; 30p x 4 (slow-motion) option, the camera records the video at 120 frames per second (fps) and the movie is played back at 30 fps. Plus, with this frame rate, 15 seconds of video produces 60 seconds of footage. At any rate, you can use slow motion for an entire movie, or create a clip that you use for a bigger project you’re editing in an application such as Adobe Premiere Pro or Adobe Premiere Elements.
To create a slow-motion movie, follow these steps:
-
Press the MENU button.
The menus appear on your tilting monitor.
-
Press the down arrow on the multi selector to highlight the Movie Shooting menu, and then press the left arrow on the multi selector.
The Movie Shooting menu icon is highlighted.
- Press the right arrow on the multi selector to place the cursor inside the menu, and then press the down arrow on the multi selector to highlight Frame Size/Frame Rate (see Figure 12-11).
-
Press the right arrow on the multi selector.
The video and frame rate options are displayed.
- Press the down arrow on the multi selector and choose one of the following slow-motion frame rates (see Figure 12-12):
- 1920 x 1080; 30p x 4 (slow-motion): This option creates a movie with a frame size of 1920 x 1080 (HD) that is recorded at 120 fps (30 fps x 4) and played back at a frame rate of 30 fps. This option is good for most slow-motion movies.
- 1920 x 1080; 25p x 4 (slow-motion): This option creates a movie with a frame size of 1920 x 1080 (HD) that is recorded at 100 fps (25 fps x 4) and played back at a frame rate of 25 fps. This option is good for videos that will be used in Europe for countries using the PAL standard.
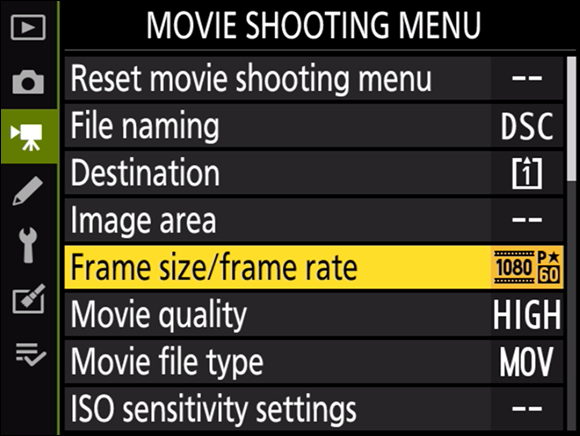
FIGURE 12-11: Your first step when creating a slow-motion movie.
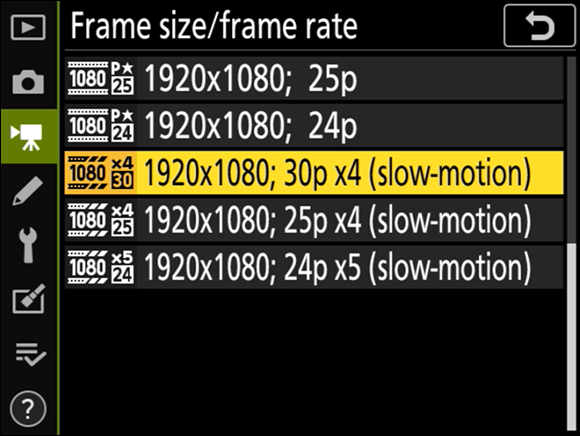
FIGURE 12-12: Choosing the frame size and frame rate for your slow-motion movie.
- 1920 x 1080; 24p x 5 (slow-motion): This option creates a movie with a frame size of 1920 x 1080 (HD) that is recorded at 120 fps (24 fps x 5) and played back at a frame rate of 24 fps. This option gives you a slow-motion movie with cinematic qualities.
-
Press OK, and then press the shutter-release button halfway.
The desired slow-motion frame size and frame rate will be applied to all videos until you visit this menu again and choose a different option.
Audio is not recorded when you create a slow-motion movie. You’ll have to add the soundtrack using third-party software.
Now that you’ve set the frame size and frame rate for your slow-motion movie, it’s time to record it. To record your slow-motion video, follow these steps:
-
Press the live view button.
The view captured by your lens is displayed on the tilting monitor.
-
Rotate the live view selector to movie live view (see Figure 12-13).
It’s the icon that looks like a movie camera.
-
Press the movie-record button (see Figure 12-14).
The camera begins recording your video.

FIGURE 12-13: They’re gonna put me in a slo-mo movie.
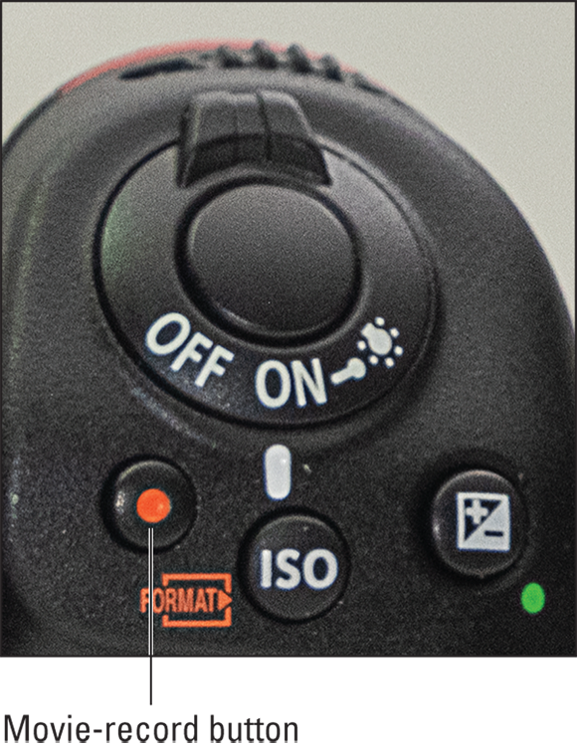
FIGURE 12-14: Press the movie-record button to begin creating your masterpiece.
-
Press the movie-record button again.
The camera stops capturing video.
After you create your slow-motion video, press the play button and review your handiwork (see Chapter 8). But before you view your slow-motion masterpiece, fill a stein with your favorite beverage, grab a bowl of popcorn, and prepare to be amazed!
Creating Dynamic Images with Active D-Lighting
When a scene you’re photographing has a wide range of tonal values, from shadows to highlights, the camera isn’t capable of recording details in the shadow areas, at least not without a little help from a friend. And that friend is Active D-Lighting. If you create an image and notice it lacks the amount of detail you can see, you can create another image with Active D-Lighting applied. When you use Active D-Lighting, the resulting image has more detail in the highlight and shadow areas. You can use Active D-Lighting with still photography, and when creating movies. Active D-Lighting does not work when you shoot in Auto mode.
Here’s how to do it:
-
Press the MENU button.
The camera menus appear on the tilting monitor.
-
Press the down arrow on the multi selector to highlight the Photo Shooting menu if you’re shooting stills or Movie Shooting menu if you’re shooting a movie, and then press the left arrow on the multi selector.
The Photo Shooting or Movie Shooting menu icon is highlighted. For the purpose of this tutorial, I show you how to use Active D-Lighting for still photography.
- Press the right arrow on the multi selector to place the cursor inside the menu, and then press the down arrow on the multi selector to highlight Active D-Lighting (see Figure 12-15).
- Press the right arrow on the multi selector to view the Active D-Lighting options (see Figure 12-16).
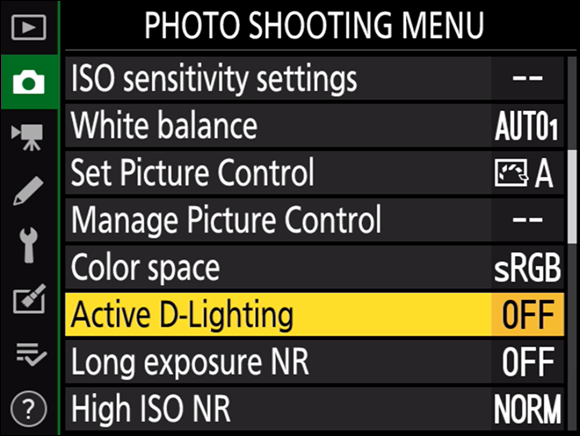
FIGURE 12-15: The Active D-Lighting command.
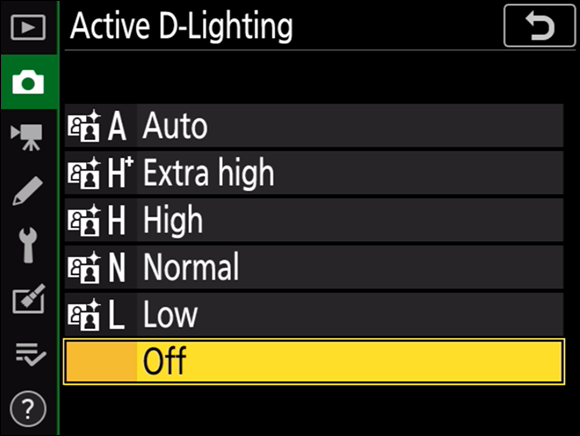
FIGURE 12-16: Choose an Active D-Lighting option.
-
Choose the desired option.
 Start with the Auto option. If the resulting image doesn’t have enough detail in the shadow and highlight areas, take another picture using the High or Extra High option. If the photo taken with the Auto option looks harsh, take another picture using the Low option.
The image on the top in Figure 12-17 shows an image without Active D-Lighting, and the image on the bottom shows the same scene with Active D-Lighting applied.
You can also bracket Active D-Lighting. When you bracket Active D-Lighting, you hedge your bets and capture three to five shots. Bracketing Active D-Lighting is useful when you’re photographing a place you may never visit again. You can review your images by playing them back on the camera and then deleting the ones you don’t like, or as I recommend, download all the bracketed shots to your computer and then delete the duds. It’s easier to see the fine details on a large computer screen.
Bracketing Active D-Lighting is a two-step process. The first step is to use a menu command to assign Active D-Lighting bracketing to the BKT button. Then you use the BKT button to specify the number of shots used to bracket Active D-Lighting.
To assign Active D-lighting to the BKT button, follow these steps:
-
Press the MENU button.
The menus appears on your tilting monitor.
-
Press the down arrow on the multi selector to select the Photo Shooting menu, and then press the left arrow on the multi selector.
The Photo Shooting menu icon is highlighted.

FIGURE 12-17: Active D-Lighting to the rescue.
- Press the right arrow on the multi selector to place the cursor in the menu, and the press the down arrow on the multi selector to highlight Auto Bracketing (see Figure 12-18).
-
Press the right arrow on the multi selector.
The Auto Bracketing options appear on your tilting monitor (see Figure 12-19).

FIGURE 12-18: The Auto Bracketing command.
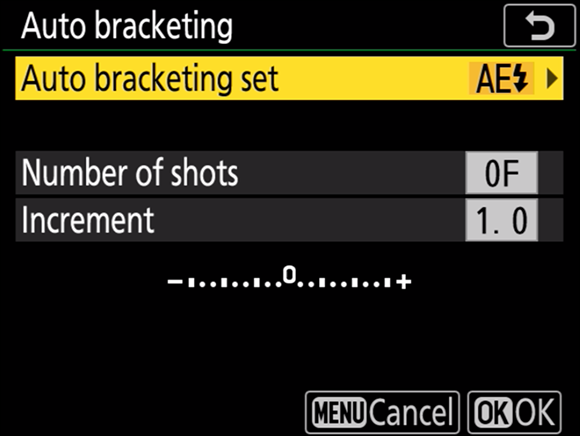
FIGURE 12-19: The Auto Bracketing Set options.
-
Press the right arrow on the multi selector.
The Auto Bracketing options you can assign to the BKT button appear on your tilting monitor (see Figure 12-20).
-
Press the down arrow on the multi selector to highlight ADL Bracketing and press OK.
Active D-Lighting is now assigned to the BKT button.
Now that you’ve assigned Active D-Lighting to the BKT button, you can bracket Active D-Lighting when needed. To bracket Active D-Lighting, follow these steps:
- Enable Active D-Lighting as outlined earlier in this section.
-
Press the BKT button (see Figure 12-21), located on the left side of the camera as you point it toward your subject, and rotate the main command dial.
As you rotate the main command dial, the number of frames you’re bracketing appears on the control panel.
-
Determine the number of frames to bracket.
You can bracket two to five frames.
- When you bracket two frames, the camera captures one image with Active D-Lighting off, and one image at the value you select. If you choose this option, hold the BKT button and rotate the sub-command dial to choose the setting for the second shot.
- When you bracket three frames, the camera captures one image with Active D-Lighting off, one image with Active D-Lighting low, and one image with Active D-Lighting normal.
- When you bracket four frames, the camera captures one image with Active D-Lighting off, one image with Active D-Lighting low, one image with Active D-Lighting normal, and one image with Active D-Lighting high.
- When you bracket five frames, the camera captures one image with Active D-Lighting off, one image with Active D-Lighting low, one image with Active D-Lighting normal, one image with Active D-Lighting high, and one image with Active D-Lighting extra high.
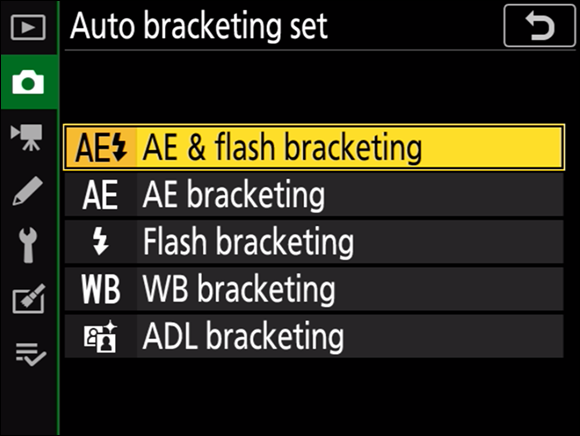
FIGURE 12-20: Assigning Active D-Lighting to the BKT button.
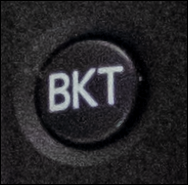
FIGURE 12-21: The BKT button.
- Compose the image and then press the shutter-release button halfway to achieve focus.
-
Press the shutter-release button fully.
The camera captures the number of frames specified with Active D-Lighting bracketing applied.
Creating High Dynamic Range (HDR) Images
You have another option when confronted with a high-contrast scene with a wide tonal range from shadows to highlights: HDR. HDR stands for high dynamic range. Your camera has the option to create a single HDR image by first capturing multiple frames at different exposure levels and then merging them into a single image. Many cameras don’t have this option. Without built-in HDR, you have to bracket exposure over several frames and merge them into a single image in an HDR program or an application like Adobe Lightroom.
In the following section, I show you how to create an HDR image and how to save bracketed images as NEF (RAW) files.
Creating an HDR image
When you create an HDR image, you can shoot a single HDR image or a series of HDR images. You can also let the camera automatically determine the HDR strength or choose one of the other options.
To create an HDR image, follow these steps:
-
Press the MENU button.
The menus appear on your tilting monitor.
-
Press the down arrow on the multi selector to select the Photo Shooting menu, and then press the left arrow on the multi selector.
The Photo Shooting menu icon is highlighted.
- Press the right arrow on the multi selector to place the cursor in the menu, and then press the down arrow on the multi selector to highlight HDR (High Dynamic Range), as shown in Figure 12-22.
-
Press the right arrow on the multi selector.
The HDR (High Dynamic Range) options appear on your tilting monitor (see Figure 12-23).
- Press the right arrow on the multi selector to see more HDR options (see Figure 12-24).
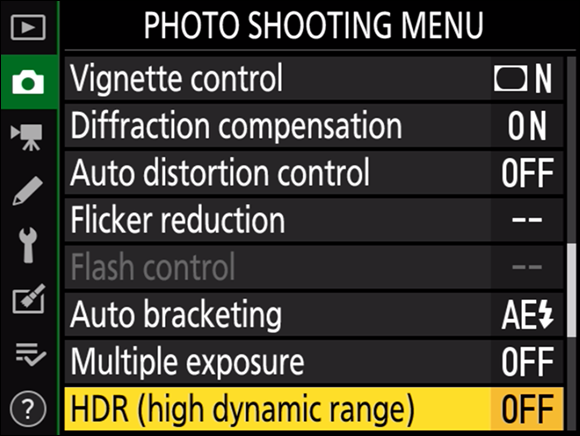
FIGURE 12-22: The HDR (High Dynamic Range) menu command.

FIGURE 12-23: The HDR options.
- Press the up arrow on the multi selector to highlight one of the following options:
- On (series): The camera captures a series of HDR images until you revisit this menu and choose Off.
- On: The camera captures one HDR image.
- Off: Choose this option after taking a series of HDR photographs to cancel HDR photography.
-
Press OK.
You’re returned to the previous menu.
-
Press the down arrow on the multi selector to highlight HDR Strength and press the right arrow on the multi selector.
The HDR Strength options are displayed on your LCD monitor (see Figure 12-25).
-
Choose the desired option.
The default option is Auto, but after taking a photograph, or capturing a series of photographs, you may decide that the HDR is too strong, or not strong enough. If so, choose one of the other strength options.
-
Press OK, and then press the shutter-release button halfway to return to shooting mode.
You’re now ready to create one HDR image or a series of HDR images. The image on the top of Figure 12-26 needs HDR to bring out the full dynamic range, and the image on the bottom shows the same scene with HDR applied.
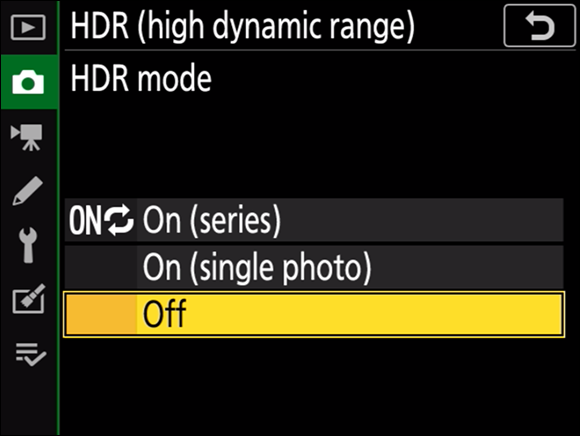
FIGURE 12-24: Choose how the camera captures HDR images.

FIGURE 12-25: Choosing an HDR Strength option.
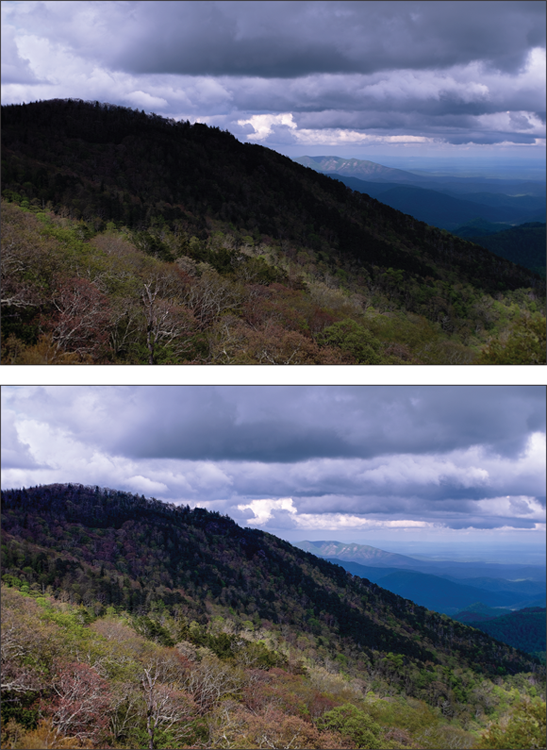
FIGURE 12-26: Using HDR to reveal the full dynamic range of a scene.
Saving bracketed HDR images as RAW files
If you love the technology your D780 offers, but you still like to tinker with HDR applications or merge bracketed exposures in Adobe Lightroom, you have that option. You can save the images the camera uses to create your HDR image as NEF (RAW) files and tinker to your heart’s content in your favorite image-editing program.
Here’s how you do it:
- Follow Steps 1 through 7 in the preceding section of this chapter.
- Press the down arrow on the multi selector to highlight Save Individual Images (NEF), as shown in Figure 12-27.
-
Press the right arrow on the multi selector.
You have two options, On or Off (see Figure 12-28).
-
Press the up arrow on the multi selector to highlight On, and then press OK.
When you create an HDR image, the images used to create the photograph are saved as NEF (RAW) files.
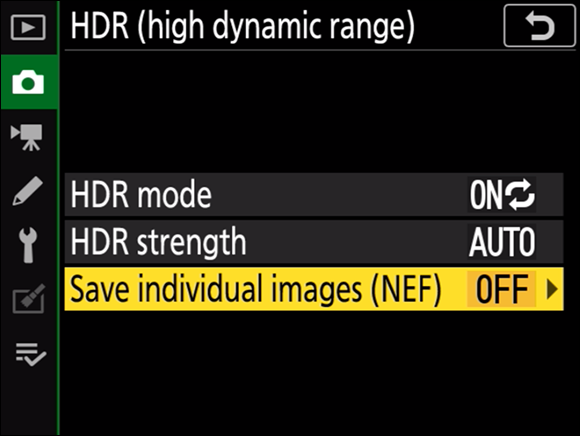
FIGURE 12-27: Saving individual HDR images.
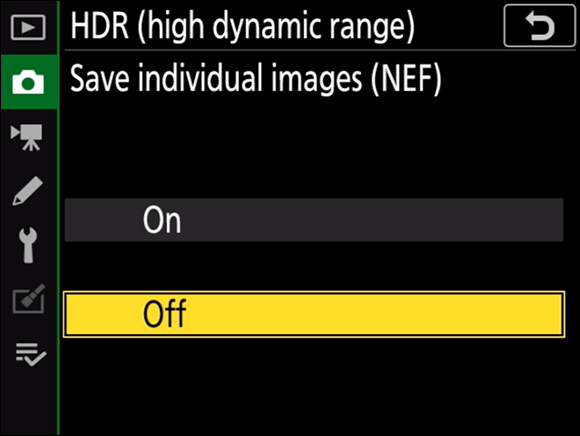
FIGURE 12-28: Choose On to save individual images as NEF files.
Creating a Time-Lapse Movie
Earlier in this chapter, I discuss creating image sequences. That’s a great option if you have the software that can be used to compile the images and, of course, the knowledge. But if you’re the kind of photographer who believes time behind the lens is better than time behind the computer, you have other a great option: creating a time-lapse movie.
Creating a time-lapse movie is a great way to record changes that happen over a period of time. You can create a time-lapse movie in any mode except EFCT. I recommend you choose Auto and let the camera make all the decisions. You’ll also need to mount your camera on a tripod. After you have those orders of business out of the way, you’re ready to create a time-lapse movie by following these steps:
-
Press the MENU button.
The menus appear on your tilting monitor.
-
Press the down arrow on the multi selector to select the Photo Shooting menu, and then press the left arrow on the multi selector.
The Photo Shooting menu icon is highlighted.
- Press the right arrow on the multi selector to place the cursor in the menu, and then press the down arrow on the multi selector to highlight Time-Lapse Movie (see Figure 12-29).
-
Press the right arrow on the multi selector.
The Time-Lapse Movie options are displayed (see Figure 12-30). Each option has its own section. You’ll need to use the multi selector to move from section to section and specify the duration.
-
Specify the following parameters:
-
Interval: This is the time between shots. The default is 5 seconds. Accept this option, or press the right arrow on the multi selector and then choose a different duration.
Choose an interval faster than the slowest anticipated shutter speed. -
Shooting time: This determines how long the camera captures the frames that make up your movie. You can specify a shooting time of up to 7 hours and 59 minutes.

FIGURE 12-29: The first step to creating a time-lapse movie.

FIGURE 12-30: Choose the options for your time-lapse movie.
 To determine the duration of the finished movie, divide the duration by the interval. For example, if the shooting time is 30 minutes (1,800 seconds) and the interval is 10 seconds, your time-lapse movie will be 3 minutes long (1,800 ÷ 10 = 180 seconds, or 3 minutes). Elementary, my dear Watson.
 - Exposure smoothing: The default option is On, which is great, especially when you anticipate the exposure changing over time. This options smooths the images so that viewers won’t notice a jarring change when exposure changes. In most instances, you should leave exposure smoothing on, especially if you’re creating a time-lapse movie that begins in late afternoon and will end in the evening.
- Silent photography: The default option is On. With the default option, the only time you hear the sound of the shutter or mirror rising is at the start and end of the shooting duration.
After specifying the options for your time-lapse movie, you’re returned to the first menu (refer to Figure 12-30).
-
-
If Start is not highlighted, use the multi selector to highlight it, and then press OK.
The camera starts capturing the images that will be used to create your time-lapse movie. Now’s a good time to break out a picnic lunch or read a good book. When the shooting duration ends, the camera assembles the individual images into a movie.
Make sure you have a fully charged battery before creating a time-lapse movie. If you’re creating a movie with a long shooting time, you may want to consider using a battery pack so your camera doesn’t run out of juice while creating the movie.
Interval Shooting
If you like taking matters into your own hands, try interval shooting. With this option, you create multiple images over a period of time, but the camera doesn’t combine them into a time-lapse movie. When you use this option, you end up with lots of images that you can then merge into a movie using a third-party application such as Adobe Photoshop. When the camera creates a time-lapse movie, there is no soundtrack, but when you create multiple images, you can add a soundtrack in your favorite image-editing application.
To create a series of images over a period of time, follow these steps:
-
Press the MENU button.
The menus appear on your tilting monitor.
Do not attempt interval shooting when using Timer or Mup for the release mode. -
Press the down arrow on the multi selector to select the Photo Shooting menu, and then press the left arrow on the multi selector.
The Photo Shooting menu icon is highlighted.
- Press the right arrow on the multi selector to place the cursor in the menu, and then press the down arrow on the multi selector to highlight Interval Timer Shooting (see Figure 12-31).
-
Press the right arrow on the multi selector.
The interval timer shooting options are displayed on your tilting monitor (see Figure 12-32).
-
Choose the following options:
- Choose start day/time: Press the right arrow on the multi selector to display a menu from which you can specify the day and time the shooting will start. The default option is Now, or you can use the multi selector to specify the day and time. After choosing the day and time, press OK to return to the previous menu and choose the next option.
- Interval: The default interval is 1 minute between shots. To choose a different interval, press the right arrow on the multi selector to display a menu from which you choose the interval between shots. After specifying the interval, press OK to return to the previous menu and choose the next option.
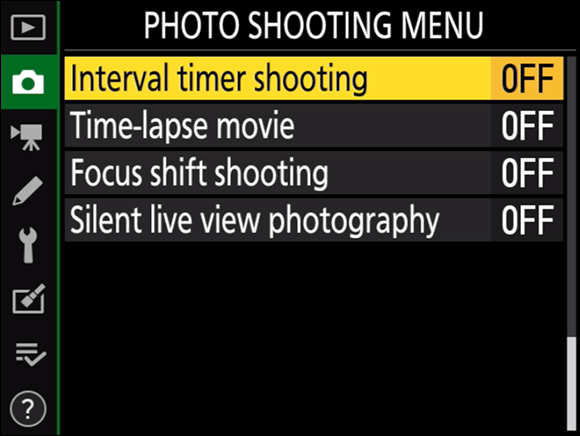
FIGURE 12-31: Go here to enable interval timer shooting.
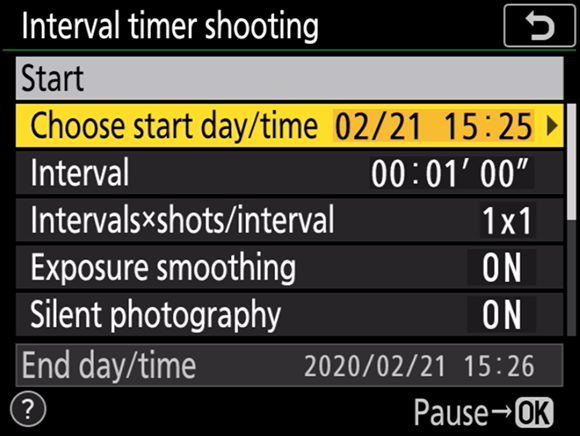
FIGURE 12-32: The options for interval timer shooting.
- Intervals x shots/interval: The default option is 1 shot per interval. Press the right arrow on the multi selector to display a menu from which you can specify more shots per interval. After specifying this option, press OK to return to the previous menu and choose the next option.
- Exposure smoothing: The default option is On, which is great, especially when you anticipate the exposure changing over time. This option smooths the images so that viewers won’t notice a jarring change when exposure changes. In most instances, you should leave exposure smoothing on, especially if you’re shooting a series of images that begin in late afternoon and end in the evening.
- Silent photography: The default option is On. With the default option, the only time you hear the sound of the shutter or mirror rising is at the start and end of the shooting duration.
After specifying these options, the ending day and amount of time are displayed at the bottom of the Interval Timer Shooting menu.
-
Highlight Start and press OK.
If you chose Now for the starting time, the mirror will lock up and the camera will start capturing images in 3 seconds. If you specified a day and time, the camera starts capturing images at the specified day and time. The camera continues writing images to the memory card until all the photos have been created.
Make sure you have a fully charged battery before shooting intervals. If you’re capturing images over a long period of time, with a short duration between intervals, you may want to consider using a battery pack so your camera doesn’t run out of juice while creating the movie.
Make sure the memory card(s) you have in the camera have enough room to capture all the images that the camera will capture during the specified duration.