
27
Events and Change Detection
Angular has powerful browser events that extend HTML events by using Angular data binding to handle responses. Some of the built-in Angular events are discussed in Chapter 24, “Data Binding,” in the section “Event Binding.” This chapter goes over built-in events, custom events, and event handling with an Angular application.
Using Browser Events
Using the built-in events in Angular works like data binding. By wrapping an event name in (), you let Angular know what event you’re binding to. The event is followed by a statement that can be used to manipulate the data. The following is an example of the syntax for a built-in event:
<input type="text" (change)="myEventHandler($event)" />
Table 27.1 lists some of the HTML events, along with their Angular counterparts and short descriptions.
Table 27.1 HTML Events with Angular Syntax and a Description of the Event
HTML Event |
Angular Syntax |
Description |
|
|
|
|
|
|
|
|
|
|
|
|
|
|
|
|
|
|
Some of these events should be familiar to you as they have been used in previous chapters. Notice that the Angular syntax uses one-way data binding, which involves using () around each event to pass information about the event to the component.
Emitting Custom Events
A great feature of components is the capability to emit events within the component hierarchy. Events enable you to send notifications to different levels in the application to indicate that the events have occurred. An event can be anything you choose, such as a value changed or a threshold reached. This is extremely useful in many situations, such as for letting child components know that a value has changed in a parent component or vice versa.
Emitting a Custom Event to the Parent Component Hierarchy
To emit an event from a component, you use the EventEmitter class. This class has the emit() method, which sends an event upward through the parent component hierarchy. Any ancestor components that have registered for the event are notified. The emit() method uses the following syntax, where name is the event name and args is zero or more arguments to pass to the event handler functions:
@Output() name: EventEmitter<any> = new EventEmitter();
myFunction(){
  this.name.emit(args);
}
Handling Custom Events with a Listener
To handle an event that is emitted, you use syntax similar to that used for the built-in events Angular has to offer. The event handler method uses the following syntax, where name is the name of the event to listen for, and event is the value passed by EventEmitter:
<div (name)="handlerMethod(event)">
Implementing Custom Events in Nested Components
Listings 27.1, 27.2, and 27.3 illustrate the use of EventEmitter, Output, emit, and an event handler to send and handle events up the component hierarchy.
Listing 27.1 shows a custom event component that uses a custom event from a child component to pass data to a variable in the parent. Lines 9 through 11 implement a custom event handler, which takes in an event and applies it to the variable text.
In Listing 27.2, line 1 implements a custom event named myCustomEvent, which passes the event to the component method eventHandler. The eventHandler method takes in the emitted value and assigns the value to the variable text, which is outputted on line 3.
In Listing 27.3, line 1 imports Output and EventEmitter from @angular/core to be used within the component. Line 15 uses Output and EventEmitter to create the custom event myCustomEvent. Lines 19 and 24 both emit the event and pass the variable message to the parent component.
Figure 27.1 shows the rendered web page.
Listing 27.1 customevent.component.ts: A Main Component with an Event Handler
01 import { Component } from '@angular/core';
02
03 @Component({
04   selector: 'app-root',
05   templateUrl: 'customevent.component.html'
06 })
07 export class AppComponent {
08   text: string = '';
09   eventHandler(event: any){
10     this.text = event;
11   }
12
13 }
Listing 27.2 customevent.component.html: HTML That Implements a Custom Event
01 <child (myCustomEvent)="eventHandler($event)"></child>
02 <hr *ngIf="text">
03 {{text}}
Listing 27.3 child.component.ts: A Child Component That Emits an Event
01 import { Component, Output, EventEmitter } from '@angular/core';
02
03 @Component({
04   selector: 'child',
05   template: `
06     <button (click)="clicked()" (mouseleave)="mouseleave()">
07       Click Me
08     </button>
09   `,
10   styleUrls: ['child.component.css']
11 })
12 export class ChildComponent {
13   private message = "";
14
15   @Output() myCustomEvent: EventEmitter<any> = new EventEmitter();
16
17   clicked() {
18     this.message = "You've made a custom event";
19     this.myCustomEvent.emit(this.message);
20   }
21
22   mouseleave(){
23     this.message = "";
24     this.myCustomEvent.emit(this.message);
25   }
26 }
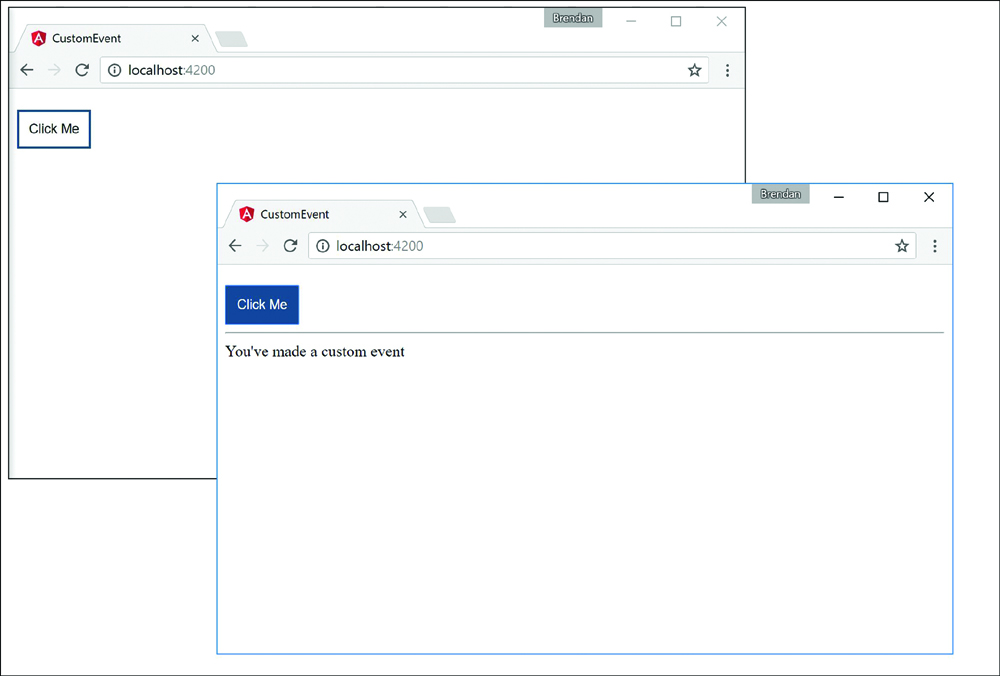
Figure 27.1 Creating a custom event
Deleting Data in a Parent Component from a Child Component
Listings 27.4 through 27.9 illustrate the use of EventEmitter, input, Output, emit, and an event handler to send and handle events up the component hierarchy.
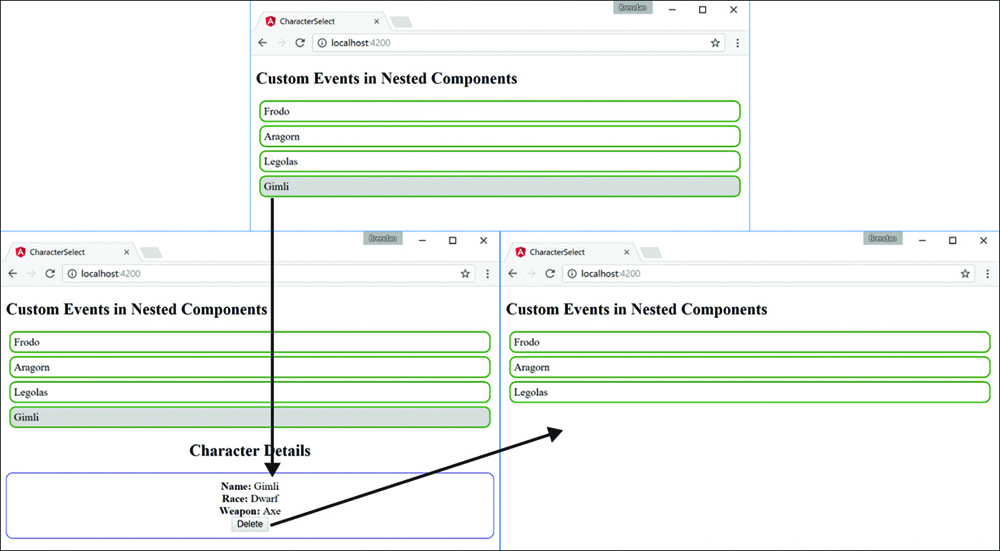
Listing 27.4 shows a component that creates a list of characters that can be manipulated via custom events. The selectCharacter() function on line 21 is an event handler that changes the character value, which can then be passed down to the details component.
In Listing 27.5, line 9 implements a custom event called CharacterDeleted, which invokes the deleteChar() method that takes in the event. Lines 24 through 30 of Listing 27.5 implement a handler for the CharacterDeleted event, which removes the character name from the names property. In line 14 of Listing 27.7, the child component emits this event via the emit() method.
In Listing 27.7, line 10 creates the character input, which takes data in from the parent. Line 11 creates the CharacterDeleted EventEmitter, which is used on line 14 to pass the character data back up to the parent to be handled.
In Listing 27.8, line 8 invokes the deleteChar() method which then activates the EventEmitter on line 41 to send the character data back to the parent component.
Figure 27.2 shows the rendered web page.
Listing 27.4 character.component.ts: A Main Component, Which Passes Data Down to a Nested Component
01 import { Component } from '@angular/core';
02
03 @Component({
04   selector: 'app-root',
05   templateUrl: './app.component.html',
06   styleUrls: ['./app.component.css']
07 })
08 export class AppComponent {
09   character = null;
10
11   characters = [{name: 'Frodo', weapon: 'Sting',
12                            race: 'Hobbit'},
13                 {name: 'Aragorn', weapon: 'Sword',
14                              race: 'Man'},
15                 {name:'Legolas', weapon: 'Bow',
16                              race: 'Elf'},
17                 {name: 'Gimli', weapon: 'Axe',
18                            race: 'Dwarf'}
19   ]
20
21   selectCharacter(character){
22     this.character = character;
23   }
24   deleteChar(event){
25     var index = this.characters.indexOf(event);
26     if(index > -1) {
27       this.characters.splice(index, 1);
28     }
29     this.character = null;
30   }
31
32 }
Listing 27.5 character.component.html: HTML That Implements a Custom Event
01 <h2>Custom Events in Nested Components</h2>
02 <div *ngFor="let character of characters">
03   <div class="char" (click)="selectCharacter(character)">
04     {{character.name}}
05   </div>
06 </div>
07 <app-character
08   [character]="character"
09   (CharacterDeleted)="deleteChar($event)">
10 </app-character>
Listing 27.6 character.component.css: Styles for the Character Component
01 .char{
02     padding: 5px;
03     border: 2px solid forestgreen;
04     margin: 5px;
05     border-radius: 10px;
06     cursor: pointer;
07 }
08 .char:hover{
09   background-color: lightgrey;
10 }
11 body{
12   text-align: center;
13 }
Listing 27.7 details.component.ts: A Details Component That Emits a Delete Event
01 import { Component, Output, Input, EventEmitter } from '@angular/core';
02
03 @Component({
04   selector: 'app-character',
05   templateUrl: './characters.component.html',
06   styleUrls: ['./characters.component.css']
07 })
08 export class CharacterComponent {
09
10   @Input('character') character: any;
11   @Output() CharacterDeleted  = new EventEmitter<any>();
12
13 deleteChar(){
14   this.CharacterDeleted.emit(this.character);
15 }
16
17 }
Listing 27.8 details.component.html: HTML that Triggers a Delete Event
01 <div>
02   <div *ngIf="character">
03     <h2>Character Details</h2>
04     <div class="cInfo">
05       <b>Name: </b>{{character.name}}<br>
06       <b>Race: </b>{{character.race}}<br>
07       <b>Weapon: </b>{{character.weapon}}<br>
08       <button (click)="deleteChar()">Delete</button>
09     </div>
10   </div>
11 </div>
Listing 27.9 details.component.css: Styles for the Details Component
01 div{
02     display: block;
03 }
04 .cInfo{
05     border: 1px solid blue;
06     text-align: center;
07     padding: 10px;
08     border-radius: 10px;
09 }
10 h2{
11   text-align: center;
12 }
13 button{
14   cursor: pointer;
15 }
Using Observables
Observables offer components a way to observe data that changes asynchronously, such as data coming from a server or from user input. Basically, observables allow you to watch values for changes over time. Unlike a JavaScript promise, which returns a single value, an observable is capable of returning an array of values. This array of values doesn’t have to be received all at once, either, which makes observables that much more powerful.
Creating an Observable Object
You import Observable from rxjs/observable to be used within a component. Once it is imported, you can create an observable object by using the following syntax, where name is the observable name:
private name: Observable<Array<number>>;
Once the observable object is created, it is available to be subscribed to and to make the observable data available to the rest of the component. This is done in two parts: implementing the observable and using the subscribe method. This following is a basic example of an observable:
01 private name: Observable<Array<number>>;
02 ngOnInit(){
03   this.name = new Observable(observer => {
04     observer.next("my observable")
05     observer.complete();
06   }
07   Let subscribe = this.name.subscribe(
08     data => { console.log(data) },
09     Error => { errorHandler(Error) },
10     () => { final() }
11   );
12   subscribe.unsubscribe();
13 }
Lines 3 through 6 instantiate the observable name as observer, making it available to be subscribed to. Line 4 uses the method next on observer, which passes data to the observable. Line 5 uses the method complete on observer to close the connection of the observable.
The subscription to the observable occurs in lines 7 through 11. This subscription has three callback functions. The first is called when data is successfully received by the subscription. The second is the error handler, which is called when the subscription fails. The third is the final one, which runs code when the subscription completes, whether the subscription succeeds or fails.
On line 8, data is passed to the console.log function when the subscription successfully receives the data. Line 9 calls the function errorHandler. Line 10 invokes final().
Watching for Data Changes with Observables
Listings 27.10 and 27.11 illustrate the use of Observable to watch for changes of data. The example in this section uses observables to watch for data changes and then makes that data available to be displayed on the DOM.
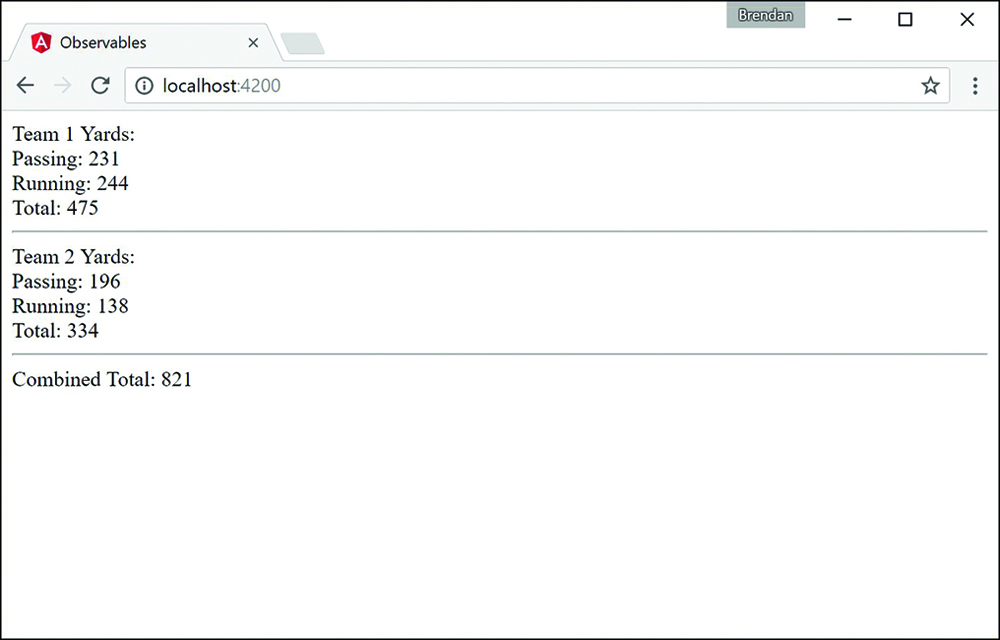
Listing 27.10 shows the component for the application. This component creates two Observable objects, pass and run. These observables have a function that goes and gets a random number between 0 and 30 and gives each number to one of the two teams randomly until the combined total of both teams equals 1,000 or greater.
In Listing 27.10, lines 11 and 12 declare the observables pass and run. These Observable objects are both initialized and subscribed to within the ngOnInit function, which runs when the component is initialized.
The observable pass is initialized on lines 18 through 20, and run is initialized on lines 27 through 28. Once they are initialized, pass and run both use the function playLoop on lines 43 through 52. playLoop creates and sends an object that contains a random number between 0 and 1 to determine the team and a random number between 0 and 29 for yards. Each observable then interprets the team and applies the yards to either the team’s pass yards or running yards.
Lines 57 through 59 create a random number generator that the rest of the application uses to create the random numbers for the timeout functions, teams, and yards.
Listing 27.11 shows the HTML for this example. This listing has three main parts. Lines 3 through 5 show data for an imaginary team’s distance, in yards. Lines 8 through 10 show the same for a second team. Line 11 shows the combination of both teams’ distances.
Figure 27.3 shows the rendered web page.
Listing 27.10 observable.component.ts: Observables for Detecting Data Changes
01 import { Component, OnInit } from '@angular/core';
02 import { Observable } from 'rxjs/observable';
03 import { Subscription } from 'rxjs/Subscription';
04 @Component({
05   selector: 'app-root',
06   templateUrl: "./observable.component.html",
07   styleUrls: ['./app.component.css']
08 })
09 export class AppComponent implements OnInit {
10   combinedTotal:number = 0;
11   private pass: Observable<any>;
12   private run: Observable<any>;
13   teams = [];
14   ngOnInit(){
15       this.teams.push({passing:0, running:0, total:0});
16       this.teams.push({passing:0, running:0, total:0});
17       //Passing
18       this.pass = new Observable(observer => {
19         this.playLoop(observer);
20       });
21       this.pass.subscribe(
22         data => {
23           this.teams[data.team].passing += data.yards;
24           this.addTotal(data.team, data.yards);
25       });
26       //Running
27       this.run = new Observable(observer => {
28         this.playLoop(observer);
29       });
30       this.run.subscribe(
31         data => {
32           this.teams[data.team].running += data.yards;
33           this.addTotal(data.team, data.yards);
34       });
35       //Combined
36       this.pass.subscribe(
37         data => { this.combinedTotal += data.yards;
38       });
39       this.run.subscribe(
40         data => { this.combinedTotal += data.yards;
41       });
42   }
43   playLoop(observer){
44     var time = this.getRandom(500, 2000);
45     setTimeout(() => {
46       observer.next(
47         { team: this.getRandom(0,2),
48           yards: this.getRandom(0,30)});
49       if(this.combinedTotal < 1000){
50         this.playLoop(observer);
51       }
52     }, time);
53   }
54   addTotal(team, yards){
55     this.teams[team].total += yards;
56   }
57   getRandom(min, max) {
58     return Math.floor(Math.random() * (max - min)) + min;
59   }
60 }
Listing 27.11 observable.component.html: A Template File for the Component
01 <div>
02   Team 1 Yards:<br>
03   Passing: {{teams[0].passing}}<br>
04   Running: {{teams[0].running}}<br>
05   Total: {{teams[0].total}}<br>
06   <hr>
07   Team 2 Yards:<br>
08   Passing: {{teams[1].passing}}<br>
09   Running: {{teams[1].running}}<br>
10   Total: {{teams[1].total}}<hr>
11   Combined Total: {{combinedTotal}}
12 </div>
Summary
The capability to manage events is one of the most critical components in most Angular applications. You can use events in Angular applications to provide user interaction with elements as well as components of the application that communicate with each other so they know when to perform certain tasks.
Components are organized into hierarchies, and the root component is defined at the application level. In this chapter, you have learned how to emit events from within a component and then implement handlers that listen for those events and get executed when they are triggered. You have also learned about observables and how to implement them for asynchronous watching of values.
Next
The next chapter will introduce you to built-in Angular services. You will get a chance to see and implement some of the built-in services such as Http for communicating with back-end services and Router for managing routing in multi-view applications.