
28
Implementing Angular Services in Web Applications
One of the most fundamental components of Angular functionality is services. Services provide task-based functionality to applications. You can think of a service as a chunk of reusable code that performs one or more related tasks. Angular provides several built-in services and also allows you to create your own customized services.
This chapter introduces built-in Angular services. You will get a chance to see and implement some of the built-in services, such as http for web server communication, router for managing and changing the state of an application, and animate to provide animation capabilities.
Understanding Angular Services
The purpose of a service is to provide a concise bit of code that performs specific tasks. A service does something as simple as providing a value definition or as complex as providing full HTTP communication to a web server.
A service provides a container for reusable functionality that is readily available to Angular applications. Services are defined and registered with the dependency injection mechanism in Angular. This allows you to inject services into modules, components, and other services.
Using the Built-in Services
Angular provides several built-in services that are included in the Angular module, using dependency injection. Once included within a module, services can be used throughout an application.
Table 28.1 describes some of the most common built-in services to give you an idea of what is available. The following sections cover the http and router services in more detail.
Table 28.1 Common Services That Are Built in to Angular
Service |
Description |
|
Provides animation hooks to link into both CSS- and JavaScript-based animations |
|
Provides a simple-to-use functionality to send HTTP requests to the web server or other service |
|
Provides navigation between views and between sections within views |
|
Provides a service that allows for dynamic and reactive forms with simple form validation |
Sending HTTP GET and PUT Requests with the http Service
The http service enables you to directly interact with the web server from your Angular code. The http service uses the browser's XMLHttpRequest object underneath but from the context of the Angular framework.
There are two ways to use the http service. The simplest is to use one of the following built-in shortcut methods that correspond to standard HTTP requests:
![]()
delete(url, [options])
![]()
get(url, [options])
![]()
head(url, [options])
![]()
post(url, data, [options])
![]()
put(url, data, [options])
![]()
patch(url, data, [options])
In these methods, the url parameter is the URL of the web request. The optional options parameter is a JavaScript object that specifies the options to use when implementing the request. Table 28.2 lists some the properties you can set in the options parameter.
Table 28.2 Properties that Can Be Defined in the config Parameter for http Service Requests
Property |
Description |
|
An HTTP method, such as |
|
The URL of the resource that is being requested. |
|
Parameters to be sent. This can be a string in the following format: Or it can be an object, in which case it is turned into a JSON string. |
Data to be sent as the request message body. |
|
|
Headers to send with the request. You can specify an object containing the header names to be sent as properties. If a property in the object has a null value, the header is not sent. |
|
A Boolean that, when |
|
The type of response to expect, such as |
Configuring the HTTP Request
You can specify a request, a URL, and data by sending the options parameter directly to the http(options) method. For example, the following are exactly the same:
http.get('/myUrl');
http({method: 'GET', url:'/myUrl'});
Implementing the HTTP Response Callback Functions
When you call a request method by using the http object, you get back an Observable object, which allows the data sent or received to/from the server to be continuously observed. Observables have many operators that use the RxJS library to allow for the transformation and use of the data. The following are some useful methods:
![]()
map: Applies a function to each value in the observable sequence. This allows you to dynamically transform the output of the observable stream into custom data formats.
![]()
toPromise: Converts the observable into a Promise object, which has access to the methods available on a promise. Promise objects provide syntax to handle asynchronous operations.
![]()
catch: Specifies a function to gracefully handle errors in the observable sequence.
![]()
debounce: Specifies an interval at which the observable stream will emit values. Only the value of the observable at the interval is emitted; interim values are not emitted.
The following is a simple example of a GET request that returns an observable with syntax to add operators:
get(): Observable<any>{
  http.get(url)
    .map(response => response.JSON())
    .catch(err => Rx.Observable.of('the error was: ${err}'));
}
Implementing a Simple JSON File and Using the http Service to Access It
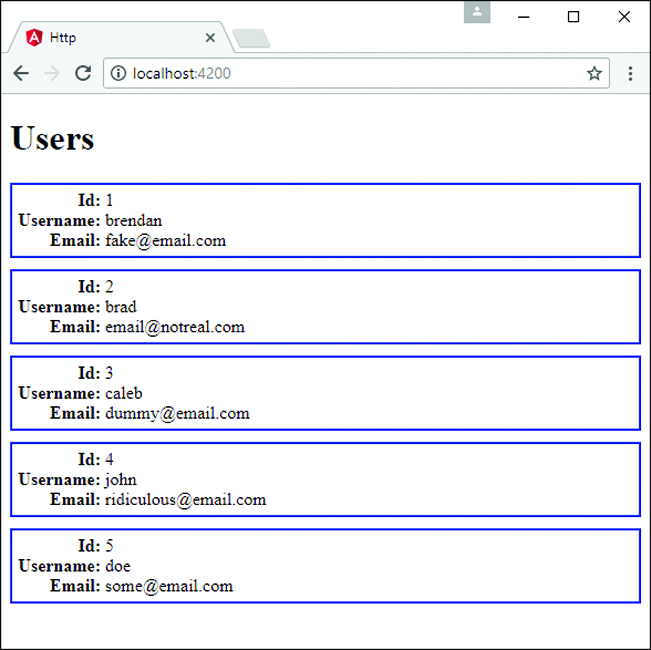
The code in Listings 28.1 through 28.5 implements a simple mock web server in the form of a JSON file and the Angular application that accesses it. Figure 28.1 shows the output. The web server contains a simple JSON object with a list of users. The web application allows a user to view the list of users. The example is very rudimentary to ensure that the code is easy to follow; it incorporates a GET request as well as an error-handling example.
Listing 28.1 shows the JSON file that contains the JSON object. This file can be accessed using an HTTP GET request, which allows http to grab the JSON object and return it to the Angular application as an observable.
Listing 28.1 dummyDB.JSON: A JSON Object that Contains Data for Users
01 [
02   {
03     "userId": 1,
04     "userName": "brendan",
05     "userEmail": "[email protected]"
06   },
07   {
08     "userId": 2,
09     "userName": "brad",
10     "userEmail": "[email protected]"
11   },
12   {
13     "userId": 3,
14     "userName": "caleb",
15     "userEmail": "[email protected]"
16   },
17   {
18     "userId": 4,
19     "userName": "john",
20     "userEmail": "[email protected]"
21   },
22   {
23     "userId": 5,
24     "userName": "doe",
25     "userEmail": "[email protected]"
26   }
27 ]
Listing 28.2 implements the Angular component. http is imported on line 3, and rxjs is imported on line 5. (Note that you may need to install rxjs via npm.) rxjs allows toPromise() to be called on the observable object. Notice that the constructor() method instantiates http on line 15. Line 16 shows an HTTP GET request, which has the path to the dummyDB.JSON file passed in as url. The toPromise() method is called to convert the observable response from the http.get() method into a promise object. Once the promise completes, .then() is called, which takes in the promise object data and applies it to the array users so it can be displayed in the application. If an error occurs, catch is called, which passes the error response object to a callback function to be used.
Listing 28.2 http.component.ts: A Component that Implements the HTTP Service for a GET Request
01 import { Component } from '@angular/core';
02 import { Observable } from 'rxjs/Observable';
03 import { Http } from '@angular/http';
04
05 import 'rxjs/Rx';
06
07 @Component({
08   selector: 'app-root',
09   templateUrl: './app.component.html',
10   styleUrls: ['./app.component.CSS']
11 })
12 export class AppComponent {
13   users = [];
14
15   constructor(private http: Http){
16       http.get('../assets/dummyDB.JSON')
17         .toPromise()
18         .then((data) => {
19           this.users = data.JSON()
20         })
21         .catch((err) =>{
22           console.log(err);
23         })
24   }
25 }
Listing 28.3 implements an Angular module that imports HttpModule to allow the http service to be used throughout the application. HttpModule is imported from @angular/http on line 4 and then added to the imports array on line 15.
Listing 28.3 app.module.ts: An Angular Module that Imports HttpModule for Use in the Application
01 import { BrowserModule } from '@angular/platform-browser';
02 import { NgModule } from '@angular/core';
03 import { FormsModule } from '@angular/forms';
04 import { HttpModule } from '@angular/http';
05
06 import { AppComponent } from './app.component';
07
08 @NgModule({
09   declarations: [
10     AppComponent
11   ],
12   imports: [
13     BrowserModule,
14     FormsModule,
15     HttpModule
16   ],
17   providers: [],
18   bootstrap: [AppComponent]
19 })
20 export class AppModule { }
Listing 28.4 implements an Angular template that uses ngFor to create a list of users to be displayed in the application.
Listing 28.4 http.component.html: An Angular Template that Displays a List of Users Received from the Database
01 <h1>
02   Users
03 </h1>
04 <div class="user" *ngFor="let user of users">
05   <div><span>Id:</span> {{user.userId}}</div>
06   <div><span>Username:</span> {{user.userName}}</div>
07   <div><span>Email:</span> {{user.userEmail}}</div>
08 </div>
Listing 28.5 is a CSS file that styles the application so that each user is distinguishable from the rest and easy to see.
Listing 28.5 http.component.CSS: A CSS File that Adds Styles to the Application
01 span{
02   width: 75px;
03   text-align: right;
04   font-weight: bold;
05   display: inline-block;
06 }
07 .user{
08   border: 2px ridge blue;
09   margin: 10px 0px;
10   padding: 5px;
11 }
Implementing a Simple Mock Server Using the http Service
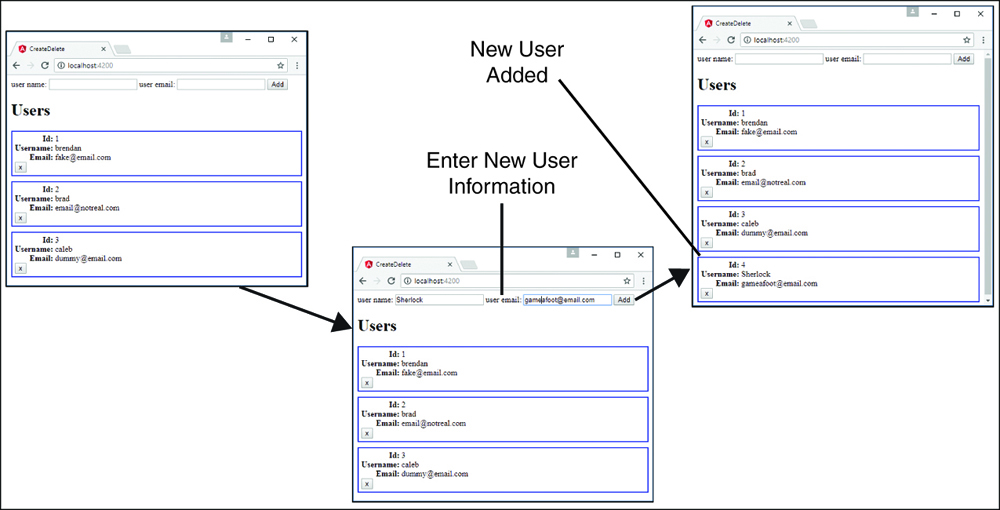
The code in Listings 28.6 through 28.11 implements a simple mock web server and the Angular application that accesses it. Figure 28.2 shows the output. The web server returns a simple JSON object with a list of users. The web application uses HTTP GET, create, and delete requests to allow the user to view, add to, and remove from the list of users.
Note
To create the mock service, you need to run the following command from the console:
npm install Angular-in-memory-web-api
This service is intended for development purposes only and shouldn’t ever be used in a production application.
Listing 28.6 is the mock data service that returns the JSON object. This file will be accessed using HTTP requests, which will allow http to modify the database. Line 1 imports InMemoryDbService, which allows Angular to use this as a database where data can be stored while the session is active. The database is created and made useable on line 3, using the createDb() method, which returns the users as a JSON object.
Listing 28.6 data.service.ts: An Angular Mock Service that Returns a JSON Object Called Users
01 import { InMemoryDbService } from 'angular-in-memory-web-api';
02 export class InMemoryDataService implements InMemoryDbService {
03   createDb() {
04     const users = [
05       {
06         "id": 1,
07         "userName": "brendan",
08         "email": "[email protected]"
09       },
10       {
11         "id": 2,
12         "userName": "brad",
13         "email": "[email protected]"
14       },
15       {
16         "id": 3,
17         "userName": "caleb",
18         "email": "[email protected]"
19       }
20     ]
21     return {users};
22   }
23 }
Listing 28.7 implements the Angular component. UserService, which is imported on line 7, contains all the HTTP functions that this application will be using. UserService is added to the component providers on line 13, making it available to the component. On line 19, UserService is implemented as a variable in the constructor.
Lines 21 through 37 define the deleteUser() function, which takes in a user object. On lines 32 and 33, the deleteUser() function on the UserService is called and passes in the user ID to let the database know which user to delete. The function has a callback in the .then() method that calls this.getUsers() to refresh the current list of users.
Lines 39 through 52 define the createUser() function. This function takes two parameters, username and email. It assigns those parameters to a user object on lines 41 through 44. Lines 48 through 51 call the createUser() method on the UserService and pass in the user object. Once the response is received, the createUser() method pushes the response into the users array, which is reflected immediately in the DOM.
Listing 28.7 createDelete.component.ts: An Angular Component that Gets and Modifies a List of Users with the http Service
01 import { Component, OnInit } from '@angular/core';
02 import { Observable } from 'rxjs/Observable';
03 import { Http } from '@angular/http';
04
05 import 'rxjs/Rx';
06
07 import { UserService } from './user.service';
08
09 @Component({
10   selector: 'app-root',
11   templateUrl: './app.component.html',
12   styleUrls: ['./app.component.CSS'],
13   providers: [UserService]
14 })
15 export class AppComponent implements OnInit {
16   users = [];
17   selectedUser;
18
19   constructor(private UserService: UserService){ }
20
21   ngOnInit(){
22     this.getUsers()
23   }
24
25   getUsers(): void {
26     this.UserService
27         .getUsers()
28         .then(users => this.users = users)
29   }
30
31   deleteUser(user){
32     this.UserService
33       .deleteUser(user.id)
34       .then(() => {
35         this.getUsers();
36       });
37   }
38
39   createUser(userName, email){
40     this.selectedUser = null;
41     let user = {
42       'userName': userName.trim(),
43       'email': email.trim()
44     };
45     if (!user.userName || !user.email){
46       return;
47     }
48     this.UserService.createUser(user)
49         .then(res => {
50           this.users.push(res);
51         })
52   }
53 }
Listing 28.8 implements the Angular service UserService, which handles all the HTTP requests for the application. Lines 16 through 21 define the deleteUser() method, which takes in the parameter id. An HTTP delete request is then created using id to go to the server and delete the user with the matching ID. Lines 22 through 31 define the createUser() method, which takes in a user object. A post request passes the user to the server as a JSON string, which is then added to the server.
Listing 28.8 user.service.ts: An Angular Service that Uses http to Send and Get Data from a Server
01 import { Injectable } from '@angular/core';
02 import { Http }       from '@angular/http';
03 import 'rxjs/add/operator/toPromise';
04
05 @Injectable()
06 export class UserService {
07   url = 'api/users'
08   constructor(private http: Http) { }
09
10   getUsers(): Promise<any[]> {
11     return this.http.get(this.url)
12                .toPromise()
13                .then(response => response.JSON().data)
14                .catch(this.handleError)
15   }
16   deleteUser(id: number): Promise<void>{
17     return this.http.delete(`${this.url}/${id}`)
18                     .toPromise()
19                     .then(() => null)
20                     .catch(this.handleError);
21   }
22   createUser(user): Promise<any>{
23     return this.http
24               .post(this.url, JSON.stringify({
25                 userName: user.userName,
26                 email: user.email
27               }))
28               .toPromise()
29               .then(res => res.JSON().data)
30               .catch(this.handleError)
31   }
32
33   private handleError(error: any): Promise<any> {
34     console.error('An error occurred', error);
35     return Promise.reject(error.message || error);
36   }
37
38 }
Listing 28.9 implements an Angular template that utilizes ngFor to create a list of users to be displayed within the application.
Listing 28.9 createDelete.component.html: An Angular Template that Displays a List of Users Received from the Database with Options to Create and Delete Users
01 <div>
02   <label>user name:</label> <input #userName />
03   <label>user email:</label> <input #userEmail />
04   <button (click)="createUser(userName.value, userEmail.value);
05           userName.value=''; userEmail.value=''">
06     Add
07   </button>
08 </div>
09
10 <h1>
11   Users
12 </h1>
13 <div class="userCard" *ngFor="let user of users">
14   <div><span>Id:</span> {{user.id}}</div>
15   <div><span>Username:</span> {{user.userName}}</div>
16   <div><span>Email:</span> {{user.email}}</div>
17   <button class="delete"
18       (click)="deleteUser(user); $event.stopPropagation()">x</button>
19 </div>
Listing 28.10 is a CSS file that styles the application so that each user is distinguishable from the rest and easy to see.
Listing 28.10 createDelete.component.CSS: A CSS Stylesheet that Styles the Application
01 span{
02   width: 75px;
03   text-align: right;
04   font-weight: bold;
05   display: inline-block;
06 }
07 .userCard{
08   border: 2px ridge blue;
09   margin: 10px 0px;
10   padding: 5px;
11 }
12 .selected{
13   background-color: steelblue;
14   color: white;
15 }
Listing 28.11 implements an Angular module that imports the mock data service. Line 5 imports InMemoryWebApiModule from angular-in-memory-web-api, which helps wire the mock database into the application. Line 8 imports InMemoryDataService from Listing 28.6. Line 18 shows InMemoryWebApiModule using its forRoot method on the InMemoryDataService, fully making the database service available to be used by the HTTP requests.
Listing 28.11 app.module.ts: An Angular Module that Imports InMemoryWebApiModule to Be Used with the Application
01 import { BrowserModule } from '@angular/platform-browser';
02 import { NgModule } from '@angular/core';
03 import { FormsModule } from '@angular/forms';
04 import { HttpModule } from '@angular/http';
05 import { InMemoryWebApiModule } from 'angular-in-memory-web-api';
06
07 import { AppComponent } from './app.component';
08 import { InMemoryDataService } from './data.service'
09
10 @NgModule({
11   declarations: [
12     AppComponent
13   ],
14   imports: [
15     BrowserModule,
16     FormsModule,
17     HttpModule,
18     InMemoryWebApiModule.forRoot(InMemoryDataService)
19   ],
20   providers: [],
21   bootstrap: [AppComponent]
22 })
23 export class AppModule { }
Implementing a Simple Mock Server and Using the http Service to Update Items on the Server
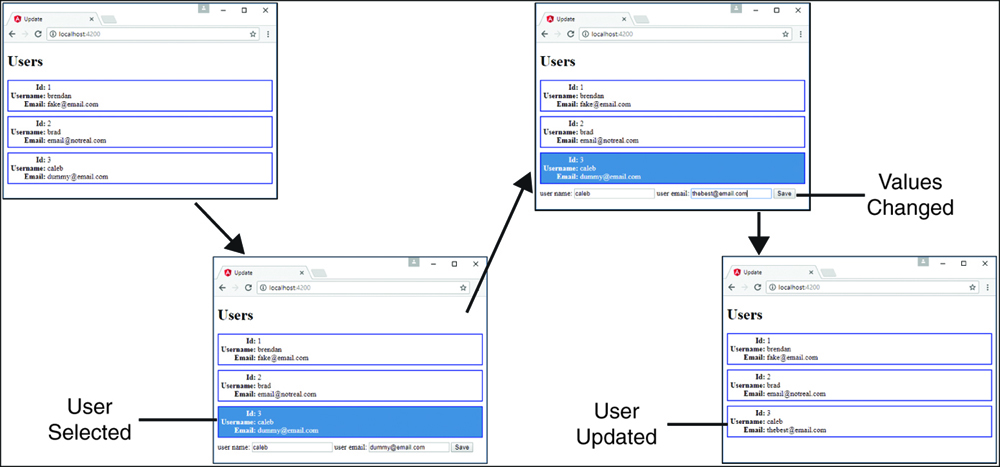
The code in Listings 28.12 through 28.16 implements the same mock web server from the previous example as well as the Angular application that accesses it. Figure 28.3 shows the output. The web application allows a user to view and edit the list of users, using HTTP get and put requests.
Listing 28.12 is the mock data service that returns the JSON object. This file will be accessed using HTTP requests, which will allow http to modify the database. Line 1 imports InMemoryDbService, which allows Angular to use this as a database where data can be stored while the session is active. The database is created and made usable on line 3, using the createDb() method, which returns the users as a JSON object.
Listing 28.12 data.service.ts: An Angular Mock Service that Returns a JSON Object Called Users
01 import { InMemoryDbService } from 'angular-in-memory-web-api';
02 export class InMemoryDataService implements InMemoryDbService {
03   createDb() {
04     const users = [
05       {
06         "id": 1,
07         "userName": "brendan",
08         "email": "[email protected]"
09       },
10       {
11         "id": 2,
12         "userName": "brad",
13         "email": "[email protected]"
14       },
15       {
16         "id": 3,
17         "userName": "caleb",
18         "email": "[email protected]"
19       }
20     ]
21     return {users};
22   }
23 }
Listing 28.13 implements an Angular component that gets a list of users to be displayed in the template. This component also allows for the updating of users. Lines 7 and 13 import UserService and provide it to the component. In line 19, UserService is turned into a usable variable also named UserService. Lines 21 through 23 show the ngOnInit method, which calls the getUsers method when the component finishes loading. Lines 25 through 29 show the getUsers method, which calls the getUsers method on UserService and assigns the result to the variable users. Lines 31 through 33 show the selectUser method, which takes a parameter named user. This method assigns user to the variable selectedUser. Lines 35 through 39 show the updateUser method, which takes a parameter named user. The updateUser method sets the variable selectedUser to null and then invokes the updateUser method on userService, passing in user as a parameter. When the updateUser method completes, the getUsers method is called to refresh the list of users that is displayed.
Listing 28.13 update.component.ts: An Angular Component that Uses http to Update Data in the Server
01 import { Component, OnInit } from '@angular/core';
02 import { Observable } from 'rxjs/Observable';
03 import { Http } from '@angular/http';
04
05 import 'rxjs/Rx';
06
07 import { UserService } from './user.service';
08
09 @Component({
10   selector: 'app-root',
11   templateUrl: './app.component.html',
12   styleUrls: ['./app.component.CSS'],
13   providers: [UserService]
14 })
15 export class AppComponent implements OnInit {
16   users = [];
17   selectedUser;
18
19   constructor(private UserService: UserService){ }
20
21   ngOnInit(){
22     this.getUsers()
23   }
24
25   getUsers(): void {
26     this.UserService
27         .getUsers()
28         .then(users => this.users = users)
29   }
30
31   selectUser(user){
32     this.selectedUser = user;
33   }
34
35   updateUser(user){
36     this.selectedUser = null;
37     this.UserService.updateUser(user)
38     .then(() => this.getUsers());
39   }
40 }
Listing 28.14 implements the Angular service UserService, which handles all the HTTP requests for the application. Lines 16 through 24 define the updateUser method, which takes in the parameter user. A URL is then generated to specify which user will be updated. An HTTP put request is made on line 20, taking in the generated URL and the user object, which is passed into the json.stringify method. The updateUser method then sends a response object on success or moves to the error handler on fail.
Listing 28.14 user.service.ts: An Angular Service that Gets Users and Updates a User
01 import { Injectable } from '@angular/core';
02 import { Http }       from '@angular/http';
03 import 'rxjs/add/operator/toPromise';
04
05 @Injectable()
06 export class UserService {
07   url = 'api/users'
08   constructor(private http: Http) { }
09
10   getUsers(): Promise<any[]> {
11     return this.http.get(this.url)
12                .toPromise()
13                .then(response => response.JSON().data)
14                .catch(this.handleError)
15   }
16   updateUser(user): Promise<void>{
17     console.log(user);
18     const url = `${this.url}/${user.id}`;
19     return this.http
20       .put(url, JSON.stringify(user))
21       .toPromise()
22       .then(() => user)
23       .catch(this.handleError)
24   }
25
26   private handleError(error: any): Promise<any> {
27     console.error('An error occurred', error);
28     return Promise.reject(error.message || error);
29   }
30
31 }
Listing 28.15 implements an Angular template that uses ngFor to create a list of users to be displayed within the application. These users are each selectable. When one is selected, the information is shown in an editable form field that allows the user to be edited and saved. Lines 20 through 24 show the button that can be clicked to invoke the updateUser method and pass in an object with that user’s updated information.
Listing 28.15 update.component.html: An Angular Template that Displays a List of Users and Can Be Updated
01 <h1>
02   Users
03 </h1>
04 <div class="userCard" *ngFor="let user of users"
05     (click)="selectUser(user)"
06     [class.selected]="user === selectedUser">
07   <div><span>Id:</span> {{user.id}}</div>
08   <div><span>Username:</span> {{user.userName}}</div>
09   <div><span>Email:</span> {{user.email}}</div>
10 </div>
11
12 <div *ngIf="selectedUser">
13   <label>user name:</label>
14   <input #updateName [ngModel]="selectedUser.userName"/>
15
16   <label>user email:</label>
17   <input #updateEmail [ngModel]="selectedUser.email" />
18
19
20   <button (click)="updateUser(
21       {'id': selectedUser.id,
22        'userName': updateName.value,
23        'email': updateEmail.value});
24   ">
25     Save
26   </button>
27 </div>
Listing 28.16 is a CSS file that styles the application so that each user is distinguishable from the rest and easy to see. It provides some logic to help the user know that each user can be clicked on.
Listing 28.16 update.component.CSS: A CSS File that Styles the Application
01 span{
02   width: 75px;
03   text-align: right;
04   font-weight: bold;
05   display: inline-block;
06 }
07 .userCard{
08   border: 2px ridge blue;
09   margin: 10px 0px;
10   padding: 5px;
11   cursor: pointer;
12 }
13 .userCard:hover{
14   background-color: lightblue;
15 }
16 .selected{
17   background-color: steelblue;
18   color: white;
19 }
Changing Views with the router Service
The router service enables you to change views on the web application so that you can route back and forth between components. This can be done as a full-page view change or can change smaller segments of a single-page application. The router service is in an external Angular module called RouterModule and needs to be included in the applications module to be used throughout the application.
To set up an app for routing, you need to import the Routes and Router modules from @angular/router. To help keep the application simple to maintain, router should get its own module that can be imported into the main application module.
Defining routes for an application is as simple as making an array of objects, with each object defining a specific route. The two required options for each of these routes are path and component. The path option specifies the tree to follow to reach the component. The component option defines which component will be loaded into the view. The following examples show the syntax for defining a Routes array:
Const routes: Routes = [
  {
    Path: '',
    Component: myComponent
  },
  {
    Path: 'route',
    Component: myComponent
  },
  {
    Path: 'routeWithParams/:param1/:param2',
    Component: myComponent
  }
]
Many more parameters can be added to the route object. Table 28.3 shows a list of some of them.
Table 28.3 Properties that Can Be Defined in the config Parameter for route Service Object
Property |
Description |
|
Shows where in the router tree this route belongs |
|
Defines which component will be loaded once routed |
|
Redirects to the defined path instead of the current route |
|
Specifies the name used for the |
|
Protects the route by preventing activation when |
|
Protects the child routes by preventing activation when |
|
Specifies whether the route can be deactivated |
|
Allows you to protect specific modules from being loaded in the route |
|
Allows for data to be passed into the component |
|
Specifies a resolver that pre-fetches data for the route before activation |
|
Allows for a nested routes array that contains route objects (Each of these objects has the same options described in this table.) |
|
Allows for lazy loading of child routes |
|
Defines when the guards and resolvers are run |
Once the routes array is defined, it needs to be implemented into the router so that the router service knows it exists and knows how to use it. This is done by using the forRoot method on RouterModule. The result of this is included in the routing module’s imports array. The syntax for this looks as follows:
imports: [RouterModule.forRoot(routes)]
Using routes in Angular
To use routes in Angular, the routing module needs to be included within the main app module and included within the imports—the same as for built-in Angular modules. Once it is included within the application module, the defined routes become available throughout the application.
To be able to use router within a component, Router and ActivatedRoute need to be imported from @angular/router. Once they are imported, they need to be implemented via the constructor. The following code shows the syntax:
Constructor(
    private route: ActivatedRoute,
    private router: Router
){}
There are two ways to navigate between routes. The first way is from HTML directly, using the Angular directive routerLink, which has the following syntax:
<arouterLink="/myRoute">
The second way to navigate between routes is from the component class, using the following syntax:
myFunction(){
    this.router.navigate(['myRoute'])
}
When the router is all wired up and ready to be used, the last step is to make sure the routes get displayed on the application. You do this by using the Angular HTML tag router-outlet. It is important to note that the component that uses router-outlet will be outside the router, and anything besides router-outlet will always display, no matter what route is currently being shown. You can implement router-outlet by using the following syntax:
<router-outlet></router-outlet>
Implementing a Simple Router
Listings 28.17 through 28.23 implement a simple router that allows the user to navigate between two components. Figure 28.4 shows the output. This router is navigated using the Angular routerLink directive within the HTML, allowing it to change between the views.
Listing 28.17 shows the application module, which is the main module for the application. App.module imports the Router module from Listing 28.17. On line 6, this file loads AppRoutingModule, which is added to the imports array on line 21.
Listing 28.17 app.module.ts: An Angular Module that Imports the Router Module File
01 import { BrowserModule } from '@angular/platform-browser';
02 import { NgModule } from '@angular/core';
03 import { FormsModule } from '@angular/forms';
04 import { HttpModule } from '@angular/http';
05
06 import { AppRoutingModule } from './app-routing.module';
07 import { AppComponent } from './app.component';
08 import { Route2Component } from './route2/route2.component';
09 import { HomeComponent } from './home/home.component';
10
11 @NgModule({
12   declarations: [
13     AppComponent,
14     Route2Component,
15     HomeComponent
16   ],
17   imports: [
18     BrowserModule,
19     FormsModule,
20     HttpModule,
21     AppRoutingModule
22   ],
23   providers: [],
24   bootstrap: [AppComponent]
25 })
26 export class AppModule { }
Listing 28.18 shows the Router module, which defines the routes for the application. The Router module imports Routes and RouterModule to enable routing within the application. The Router module also imports any components that will be used as routes. Lines 5 through 14 define the routes array, which contains the route definitions for the application. Lines 6 through 9 define the home route that the application will default to because the path is set to an empty string. The home route uses HomeComponent as the component that controls the view. Lines 10 through 13 define a second route object that will be displayed when the path is set to route2. This route uses Route2Component.
Listing 28.18 app-routing.module.ts: An Angular Module that Defines the routes for This Application
01 import { NgModule } from '@angular/core';
02 import { Routes, RouterModule } from '@angular/router';
03 import { Route2Component } from './route2/route2.component';
04 import { HomeComponent } from './home/home.component';
05 const routes: Routes = [
06   {
07     path: '',
08     component: HomeComponent
09   },
10   {
11     path: 'route2',
12     component: Route2Component
13   }
14 ];
15
16 @NgModule({
17   imports: [RouterModule.forRoot(routes)],
18   exports: [RouterModule]
19 })
20 export class AppRoutingModule { }
Listing 28.19 shows the root component for the application. This component has a simple template that outputs router-outlet for router to display its routes.
Listing 28.19 app.component.ts: An Angular Component that Defines the Router Outlet
01 import { Component } from '@angular/core';
02
03 @Component({
04   selector: 'app-root',
05   template: '<router-outlet></router-outlet>'
06 })
07 export class AppComponent {}
Listing 28.20 shows the home component template file. This file displays a message that lets the user know that the route is working, followed by a link that uses routerLink to navigate the user to a separate view.
Listing 28.20 home.component.html: An HTML File that Is the Default Displayed Route
01 <p>
02   Home Route works!
03 </p>
04 <a routerLink="/route2">Route 2</a>
Listing 28.21 shows the home component file. This file is as barebones as a component gets. Its main purpose is to load the template file and make it available to the router.
Listing 28.21 home.component.ts: An Angular Component that Includes a Template with a Route
01 import { Component} from '@angular/core';
02
03 @Component({
04   selector: 'app-home',
05   templateUrl: './home.component.html',
06   styleUrls: ['./home.component.CSS']
07 })
08 export class HomeComponent{}
Listing 28.22 shows the route2 component template file. This file displays a message that lets the user know the route is working, followed by a link that uses routerLink to navigate the user to a separate view.
Listing 28.22 route2.component.html: A CSS File that Styles the Application
01 <p>
02   route 2 works!
03 </p>
04 <a routerLink="/">Route 1</a>
Listing 28.23 shows the barebones route2 component file. Its main purpose is to load the template file and make it available to the router.
Listing 28.23 route2.component.ts: An Angular Component that Includes a Template with a Route
01 import { Component } from '@angular/core';
02
03 @Component({
04   selector: 'app-route2',
05   templateUrl: './route2.component.html'
06 })
07 export class Route2Component {}
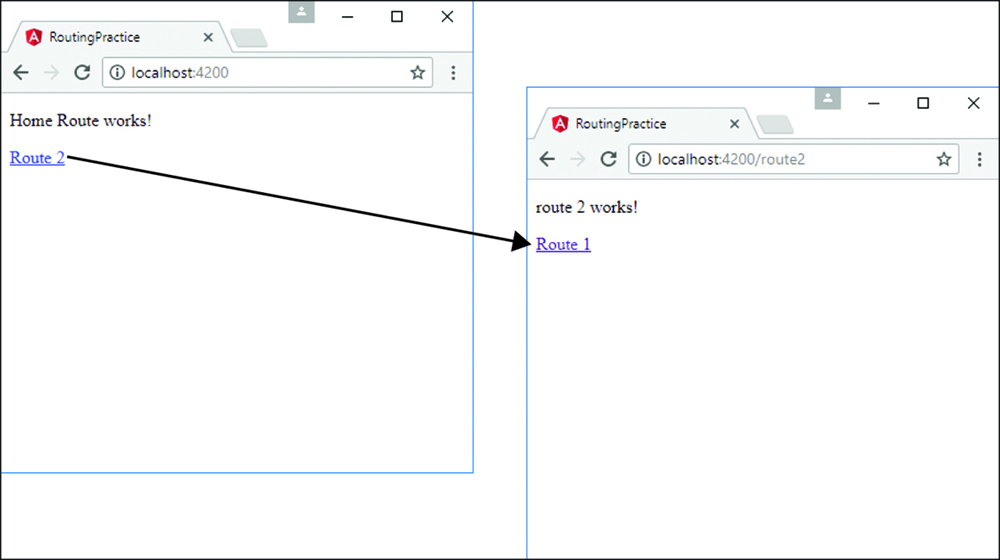
Figure 28.4 Implementing the http service to allow Angular components to interact with a web server
Implementing a Router with a Navigation Bar
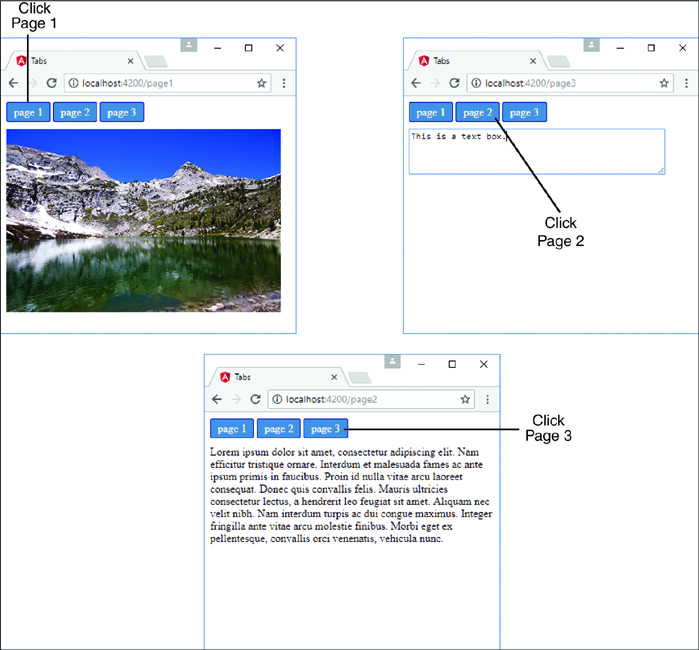
The code in Listings 28.24 through 28.35 implements a router with a nav bar that allows the user to navigate between views that are nested. Figure 28.5 shows the output. This router is navigated using the Angular routerLink directive within the HTML, allowing it to change between the views.
Listing 28.24 shows the Router module, which defines the routes for the application. The Router module imports any components that will be used as routes. There isn’t a home route for this example. If the route is empty, the router redirects to page1, as shown in lines 22 through 25. In addition, if an invalid route is typed into the URL, the router again redirects to page1, as shown in lines 27 through 30.
Listing 28.24 app-routing.module.ts: An Angular Module that Defines the Routes for the Application
01 import { NgModule } from '@angular/core';
02 import { Routes, RouterModule } from '@angular/router';
03 import { Page1Component } from './page1/page1.component';
04 import { Page2Component } from './page2/page2.component';
05 import { Page3Component } from './page3/page3.component';
06 import { Page4Component } from './page4/page4.component';
07 import { NavComponent } from './nav/nav.component';
08 const routes: Routes = [
09   {
10     path: 'page1',
11     component: Page1Component
12   },
13   {
14     path: 'page2',
15     component: Page2Component
16   },
17   {
18     path: 'page3',
19     component: Page3Component
20   },
21   {
22     path: '',
23     redirectTo: '/page1',
24     pathMatch: 'full'
25   },
26   {
27     path: '**',
28     redirectTo: '/page1',
29     pathMatch: 'full'
30   }
31 ];
32
33 @NgModule({
34   imports: [RouterModule.forRoot(routes)],
35   exports: [RouterModule]
36 })
37 export class AppRoutingModule { }
Listing 28.25 shows the nav component, which controls the nav bar and links to the views within the page. Lines 9 through 19 show an array of available pages which the nav bar can use to create buttons with links for navigation.
Listing 28.25 nav.component.ts: An Angular Component that Creates a Persisting Nav Bar That Navigates Between Views
01 import { Component, OnInit } from '@angular/core';
02
03 @Component({
04   selector: 'app-nav',
05   templateUrl: './nav.component.html',
06   styleUrls: ['./nav.component.CSS']
07 })
08 export class NavComponent{
09   pages = [
10     { 'url': 'page1',
11      'text': 'page 1'
12     },
13     { 'url': 'page2',
14      'text': 'page 2'
15     },
16     { 'url': 'page3',
17      'text': 'page 3'
18     }
19   ]
20 }
Listing 28.26 shows the nav component template file. It creates a list of buttons that allow for navigation between the named routes.
Listing 28.26 nav.component.html: An Angular Template that Creates the View for the Nav Bar
01 <span class="container" *ngFor="let page of pages">
02   <a routerLink="/{{page.url}}">{{page.text}}</a>
03 </span>
Listing 28.27 shows the nav component CSS file. This file styles the nav bar buttons so they make sense. Lines 9 through 12 cause the color of the buttons and text to change when the user hovers the mouse over a button.
Listing 28.27 nav.component.CSS: A CSS File that Styles the Navigation Buttons for the Application
01 a{
02   padding: 5px 10px;
03   border: 1px solid darkblue;
04   background-color: steelblue;
05   color: white;
06   text-decoration: none;
07   border-radius: 3px;
08 }
09 a:hover{
10   color: black;
11   background-color: lightgrey;
12 }
Listing 28.28 shows the root component file app.component.ts, which serves as the entry to the application and loads the routed views and the nav component.
Listing 28.28 app.comonent.ts: An Angular Component that Acts as the Root Component for the Application
01 import { Component } from '@angular/core';
02
03 @Component({
04   selector: 'app-root',
05   templateUrl: './app.component.html',
06   styleUrls: ['./app.component.CSS']
07 })
08 export class AppComponent { }
Listing 28.29 shows the root component template file, which loads the nav component followed by the router outlet, which is where the views are loaded for the application.
Listing 28.29 app.component.html: An Angular Template that Loads the Nav Component Followed by the Router Outlet
01 <div><app-nav></app-nav></div>
02 <div><router-outlet></router-outlet></div>
Listing 28.30 shows the root component CSS file, which provides some spacing for the nav bar so it is displayed nicely.
Listing 28.30 app.component.CSS: An Angular Module that Imports the Router Module File
01 div{
02   margin: 15px 0px;
03 }
Listing 28.31 shows the page1 component. This component loads a template that will be used as one of the views for this application. Line 5 loads an image to be displayed on the view.
Listing 28.31 page1.component.ts: An Angular Module that Imports the Router Module File
01 import { Component } from '@angular/core';
02
03 @Component({
04   selector: 'app-page1',
05   template: '<img src="../assets/images/lake.jpg" />'
06 })
07 export class Page1Component {}
Listing 28.32 shows the page2 component. This component loads a template that will be used as one of the views for this application.
Listing 28.32 page2.component.ts: An Angular Module that Imports the Router Module File
01 import { Component } from '@angular/core';
02
03 @Component({
04   selector: 'app-page2',
05   templateUrl: './page2.component.html'
06 })
07 export class Page2Component { }
Listing 28.33 shows the page2 template file, which contains some dummy text that will be loaded into the view.
Listing 28.33 page2.component.html: An Angular Template that Creates the View for Page 2
01 <p>
02   Lorem ipsum dolor sit amet, consectetur adipiscing elit. Nam efficitur
03   tristique ornare. Interdum et malesuada fames ac ante ipsum primis in
04   faucibus. Proin id nulla vitae arcu laoreet consequat. Donec quis
05   convallis felis. Mauris ultricies consectetur lectus, a hendrerit leo
06   feugiat sit amet. Aliquam nec velit nibh. Nam interdum turpis ac dui
07   congue maximus. Integer fringilla ante vitae arcu molestie finibus. Morbi
08   eget ex pellentesque, convallis orci venenatis, vehicula nunc.
09 </p>
Listing 28.34 shows the page3 component. This component loads a template that will be used as one of the views for this application.
Listing 28.34 page3.component.ts: An Angular Module that Imports the Router Module File
01 import { Component } from '@angular/core';
02
03 @Component({
04   selector: 'app-page3',
05   templateUrl: './page3.component.html'
06 })
07 export class Page3Component {}
Listing 28.35 shows the page3 template file, which creates a text area box to be displayed on the view.
Listing 28.35 page3.component.html: An Angular Template that Creates the View for Page 3
01 <textarea rows="4" cols="50" placeHolder="Some Text Here">
02 </textarea>
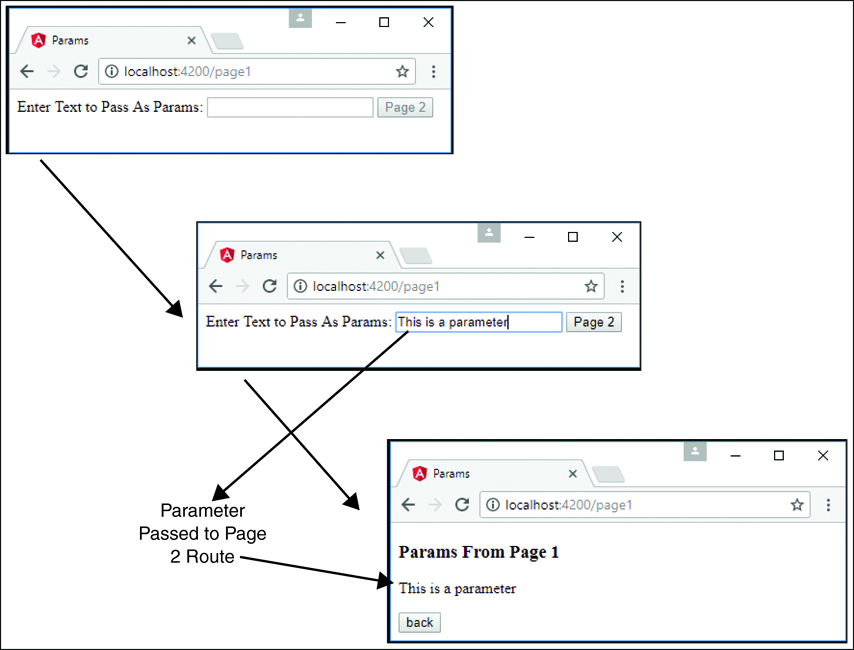
Implementing a Router with Parameters
Listings 28.36 through 28.40 implement a router with a route that takes in a parameter that allows for data to be transferred to that view through the url parameter. Figure 28.6 shows the output.
Listing 28.36 shows the Router module, which defines the routes for the application. The Router module imports any components that will be used as routes. Line 14 defines the path to page 2, which takes in the parameter this.text.
Listing 28.36 app-routing.module.ts: An Angular Template that Assigns Router Parameters
01 import { Component } from '@angular/core';
02 import { Router, ActivatedRoute, Params } from '@angular/router';
03
04 @Component({
05   selector: 'app-page1',
06   templateUrl: './page1.component.html'
07 })
08 export class Page1Component {
09   text='';
10   constructor(
11     private route: ActivatedRoute,
12     private router: Router,
13   ){ }
14   gotoPage2(){
15     this.router.navigate(
16         ['/page2', this.text],
17         {
18           relativeTo: this.route,
19           skipLocationChange: true
20         }
21     );
22   }
23 }
Listing 28.37 shows the root component app.component.ts. This file has a template that declares router-outlet to display the views from the router.
Listing 28.37 app.component.ts: An Angular Component that Acts as the Entry Point to the Application
01 import { Component } from '@angular/core';
02
03 @Component({
04   selector: 'app-root',
05   template: '<router-outlet></router-outlet>'
06 })
07 export class AppComponent { }
Listing 28.38 shows the page1 component. This component imports Router and ActivatedRoute from @angular/router to allow this component to access the router and read or assign parameters to RouterState. Lines 10 through 13 define the constructor, which on lines 11 and 12 implements ActivatedRoute and Router as private variables route and router. Lines 14 through 22 define the function gotoPage2(), which navigates to page2, passing in a parameter. Line 16 navigates to page2, passing in this.text as the parameter. Lines 18 and 19 allow the application to change views without changing the URL in the browser.
Listing 28.38 page1.component.ts: An Angular Component that Navigates to Page 2 with Parameters
01 import { Component } from '@angular/core';
02 import { Router, ActivatedRoute } from '@angular/router';
03
04 @Component({
05   selector: 'app-page1',
06   templateUrl: './page1.component.html'
07 })
08 export class Page1Component {
09   text='';
10   constructor(
11     private route: ActivatedRoute,
12     private router: Router,
13   ){ }
14   gotoPage2(){
15     this.router.navigate(
16         ['/page2', this.text],
17         {
18           relativeTo: this.route,
19           skipLocationChange: true
20         }
21     );
22   }
23 }
Listing 28.39 shows the page1 template file. Line 4 shows a text area that is bound to the variable text that is passed as a parameter when routed to page 2. Line 5 creates a button that invokes the gotoPage2 function, changing the view. This button is available only when the variable text has a non-empty value.
Listing 28.39 page1.component.html: An HTML Template that Provides an Input Field to Give a Value to Router Parameters
01 <span>
02   Enter Text to Pass As Params:
03 </span>
04 <input type=text [(ngModel)]="text" />
05 <button [disabled]="!text" (click)="gotoPage2()">Page 2</button>
Listing 28.40 shows the page2 component. This component imports Router and ActivatedRoute from @angular/router to allow this component to access the router and parameters that were set when the route was loaded. Lines 15 and 16 create a subscription to the params observable and assign the value to the variable text to be displayed in the view.
Listing 28.40 page2.component.ts: An Angular Component that Displays Router Parameters on the View
01 import { Component, OnInit } from '@angular/core';
02 import { Router, ActivatedRoute } from '@angular/router';
03
04 @Component({
05   selector: 'app-page2',
06   templateUrl: './page2.component.html'
07 })
08 export class Page2Component implements OnInit {
09   text;
10   constructor(
11     private route: ActivatedRoute,
12     private router: Router
13   ) { }
14   ngOnInit() {
15     this.route.params
16       .subscribe(text => this.text = text.params);
17   }
18
19   goBack(){
20     this.router.navigate(['/page1']);
21   }
22 }
Listing 28.41 shows the page2 template file. Line 2 displays the variable text, which gets its value from the route params. Line 3 creates a button that can be clicked to navigate back to page 1.
Listing 28.41 page2.component.html: Parameters Passed from the Router
01 <h3>Params From Page 1</h3>
02 <p>{{text}}</p>
03 <button (click)="goBack()" >back</button>
Summary
Angular services are objects that contain functionality you can inject into other Angular components. Angular’s built-in services provide a lot of prebuilt functionality needed for your client code. For example, the http service allows you to easily integrate web server communication into your Angular applications, and the router service allows you to manage navigation between views.