
Chapter 10. Managing applications
- Discovering and deploying bundles using the OSGi Bundle Repository
- Deploying applications using Deployment Admin
- Controlling bundle activation order using start levels
In the last chapter, we focused on issues relating to the management of individual bundles, such as how to version them, manage their configuration data, and control their activation policies. Now, we’ll move beyond managing individual bundles to issues related to managing OSGi-based applications composed of many bundles. As we’ve mentioned previously, in OSGi-based applications the deployed set of bundles is your application’s configuration. This is a powerful aspect of the OSGi approach, so understanding this point and knowing how to manage sets of bundles is important to be able to fully take advantage of OSGi technology.
In this chapter, we’ll explore a couple of different aspects of application management:
- Deploying applications using the OSGi Bundle Repository or Deployment-Admin
- Controlling bundle activation order using the StartLevel service
With these tools, you’ll be better equipped to build, deploy, and configure sophisticated OSGi-based applications. Let’s start by looking at bundle deployment.
10.1. Deploying bundles
When you’ve created some configurable bundles and versioned them according to a meaningful policy, you need to install them into an OSGi framework. In chapter 3, we looked at the various details of the lifecycle layer API, which allows you to install, start, update, and uninstall bundles from a running framework. Given the nature of modularity, it’s likely your applications will grow over time to include too many bundles for you to manage their deployment in an ad hoc fashion. Manually installing and updating tens, hundreds, or even thousands of bundles becomes impractical. What can you do? This is when it becomes important to think about how you (or your users) are going to discover and deploy bundles.
10.1.1. Introducing management agents
The solution, in OSGi lingo, is to create a specific type of bundle called a management agent. Although we’ve shown how to programmatically manipulate the lifecycle of a bundle, it’s typically not a good idea for a bundle to change its own state or the state of other bundles. Such a bundle is difficult to reuse in other compositions, because it’s tightly bound to the other bundles it expects to control. The solution employed by most management agents is to externalize the information about which bundles to install or start. For example, management information can refer to bundles using URIs and aggregate useful groups of bundles using some sort of composition language/mechanism. A management agent can generically process such information, leaving it nicely decoupled from the bundles it’s managing.
A simple example of a management agent is the shell from chapter 3. Granted, it’s perhaps too simplistic because it only accepts and executes commands; but if such capabilities are sufficient for your application, it’s fine. A management agent can be much more powerful, however. Even for your shell, you could easily extend it to handle command scripts for executing commands in batches. You could then create a couple of scripts, one for each configuration you need. Switching between application configurations would then be trivial.
More sophisticated management agents are possible. Your shell assumes human interaction to either directly or indirectly make the correct decisions and issue commands to manage the bundles. You could devise a system with rules to automate some of this by reacting to certain conditions autonomously. Consider a home-automation system that’s able to detect a new device, automatically discover a driver for it in a remote repository, and subsequently install the driver along with its dependencies. Or you may have an application that automatically adapts itself to the language of the current user by installing the necessary locale bundles.
In essence, a management agent manages a running framework. OSGi supports you in developing such an agent by providing you with the means to monitor and manipulate a running framework. One of the more critical aspects of managing the framework is determining which bundles should be deployed to it. Various strategies are possible to manage complex sets of interdependent bundles. The two most prominent at the moment are the OSGi Bundle Repository (OBR) and Deployment Admin.
OBR and Deployment Admin address bundle deployment from different angles, but both can help when it comes to developing a management agent. The difference in focus between the two can be summarized as follows:
- OBR focuses on remote discovery and deployment of individual bundles and their dependencies.
- Deployment Admin focuses on the deployment of sets of bundles and associated resources.
In the following sections, we’ll explore these two technologies in more detail and show you how to use them to provision or deploy your applications and bundles.
A number of other technologies attempt to address deployment and provisioning for OSGi, including Apache Ace, Paremus Nimble, and Equinox p2:
- Ace is a software distribution framework based on Deployment Admin. It focuses on centrally managing target systems, and distributing software components, configuration data, and other artifacts to them. The target systems are usually OSGi-based, but they don’t have to be.
- Nimble is based on open source work from the Newton project and focuses on building an extensible resolver architecture that can deal with other types of dependencies outside of the OSGi modularity layer, such as service-level dependencies. For example, if a bundle containing servlets is deployed and activated, a servlet container should be deployed and activated alongside it.
- p2 is a subproject of the Eclipse Equinox framework. p2 focuses on extending the types of deployable artifacts to encompass things outside of an OSGi environment, including Unix RPM packages or Windows services, for example.
We won’t discuss the details of any of these in the remainder of this book. If you’re interested in them, they’re just a Google search away.
10.1.2. OSGi Bundle Repository
The OSGi Bundle Repository (OBR) is officially not an OSGi standard specification; rather, it’s a proposal for a specification, internally referred to as RFC 112 in the OSGi Alliance. Because OBR is only an RFC, its details may change in the future, but it’s still a useful tool as it is.
OBR started life as the Oscar Bundle Repository, which was associated with the Oscar OSGi framework (which ultimately became the Apache Felix framework). OBR is intended to address two aspects of bundle deployment:
- Discovery— Provide a simple mechanism to discover which bundles are available for deployment
- Dependency deployment— Provide a simple mechanism to deploy a bundle and its transitive set of dependencies
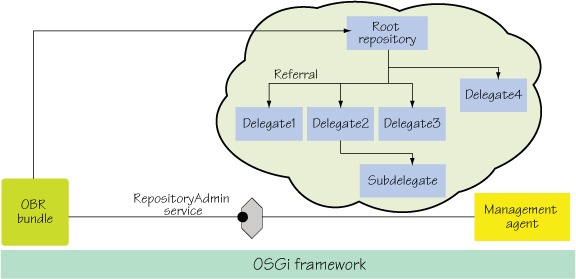
To achieve the first goal, OBR defines a simple bundle repository with an API for accessing it and a common XML interchange format for describing deployable resources. An OBR repository can refer to other OBR repositories, defining a federation of repositories. But it’s not necessary to define federations, so it’s possible to create independent repositories specifically for your own purposes and applications. One of the main goals of OBR was simplicity, so it’s easy for anyone to provide a bundle repository. One of the benefits of using an XML-based repository format is that no server-side process is needed (although server-side processes are possible). Figure 10.1 shows the federated structure of an OBR repository.
Figure 10.1. The OBR proposed specification provides a federated index that allows a management agent to resolve and install large numbers of bundles from a number of remote locations. The OBR index files are aggregated by a RepositoryAdmin service that resolves bundle dependencies on behalf of a management agent.
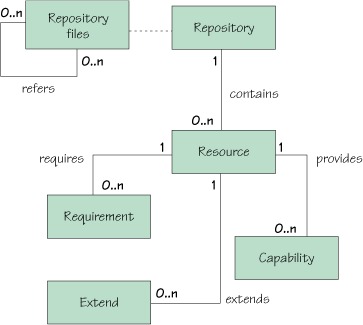
The key concept of an OBR repository is a generic description of a resource and its dependencies. A resource is an abstract entity used to represent any type of artifact such as a bundle, a certificate, or a configuration file. The resource description allows an agent to discover applicable artifacts, typically bundles, and deploy them along with their transitive dependencies. Each resource description has
- Zero or more requirements on other resources or the environment
- Zero or more capabilities used to satisfy other resources’ requirements
Resource requirements are satisfied by capabilities provided by other resources or the environment. OBR maps bundle metadata from Import-Package and Require-Bundle headers onto resource requirements and from Export-Package and Bundle-SymbolicName headers onto resource capabilities. Figure 10.2 shows the relationship among the repository entities.
Figure 10.2. Relationships among the OBR repository entities
Using this information, an OBR implementation is able to resolve a consistent set of bundles for deployment given an initial set of bundles to be deployed. OBR’s dependency-resolution algorithm is basically the same as the framework’s dependency-resolution algorithm.
Although the dependency-resolution algorithms for OBR and the framework are similar, they aren’t identical. OBR starts from a given set of bundles and pulls in resources from its available repositories in an attempt to satisfy any dependencies. The framework’s resolution algorithm will never pull in additional resources; it only considers installed bundles.
Another gotcha is the fact that the current OBR RFC doesn’t currently mandate uses constraints when resolving dependencies. This can lead to unexpected failures at execution time if a uses constraint prevents bundles from resolving. OBR is an active area of work within the OSGi Alliance, so future revisions of the RFC may address this issue.
With this overview of OBR, let’s look at how you can create a repository for it.
Creating OBR Repositories
To illustrate how to create an OBR repository, let’s use the bundles from the service-based paint program example. The repository is just an XML file containing the metadata of the bundles. We’ll go through the entries in the XML file and explain the schema along the way. Assume you have the bundles from the example in a directory called paint-bundles. The directory contains the paint frame bundle, the API bundle, and the three shape bundles:
paint-bundles/
  frame-4.0.jar
  circle-4.0.jar
  triangle-4.0.jar
  shape-4.0.jar
  square-4.0.jar
You could create the repository XML file by hand, but you can use several different tools to create one instead. This example uses BIndex (http://www.osgi.org/Repository/BIndex), which is provided by the OSGi Alliance. For Maven users, there’s also Maven support, which we’ll discuss in appendix A. To create a repository using BIndex, run the following from above the bundles directory (this example assumes you’re in the chapter10/combined-example/ directory of the companion code):
java -jar bindex.jar -r repository.xml -n Paint paint-bundles/*.jar
This creates a repository.xml file that contains the metadata of the bundles from the example. The main XML element is a repository tag defining the repository:
<repository lastmodified='20090215101706.874' name='Paint'>
...
</repository>
The lastmodified attribute is used as a timestamp by the OBR service to determine whether something has changed. The most interesting element is the <resource> tag: it describes a bundle you want to make available. The created repository XML file contains one resource block per bundle. The shape API bundle converted into OBR is as follows.
Listing 10.1. Shape API bundle converted into OBR repository XML syntax

The capability elements ![]() and
and ![]() represent what the bundle provides. In this case,
represent what the bundle provides. In this case, ![]() represents the bundle itself, because the bundle can be required (for example, Require-Bundle), whereas
represents the bundle itself, because the bundle can be required (for example, Require-Bundle), whereas ![]() represents the package exported by the bundle. Bundle dependencies are represented as requirement elements, such as the one
for an imported package
represents the package exported by the bundle. Bundle dependencies are represented as requirement elements, such as the one
for an imported package ![]() . Both capabilities and requirements have a name, which is actually a namespace; it’s how capabilities are matched to requirements.
For example, capabilities representing exported packages and requirements representing imported packages both have the package namespace.
. Both capabilities and requirements have a name, which is actually a namespace; it’s how capabilities are matched to requirements.
For example, capabilities representing exported packages and requirements representing imported packages both have the package namespace.
In general, a capability is a set of properties specified using a <p> element with the following attributes:
- n—The name of the property
- v—The value of the property
- t—The type of the property, which is one of the following:
- string—A string value, which is the default
- version—An OSGi version
- uri—A URI
- long—A long value
- double—A double value
- set—A comma-separated list of values
Looking more closely at the bundle capability ![]() , you see it’s a fairly straightforward mapping from the bundle identification metadata:
, you see it’s a fairly straightforward mapping from the bundle identification metadata:
Bundle-ManifestVersion: 2
Bundle-Name: Simple Paint API
Bundle-SymbolicName: org.foo.shape
Bundle-Version: 4.0
Likewise, the package capability ![]() is also a simple mapping from the bundle’s Export-Package header:
is also a simple mapping from the bundle’s Export-Package header:
Export-Package: org.foo.shape;version="4.0"
A requirement is an LDAP query over the properties of a capability. So, to match a requirement to a capability, first the namespace must
match. If that matches, the requirements LDAP query must match the properties supplied by the capabilities. Even with the
LDAP query, the package requirement ![]() is a fairly easy mapping from the Import-Package header:
is a fairly easy mapping from the Import-Package header:
Import-Package: org.foo.shape;version="[4.0,5.0)"
One reason the filter ![]() looks somewhat more complicated than necessary is that version ranges aren’t directly supported by the filter syntax and
must be expressed as the lower and upper bound.
looks somewhat more complicated than necessary is that version ranges aren’t directly supported by the filter syntax and
must be expressed as the lower and upper bound.
If your bundle had a Require-Bundle, Fragment-Host, or Bundle-Execution-Environment header, it would be mapped to requirements. Even though the mappings are straightforward, it’s still nice to have a tool like BIndex doing this for you. You can even integrate BIndex into in your build cycle so your repository is updated whenever your bundles change.
The repository XML is all well and good, but you’re probably wondering how you can use repositories in your management agent. You don’t need to know anything about the XML format to use OBR. All you need to do is grab the service implemented by OBR and use it. Let’s take a closer look at this.
Browsing OBR Repositories
The best way to familiarize you with how to use repositories is to give an example and explain what it does along the way. Let’s use the shell example again and extend it with a new command to add/remove/list repositories and browse the bundles inside them. The programmatic entry point to the OBR specification is the RepositoryAdmin service, which is represented by the following interface:
public interface RepositoryAdmin {
  Resource[] discoverResources(String filterExpr);
  Resolver resolver();
  Repository addRepository(URL repository) throws Exception;
  boolean removeRepository(URL repository);
  Repository[] listRepositories();
  Resource getResource(String respositoryId);
}
This RepositoryAdmin service provides centralized access to the federated repository. An OBR implementation implements this interface as well as the other types referenced by it. Figure 10.3 shows the relationships among the involved entities.
Figure 10.3. UML diagram of the Repository-Admin service. An external repository client uses the RepositoryAdmin and Resolver interfaces to download and install bundles and their transitive dependencies.

The code in the following listing shows the code for the new obr-repo command. It uses RepositoryAdmin to add, remove, and list repositories as well as to discover resources.
Listing 10.2. OBR repository shell command example

The obr-repo command has the following subcommands: list-url, add-url, remove-url, and list. A RepositoryAdmin provides access to a number of repositories referenced by URLs. You implement the list-url subcommand ![]() to list these repositories by retrieving the RepositoryAdmin service and calling its listRepositories() method, which gives you access to the associated Repository objects. In this case, you loop through the repositories and print their names and URLs.
to list these repositories by retrieving the RepositoryAdmin service and calling its listRepositories() method, which gives you access to the associated Repository objects. In this case, you loop through the repositories and print their names and URLs.
You can add or remove repository URLs with the add-url and remove-url subcommands, respectively. As you can see at ![]() and
and ![]() , there’s a one-to-one mapping to the addRepository() and removeRepository() methods of the RepositoryAdmin service. Finally, the list subcommand expects an LDAP query which it passes to discover-Repositories() to discover resources
, there’s a one-to-one mapping to the addRepository() and removeRepository() methods of the RepositoryAdmin service. Finally, the list subcommand expects an LDAP query which it passes to discover-Repositories() to discover resources ![]() . If no query is specified, all resources are listed. You loop through the discovered resources and print their presentation name, symbolic name, and version.
. If no query is specified, all resources are listed. You loop through the discovered resources and print their presentation name, symbolic name, and version.
You can now use this command to configure repositories and discover bundles. After you’ve discovered a bundle you want to use, you need to deploy it. You’ll implement a separate command for that next.
Deploying Bundles With OBR
Discovering bundles is one half of the OBR story; the other half is deploying them and their dependencies into the framework. The RepositoryAdmin.getResolver() method gives you access to a Resolver object to select, resolve, and deploy resources. A Resolver has these methods:
public interface Resolver {
  void add(Resource resource);
  Requirement[] getUnsatisfiedRequirements();
  Resource[] getOptionalResources();
  Requirement[] getReason(Resource resource);
  Resource[] getResources(Requirement requirement);
  Resource[] getRequiredResources();
  Resource[] getAddedResources();
  boolean resolve();
  void deploy(boolean start);
}
The process for deploying resources is fairly simple. Follow these steps:
1. Add desired resources using Resolver.add().
2. Resolve the desired resources’ dependencies with Resolver:resolve().
3. If the desired resources resolve successfully, deploy them with Resolver.deploy().
The following listing implements an obr-resolver shell command to resolve and deploy resources.
Listing 10.3. OBR resolver shell command example

You first get the Resolver from the RepositoryAdmin service. Then you use the RepositoryAdmin.discoverResources() method with a LDAP filter argument to discover a resource to deploy. If you find any resources, you add the first one to
the Resolver and call resolve() to resolve its dependencies from the available repositories ![]() . If the resource is successfully resolved, you print out all of the dependencies of the resource you’re deploying. Then you
use Resolver.deploy() to install and start the discovered bundle and its dependencies
. If the resource is successfully resolved, you print out all of the dependencies of the resource you’re deploying. Then you
use Resolver.deploy() to install and start the discovered bundle and its dependencies ![]() . If the resource couldn’t be resolved, you print out the missing requirements.
. If the resource couldn’t be resolved, you print out the missing requirements.
To run this example, go to the chapter10/combined-example/ directory of the companion code. Type ant to build the example and java -jar launcher.jar bundles to execute it. To interact with the shell, use telnet localhost 7070. This example uses the Apache Felix OBR implementation (http://felix.apache.org/site/apache-felix-osgi-bundle-repository.html). The following session uses the obr-repo and obr-resolver commands:
-> obr-repo add-url file:repository.xml
-> obr-repo list-urls
Paint (file:repository.xml)
-> obr-repo list
circle (org.foo.shape.circle) 4.0.0
frame (org.foo.paint) 4.0.0
shape (org.foo.shape) 4.0.0
square (org.foo.shape.square) 4.0.0
triangle (org.foo.shape.triangle) 4.0.0
-> obr-resolver (symbolicname=org.foo.paint)
Deploying dependency: shape (org.foo.shape) 4.0.0
-> obr-resolver (symbolicname=org.foo.shape.circle)
In this session, you first use the add-url subcommand to add your repository containing the paint program bundles. You verify the configured repository using the list-url subcommand. Using the list subcommand, you browse the bundles contained in the repository. Then, you use the obr-resolver command with an LDAP filter to select and deploy the paint-frame bundle, which also installs its dependencies. Finally, you install the circle bundle.
That’s about all you need to know to start using OBR to discover and deploy your bundles. Often, this is enough to manage the growing complexity of your applications. But sometimes you’ll be faced with a slightly different scenario that doesn’t fit as well with what OBR provides. Perhaps you want to package your application in a single deployment unit composed of several bundles. What can you do in this case? Another OSGi Compendium specification targets such needs. Let’s look at that next.
10.1.3. Deployment Admin
With OBR, you tend to think about deploying specific bundles and letting OBR automatically calculate and deploy any dependent bundles. With Deployment Admin, your thinking changes to deploying entire applications or subsystems as a single unit. The Deployment Admin specification standardizes some of the responsibilities of a management agent; specifically, it addresses lifecycle management of interlinked resources on an OSGi Service Platform.
Deployment Admin defines a way to package a number of resources in a deployment package. A deployment package is a JAR file with a format similar to a bundle. You can install deployment packages using the DeploymentAdmin service. The Deployment-Admin service can process bundle resources itself, but other types of resources in the deployment package are handled by passing them to a ResourceProcessor service for that specific type of resource. The chosen ResourceProcessor service appropriately processes the given resource type. The uninstallation and update of a deployment package works similarly: bundles are processed by the DeploymentAdmin service, and other types of resources are handed off to ResourceProcessors. All ResourceProcessor services are notified about any resources that are uninstalled or updated. If all resources have been processed, the changes are committed. If an operation fails, all changes are rolled back.
Note
Although we’re talking in terms of commits and rollbacks, a Deployment Admin implementation isn’t guaranteed to support all features of transactions. Most implementations tend to provide only a best effort rollback.
This sounds fairly promising for managing applications. To get a better idea of how it works, we’ll present some of the details of deployment packages next. After that, we’ll give an example of how you can use the Deployment Admin to install and manage deployment packages.
Creating Deployment Packages
As an example, let’s think about how to provision your paint program. The paint program has the following artifacts:
paint-4.0.jar
shape-4.0.jar
circle-4.0.jar
square-4.0.jar
triangle-4.0.jar
To be able to show all of what deployment packages have to offer, let’s assume you want to provide a core version of the program containing the drawing frame and the shape API bundles. This way, you’re able to deploy the actual shape implementations separately via an extension pack. The extension pack contains the square, circle, and triangle bundles. Let’s go with this approach and explore the different ways you can use deployment packages to make it work.
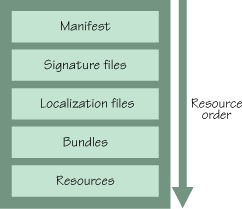
The general structure of a deployment package is shown in figure 10.4. This ordering is carefully designed to allow deployment packages to be streamed in such a way that the contents can be processed without needing to download the entire JAR file.
Figure 10.4. Structure of a deployment package JAR file
The deployment package design has a few other desirable characteristics. First, the deployment package puts metadata in its manifest, similar to bundles, which allows you to turn it into a named and versioned set of resources. Second, by taking advantage of the fact that JAR files can be signed, you can use signed JAR files to make your deployment packages tamperproof.
For this example, you can do either of the following (see figure 10.5):
Figure 10.5. Paint program packaging alternatives

- Create a deployment package for the core bundles and one package for all shape bundles.
- Create a deployment package for the core bundles and individual deployment packages for each shape bundle.
The difference is obviously that in the first case, you’ll deploy either all shapes or none; and in the second case, you can extend the core bundle piecemeal. The important point to understand, though, is that you can’t use both approaches at the same time: you must choose one.
In terms of the example, you need to make a decision. In this case, you’ll go with the first approach and create a single deployment bundle for all shapes. But because deployment packages can be updated, you can gain some flexibility by starting with only one shape in the deployment package and then adding another one in an updated version and another for the third or other combinations. When you create an update that adds or removes resources from a previous version, you don’t even have to package the resources inside the update; instead, you can use fix packages.
These two different packaging strategies can’t be used simultaneously. The specification only allows resources to belong to a single resource package. Using both approaches at the same time or changing your approach after the fact would move ownership of the bundle resources to another deployment package and thus violate the specification.
A deployment package is defined as a set of resources that must be managed as a unit. The resources in a deployment package are assumed to be tightly coupled, such as a bundle and its configuration data. As a consequence, a resource can belong to only one deployment package; otherwise, for example, you could run into situations where you had two different, conflicting configurations for the same bundle.
Fix Package
A deployment package that minimizes download time by excluding resources that aren’t required to upgrade or downgrade a deployment package. It can only be installed if a previous version of that deployment package is already installed. A fix package contains only the changed and new resources. A fix package (called the source) therefore must specify the range of versions that the existing deployment package (called the target) must have installed. You’ll see this shortly when we walk through the example.
Let’s assume that you want to be able to add new shapes to the application when they become available. In this scenario, it makes sense to start with a core deployment package and create fix packages, adding new shapes as they become available.
Now that you’ve figured out your packaging approach, how do you proceed? You need to create a manifest for the target that contains the paint frame and shape API bundles; you’ll use this to provision the paint program core. Then you need to create the manifest of the fix package that you’ll use to add the three shape bundles to the core. When you have your manifests, you need to create two JAR files with the corresponding manifests and your bundles, you can optionally sign them, and you’re good to go. Here’s the manifest of the core deployment package:
Manifest-Version: 1.0
DeploymentPackage-SymbolicName: org.foo.paint
DeploymentPackage-Version: 1.0.0

Name: paint-4.0.jar
Bundle-SymbolicName: org.foo.paint
Bundle-Version: 4.0.0

Name: shape-4.0.jar
Bundle-SymbolicName: org.foo.shape
Bundle-Version: 4.0.0
You first specify the deployment package’s symbolic name and version. Next, you specify the list of resources contained in the JAR file. You specify the name of a resource, its symbolic name, and its version; you must do this for each resource. For this example, you only have bundle resources. To finish, you need to use the jar tool to create the JAR file with the appropriate content, and you’re finished with your first deployment package.
In this example, you don’t sign your deployment package, nor is it required for you to do so. If you want to create a signed deployment package, you use the jarsigner tool from the standard Java SDK. The signing process is no different than signing a normal JAR file; it results in the signatures being placed in the deployment package JAR file in the META-INF directory and after the MANIFEST.MF file. Additionally, each entry section in the manifest contains a digest entry.
Now you need to create the manifest for your fix package containing the shape bundles. This manifest is as follows:
Manifest-Version: 1.0
DeploymentPackage-Symbolicname: org.foo.paint
DeploymentPackage-Version: 2.0
DeploymentPackage-FixPack: [1,2)

Name: paint-4.0.jar
Bundle-SymbolicName: org.foo.paint
Bundle-Version: 4.0.0
DeploymentPackage-Missing: true

Name: shape-4.0.jar
Bundle-SymbolicName: org.foo.shape
Bundle-Version: 4.0.0
DeploymentPackage-Missing: true

Name: triangle-4.0.jar
Bundle-SymbolicName: org.foo.shape.triangle
Bundle-Version: 4.0.0

Name: circle-4.0.jar
Bundle-SymbolicName: org.foo.shape.circle
Bundle-Version: 4.0.0

Name: square-4.0.jar
Bundle-SymbolicName: org.foo.shape.square
Bundle-Version: 4.0.0
Because the fix package is an update to your core package, the symbolic name stays the same, but the version is upgraded to 2.0.0. The DeploymentPackage-FixPack header indicates that this is a fix package; you use version-range syntax to indicate that the fix package can be applied to any previously installed version of the deployment package from 1.0.0 inclusive to 2.0.0 exclusive. This version-numbering scheme expresses the assumption that only major version-number changes indicate added bundles. You don’t need to package the bundles already present in the core package, but you still need to mention them in the manifest. You use the DeploymentPackage-Missing header to do this. Then you specify the shape bundles in the same fashion as before. To use the deployment packages, you need to make each available via a URL.
Note
If you make deployment packages available via a protocol that supports MIME types, the standard MIME type for deployment packages is application/vnd.osgi.dp.
Next, you can use the provided DeploymentAdmin service in your management agent to install, update, and uninstall deployment packages.
Managing Deployment Packages
To demonstrate how a management agent can use Deployment Admin, you’ll again return to the shell and create a new dpa shell command to list, install, and uninstall deployment packages. This command will use the DeploymentAdmin service, which is represented by the following interface:
public interface DeploymentAdmin {
  DeploymentPackage installDeploymentPackage(InputStream in)
    throws DeploymentException;
  DeploymentPackage[] listDeploymentPackages();
  DeploymentPackage getDeploymentPackage(String symbName);
  DeploymentPackage getDeploymentPackage(Bundle bundle);
  boolean cancel();
}
The following listing shows the implementation of the command.
Listing 10.4. Deployment Admin shell command example

Like the previous example commands, you more or less map the command onto the DeploymentAdmin service interface. You get installed deployment packages using the listDeploymentPackages() service method and print their names and versions ![]() . Then, you uninstall an existing deployment package associated with a specified symbolic name using DeploymentPackage.uninstall()
. Then, you uninstall an existing deployment package associated with a specified symbolic name using DeploymentPackage.uninstall() ![]() . Finally, you install a deployment package from the specified URL using the installDeploymentPackage() service method
. Finally, you install a deployment package from the specified URL using the installDeploymentPackage() service method ![]() . The approach is fairly similar to managing bundles.
. The approach is fairly similar to managing bundles.
To run this example, go to the chapter10/combined-example/ directory of the companion code. Type ant to build the example and java -jar launcher.jar bundles to execute it. To interact with the shell, use telnet localhost 7070. This example uses the Apache Felix Deployment Admin implementation (http://felix.apache.org/site/apache-felix-deployment-admin.html). Here’s the command in action:
-> dpa install file:org.foo.paint-1.0.dp
org.foo.paint 1.0.0
-> dpa install file:org.foo.paint-2.0.dp
org.foo.paint 2.0.0
-> dpa list
org.foo.paint 2.0.0
-> dpa uninstall org.foo.paint
This session installs the core paint program deployment package. You then update it to include the fix package for the shapes. You list the installed deployment packages and then uninstall the deployment package. (Note that the Apache Felix implementation of Deployment Admin doesn’t currently implement the uninstall functionality.) This highlights the difference between the OBR and Deployment Admin approaches, because you can manage your bundles as a single unit of deployment rather than individual bundles.
Before concluding our discussion on Deployment Admin, we’ll discuss resource processors. Resource processors are an important part of the Deployment Admin specification, because they extend OSGi deployment beyond bundles.
Resource Processors
Deployment Admin can process bundle resources in deployment packages by itself; but when it comes to other types of resources, it needs to enlist the help of ResourceProcessor services. A ResourceProcessor is a service used to appropriately process arbitrary resource types; it implements the following interface:
public interface ResourceProcessor {
  void begin(DeploymentSession session);
  void process(String name, InputStream stream)
    throws ResourceProcessorException;
  void dropped(String resource) throws ResourceProcessorException;
  void dropAllResources() throws ResourceProcessorException;
  void prepare() throws ResourceProcessorException;
  void commit();
  void rollback();
  void cancel();
}
Deployment Admin connects resource types to resource processors using the Resource-Processor header in the resource entry of the deployment-package manifest. You use this header to specify the service PID of the needed resource processor. These kinds of services are provided by customizer bundles delivered as part of the deployment package.
You indicate a customizer bundle by using the DeploymentPackage-Customizer header in the resource entry for a bundle in the deployment package. This allows Deployment Admin to start customizers first, so they can provide the necessary ResourceProcessor services to handle the deployment package content. Resource processors may result in new file system artifacts but can perform other tasks like database initialization or data conversion, for example. Each nonbundle resource should have a processor associated with it. With the necessary resource processor specified, Deployment Admin is able to process all resource package content.
Before processing of the deployment package starts, Deployment Admin creates a session in which all actions needed to process the package will take place. A session isn’t visible to clients of the DeploymentAdmin service; it’s used to join the required resource processors to the processing of the deployment package. If an exception is raised during a session by any of the resource processors or the session is canceled, Deployment Admin rolls back the changes. As we mentioned before, this may only be a best-effort rollback, but it’s normally sufficient to leave the framework in a consistent state. If no exceptions are raised during a session, Deployment Admin commits the changes. During a commit, Deployment-Admin tells all joined ResourceProcessor services to prepare and subsequently commit their changes. Figure 10.6 shows the transactional aspects of the session.
Figure 10.6. Transactional aspects of a session

As you can see, this essentially provides a two-phase commit implementation. It allows ResourceProcessors to cleanly handle rollbacks. But rolling back a bundle update, as well as reinstalling a stale bundle, requires an implementation-specific back door into the OSGi framework, because the framework specification isn’t transactional over multiple lifecycle operations. This is why the Deployment Admin specification doesn’t mandate full transactional behavior.
In this section, we’ve looked at two different ways of deploying bundles. Which approach to choose depends on your needs. OBR is geared toward discovery and installation of bundles together with the transitive closure of their dependencies. Deployment Admin provisions sets of bundles and their required resources as complete units. These provide solutions to many of the deployment and discovery tasks you’ll need for a management agent. Of course, if necessary, you can always use the core OSGi API to create something for your specific needs.
Now that you know how to deploy bundles to the OSGi framework, we need to look at one final management-related task. After deploying a set of bundles, sometimes you need to control their relative activation order. We’ll discuss this management activity next.
10.2. Ordering bundle activation
In certain scenarios, you may need to control the relative order in which deployed bundles are activated and/or deactivated. There are some good reasons to control such ordering, but there are many more bad ones. Best practice dictates that you should create your bundles to be independent of activation and deactivation ordering. OSGi allows bundles to listen for lifecycle events from other bundles because it eliminates the need to order dependencies and allows bundles to be aware of changes and react to them. Ordering constraints are another form of coupling among bundles, which severely limits their ability to be reused and arbitrarily composed. A bundle shouldn’t require that functionality from another bundle be available for it to be started itself; instead, it should wait for the functionality to become available and then continue with its own functionality.
Having said that, there are a few valid reasons why you may want to ensure that a given bundle is activated before another. For example, you may want to implement a splash screen to display the progress of your application’s startup. If your splash screen is developed as a bundle, you need a way to ensure that it’s activated first. After all, what good would a splash screen showing the startup progress be if it came up last? You can generalize this kind of functionality as a high-priority feature, which in general requires ordering because it needs preferred treatment. In addition to high-priority features, ordering may be needed in two other scenarios:
- When a bundle violates the best practices mentioned earlier and relies on implicit activation ordering during startup. In reality, you should consider fixing or replacing such a bundle; but if you can’t, then you must ensure that the bundles it depends on are started first. Again, this is extremely bad practice, and you should feel a generous amount of shame until the bundle is fixed.
- When bundles can be grouped into sets with certain desirable properties. For example, you may define a set of bundles comprising a safe mode, where you deactivate all but a small set of trusted bundles and provide limited core functionality for safety or security reasons. Other examples include diagnostic or power save modes.
How can you influence and control relative activation and deactivation ordering among bundles? By using the standard Start Level Service provided by the OSGi framework.
10.2.1. Introducing the Start Level Service
The Start Level Service allows a management agent to control the relative activation/ deactivation order among bundles as well as when transitions should occur. The idea is simple, and you may already be familiar with it from other contexts, such as in UNIX environments where system services are started or stopped based on the system’s current run level.
In OSGi, the framework has an active start level associated with it, which is a nonnegative integer indicating the start level in which it’s executing. The framework starts with an active start level of zero and, by default, transitions to an active start level of one when it’s fully running. Each bundle also has an integer start level associated with it, which indicates the required start level of the bundle. Only bundles with a start level less than or equal to the framework’s active start level are allowed to be in the ACTIVE state. The Start Level Service is represented by the following interface:
public interface StartLevel {
  int getStartLevel();
  void setStartLevel(int startlevel);
  int getBundleStartLevel(Bundle bundle);
  void setBundleStartLevel(Bundle bundle, int startlevel);
  int getInitialBundleStartLevel();
  void setInitialBundleStartLevel(int startlevel);
  boolean isBundlePersistentlyStarted(Bundle bundle);
  boolean isBundleActivationPolicyUsed(Bundle bundle);
}
This service interface supports the following operations:
- Modifying the active start level of the framework— You can change the framework’s active start level with setStartLevel(). Doing so results in all active bundles with a higher start level being stopped, and bundles with a lower or equal start level that are persistently marked as started being activated.
- Assigning a specific start level to a bundle— You can change an individual bundle’s start level with setBundleStartLevel(). The framework activates the bundle if it’s persistently marked as started and the new start level is less than or equal to the active start level or stops the bundle if the new start level is greater than the active start level.
- Setting the initial start level for newly installed bundles— All bundles are installed with a default start level of 1. With setInitialBundleStartLevel(), you can change this default value to any desired initial start level. This only impacts subsequently installed bundles.
- Querying relevant values— You can query the framework’s active start level, the start level of a bundle, and the initial bundle start level. Additionally, you can query whether a given bundle is persistently marked as started.
What does all this mean in simple terms? The framework’s active start level and a bundle’s start level control whether a bundle can be started. This means that if you explicitly start a bundle (invoke Bundle.start() on it), it won’t activate unless the bundle’s start level is less than or equal to the framework’s active start level. In such a case, the only effect of invoking Bundle.start() is that the bundle is persistently marked as started. If the framework’s active start level is eventually changed to a greater or equal value, the bundle will be automatically activated by the framework.
As you can imagine, changing the active start level of the framework can have a dramatic impact on the framework, because a lot of bundles may be started or stopped as a result. When you use the Start Level Service to change the framework’s active start level, all active bundles with start levels greater than the target start level are stopped, whereas all bundles persistently marked as started with start levels less than or equal to the target start level are started. When you invoke StartLevel. setStartLevel(), the actual process occurs on a background thread, so the method returns immediately. The background thread effectively increments or decrements the current active start level one step at a time, depending on whether the new active start level is greater than or less than the current active start level, respectively. At each step, the background thread starts or stops the bundles at that level until the new target level is reached.
10.2.2. Using the Start Level Service
To illustrate how you use the Start Level Service, you’ll add startlevel and bundlelevel commands to the shell. These two commands, implemented in the following listing, perform the four functions mentioned earlier.
Listing 10.5. Start Level Service shell commands example

Executing the startlevel command without an argument prints the framework’s active start level ![]() . You implement this with the StartLevel.getStartLevel() method. If the startlevel command is passed an argument, the new active start level is parsed from the argument, and you call the StartLevel.setStartLevel() method, which causes the framework to move to the specified active start level.
. You implement this with the StartLevel.getStartLevel() method. If the startlevel command is passed an argument, the new active start level is parsed from the argument, and you call the StartLevel.setStartLevel() method, which causes the framework to move to the specified active start level.
Next, the bundlelevel command allows you to set and get the start level of an individual bundle. When the command is given only one argument, you
use the argument as the bundle identifier and retrieve and output the associated bundle’s start level with StartLevel.getBundleStartLevel() ![]() . You add a -i switch to the command to set the initial bundle start level using the StartLevel.setInitialBundleStartLevel() method. Finally, you add the ability to change an individual bundle’s start level by using the StartLevel.setBundleStartLevel() method.
. You add a -i switch to the command to set the initial bundle start level using the StartLevel.setInitialBundleStartLevel() method. Finally, you add the ability to change an individual bundle’s start level by using the StartLevel.setBundleStartLevel() method.
When the framework’s active start level is changed, the background thread doing the work fires a FrameworkEvent.STARTLEVEL_CHANGED event to indicate that it’s finished doing the work. Here’s a simple session demonstrating what you can do with these commands.
Listing 10.6. Using the startlevel and bundlelevel commands
-> bundles
  ID      State      Name
[   0] [   ACTIVE] System Bundle
                   Location: System Bundle
                   Symbolic-Name: system.bundle
[   1] [   ACTIVE] Simple Shell
                   Location: file:org.foo.shell-1.0.jar
                   Symbolic-Name: org.foo.shell
-> startlevel
1
-> bundlelevel -i 2
-> install file:foo.jar
Bundle: 3
-> start 3
-> bundles
  ID      State       Name
[   0] [   ACTIVE]  System Bundle
                    Location: System Bundle
                    Symbolic-Name: system.bundle
[   1] [   ACTIVE]  Simple Shell
                    Location: file:org.foo.shell-1.0.jar
                    Symbolic-Name: org.foo.shell
[   3] [INSTALLED]  Foo Bundle
                    Location: file:foo.jar
                    Symbolic-Name: org.foo.foo
-> startlevel 2
-> bundles
  ID      State       Name
[   0] [   ACTIVE]  System Bundle
                    Location: System Bundle
                    Symbolic-Name: system.bundle
[   1] [   ACTIVE]  Simple Shell
                    Location: file:org.foo.shell-1.0.jar
                    Symbolic-Name: org.foo.shell
[   3] [   ACTIVE]  Foo Bundle
                    Location: foo.jar
                    Symbolic-Name: org.foo.foo
-> bundlelevel 3 3
-> bundles
  ID      State       Name
[   0] [   ACTIVE]  System Bundle
                    Location: System Bundle
                    Symbolic-Name: system.bundle
[   1] [   ACTIVE]  Simple Shell
                    Location: file:org.foo.shell-1.0.jar
                    Symbolic-Name: org.foo.shell
[   3] [ RESOLVED]  Foo Bundle
                    Location: file:foo.jar
                    Symbolic-Name: org.foo.foo
In this example session, you first use the startlevel command to display the framework’s current active start level, which is 1 by default. You use the bundlelevel command with the -i switch to set the initial bundle start level of installed bundles to 2. Subsequently, when you install and start the foo bundle, you can see from the following bundles command output that it’s not started yet. This is expected, because the bundle’s start level is 2, but the framework’s active start level of 1 is less than that. You raise the framework’s active start level to 2, which ultimately causes the foo bundle to be started. Using the bundlelevel command to set the foo bundle’s start level to 3 stops the bundle again.
That’s all there is to the Start Level Service. You’ll not likely need this service often, because bundle activation ordering isn’t good practice, but it can come in handy in certain situations. We’ve finished covering application management; let’s summarize what we’ve discussed.
10.3. Summary
In this chapter, we discussed how to manage your OSGi-based applications. We covered the following issues:
- One of the key management tasks is deploying bundles to the OSGi framework. You can use multiple techniques to do so, including rolling your own approach or using technologies like OBR and Deployment Admin.
- OBR focuses on discovering and deploying bundles and the transitive closure of their dependencies, whereas Deployment Admin focuses on defining and deploying sets of bundles and needed resources.
- You can use the Start Level Service to control the relative activation order of your deployed bundles, which may be needed in a few situations like creating splash screens and different execution modes.
These topics have given you a fairly good foundation for managing your bundles. Now that you know how to build and manage your OSGi applications, we’ll move into more advanced topics, such as service-oriented component models.