
Chapter 15. Web applications and web services
- Using the OSGi HTTP Service specification to serve content and servlets
- Using the OSGi Web Applications specification to deploy WAR files
- Using the OSGi Remote Services specification to provide and consume web services
This is it: the last chapter. We hope that throughout the course of this book, we’ve been able to convince you that OSGi technology is fairly easy to use and extremely powerful. This final chapter touches on an area that we haven’t covered yet but that is hugely important to many modern developers: web applications and web services. We’ll show you how to build and deploy web applications using OSGi, and the benefits this technique can bring to traditional web-development frameworks. You’ll reuse a lot of knowledge from earlier in the book to build a dynamic, distributed OSGi application.
Web-related technologies are ubiquitous. Almost all organizations and many individuals have some form of web presence, whether via social networking sites, static HTML pages, simple one-tier web applications, medium-sized n-tiered architectures, or massive global behemoths. Developers of these types of systems are familiar with a number of key technologies, including web services for back-end communication between business tiers and web applications for user interaction via a browser.
If you’re reasonably familiar with Java, you know that a plethora of tools and technologies are available to help you build such applications. In fact, there are so many that it’s impossible for us to cover all the possibilities in a single chapter. Instead, we’ll pick a few of the more popular Java toolkits and show you how OSGi can improve on their design and usage. From here, you should be able to extend the general principles we cover to integrate OSGi with other toolkits of your choice.
To illustrate our points, we’ll look at a number of simple examples before explaining how you can extend an existing stock-watcher web application from the Google Web Toolkit (GWT) tutorial to use OSGi. For the purposes of brevity, we’ll focus on the aspects of these technologies that directly relate to OSGi and skip over (or even ignore) some of the more complex aspects of web development and distributed computing in general. Our goal is to show you how OSGi can work in a web context, not how to build and manage all aspects of web applications or services. Let’s get started.
15.1. Creating web applications
We’ll start our foray into web technologies by looking at web applications, before moving on to web services. Unless you’ve been living on the moon for the last decade, you must’ve had some exposure to web applications, whether as a user or as a developer. Web applications are a class of applications that present their user interface in a standard web browser such as Internet Explorer, Firefox, or Safari. They range from consumer shopping carts to online banking, from travel booking to social networking, from games to employment to government—the list is pretty much endless.
In this section, we’ll look at using OSGi with the following web-application technologies:
- Static content
- Java Servlets
- JavaServer Pages (JSP)
- Google Web Toolkit (GWT)
Figure 15.1 provides a simple diagram of the components you’ll build in this chapter. What benefits can OSGi bring to web-application development to cause you to break from the status quo? The major benefits are related to OSGi’s different layers:
Figure 15.1. In this chapter you’ll build a simple web application hosted on a single OSGi framework that calls out to a number of back-end OSGi frameworks using web-services protocols.

- The module layer provides an improved physical and logical structure, so web applications are easier to maintain and deploy.
- The lifecycle layer enables managing web-application installation and activation, to control what is available and when.
- The services layer supports a more loosely coupled application development approach, making it easy to swap in different implementations or even move those pieces to other machines to improve performance without changing a single line of client code.
There are two main routes into the OSGi framework for web applications: the OSGi HTTP Service specification and the Web Applications specification. The HTTP Service specification is an OSGi Compendium specification. It enables programmatic registration of servlets and static resources. The Web Applications specification is one of the R4.2 Enterprise specifications and defines a web application bundle (WAB). A WAB is a special web archive (WAR) file that supplies OSGi metadata and relies on the OSGi framework’s lifecycle layer to control when its resources are made available. We’ll look at HTTP Service first.
15.1.1. Using the HTTP Service specification
If you’re starting a web application from scratch, the simplest way of providing it in OSGi is to use the HTTP Service, which is represented by the org.osgi.service.http.HttpService interface. You find the HTTP Service like any other OSGi service, by looking in the service registry using the BundleContext:
String name = HttpService.class.getName();
ServiceReference ref = ctx.getServiceReference(name);
if (ref != null) {
  HttpService svc = (HttpService) ctx.getService(ref);
  if (svc != null) {
    // do something
  }
}
Having found the HTTP Service, what can you do with it? The HttpService interface provides methods to register and unregister static resources (for example, images or HTML pages) and Java servlets. The HttpService interface is defined as follows:
public interface HttpService {
  HttpContext createDefaultHttpContext();
  void registerResources(String alias, String name, HttpContext context);
  void registerServlet(
    String alias, Servlet servlet,
    Dictionary initparams, HttpContext context);
  void unregister(String alias)
}
Let’s look at how you use this interface; you’ll start with registering static resources and then move on to servlets.
Registering Resources
Let’s dive into a web application by creating a bundle to register a set of static resources. You’ll reuse your knowledge of components from chapter 12 to build a simple iPOJO component that registers resources with the HTTP Service. Listing 15.1 shows the complete source code for this component. You may wonder why you’re using an iPOJO component instead of a simple BundleActivator. The reason is the complex startup-ordering issues associated with using multiple services, because your component uses the HTTP Service and the Log Service. You could do this without a component framework, but using one makes life simpler.
Listing 15.1. ResourceBinder component class
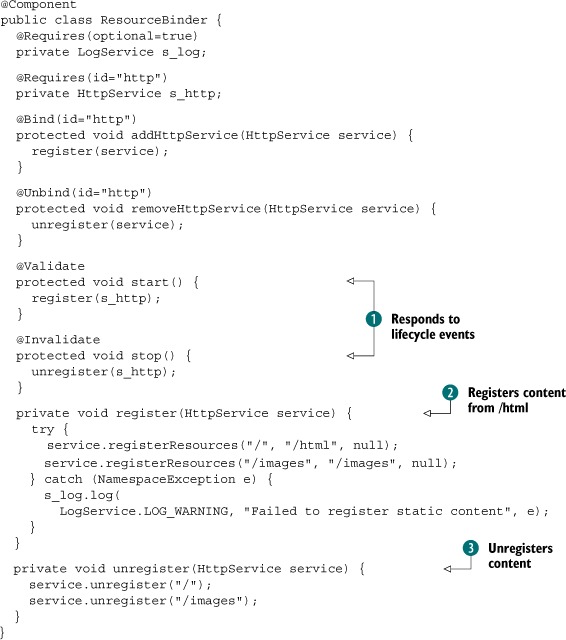
The iPOJO runtime automatically injects the Log Service into the s_log field and uses the addHttpService() and removeHttpService() methods to bind and unbind (respectively) the HTTP Service. The ResourceBinder component responds to lifecycle events ![]() . The real work, for this example, is done when you register content from the /html directory within your bundle to the root
context of the HTTP Service
. The real work, for this example, is done when you register content from the /html directory within your bundle to the root
context of the HTTP Service ![]() . In other words, the file /html/index.html from within your bundle is served as /index.html from the HTTP Service. You unregister
it when the service is removed or the component is deactivated
. In other words, the file /html/index.html from within your bundle is served as /index.html from the HTTP Service. You unregister
it when the service is removed or the component is deactivated ![]() . What does the end result look like? Figure 15.2 shows the service- and bundle-level dependencies of the ResourceBinder component.
. What does the end result look like? Figure 15.2 shows the service- and bundle-level dependencies of the ResourceBinder component.
Figure 15.2. The ResourceBinder has a mandatory dependency on the HTTP Service for providing content and an optional dependency on the Log Service for logging errors.

To see this example running, go into the chapter15/httpservice/directory of the book’s companion code. Type ant to build the example and java -Dorg.osgi.service.http.port=8080-jar launcher.jar bundles to execute it. In addition to using iPOJO, this example uses the Apache Felix HTTP Service (http://felix.apache.org/site/apache-felix-http-service.html) and Apache Felix Log Service (http://felix.apache.org/site/apache-felix-log.html) implementations.
After launching the example, navigate to http://localhost:8080/index.html; you should see the web page shown in figure 15.3.
Figure 15.3. Static content served from the OSGi HTTP Service

The HTTP Service is registered by an implementation bundle. The client has no control over the port or URL on which the service is running. That’s the job of the administrator of the OSGi framework. The HTTP Service specification defines framework properties to configure the service ports:
- org.osgi.service.http.port—Specifies the port used for servlets and resources accessible via HTTP. The default value is 80.
- org.osgi.service.http.port.secure—Specifies the port used for servlets and resources accessible via HTTPS. The default value is 443.
You can set framework properties using the launching API covered in chapter 13. In this case, the launcher passes system properties through to the framework properties. It’s also generally possible to configure the HTTP Service implementation using the Configuration Admin Service, but that is implementation-dependent.
Setting the HttpContext
You may have noticed the HttpContext parameter in the HttpService.register-Resources() method. In the previous example, you passed in null, but what does this parameter do? HttpContext provides a way to inject the HTTP Service with resource-lookup and -access policies. Let’s first look at the API, followed by an example, to show what this allows you to do. The HttpContext interface is defined as follows:
public interface HttpContext {
  boolean handleSecurity(HttpServletRequest req, HttpServletResponse res)
    throws IOException;
  URL getResource(String name);
  String getMimeType(String path);
}
The handleSecurity() method provides a callback to allow the HTTP Service to verify whether a request should be allowed for a given resource. The getResource() method provides a mechanism to define how a particular resource is mapped to a URL, which makes it possible to host contents from any scheme accessible from URLs. Finally, the getMimeType() provides a mechanism to control the MIME type headers returned with the stream of a particular resource.
If you use null for the HttpContext, as in the previous example, the HTTP Service uses a default context implementation, which can also be accessed using the HttpService.createDefaultHttpContext() method. Table 15.1 describes the behavior of the default HttpContext as defined by the OSGi specification.
To demonstrate how to use the HttpContext, let’s create a ResourceTracker to track bundles and automatically register their resources with the HTTP Service. To accomplish this, you’ll use the org.osgi.util.tracker.BundleTracker introduced in the OSGi R4.2 Compendium specification. Listing 15.2 shows the body of the add-Bundle() method of the BundleTracker subclass.
Table 15.1. Default behavior of HttpContext implementations
|
Behavior |
|
|---|---|
| handleSecurity() | Implementation-specific authentication, although all known open source implementations return true |
| getResource() | Maps requested resources to the content of the registering bundle |
| getMimeType() | Always returns null |
The BundleTracker class provided by the OSGi R4.2 Compendium simplifies the task of tracking bundles much as ServiceTracker simplifies tracking services. As with ServiceTracker, which we introduced in chapter 4, BundleTracker supports a filter pattern based on bundle states and a customizer object to fine-tune which bundles are tracked and/or to create a customized object to track with the bundle.
Compared to the simple BundleTracker you created in chapter 3, the OSGi Bundle-Tracker performs the same task, but does so in a more sophisticated way. In particular, it handles concurrency issues better and allows you to track bundles based on desired states, instead of just the ACTIVE state as the simple implementation did.
Listing 15.2. Tracking HTTP resources in ResourceTracker
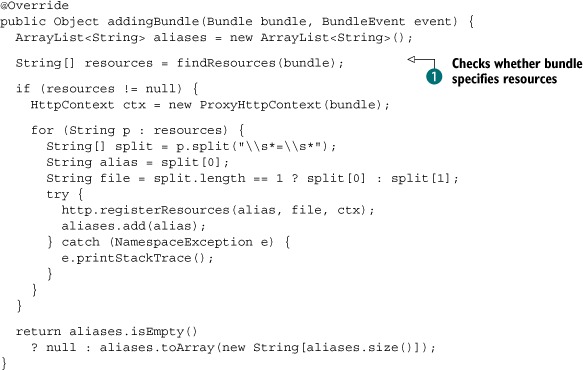
In this example, you define an HTTP-Resources manifest header that bundles can use to specify resources they wish to register with the HTTP Service. You check whether
a bundle specifies any resources in the HTTP-Resources header ![]() . The format of this header is a comma-delimited list of directories that may optionally be aliased (you’ll see this working
in a second). If any resources are found, you create a ProxyHttpContext (shown in the following listing) and register the resources with the HttpService.
. The format of this header is a comma-delimited list of directories that may optionally be aliased (you’ll see this working
in a second). If any resources are found, you create a ProxyHttpContext (shown in the following listing) and register the resources with the HttpService.
Listing 15.3. ProxyHttpContext for reading resources from a bundle

If you used the default HttpContext, the HTTP Service would try to find the requested resources in your ResourceTracker bundle, which clearly isn’t correct. ProxyHttp-Context attempts to find the resources in the bundle you’re tracking. You create a unique ProxyHttpContext for each tracked bundle. The key line of code in this class passes the getResource() call through to the tracked bundle ![]() .
.
To demonstrate how to use the resource tracker, the org.foo.http.resource bundle in the chapter15/httpservice/ directory of the companion code contains the following header:
HTTP-Resources: /resource=html,/resource/images=images
If you deploy this bundle into an OSGi framework along with an HTTP Service and your ResourceTracker, then its resources are registered; you can browse them at http://localhost:8080/resource/index.html. This is just one trivial usage of the Http-Context object. Other possible scenarios might include the following:
- Managing authenticated access to web content
- Mapping local file system resources into the HTTP Service
Now that you’re familiar with registering static resources with the HTTP Service, let’s look at how it allows you to use servlets in an OSGi environment.
Registering Servlets
Java servlets are the building block on which a vast number of web applications have been built. Some of the key advantages of the servlet specification are the relative simplicity of the API and the huge number of tools and frameworks available to help you develop web applications with it. Similar to static content, the HTTP Service provides a mechanism to dynamically register servlets using the following Http-Service method:
void registerServlet(String alias, Servlet servlet,
  Dictionary initparams, HttpContext context);
In the example using static content with the HTTP Service, we showed how you can use the registerResources() method to dynamically register content. Can you do the same for servlets? Yes, you can. But because the registerServlet() method expects an instance of a servlet, instead of using the BundleTracker, you’ll find serv-lets in the OSGi service registry and automatically register them with the HTTP Service.
The following listing shows a snippet from an iPOJO component that maps servlets registered in the service registry with a Web-ContextPath service property to any available HttpServices.
Listing 15.4. Binding servlets in the OSGi service registry using iPOJO

In this example, you declare an optional service dependency on the LogService to allow you to inform the outside world of any exceptions. You synchronize on the current servlets to create a snapshot
of them and to add the HttpService to the set of known services. Then you iterate over the current servlets and register them with the recently discovered HttpService ![]() . Because this is a dynamic environment, you also need to consider the case where servlets come before or after an Http-Service. Hence you need similar logic in the bindServlet() method, shown in the next code snippet.
. Because this is a dynamic environment, you also need to consider the case where servlets come before or after an Http-Service. Hence you need similar logic in the bindServlet() method, shown in the next code snippet.
Listing 15.5. Binding servlets in the OSGi service registry using iPOJO

In this method, you read the Web-ContextPath from the service headers ![]() . If this isn’t null, you then snapshot the HttpServices and store the servlet using the same object lock as in listing 15.4—ensuring that you don’t miss any services
. If this isn’t null, you then snapshot the HttpServices and store the servlet using the same object lock as in listing 15.4—ensuring that you don’t miss any services ![]() . Finally, you iterate over the available HttpServices and register the new servlet
. Finally, you iterate over the available HttpServices and register the new servlet ![]() .
.
The final piece of the puzzle is the actual registration of a servlet. Here you create the trivial HelloServlet shown in the following listing, which prints a message in the web browser.
Listing 15.6. Binding servlets in the OSGi service registry using iPOJO
@Component(immediate = true)
@Provides(specifications = Servlet.class)
public class HelloServlet extends HttpServlet {
  @ServiceProperty(name = "Web-ContextPath")
  String ctx = "/hello";

  @Override
  protected void doGet(HttpServletRequest req, HttpServletResponse resp)
      throws IOException {
    ...
  }
}
You register this component using the Servlet interface and add the Web-Context-Path service property with iPOJO annotations.
To see this example in action, go into the chapter15/httpservice/directory of the book’s companion code; type ant to build it and java -Dorg.osgi.service.http.port=8080 -jar launcher.jar bundles/ to launch it. Then browse to http://localhost:8080/hello with a web browser.
The HTTP Service specification specifies that only servlets registered with the same HttpContext object are part of the same ServletContext. The HTTP Service implementation creates a ServletContext for each unique HttpContext object that is registered. If null is passed in, the HTTP Service calls createDefaultHttp-Context(), which puts the registered servlet in a separate ServletContext.
Pax Web Support
Before leaving this section on the HTTP Service, we should also point out the support provided by the Pax Web project (http://wiki.ops4j.org/display/paxweb/Pax+Web). This project defines a WebContainer service interface that extends the standard OSGi HttpService interface. This new interface provides a number of extra methods to register other servlet-related services, including JSP, servlet filters, and servlet event listeners.
We won’t cover Pax Web in depth, but we’ll show you how to run a shopping cart example from another Manning publication, Web Development with Java Server Pages, Second Edition (Fields, Kolb, and Bayern, 2001), in an OSGi context. The following listing shows a Declarative Services component for registering JSPs when the WebContainer service is published in the OSGi service registry.
Listing 15.7. Binder to register JPS pages in the Pax Web WebContainer
public class Binder {
  private volatile HttpContext http;

  protected void bindWebContainer(WebContainer c) {
    http = c.createDefaultHttpContext();
    c.registerJsps(new String[] { "*.jsp" }, http);
  }

  protected void unbindWebContainer(WebContainer c) {
    c.unregisterJsps(http);
    http = null;
  }
}
This component registers all JSPs in the bundle under a shared HttpContext and unregisters the JSPs. The next listing shows the Declarative Services component description.
Listing 15.8. Declarative Services component definition for JSP binder
<?xml version="1.0" encoding="UTF-8"?>
<component name="sample.component" immediate="true">
  <implementation class="org.foo.webapp.jspapp.Binder" />
  <reference name="webcontainer"
        interface="org.ops4j.pax.web.service.WebContainer"
        cardinality="1..1"
        policy="static"
        bind="bindWebContainer"
        unbind="unbindWebContainer"
    />
</component>
You specify the component implementation class and declare the component as immediate, so an instance is created as soon as the component’s dependencies are satisfied. Then you specify a one-to-one dependency on a WebContainer service, which you want injected into your component using the specified binding methods. We’ll leave it as an exercise for you, but you can trivially extend this to use the Bundle-Tracker approach from listing 15.2 to track JSP bundles centrally, rather than duplicating binding logic in different bundles.
To see this example running, go into the chapter15/pax-web/ directory of the book’s companion code. Type ant to build the example and java -jar launcher.jarbundles to execute it. To see the shopping-cart application in action, go to http://localhost:8080/jsps/catalog.jsp. When you do, you should see a simple shopping cart page. Add a couple of items to the cart to verify that it works, as shown in figure 15.4.
Figure 15.4. JSP shopping cart application running in an OSGi environment

We’ve shown you how to deploy a range of web-application technologies from static resources to servlets to JSPs using the HTTP Service or its extensions. This may leave you wondering, “What about my WAR files?” Good question. In the next section, we’ll look at the standard way to deal with WAR files in OSGi.
15.1.2. Using the Web Applications specification
Since the Servlet 2.2 specification came out in August 1999, we’ve been packaging and deploying servlets, JSPs, and other web technologies in WAR files. WAR files provide a standard way to map a range of web technologies to a servlet-container context. Despite the widespread use of WAR files, until recently there was no standard way to use WAR files in an OSGi framework. Due to the increasing use of OSGi technology in the enterprise domain, member companies in the OSGi Alliance are now producing enterprise-related specifications.
The OSGi R4.2 Enterprise specification is the result of this effort. The Enterprise specification defines another set of compendium specifications specifically targeting enterprise technologies. One of these specifications is the Web Applications specification, which provides a standard way for servlet and JSP application components to execute within an OSGi framework by defining a web application bundle (WAB).
WAB is pretty much a standard WAR file that has been converted into a bundle. More specifically, it’s a WAR file that adheres to the Servlet 2.5 and JSP 2.1 specifications and additionally declares its dependencies using the standard OSGi metadata. To demonstrate the process of creating a WAB, you’ll take the stock-watcher application from the GWT tutorial and convert it to run in an OSGi context. You can use bnd to convert the WAR file generated by the GWT build into a bundle using the following Ant target:
<target name="osgi">
  <path id="bnd.class.path">
    <fileset dir="${root.dir}/lib" includes="osgi.*.jar"/>
    <fileset dir="build" includes="*.war"/>
  </path>
  <mkdir dir="../bundles" />
  <pathconvert pathsep=":" property="bnd.cp" refid="bnd.class.path"/>
  <bnd files="build.properties" classpath="${bnd.cp}" exceptions="true"/>
</target>
Bnd takes its configuration properties from the build.properties file in the same directory, which contains the following:
Bundle-SymbolicName: com.google.gwt.sample.stockwatcher
Bundle-ClassPath: WEB-INF/lib/gwt-servlet.jar,WEB-INF/classes
Include-Resource: war
Import-Package:
  com.google.gwt.benchmarks;resolution:=optional,
  junit.framework;resolution:=optional,
  *
Web-ContextPath:  /stockwatcher/stockPrices
Most of these headers look similar to those introduced in chapter 2; if you aren’t familiar with bnd syntax, refer to appendix A. Briefly, you first specify the bundle symbolic name for your WAB. Next, you set up the bundle class path to include the gwt-servlet.jar file, which is embedded in the WAR file, and the WEB-INF/classes directory, which contains the classes of your application. You embed the various resources used by this application, including JavaScript files and images. Then you specify two optional package imports that are only used in testing scenarios.
The only new header here is Web-ContextPath. It’s used to identify the bundle as a WAB. The header is used by the web container extender bundle. This bundle is defined in the Web Application specification; it uses the extender pattern, which we discussed in chapter 3, to track bundles with the Web-ContextPath header and register the servlet resources specified in these WABs as a web application, similar to the previous examples in this chapter. The value of this header specifies the context root that the web container uses to register the web application. All web-accessible resources in the bundle are served up relative to this path.
Before we delve any further into the inner workings of WAB files, let’s launch the GWT application to show it in action. Go into the chapter15/gwtapp/ directory of the book’s companion code. Type ant to build the example and java -jar launcher.jar bundles to execute it. Browse to http://localhost:8080/stockwatcher/stockPrices/, which should look something like figure 15.5.
Figure 15.5. The Google stock-watcher application running in an OSGi context

The Web Applications specification allows you to take advantage of OSGi’s module layer to share classes installed elsewhere in the OSGi framework, ensure that you have the correct dependencies installed, and enforce defined module boundaries. You can also use the lifecycle layer to allow dynamic installation, update, and removal of your web application.
In this trivial example, sharing classes offers relatively little value, because the stock watcher has few external dependencies. But consider the benefits of being able to share classes in a large web application environment. In standard WAR development, each application must embed its own set of dependencies in its WAR file under the WEB-INF/lib directory. For utility classes, such as collections libraries, XML parsers, and logging frameworks, this can mean a lot of duplicate classes get loaded into the VM for each WAR file installed in your application server. These classes can eat up memory. In an OSGi environment, you can move dependencies into separate bundles that are then shared among installed applications, reducing the overall memory footprint.
You’ve got modularity. You’ve got lifecycle. What about services? Yep, the example uses services too! The following listing shows how.
Listing 15.9. Accessing the BundleContext from within a servlet
public class StockPriceServiceImpl extends RemoteServiceServlet
  implements StockPriceService {

  private BundleContext ctx;

  @Override
  public void init() throws ServletException {
    ctx = (BundleContext) getServletContext()
      .getAttribute("osgi-bundlecontext");

  }

  @Override
  public void destroy() {
    ctx = null;
  }
}
Here you extend com.google.gwt.user.server.rpc.RemoteServiceServlet with your own implementation class. Although the details of GWT aren’t important for this example, note that you override the init() and destroy() methods of javax.servlet.GenericServlet. You grab a reference to the BundleContext from an attribute on the javax.servlet.ServletContext. Having cached a reference to the BundleContext, you can use it to discover other services in the framework.
Extending the GWT Sample Web Application for OSGI
To demonstrate how you can use services in a WAB context, you can make a minor change to the sample GWT application to discover a trivial StockProvider service from the OSGi registry using the following interface:
public interface StockProvider {
  Map<String, Double> getStocks(String[] symbols);
}
This service returns a Map of stock prices for the given symbols. In the StockPriceServiceImpl.getPrices() method, you look up a StockProvider service and use it to get stock prices as shown in the next listing.
Listing 15.10. Reading stock prices from the StockProvider service
public StockPrice[] getPrices(String[] symbols)
  throws DelistedException, ServiceUnavailableException {
  StockPrice[] prices = null;

  StockProvider provider = (StockProvider) tracker.getService();
  if (provider != null) {
    prices = readPrices(provider, symbols);
  } else {
    throw new ServiceUnavailableException();
  }

  return prices;
}
You see whether a StockProvider service is registered using a ServiceTracker. If one is available, you use it to read prices for the specified symbols or throw a checked exception to indicate that an error message should be displayed to the user.
You’ve now taken an existing servlet application and deployed it to an OSGi environment using the WAB format. You’ve also extended this application to discover services from the OSGi registry. As it stands, this is a trivial example; but you’ll see in the next section how to extend the example further by using the service abstraction to allow your application to be divided into a multiprocess application. First, we’ll briefly cover one remaining area of interest: how to support standard WAR files in OSGi.
Retrieving the OSGi bundle context from the ServletContext is the most direct way to interact with the OSGi environment. Many existing servlets use JNDI to discover Java EE services—wouldn’t it be great if a bridge existed between these two worlds? Such a bridge does exist in the R4.2 Enterprise specification, so rest assured that you can use this mechanism to access services. The technical details of how this interaction works are beyond the scope of this book; refer to the specification for more information (www.osgi.org/Download/Release4V42).
15.1.3. Standard WARs: the Web URL Handler
As a convenience for users who wish to migrate web applications to OSGi but don’t wish to undertake the effort of converting a WAR file to a WAB, the Web Applications specification provides a utility mechanism to convert a WAR file to a WAB at execution time: the Web URL Handler. It uses the OSGi URL Handlers Service to turn WARs into WABs.
The OSGi URL Handlers Service specification provides a service-based approach for bundles to offer custom stream and content handlers associated with URLs. The normal approach for dealing with stream and content handlers in Java is to set a URLStreamHandlerFactory and/or a ContentHandlerFactory on URL and URLConnection, respectively. Unfortunately, these are singletons, so they can’t be shared and they aren’t dynamic. The URL Handlers specification addresses both of these issues.
The URL Handlers Service works by setting the URLStreamHandlerFactory and ContentHandlerFactory objects once; it then uses the whiteboard pattern to discover services offered by bundles implementing custom stream and content handlers. When the URL Handlers service receives a request for a specific protocol or content type, it delegates the request to the appropriate underlying service to perform the processing.
To use the Web URL Handler, all you need to do is prefix any existing URL pointing to a WAR file with the webbundle protocol when installing the WAR file into the framework. For example, you could use your shell’s install command like this:
install webbundle:http://www.acme.com/acme.war?Bundle-SymoblicName=
     com.example&Web-ContextPath=acme
The Web URL Handler converts the referenced WAR file into a WAB on the fly prior to the OSGi framework installing. The Web URL Handler makes a best-effort attempt to convert a WAR to a WAB, but in certain circumstances you may have to give it extra hints to help the process go smoothly. In this example above, you specify a Bundle-SymbolicName as a parameter in the query portion of the URL. The Web URL Handler also supports a number of other parameters that affect the outcome of the conversion; these parameters are listed in table 15.2.
Table 15.2. Parameters supported by the Web URL Handler
|
Description |
|
|---|---|
| Bundle-SymbolicName | Desired symbolic name for the resulting WAB. |
| Bundle-Version | Version of the resulting WAB. The value of this parameter must follow OSGi versioning syntax. |
| Bundle-ManifestVersion | Desired bundle manifest version. Currently, the only valid value for this parameter is 2. |
| Import-Package | List of packages on which the WAR file depends. |
| Web-ContextPath | Context path from which the servlet container should serve content from the resulting WAB. If the input JAR is already a WAB, this parameter is optional but may be used to override the context path. Otherwise, it must be specified. |
In the first half of this chapter, we’ve looked at a range of web-application technologies and shown how they can be integrated with OSGi. We’ve highlighted a number of themes:
- Using the HTTP Service to provide static and dynamic content
- The benefits modularity brings at execution time due to improved memory consumption from the use of shared classes
- Flexible collaboration between functional units due to the use of service patterns
- Converting WAR-style applications to WABs using OSGi R4.2 Enterprise features
In the second half of this chapter, we’ll turn our attention to making OSGi services available across process boundaries—that is, how to build distributed OSGi applications.
15.2. Providing and consuming web services
Until this point in the book, all your applications have resided in a single JVM process; but this is rarely the case for web-based applications. The entire ethos of internet-based development is predicated on distributed processes communicating over network protocols. You saw how to do this at a low level in chapter 3, where you built a simple telnet implementation. But this is the early twenty-first century, and the zeitgeist for distributed computing today is web services. In this section, we’ll investigate OSGi-based technologies for communicating between JVM processes using web-service protocols.
Obviously, we’ll only be able to scratch the surface of distributed computing, because the topic is too large and complex to cover in a single section of a chapter. Instead of going into a lot of detail about specific web-service protocols or technologies, we’ll introduce you to some of the key features of the Remote Services specification, which is another specification in the OSGi R4.2 Enterprise specification.
The Remote Services specification and its sibling specifications, Remote Services Admin and SCA Configuration Type, provide a comprehensive model for building distributed computer systems in OSGi. Their key purpose is to provide a common model to import remote services (provided over any protocol, such as SOAP, RMI, or JMS) into the OSGi service registry and symmetrically export services from the OSGi service registry so they can be accessed by other processes external to the JVM.
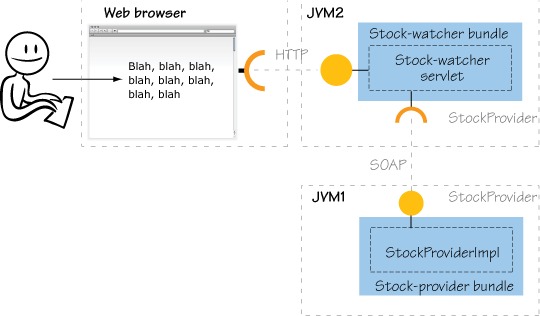
To see how this works in practice, let’s look at the stock-watcher application you built in the last section. It has a three-tier architecture, consisting of a web browser connected to a back-end servlet engine that talks to an in-process StockProvider service. A logical step in this section of the book is to split the StockProvider service into a separate JVM process and communicate with it using an over-the-wire protocol, such as SOAP. The new architecture is shown in figure 15.6. Let’s look into how you can realize this design using the Remote Services specification.
Figure 15.6. The Google stock-watcher application running in an OSGi context
15.2.1. Providing a web service
The first step in making a distributed OSGi application is to create the remote implementation of the StockProvider service. To do this, create the BundleActivator shown in the following listing.
Listing 15.11. Reading stock prices from the StockProvider service
public class Activator implements BundleActivator {

  public void start(BundleContext ctx) throws Exception {
    Dictionary props = new Hashtable();

    props.put("service.exported.interfaces", "*");
    props.put("service.exported.intents", "SOAP");
    props.put("service.exported.configs", "org.apache.cxf.ws");
    props.put("org.apache.cxf.ws.address",
      "http://localhost:9090/stockprovider");

    ctx.registerService(StockProvider.class.getName(),
      new StockProviderImpl(), props);
  }

  public void stop(BundleContext ctx) throws Exception {
  }
}
As you can see, this is a fairly typical BundleActivator. You’re basically registering a service with a set of properties. You may be asking yourself, “Where is the remote communication?” That’s the cool thing about the Remote Services specification: it shields you from those messy details. The specification defines a set of service properties you can attach to your services to indicate that they should be made available remotely. The actual remote communication is handled by another bundle or set of bundles; these types of bundles are classified as distribution provider bundles.
The key service property in listing 15.11 is service.exported.interfaces, which tells any distribution providers that you intend for your service to be made available remotely. The value * indicates that all interfaces specified when registering the service should be exported remotely. You can also change this to a String array to specify a specific set of interfaces.
Note
This opt-in approach is reasonable, because not all services make sense in a remote context. For example, consider the whiteboard pattern for serv-lets that we provided earlier, in section 15.1.1. It makes little sense to register a Java5 servlet interface remotely, because it’s entirely an in-memory API.
The rest of the attributes specify either intents or configuration for the distribution provider, which it uses to decide how to publish the remote service. We’ll look at intents and configuration in more detail a little later; for now, you can probably intuitively guess that you’re requesting that your service be exposed using a SOAP interface from the specified URL.
To create a remote service, you need to select a distribution provider. For this example, we’ve chosen to use the Apache CXF Distributed OSGi implementation (http://cxf.apache.org/distributed-osgi.html), which is a Remote Services distribution provider built on top of Apache CXF. To run your remote service, go into the chapter15/webservice/ directory of the book’s companion code. Type ant to build the example and java -jar launcher.jar bundles/ to run it. You can test your intuition by visiting http://localhost:9090/stockprovider?wsdl in a web browser. You should see something like the following (truncated):
<wsdl:definitions name="StockProvider"
 targetNamespace="http://stockprovider.foo.org/">
  <wsdl:types>
    <xsd:schema attributeFormDefault="qualified"
     elementFormDefault="qualified"
     targetNamespace="http://stockprovider.foo.org/">
      <xsd:complexType name="string2doubleMap">
        <xsd:sequence>
          <xsd:element maxOccurs="unbounded" minOccurs="0" name="entry">
That’s all there is to it! By deploying the StockProvider bundle into an OSGi framework along with a distribution provider, you’re able to make it available remotely. Pretty neat. Before we move on to the client side of the example, let’s look a little more at intents and configuration.
Understanding Intents and Configuration
To understand intents and configuration it’s useful to consider the actual mechanics of how OSGi distribution providers publish a service remotely. This process follows the classic whiteboard pattern, where the distribution provider waits around listening for services to be registered with the service.exported.interfaces service property. This is the cue for it to make the corresponding service available remotely.
Given no other information, a distribution provider can pick any number of ways to make the service available remotely. It can use various protocols (SOAP, REST, RMI, and so on). It can use a range of different security or authentication mechanisms (such as SSL, DSA, Blowfish, LDAP, or Kerberos). There are even many different transport technologies (HTTP, JMS, Unicast, Multicast, and P2P). This dilemma is shown in figure 15.7.
Figure 15.7. When making remote services available, the number of options is bewildering: protocols, transports, authentication schemes, and encryption algorithms all play their part.

There’s no single best choice for any of these options. When you’re building distributed applications, as with most applications, one size doesn’t fit all. Different techniques are appropriate in different scenarios. Having said that, it doesn’t make sense for business-level services to specify the minute details of how they should be made available remotely. Coming back full circle to the theme from chapter 2, this is another area where separation of concerns is applicable.
Intents and configurations provide a layer of indirection between the service provider and the distribution provider. They allow the service provider to specify just enough information to ensure that the service behaves as expected, yet still allow the distribution provider to optimize communications for the environment in which they’re deployed. Now that you understand what intents and configuration are in the abstract, let’s look at them in concrete terms.
Intents
Intents are a pattern borrowed from the Service Component Architecture (SCA) specification. An intent is a string value with agreed-on distribution-level semantics. To make this concept less abstract, let’s look at an example of an intent you might attach to a registered service:
props.put("service.exported.intents",
  new String[] { "propagatesTransaction", "authentication" });
In this case, you’re communicating two different intents to the distribution provider. The first, propagatesTransaction, says the service should be made available in such a way that transactional boundaries are transmitted to the service. The second, authentication, says the client application should be authenticated prior to using the service. The precise details of how these intents are accomplished is left up to the distribution provider.
Intent values are hierarchical. This is expressed by delimiting the intent value with the . character. For example, authentication.transport indicates that the service should use transport-level authentication. The practical upshot is that a service specifying authentication as an intent may be implemented by a provider that provides authentication.transport. But a service specifying authentication.transport may not be implemented by a provider only providing authentication.
Because the meaning of the intents is well-known, a distribution provider can make its best attempt at how to achieve them in its underlying implementation. This aids in decoupling distributed applications, because you can specify the qualities of the desired remote communication without tying yourself to a particular distribution technology. If you move your application to a different environment, a different distribution provider may make equally valid but potentially different choices. The SCA specification defines many intent values, but the precise details are beyond the scope of this book—for more information on SCA, visit the OSOA consortium website (www.osoa.org).
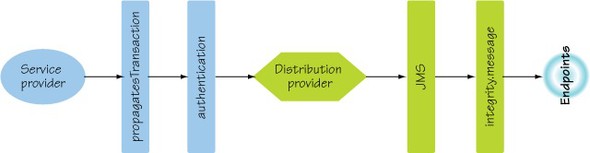
A service provider specifies intents, and the distribution provider realizes them. Is this the end of the story? Not exactly. The distribution provider must honor the requirements of the service provider, but it’s free to add any behaviors it feels are appropriate. These may include default communication protocols, authentication schemes, and buffering strategies, as shown in figure 15.8.
Figure 15.8. Service providers and distribution providers can each define intents that are applied to a service endpoint.
In summary, intents provide a distribution provider with some flexibility when it comes to deciding how to distribute a service. Sometimes, though, you know exactly how you want your service to be made available remotely. In these situations, you need a mechanism to give specific instructions to the distribution provider. This leads us to Remote Services configuration properties.
Configuration
Configuration properties provide a mechanism for the service provider to communicate explicit settings to the distribution provider. Given the range of possible configuration schemes, the Remote Services specification defines a mechanism for how the configuration is encoded. In the earlier example, you added the following property to the service:
props.put("service.exported.configs","org.apache.cxf.ws");
This specifies that the configuration properties follow the CXF web-services configuration scheme or configuration type. Note that this doesn’t mean that only CXF can be used to distribute the service; it means the semantics of the configuration properties are defined by CXF. The Remote Services specification suggests a naming convention for configuration properties, which is the configuration type followed by . and a key. In the example, you specified a single configuration property:
props.put(
  "org.apache.cxf.ws.address","http://localhost:9090/stockprovider");
Here, the configuration type is org.apache.cxf.ws and the key is address. It’s possible to use a number of different configuration types, in which case you may see something like this:
props.put("service.exported.configs", new String[]{"foo","bar"});
props.put("foo.key1","value1");
props.put("foo.key2","value2");
props.put("bar.key1","value3");
props.put("bar.key2","value4");
The idea behind using configuration properties from multiple configuration types is to make your service’s configuration more broadly applicable. Clearly, the Apache CXF distribution provider understands the org.apache.cxf.ws configuration type. Some other distribution providers may understand it too, but not all of them will. By using additional configuration types, you make your service’s configuration understandable to a wider range of distribution providers.
For interoperability purposes, the OSGi R4.2 Enterprise specification introduces a standard configuration type based on the SCA XML format. This configuration format uses the configuration type org.osgi.sca and defines a single configuration attribute org.osgi.sca.bindings which points to a named service definition. This forms a recommended approach for different distribution providers to share configuration data in a vendor-neutral format. A full description of this functionality is outside the scope of this book, but you can refer to the OSGi Enterprise specification for more information (www.osgi.org/Download/Release4V42).
This concludes our overview of intents and configurations. They provide an extensible and flexible mechanism for service providers to specify to distribution providers how services should behave in a distributed environment. In general, intents and configuration should be kept to a minimum to allow distribution-provider flexibility. Let’s now turn our attention to the other side of the equation: client-side distributed services.
15.2.2. Consuming a web service
Returning to the stock-watcher example, what do you need to do it to make it use the remote StockProvider service? Currently, it looks for the StockProvider service in the OSGi service registry; what needs to change? With respect to your application, nothing at all.
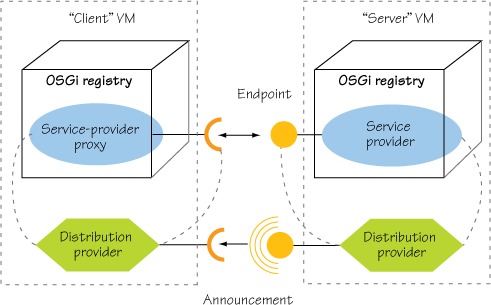
Because your client bundle runs in a separate JVM, all you need to do is install a distribution provider into the client-side OSGi framework and configure it to discover the distributed StockProvider service. The distribution provider will automatically create a proxy of the remote service and inject it into the local service registry, which the stock-watcher application will discover and use as normal. This scenario is shown in figure 15.9.
Figure 15.9. The distribution provider bundle creates a remote endpoint for the service provider. It may also announce the location and type of this endpoint for other distribution provider bundles to find. The client-side distribution provider discovers remote endpoints and creates proxies to these services, which it injects into the local OSGi service registry.
If you’re familiar with technologies such as Zeroconf, SSDP, UDDI, and Jini, you’re acquainted with the concept of discovery. Even if you aren’t familiar with these technologies, it should be relatively intuitive that discovery is a pattern used in distributed computing to allow a service provider to announce the presence of a service and for a consumer to find it. Often, this is achieved using a central registry or peer-to-peer mechanism, such as multicast TCP or multicast DNS. With such approaches, services are discovered as needed by client applications. The Remote Services specification provides an extensible pattern for implementing service discovery, which we’ll cover in more depth in the next section. For now, we’ll look at what you need to do to configure your distribution provider to discover the remote StockProvider service.
Configuring the Distribution Provider for Discovery
The Remote Services specification doesn’t explicitly define how discovery is implemented, only how it should behave. The Apache CXF Distributed OSGi implementation provides discovery based on the Apache Hadoop Zookeeper project (http://hadoop.apache.org/zookeeper/), but its usage is beyond the scope of this book. Luckily, Apache CXF Distributed OSGi also provides a static version of discovery based on the Remote Services Admin Endpoint description from the R4.2 Enterprise specification. With this approach, the discovery process is directed by XML files contained in bundles installed in the framework. The following listing shows the XML that describes the StockProvider service, which is nearly identical to the configuration for publishing the service.
Listing 15.12. XML discovery file for the StockProvider service for Apache CXF
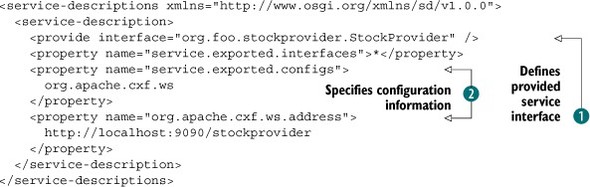
For this example, package this file in OSGI-INF/remote-service/remote-services.xml of a new bundle called stockprovider-client-1.0.jar.
You define the interface that the discovered service will provide ![]() . Then you provide the configuration entries needed by the distribution provider to bind to the remote service into the OSGi
service registry
. Then you provide the configuration entries needed by the distribution provider to bind to the remote service into the OSGi
service registry ![]() . In this example, this new bundle is purely for configuring the discovery process, so it only contains this XML file.
. In this example, this new bundle is purely for configuring the discovery process, so it only contains this XML file.
That’s all there is to it. The service is automatically published into the OSGi service registry; you can look it up and invoke methods on it, which results in remote method invocations being sent using SOAP to the server proxy created in the remote JVM.
You now know how to provide and consume remote services. Let’s wrap up this example by seeing how to use this service in the stock-watcher application.
Using Your Web Service
It’s time to see the updated stock-watcher application in action. Go into the chapter15/webservice/ directory of the book’s companion code. Type ant to build the example and java -Dorg.osgi.service.http.port=8081 -jar launcher.jar bundles/ to execute it. Doing so starts the remote StockProvider service.
Now you need to start the stock-watcher application. In a separate command shell, go into the chapter15/webservice-client/ directory of the companion code. Type ant to build the application and java -jar launcher.jar bundles/ to start it. Browse to http://localhost:8080/stockwatcher/stockPrices/, and enter the stock name foo. You should see results appear in the browser and in the output of the first console, as follows:
Retrieved {FOO=4.736842484258008}
Retrieved {FOO=48.88924250369791}
Retrieved {FOO=22.847587831790904}
This output shows that the method invocation of the local StockProvider service is being sent across the wire from the stock-watcher JVM using SOAP to the stock-provider JVM. Very cool!
One thing that should be obvious to experienced developers of distributed software is that remote services are unreliable. In RMI, for example, this unreliability is dealt with by using java.rmi.RemoteException, which is a checked exception to inform the client when things go wrong during attempts to communicate with a remote service. In OSGi, the equivalent exception is osgi.framework.ServiceException, but in this case it’s an unchecked exception. Regardless, you should expect these types of exceptions to occur when dealing with a remote service.
As you can see, it’s fairly straightforward to configure a distribution provider to import a remote service for use locally. In the example, the client isn’t particularly picky about which StockProvider service it uses: it takes whichever one is available in the service registry. The Remote Services specification allows the consumer to be more selective; we’ll conclude this section by looking into how it does so.
Matchmaking Services
Earlier, we covered how the service provider uses intents and configuration to have control over how its service is exposed remotely. In a symmetric fashion, clients often need to use services with specific characteristics. For example, a medical insurance web application may require encrypted communications to ensure patient confidentiality, or a financial trading application may require a certain protocol to communicate between services for performance or regulatory reasons. Using the OSGi service registry’s query mechanism, clients can select services using filters over the intents and configurations specified on published services.
Let’s consider the simplest case of differentiating between local and remote services. In this case, the Remote Services specification requires distribution providers to automatically add a service.imported service property to imported remote services. If you explicitly want to bind to only a remote service, you can use a filter like the following:
ServiceReference ref =
  context.getServiceReferences(
    MyService.class.getName(),"(service.imported=*)")
Alternatively, if you explicitly want to bind to only a local service, you use a filter like the following:
ServiceReference ref =
  context.getServiceReferences(
    MyService.class.getName(),"(!(service.imported=*))")
Now, let’s consider the more complex case of matching remote-service qualities. You saw earlier that a service provider can specify various intents (propagatesTransaction, authentication, and so on) when publishing its service. We also mentioned that a distribution provider can augment this set. The Remote Services specification requires distribution providers to automatically add a service.intents service property to imported remote services, which contains the union of the service provider and distribution provider intents. Therefore, if you want a service that propagates transactions and uses encryption, you can use a filter like the following:
ServiceReference ref =
  context.getServiceReferences(
    MyService.class.getName(),
    "(&(service.intents=propagatesTransaction)
      (service.intents=confidentiality))")
One slightly thorny area surrounds the matching of qualified intents where, for example, the client requires service.intents=confidentiality, but a service provides service.intents=confidentiality.message. These two intents should match because the client doesn’t care how the confidentiality is achieved, but a pure LDAP filter match would fail. To work around such issues, the Remote Services specification requires distribution providers to expand all implied qualified intents on services so LDAP queries function intuitively. For example, service. intents=confidentiality.message becomes service.intents="confidentiality,confidentiality.message".
We’ve looked at how the Remote Services distribution provider makes it easy to publish and consume remote services within an OSGi-based environment. What if you’re coming at this from the other side? What if you’re a distributed software developer and want to import/export services from/to the OSGi service registry using your own distribution technology of choice? In that case, you’ll need to implement your own distribution provider. We’ll briefly look into doing this next.
15.2.3. Distributing services
In this section, we’ll lead you through a short example showing how you can implement a trivial distribution-provider framework. The goal isn’t to create something particularly useful, but to show the underlying mechanics at play.
For the purposes of this example, you’ll create a simple RemoteRegistry interface to abstract away the details of dealing with remote services. You’ll first see how you can export local OSGi services into your remote registry; then you’ll see how to import remote services into the local OSGi service registry. Figure 15.10 provides a view of the classes involved in this example.
Figure 15.10. Simple registry scheme that abstracts mechanism of service discovery

If you’re interested in building this sort of technology, we advise you to look at the Remote Services Admin chapter of the OSGi R4.2 Enterprise specification. It provides a more complete model for building pluggable discovery and transport schemes, but it goes beyond the scope of this book.
During this example, we’ll focus on the following classes:
- ExportedServiceTracker
- ImportedServiceListenerHook
- ImportedServiceFindHook
But before we get there, let’s look briefly at the other classes in this diagram. The Remote-Registry interface provides a simple lookup and listener scheme similar to those of the OSGi service registry. The RegistryListener interface receives notifications of RegistryEvents, which contain details of added or removed RemoteServiceReferences.
For the purposes of providing a concrete implementation of this API, you’ll implement a DummyRegistry that performs no remote communication at all; instead, it tracks the available remote services using a java.util.HashMap.
You may think we’re cheating a little by using a HashMap in this example—and we are. But this HashMap-based approach demonstrates all the key functionality of implementing a Remote Services distribution provider, which involves dealing with an externally managed service registry. By necessity, we must ignore the complex issues in the area of distributed computing, such as network-discovery protocols, remote procedure calls, and object marshaling. These are all important topics, but they’re beyond the scope of this book. We leave you as architects or developers with the task of choosing your favorite distributed technologies if you wish to implement a real remote registry.
Having described the general registry architecture, let’s look more closely at the ExportedServiceTracker, which handles the task of exporting local services with the service.exported.interfaces service property into the remote registry.
Exportedservicetracker
The ExportedServiceTracker class extends the ServiceTracker class you met in chapter 4. As the name implies, it tracks any services that have been marked for export. Here’s how you do this.
Listing 15.13. Constructing an exported service tracker
public ExportedServiceTracker(BundleContext ctx, Registry registry,
  String[] intents, String[] configs) {
  super(ctx, createFilter(ctx), null);
  this.ctx = ctx;
  this.registry = registry;
  this.intents = intents == null ? new String[0] : intents;
  this.configs = configs == null ? new String[0] : configs;
}

private static Filter createFilter(BundleContext ctx) {
  try {
    return ctx.createFilter("(service.exported.interfaces=*)");
  } catch (InvalidSyntaxException e) {
    throw new IllegalStateException(e);
  }
}
You call the ServiceTracker constructor, passing in an LDAP filter that you create to match all services with a service.exported.interfaces attribute of any value; the * is interpreted by the LDAP syntax to be a wildcard that matches any value. Then you store the intents and configurations supported by your remote registry. You’ll see a little later how these are derived; for now, let’s look at the overridden addingService() method in the next listing.
Listing 15.14. Dealing with new exported services
@Override
public Object addingService(ServiceReference ref) {
  Object svc = super.addingService(ref);

  if (isValidService(ref)) {
    String[] ifaces = findExportedInterfaces(ref);
    for (String iface : ifaces) {
      registry.registerService(ref, iface, svc);
    }
  }

  return svc;
}
This method is called by the ServiceTracker super-class whenever a service published in the OSGi service registry matches the filter specified in listing 15.13. In this method, you first get a reference to the matching service by calling the addingService() method of the ServiceTracker super class. You check whether the service’s intents match the supported intents and configurations passed into the constructor. If so, you determine the set of interfaces by which the service should be exported. Finally, the service is exported to your remote registry.
Note
This example exports the service multiple times for each desired interface. In a real-world scenario, it might be more appropriate to register the service once with multiple interfaces. The approach used in this book is for conceptual simplicity only.
The next listing shows how to check whether a matching service is supported by the registry. The process compares the matching intents and configurations with the ones supplied to your ExportedServiceTracker’s constructor.
Listing 15.15. Checking if a service matches supported intents and configurations
private boolean isValidService(ServiceReference ref) {
  List<String> list = readIntents(ref);
  list.removeAll(Arrays.asList(intents));
  if (list.isEmpty()) {
    list = readConfigs(ref);
    list.removeAll(Arrays.asList(configs));
    return list.isEmpty();
  }
  else {
    return false;
  }
}
This code reads the intent and configuration values from the matching service’s service properties. You then use String.equals() via List.removeAll() to verify that the service doesn’t export any intents and configurations your remote registry doesn’t support, respectively.
Note
The isValidService() method is a naïve implementation for checking whether a given service matches your remote registry’s supplied intents and configurations. It’s naïve because it doesn’t take into account the qualified naming convention mentioned in section 15.2.1. A proper implementation needs to do this, but the logic to achieve it is too long to list here and doesn’t add much to the discussion. We’ll neatly skip over it and leave it as an exercise for you.
You now need to find out the interfaces that matching services wish to export remotely. The following listing shows how to find these interfaces. The method find-ExportedInterfaces() returns a String[] containing the interface names or null if the service isn’t exported.
Listing 15.16. Checking the exported interfaces of a service
private String[] findExportedInterfaces(ServiceReference ref) {
  Object ifaces = ref.getProperty("service.exported.interfaces");
  if (ifaces == null) {
     return null;
  }
  else {
    String[] strs = PropertyUtil.toStringArray(ifaces);
    if (strs.length == 1 && "*".equals(strs[0])) {
      ifaces = ref.getProperty(Constants.OBJECTCLASS);
      strs = PropertyUtil.toStringArray(ifaces);
    }
     return strs;
  }
}
You first look for the appropriate service property indicating whether the service is to be exported. If it is, you use a utility class to return the interfaces. Then you check to see whether the name of the exported interface is *. If it is, you get the interfaces from the standard OSGi objectClass service property, which lists all the registered service interfaces of the service object.
You also need to override the ServiceTracker methods for handling when matching services are modified or removed, but we’ll skip describing these in detail because they’re fairly similar to adding services. If you’re curious, you can look at the companion code in chapter15/webservice-impl/org.foo.dosgi.
Let’s turn our attention away from exporting local services to a remote registry and toward importing remote services into the local OSGi service registry. To facilitate this, the OSGi R4.2 core specification introduced a way to hook into the OSGi service registry using two new service interfaces:
- org.osgi.framework.hooks.service.FindHook
- org.osgi.framework.hooks.service.ListenerHook
The OSGi R4.2 core specification allows third-party code to inject various hooks into the framework service registry. These hooks let you monitor or even mask service lookup, service discovery, and service registrations. The new interfaces:
- FindHook detects when services are requested from the framework.
- ListenerHook detects when service listeners are registered.
- EventHook detects service registrations, modifications, or removals, and enables the masking of these events.
Services implementing these interfaces are registered in the OSGi service registry, just like any other service, but they’re picked up by the framework implementation. These interfaces can provide some extremely powerful patterns, but you should be highly wary because they have the capacity to create complex situations that are difficult to debug. That being said, they’re the only practical way to build distributed service models on top of the OSGi service registry, so here we are.
To save ourselves from repeating boilerplate code in the following examples, you define a RegistryWatcher helper class to handle the lookup of services from the remote registry and injection into the OSGi service registry. To give context for the example, the following listing shows the implementation of the addWatch() method of RegistryWatcher.
Listing 15.17. RegistryWatcher helper addWatch() method
 public void addWatch(String clazz, String filter) {
    Watch watch = new Watch(clazz, filter);
    synchronized (watches) {
       Integer count = watches.get(watch);
      if (count == null) {
        log.info("Adding watch " + clazz + " -> " + filter);
        Collection<RegistryServiceReference> services = registry
             .findServices(clazz, filter);
        for (RegistryServiceReference ref : services) {
          if (!regs.containsKey(ref)) {
            log.debug("Registering " + ref);
            Future<ServiceRegistration> future = exec
                .submit(new Registration(ref));
            regs.put(ref, future);
           }
          else {
            log.debug("Already registered " + ref);
           }
        }
      } else {
        watches.put( watch, count + 1 );
      }
    }
  }
You begin by checking whether this a new Watch—a unique class and filter request. If it is, you find the existing services that match your watch criteria from the Remote-Registry. For each service, you check whether you’ve already imported it for a different watch. If this is in fact a new service, you create a new Registration callable object. Here, the Registration callable object is submitted to a background thread executor to avoid deadlock scenarios that can occur if you execute external code while holding the object lock on the m_watches object. Finally, you store the future ServiceRegistration for tidying up later, should the Watch be removed.
The next listing shows the code for the Registration inner class.
Listing 15.18. Registration callable
public class RegistryWatcher {
...
  class Registration implements Callable<ServiceRegistration> {
    private final RemoteServiceReference ref;

    public Registration(RemoteServiceReference ref) {
      this.ref = ref;
    }

    public ServiceRegistration call() throws Exception {
      Hashtable props = new Hashtable(ref.getProperties());
      return ctx.registerService(
        ref.getInterface(), ref.getService() ,props);
    }
  }
...
}
This class passes through the service properties of the remote service and registers the service object in the OSGi service registry.
The final area to look at is what happens if a new remote service is discovered by the watcher.
Listing 15.19. RegistryListener event handling
private void handleAdd(RemoteServiceReference ref) {
  synchronized (m_watches) {
    if (!m_regs.containsKey(ref)) {
      for (Watch w : m_watches.keySet()) {
        if (w.matches(ref)) {
          Future<ServiceRegistration> future = exec
              .submit(new Registration(ref));
          m_regs.put(ref, future);
          break;
        }
      }
    }
  }
}
This method is called as a result of a RegistryListener event indicating that a new remote-service reference has been added to your RemoteRegistry. You check whether this is a new service reference and whether any existing watch has been created for this service. If so, you create another background registration and store the future OSGi service registration.
In summary, using your helper class and the service-hook interfaces, you can find out when a remote service is needed and inject it into the local OSGi service registry on demand. Let’s see how this works in practice.
Importedservicelistenerhook
ImportedServiceListenerHook tracks service-listener registrations and adds a watch in the remote registry for the associated services. You keep track of which types of services other bundles are interested in so you know which types of remote services you should import. The following listing shows how to process service-listener registrations.
Listing 15.20. ListenerHook that tracks registered service listeners
public void added(Collection listeners) {
  for (final ListenerInfo info : (Collection<ListenerInfo>) listeners) {
    if (!info.isRemoved()) {
      LDAPExpr expr = LDAPParser.parseExpression(info.getFilter());
      expr.visit(new ExprVisitor() {
        public void visitExpr(LDAPExpr expr) {
          if (expr instanceof SimpleTerm) {
            SimpleTerm term = (SimpleTerm) expr;
            if (term.getName().equals(Constants.OBJECTCLASS)) {
              watcher.addWatch(term.getRval(), info.getFilter());
            }
          }
         }
       });
    }
  }
}
You first check whether the listener is removed. This may seem a little odd, given that it happens in the added() method, but it protects your listener against race conditions due to asynchronous event delivery. You then inspect the body of the LDAP expression by using a utility class to walk your way through the filter expression to find references to the objectClass service property, indicating the service interfaces of interest. Finally, you add a watch in your remote registry for the discovered service interfaces specified.
Now, when another bundle registers a service listener, your listener hook will find any matching remote services in the remote registry and add them to the local OSGi service registry. This lets you handle asynchronous service lookup; but how do you handle direct service queries? We’ll look at this next.
Importedservicefindhook
When a bundle invokes BundleContext.getServiceReference(), you’d like to be able to intercept it and inject a remote service into the OSGi service registry. You can achieve this using a find hook:
public class ImportedServiceFindHook implements FindHook {
...
  public void find(BundleContext ctx, java.lang.String name,
      java.lang.String filter, boolean allServices, Collection references)
  {
    watcher.findServices(name, filter);
  }
}
This implementation is trivial because it asks the registry watcher to find any matching services in the remote registry, which then adds the services to the local OSGi service registry.
Putting it All Together
We’ll skip over the implementation of the DummyRegistry, because it’s indeed trivial (the curious can look in the companion code). You can complete the example by creating a test bundle that exports a Foo service using the service.exported. interfaces=* service property as follows:
Hashtable props = new Hashtable();
props.put("service.exported.interfaces","*");
context.registerService(Foo.class.getName(), new FooImpl(), props);
In a second bundle, add a ServiceTracker that finds the “remote” service in listing 15.21. Because all of this example is happening in the same OSGi framework (it isn’t distributed), you explicitly look for the service.imported service property to ensure that you find the “remote” version of your service versus the local service, both of which are published in the local framework’s service registry.
Listing 15.21. Tracking the “remote” service
Filter filter = context.createFilter(
  "(&(" + Constants.OBJECTCLASS + "=" + Foo.class.getName()
  + ")(service.imported=*))");
ServiceTracker tracker = new ServiceTracker(context, filter, null) {
  @Override
  public Object addingService(ServiceReference reference) {
    System.out.println("Found " + reference + " !!!!!!!");
    return super.addingService(reference);
  }

  @Override
   public void removedService(ServiceReference reference, Object service) {
    System.out.println("Lost " + reference + " !!!!!!!");
    super.removedService(reference, service);
  }
};
tracker.open();
To see this in action, go into the chapter15/webservice-impl/ directory of the companion code. Type ant to build the example and java -jar launcher.jar bundles to run it. You should see the following output:
Found [org.foo.dosgi.test.Foo] !!!!!!!
Although this Remote Services distribution provider is simplistic, it demonstrates the general outline and underlying mechanics for getting remote services to work seamlessly with existing OSGi applications.
15.3. Summary
In this chapter, we’ve shown you how to build web applications and web services that take advantage of the OSGi framework. We built on the advanced features of the OSGi framework and demonstrated the extensibility of the OSGi framework, including the following topics:
- Using the HTTP Service to provide static resources and simple servlet-based applications in an OSGi framework
- Using the Pax Web extensions to the HTTP Service to deploy JSP applications in an OSGi framework
- Converting a more complex WAR-style application based on the stock-watcher application for the Google Web Toolkit into a web application bundle
- Exporting a local OSGi service into a remote JVM using a Remote Services distribution provider, which, thanks to the flexibility of service-based programming, required no changes to the client application
- Examining at a high level the mechanics of implementing an OSGi Remote Services distribution provider
Let’s quickly review what we’ve covered during the course of this book. We started by introducing you to the core concepts of OSGi development provided by its module, service, and lifecycle layers. In the middle of the book, we moved on to practical considerations of developing OSGi, including migrating, testing, debugging, and managing OSGi-based applications. Finally, in this last part of the book, we covered a number of advanced topics including component development, launching and embedded use cases, how to manage security, and building web applications.
We’ve covered a lot of ground, and you deserve congratulations for making it all the way through. We think you’ll agree that OSGi is both flexible and powerful—and now you have the skills and knowledge required to build your own dynamic modular applications using OSGi. Thanks for reading.