
Chapter 6. Moving toward bundles
- Choosing a bundle identity for a JAR file
- Determining which packages a bundle should export and/or import
- Migrating an application to OSGi
- Dividing an application into a set of bundles
The first part of this book introduced the three layers of OSGi: module, lifecycle, and service. We’ll now take a more practical look at how you can migrate existing code to OSGi by using one or more of these layers, beginning with examples of turning real-world JAR files into bundles. After that, we’ll examine different ways of migrating a complete application to OSGi and finish up with a short discussion of situations where you might decide not to bundle.
By the end of this chapter, you’ll know how to take your current application and all of its third-party libraries and turn them into bundles, step by step. You’ll be able to move existing projects to OSGi, plan new projects with OSGi in mind, and understand when it may not be the right solution for you. In other words, you should be able to explain in detail to your manager and co-workers how OSGi will affect your project. But before we reach that stage, we first need to consider a simple question that often comes up on the OSGi mailing lists: how can you turn your JAR file into a bundle?
6.1. Turning JARs into bundles
As you saw in chapter 2, a bundle is a JAR file with additional metadata. So to turn a JAR file into a bundle, you need to add metadata giving it a unique identity and describing what it imports and exports. Simple, right? For most business-domain JAR files, it is; but for others (such as third-party GUI or database libraries), you’ll need to think carefully about their design. Where is the line between what’s public and what’s private, which imports are required and which are optional, and which versions are compatible with one another?
In this section, we’ll help you come up with this metadata by taking a series of common library JAR files and turning them into working bundles. We’ll also consider some advanced bundling techniques, such as embedding dependencies inside the bundle, as well as how to manage external resources and background threads.
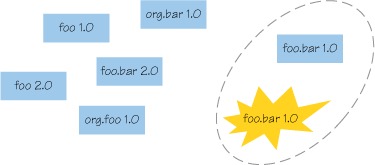
Before you can even load a bundle into an OSGi framework, it must have an identity. This identity should be unique, at least among the set of bundles loaded into the framework. But how should you choose such an identity? If you pick names at random, you may clash with other projects or other developers, as shown in figure 6.1.
Figure 6.1. A bundle must have a unique identity.
6.1.1. Choosing an identity
Each bundle installed into an OSGi framework must have a unique identity, made up of the Bundle-SymbolicName and Bundle-Version. We’ll look into approaches for defining both of these now.
Choosing a Symbolic Name
One of the first steps in turning a JAR file into a bundle is to decide what symbolic name to give it. The OSGi specification doesn’t mandate a naming policy but recommends a reverse-domain naming convention. This is the same as Java package naming: if the bundle is the primary source of a particular package, it makes sense to use it as the Bundle-SymbolicName.
Let’s look at a real-world example, the kXML parser (http://kxml.sourceforge.net/). This small JAR file provides two distinct top-level packages: the XmlPull API org.xmlpull.v1 and the kXML implementation org.kxml2. If this JAR was the only one expected to provide the org.xmlpull.v1 API, or if it only contained this package, it would be reasonable to use this as the symbolic name. But this JAR file also provides a particular implementation of the XmlPull API, so it makes more sense to use the name of the implementation as the symbolic name because it captures the essence of what the bundle provides:
Bundle-SymbolicName: org.kxml2
Alternatively, you can use the domain of the project that distributes the JAR file. Here, the domain is http://kxml.sourceforge.net/kxml2/:
Bundle-SymbolicName: net.sourceforge.kxml.kxml2
Or if Maven (http://maven.apache.org/) project metadata is available, you can use the Maven groupId + artifactId to identify the JAR file:
Bundle-SymbolicName: net.sf.kxml.kxml2
Sometimes, you may decide on a name that doesn’t correspond to a particular package or distribution. For example, consider two implementations of the same service API provided by two different bundles. OSGi lets you hide non-exported packages, so these bundles can have an identical package layout but at the same time provide different implementations. You can still base the symbolic name on the main top-level package or the distribution domain, but you must add a suffix to ensure that each implementation has a unique identity. This is the approach that the Simple Logging Facade for Java (SLF4J; www.slf4j.org/) project used when naming its various logging implementation bundles:

If you’re wrapping a third-party library, you may want to prefix your own domain in front of the symbolic name. This makes it clear that you’re responsible for the bundle metadata rather than the original third party. For example, the symbolic name for the SLF4J API bundle in the SpringSource Enterprise Bundle Repository (www.springsource.com/repository/app/) clearly shows that it was modified by SpringSource and isn’t an official SLF4J JAR:
Bundle-SymbolicName: com.springsource.slf4j.api
Don’t worry too much about naming bundles—in the end, you need to give each bundle a unique enough name for your target deployment. You’re free to rename your bundle later if you wish, because by default the framework wires import packages to export packages regardless of bundle symbolic names. It’s only when someone uses Require-Bundle (see section 5.3) that consistent names become important. That’s another reason why package dependencies are preferred over module dependencies: they don’t tie you to a particular symbolic name forever.
Choosing a Version
After you’ve decided on a symbolic name, the next step is to version your bundle. Determining the Bundle-Version is more straightforward than choosing the symbolic name, because pretty much every JAR file distribution is already identified by some sort of build version or release tag. On the other hand, version-numbering schemes that don’t match the recognized OSGi format of major.minor.micro.qualifier must be converted before you can use them. Table 6.1 shows some actual project versions and attempts to map them to OSGi.
Table 6.1. Mapping real-world project versions to OSGi
|
Suggested OSGi equivalent |
|
|---|---|
| 2.1-alpha-1 | 2.1.0.alpha-1 |
| 1.4-m3 | 1.4.0.m3 |
| 1.0_01-ea | 1.0.1.ea |
| 1.0-2 | 1.0.2 |
| 1.0.b2 | 1.0.0.b2 |
| 1.0a1 | 1.0.0.a1 |
| 2.1.7c | 2.1.7.c |
| 1.12-SNAPSHOT | 1.12.0.SNAPSHOT |
| 0.9.0-incubator-SNAPSHOT | 0.9.0.incubator-SNAPSHOT |
| 3.3.0-v20070604 | 3.3.0.v20070604 |
| 4aug2000r7-dev | 0.0.0.4aug2000r7-dev |
Not every version is easily converted to the OSGi format. Look at the last example in the table; it starts with a number, but this is part of the date rather than the major version. This is the problem with free-form version strings—there’s no standard way of comparing them or breaking them into component parts. OSGi versions, on the other hand, have standardized structure and well-defined ordering. (Later, you’ll use a tool called bnd that makes a good attempt at automated mapping based on common-sense rules, but even bnd has its limits.)
After you’ve uniquely identified your bundle by name and version, you can add more information: a human-friendly Bundle-Name, a more detailed Bundle-Description, license details, vendor details, a link to online documentation, and so on. Most if not all of these details can be taken from existing project information, such as the following example from the second release of Google Guice (http://code.google.com/p/google-guice/):
Bundle-SymbolicName: com.google.inject
Bundle-Version: 2.0
Bundle-Name: guice
Bundle-Copyright: Copyright (C) 2006 Google Inc.
Bundle-Vendor: Google Inc.
Bundle-License: http://www.apache.org/licenses/LICENSE-2.0
Bundle-DocURL: http://code.google.com/p/google-guice/
Bundle-Description: Guice is a lightweight dependency injection
 framework for Java 5 and above
Remember that new OSGi bundles should also have this header:
Bundle-ManifestVersion: 2
This tells the OSGi framework to process your bundle according to the latest specification. Although this isn’t mandatory, it’s strongly recommended because it enables additional checks and support for advanced modularity features offered by OSGi R4 specifications and beyond.
After you’ve captured enough bundle details to satisfactorily describe your JAR file, the next thing to decide is which packages it should export to other bundles in the framework.
6.1.2. Exporting packages
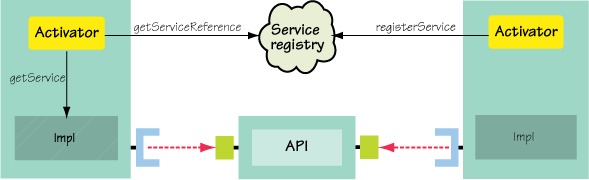
Most bundles export at least one package, but a bundle doesn’t have to export any. Bundles providing service implementations via the service registry don’t have to export any packages if they import their service API from another bundle. This is because their implementation is shared indirectly via the service registry and accessed using the shared API, as illustrated in figure 6.2. But what about the package containing the Bundle-Activator class? Doesn’t that need to be exported? No, you don’t need to export the package containing the bundle activator unless you want to share it with other bundles. Best practice is to keep it private. As long as the activator class has a public modifier, the framework can load it, even if it belongs to an internal, non-exported package. The question remains: when is it necessary for you to export packages, and which packages in your JAR file do you need to export?
Figure 6.2. Sharing implementations without exporting their packages
Selecting Exported Packages
The classic, non-OSGi approach is to export everything and make the entire contents of the JAR file visible. For API-only JAR files, this is fine; but for implementation JAR files, you don’t want to expose internal details. Clients might then use and rely on these internal classes by mistake. As you’ll see in a moment, exporting everything also increases the chance of conflicts among bundles containing the same package, particularly when they provide a different set of classes in those packages. When you’re new to OSGi, exporting everything can look like a reasonable choice to begin with, especially if you don’t know precisely where the public API begins or ends. On the contrary: you should try to trim down the list of exported packages as soon as you have a working bundle.
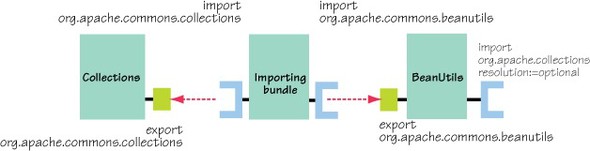
Let’s use a real-world example to demonstrate how to select your exports. Here are some of the packages containing classes and resources inside the core BeanUtils 1.8.0 library from Apache Commons (http://commons.apache.org/beanutils/):
org.apache.commons.beanutils
org.apache.commons.beanutils.converters
org.apache.commons.beanutils.locale
org.apache.commons.beanutils.locale.converters
org.apache.commons.collections
None of these packages seem private; there isn’t an impl or internal package in the list, but the org.apache.commons.collections package is in fact an implementation detail. If you look closely at the BeanUtils Javadoc (http://commons.apache.org/beanutils/v1.8.2/apidocs/index.html), you’ll see that this package contains a subset of the original Apache Commons Collections API (http://commons.apache.org/collections/). BeanUtils uses only a few of the Collections classes; and rather than have an execution-time dependency on the entire JAR file, the project embeds a copy of what it needs. What happens when your application requires both the BeanUtils and Collections JAR files?
This typically isn’t a problem in a non-OSGi environment because the application class loader exhaustively searches the entire class path to find a class. If both BeanUtils and Collections were on the same class path, they would be merged together, with classes in BeanUtils overriding those from Collections or vice versa depending on their ordering on the class path. Figure 6.3 (based on the class path diagram from chapter 2) shows an example.
Figure 6.3. The classic application class loader merges JAR files into a single class space.

One important caveat is that this only works if the BeanUtils and Collections versions are compatible. If you have incompatible versions on your class path, you’ll get runtime exceptions because the merged set of classes is inconsistent.
OSGi tries to avoid this incompatibility by isolating bundles and only exposing packages by matching imports with exports. Unfortunately for the current example, this means that if you export org.apache.commons.collections from the BeanUtils bundle, and the framework wires another bundle that imports org.apache.commons.collections to it, it only sees the handful of Collections classes from BeanUtils. It doesn’t see the complete set of classes sitting in the Commons Collections bundle. To make sure this doesn’t happen, you must exclude the partial org.apache.commons.collections package from the BeanUtils exports:
Export-Package: org.apache.commons.beanutils,
 org.apache.commons.beanutils.converters,
 org.apache.commons.beanutils.locale,
 org.apache.commons.beanutils.locale.converters
You can do this because the Collections package doesn’t belong to the main Bean-Utils API. Now, if it was purely an implementation detail that was never exposed to clients, your job would be complete. But there’s a hitch: a class from the Collections package is indirectly exposed to BeanUtils clients via a return type on some deprecated methods. What can you do? You need to find a way to guarantee that the Bean-Utils bundle uses the same Commons Collections provider as its clients. The simplest solution would be to make this dependency explicit by importing org.apache. commons.collections into the BeanUtils bundle, but then your bundle wouldn’t resolve unless the Commons Collections bundle was also installed. Perhaps you could you use an optional import instead:
Import-Package: org.apache.commons.collections;resolution:=optional
Now, if the full package is available, you’ll import it; but if it’s not available, you can still use your internal private copy. Will this work? It’s better, but it still isn’t entirely accurate.
Unfortunately, the only correct way to resolve this situation is to refactor the BeanUtils bundle to not contain the partial private copy of org.apache.commons.collections. See the sidebar “Revisiting uses constraints” if you want more details as to why an optional import won’t work.
We hypothesized about modifying the example BeanUtils bundle to optionally import org.apache.commons.collections. The idea was that your bundle would import it if an exporter was available, but would use its private copy if not. This doesn’t work, but why not? It’s all about uses constraints, as discussed in section 2.7.2.
As we mentioned, BeanUtils exposes a type from the Collections package in a return type of a method in its exported types; this is a uses constraint by definition. To deal with this situation, you must express it somehow. Let’s assume you follow the optional import case and try to model the uses constraint correctly, like this:
Export-Package:
 org.apache.commons.beanutils;
  uses:="org.apache.commons.collections",
 org.apache.commons.beanutils.converters,
 org.apache.commons.beanutils.locale;
  uses:="org.apache.commons.collections",
 org.apache.commons.beanutils.locale.converters
Import-Package: org.apache.commons.collections;resolution:=optional
This may work in some situations; for example, it would work if you deployed your BeanUtils bundle, another bundle importing BeanUtils and Collections, and a bundle exporting the Collections package. In this case, all the bundles would be wired up to each other, and everyone would be using the correct version of the Collections packages. Great!
But what would happen if the BeanUtils bundle was installed and resolved by itself first? In that case, it wouldn’t import the Collections package (because there isn’t one) and would use its private partial copy instead. Now, if the other bundles were installed and resolved, you’d end up with the wiring depicted here:
A uses constraint on an optionally imported package is ignored if the optionally imported package isn’t wired to an exporter.
This means the BeanUtils bundle is using its own private copy of the Collections types, whereas the importing bundle is using its imported collections types, so it will receive a ClassCastException if it uses any methods from BeanUtils that expose Collections types. In the end, there’s no way to have a private copy of a package if its types are exposed via exported packages. As we’ve concluded already, you must refactor your bundle to export preferably the whole package or to import the package.
A surprising number of third-party libraries include partial packages. Some want to reuse code from another large library but don’t want to bloat their own JAR file. Some prefer to ship a single self-contained JAR file that clients can add to their class path without worrying about conflicting dependencies. Some libraries even use tools such as Jar Jar Links (http://code.google.com/p/jarjar/) to repackage internal dependencies under different namespaces to avoid potential conflicts. This leads to multiple copies of the same class all over the place, because Java doesn’t provide modularity out of the box! Renamed packages also make debugging harder and confuse developers. OSGi removes the need for renaming and helps you safely share packages while still allowing you to hide and embed implementation details.
At this point, you may decide it’s a good time to refactor the API to make it more modular. Separating interfaces from their implementations can avoid the need for partial (or so-called split) packages. This helps you reduce the set of packages you need to export and make your bundle more manageable. Although this may not be an option for third-party libraries, it’s often worth taking time to contact the original developers to explain the situation. This happened a few years ago with the SLF4J project, which refactored its API to great effect (www.slf4j.org/pipermail/dev/2007-February/000750.html). You should also be careful to avoid accidentally leaking implementation types via method signatures. As you saw with the BeanUtils example, the more internal details are exposed through your API, the harder it is to modularize your code.
Versioning Exported Packages
After you have your list of exported packages, you should consider versioning them. Which version should you use? The common choice is to use the bundle version, which implies that the packages change at the same rate as the bundle, but some packages inevitably change faster than others. You may also want to increment the bundle version because of an implementation fix while the exported API remains at the same level. Although everything starts out aligned, you’ll probably find that you need a separate version for each package (or at least each group of tightly coupled packages).
We’ll take an in-depth look at managing versions in chapter 9, but a classic example is the OSGi framework itself, which provides service APIs that have changed at different rates over time:
Export-Package: org.osgi.framework;version="1.4",
 org.osgi.service.packageadmin;version="1.2",
 org.osgi.service.startlevel;version="1.1",
 org.osgi.service.url;version="1.0",
 org.osgi.util.tracker;version="1.3.3"
Knowing which packages to export is only half of the puzzle of turning a JAR into a bundle—you also need to find out what should be imported. This is often the hardest piece of metadata to define and causes the most problems when people migrate to OSGi.
6.1.3. Discovering what to import
Do you know what packages a given JAR file needs at execution time? Many developers have tacit or hidden knowledge of what JAR files to put on the class path. Such knowledge is often gained from years of experience getting applications to run, where you reflexively add JAR files to the class path until any ClassNotFoundExceptions disappear. This leads to situations where an abundance of JAR files is loaded at execution time, not because they’re all required, but because a developer feels they may be necessary based on past experience.
The following lines show an example class path for a Java EE client. Can you tell how these JAR files relate to one another, what packages they provide and use, and their individual versions?
concurrent.jar:getopt.jar:gnu-regexp.jar:jacorb.jar:
jbossall-client.jar:jboss-client.jar:jboss-common-client.jar:
jbosscx-client.jar:jbossha-client.jar:jboss-iiop-client.jar:
jboss-j2ee.jar:jboss-jaas.jar:jbossjmx-ant.jar:jboss-jsr77-client.jar:
jbossmq-client.jar:jboss-net-client.jar:jbosssx-client.jar:
jboss-system-client.jar:jboss-transaction-client.jar:jcert.jar:
jmx-connector-client-factory.jar:jmx-ejb-connector-client.jar:
jmx-invoker-adaptor-client.jar:jmx-rmi-connector-client.jar:jnet.jar:
jnp-client.jar:jsse.jar:log4j.jar:xdoclet-module-jboss-net.jar
With OSGi, you explicitly define which packages your bundle needs, and this knowledge is then available to any developer who wants it. They no longer have to guess how to compose their class path—the information is readily available in the metadata! It can also be used by tools such as the OSGi Bundle Repository (OBR; http://felix.apache.org/site/apache-felix-osgi-bundle-repository.html) to automatically select and validate collections of bundles for deployment.
This means any developer turning a JAR file into a bundle has a great responsibility in defining the correct set of imported packages. If this list is incomplete or too excessive, it affects all users of the bundle. Unfortunately, standard Java tools don’t provide an easy way to determine which packages a JAR file may use at execution time. Manually skimming the source for package names is time consuming and unreliable. Byte-code analysis is more reliable and repeatable, which is especially important for distributed teams, but it can miss classes that are dynamically loaded by name. For instance, this could load a class from any package:
String name = someDynamicNameConstruction(someSortOfContext);
Class<?> clazz = someClassLoader.loadClass(name);
The ideal solution is to use a byte-code analysis tool like bnd (http://aqute.biz/Code/Bnd) followed by a manual review of the generated metadata by project developers. You can then decide whether to keep generating the list of imported packages for every build or generate the list once and save it to a version-controlled file somewhere so it can be pulled into later builds. Most tools for generating OSGi manifests also let you supplement or override the generated list, in case the manual review finds missing or incorrect packages.
After you’re happy with the metadata, you should run integration tests on an OSGi framework to verify that the bundle has the necessary imported packages. You don’t want to get a ClassNotFoundException in production when an obscure but important piece of code runs for the first time and attempts to access a package that hasn’t been imported!
Using Tools to Generate Imports
Let’s continue with the BeanUtils example and use bnd to discover what imports you need. The bnd tool was developed by the OSGi director of technology, Peter Kriens, and provides a number of Ant tasks and command-line commands specifically designed for OSGi. Bnd uses a pull approach to divide a single class path into separate bundles based on a set of instructions. This means you have to tell bnd what packages you want to pull in and export, as well as those you want to pull in and keep private.
Bnd instructions use the same format as OSGi directives, which means you can mix normal manifest entries along with bnd instructions. In addition to accepting OSGi manifest headers as instructions, bnd adds some of its own, such as Include-Resource and Private-Package, to give you more control over exactly what goes into the bundle. These instructions aren’t used by the OSGi framework at execution time.
The following instructions select the exported and non-exported (or so-called private) packages that should be contained in your final BeanUtils bundle. You start by exporting all of the BeanUtils API, as discussed in section 6.1.2. Remember that you also want to remove the partial Collections package from the internals and import it instead. Finally, you let bnd decide what this bundle needs to import. Let’s put these instructions in a file named beanutils.bnd, which you can find under chapter06/ BeanUtils-example/ in this book’s examples:
Export-Package: org.apache.commons.beanutils.*
Private-Package: !org.apache.commons.collections.*, *
Import-Package: *
Notice that unlike the standard OSGi headers, bnd package instructions can contain wildcards and negative patterns. Bnd expands these patterns at build time according to what it finds in the project byte code on the class path, saving you the hassle of typing everything in minute detail.
After you’ve chosen your exported and internal packages, you invoke the bnd build task by passing it the original BeanUtils JAR file along with your custom bnd instructions:
$ cd chapter06/BeanUtils-example

$ java -jar ../../lib/bnd-0.0.384.jar
    build -classpath commons-beanutils-1.8.0.jar beanutils.bnd
Bnd processes the given class path using your instructions and generates a new JAR alongside the instructions file, called beanutils.jar. You can extract the OSGi-enhanced manifest from the newly created BeanUtils bundle like so:
$ java -jar ../../lib/bnd-0.0.384.jar
    print -manifest beanutils.jar
As you can see, it contains the following generated list of imported packages:
Import-Package:
  org.apache.commons.beanutils;version="1.8",
  org.apache.commons.beanutils.converters;version="1.8",
  org.apache.commons.beanutils.expression;version="1.8",
  org.apache.commons.beanutils.locale;version="1.8",
  org.apache.commons.beanutils.locale.converters;version="1.8",
  org.apache.commons.collections,
  org.apache.commons.collections.comparators,
  org.apache.commons.collections.keyvalue,
  org.apache.commons.collections.list,
  org.apache.commons.collections.set,
  org.apache.commons.logging
There are a couple of interesting points about this list. First, bnd has added imports for all the BeanUtils packages that you want to export. As we discussed in section 5.1.1, this is usually good practice when exporting an API that has multiple implementations, because it means that if (for whatever reason) an existing bundle already exports these packages, you’ll share the same class space for the API. Without these imports, your bundle would sit on its own little island, isolated from any bundles already wired to the previous package exporter. But if you don’t expect alternative implementations of Commons Collections, you can always turn off this feature with a special bnd directive:
Export-Package: org.apache.commons.beanutils.*;-noimport:=true
Bnd has also found byte code references to the Apache Collections and Logging packages, which aren’t contained in the BeanUtils bundle and must therefore be imported. Just think: you can now tell what packages a JAR file needs at execution time by checking the imported package list in the manifest. This is extremely useful for automated deployment of applications. Such a system knows that when deploying BeanUtils, it should also deploy Commons Collections and Commons Logging (or another bundle that provides the same logging package, like SLF4J). But which particular version of Logging should it deploy?
Importing the Correct Version
Just as with exported packages, you should consider versioning your imports. Chapter 2 explained how versioning helps ensure binary compatibility with other bundles. You should try to use ranges rather than leave versions open-ended, because doing so protects you against potentially breaking API changes in the future. For example, consider the following:
Import-Package: org.slf4j;version="1.5.3"
This matches any version of the SLF4J API from 1.5.3 onward, even unforeseen future releases that could be incompatible with your code.
One recommended practice is to use a range starting from the minimum acceptable version up to, but not including, the next major version. (This assumes a change in major version is used to indicated that the API isn’t binary compatible.) For example, if you tested against the 1.5.3 SLF4J API, you might use the following range:
Import-Package: org.slf4j;version="[1.5.3,2)"
This ensures that only versions from the tested level to just before the next major release are used.
Not all projects follow this particular versioning scheme—you may need to tweak the range to narrow or widen the set of compatible versions. The width of the import range also depends on how you’re using the package. Consider a simple change like adding a method to an interface, which typically occurs during a point release (such as 1.1 to 1.2). If you’re just calling the interface, this change doesn’t affect you. If, on the other hand, you’re implementing the interface, this will definitely break, because you now need to implement a new method.
Adding the correct version ranges to imported packages takes time and patience, but this is often a one-time investment that pays off many times over during the life of a project. Tools such as bnd can help by detecting existing version metadata from dependencies on the class path and by automatically applying version ranges according to a given policy.
Unfortunately, tools aren’t perfect. While you’re reviewing the generated list of imported packages, you may notice a few that aren’t used at execution time. Some code may only be executed in certain scenarios, such as an Ant build task that’s shipped with a library JAR file for convenience. Other JAR files may dynamically test for available packages and adapt their behavior at execution time to match what’s installed. In such cases, it’s useful to mark these imports as optional to tell the OSGi framework that the bundle can still work even when these packages aren’t available. Table 6.2 shows some real-world packages that are often consid-ered optional.
As you saw back in section 5.2, OSGi provides two ways to mark a package as optional. You can either mark packages with the resolution:=optional directive or list them as dynamically imported packages. For packages you never expect to be used at execution time, like the Ant packages, we suggest that you either use the optional attribute or remove them from the list of imported packages. Use resolution:= optional when you know the bundle will always be used the same way after it’s installed. If you want a more adaptive bundle that reacts to the latest set of available packages, you should list them as dynamic imports.
Table 6.2. Common optional imported packages found in third-party libraries
|
Package |
Used for |
|---|---|
| javax.swing.* | GUI classes (could be interactive tests) |
| org.apache.tools.ant.* | ANT taskdefs (build time) |
| antlr.* | Parsing (maybe build/test related) |
| sun.misc.* | Sun implementation classes (like BASE64) |
| com.sun.tools.* | Sun tool support (javac, debugging, and so on) |
If you’re new to OSGi and unsure exactly what packages your JAR file uses, consider using
DynamicImport-Package: *
This makes things similar to the classic model, where requests to load a new class always result in a query to the complete class path. It also allows your bundle to successfully resolve regardless of what packages are available. The downside is that you’re pushing the responsibility of finding the right set of bundles onto users, because you don’t provide any metadata defining what you need! This approach should only be considered as a stopgap measure to get you started.
You’ve now chosen the exports and imports for your new bundle. Every non-optional, nondynamic package you import (but don’t export) must be provided by another bundle. Does this mean that for every JAR file you convert into a bundle, you also need to convert each of its dependencies into bundles? Not necessarily, because unlike standard JAR files, OSGi supports embedding JAR files inside bundles.
6.1.4. Embedding vs. importing
Sometimes a JAR file has a close dependency on another JAR file. Maybe they only work together, or the dependency is an implementation detail you want to keep private, or you don’t want to share the static member fields in the JAR file with other bundles. In these situations, it makes more sense to embed the dependencies inside the primary JAR file when you turn it into a bundle. Embedding the JAR file is easier than converting both JAR files to bundles because you can ignore packages that would otherwise need to be exported and imported between them. The downside of embedding is that it adds unnecessary weight for non-OSGi users, who can’t use the embedded JAR file unless the bundle is first unpacked. Figure 6.4a shows how a CGLIB bundle might embed ASM, a small utility for processing byte code.
Figure 6.4. Embedding tightly coupled dependencies in a bundle

Alternatively, you can consider creating a new bundle artifact that embeds all the related JAR files together instead of turning the primary JAR file into a bundle. This aggregate bundle can then be provided separately to OSGi users without affecting users of the original JAR files. Figure 6.4b shows how you can use this approach for the CGLIB library. Although this means you have an extra deliverable to support, it also gives you an opportunity to override or add classes for better interoperability with OSGi. You’ll see an example in a moment and also later on in section 6.2.1. This often happens when libraries use external connections or background threads, which ideally should be managed by the OSGi lifecycle layer. Such libraries are said to have state.
6.1.5. Adding lifecycle support
You may not realize it when you use a third-party library, but a number of them have a form of state. This state can take the form of a background thread, a file system cache, or a pool of database connections. Libraries usually provide methods to manage this state, such as cleaning up resources and shutting down threads. Often, you don’t bother calling these methods because the life of the library is the same as the life of your application. In OSGi, this isn’t necessarily the case; your application could still be running after the library has been stopped, updated, and restarted many times. On the other hand, the library could still be available in the framework long after your application has come and gone. You need to tie the library state to its bundle lifecycle; and to do that, you need to add a bundle activator (see section).
The original HttpClient library from Apache Commons (http://hc.apache.org/httpclient-3.x/apidocs/index.html) manages a pool of threads for multithreaded connections. These threads are started lazily so there’s no need to explicitly initialize the pool, but the library provides a method to shut down and clean everything up:
MultiThreadedHttpConnectionManager.shutdownAll();
To wrap the HttpClient library JAR file up as a bundle, you can add an activator that shuts down the thread pool whenever the HttpClient bundle is stopped. This approach is as follows:
package org.apache.commons.httpclient.internal;

import org.apache.commons.httpclient.MultiThreadedHttpConnectionManager;
import org.osgi.framework.*;

public class Activator implements BundleActivator {
  public void start(BundleContext ctx) {}
  public void stop(BundleContext ctx) {
    MultiThreadedHttpConnectionManager.shutdownAll();
  }
}
You have to tell OSGi about this activator by adding metadata to the manifest:
Bundle-Activator: org.apache.commons.httpclient.internal.Activator
You can see this in action by building and running the following example:
$ cd chapter06/HttpClient-example

$ ant dist

$ java -jar launcher.jar bundles
You should see it start and attempt to connect to the internet (ignore log4j warnings):
GET http://www.google.com/
GOT 5500 bytes
->
If you use jstack to see what threads are running in the JVM, one of them should be
"MultiThreadedHttpConnectionManager cleanup" daemon
Stop the HttpClient bundle, which should clean up the thread pool, and check again:
-> stop 5
The MultiThreadedHttpConnectionManager thread should now be gone. Unfortunately, this isn’t a complete solution, because if you stop and restart the test bundle, the thread pool manager reappears—even though the HttpClient bundle is still stopped! Restricting use of the HttpClient library to the bundle active state would require all calls to go through some sort of delegating proxy or, ideally, the OSGi service registry. Thankfully, the 4.0 release of the HttpClient library makes it much easier to manage connection threads inside a container such as OSGi and removes the need for this single static shutdown method.
Bundle activators are mostly harmless because they don’t interfere with non-OSGi users of the JAR file. They’re only referenced via the bundle metadata and aren’t considered part of the public API. They sit there unnoticed and unused in classic Java applications until the bundle is loaded into an OSGi framework and started. Whenever you have a JAR file with implicit state or background resources, consider adding an activator to help OSGi users.
We’ve now covered most aspects of turning a JAR file into a bundle: identity, exports, imports, embedding, and lifecycle management. How many best practices can you remember? Wouldn’t it be great to have them summarized as a one-page cheat sheet?
Look no further than the following section.
6.1.6. JAR file to bundle cheat sheet
Figure 6.5 presents a cheat sheet that gives you a handy summary of converting JAR files into bundles.
Figure 6.5. JAR-to-bundle cheat sheet

OK, you know how to take a single JAR file and turn it into a bundle, but what about a complete application? You could take your existing JAR, EAR, and WAR files and turn them all into bundles; or you could choose to wrap everything up as a single application bundle. Surely you can do better than that. What techniques can you use to bundle up an application, and what are the pros and cons? For the answers to this and more, read on.
6.2. Splitting an application into bundles
Most applications are made up of one or more JAR files. One way to migrate an application to OSGi is to take these individual JAR files and convert each of them into a bundle using the techniques discussed in the previous section. Converting lots of JAR files is time consuming (especially for beginners), so a simpler approach is to take your complete application and wrap it up as a single bundle. In this section, we’ll show you how to start from such a single application bundle and suggest ways of dividing it further into multiple bundles. Along the way, we’ll look at how you can introduce other OSGi features, such as services, to make your application more flexible. Finally, we’ll suggest places where it doesn’t make sense to introduce a bundle.
Let’s start with the single application bundle or so-called mega bundle.
6.2.1. Making a mega bundle
A mega bundle comprises a complete application along with its dependencies. Anything the application needs on top of the standard JDK is embedded inside this bundle and made available to the application by extending the Bundle-ClassPath (2.5.3). This is similar to how Java Enterprise applications are constructed. In fact, you can take an existing web application archive (WAR file) and easily turn it into a bundle by adding an identity along with Bundle-ClassPath entries for the various classes and libraries contained within it, as shown in figure 6.6.
Figure 6.6. Turning a

The key benefit of a mega bundle is that it drastically reduces the number of packages you need to import, sometimes down to no packages at all. The only packages you may need to import are non-java.* packages from the JDK (such as javax.* packages) or any packages provided by the container itself. Even then, you can choose to access them via OSGi boot delegation by setting the org.osgi.framework.bootdelegation framework property to the list of packages you want to inherit from the container class path. Boot delegation can also avoid certain legacy problems (see section 8.2 for the gory details). The downside is that it reduces modularity, because you can’t override boot-delegated packages in OSGi. A mega bundle with boot delegation enabled is close to the classic Java application model; the only difference is that each application has its own class loader instead of sharing the single JDK application class loader.
Jedit Mega-Bundle Example
Let’s shelve the theoretical discussion for the moment and create a mega bundle based on jEdit (www.jedit.org/), a pluggable Java text editor. The sample code for this book comes with a copy of the jEdit 4.2 source, which you can unpack like so:
$ cd chapter06/jEdit-example

$ ant jEdit.unpack

$ cd jEdit
The jEdit build uses Apache Ant (http://ant.apache.org/), which is good news because it means you can use bnd’s Ant tasks to generate OSGi manifests. Maven users shouldn’t feel left out, though: you can use maven-bundle-plugin (http://felix.apache.org/site/apache-felix-maven-bundle-plugin-bnd.html), which also uses bnd under the covers.
How exactly do you add bnd to the build? The following listing shows the main target from the original (non-OSGi) jEdit build.xml.
Listing 6.1. Default jEdit build target
<target name="dist" depends="compile,compile14"
  description="Compile and package jEdit.">

  <jar jarfile="jedit.jar"
    manifest="org/gjt/sp/jedit/jedit.manifest"
     compress="false">

     <fileset dir="${build.directory}">
       <include name="bsh/**/*.class"/>
       <include name="com/**/*.class"/>
       <include name="gnu/**/*.class"/>
       <include name="org/**/*.class"/>
     </fileset>

     <fileset dir=".">
      <include name="bsh/commands/*.bsh"/>
       <include name="gnu/regexp/MessagesBundle.properties"/>
       <include name="org/gjt/sp/jedit/**/*.dtd"/>
       <include name="org/gjt/sp/jedit/icons/*.gif"/>
       <include name="org/gjt/sp/jedit/icons/*.jpg"/>
       <include name="org/gjt/sp/jedit/icons/*.png"/>
       <include name="org/gjt/sp/jedit/*.props"/>
       <include name="org/gjt/sp/jedit/actions.xml"/>
       <include name="org/gjt/sp/jedit/browser.actions.xml"/>
       <include name="org/gjt/sp/jedit/dockables.xml"/>
       <include name="org/gjt/sp/jedit/services.xml"/>
       <include name="org/gjt/sp/jedit/default.abbrevs"/>
     </fileset>
  </jar>
</target>
The jar task is configured to take a static manifest file: org/gjt/sp/jedit/jedit.manifest. If you don’t want to change the build process but still want an OSGi-enabled manifest, you can take the jEdit binary, run it through an analyzer like bnd, and add the generated OSGi headers to this static manifest. As we mentioned back in section 6.1.3, this approach is fine for existing releases or projects that don’t change much. On the other hand, integrating a tool such as bnd with your build means you get feedback about the modularity of your application immediately rather than when you try to deploy it.
Replacing the Jar Task With Bnd
Let’s make things more dynamic and generate OSGi metadata during the build. This is the recommended approach because you don’t have to remember to check and regenerate the metadata after significant changes to the project source. This is especially useful in the early stages of a project, when responsibilities are still being allocated.
There are several ways to integrate bnd with a build:
- Use bnd to generate metadata from classes before creating the JAR file.
- Create the JAR file as normal and then post-process it with bnd.
- Use bnd to generate the JAR file instead of using the Ant jar task.
If you need certain features of the jar task, such as indexing, you should use the first or second option. If you’re post-processing classes or need to filter resources, choose either the second or third option. Let’s go with the third option to demonstrate how easy it is to switch your build over to bnd. It will also help you later, in section 6.2.2, when you start partitioning the application into separate bundles.
First, comment out the jar task:
<!-- jar jarfile="jedit.jar"
  manifest="org/gjt/sp/jedit/jedit.manifest"
  compress="false">
...
</jar -->
The first line above shows where to put the JAR file, and the second lists fixed manifest entries.
Next, add the bnd definition and target task:
<taskdef resource="aQute/bnd/ant/taskdef.properties"
  classpath="../../../lib/bnd-0.0.384.jar" />

<bnd classpath="${build.directory}"
  files="jedit-mega.bnd" />
Here, you first give the location of the bnd JAR file to tell Ant where it can find the bnd task definition. Then you specify a bnd task to create your bundle JAR file, giving it the project class path and the file containing your bnd instructions.
There’s one key difference between the jar and bnd tasks that you must remember:
- The jar task takes a list of files and directories and copies them all into a single JAR file.
- The bnd task takes a class path and a list of instruction files (one file per bundle) that tell it which classes and/or resources to copy from the class path into each bundle.
If you don’t tell bnd to pull a certain package into the bundle, don’t be surprised if the package isn’t there. You’re building a single mega bundle, so you need only one instruction file: call it jedit-mega.bnd. The first thing you must add is an instruction to tell bnd where to put the generated bundle:
-output: jedit.jar
The bnd task can also copy additional manifest headers into the final manifest, so let’s ask bnd to include the original jEdit manifest rather than duplicate its content in your new file:
-include: org/gjt/sp/jedit/jedit.manifest
You could have left the manifest file where it was, added your instructions to it, and passed that into bnd, but this would make it harder for people to separate out the new build process from the original. It’s also better to have the bnd instructions at the project root where they’re more visible. You can now try to build the project from inside the jEdit directory:
$ ant dist
...
[bnd] Warnings
[bnd] None of Export-Package, Private-Package, -testpackages, or -
     exportcontents is set, therefore no packages will be included
[bnd] Did not find matching referal for *
[bnd] Errors
[bnd] The JAR is empty
Adding Bnd Instructions
What went wrong? You forgot to tell bnd what packages to pull into your new bundle! Using the JAR-to-bundle cheat sheet from section 6.1.6, add the following bundle headers to jedit-mega.bnd along with a bnd-specific instruction to pull in all classes and resources from the build class path and keep them private:
Bundle-Name: jEdit
Bundle-SymbolicName: org.gjt.sp.jedit
Bundle-Version: 4.2

Private-Package: *
Remember that bnd supports wildcard package names, so you can use * to represent the entire project. Although this is useful when creating mega bundles, you should be careful about using wildcards when separating a class path into multiple, separate bundles, or when already bundled dependencies appear on the class path. Always check the content of your bundles to make sure you aren’t pulling in additional packages by mistake!
Getting back to the task at hand, when you rebuild the jEdit project you now see this:
$ ant dist
...
[bnd] # org.gjt.sp.jedit (jedit.jar) 849
Success! Try to run your new JAR file:
$ java -jar jedit.jar
Whoops, something else went wrong:
Uncaught error fetching image:
java.lang.NullPointerException
 at sun.awt.image.URLImageSource.getConnection(Unknown Source)
 at sun.awt.image.URLImageSource.getDecoder(Unknown Source)
 at sun.awt.image.InputStreamImageSource.doFetch(Unknown Source)
 at sun.awt.image.ImageFetcher.fetchloop(Unknown Source)
 at sun.awt.image.ImageFetcher.run(Unknown Source)
Adding Resource Files
It seems your JAR file is missing some resources. Can you see why? Look closely at the jar task in listing 6.1; notice how classes come from ${build.directory}, but the resource files come from . (the project root). You could write a bnd-specific Include-Resource instruction to tell bnd to pull in these resources, but there’s an easier solution that lets you reuse instructions from the jEdit build file. Take the existing resource file set from the old jar task, and put it inside a copy task to copy matching resources to the build directory before the bnd task runs:
<copy todir="${build.directory}">
  <fileset dir=".">
    <include name="bsh/commands/*.bsh"/>
    <!-- and so on... -->
  </fileset>
</copy>
The resource files can now be found on the build class path. Rebuild, and run jEdit again:
$ ant dist
...
[bnd] # org.gjt.sp.jedit (jedit.jar) 1003

$ java -jar jedit.jar
Bingo! You should see the main jEdit window appear, as shown in figure 6.7.
Figure 6.7. Main jEdit window

Your bundle works as a classic JAR file, but will it work as a bundle? Let’s review the manifest.
Listing 6.2. jEdit mega bundle manifest
Manifest-Version: 1.0
Created-By: 1.6.0_13 (Sun Microsystems Inc.)
Bnd-LastModified: 1250524748304
Tool: Bnd-0.0.384
Main-Class: org.gjt.sp.jedit.jEdit
Bundle-ManifestVersion: 2
Bundle-Name: jEdit
Bundle-SymbolicName: org.gjt.sp.jedit
Bundle-Version: 4.2
Private-Package:
 bsh,
 bsh.collection,
 bsh.commands,
 bsh.reflect,
 com.microstar.xml,
 gnu.regexp,
 installer,
 org.gjt.sp.jedit,
 org.gjt.sp.jedit.browser,
 org.gjt.sp.jedit.buffer,
 org.gjt.sp.jedit.gui,
 org.gjt.sp.jedit.help,
 org.gjt.sp.jedit.icons,
 org.gjt.sp.jedit.io,
 org.gjt.sp.jedit.menu,
 org.gjt.sp.jedit.msg,
 org.gjt.sp.jedit.options,
 org.gjt.sp.jedit.pluginmgr,
 org.gjt.sp.jedit.print,
 org.gjt.sp.jedit.proto.jeditresource,
 org.gjt.sp.jedit.search,
 org.gjt.sp.jedit.syntax,
 org.gjt.sp.jedit.textarea,
 org.gjt.sp.util,
 org.objectweb.asm
Import-Package:
 javax.print.attribute,
 javax.print.attribute.standard,
 javax.swing,
 javax.swing.border,
 javax.swing.event,
 javax.swing.filechooser,
 javax.swing.plaf,
 javax.swing.plaf.basic,
 javax.swing.plaf.metal,
 javax.swing.table,
 javax.swing.text,
 javax.swing.text.html,
 javax.swing.tree
Your jEdit bundle doesn’t export any packages, but it does use packages from Swing. These should come from the system bundle, which is typically set up to export JDK pack-ages (although this can be overridden). You may wonder if you should add version ranges to the packages imported from the JDK. This isn’t required, because most system bundles don’t version their JDK packages. You only need to version these imports if you want to use another implementation that’s different from the stock JDK version.
We should also mention that the final manifest contains some bnd-specific headers that aren’t used by the OSGi framework (such as Private-Package, Tool, and Bnd-LastModified). They’re left as a useful record of how bnd built the bundle, but if you don’t want them, you can remove them by adding this bnd instruction to jedit-mega.bnd:
-removeheaders: Private-Package,Tool,Bnd-LastModified
The new manifest looks correct, but the real test is yet to come. You must now try to deploy and run your bundle on an actual OSGi framework. Will it work the first time or fail with an obscure exception?
Running Jedit With Osgi
You can deploy your jEdit bundle by using the same simple launcher used to launch the earlier paint examples. Remember, this launcher first installs any bundles found in the directory and then uses the first Main-Class header it finds to bootstrap the application. Your manifest already has a Main-Class, so you need to point the launcher at the jEdit directory, like so:
$ cd ..

$ cp ../../launcher/dist/launcher.jar .

$ java -jar launcher.jar jEdit
Unfortunately, something’s not quite right. The bundle installs and the application starts, but it hangs at the splash screen shown in figure 6.8, and the main jEdit window never appears.
Figure 6.8. jEdit when first run as OSGi bundle
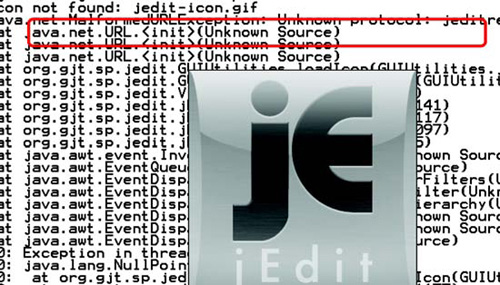
If you look closely at the top of the stack trace, you see the following warning message:
java.net.MalformedURLException: Unknown protocol: jeditresource
Why did this work when the bundle was run as a classic application, but not when the bundle was installed in an OSGi framework? The answer lies in the URL Handlers Service we discussed briefly back in section 4.6.1. To implement this service, the OSGi framework installs its own URLStreamHandlerFactory, which delegates requests to handlers installed via the service registry. Unlike the default URLStreamHandlerFactory, this implementation doesn’t automatically scan the class path for URL handlers. Instead, all URL handlers must be registered as OSGi services, which also means the handlers are tied to their bundle lifecycle.
Fixing the Url Handler Issue
Your first thought may be to try to disable the URL Handlers Service so it doesn’t install this factory. Unfortunately, there’s no standard switch for this; but to disable it in Felix, you set the felix.service.urlhandlers framework property to false. Turning off the global URL Handlers Service also has serious implications. It means no bundle can contribute dynamic protocol handlers, which would break applications that rely on the URL Handlers Service. It also won’t fix this particular problem because the jeditresource handler isn’t visible to the default URLStreamHandler-Factory when you run jEdit as a bundle. The JDK’s URL Handler factory uses Class.forName() to search the application class path for valid handlers, but your jeditresource handler is hidden from view inside the jEdit bundle class loader.
The solution is to register the jeditresource handler as a URLStreamHandler-Service when the jEdit bundle is started and remove it when the bundle is stopped. But how can you add OSGi-specific code without affecting classic jEdit users? Cast your mind back to section 6.1.5, where we talked about using lifecycles to manage external resources. This is exactly the sort of situation that requires a bundle activator, such as the one shown next.
Listing 6.3. Bundle activator to manage the jeditresource handler
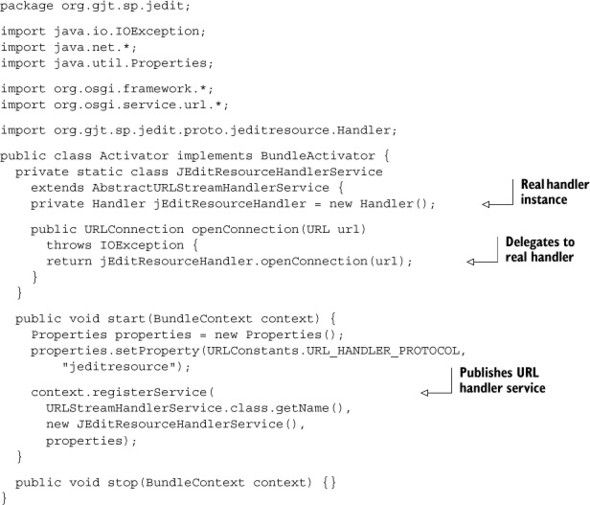
After you’ve added this activator class to the build, you must remember to declare it in the OSGi metadata—otherwise, it will never be called. This is a common cause of head-scratching for people new to OSGi, because the framework can’t tell when you accidentally forget a Bundle-Activator header. When you’ve added an activator, but it’s having no effect, always check your manifest to make sure it’s been declared—it saves a lot of hair!
Bundle-Activator: org.gjt.sp.jedit.Activator
Your activator code uses OSGi constants and interfaces, so you must add the core OSGi API to the compilation class path in the jEdit build.xml. Otherwise, your new code won’t compile:
<javac ... >
        <classpath path="../../../lib/osgi.core.jar"/>
        <!-- the rest of the classpath -->
This API is only required when compiling the source; it isn’t necessary at execution time unless the activator class is explicitly loaded. One more build, and you now have a JAR file that can run as a classic Java application or an OSGi bundle! The following snippet shows the final set of bnd instructions for the jEdit mega bundle:
-output: jedit.jar

-include: org/gjt/sp/jedit/jedit.manifest

Bundle-Name: jEdit
Bundle-SymbolicName: org.gjt.sp.jedit
Bundle-Version: 4.2

Private-Package: *

Bundle-Activator: org.gjt.sp.jedit.Activator
One last wrinkle: you have to tell jEdit where its installation directory is by using the jedit.home property. Normally, jEdit can detect the installation directory containing its JAR file by peeking at the application class path, but this won’t work when running it as a bundle on OSGi because the JAR file is loaded via a different mechanism:
$ ant dist

$ cd ..

$ java -Djedit.home=jEdit -jar launcher.jar jEdit
With this last piece of configuration in place, you should see jEdit start and the main window appear, as you saw earlier in figure 6.8. It should also still work as a classic Java application.
Revisiting Mega Bundles
You’ve successfully created a mega bundle for jEdit with a small amount of effort. What are the downsides of a mega bundle? Well, your application is still one single unit. You can’t replace or upgrade sections of it without shutting down the complete application, and doing so may shut down the entire JVM process if the application calls System.exit(). Because nothing is being shared, you can end up with duplicate content between applications.
Effectively, you’re in the same situation as before moving to OSGi, but with a few additional improvements in isolation and management. This doesn’t mean the mega bundle approach is useless—as a first step, it can be reassuring to be able to run your application on an OSGi framework with the minimum of fuss. It also provides a solid foundation for further separating (or slicing) your application into bundles, which is the focus of the next section.
6.2.2. Slicing code into bundles
You now have a single mega bundle containing your entire application. The next step toward a full-fledged flexible OSGi application is to start breaking it into bundles that can be upgraded independently of one another. How and where should you draw the lines between bundles?
Bundles import and export packages in order to share them, so it makes sense to draw lines that minimize the number of imports and exports. If you have a high-level design document showing the major components and their boundaries, you can take each major component and turn it into a bundle. If you don’t have such a document, you should look for major areas of responsibility such as business logic, data access, and graphical components. Each major area can be represented by a bundle, as depicted in figure 6.9.
Figure 6.9. Slicing code into bundles

Another way to approach this is to review the benefits of modularity (described in section 2.2) and think about where they make the most sense in your application. For example, do any areas need to be upgraded or fixed independently? Does the application have any optional parts? Are common utilities shared throughout the application?
Cutting Along the Dotted Lines
Returning to the jEdit example, what areas suggest themselves as potential bundles? The obvious choice to begin with is to separate the jEdit code from third-party libraries and then try to extract the main top-level package. But how do you go about dividing the project class path into different bundles?
Recall what we said about bnd back in section 6.1.3, that it uses a pull approach to assemble bundles from a project class path based on a list of instruction files. All you need to do is provide your bnd task with different instruction files for each bundle. The following example divides the class path into three bundles:
<bnd classpath="${build.directory}"
  files="jedit-thirdparty.bnd,jedit-main.bnd,jedit-engine.bnd" />
The first bundle contains all third-party classes—basically, any package from the build directory that doesn’t start with org.gjt.sp. Bnd makes this easy by allowing negated packages. For example:
Private-Package: !org.gjt.sp.*, *
This copies all other packages into the bundle and keeps them private.
Using the earlier jedit-mega.bnd file as a template, you can flesh out the rest to get the following jedit-thirdparty.bnd file:
-output: jedit-thirdparty.jar

Bundle-Name: jEdit Third-party Libraries
Bundle-SymbolicName: org.gjt.sp.jedit.libs
Bundle-Version: 4.2

Private-Package: !org.gjt.sp.*, !installer.*, *
You also exclude the installer package because it isn’t required at execution time and doesn’t belong in the third-party library bundle.
The second bundle contains the top-level package containing the main jEdit class. You should also add the org.gjt.sp.jedit.proto package containing the URL handler code because it’s only used by the bundle activator in the top-level package. Here’s an initial attempt at jedit-main.bnd:
-output: jedit.jar

-include: org/gjt/sp/jedit/jedit.manifest

Bundle-Name: jEdit
Bundle-SymbolicName: org.gjt.sp.jedit
Bundle-Version: 4.2

Private-Package: org.gjt.sp.jedit, org.gjt.sp.jedit.proto.*

Bundle-Activator: org.gjt.sp.jedit.Activator
Notice that the only difference between this file and the mega bundle instructions shown earlier is the selection of private packages; everything else is exactly the same. The main bundle also replaces the mega bundle as the executable JAR file.
The third and final bundle contains the rest of the jEdit packages, which we’ll call the engine for now. It should contain all packages beneath the org.gjt.sp namespace, except the top-level jEdit package and packages under org.gjt.sp.jedit.proto. The resulting jedit-engine.bnd file is as follows:

Notice how the same packages listed in the main instructions are negated in the engine instructions. Refactoring packages between bundles is as simple as moving entries from one instruction file to another.
Stitching the Pieces Together
You now have three bundles that together form the original class path, but none of them share any packages. If you tried to launch the OSGi application at this point, it would fail because of unsatisfied imports between the three bundles. Should you go ahead and export everything by switching all Private-Package instructions to Export-Package? You could, but what would you learn by doing that? Let’s try to export only what you absolutely need to share, keeping as much as possible private.
There are three ways you can find out which packages a bundle must export:
- Gain an understanding of the code base and how the packages relate to one other. This can involve the use of structural analysis tools such as Structure101 (www.headwaysoftware.com/products/structure101/index.php).
- Read the Import-Package headers from generated manifests to compile a list of packages that “someone” needs to export. Ignore JDK packages like javax.swing. You can use the bnd print command to avoid having to unpack the manifest.
- Repeatedly deploy the bundles into a live framework, and use any resulting error messages and/or diagnostic commands (such as the diag command on Equinox) to fine-tune the exported packages until all bundles resolve.
The first option requires patience, but the reward is a thorough understanding of the package structure. It also helps you determine other potential areas that can be turned into bundles. The third option can be quick if the framework gives you the complete list of missing packages on the first attempt, but sometimes it feels like an endless loop of “deploy, test, update.” The second option is a good compromise between the other two. The bnd tool has already analyzed the code base to come up with the list of imports, and you already know that the framework will follow the import constraints listed in the manifest. The structured manifest also means you can write a script to do the hard work for you.
For example, consider this rather obscure command on Linux:
$ java -jar ../../lib/bnd-0.0.384.jar print jEdit/*.jar
    | awk '/^Import-Package$/ {getline;ok=1} /^[^ ]/ {ok=0}
           {if (ok) print $1}' | sort -u
It uses bnd to print a summary of each jEdit bundle, extracts the package names from the Import-Package part of the summary, and sorts them into a unique list. (You could also use the bnd print -uses command to get a tabular view of what packages use other packages.) After you remove the JDK and OSGi framework packages, you get the following:
bsh
com.microstar.xml
gnu.regexp

org.gjt.sp.jedit

org.gjt.sp.jedit.browser
org.gjt.sp.jedit.buffer
org.gjt.sp.jedit.gui
org.gjt.sp.jedit.help
org.gjt.sp.jedit.io
org.gjt.sp.jedit.menu
org.gjt.sp.jedit.msg
org.gjt.sp.jedit.options
org.gjt.sp.jedit.pluginmgr
org.gjt.sp.jedit.search
org.gjt.sp.jedit.syntax
org.gjt.sp.jedit.textarea
org.gjt.sp.util
The first group includes third-party packages, next is the main jEdit package, and the long group contains other jEdit packages.
It’s clear that the third-party library bundle needs to export only three packages and the main jEdit bundle just the top-level package. Unfortunately, the jEdit engine bundle needs to export almost all of its packages, indicating a tight coupling between the engine and the top-level jEdit package. This suggests that it would be better to merge these two bundles back together, unless you were going to refactor the code to reduce this coupling. Let’s ignore this for now and press on, because this separation will eventually lead to an interesting class-loading issue that’s worth knowing about. Anyone who’s curious can skip ahead to section 6.2.4.
What’s next on the JAR-to-bundle checklist? Ah, yes: versioning. You should version all the exported jEdit packages with the current bundle version (4.2); but you won’t version the individual third-party packages at the moment, because it’s not obvious what releases are being used. You can always add the appropriate versions in the future, when you divide the combined third-party bundle into separate library bundles.
You should also add version ranges to your imports, as suggested back in section 6.1.3. Rather than endure the hassle of explicitly writing out all the ranges, you can take advantage of another bnd feature and compute them:
-versionpolicy: [${version;==;${@}},${version;+;${@}})
This instruction (http://aqute.biz/Code/Bnd#versionpolicy) tells bnd to take the detected version ${@} and turn it into a range containing the current major.minor version ${version;==;...} up to but not including the next major version ${version; +;...}. (See appendix A for more information about the various bnd instructions.) So if the bnd tool knows that a package has a version of 4.1.8, it applies a version range of [4.1,5) to any import of that package. You add this to each of your bnd files (you can also put it in a shared common file) along with the changes to export the necessary packages.
Following are the final bnd instructions for the jEdit third-party library bundle:
-output: jedit-thirdparty.jar

Bundle-Name: jEdit Third-party Libraries
Bundle-SymbolicName: org.gjt.sp.jedit.libs
Bundle-Version: 4.2

Export-Package: bsh, com.microstar.xml, gnu.regexp
Private-Package: !org.gjt.sp.*, !installer.*, *

-versionpolicy: [${version;==;${@}},${version;+;${@}})
And here are the final bnd instructions for the jEdit engine bundle:
-output: jedit-engine.jar

Bundle-Name: jEdit Engine
Bundle-SymbolicName: org.gjt.sp.jedit.engine
Bundle-Version: 4.2

Export-Package:
 !org.gjt.sp.jedit,
 !org.gjt.sp.jedit.proto.*,
 org.gjt.sp.*;version="4.2"

-versionpolicy: [${version;==;${@}},${version;+;${@}})
You still have one more (non-OSGi) tweak to make to the main jEdit bundle instructions. Remember that you now create three JAR files in place of the original single JAR file. Although you can rely on the OSGi framework to piece these together into a single application at execution time, this isn’t true of the standard Java launcher. You need some way to tell it to include the two additional JAR files on the class path whenever someone executes:
$ java -jar jedit.jar
Thankfully, there is a way: you need to add the standard Class-Path header to the main JAR file manifest. The Class-Path header takes a space-separated list of JAR files, whose locations are relative to the main JAR file. These final main-bundle instructions allow jEdit to work both as a bundle and an executable JAR:
-output: jedit.jar

-include: org/gjt/sp/jedit/jedit.manifest
Class-Path: jedit-thirdparty.jar jedit-engine.jar
Bundle-Name: jEdit
Bundle-SymbolicName: org.gjt.sp.jedit
Bundle-Version: 4.2

Export-Package:
 org.gjt.sp.jedit;version="4.2"

Private-Package:
 org.gjt.sp.jedit.proto.*

-versionpolicy: [${version;==;${@}},${version;+;${@}})

Bundle-Activator: org.gjt.sp.jedit.Activator
Update your three bnd files as shown, and rebuild. Or if you want a shortcut, use this:
$ cd ..

$ ant jEdit.patch dist
Congratulations—you’ve successfully separated jEdit into three JAR files that work with or without OSGi! The following lines launch jEdit OSGi and jEdit classic, respectively:
$ java -Djedit.home=jEdit -jar launcher.jar jEdit

$ java -jar jEdit/jedit.jar
As we hope this example demonstrates, after you have an application working in OSGi, it doesn’t take much effort to start slicing it up into smaller, more modularized bundles. But is this all you can do with jEdit on OSGi—keep slicing it into smaller and smaller pieces?
6.2.3. Loosening things up
So far, we’ve focused on using the first two layers of OSGi: module and lifecycle. There’s another layer you haven’t yet used in this chapter: service. The service layer is different from the first two layers in that it can be hard to tell when or where you should use it, especially when migrating an existing application to OSGi. Often, people decide not to use services at all in new bundles, instead relying on sharing packages to find implementations. But as you saw in chapter 4, services make your application more flexible and help reduce the coupling between bundles. The good news is, you can decide to use services at any time; but how will you know when the time is right?
There are many ways to share different implementations inside a Java application. You can construct instances directly, call a factory method, or perhaps apply some form of dependency injection. When you first move an application to OSGi, you’ll probably decide to use the same tried-and-tested approach you did before, except that now some of the packages come from other bundles. As you saw in chapter 4, these approaches have certain limitations compared to OSGi services. Services in OSGi are extremely dynamic, support rich metadata, and promote loose coupling between the consumer and provider.
If you expect to continue to use your application outside of OSGi—for example, as a classic Java application—you may be worried about using the service layer in case it ties you to the OSGi runtime. No problem! You can get the benefits of services without being tied to OSGi by using component-based dependency injection. Chapters 11 and 12 introduce a number of component models that transparently support services without forcing you to depend on the OSGi API. If you already use dependency injection, moving to these component models is straightforward; sometimes it’s only a matter of reconfiguring the dependency bindings in your original application. If you’re itching to try out these component models, feel free to skip ahead to chapter 11. But make sure you come back and read the intervening chapters; they’ll be an invaluable guide when it comes to managing, testing, and debugging your new OSGi application.
Let’s get back to discussing services. Where might you use services in jEdit? Well, jEdit has its own home-grown plugin framework for developers to contribute all sorts of gadgets, tools, and widgets to the GUI. In addition, jEdit uses its own custom class loader org.gjt.sp.jedit.JARClassLoader to allow hot deployment and removal of jEdit plugins. Plugins hook back into jEdit by accessing implementation classes and calling static methods, such as jEdit.getSettingsDirectory(). These static method calls are convenient, but they make it hard to mock out (or replace) dependencies for testing purposes.
Instead of relying on static methods, you can change jEdit to use dependency injection. Plugins then have their dependencies injected, rather than call jEdit directly. After you replace the static methods calls with dependency injection, it’s just another step to replace the static bindings with dynamic OSGi services (see chapters 11 and 12). This also simplifies unit testing, because you can swap out the real bindings and put in stubbed or scripted test implementations. Unfortunately, refactoring jEdit to use dependency injection throughout is outside the scope of this book, but you can use chapters 11 and 12 as a general guide. With this in mind, is there a smaller task that can help bridge the gap between OSGi bundles and jEdit plugins and make it easier to use services?
You can consider replacing the jEdit plugin framework with OSGi, much as Eclipse replaced its original plugin framework. To do this, you have to take the JARClassLoader and PluginJAR classes and extract a common API that you can then reimplement using OSGi, as shown in figure 6.10. You use the original jEdit plugin code when running in classic Java mode and the smaller OSGi mapping layer when running on an OSGi framework.
Figure 6.10. Extracting a common jEdit plugin API
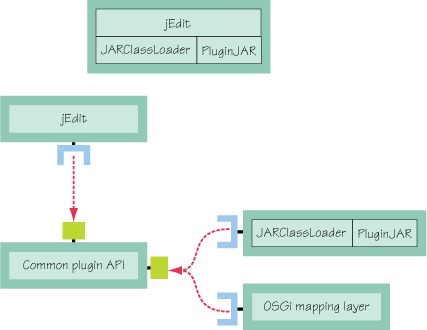
Extracting the common plugin API is left as an interesting exercise for you; one wrinkle is the fact that jEdit assumes plugins are located in the file system, whereas OSGi supports bundles installed from opaque input streams. The new plugin API can have methods to iterate over and query JAR file entries to avoid having to know where the plugin is located. These methods will map nicely to the resource-entry methods on the OSGi Bundle interface.
How about being able to register OSGi bundles as jEdit plugins? This is a stepping stone to using services, because you need a bundle context to access OSGi services. The main jEdit class provides two static methods to add and remove plugin JAR files:
public static void addPluginJAR(String path);

public static void removePluginJAR(PluginJAR jar, boolean exit);
Following the extender pattern introduced in section 3.4, let’s use a bundle tracker to look for potential jEdit plugins. The code in the following listing uses a tracker to add and remove jEdit plugin bundles as they come and go.
Listing 6.4. Using the extender pattern to install jEdit plugins

The code identifies jEdit plugins by looking for a file called actions.xml in the bundle root ![]() . Because the jEdit API only accepts path-based plugins, it ignores bundles whose locations don’t map to a file
. Because the jEdit API only accepts path-based plugins, it ignores bundles whose locations don’t map to a file ![]() . To remove a plugin bundle, it uses another jEdit method to map the location back to the installed PluginJAR instance
. To remove a plugin bundle, it uses another jEdit method to map the location back to the installed PluginJAR instance ![]() . The last piece of the puzzle is to start the bundle tracker only when jEdit is ready to accept new plugins. If you look
at the jEdit startup code, you may notice that one of the last things it does in finishStartup() is send out the initial EditorStarted message on the EditBus (jEdit’s event-notification mechanism). The code registers a one-shot component that listens for any
message event, deregisters itself, and starts the bundle tracker
. The last piece of the puzzle is to start the bundle tracker only when jEdit is ready to accept new plugins. If you look
at the jEdit startup code, you may notice that one of the last things it does in finishStartup() is send out the initial EditorStarted message on the EditBus (jEdit’s event-notification mechanism). The code registers a one-shot component that listens for any
message event, deregisters itself, and starts the bundle tracker ![]() .
.
Let’s see this extender in action:
$ cd chapter06/jEdit-example

$ ant jEdit.patch dist

$ java -Djedit.home=jEdit -jar launcher.jar jEdit

-> install file:test/Calculator.jar
Look in the Plugins menu; no plugins should be available. Now start the calculator bundle that you just installed:
-> start 9
You should see the calculator in the Plugins menu. Selecting this item opens the window shown in figure 6.11. If you stop the calculator bundle, this window immediately disappears, and the Plugins menu once again shows no available plugins:
Figure 6.11. jEdit calculator plugin
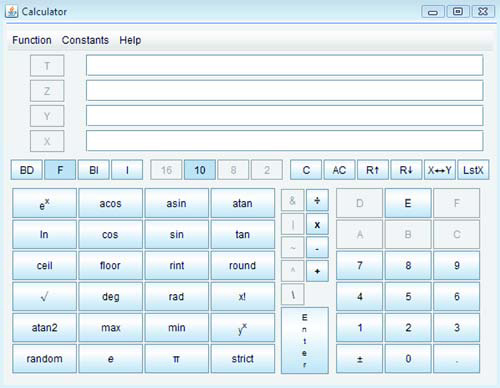
-> stop 9
Cool—the extender successfully bridges the gap between OSGi bundles and jEdit plugins! You can now use existing OSGi management agents, such as the Apache Felix Web Console (http://felix.apache.org/site/apache-felix-web-console.html), to manage jEdit plugins. This small example shows how standards like OSGi can make it much easier to reuse and assemble existing pieces into new applications.
Are you eager to start moving your application to OSGi? Wait, not so fast! We have one last topic to discuss before we close out this chapter, and it’s something you should keep asking yourself when you’re modularizing applications: is this bundle adding any value?
6.2.4. To bundle or not to bundle?
Sometimes, you should take a step back and think, do I need another bundle? The more bundles you create, the more work is required during build, test, and management in general. Creating a bundle for every individual package is obviously overkill, whereas putting your entire application inside a single bundle means you’re missing out on modularity. Some number of bundles in between is best, but where’s the sweet spot?
One way to tell is to measure the benefit introduced by each bundle. If you find you’re always upgrading a set of bundles at the same time and you never install them individually, keeping them as separate bundles isn’t bringing much benefit.
You can also look at how your current choice affects developers. If a bundle layout helps developers work in parallel or enforces separation between components, it’s worth keeping. But if a bundle is getting in the way of development, perhaps for legacy class-loader reasons, you should consider removing it, either by merging it with an existing bundle or by making it available via boot delegation (we briefly discussed this option at the start of section 6.2.1). Consider the jEdit example: have you reached the right balance of bundles?
A Bundle Too Far
Let’s refresh your memory. Recall the Import-Package discussion back in the section “Stitching the pieces together.” We mentioned an interesting issue caused by placing the top-level package in its own bundle, separate from the rest of the jEdit engine. You can see the problem for yourself by starting the OSGi version of jEdit and selecting File > Print. A message box pops up (see figure 6.12), describing a failure in a Bean-Shell script.
Figure 6.12. Error attempting to print from jEdit
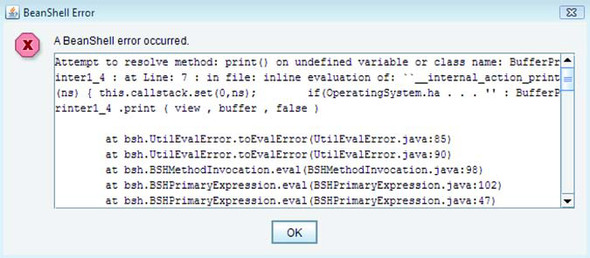
Why did the script fail? The error message suggests a class-loading problem. If you scroll down through the stack trace, you’ll notice the last jEdit class before the call to bsh.BshMethod.invoke() is org.gjt.sp.jedit.BeanShell. This is a utility class that manages BeanShell script execution for jEdit. It’s part of the top-level jEdit package loaded by the main bundle class loader, and it configures the BeanShell engine to use a special instance of JARClassLoader (previously discussed in section 6.2.3) that delegates to each plugin class loader in turn. This is so BeanShell scripts can access any class in the entire jEdit application. If none of the plugin class loaders can see the class, this special class loader delegates to its parent class loader. For a classic Java application, this is the application class loader, which can see all the jEdit classes on the class path. For your OSGi application, the parent is the class loader for the main bundle, which can only see the org.gjt.sp.jedit and proto packages it contains as well as any packages it explicitly imports. One thing you know it can’t see is the BufferPrinter1_4 class.
Who owns the BufferPrinter1_4 class? It’s part of the org.gjt.sp.jedit.print package, belonging to the jEdit engine bundle. You could check the manifest to make sure this package is being exported as expected; but if you’re using the instructions from the section “Stitching the pieces together,” then it is. It’s being exported from the engine bundle, but is it being imported by the main bundle? Without an import, this package isn’t visible. Let’s avoid cracking open the JAR file and instead use bnd to see the list of imports.
Listing 6.5. Using bnd to print imported and exported packages

Aha! The main bundle manifest contains no mention of the org.gjt.sp. jedit.print package, which explains why the BufferPrinter1_4 class wasn’t found and the script failed. A last question before you try to fix this issue: why didn’t bnd pick up the reference to the org.gjt.sp.jedit.print package? Remember that bnd works primarily on byte code, not source code; it won’t pick up packages referenced in scripts, arbitrary strings, or runtime configuration files. The only reference to this package was in a BeanShell script, which wasn’t analyzed by the bnd tool.
You now have all the answers as to why the script failed, but how should you solve the problem? Bnd supports adding custom analyzers to process additional content, so you could write your own BeanShell analyzer for bnd. But what if writing such an analyzer is outside your expertise? Can you instead fix the class-loading problem at execution time? There are two approaches to solving this type of class-loading issue:
- Attempt to use a different class loader to load the class.
- Add the necessary imports to the bundle doing the loading.
The first approach is only possible when the library provides some way of passing in the class loader or when it uses the Thread Context Class Loader (TCCL) to load classes. (You can read more about the TCCL in chapter 8.) The BeanShell library does provide a method to set the class loader, but jEdit is already using it to pass in the special class loader that provides access to all currently installed jEdit plugins. Rather than mess around with jEdit’s internal JARClassLoader code and potentially break the jEdit plugin framework, you’ll take the second approach and add the missing imports to the main bundle. This has the least impact on existing jEdit code—all you’re doing is updating the OSGi part of the manifest.
You know that you need to import the org.gjt.sp.jedit.print package, but what else might you need? To make absolutely sure, you’d have to run through a range of tests exercising the whole of the jEdit GUI. Although this testing could be automated to save time, let’s instead try the suggestion from the end of section 6.1.3 and allow the main jEdit bundle to import any package on demand:
DynamicImport-Package: *
Add this to the jedit-main.bnd instruction file, and rebuild one more time. You can now open the print dialog box without getting the error message. The application will also continue to work even if you use a more restrictive dynamic import, such as
DynamicImport-Package: org.gjt.sp.*
Why does this work? Well, rather than say up front what you import, you leave it open to whatever load requests come through the main bundle class loader. As long as another bundle exports the package, and it matches the given wildcard, you’ll be able to see it. But is this the right solution? Merging the main and engine bundles back together would solve the BeanShell problem without the need for dynamic imports. You already know these bundles are tightly coupled; keeping them apart is causing you further trouble. This is a good example of when introducing more bundles doesn’t make sense. OSGi isn’t a golden hammer, and it won’t magically make code more modular.
In short, if you’re getting class-loading errors or are sharing lots of packages between bundles, that could be a sign that you should start merging them back together. You may decide to fall back to classic Java class loading by putting troublesome JAR files back on the application class path and exposing a selection of their packages via the system bundle with the org.osgi.framework.system.packages.extra property. You can go even further by adding their packages to the org.osgi.framework.bootdelegation property, which makes them automatically available to all bundles without needing to explicitly import them.
This sounds useful, but there’s a catch: if you use boot delegation, you won’t be able to use multiple versions or dynamically deploy them. But if it avoids tangled class-loading problems and helps keep your developers sane, you may decide this is a fair trade. You can often achieve more by concentrating on modularizing your own code. Leave complex third-party library JAR files on the application class path until you know how to turn them into bundles or until an OSGi-compatible release is available. Not everything has to be a bundle. As we often say in this book, you can decide how much OSGi you want to use: it’s definitely not an all-or-nothing approach!
6.3. Summary
In this chapter, we did the following:
- Showed how to turn an existing JAR into a bundle (abracadabra!)
- Turned Apache BeanUtils and HttpClient into example bundles
- Discussed slicing complete applications into one or more bundles
- Converted jEdit into an OSGi application that still works outside of OSGi
- Explained why you should watch for the sweet spot where you get the most value per bundle
- Looked at why too few bundles make your application less modular and less flexible
- Looked at why too many bundles can lead to exponential test and management costs
But what is involved in testing bundles? After you’ve split your application into many independent parts, how do you keep everything consistent, and how do you upgrade your application without bringing everything down? The next chapter will discuss this and more, as we look at testing OSGi applications.