
Chapter 3. Learning lifecycle
- Understanding software lifecycle management
- Introducing the lifecycle of a bundle
- Exploring the lifecycle layer API
- Extending an application to make it lifecycle aware
- Explaining the relationship between the module and lifecycle layers
In the last chapter, we looked at the OSGi module layer and introduced you to bundles: a bundle is OSGi terminology for a module, which is a JAR file with the extra modularity metadata. You use bundles to define both the logical (code encapsulation and dependencies) and physical (deployable units) modularity of an application.
The OSGi module layer goes to great lengths to ensure that class loading happens in a consistent and predictable way. But to avoid putting the cart before the horse, in chapter 2 we glossed over the details of how you install bundles into an OSGi framework. No longer: in this chapter, we’ll look at the next layer of the OSGi stack—the lifecycle layer.
As we mentioned in chapter 2, to use a bundle you install it into a running instance of the OSGi framework. So creating a bundle is the first half of leveraging OSGi’s modularity features; the second half is using the OSGi framework as a runtime to manage and execute bundles. The lifecycle layer is unique in allowing you to create externally (and remotely) managed applications or completely self-managed applications (or any combination of the two). It also introduces dynamism that isn’t normally part of an application.
This chapter will familiarize you with the features of the lifecycle layer and explain how to effectively use them. In the next section, we’ll take a closer look at what lifecycle management is and why you should care about it, followed by the definition of the OSGi bundle lifecycle. In subsequent sections, you’ll learn about the API for managing the lifecycle of bundles. Throughout this chapter, we’ll bring all the points home via examples of a simple OSGi shell and a lifecycle-aware version of the paint program.
3.1. Introducing lifecycle management
The OSGi lifecycle layer provides a management API and a well-defined lifecycle for bundles at execution time in the OSGi framework. The lifecycle layer serves two different purposes:
- External to your application, the lifecycle layer precisely defines the bundle lifecycle operations. These lifecycle operations allow you to manage and evolve your application by dynamically changing the composition of bundles inside a running framework.
- Internal to your application, the lifecycle layer defines how your bundles gain access to their execution context, which provides them with a way to interact with the OSGi framework and the facilities it provides at execution time.
But let’s take a step back. It’s fine to state what the OSGi lifecycle layer does, but this won’t necessarily convince you of its worth. Instead, let’s look at a quick example of how it can improve your applications with a real-world scenario.
3.1.1. What is lifecycle management?
Imagine you have a business application that can report management events via JMX. Do you always want to enable or even install the JMX layer? Imagine running in a lightweight configuration and only enabling the JMX notifications on demand. The lifecycle layer allows you to install, start, update, stop, and uninstall different bundles externally, to customize your application’s configuration at execution time.
Further, imagine that a critical failure event in your application must trigger the JMX layer to send out a notification regardless of whether the administrator previously enabled or installed the layer. The lifecycle layer also provides programmatic access to bundles so they can internally modify their application’s configuration at execution time.
Generally speaking, programs (or parts of a program) are subject to some sort of lifecycle, which may or may not be explicit. The lifecycle of software typically has four distinct phases, as shown in figure 3.1.
Figure 3.1. The four phases of the software lifecycle. An application is installed so you can execute it. Later, you can update it to a newer version or, ultimately, remove it if you no longer need it.

If you’re creating an application, think about the typical lifecycle of the application as a whole. First you need to install it. Assuming all its dependencies are satisfied, you can execute it, which allows it to begin acquiring resources.
When the application is no longer needed, you stop it, which allows it to release any resources and perhaps persist any important state. Over time, you may want to update the application to a newer version. Ultimately, you may remove the application because you no longer need it. For nonmodular applications, the lifecycle operates on the application as a whole; but as you’ll see, for modular applications, fine-grained lifecycle management is possible for individual pieces of the application.
The following are two of the more popular models for creating applications in Java and how they manage software lifecycle:
- Standard Java —For the purposes of this discussion, we’ll equate an application in standard Java to a JAR file containing the Main-Class header in its manifest, which allows it to be easily executed. In standard Java development, the lifecycle of an application is simple. Such a JAR-based Java application is installed when downloaded. It’s executed when the user launches a JVM process, typically by double-clicking it. The application is stopped when the program terminates. Updating is usually done by replacing the JAR with a newer version. Removal is achieved by deleting the JAR from the file system.
- Servlet —In servlet development, the lifecycle of the web application is managed by the servlet container. The application is installed via a container-specific process; sometimes this involves dropping a WAR file containing the application in a certain directory in the file system or uploading a WAR file via a web-management interface. The servlet container calls various lifecycle API methods such as Servlet.init() and Servlet.destroy() on the WAR file’s subcomponents during the execution phase of the application’s lifecycle. To update the application, a completely new WAR file is generated. The existing WAR must be stopped and the new WAR file started in its place. The application is removed by a container-specific process, again sometimes removing the WAR from the file system or interacting with a management interface.
As you know, many different lifecycle-management approaches are used in Java today. In traditional Java applications, the lifecycle is largely managed by the platform-specific mechanism of the underlying operating system via installers and double-clicking desktop icons. For modular development approaches, such as servlets, Java EE, and Net-Beans, each has its own specific mechanism of handling the lifecycle of its components. This leads us to the question of why you need lifecycle management at all.
3.1.2. Why lifecycle management?
Cast your mind back to the earlier discussion about why you should modularize your application code into separate bundles. We talked about the benefits of separating different concerns into bundles and avoiding tight coupling among them. The OSGi module layer provides the necessary means to do this at the class level, but it doesn’t address when a particular set of classes or objects is needed in an application.
An explicit lifecycle API lets the providing application take care of how to configure, initialize, and maintain a piece of code that’s installed so it can decide how it should operate at execution time. For example, if a database driver is in use, should it start any threads or initialize any cache tables to improve performance? If it does any of these things, when are these resources released? Do they exist for the lifetime of the application as a whole? And if not, how are they removed? Because the OSGi specification provides an explicit lifecycle API, you can take any bundle providing the functionality you need and let it worry about how to manage its internal functions. In essence, it’s a matter of compose versus control.
Because you can architect your application such that parts of it may come and go at any point in time, the application’s flexibility is greatly increased. You can easily manage installation, update, and removal of an application and its required modules. You can configure or tailor applications to suit specific needs, breaking the monolithic approach of standard development approaches. Instead of “you get what you get,” wouldn’t it be great if you could offer “you get what you need”?
Another great benefit of the standard lifecycle API is that it allows for a diverse set of management applications that can manage your application. There’s no magic going on; lifecycle management can be done completely using the provided API.
We hope this discussion has piqued your interest. Now, let’s focus specifically on defining the OSGi bundle lifecycle and the management API associated with it.
3.2. OSGi bundle lifecycle
The OSGi lifecycle layer is how you use the bundles; it’s where the rubber meets the road. The module metadata from chapter 2 is all well and good, but creating bundles in and of itself is useful only if you use them. You need to interact with the OSGi lifecycle layer in order to use the bundles. Unlike the module layer, which relies on metadata, the lifecycle layer relies on APIs. Because introducing APIs can be a boring endeavor (Javadoc, anyone?), we’ll move in a top-down fashion and use an example to show what the lifecycle layer API allows you to do.
It’s important to note that the OSGi core framework doesn’t mandate any particular mechanism of interacting with the lifecycle API (such as the command line, a GUI, or an XML configuration file); the core is purely a Java API. This turns out to be extremely powerful, because it makes it possible to design as many different ways of managing the OSGi framework as you can think of; in the end, you’re limited only by your imagination as a developer.
Because there’s no standard way for users to interact with the lifecycle API, you could use a framework-specific mechanism. But using this approach here would be a disservice to you, because it’s a great opportunity for learning. Instead of reusing someone else’s work in this chapter, we’ll lead you through some basic steps for developing your own command line interface for interacting with the OSGi framework. This gives you the perfect tool, alongside the paint program, to explore the rich capabilities provided by the OSGi lifecycle API.
If you have some familiarity with using OSGi frameworks, you’re likely aware that most OSGi framework implementations (such as Apache Felix, Eclipse Equinox, and Knopflerfish) have their own shells for interacting with a running framework. The OSGi specification doesn’t define a standard shell (although there has been some work toward this goal recently; see http://felix.apache.org/site/apache-felix-gogo.html), but shells need not be tied to a specific framework and can be implemented as bundles, just as you’ll do here.
3.2.1. Introducing lifecycle to the paint program
Enough with the talk—let’s see the lifecycle API in action by kicking off the shell application and using it to install the paint program. To do this, type the following into your operating system console (Windows users, substitute for /):
$ cd chapter03/shell-example/
$ ant
$ java -jar launcher.jar bundles
Bundle: org.foo.shell started with bundle id 1 - listening on port 7070
The shell is created as a bundle that, on starting, begins listening for user input on a telnet socket. This allows clients to connect and perform install, start, stop, update, and uninstall actions on bundles. It also provides some basic diagnostic facilities. Here’s a session that connects to the newly launched framework and uses the shell to install the paint example:
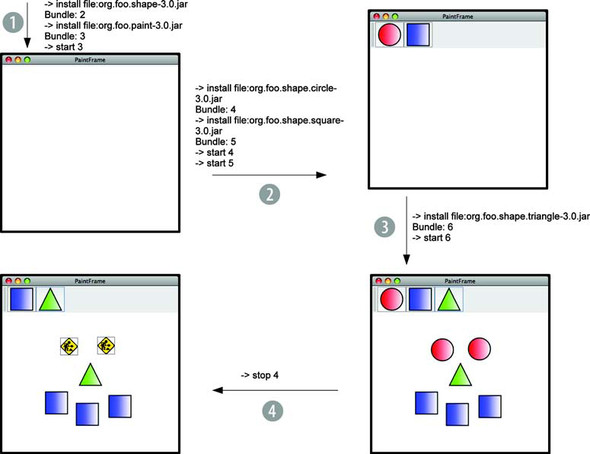
$ telnet localhost 7070
->  install file:../paint-example/bundles/paint-3.0.jar
Bundle: 2
->  install file:../paint-example/bundles/shape-3.0.jar
Bundle: 3
-> start 2
->  install file:../paint-example/bundles/circle-3.0.jar
Bundle: 4
->  install file:../paint-example/bundles/square-3.0.jar
Bundle: 5
->  start 4
->  start 5
-> install file:../paint-example/bundles/triangle-3.0.jar
Bundle: 6
->  start 6
-> stop 4
In figure 3.2, you can see that in step 1, you first install the shape API bundle, and then you install and start the paint program bundle. This causes an empty paint frame to appear with no available shapes, which makes sense because you haven’t installed any other bundles yet. In step 2, you install and start the circle and square bundles. As if by magic, the two shapes dynamically appear in the paint frame’s toolbar and are available for drawing. In step 3, you install and start the triangle bundle; then, you draw some shapes on the paint canvas. What happens if you stop a bundle? In step 4, you stop the circle bundle, which you see is replaced on the canvas with the placeholder icon (a construction worker) from DefaultShape.
Figure 3.2. Execution-time evolution: dynamically adding shapes to and removing shapes from the paint program as if by magic
This shows you in practice that you can use the lifecycle API to build a highly dynamic application, but what’s going on in this example? To understand, we’ll take a top-down approach, using the shell and paint example for context:
- In section 3.2.2, we’ll explain the framework’s role in the application’s lifecycle.
- In section 3.2.3, we’ll look at the changes you need to make to the bundle manifest to hook the bundles into the OSGi framework.
- In section 3.2.4, we’ll investigate the key API interfaces used by the OSGi lifecycle: BundleActivator, BundleContext, and Bundle.
- In section 3.2.5, we’ll wrap up with a review of the OSGi lifecycle state diagram.
Let’s get started.
3.2.2. The OSGi framework’s role in the lifecycle
In standard Java programming, you use JAR files by placing them on the class path. This isn’t the approach for using bundles. A bundle can only be used when it’s installed into a running instance of the OSGi framework. Conceptually, you can think of installing a bundle into the framework as being similar to putting a JAR file on the class path in standard Java programming.
This simplified view hides some important differences from the standard class path, as you can see in figure 3.3. One big difference is the fact that the OSGi framework supports full lifecycle management of bundle JAR files, including install, resolve, start, stop, update, and uninstall. At this point, we’ve only touched on installing bundles and resolving their dependencies. The remainder of this chapter will fully explain the lifecycle activities and how they’re related to each other. For example, we’ve already mentioned that the framework doesn’t allow an installed bundle to be used until its dependencies (Import-Package declarations) are satisfied.
Figure 3.3. Class path versus OSGi framework with full lifecycle management

Another huge difference from the standard class path is inherent dynamism. The OSGi framework supports the full bundle lifecycle at execution time. This is similar to modifying what’s on the class path dynamically.
As part of lifecycle management, the framework maintains a persistent cache of installed bundles. This means the next time you start the framework, any previously installed bundles are automatically reloaded from the bundle cache, and the original JAR files are no longer necessary. Perhaps we can characterize the framework as a fully manageable, dynamic, and persistent class path. Sounds cool, huh? Let’s move on to how you have to modify the metadata to allow bundles to hook into the lifecycle layer API.
3.2.3. The bundle activator manifest entry
How do you tell the framework to kick-start the bundles at execution time? The answer, as with the rest of the modularity information, is via the bundle metadata. Here’s the JAR file manifest describing the shell bundle you’ll create:
Manifest-Version: 1.0
Bundle-ManifestVersion: 2
Bundle-SymbolicName: org.foo.shell
Bundle-Version: 1.0
Bundle-Activator: org.foo.shell.Activator
Import-Package: org.osgi.framework;version="[1.3,2.0)",
 org.osgi.service.packageadmin;version="[1.2,2.0)",
 org.osgi.service.startlevel;version="[1.1,2.0)"
Bundle-Name: remote_shell
Bundle-DocURL: http://code.google.com/p/osgi-in-action/
You should already be familiar with most of these headers from chapter 2. But to recap, most of the entries are related to the class-level modularity of the bundle. This metadata does the following:
- Defines the bundle’s identity
- Specifies the packages on which this bundle depends
- Declares additional human-readable information
The only new header is Bundle-Activator. This is the first sighting of the OSGi lifecycle API in action! The Bundle-Activator header specifies the name of a reachable class (that is, either imported or on the bundle class path) implementing the org.osgi.framework.BundleActivator interface. This interface provides the bundle with a hook into the lifecycle layer and the ability to customize what happens when it’s started or stopped.
Keep in mind that not all bundles need an activator. An activator is necessary only if you’re creating a bundle and wish to specifically interact with OSGi API or need to perform custom initialization/de-initialization actions. If you’re creating a simple library bundle, it isn’t necessary to give it an activator because it’s possible to share classes without one.
This doesn’t mean your bundles won’t be able to do anything. Bundles don’t necessarily need to be started in order to do useful things. Remember the paint program you created in chapter 2: none of the bundles had activators, nor did any of them need to be started, but you still created a fully functioning application.
To understand what’s going on in the shell example, we’ll now introduce you to three interfaces (BundleActivator, BundleContext, and Bundle) that are the heart and soul of the lifecycle layer API.
3.2.4. Introducing the lifecycle API
The last section described how the shell bundle declares a BundleActivator to hook into the framework at execution time. We can now look into the details of this interface and the other lifecycle APIs made available from it to the bundle. This is the bundle’s hook into the world of OSGi.
Bundle Activator
As you’ve seen, adding an activator to the bundle is straightforward, because you only need to create a class implementing the BundleActivator interface, which looks like this:
public interface BundleActivator {
  public void start(BundleContext context) throws Exception;
  public void stop(BundleContext context) throws Exception;
}
For the shell example, the activator allows it to become lifecycle aware and gain access to framework facilities. The following listing shows the activator for the shell bundle.
Listing 3.1. Simple shell bundle activator
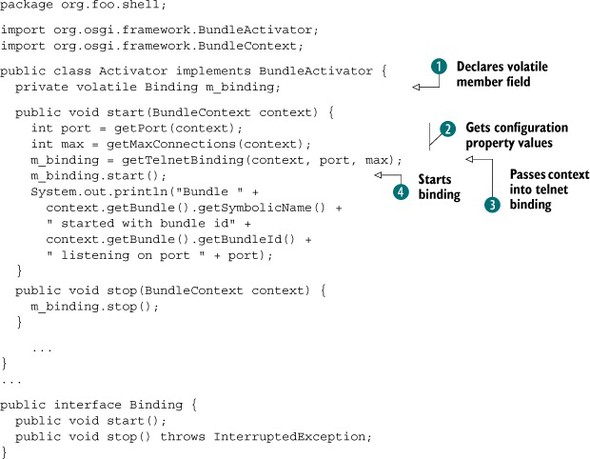
This class implements the OSGi BundleActivator interface. When the bundle is installed and started, the framework constructs an instance of this activator class and invokes the start() method. When the bundle is stopped, the framework invokes the stop() method. The start() method is the starting point for your bundle, sort of like the static main() method in standard Java. After it returns, your bundle is expected to function until the stop() method is invoked at some later point. The stop() method should undo anything done by the start() method.
We need to mention a few technical but potentially important details about the handling of the BundleActivator instance:
- The activator instance on which start() is called is the same instance on which stop() is called.
- After stop() is called, the activator instance is discarded and isn’t used again.
- If the bundle is subsequently restarted after being stopped, a new activator instance is created, and the start() and stop() methods are invoked on it as appropriate.
As you can see, the rest of the activator isn’t complicated. In the start() method, you get the port on which the bundle listens for connection requests and the number of allowed concurrent connections.
You also create a TelnetBinding, which does the work of listening on a socket for user input and processes it; the details of creating the telnet binding
are omitted here for reasons of simplicity and brevity. The next step is to start the binding, which creates a new Thread to run the shell. How this happens is left to the binding, which you start next ![]() .
.
The point about the binding starting its own thread is important because the activator methods shouldn’t do much work. This is best practice as with most callback patterns, which are supposed to return quickly, allowing the framework to carry on managing other bundles. But it’s also important to point out that the OSGi specification doesn’t mandate you start a new thread if your application’s startup doesn’t warrant it—the ball is in your court.
For the activator stop() method, all you do is tell the binding to stop listening to user input and cease to execute. You should make sure it does stop by waiting until its thread is finished; the binding method waits for its thread to stop. Sometimes, you may have special cases for certain situations because, as you’ll see later, the shell thread itself may call the stop() method, which will cause the bundle to freeze. We’ll cover these and other advanced use cases later. In general, if you use threads in your bundles, do so in such a way that all threads are stopped when the stop() method returns.
OSGi is designed around the normal Java thread abstraction. Unlike other, more heavyweight frameworks, it assumes that you
do your own thread management. You gain a lot of freedom by doing this, but at the same time you have to make sure your programs
are correctly synchronized and thread safe. In this simple example, nothing special is needed; but in general, it’s likely
that stop() will be called on a different thread than start() (for this reason, you make the member at ![]() volatile).
volatile).
The OSGi libraries are thread safe, and callbacks are normally done in a way to give you some guarantees. For example, in the case of the bundle activator, start() and stop() are guaranteed to be called in order and not concurrently. So, technically, in this particular case the volatile might not be necessary, but in general your code must take thread visibility into account.
Now you’ve seen how you can handle starting and stopping a bundle, but what if you want to interact with the OSGi framework? We’ll now switch the focus to the BundleContext object passed into the start() and stop() methods of the activator; this allows a bundle to interact with the framework and manage other bundles.
Bundle Context
As you learned in the previous section, the framework calls the start() method of a bundle’s activator when it’s started and the stop() method when it’s stopped. Both methods receive an instance of the BundleContext interface. The methods of the BundleContext interface can be roughly divided into two categories:
- The first category is related to deployment and lifecycle management.
- The second category is related to bundle interaction via services.
We’re interested in the first category of methods, because they give you the ability to install and manage the lifecycle of other bundles, access information about the framework, and retrieve basic configuration properties. This listing captures these methods from BundleContext.
Listing 3.2. BundleContext methods related to lifecycle management
public interface BundleContext {
  ...
  String getProperty(String key);
  Bundle getBundle();
  Bundle installBundle(String location, InputStream input)
    throws BundleException;
  Bundle installBundle(String location) throws BundleException;
  Bundle getBundle(long id);
  Bundle[] getBundles();
  void addBundleListener(BundleListener listener);
  void removeBundleListener(BundleListener listener);
  void addFrameworkListener(FrameworkListener listener);
  void removeFrameworkListener(FrameworkListener listener);
  ...
}
We’ll cover most of these methods in this chapter. The second category of Bundle-Context methods related to services will be covered in the next chapter.
One important aspect of the bundle context object is its role as the unique execution context of its associated bundle. Because it represents the execution context, it’s only valid while the associated bundle is active, which is explicitly from the moment the activator start() method is invoked until the activator stop() method completes and the entire time in between. Most bundle context methods throw an exception if used when the associated bundle isn’t active. It’s a unique execution context because each activated bundle receives its own context object. The framework uses this context for security and resource allocation purposes for each individual bundle. Given this capability of BundleContext objects, they should be treated as sensitive or private objects and not passed freely among bundles.
The shell activator in listing 3.1 uses the bundle context to get its configuration property values ![]() . It also passes the context into the telnet binding
. It also passes the context into the telnet binding ![]() , which client connections will use to interact with the running framework. Finally, it uses the context to obtain the bundle’s
Bundle object to access the identification information. We’ll look at these details shortly, but for now we’ll continue the top-down
description by looking at the final lifecycle layer interface: org.osgi.framework.Bundle.
, which client connections will use to interact with the running framework. Finally, it uses the context to obtain the bundle’s
Bundle object to access the identification information. We’ll look at these details shortly, but for now we’ll continue the top-down
description by looking at the final lifecycle layer interface: org.osgi.framework.Bundle.
Bundle
For each installed bundle, the framework creates a Bundle object to logically represent it. The Bundle interface defines the API to manage an installed bundle’s lifecycle; a portion of the interface is presented in the following listing. As we discuss the Bundle interface, you’ll see that most lifecycle operations have a corresponding method in it.
Listing 3.3. Bundle interface methods related to lifecycle management
public interface Bundle {
  ...
  BundleContext getBundleContext();
  long getBundleId();
  Dictionary getHeaders();
  Dictionary getHeaders(String locale);
  String getLocation();
  int getState();
  String getSymbolicName();
  Version getVersion();
  void start(int options) throws BundleException;
  void start() throws BundleException;
  void stop(int options) throws BundleException;
  void stop() throws BundleException;
  void update(InputStream input) throws BundleException;
  void update() throws BundleException;
  void uninstall() throws BundleException;
  ...
}
Each installed bundle is uniquely identified in the framework by its Bundle object. From the Bundle object, you can also access two additional forms of bundle identification: the bundle identifier and the bundle location. You might be thinking, “Didn’t we talk about bundle identification metadata back in chapter 2?” Yes, we did, but don’t get confused. The identification metadata in chapter 2 was for static identification of the bundle JAR file. The bundle identifier and bundle location are for execution-time identification, meaning they’re associated with the Bundle object. You may wonder why you need two different execution-time identifiers.
The main difference between the two is who defines the identifier; see figure 3.4. The bundle identifier is a Java language long value assigned by the framework in ascending order as bundles are installed. The bundle location is a String value assigned by the installer of the bundle.
Figure 3.4. Difference between the bundle identifiers

Both the bundle identifier and location values uniquely identify the Bundle object and persist across framework executions when the installed bundles are reloaded from the framework’s cache.
The bundle location has a unique characteristic because most OSGi framework implementations interpret it as a URL pointing to the bundle JAR file. The framework then uses this URL to download the contents of the bundle JAR file during bundle installation. The specification doesn’t define the location string as an URL, nor is it required, because you can install bundles from an input stream as well.
You may still be thinking, “I’m not convinced that all these identification mechanisms are necessary. Couldn’t you find the Bundle object using the bundle’s symbolic name and version from chapter 2?” Yes, you could, because the framework allows only one bundle with a given symbolic name and version to be installed at a time. This means the bundle symbolic name and version pair also act as an execution-time identifier.
History plays a role here. As mentioned in chapter 2, the notion of using a bundle’s symbolic name and version to uniquely identify it didn’t exist in versions of the specification prior to R4. Therefore, prior to R4, it made sense to have internally and externally assigned identifiers. Now it makes less sense, because the bundle’s symbolic name and version pair are externally defined and explicitly recognized internally by the framework.
There’s still a role for the bundle identifier because in some cases the framework treats a lower identifier value as being better than a higher one when deciding between two otherwise equal alternatives, such as when two bundles export the same version of a given package. The real loser here is the bundle location, which doesn’t serve a useful purpose other than potentially giving the initial URL of the bundle JAR file.
Although one instance of Bundle exists for each bundle installed into the framework, at execution time there’s also a special instance of Bundle to represent the framework itself. This special bundle is called the system bundle; and although the API is the same, it merits its own discussion.
The System Bundle
At execution time, the framework is represented as a bundle with an identifier of 0, called the system bundle. You don’t install the system bundle—it always exists while the framework is running.
The system bundle follows the same lifecycle as normal bundles, so you can manipulate it with the same operations as normal bundles. But lifecycle operations performed on the system bundle have special meanings when compared to normal bundles. One example of the special meaning is evident when you stop the system bundle. Intuitively, stopping the system bundle shuts down the framework in a well-behaved manner. It stops all other bundles first and then shuts itself down completely.
With that, we conclude our high-level look at the major API players in the lifecycle layer (BundleActivator, BundleContext, and Bundle). You now know the following:
- BundleActivator is the entry point for the bundles, much like static main() in a standard Java application.
- BundleContext provides applications with the methods to manipulate the OSGi framework at execution time.
- Bundle represents an installed bundle in the framework, allowing state manipulations to be performed on it.
With this knowledge in hand, we’ll complete the top-down approach by defining the overall bundle lifecycle state diagram and see how these interfaces relate to it.
3.2.5. Lifecycle state diagram
Until now, we’ve been holding off on explicitly describing the complete bundle lifecycle in favor of getting a high-level view of the API forming the lifecycle layer. This allowed you to quickly get your hands a little dirty. Now you can better understand how these APIs relate to the complete bundle lifecycle state diagram, shown in figure 3.5.
Figure 3.5. OSGi bundle lifecycle
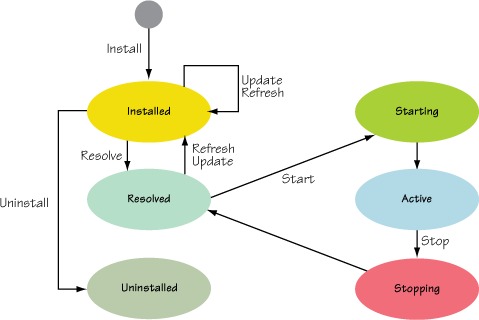
The entry point of the bundle lifecycle is the BundleContext.installBundle() operation, which creates a bundle in the INSTALLED state. From figure 3.5, you can see that there’s no direct path from INSTALLED to STARTING. This is because the framework ensures all dependencies of a bundle are satisfied before it can be used (that is, no classes can be loaded from it). The transition from the INSTALLED to the RESOLVED state represents this guarantee. The framework won’t allow a bundle to transition to RESOLVED unless all its dependencies are satisfied. If it can’t transition to RESOLVED, by definition it can’t transition to STARTING. Often, the transition to RESOLVED happens implicitly when the bundle is started or another bundle tries to load a class from it, but you’ll see later in this chapter that it’s also possible to explicitly resolve a bundle.
The transition from the STARTING to the ACTIVE state is always implicit. A bundle is in the STARTING state while its activator’s start() method executes. Upon successful completion of the start() method, the bundle’s state transitions to ACTIVE; but if the activator throws an exception, it transitions back to RESOLVED.
An ACTIVE bundle can be stopped, which also results in a transition back to the RESOLVED state via the STOPPING state. The STOPPING state is an implicit state like STARTING, and the bundle is in this state while its activator’s stop() method executes. A stopped bundle transitions back to RESOLVED instead of INSTALLED because its dependencies are still satisfied and don’t need to be resolved again. It’s possible to force the framework to resolve a bundle again by refreshing it or updating it, which we’ll discuss later. Refreshing or updating a bundle transitions it back to the INSTALLED state.
A bundle in the INSTALLED state can be uninstalled, which transitions it to the UNINSTALLED state. If you uninstall an active bundle, the framework automatically stops the bundle first, which results in the appropriate state transitions to the RESOLVED state and then transitions it to the INSTALLED state before uninstalling it.[1] A bundle in the UNINSTALLED state remains there as long as it’s still needed (we’ll explain later what this means), but it can no longer transition to another state. Now that you understand the complete bundle lifecycle, let’s discuss how these operations impact the framework’s bundle cache and subsequent restarts of the framework.
1 This is a change in the R4.2 version of the OSGi specification. You can’t go to UNINSTALLED from RESOLVED; you have to go to INSTALLED first, and only INSTALLED goes to UNINSTALLED. This detail is listed in the R4.2 specification errata.
3.2.6. Bundle cache and framework restarts
To use bundles, you have to install them into the OSGi framework. Check. But what does this mean? Technically, you know you must invoke BundleContext.installBundle() to install a bundle. In doing so, you must specify a location typically interpreted as a URL to the bundle JAR file or an input stream from which the bundle JAR file is read. In either case, the framework reads the bundle JAR file and saves a copy in a private area known as the bundle cache. This means two things:
- Installing a bundle into the framework is a persistent operation.
- After the bundle is installed, the framework no longer needs the original copy of the bundle JAR file.
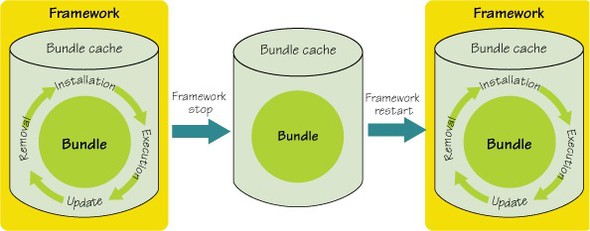
The exact details of the bundle cache are dependent on the framework implementation; the specification doesn’t dictate the format nor structure other than that it must be persistent across framework executions. If you start an OSGi framework, install a bundle, shut down the framework, and then restart it, the bundle you installed will still be there, as shown in figure 3.6. If you compare this approach to using the class path, where you manually manage everything, having the framework cache and manage the artifacts relieves you of a lot of effort.
Figure 3.6. Bundle cache during framework restarts
In terms of your application, you can think of the bundle cache as the deployed configuration of the application. This is similar to the chapter 2 discussion of creating different configurations of the paint program. Your application’s configuration is whichever bundles you install into the framework. You maintain and manage the configuration using the APIs and techniques discussed in this chapter.
Bundle installation isn’t the only lifecycle operation to impact the bundle cache. When a bundle is started using Bundle.start(), the framework persistently marks the bundle as started, even if Bundle.start() throws an exception, such as when the bundle can’t be resolved or the bundle’s BundleActivator.start() method throws an exception. When a bundle is persistently marked as started, subsequent executions of the framework not only reinstall the bundle but also attempt to start it. From a management perspective, you deploy a configuration of your application by installing a set of bundles and activating them. Subsequent framework executions automatically restart your application. If you stop a bundle using Bundle.stop(), this removes the persistently started status of the bundle; subsequent framework executions no longer restart the bundle, although it’s still reinstalled. This is another means of modifying your application’s configuration.
You may want to ask, “What about updating and uninstalling a bundle? These must impact the bundle cache, right?” The short answer is, yes, but this isn’t the whole answer. Bundle.update() and Bundle.uninstall() impact the bundle cache by saving a new bundle JAR file or removing an existing bundle JAR file, respectively. But these operations may not affect the cache immediately. We’ll explain these oddities when we discuss the relationship between the modularity and lifecycle layers in section 3.5. Next, we’ll delve into the details of the shell bundle as we more fully explore how to use the lifecycle layer API.
3.3. Using the lifecycle API in your bundles
So far, you haven’t implemented much functionality for the shell—you just created the activator to start it up and shut it down. In this section, we’ll show you how to implement the bulk of its functionality. You’ll use a simple command pattern to provide the executable actions to let you interactively install, start, stop, update, and uninstall bundles. You’ll even add a persistent history to keep track of previously executed commands.
A high-level understanding of the approach will be useful before you start. The main piece is the telnet binding, which listens to the configured port for connection requests. It spawns a new thread for each connecting client. The client sends command lines to its thread, where a command line consists of a command name and the arguments for the command. The thread parses the command line, selects the appropriate command, and invokes it with any specified arguments, as shown in figure 3.7.
Figure 3.7. TelnetBinding overview
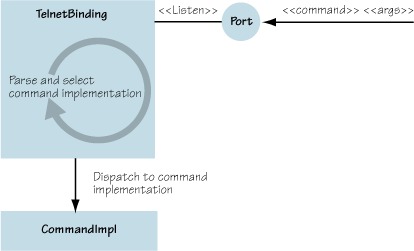
Commands process the arguments passed in to them. We won’t discuss the implementation of the telnet binding and the connection thread, but full source code is available in the companion code. We’ll dissect the command implementations to illustrate how to use Bundle and BundleContext. Let’s get the ball rolling by showing how you configure the bundle.
3.3.1. Configuring bundles
The shell needs two configuration properties: one for the port and one for the maximum number of concurrent connections. In traditional Java programming, you’d use the System.getProperty() method to retrieve them. When creating a bundle, you can use the BundleContext object to retrieve configuration properties instead. The main benefit of this approach is that it avoids the global aspect of System.getProperty() and allows properties per framework instance.
The OSGi specification doesn’t specify a user-oriented way to set bundle configuration properties, so different frameworks handle this differently; typically, they provide a configuration file where the properties are set. But the specification does require bundle-configuration properties to be backed by system properties, so you can still use system properties in a pinch. Retrieving bundle-configuration property values is standardized via the BundleContext.getProperty() method, as shown next.
Listing 3.4. Bundle configuration by example

This listing continues the activator implementation from listing 3.1; in the activator, you use these two methods to get configuration properties. Here, the methods use the BundleContext.getProperty() method to retrieve the properties ![]() . This method looks in the framework properties to find the value of the specified property. If it can’t find the property,
it searches the system properties, returning null if the property isn’t found. For the shell, you return default values if no configured value is found. The OSGi specification
also defines some standard framework properties, shown in table 3.1. If you need to use these standard properties, you can use the constants for them defined in the org.osgi.framework.Constants class.
. This method looks in the framework properties to find the value of the specified property. If it can’t find the property,
it searches the system properties, returning null if the property isn’t found. For the shell, you return default values if no configured value is found. The OSGi specification
also defines some standard framework properties, shown in table 3.1. If you need to use these standard properties, you can use the constants for them defined in the org.osgi.framework.Constants class.
Table 3.1. Standard OSGi framework properties
|
Property name |
Description |
|---|---|
| org.osgi.framework.version | OSGi framework version |
| org.osgi.framework.vendor | Framework implementation vendor |
| org.osgi.framework.language | Language being used; see ISO 639 for possible values |
| org.osgi.framework.os.name | Host computer operating system |
| org.osgi.framework.os.version | Host computer operating system version number |
| org.osgi.framework.processor | Host computer processor name |
There you have it: your first real interaction with the OSGi framework. This is only a small part of the API that you can use in your bundles, but we’ll cover a lot of ground in the next section, so don’t worry. And those of you thinking, “Hey, this configuration mechanism seems overly simplistic!” are correct. There are other, more sophisticated ways to configure your bundle, but we won’t discuss them until chapter 9. Bundle properties are the simplest mechanism available and should only be used for properties that don’t change much. In this regard, they may not be the best choice for the shell, but it depends on what you want to achieve; for example, it makes it difficult to change the shell’s port dynamically. For now, we’ll keep things simple, so this is sufficient.
3.3.2. Deploying bundles
Each bundle installed into the framework is represented by a Bundle object and can be identified by its bundle identifier, location, or symbolic name. For most of the shell commands you’ll implement, you’ll use the bundle identifier to retrieve a Bundle object, because the bundle identifier is nice and concise. Most of the commands accept a bundle identifier as a parameter, so let’s look at how you can use it and the bundle context to access Bundle objects associated with other bundles. As part of the design, you create an abstract BasicCommand class to define a shared method, getBundle(), to retrieve bundles by their identifier, as shown here:
protected volatile BundleContext m_context;
...
public Bundle getBundle(String id) {
  Bundle bundle = m_context.getBundle(Long.parseLong(id.trim()));
  if (bundle == null) {
    throw new IllegalArgumentException("No such bundle.");
  }
  return bundle;
}
All you do is call BundleContext.getBundle() on the context object with the parsed bundle identifier, which is passed in as a String. The only special case you need to worry about is when no bundle with the given identifier exists. In such a case, you throw an exception.
Install Command
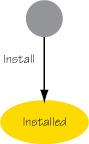
With this basic functionality in place, you can start the first command. The next listing shows the implementation of an install command, and figure 3.8 reminds you which portion of the bundle lifecycle is involved.
Figure 3.8. The install-related portion of the bundle lifecycle state diagram
Listing 3.5. Bundle install command
package org.foo.shell;

import org.osgi.framework.Bundle;
import org.osgi.framework.BundleContext;

public class InstallCommand extends BasicCommand {
  public void exec(String args, PrintStream out, PrintStream err)
    throws Exception {
    Bundle bundle = m_context.installBundle(args);
    out.println("Bundle: " + bundle.getBundleId());
  }
}
You use BundleContext.installBundle() to install a bundle. In most framework implementations, the argument to installBundle() is conveniently interpreted as a URL in String form from which the bundle JAR file can be retrieved. Because the user enters the URL argument as a String, you can use it directly to install the bundle. If the install succeeds, then a new Bundle object corresponding to the newly installed bundle is returned. The bundle is uniquely identified by this URL, which is used as its location. This location value will also be used in the future to determine if the bundle is already installed. If a bundle is already associated with this location value, the Bundle object associated with the previously installed bundle is returned instead of installing it again. If the install operation is successful, the command outputs the installed bundle’s identifier.
The bundle context also provides an overloaded installBundle() method for installing a bundle from an input stream. We won’t show this method here, but the other form of installBundle() accepts a location and an open input stream. When you use this other form of the method, the location is used purely for identification, and the bundle JAR file is read from the passed-in input stream. The framework is responsible for closing the input stream.
Start Command
Now you have a command to install bundles, so the next operation you’ll want to do is start bundles. The start command shown in listing 3.6 does just that (see figure 3.9).
Figure 3.9. The start-related portion of the bundle lifecycle state diagram

Listing 3.6. Bundle start command
package org.foo.shell;

import org.osgi.framework.Bundle;
import org.osgi.framework.BundleContext;

    public class StartCommand extends BasicCommand {
      public void exec(String id) throws Exception {
    Bundle bundle = getBundle(id);
    bundle.start();
  }
}
Again, the implementation is pretty easy. You use the method from the base command class to get the Bundle object associated with the user-supplied identifier, and then you invoke Bundle.start() to start the bundle associated with the identifier.
The result of Bundle.start() depends on the current state of the associated bundle. If the bundle is INSTALLED, it transitions to ACTIVE via the RESOLVED and STARTING states. If the bundle is UNINSTALLED, the method throws an IllegalStateException. If the bundle is either STARTING or STOPPING, start() blocks until the bundle enters either ACTIVE or RESOLVED. If the bundle is already ACTIVE, calling start() again has no effect. A bundle must be resolved before it can be started. You don’t need to explicitly resolve the bundle, because the specification requires the framework to implicitly resolve the bundle if it’s not already resolved. If the bundle’s dependencies can’t be resolved, start() throws a BundleException and the bundle can’t be used until its dependencies are satisfied. If this happens, you’ll typically install additional bundles to satisfy the missing dependencies and try to start the bundle again.
If the bundle has an activator, the framework invokes the BundleActivator.start() method when starting the bundle. Any exceptions thrown from the activator result in a failed attempt to start the bundle and an exception being thrown from Bundle.start(). One last case where an exception may result is if a bundle tries to start itself; the specification says attempts to do so should result in an IllegalStateException.
Stop Command
That’s it for starting bundles. Now we can look at stopping bundles, which is similar to starting them; see the next listing and figure 3.10.
Figure 3.10. The stop-related portion of the bundle lifecycle state diagram

Listing 3.7. Bundle stop command
package org.foo.shell;

import org.osgi.framework.Bundle;
import org.osgi.framework.BundleContext;

   public class StopCommand extends BasicCommand {
  public void exec(String id) throws Exception {
    Bundle bundle = getBundle(id);
    bundle.stop();
  }
}
Like starting a bundle, stopping a bundle takes a simple call to Bundle.stop() on the Bundle object retrieved from the specified identifier. As before, you must be mindful of the bundle’s state. If it’s UNINSTALLED, an Illegal-StateException results. Either STARTING or STOPPING blocks until ACTIVE or RESOLVED is reached, respectively. In the ACTIVE state, the bundle transitions to RESOLVED via the STOPPING state. If the bundle has an activator and the activator’s stop() method throws an exception, a BundleException is thrown. Finally, a bundle isn’t supposed to change its own state; trying to do so may result in an IllegalStateException.
Update Command
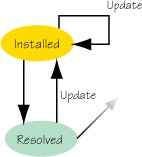
Let’s continue with the update command in the following listing (see figure 3.11).
Figure 3.11. The update-related portion of the bundle lifecycle state diagram
Listing 3.8. Bundle update command
package org.foo.shell;

import org.osgi.framework.Bundle;
import org.osgi.framework.BundleContext;

   public class UpdateCommand extends BasicCommand {
     public void exec(String id) throws Exception {
    Bundle bundle = getBundle(id);
    bundle.update();
  }
}
By now, you may have noticed the pattern we mentioned in the beginning. Most lifecycle operations are methods on the Bundle and BundleContext objects. The Bundle. update() method is no exception, as you can see. The update() method is available in two forms: one with no parameters (shown) and one taking an input stream (not shown). The update command uses the form without parameters here, which reads the updated bundle JAR file using the original location value as a source URL. If the bundle being updated is in the ACTIVE state, it needs to be stopped first, as required by the bundle lifecycle. You don’t need to do this explicitly, because the framework does it for you, but it’s still good to understand that this occurs because it impacts the application’s behavior. The update happens in either the RESOLVED or INSTALLED state and results in a new revision of the bundle in the INSTALLED state. If the bundle is in the UNINSTALLED state, an IllegalStateException is thrown. As in the stop command, a bundle shouldn’t try to update itself.
We should point out an anti-practice for updating a bundle. The OSGi specification provides a third option for updating bundles based on bundle metadata. A bundle may declare a piece of metadata in its bundle manifest called Bundle-UpdateLocation. If it’s present, Bundle.update() with no parameters uses the update location value specified in the metadata as the URL for retrieving the updated bundle JAR file. Using this approach is discouraged because it’s confusing if you forget it’s set, and it doesn’t make sense to bake this sort of information into the bundle.
Uninstall Command
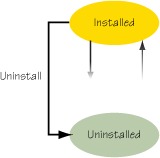
You can now wrap up the lifecycle operations by implementing the uninstall command, as shown next (see figure 3.12).
Figure 3.12. The uninstall-related portion of the bundle lifecycle state diagram
To uninstall a bundle, you call the Bundle. uninstall() method after retrieving the Bundle object associated with the user-supplied bundle identifier. The framework stops the bundle, if necessary. If the bundle is already UNINSTALLED, an IllegalStateException is thrown. As with the other lifecycle operations, a bundle shouldn’t attempt to uninstall itself.
Listing 3.9. Bundle uninstall command
package org.foo.shell;

import org.osgi.framework.Bundle;
import org.osgi.framework.BundleContext;

   public class UninstallCommand extends BasicCommand {
     public void exec(String id) throws Exception {
    Bundle bundle = getBundle(id);
    bundle.uninstall();
  }
}
That’s it. You’ve created a telnet-based shell bundle that you can use in any OSGi framework. But there is one fly in the ointment. Most of the shell commands require the bundle identifier to perform their action, but how does the shell user know which identifier to use? You need some way to inspect the state of the framework’s installed bundle set. You’ll create a command for that next.
3.3.3. Inspecting framework state
You need one more command to display information about the bundles currently installed in the framework. The next listing shows a simple implementation of a bundles command.
Listing 3.10. Bundle information example
package org.foo.shell;

import org.osgi.framework.Bundle;
import org.osgi.framework.BundleContext;
import org.osgi.framework.Constants;

public class BundlesCommand extends BasicCommand {
  public void exec(String args, PrintStream out, PrintStream err)
    throws Exception {
    Bundle[] bundles = m_context.getBundles();

    out.println("  ID      State      Name");

    for (Bundle bundle : bundles) {
      printBundle(
         bundle.getBundleId(), getStateString(bundle.getState()),
         (String) bundle.getHeaders().get(Constants.BUNDLE_NAME),
        bundle.getLocation(), bundle.getSymbolicName(), out);
    }
  }

  private String getStateString(int state) {
    switch (state) {
      case Bundle.INSTALLED:
         return "INSTALLED";
       case Bundle.RESOLVED:
         return "RESOLVED";
       case Bundle.STARTING:
         return "STARTING";
       case Bundle.ACTIVE:
        return "ACTIVE";
       case Bundle.STOPPING:
         return "STOPPING";
      default:
         return "UNKNOWN";
    }
  }

  private void printBundle(long id, String state, String name,
    String location, String symbolicName) {...}
}
The implementation of this command is pretty easy too, because you only need to use BundleContext.getBundles() to get an array of all bundles currently installed in the framework. The rest of the implementation loops through the returned array and prints out information from each Bundle object. Here you print the bundle identifier, lifecycle state, name, location, and symbolic name for each bundle.
With this command in place, you have everything you need for the simple shell. You can install, start, stop, update, and uninstall bundles and list the currently installed bundles. That was fairly simple, wasn’t it? Think about the flexibility at your fingertips versus the amount of effort needed to create the shell. Now you can create applications as easily deployable configurations of bundles that you can manage and evolve as necessary over time.
Before you move back to the paint program, two final lifecycle concepts are worth exploring in order to fully appreciate the approach you’ll take to make the paint program dynamically extensible: persistence and events. We’ll describe them in the context of the shell example; but as you’ll see in the paint example in a couple of pages, they’re generally useful tools to have in mind when building OSGi applications.
3.3.4. Persisting bundle state
As we mentioned when discussing bundle activators, the framework creates an instance of a bundle’s activator class and uses the same instance for starting and subsequently stopping the bundle. An activator instance is used only once by the framework to start and stop a bundle, after which it’s discarded. If the bundle is subsequently restarted, a new activator instance is created. Given this situation, how does a bundle persist state across stops and restarts? Stepping back even further, we mentioned how the framework saves installed bundles into a cache so they can be reloaded the next time the framework starts. How does a bundle persist state across framework sessions? There are several possibilities.
One possibility is to store the information outside the framework, such as in a database or a file, as shown in figure 3.13. The disadvantage of this approach is that the state isn’t managed by the framework and may not be cleaned up when the bundle is uninstalled.
Figure 3.13. Storing state externally

Another possibility is for a bundle to give its state to another bundle that isn’t being stopped; then, it can get the state back after it restarts, as shown in figure 3.14. This is a workable approach, and in some cases it makes the most sense.
Figure 3.14. Storing state with other bundles

For simplicity, it would be nice to be able to use files, but have them managed by the framework. Such a possibility exists. The framework maintains a private data area in the file system for each installed bundle.
The BundleContext.getDataFile() method provides access to your bundle’s private data area. When using the private data area, you don’t need to worry about where it is on the file system because the framework takes care of that for you, as well as cleaning up in the event of your bundle being unin-stalled (see figure 3.15). It may seem odd to not directly use files to store your data; but if you did, it would be impossible for your bundle to clean up during an uninstall. This is because a bundle isn’t notified when it’s uninstalled. Further, this method simplifies running with security enabled, because bundles can be granted permission to access their private area by the framework.
Figure 3.15. Storing state internally

For the shell example, you want to use the private area to persistently save the command history. Here’s how the history command should work; it prints the commands issued via the shell in reverse order:
-> history
bundles
uninstall 2
bundles
update 2
bundles
stop 2
bundles
start 2
bundles
install file:foo.jar
bundles
Listing 3.11 shows how you use the bundle’s private storage area to save the command history. The bundle activator’s start() and stop() methods also need to be modified to invoke these methods, but these changes aren’t shown here, so please refer to the companion code for complete implementation details.
Listing 3.11. Bundle persistent storage example
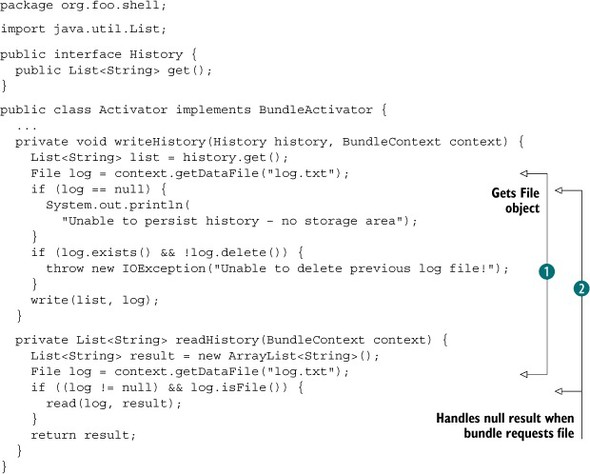
You use BundleContext.getDataFile() to get a File object in the bundle’s private storage area ![]() . The method takes a relative path as a String and returns a valid File object in the storage area. After you get the File object, you can use it normally to create the file, make a subdirectory, or do whatever you want. It’s possible for a framework
to return null when a bundle requests a file; so as you can see
. The method takes a relative path as a String and returns a valid File object in the storage area. After you get the File object, you can use it normally to create the file, make a subdirectory, or do whatever you want. It’s possible for a framework
to return null when a bundle requests a file; so as you can see ![]() , you need to handle this possibility. This can happen because the OSGi framework was designed to run on a variety of devices,
some of which may not support a file system. For the shell, you ignore it if there’s no file system support, because the history command is noncritical functionality.
, you need to handle this possibility. This can happen because the OSGi framework was designed to run on a variety of devices,
some of which may not support a file system. For the shell, you ignore it if there’s no file system support, because the history command is noncritical functionality.
If you want to retrieve a File object for the root directory of your bundle’s storage area, you can call getDataFile() with an empty string. Your bundle is responsible for managing the content of its data area, but you don’t need to worry about cleaning up when it’s uninstalled, because the framework takes care of this.
Keep in mind that your bundle may be updated. Due to this possibility, you should design your bundles so they properly deal with previously saved state, because they may start with a private area from an older version of the bundle. The best approach is for your bundles to seamlessly migrate old state formats to new state formats if possible. One tricky issue, though, is that the update lifecycle operation may also be used to downgrade a bundle. In this case, your bundle may have difficulty dealing with the newer state formats, so it’s probably best if you implement your bundles to delete any existing state if they can’t understand it. Otherwise, you can always uninstall the newer bundle first and then install the older version instead of downgrading.
You could finish the history command, but let’s try to make it a little more interesting by keeping track of what’s going on inside the framework. You can record not only the issued commands, but also the impact they have on the framework. The next section shows how you can achieve this using the framework’s event-notification mechanism.
3.3.5. Listening for events
The OSGi framework is a dynamic execution environment. To create bundles and, ultimately, applications that are flexible enough to not only cope with but also take advantage of this dynamism, you need to pay attention to execution-time changes. The lifecycle layer API provides access to a lot of information, but it isn’t easy to poll for changes; it’s much more convenient if you can be notified when changes occur. To make this possible, the OSGi framework supports two types of events: BundleEvents and FrameworkEvents. The former event type reports changes in the lifecycle of bundles, whereas the latter reports framework-related issues.
You can use the normal Java listener pattern in your bundles to receive these events. The BundleContext object has methods to register BundleListener and FrameworkListener objects for receiving BundleEvent and FrameworkEvent notifications, respectively. The following listing shows how you implement the history command. You record all executed commands as well as the events they cause during execution.
Listing 3.12. Bundle and framework event listener example

You use an interceptor pattern to wrap the commands so you can record the issued commands. The wrapper also records any events
in the history by implementing the BundleListener and FrameworkListener interfaces. You maintain a list of all issued commands and received events in the m_history member defined at ![]() . The history wrapper command forwards the command execution to the command
. The history wrapper command forwards the command execution to the command ![]() and stores it in the history list.
and stores it in the history list.
The wrapper implements the single FrameworkListener.frameworkEvent(). Here, you record the event information in the history list. The most important part of the event is its type. Framework events are of one of the following types:
- FrameworkEvent.STARTED—Indicates the framework has performed all initialization and has finished starting up.
- FrameworkEvent.INFO—Indicates some information of general interest in various situations.
- FrameworkEvent.WARNING—Indicates a warning. Not crucial, but may indicate a potential error.
- FrameworkEvent.ERROR—Indicates an error. Requires immediate attention.
- FrameworkEvent.PACKAGES_REFRESHED—Indicates the framework has refreshed some shared packages. We’ll discuss what this means in section 3.5.
- FrameworkEvent.STARTLEVEL_CHANGED—Indicates the framework has changed its start level. We’ll discuss what this means in chapter 10.
The wrapper also implements the single BundleListener.bundleChanged() method. Here, you also record the event information in the history list. Bundle events have one of the following types:
- BundleEvent.INSTALLED—Indicates a bundle was installed
- BundleEvent.RESOLVED—Indicates a bundled was resolved
- BundleEvent.STARTED—Indicates a bundle was started
- BundleEvent.STOPPED—Indicates a bundle was stopped
- BundleEvent.UPDATED—Indicates a bundle was updated
- BundleEvent.UNINSTALLED—Indicates a bundle was uninstalled
- BundleEvent.UNRESOLVED—Indicates a bundle was unresolved
You register the listeners using the bundle context as follows:
private void addListener(BundleContext context,
    BundleListener bundleListener, FrameworkListener frameworkListener) {
    context.addBundleListener(bundleListener);
    context.addFrameworkListener(frameworkListener);
}
The example doesn’t show how to remove the listeners, which requires calls to the removeBundleListener() and removeFrameworkListener() methods on the bundle context. It’s not necessary to remove the listeners, because the framework will do so automatically when the bundle is stopped; this makes sense because the bundle context is no longer valid after the bundle is stopped. You only need to explicitly remove your listeners if you want to stop listening to events while your bundle is active.
For the most part, the framework delivers events asynchronously. It’s possible for framework implementations to deliver them synchronously, but typically they don’t because it complicates concurrency handling. Sometimes you need synchronous delivery because you need to perform an action as the event is happening, so to speak. This is possible for BundleEvents by registering a listener implementing the SynchronousBundleListener interface instead of BundleListener. The two interfaces look the same, but the framework delivers events synchronously to SynchronousBundle-Listeners, meaning the listener is notified during the processing of the event. Synchronous bundle listeners are processed before normal bundle listeners. This allows you to take action when a certain operation is triggered; for example, you can give permissions to a bundle at the moment it’s installed. The following event types are only sent to SynchronousBundleListeners:
- BundleEvent.STARTING—Indicates a bundle is about to be started
- BundleEvent.STOPPING—Indicates a bundle is about to be stopped
Synchronous bundle listeners are sometimes necessary (as you’ll see in the paint example in the next section), but should be used with caution. They can lead to concurrency issues if you try to do too much in the callback; as always, keep your callbacks as short and simple as possible and don’t call foreign code while holding a lock. In all other cases, the thread invoking the listener callback method is undefined. Events become much more important when you start to write more sophisticated bundles that take full advantage of the bundle lifecycle.
3.3.6. Bundle suicide
We’ve mentioned it numerous times: a bundle isn’t supposed to change its own state. But what if a bundle wants to change its own state? Good question. This is one of the more complicated aspects of the lifecycle layer, and there are potentially negative issues involved.
The central issue is that if a bundle stops itself, it finds itself in a state it shouldn’t be in. Its BundleActivator.stop() method has been invoked, which means its bundle context is no longer valid. Additionally, the framework has cleaned up its bookkeeping for the bundle and has released any framework facilities it was using, such as unregistering all of its event listeners. The situation is even worse if a bundle tries to uninstall itself, because the framework will likely release its class loader. In short, the bundle is in a hostile environment, and it may not be able to function properly.
Because its bundle context is no longer valid, a stopped bundle can no longer use the functionality provided by the framework. Most method calls on an invalid bundle context will throw IllegalStateExceptions. Even if the bundle’s class loader is released, this may not pose a serious issue if the bundle doesn’t need any new classes, because the class loader won’t be garbage collected until the bundle stops using it. But you’re not guaranteed to be able to load new classes if the bundle was uninstalled. In this case, the framework may have closed the JAR file associated with the bundle. Already-loaded classes continue to load, but all bets are off when attempting to load new classes.
Depending on your bundle, you may run into other issues too. If your bundle creates and uses threads, it’s typically a good idea for it to wait for all of its threads to complete when its BundleActivator.stop() method is called. If the bundle tries to stop itself on its own thread, that same thread can end up in a cycle waiting for other sibling threads to complete. In the end, the thread waits forever. For example, the simple shell uses a thread to listen for telnet connections and then uses secondary threads to execute the commands issued on those connections. If one of the secondary threads attempts to stop the shell bundle itself, it ends up waiting in the shell bundle’s BundleActivator.stop() method for the connection thread to stop all of the secondary threads. Because the calling thread is one of the secondary threads, it’ll end up waiting forever for the connection thread to complete. You have to be careful of these types of situations, and they’re not always obvious.
Under normal circumstances, you shouldn’t try to stop, uninstall, or update your own bundle. OK—that should be enough disclaimers. Let’s look at a case where you may need to do it anyway. We’ll use the shell as an example, because it provides a means to update bundles, and it may need to update itself. What do you have to do to allow a user to update the shell bundle via the shell command line? You must do two things to be safe:
- Use a new thread when you stop, update, or uninstall your own bundle.
- Do nothing in the new thread after calling stop, update, or uninstall.
You need to do this to prevent yourself from waiting forever for the shell thread to return when you get stopped and to avoid the potential ugliness of the hostile environment in which the thread will find itself. The following listing shows the changes to the implementation of the stop command to accommodate this scenario.
Listing 3.13. Example of how a bundle can stop itself
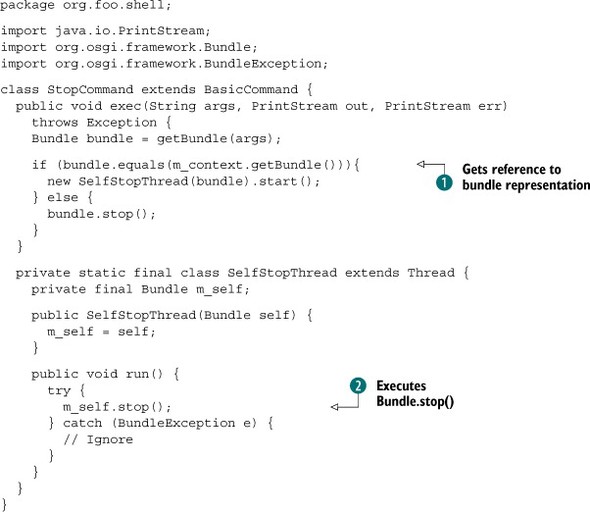
You use the BundleContext.getBundle() method to get a reference to the bundle representation and compare it to the target bundle ![]() . When the target is the shell bundle, you need to stop it using a different thread. For this reason, you create and start a new thread of type SelfStopThread, which executes the Bundle.stop() method
. When the target is the shell bundle, you need to stop it using a different thread. For this reason, you create and start a new thread of type SelfStopThread, which executes the Bundle.stop() method ![]() . There’s one final point to note in this example: you change the behavior of stopping a bundle in this case from synchronous
to asynchronous. Ultimately, this shouldn’t matter much, because the bundle will be stopped anyway.
. There’s one final point to note in this example: you change the behavior of stopping a bundle in this case from synchronous
to asynchronous. Ultimately, this shouldn’t matter much, because the bundle will be stopped anyway.
You should also modify the implementation of the update and uninstall commands the same way. Using the shell to stop the framework (the system bundle) also requires special consideration. Why? Because stopping the system bundle causes the framework to stop, which stops every other bundle. This means you’ll stop your bundle indirectly, so you should make sure you’re using a new thread.
We hope you now have a good understanding of what is possible with OSGi’s lifecycle layer. Next, you’ll apply this knowledge to the paint program.
3.4. Dynamically extending the paint program
Let’s look at how you can use the individual parts of the lifecycle layer to dynamically extend the paint program. As you’ll recall from the last chapter, you first converted a nonmodular version of the paint program into a modular one using an interface-based programming approach for the architecture. This is great because you can reuse the resulting bundles with minimal extra work. The bundles containing the shape implementations don’t need to change, except for some additional metadata in their manifest. You just need to modify the paint program to make it possible for shapes to be added and removed at execution time.
The approach you’ll take is a well-known pattern in the OSGi world, called the extender pattern. The main idea behind the extender pattern is to model dynamic extensibility on the lifecycle events (installing, resolving, starting, stopping, and so on) of other bundles. Typically, some bundle in the application acts as the extender: it listens for bundles being started and/or stopped. When a bundle is started, the extender probes it to see if it’s an extension bundle. The extender looks in the bundle’s manifest (using Bundle.getHeaders()) or the bundle’s content (using Bundle.getEntry()) for specific metadata it recognizes. If the bundle does contain an extension, the extension is described by the metadata. The extender reads the metadata and performs the necessary tasks on behalf of the extension bundle to integrate it into the application. The extender also listens for extension bundles to be stopped, in which case it removes the associated extensions from the application.
That’s the general description of the extender pattern, which is shown in figure 3.16. Let’s look at how you’ll use it in the paint program.
Figure 3.16. Extender pattern overview

You’ll treat the shape implementations as extensions. The extension metadata will be contained in the bundle manifest and will describe which class implements the shape contained in the shape bundle. The extender will use this information to load the shape class from the bundle, instantiate it, and inject it into the application when an extension bundle is activated. If a shape bundle is stopped, the extender will remove it from the application. Figure 3.17 illustrates this usage scenario.
Figure 3.17. Paint program as an implementation of the extender pattern

Let’s dive in and start converting the application. The first thing you need to do is define the extension metadata for shape bundles to describe their shape implementation. In the following snippet, you add a couple of constants to the SimpleShape interface for extension metadata property names; it’s not strictly necessary to add these, but it’s good programming practice to use constants:
package org.foo.shape;

import java.awt.Graphics2D;
import java.awt.Point;

public interface SimpleShape {
  public static final String NAME_PROPERTY = "Extension-Name";
  public static final String ICON_PROPERTY = "Extension-Icon";
  public static final String CLASS_PROPERTY = "Extension-Class";

  public void draw(Graphics2D g2, Point p);
}
The constants indicate the name of the shape, the bundle resource file for the shape’s icon, and the bundle class name for the shape’s class. The draw() method draws the shape on the canvas,
From the constants, it’s fairly straightforward to see how you’ll describe a specific shape implementation. You only need to know the name, an icon, and the class implementing the shape. As an example, for the circle implementation you add the following entries to its bundle manifest:
Extension-Name: Circle
Extension-Icon: org/foo/shape/circle/circle.png
Extension-Class: org.foo.shape.circle.Circle
The name is just a string, and the icon and class refer to a resource file and a class inside the bundle JAR file, respectively. You add similar metadata to the manifests of all shape implementation bundles, which converts them all to extensions. Next, you need to tweak the architecture of the paint program to make it cope with dynamic addition and removal of shapes. Figure 3.18 captures the updated design.
Figure 3.18. Dynamic paint program class relationships
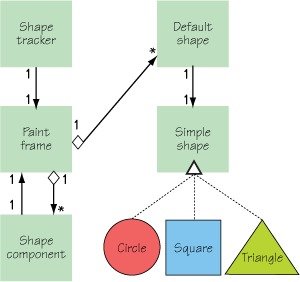
Comparing the new design to the original, you add two new classes: Shape-Tracker and DefaultShape. They help you dynamically adapt the paint frame to deal with SimpleShape implementations dynamically appearing and disappearing. In a nutshell, the ShapeTracker is used to track when extension bundles start or stop, in which case it adds or removes Default-Shapes to/from the PaintFrame, respectively.
The concrete implementation of the ShapeTracker is a subclass of another class, called BundleTracker. The latter class is a generic class for tracking when bundles are started or stopped. Because BundleTracker is somewhat long, we’ll divide it across multiple listings; the first part is shown next.
Listing 3.14. BundleTracker class declaration and constructor

The bundle tracker is constructed with a BundleContext object, which is used to listen for bundle lifecycle events. The tracker uses a SynchronousBundleListener to listen to events because a regular BundleListener doesn’t get notified when a bundle enters the STOPPING state, only STOPPED. You need to react on the STOPPING event instead of the STOPPED event because it’s still possible to use the stopping bundle, which hasn’t been stopped yet; a potential subclass might need
to do this if it needed to access the stopping bundle’s BundleContext object. The bundle listener’s single method ![]() makes sure the tracker is tracking bundles
makes sure the tracker is tracking bundles ![]() . If so, for started events, it adds the associated bundle to its bundle list
. If so, for started events, it adds the associated bundle to its bundle list ![]() and invokes the abstract addedBundle() method. Likewise, for stopping events, it removes the bundle from its bundle list and invokes the abstract removedBundle() method.
and invokes the abstract addedBundle() method. Likewise, for stopping events, it removes the bundle from its bundle list and invokes the abstract removedBundle() method.
The following listing shows the next portion of the BundleTracker.
Listing 3.15. Opening and using a BundleTracker
   public synchronized void open() {
    if (!m_open) {
      m_open = true;
      m_context.addBundleListener(m_listener);
       Bundle[] bundles = m_context.getBundles();
       for (int i = 0; i < bundles.length; i++) {
        if (bundles[i].getState() == ACTIVE) {
          m_bundleSet.add(bundles[i]);
           addedBundles(bundles[i]);
        }
      }
    }
  }

  public synchronized Bundle[] getBundles() {
    return (Bundle[]) m_bundleSet.toArray(
      new Bundle[m_bundleSet.size()]);
  }

  protected abstract void addedBundle(Bundle bundle);

  protected abstract void removedBundle(Bundle bundle);
To start a BundleTracker instance tracking bundles, you must invoke its open() method. This methods registers a bundle event listener and processes any existing ACTIVE bundles by adding them to its bundle list and invoking the abstract added-Bundle() method. The getBundles() method provides access to the current list of active bundles being tracked. Because BundleTracker is abstract, subclasses must provide implementations of addedBundle() and removedBundle() to perform custom processing of added and removed bundles, respectively.
The last portion of the BundleTracker is as follows.
Listing 3.16. Disposing of a BundleTracker
  public synchronized void close() {
    if (m_open) {
      m_open = false;
      m_context.removeBundleListener(m_listener);
      Bundle[] bundles = (Bundle[])
        m_bundleSet.toArray(new Bundle[m_bundleSet.size()]);
      for (int i = 0; i < bundles.length; i++) {
        if (m_bundleSet.remove(bundles[i])) {
          removedBundle(bundles[i]);
        }
      }
    }
  }
}
Calling BundleTracker.close() stops it from tracking bundles. This removes its bundle listener, removes each currently tracked bundle from its bundle list, and invokes the abstract removedBundle() method.
Tracking bundles is a useful building block. It’s so useful that the OSGi Alliance decided to create a standard BundleTracker for the R4.2 specification. The R4.2 BundleTracker is more complicated than the one presented here, but it follows the same basic principles; we’ll discuss it in chapter 15.
Now that you know how the BundleTracker works, let’s return to its subclass, Shape-Tracker. The heart of this subclass is the processBundle() method shown next, which processes added and removed bundles.
Listing 3.17. Processing shapes in ShapeTracker
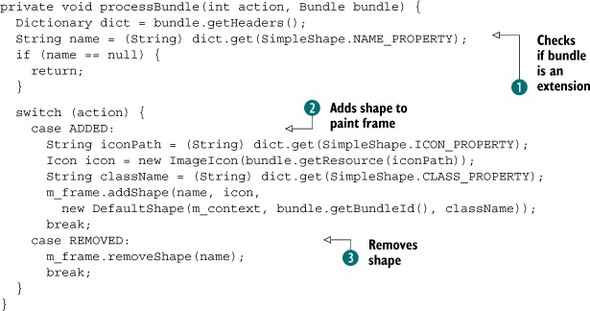
ShapeTracker overrides BundleTracker’s addedBundle() and removedBundle() abstract methods to invoke processBundle() in either case. You determine whether the bundle is an extension by probing its manifest for the Extension-Name property ![]() . Any bundle without this property in its manifest is ignored. If the bundle being added contains a shape, the code grabs
the metadata from the bundle’s manifest headers and adds the shape to the paint frame wrapped as a DefaultShape
. Any bundle without this property in its manifest is ignored. If the bundle being added contains a shape, the code grabs
the metadata from the bundle’s manifest headers and adds the shape to the paint frame wrapped as a DefaultShape ![]() . For the icon metadata, you use Bundle.getResource() to load it. If the bundle being removed contains a shape, you remove the shape from the paint frame
. For the icon metadata, you use Bundle.getResource() to load it. If the bundle being removed contains a shape, you remove the shape from the paint frame ![]() .
.
DefaultShape, shown in listing 3.18, serves two purposes. It implements the SimpleShape interface and is responsible for lazily creating the shape implementation using the Extension-Class metadata. It also serves as a placeholder for the shape if and when the shape is removed from the application. You didn’t have to deal with this situation in the original paint program, but now shape implementations can appear or disappear at any time when bundles are installed, started, stopped, and uninstalled. In such situations, the DefaultShape draws a placeholder icon on the paint canvas for any departed shape implementations.
Listing 3.18. DefaultShape example

In summary, when the paint application is started, its activator creates and opens a ShapeTracker. This tracks STARTED and STOPPED bundle events, interrogating the associated bundle for extension metadata. For every started extension bundle, it adds a new DefaultShape for the bundle to the paint frame, which creates the shape implementation, if needed, using the extension metadata. When the bundle stops, the Shape-Tracker removes the shape from the paint frame. When a drawn shape is no longer available, the DefaultShape is used to draw a placeholder shape on the canvas instead. If the departed shape reappears, the placeholder is removed and the real shape is drawn on the canvas again.
Now you have a dynamically extensible paint program, as demonstrated in section 3.2.1. Although we didn’t show the activator for the paint program, it’s reasonably simple and only creates the framework and shape tracker on start and disposes of them on stop. Overall, this is a good example of how easy it is to make a modularized application take advantage of the lifecycle layer to make it dynamically extensible. As a bonus, you no longer need to export the implementation packages of the shape implementations. What you’re still missing at this point is a discussion about how the lifecycle and module layers interact with each other, which we’ll get into next.
3.5. Lifecycle and modularity
A two-way relationship exists between OSGi’s lifecycle and module layers. The lifecycle layer manages which bundles are installed into the framework, which obviously impacts how the module layer resolves dependencies among bundles. The module layer uses the metadata in bundles to make sure all their dependencies are satisfied before they can be used. This symbiotic relationship creates a chicken-and-egg situation when you want to use your bundles; to use a bundle you have to install it, but to install a bundle you must have a bundle context, which are only given to bundles. This close relationship is also obvious in how the framework resolves bundle dependencies, especially when bundles are dynamically installed and/or removed. Let’s explore this relationship by first looking into bundle dependency resolution.
3.5.1. Resolving bundles
The act of resolving a bundle happens at the discretion of the framework, as long as it happens before any classes are loaded from the bundle. Often, when resolving a given bundle, the framework ends up resolving another bundle to satisfy a dependency of the original bundle. This can lead to cascading dependency resolution, because in order for the framework to use a bundle to satisfy the requirements of another bundle, the satisfying bundle too must be resolved, and so on. Because the framework resolves dependencies when needed, it’s possible to mostly ignore transitioning bundles to the RESOLVED state; you can start a bundle and know the framework will resolve it before starting it, if possible. This is great compared to the standard Java way, where you can run into missing dependencies at any point during the lifetime of your application.
But what if you want to make sure a given bundle resolves correctly? For example, maybe you want to know in advance whether an installed bundle can be started. In this case, there’s a way to ask the framework to resolve the bundle directly, but it’s not a method on Bundle like most other lifecycle operations. Instead, you use the Package Admin Service. The Package Admin Service is represented as an interface and is shown here:
public interface PackageAdmin {
  static final int BUNDLE_TYPE_FRAGMENT = 0x00000001;
  Bundle getBundle(Class clazz);
  Bundle[] getBundles(String symbolicName, String versionRange);
  int getBundleType(Bundle bundle);
  ExportedPackage getExportedPackage(String name);
  ExportedPackage[] getExportedPackages(Bundle bundle);
  ExportedPackage[] getExportedPackages(String name);
  Bundle[] getFragments(Bundle bundle);
  RequiredBundle[] getRequiredBundles(String symbolicName);
  Bundle[] getHosts(Bundle bundle);
  void refreshPackages(Bundle[] bundles);
  boolean resolveBundles(Bundle[] bundles);
}
You can explicitly resolve a bundle with the resolveBundles() method, which takes an array of bundles and returns a Boolean flag indicating whether the bundles could be resolved. The Package Admin Service can do a bit more than resolving bundles, and it’s a fairly important part of the framework; it also supports the following operations, among others:
- Determines which bundle owns a particular class —In rare circumstances, you may need to know which bundle owns a particular class. You can accomplish this with the getBundle() method, which takes a Class and returns the Bundle to which it belongs.
- Introspects how the framework resolves bundle dependencies —You can use the getExportedPackage() family of methods to find out which bundles are importing a given package, whereas other methods inspect other types of dependencies we won’t talk about until chapter 5, such as getRequiredBundles() and getFragments().
- Refreshes the dependency resolution for bundles —Because the installed set of bundles can evolve over time, sometimes you need to have the framework recalculate bundle dependencies. You can do this with the refreshBundles() method.
The most important feature of the Package Admin Service isn’t the ability to resolve bundles or introspect dependencies; it’s the ability to refresh bundle dependencies, which is another tool needed for managing bundles. But before we get into the details of refreshing bundles, let’s finish the discussion of explicitly resolving bundles.
To demonstrate how to use the Package Admin Service to explicitly resolve a bundle, you’ll create a new resolve command for the shell to instigate bundle resolution, as shown next.
Listing 3.19. Bundle resolve command
package org.foo.shell;

import java.io.PrintStream;
import java.util.*;
import org.osgi.framework.Bundle;
import org.osgi.service.packageadmin.PackageAdmin;

public class ResolveCommand extends BasicCommand {

  public void exec(String args, PrintStream out, PrintStream err)
    throws Exception {
    boolean success;
    if (args == null) {
      success =
         getPackageAdminService().resolveBundles(null);
    } else {
      List<Bundle> bundles = new ArrayList<Bundle>();
       StringTokenizer tok = new StringTokenizer(args);
      while (tok.hasMoreTokens()) {
        bundles.add(getBundle(tok.nextToken()));
      }
       success = getPackageAdminService().resolveBundles(
         bundles.toArray(newBundle[bundles.size()]));
    }
    out.println(success ? "Success" : "Failure");
  }

  private PackageAdmin getPackageAdminService() {...}
}
We won’t discuss the details of how you obtain the Package Admin Service until the next chapter; for now, you use the getPackageAdminService() method. If the resolve command is executed with no arguments, you invoke resolveBundles() with null, which causes the framework to attempt to resolve all unresolved bundles. Otherwise, you parse the argument as a list of whitespace-separated bundle identifiers. For each identifier, you get its associated Bundle object and add it to a list. After you’ve retrieved the complete list of bundles, you pass them in as an array to resolveBundles(). The framework attempts to resolve any unresolved bundles of those specified.
It’s worthwhile to understand that the framework may resolve bundles in addition to those that were specified. The specified bundles are the root of the framework’s resolve process; the framework will resolve any additional unresolved bundles necessary to resolve the specified roots.
Resolving a bundle is a fairly easy process, because the framework does all the hard work for you. You’d think that’d be it. As long as your bundle’s dependencies are resolved, you have nothing to worry about, right? It turns out the dynamic nature of the bundle lifecycle makes this an invalid assumption. Sometimes you need to have the framework recalculate a bundle’s dependencies. You’re probably wondering, “Why?” We’ll tell you all about it in the next section.
3.5.2. Refreshing bundles
The lifecycle layer allows you to deploy and manage your application’s bundles. Up until now we’ve focused on installing, resolving, and starting bundles, but there are other interesting bundle lifecycle operations. How about updating or uninstalling a bundle? In and of themselves, these operations are as conceptually simple as the other lifecycle operations. We certainly understand what it means to update or uninstall a bundle. The details are a little more complicated. When you update or uninstall a resolved bundle, you stand a good chance of disrupting your system. This is the place where you can start to see the impact of the framework’s dynamic lifecycle management.
The simple case is updating or uninstalling a self-contained bundle. In this case, the disruption is limited to the specific bundle. Even if the bundle imports packages from other bundles, the disruption is limited to the specific bundle being updated or uninstalled. In either case, the framework stops the bundle if it’s active. In the case of updating, the framework updates the bundle’s content and restarts it if it was previously active. Complications arise if other bundles depend on the bundle being updated or uninstalled. Such dependencies can cause a cascading disruption to your application, if the dependent bundles also have bundles depending on them.
Why do dependencies complicate the issue? Consider updating a given bundle. Other dependent bundles have potentially loaded classes from the old version of the bundle. They can’t just start loading classes from the new version of the bundle, because they would see old versions of the classes they already loaded mixed with new versions of classes loaded after the update. This would be inconsistent. In the case of an uninstalled bundle, the situation is more dire, because you can’t pull the rug out from under the dependent bundles.
It’s worthwhile to limit the disruptions caused by bundle updates or uninstalls. The framework provides such control by making updating and uninstalling bundles a two-step process. Conceptually, the first step prepares the operation; and the second step, called refreshing, enacts its. Refreshing recalculates the dependencies of the impacted bundles. How does this help? It allows you to control when the changeover to the new bundle version or removal of a bundle occurs for updates and uninstalls, respectively, as shown in figure 3.19.
Figure 3.19. Updating and refreshing bundles is a two-step process. Most of the work normally takes place in the second step during the framework refresh operation.

We say this is a two-step process, but what happens in the first step? For updates, the new bundle version is put in place, but the old version is still kept around so bundles depending on it can continue loading classes from it. You may be thinking, “Does this mean two versions of the bundle are installed at the same time?” Effectively, the answer is, yes. And each time you perform an update without a refresh, you introduce yet another version. For uninstalls, the bundle is removed from the installed list of bundles, but it isn’t removed from memory. Again, the framework keeps it around so dependent bundles can continue to load classes from it.
For example, imagine you want to update a set of bundles. It would be fairly inconvenient if the framework refreshed all dependent bundles after each individual update. With this two-step approach, you can update all bundles in the set and then trigger one refresh of the framework at the end. You can experience a similar situation if you install a bundle providing a newer version of a package. Existing resolved bundles importing an older version of the package won’t be automatically rewired to the new bundle unless they’re refreshed. Again, it’s nice to be able to control the point in time when this happens. It’s a fairly common scenario when updating your application that some of your bundles are updated, some are uninstalled, and some are installed; so a way to control when these changes are enacted is helpful.
You trigger a refresh by using the Package Admin Service again. To illustrate how to use it, let’s add a refresh command to the shell, as shown next.
Listing 3.20. Bundle refresh command

Just as in the resolve command, you rely on the magic method to get the Package Admin Service. You use the PackageAdmin.refreshPackages() method to refresh bundles. If no arguments are given to the command, you pass in null to the Package Admin Service. This results in the framework refreshing all previously updated and uninstalled bundles since
the last refresh. This captures the update and uninstall cases presented earlier, but it doesn’t help with the rewiring case.
You achieve that by passing in the specific bundles you want refreshed. For this case, the refresh command accepts an argument of whitespace-separated bundle identifiers. You parse their identifiers out of the supplied argument,
retrieve their associated Bundle object, and add them to a list to be refreshed ![]() . You then pass in the array of bundles to refresh to the Package Admin Service
. You then pass in the array of bundles to refresh to the Package Admin Service ![]() .
.
The PackageAdmin.refreshPackages() method updates or removes packages exported by the bundles being refreshed. The method returns to the caller immediately and performs the following steps on a separate thread:
- It computes the graph of affected dependent bundles, starting from the specified bundles (or from all updated or uninstalled bundles if null is specified). Any bundle wired to a package currently exported by a bundle in the graph is added to the graph. The graph is fully constructed when there is no bundle outside the graph wired to a bundle in the graph.
- Each bundle in the graph in the ACTIVE state is stopped, moving it to the RESOLVED state.
- Each bundle in the graph in the RESOLVED state, including those that were stopped, is unresolved and moved to the INSTALLED state. This means the bundles’ dependencies are no longer resolved.
- Each bundle in the graph in the UNINSTALLED state is removed from the graph and completely removed from the framework (is free to be garbage collected). You’re back to a fresh starting state for the affected bundles.
- For the remaining bundles in the graph, the framework restarts any previously ACTIVE bundles, which resolves them and any bundles on which they depend.
- When everything is done, the framework fires an event of type Framework-Event.PACKAGES_REFRESHED.
As a result of these steps, it’s possible that some of the previously ACTIVE bundles can no longer be resolved; maybe a bundle providing a required package was uninstalled. In such cases, or for any other errors, the framework fires an event of type FrameworkEvent.ERROR.
The following shell session shows how you can use the resolve and refresh commands in combination to manage a system:
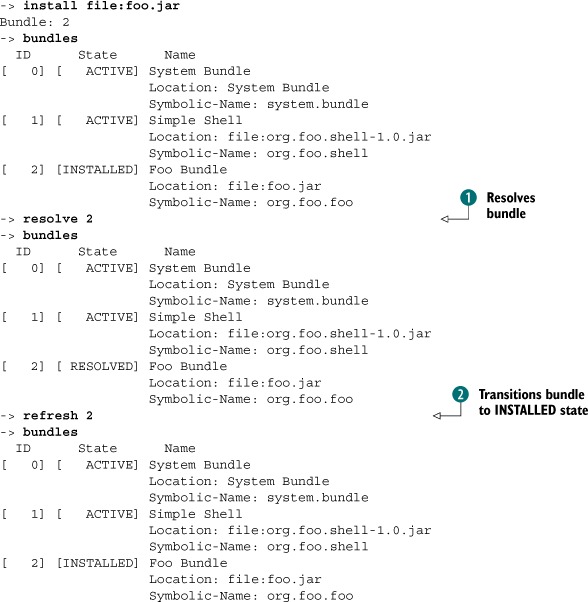
You install a bundle and resolve it using the resolve command ![]() , which transitions it to the RESOLVED state. Using the refresh command
, which transitions it to the RESOLVED state. Using the refresh command ![]() , you transition it back to the INSTALLED state.
, you transition it back to the INSTALLED state.
At this point, you’ve achieved a lot in understanding the lifecycle layer; but before you can finish, we need to explain some nuances about updating bundles. Let’s get to it.
3.5.3. When updating isn’t updated
One of the gotchas many people run into when updating a bundle is the fact that it may or may not use its new classes after the update operation. We said previously that updating a bundle is a two-step process, where the first step prepares the operation and the second step enacts it, but this isn’t entirely accurate when you update a bundle. The specification says the framework should enact the update immediately, so after the update the bundle should theoretically be using its new classes; but it doesn’t necessarily start using them immediately. In some situations, after a bundle is updated, new classes are used; in other situations, old classes are used. Sounds confusing, doesn’t it? It is. Why not just wait until a refresh to enact the new revision completely?
The answer, as you might guess, is historical. The original R1 specification defined the update operation to update a bundle. End of story. There was no Package Admin Service. With experience, it became clear that the specified definition of update was insufficient. Too many details were left for framework implementations to decide, such as when to dispose of old classes and start using new classes. This led to inconsistencies, which made it difficult to manage bundle lifecycles across different framework implementations. This situation resulted in the introduction of the Package Admin Service in the R2 specification, to resolve the inconsistencies around update once and for all. Unfortunately, the original behavior of update was left intact, due to backward-compatibility concerns. These concerns leave you with the less-than-clean approach to bundle update that we have today, but at least it’s fairly consistent across framework implementations.
Back to the issue of an updated bundle sometimes using old or new classes. As arcane as it may be, there is a way to understand what’s going on. Whether your bundle’s new classes or the old classes are used after an update depends on two factors:
- Whether the classes are from a private package or an exported package
- If the classes are from an exported package, whether they’re being used by another bundle
Regarding the first factor:
- If the classes come from a private bundle package (one that isn’t exported), the new classes become available immediately no matter what.
- If they’re from an exported package, their visibility depends on whether other bundles are using them:
- If no other bundles are using the exported packages, the new classes become available immediately. The old versions of the classes are no longer needed.
- If any other bundles are using the exported packages, the new classes don’t become available immediately, because the old version is still required. In this case, the new classes aren’t made available until the PackageAdmin. refreshPackages() method is called.
There is yet another nuance. In chapter 5, you’ll learn that bundles can also import the same packages they export. If a bundle imports a package it exports, and the imported package from the updated bundle matches the exported package from the old version, the updated bundle’s import is wired to the old exported packages. This may work out well in some cases—when you’re fixing a bug in a private package, for example. But it can potentially lead to odd situations, because the updated bundle is using new versions of private classes alongside old versions of exported classes. If you need to avoid this situation, you should specify version ranges when your bundle imports its own packages.
If the updated bundle imports its own package, but the import doesn’t match the old version of the exported package, you have a different situation. It’s similar to the case where the bundle only exports the package. In this case, the new classes from the exported packages become available immediately to the updated exporting bundle and for future resolves of other bundles, but not to existing importer bundles, which continue to see the old version. This situation generally requires Package-Admin.refreshPackages() to bring the bundles back to a useful state.
You can avoid some of these issues through interface-based programming and bundle partitioning. For example, if you can separate shared APIs (the APIs through which bundles interact) into interfaces, and you place those interfaces into a separate set of packages contained in a separate bundle, you can sometimes simplify this situation. In such a setup, both the client bundles and the bundles implementing the interfaces have dependencies on the shared API bundle, but not on each other. In other words, you limit the coupling between clients and the providers of the functionality.
3.6. Summary
In this chapter, you’ve seen that whether your desire is to deploy the bundles needed to execute your application or to create a sophisticated auto-adaptive system, the life-cycle layer provides everything you need. Let’s review what you’ve learned:
- A bundle can only be used by installing it into a running instance of the OSGi framework.
- The lifecycle layer API is composed of three main interfaces: BundleActivator, BundleContext, and Bundle.
- A BundleActivator is how a bundle hooks into the lifecycle layer to become lifecycle aware, which allows it to gain access to all framework facilities for inspecting and modifying the framework state at execution time.
- The framework associates a lifecycle state with each installed bundle, and the BundleContext and Bundle lifecycle interfaces make it possible to transition bundles though these states at execution time.
- Monitoring bundle lifecycle events is a form of dynamic extensibility available in the OSGi framework based on the dynamically changing installed set of bundles (also known as the extender pattern).
- The lifecycle and module layers have a close relationship, which is witnessed when bundles are updated and uninstalled. You use the Package Admin Service to manage this interaction.
Now we’ll move on to the next layer of the OSGi framework: the service layer. Services promote interface-based programming among bundles and provide another form of dynamic extensibility.