
Chapter 14. Securing your applications
- Providing an overview of the Java security architecture
- Using OSGi Conditional Permission Admin to manage permissions
- Signing bundles and granting permissions based on bundle signers
- Creating custom permission conditions for advanced use cases
OSGi allows you to create loosely coupled, extensible applications. In such applications, bundles can come and go at any time, and it’s easy to allow third parties to extend your application in a well-defined way. But as with most things in life, there’s a downside to this flexibility: you open yourself (or your users) to security vulnerabilities because third-party bundles can’t be completely trusted.
Luckily, the Java platform has built-in support for secure sandboxes, and the OSGi framework is designed to take advantage of them. Unfortunately, secure sandboxes and their restrictions are difficult to get right and often hard to manage. This is especially true in an environment as dynamic as the OSGi framework. To help with this situation, OSGi defines an extensive and powerful security model to ease security management.
In this chapter, we’ll familiarize you with the Java security model and how OSGi uses it to securely deploy and manage applications. You’ll learn how to create secure applications and well-behaved bundles for security-enabled OSGi frameworks. Before we start with that, let’s look at some general issues you’ll need to consider when trying to secure your applications.
14.1. To secure or not to secure
Modern applications and software solutions increasingly center around loosely coupled, extensible architectures. Component and service orientation are applied to almost all areas of application development including distributed systems, ubiquitous computing, embedded systems, and client-side applications. One of the main drawbacks of loosely coupled, extensible applications is the potential security issues around executing untrusted code. There are two common reasons for running untrusted software:
- Permission management is often extremely complicated. Often, users are left to make security policy decisions, and they’re typically unable to assess the impact of granting a given permission. Further, because the user is typically using an application to perform some task, security is largely viewed as an obstacle because it doesn’t contribute to the task at hand.
- It’s inherently tricky to establish meaningful identity of third-party software providers. It’s often necessary to differentiate between providers or types of providers to properly grant or deny permissions. Often the origin of the software artifact (where it came from) is used for this purpose, but techniques like digital signatures are also needed to ensure that the software hasn’t been tampered with. Digital signatures introduce the complicated process of creating and maintaining certificates and trust between certificates, which can be onerous for both users and developers.
This raises perhaps the biggest issue with securing code: it adds another burden to development. Even if you don’t plan to run with security enabled, your code has to be aware of security if you want it to be possible for other people to use the code when security is enabled. Then, to make matters worse, if you decide to enable security, the fine-grained security checks impose an execution-time performance penalty.
Despite these issues, security isn’t something that can or should be ignored, because plenty of people are willing to take advantage of software vulnerabilities. What do you need to do? Providing meaningful security management involves three key aspects:
- Establishing identity
- Establishing policies to manage permissions
- Performing permission checks and privilege management
As we mentioned previously, identity can be established by the location or origin of the software artifact or by cryptographic measures using digital certificates. Especially for the latter approach, the software provider generally needs to make the code available in such a way that you can establish the needed credentials. When you have identity established, you need to define the permissions that code should have. For OSGi, this is the responsibility of whoever is managing the framework, which can be a gateway operator, a server administrator, or even an end user. As a consequence, permission management should be kept as simple as possible. Last but not least, security must be built into the code itself. You have to think about internal security checks to prevent external code from performing undesired operations and also how to limit privileges so external code can perform potentially sensitive operations in a safe way.
Assuming you’re able to develop your code with all the security checks in the right place, define a reasonably policy to manage permissions, and sign it using a trusted certificate for establishing identity, is all the work worth it?
Clearly, it depends on your specific situation. In some cases, it’s not within the scope of your application. Either the performance impact is too great or the development costs are too high. Often, these issues serve as the determining factor for creating security-enabled applications. This is compounded by the fact that if code isn’t designed to be usable in security-enabled environments, it’s unlikely to happen by accident. This results in a catch-22 type of situation, where the difficulty associated with creating secure code results in security being ignored, which makes it next to impossible to use such code with security enabled, thus further raising the barriers for deciding to develop with security in mind in the first place.
All hope isn’t lost. In the remainder of this chapter, we’ll show you that taking advantage of the security capabilities of the OSGi framework needn’t be too difficult. In the next section, we’ll start by taking a high-level view of Java and OSGi security.
14.2. Security: just do it
So you want to secure your OSGi-based application. Great—but where do you start? Let’s begin at the beginning and look at the Java security architecture and its permission model, on which the OSGi security model is based.
14.2.1. Java and OSGi security
It’s important to understand the Java security architecture; but to keep this chapter tightly scoped, we’ll introduce only the parts needed to understand the remainder of the chapter. Welcome to Java security boot camp!
The Java security architecture is fundamentally about the assignment of java.security.Permission subclass objects to code. Specific permissions allow access to specific, sensitive operations, such as file system or network socket access. How do you grant Permission objects to code? The Java security architecture is based on the two fundamental concepts of domain- and role-based security:
- Domain-based security revolves around granting code permissions based on its origins (also referred to as its code base).
- Role-based security revolves around authenticating users or processes and granting them permissions based on who they are.
The OSGi framework security model relies on Java’s domain-based approach; the role-based approach is possible, but only as a layer on top. In standard Java, role-based security is provided by the Java Authentication and Authorization Service (JAAS) framework, but OSGi also provides its own API in the form of the User Admin Service. We won’t deal with role-based security in this chapter; for more information on the User Admin Service, refer to the OSGi compendium specification. Now, let’s delve a little deeper into domain-based security.
Permissions
The Java permission model is fairly simple. The Permission class is a base class from which more specific permissions can be derived via subclassing. You grant Permission objects to code to give it the ability to perform sensitive operations. Additionally, the Permission class has a method called implies() that accepts another Permission. This method checks to see if the supplied permission is implied by the target permission (similar to being a subset). Thus, Permission objects are used to both grant and check permissions.
Protection Domains
You grant permissions to code, but how are they associated with it? For domain-based security, Java uses a special concept called a protection domain, which is represented by the java.security.ProtectionDomain class, to encapsulate the security characteristics of a domain. Permissions are granted to protection domains, and all classes belong to a single protection domain. Sound complicated? Actually, in OSGi it’s pretty simple, because a domain is mapped one-to-one with a bundle; you can think of it as a bundle protection domain. All classes originating from a given bundle are members of the same bundle protection domain.
Bundle Protection Domain
Maintains a set of permissions granted to a given bundle. All classes loaded from a bundle are associated with the bundle’s protection domain, thus granting them the permissions granted to the bundle.
To understand how protection domains enable permission checking, consider code that performs a sensitive operation, such as creating a file. The code in the JRE for file access performs security checks internally to make sure the invoking code has permission to perform the operation. Internally, the code associated with performing file system operations triggers a specific permission check by using the security-checking methods of SecurityManager or AccessController. When triggered, the JVM collects the ProtectionDomains of all classes on the call stack leading to the invocation of the sensitive operation. It checks that each protection domain on the call stack has at least one permission implying (granting) the specific permission being checked by the method. Figure 14.1 shows how this looks in practice.
Figure 14.1. The JVM checks permissions by collecting all protection domains associated with classes on the call stack and seeing if each involved protection domain has the specified permission granted to it.
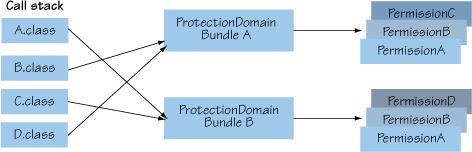
In this case, assume that class D performs a sensitive operation that triggers an internal permission check using the AccessController.checkPermission(Permission p) method. This checks whether at the point of the permission check, all protection domains on the call stack have permission p. Looking at figure 14.1, the JVM performs a stack walk from the class performing the security check and determines that classes A, B, C, and D are involved. Subsequently, it determines that classes A and C originate from the protection domain of Bundle B, and classes B and D originate from the protection domain of Bundle A. With this information, the JVM checks whether all protection domains have some permission implying the checked permission. If not, then a security exception is thrown.
This provides a good foundation for understanding the Java security architecture, but there’s one final piece to the puzzle: privileged calls.
Privileged Calls
You now know that checking a specific permission triggers a complete stack walk to collect all involved protection domains and verify that they all imply that permission. This is useful, but it’s too restrictive by itself. For example, assume you have a service with a method for appending a message to a log file. Because disk operations trigger file system–related permission checks, all code on the call stack must have permission to write to the file. This may be fine if only trusted code is involved; but in an extensible and collaborative environment like OSGi, you generally want to allow arbitrary bundles to share code and services, so it’s likely that some code on the call stack won’t be trusted.
In such cases, if a permission check always walks up the entire call stack, you either have to disallow all nontrusted code or grant code-sensitive permissions to untrusted code. Neither choice is palatable, which is why Java supports privileged calls. A privileged call is a mechanism to short-circuit the stack walk when performing a permission check. In practice, this allows trusted code to perform sensitive operations on behalf of code with insufficient permissions.
You achieve this by using the AccessController.doPrivileged() method, which takes a PrivilegedAction instance (it has a run() method similar to a Runnable). When the doPrivileged() method is invoked, it invokes the run() method of the passed-in PrivilegedAction. Any subsequent permission checks triggered by the PrivilegedAction stop walking the call stack at the last privileged call. Thus, only the protection domains from the privileged action onward are considered by subsequent permission checks.
Returning to the example of a service for appending a message to a log file, you trust the bundle containing the service implementation, but you don’t want to give direct file system access to anyone else. To do this, your service must encapsulate its file system operations inside a PrivilegedAction and use doPrivileged() like this:
public void append(String msg) {
  SecurityManager sm = System.getSecurityManager();
  if (sm != null) {
    AccessController.doPrivileged(new PrivilegedAction() {
      public Object run() {
        doFileAppend();
       }
     });
  }
  else {
    doFileAppend();
  }
}
Any triggered permission checks stop walking the call stack at the run() method, which means nontrusted code further up the stack won’t have its protection domain checked for the triggered permissions. Pushing this example further, you may decide to limit which code can call the append() method. To so this, you can create your own Permission subclass, which you can grant to code. For the append method, if you create an AppendPermission, it can check the permission before performing the privileged call:
public void append(String msg) {
  SecurityManager sm = System.getSecurityManager();
  if (sm != null) {
    sm.checkPermission(new AppendPermission());
    AccessController.doPrivileged(new PrivilegedAction() {
      public Object run() { doFileAppend(); }});
  } else {
    doFileAppend();
  }
}
Here your service asks the SecurityManager to check whether the code on the call stack has been granted the custom AppendPermission. If so, it can continue to perform the file-append operation; otherwise, a security exception is thrown.
Warning
You may have noticed that you check whether the security manager is null before performing security checks. You do it this way because you want to perform security checks only if security is enabled, to avoid performance penalties when it’s not enabled.
That pretty much sums up the important pieces of the Java security architecture. These mechanisms provide for flexible, fine-grained security management. A potential downside is that managing all these permissions can be complex. Luckily, the OSGi specification lessens some of this complexity by defining services to help you perform permission management. We’ll look at these services shortly; first, let’s examine OSGi-specific permissions defined by the OSGi specification.
14.3. OSGi-specific permissions
Certain methods in the OSGi framework API perform sensitive operations or provide access to sensitive information. To control which code can access these sensitive methods, the OSGi specification defines a few custom permissions, as you learned about in the last section. You can group these permissions by the layers of the OSGi framework, as shown in table 14.1.
Table 14.1. Permissions defined by the OSGi specification
|
Layer |
Permission(s) |
|---|---|
| Module | PackagePermission—Controls which packages a bundle is allowed to import and/or export BundlePermission—Controls which bundles a bundle is allowed to require |
| Lifecycle | AdminPermission—Controls which bundles are allowed to perform sensitive lifecycle operations |
| Services | ServicePermission—Controls which services a bundle is allowed to publish and/or use |
We’ll introduce these OSGi permissions in the following subsections, and you’ll subsequently use them when we discuss permission management.
Standard Java permissions typically have constructors that accept two parameters: a name string and an actions string. The meaning of these parameters is determined by the specific permission. For example, java.io.FilePermission expects a file path for name and a comma-delimited value that may include READ, WRITE, EXECUTE, or DELETE for actions. The combination of name and actions allows you to express everything the permission allows you to control. All of the OSGi-specific permissions follow this pattern, as you’ll see.
14.3.1. PackagePermission
PackagePermission is a module-layer permission giving you the ability to limit which packages a bundle can import or export. For example, we discussed how methods can use AccessController.doPrivileged() to allow code with insufficient privileges to perform sensitive operations. You may not want any arbitrary code using the packages containing these privileged operations. In that case, you can use PackagePermission to limit which bundles can import the packages containing the associated classes. Likewise, you can use PackagePermission to control which bundles can export a given package, because you may only want trusted bundles providing some packages.
To grant a specific PackagePermission, you need to supply the name and actions parameters for its constructor; these parameters are described in table 14.2.
Table 14.2. PackagePermission constructor parameters
|
Parameter |
Description |
|---|---|
| String name | Name of the package or packages to which this permission applies |
| String actions | Comma-delimited list of the actions granted by the permission (export, import, or exportonly) |
For convenience, you can use * or a trailing .* as a wildcard to target several packages with a single permission. For the actions, import gives a bundle permission to import the named packages, export gives a bundle permission to export and import the package, and exportonly does as its name implies. You may wonder why export also gives permission to import the named packages. It’s to support bundles’ ability to import packages they export (that is, substitutable exports), as described in section 5.1.1.
To get an idea of how PackagePermission works, let’s take a conceptual look at how the framework uses it. Assume you have a bundle with the following imports and exports:
Import-Package: org.foo, org.bar
Export-Package: org.bar
When the framework resolves this bundle, it checks to see whether the bundle has the following permissions granted to it:
- PackagePermission.IMPORT permission for the org.foo package
- PackagePermission.IMPORT permission for the org.bar package
- PackagePermission.EXPORT permission for the org.bar package
For these checks to succeed, you’d have to grant the necessary permissions, such as
new PackagePermission("org.foo", PackagePermission.IMPORT);
new PackagePermission("org.bar", PackagePermission.EXPORT);
Notice that you don’t need to grant the bundle permission to import org.bar, because it’s implied by the export action.
That’s the basics for PackagePermission; let’s move on to the next OSGi permission.
14.3.2. BundlePermission
Similar to PackagePermission, BundlePermission is a module-layer permission for controlling bundle and fragment dependencies. To grant a BundlePermission, you need to construct it with the parameters shown in table 14.3.
Table 14.3. BundlePermission constructor parameters
|
Parameter |
Description |
|---|---|
| String symbolicName | Symbolic name of the bundle to which this permission applies |
| String actions | Comma-delimited list of the actions granted by the permission (provide, require, host, or fragment) |
As with PackagePermission, you can use * or a trailing .* as a wildcard to target several packages with a single permission. To control bundle dependencies, the provide action gives a bundle permission to be required by bundles matching the supplied symbolic name, whereas require gives it permission to require matching bundles.
Fragment dependencies are controlled by the host and fragment actions, which give a bundle the ability to be a host bundle for matching fragments or be a fragment for matching hosts, respectively. Another similarity to PackagePermission is that the provide action implies the require action.
Using BundlePermission isn’t sufficiently different from using PackagePermission, so we won’t look into it any further. Instead, we’ll move on to the next OSGi permission.
14.3.3. AdminPermission
AdminPermission is a lifecycle-layer permission to control access to sensitive framework operations and information. The operations and information protected by AdminPermission are diverse, which makes it somewhat complex but fairly powerful. Table 14.4 shows the parameters needed to create such a permission.
Table 14.4. AdminPermission constructor parameters
|
Parameter |
Description |
|---|---|
| String filter | LDAP filter to specify matching bundles |
| String actions | Comma-delimited list of the actions granted by the permission (class, execute, extensionLifecycle, lifecycle, listener, metadata, resolve, resource, startlevel, or context) |
When you grant AdminPermission to a bundle, that bundle is allowed to perform the specified actions on the bundles matching the filter. The filter uses the same LDAP filter syntax used by the OSGi service registry, but only the following attributes are defined for matching:
- signer—Identity information about the bundle provider
- location—Bundle location
- id—Bundle identifier
- name—Bundle symbolic name
We’ll give some filter examples shortly. First we’ll briefly describe what the granted actions allow on the matching bundles:
- class—Load a class
- execute—Start, stop, and set the start level
- extensionLifecycle—Manage extension bundles
- lifecycle—Install, update, and uninstall
- listener—Add/remove a synchronous bundle listener
- metadata—Retrieve bundle headers and location
- resolve—Resolve and refresh
- resource—Get resources
- startlevel—Set the start level, and initial the start level
- context—Get the bundle context
The special action * represents all actions. As you can see, AdminPermission gives you fine-grained control over which bundles can do what on which bundles. For example, assume a bundle wants to install another bundle using code like this:
context.installBundle("file:bundle.jar").start();
This triggers the framework to check whether all code on the call stack has the following:
- AdminPermission.LIFECYCLE permission for the installed bundle
- AdminPermission.EXECUTE permission for the installed bundle
This is relatively straightforward, although granting the permission can be a little confusing. The thing to remember about AdminPermission is that you use it to grant a bundle the right to perform specific operations on other bundles. The filter constructor parameter is how you specify the bundles that can be controlled. For a more complicated example, you can grant an AdminPermission like this:
new AdminPermission("(&(signer=CN=core,O=baz,C=de)(name=org.foo.*)
  (location=file://*)(id>=10))", AdminPermission.LIFECYCLE + "," +
  AdminPermission.EXECUTE);
The bundle granted this permission can perform the operations associated with AdminPermission.LIFECYCLE and AdminPermission.EXECUTE on bundles with a signer matching CN=core,O=baz,C=de (more on signing later), a symbolic name starting with org.foo, a location starting with file://, and a bundle identifier greater than 10. Granted, this is completely contrived, but it illustrates the possibilities.
You’ve now seen the module- and lifecycle-layer permissions, which means you have one framework layer to go—services.
14.3.4. ServicePermission
ServicePermission is a service-layer permission for controlling which services a bundle can provide or use. As with the other permissions, the actual permission granted is controlled by its constructor parameters, as shown in table 14.5.
Table 14.5. ServicePermission constructor parameters
|
Parameter |
Description |
|---|---|
| String name | Service interface or class name(s) |
| String actions | Comma-delimited list of the actions granted by the permission (get or register) |
You can use * or a trailing .* as a wildcard to target several service interfaces or classes with a single permission. The get action grants the ability to use the specified services, whereas the register action grants the ability to provide the specified services. For the get action, you can also use an LDAP filter for name, which matches against the associated service properties in addition to the same set of bundle properties described for BundlePermission (signer, location, id, and name).
To get a better understanding of how this permission is used, consider the following snippet of code a bundle can use to find a service and to register a service:
context.getServiceReference("org.foo.Service");
context.registerService("org.bar.Service", new Service(), null);
Here you find an org.foo.Service service and register an org.bar.Service service. This triggers the framework to check whether all code on the call stack has the following:
- ServicePermission.GET for the org.foo.Service interface
- ServicePermission.REGISTER for the org.bar.Service interface
These permission checks are straightforward. For the associated bundle to perform these tasks, you can grant it these permissions:
new ServicePermission("org.foo.*", ServicePermission.GET);
new ServicePermission("org.bar.Service", ServicePermission.REGISTER);
In the first permission, you use a wildcard to allow it to access all services in the org.foo package. In the second permission, you specifically allow it to register org.bar.Service services.
That completes the OSGi-specific permissions you can grant to bundles. Before we move on to discussing permission management, let’s briefly discuss file permissions, because they behave slightly differently in an OSGi environment.
14.3.5. Relative file permissions
Although java.io.FilePermission isn’t defined by the OSGi specification, it’s still impacted by how the framework interprets it. In a standard Java environment, a file permission created with a relative path is interpreted as being relative to the directory from which the Java process was started (the current working directory). This isn’t the case in an OSGi environment. Instead, it’s treated as relative to the root of the private data area of the associated bundle.
Typically, this doesn’t have much of an effect, especially because the framework automatically grants bundles permission to read, write, and delete files in their own private area. The main thing this enables is the ability to grant a bundle additional permissions for files in its private data area, such as the execute permission.
Enough of describing permissions. Next, we’ll discuss how you manage them with the Conditional Permission Admin Service.
14.4. Managing permissions with Conditional Permission Admin
Until now, we’ve talked mostly about the details of permissions (what they look like and what they mean) and otherwise glossed over how you grant permissions to bundles. Individual permissions in and of themselves aren’t that useful. The useful part is being able to grant and manage permissions for groups of bundles in accordance with your desired security policies. To help you achieve this goal, the OSGi specification defines the Conditional Permission Admin Service.
Whereas standard Java offers a file-based policy approach for permission management, OSGi only defines an API-based approach, because it fits better with the inherently dynamic nature of the OSGi environment. The Conditional Permission Admin Service is the one place to go to define and maintain your security policy. Further, it introduces a new way of performing permission management by defining the concept of conditional permission management, which is how it got its name. Let’s explore this concept first.
14.4.1. Conditional permissions
If you’re at all familiar with standard Java permission management, you know that the basic approach is to grant permissions to code using a policy file. A standard Java policy file may look something like this:
grant signedBy "sysadmin" {
  permission java.security.AllPermission;
};
grant codeBase "file:/app/main.jar" {
  permission java.security.AllPermission;
};
grant {
  permission java.io.FilePermission "/tmp/*", "read,write";
};
In this policy file, you granted all permissions to classes signed by sysadmin and from file:/app/main.jar. All other classes are only granted read/write access to the /tmp/ directory. Although this example assigns only a single permission for each case, you can assign any number of permissions in a single group. When the security manager walks up the call stack to check permissions at execution time, the permissions for a given class are determined by effectively using either its signer or code base as a key to look up the associated protection domain to see which permissions have been granted to it. If the protection domain has the permission, the call can proceed; if not, the call fails.
This approach works, but it’s somewhat simplistic. In particular, it allows you to grant permissions only based on one of two conditions:
- Who cryptographically signed the class
- The originating location of the class (that is, the code base)
The Conditional Permission Admin Service improves on this by introducing an abstract condition concept, which allows you to grant permissions based on arbitrary conditions. A condition acts as a Boolean guard that determines whether a permission group is applicable; a permission group can be guarded by zero or more conditions. Because permissions are granted to bundles in OSGi, conditions are evaluated against the bundles on the call stack to determine which permissions have been granted to a bundle. If multiple conditions are associated with a permission group, all conditions must be satisfied for the permissions to apply (a logical AND).
If it isn’t already clear, this is pretty powerful. Not only does it allow you to introduce your own arbitrary conditions for granting permissions, but these conditions can also be much more dynamic and fine-grained. For example, you can create a condition to only grant permissions based on license status via remote server communication or even the time of day. We’ll get into creating custom conditions later; for now, we’ll continue to explore what’s provided by the Conditional Permission Admin Service.
If you know anything about Java security, you probably know it can have a significant impact on execution-time performance. Evaluating all conditions for all bundles on the call stack on every permission check can get expensive. Luckily, the Conditional Permission Admin Service provides a way to mitigate this cost in a lot of cases by differentiating between mutable and immutable conditions. This means the Boolean results for immutable conditions only need to be calculated once per bundle protection domain. You’ll see an example of an immutable condition shortly.
14.4.2. Introducing the Conditional Permission Admin Service
Let’s look at the API behind the Conditional Permission Admin Service, which is the ConditionalPermissionAdmin service interface shown in the following listing.
Listing 14.1. The ConditionalPermissionAdmin interface
public interface ConditionalPermissionAdmin {

  ConditionalPermissionInfo addConditionalPermissionInfo(
    ConditionInfo[] conds, PermissionInfo[] perms);

  AccessControlContext getAccessControlContext(String[] signers);

  ConditionalPermissionInfo getConditionalPermissionInfo(String name);

  Enumeration getConditionalPermissionInfos();

  ConditionalPermissionInfo setConditionalPermissionInfo(
    String name, ConditionInfo[] conds, PermissionInfo[] perms);

  public ConditionalPermissionUpdate newConditionalPermissionUpdate();

  public ConditionalPermissionInfo newConditionalPermissionInfo(
    String name, ConditionInfo[] conditions, PermissionInfo[] permissions,
    String access);

  public ConditionalPermissionInfo newConditionalPermissionInfo(
    String encodedConditionalPermissionInfo);
}
With this service, you can grant permissions to bundles. To achieve this, you use the service to maintain a persistent set of ConditionalPermissionInfo objects, which as a whole embody your current security policy. A ConditionalPermissionInfo object is a tuple containing a set of ConditionInfo objects and a set of PermissionInfo objects. Figure 14.2 depicts these relationships.
Figure 14.2. Conditional Permission Admin Service overview

The set of ConditionInfo objects encodes the conditions that must be true for the permissions to apply, and the set of PermissionInfo objects encodes the permissions to be granted. You may wonder why you need ConditionInfo and PermissionInfo objects to encode the conditions and permissions, respectively, rather than directly creating instances of conditions and permissions. This is because the bundle assigning permissions may not have access to the associated classes, because you’re in a modular environment. Both of these info objects encode a target class name and its constructor arguments.
More specifically, a ConditionInfo encodes two arguments: the class name of the condition and an array of String objects for any constructor arguments for the condition class. The PermissionInfo object, on the other hand, encodes three arguments: the class name of the permission and the standard name and actions arguments of the permission class constructor. As a simple example, you can construct a PermissionInfo object like this:
new PermissionInfo(
  AdminPermission.class.getName(), "(id>10)", AdminPermission.EXECUTE);
This encodes the AdminPermission with the name of (id>10) and actions of execute, which grants the right to start and stop bundles with a bundle identifier greater than 10. To see a ConditionInfo example, you’ll need a concrete condition to play with, so we’ll introduce one next. After that, we can get down to brass tacks and show you the steps involved in using ConditionalPermissionAdmin.
14.4.3. Bundle location condition
We’ve talked abstractly about conditions, but we haven’t yet discussed any concrete condition types. The OSGi specification defines two: BundleLocationCondition and BundleSignerCondition. Intuitively, you can probably guess that these conditions correspond to the two types of conditions that exist in standard Java policy files. You’ll learn about the former right now and the latter when we discuss bundle signing a little later.
You construct a BundleLocationCondition with a location string, which it uses to match against bundles on the call stack during a permission check. In other words, this condition matches bundles with the same location string, which for all intents and purposes is equivalent to the bundle’s origin or code base. The condition location string may contain * as a wildcard to match multiple locations. As we mentioned previously, to use this condition with the ConditionalPermissionAdmin service, you need to encode it in a ConditionInfo, such as in the following example:
new ConditionInfo(BundleLocationCondition.class.getName(),
  new String[] { "*://foo.org/*" });
Here you encode the name of the BundleLocationCondition class and its constructor arguments. This particular example matches all bundles coming from the foo. org domain using any protocol. Since the OSGi R4.2 specification, BundleLocation-Condition also accepts a second parameter; you can use ! to negate the evaluated result. For example:
new ConditionInfo(BundleLocationCondition.class.getName(),
  new String[] { "file:bundle/foo.jar", "!" });
This results in a BundleLocationCondition that matches all bundles except a bundle with the location file:bundle/foo.jar. With this concrete condition under your belt, you can now see what’s involved in using the ConditionalPermissionAdmin service in practice.
14.4.4. Using ConditionalPermissionAdmin
The steps for using ConditionalPermissionAdmin are straightforward:
1. Get the service from the OSGi service registry.
2. Give your bundle AllPermission.
3. Set permissions for other bundles to implement a security policy.
Nothing too surprising here, but these steps do assume you’re starting from a clean slate. When an OSGi framework is started for the first time with security enabled, all bundles have AllPermission. This essentially means that the first bundle to get the ConditionalPermissionAdmin service and set a security policy is in control, because any permissions it sets are persistently recorded. If your bundle isn’t the first, it may not be able to get the service or may get a security exception when it tries to change the security policy, because AllPermission is required to change permissions. For now, let’s assume your bundle is first or at a minimum has AllPermission.
When you’ve retrieved the service, you want to use the ConditionalPermissionAdmin.newConditionalPermissionUpdate() method to create a session for modifying permissions. The ConditionalPermissionUpdate object has a getConditionalPermissionInfos() method for retrieving a mutable list of ConditionalPermissionInfo objects that make up the current security policy. To make changes to the policy, modify the returned list and then call ConditionalPermissionUpdate.commit() to write your changes. For example, the following code snippet shows how a bundle can give itself AllPermission (steps 1 and 2 from earlier).
Listing 14.2. Using the ConditionalPermissionUpdate to set permissions
ConditionalPermissionAdmin cpa = getConditionalPermissionAdmin();
ConditionalPermissionUpdate u = cpa.newConditionalPermissionUpdate();
List infos = u.getConditionalPermissionInfos();
infos.clear();
infos.add(
  cpa.newConditionalPermissionInfo(
    "management agent all permission",
    new ConditionInfo[] {
      new ConditionInfo(
        BundleLocationCondition.class.getName(),
        new String[] { context.getBundle().getLocation() })
      },
    new PermissionInfo[] {
      new PermissionInfo(
        AllPermission.class.getName(), "", "")
      }
    },
    ConditionalPermissionInfo.ALLOW));
u.commit();
Going step by step through the code, you begin by using a utility method to retrieve the ConditionalPermissionAdmin service, and then you use the service to get a ConditionalPermissionUpdate object. From the update object, you get a list of ConditionalPermissionInfo objects representing the current security policy (which is an empty list initially). Although it may not technically be necessary, you clear the list to make sure there aren’t any other random permissions in your security policy. Then you add a new ConditionalPermissionInfo object, which you construct using the newConditionalPermissionInfo() method of the ConditionalPermissionAdmin ser-vice. This method takes four arguments: the name associated with the Conditional-PermissionInfo, an array of ConditionalInfo objects, an array of PermissionInfo objects, and an access-decision flag.
What does this particular permission entry do? The name you set is a unique key to identify the entry and has no inherent meaning; if you specify null for the name, a unique name will be generated for you. The single ConditionInfo and Permission-Info objects in their respective arrays match your bundle and grant it AllPermission. We’ll expand on the last argument, the access-decision flag, in the next section.
The last step after adding the ConditionalPermissionInfo object is to commit it, which you do using the update object. Assuming this completes successfully, you’ve successfully modified the security policy. To set permissions for other bundles, you follow a similar set of steps: get an update object, add or remove any desired permissions, and then call commit(). Pretty simple. Just make sure you don’t delete the entry giving your own bundle AllPermission!
Now let’s look into what the access-decision flag means.
The approach we just outlined for using the ConditionalPermissionAdmin service is simplified by the introduction of the ConditionalPermissionUpdate API in the OSGi R4.2 specification. If you’re using a framework that implements an older R4 specification, the steps are conceptually the same, but the details are different. For example, after getting the ConditionalPermissionAdmin service, you need to directly add AllPermission for your bundle:
ConditionPermissionInfo myCPI = cpa.addConditionalPermissionInfo(
  new ConditionInfo[] {
    new ConditionInfo(
      BundleLocationCondition.class.getName(),
      new String[]{context.getBundle().getLocation()}) },
  new PermissionInfo[] {
    new PermissionInfo(
      AllPermission.class.getName(), "", "") });
You assign permissions to other bundles in a similar fashion. To remove unexpected or unwanted permission entries, you need to loop through any existing ConditionalPermissionInfo objects and delete them, like this:
Enumeration e = cpa.getConditionalPermissionInfos();
while (e.hasMoreElements()) {
  ConditionalPermissionInfo info =
    (ConditionPermissionInfo) e.nextElement();
  if (!info.equals(myCPI)) {
    info.delete();
  }
}
Notice that in this example, you take care not to delete your own Conditional-PermissionInfo; otherwise, you’d lose the ability to set permissions. This highlights the most important difference between this older (and deprecated) approach and the newer update approach: changes happen immediately and don’t require any sort of commit operation.
Allow- VS. Deny-Access Decisions
Until this point, we’ve talked about granting permissions to allow code to perform some operation. This is the standard way to think about permissions in Java. The OSGi R4.2 specification introduced a new wrinkle: deny-access decisions. Instead of only using permissions to say what code is allowed to do, you can also use them to say what code isn’t allowed to do. You saw the standard case in listing 14.2, where you added a condition with an access decision of ConditionalPermissionInfo.ALLOW; this corresponds to the normal case of saying what is allowed. But now you can use ConditionalPermissionInfo.DENY to say what isn’t allowed.
Being able to allow/deny permissions makes it possible to use a white list/black list approach for handling security. Deny-access decisions can significantly simplify some security policies because they let you easily handle an exception to a general rule. Consider a case where you want to allow a bundle to import all packages except those with names starting with org.foo.secure. How can you implement such a policy with only allow-access decisions? You’d have to exhaustively grant permissions to import every package except the ones you want to exclude. This wouldn’t even be possible in an open-ended system. This is where a deny-access decision becomes valuable.
Assume you add a ConditionalPermissionInfo with a deny-access decision. During a permission check, if the associated conditions match and the permission being checked is implied by the associated permissions, the bundle on the stack will be denied permission to perform the operation. To complete the hypothetical example, you can grant a bundle the following permission:
infos.add(admin.newConditionalPermissionInfo(
  "deny-secure-packages",
  new ConditionInfo[] { new ConditionInfo(
    BundleLocationCondition.class.getName(),
    new String[] { "file:foo.jar" }) },
  new PermissionInfo[] { new PermissionInfo(
    PackagePermission.class.getName(),
    "org.foo.secure.*", PackagePermission.IMPORT)
  }, ConditionalPermissionInfo.DENY));
This prevents it from importing packages starting with org.foo.secure. Of course, to give it permission to import everything else, you also have to grant it the following permission:
infos.add(admin.newConditionalPermissionInfo(
  "allow-non-secure-packages",
  new ConditionInfo[] { new ConditionInfo(
    BundleLocationCondition.class.getName(),
    new String[] { "file:foo.jar" }) },
  new PermissionInfo[] { new PermissionInfo(
    PackagePermission.class.getName(),
    "*", PackagePermission.IMPORT)
  }, ConditionalPermissionInfo.ALLOW));
This allows it to import everything else. This also raises another important point when mixing allow and deny decisions into a single security policy: ordering. With allow-and deny-access decisions, the order of ConditionalPermissionInfo objects in the policy table managed by the ConditionalPermissionAdmin service becomes important. When a permission check is triggered, the entries in the policy table are traversed in ascending index order until the first one is found where the conditions are satisfied and the required permission is present. If the associated access policy is DENY, the check fails. If it’s ALLOW, the checking continues with the next bundle protection domain on the stack. Thus, in the example, to implement the policy correctly the denied permission must be added before the allowed permission.
That covers the basics of using the ConditionalPermissionAdmin service. To provide a slightly more familiar approach to defining a security policy for seasoned Java developers, you’ll now use this API to create a policy-file reader. A lot of what you need for doing this is provided by the OSGi specification already, so it’s pretty easy to accomplish.
14.4.5. Implementing a policy-file reader
The main purpose behind implementing a policy-file reader is to give you a convenient way to populate the ConditionalPermissionAdmin service with Conditional-PermissionInfo objects composing your desired security policy. To achieve this, you need a way to encode/decode ConditionalPermissionInfo objects to/from human-readable text. As luck would have it, the Conditional Permission Admin Service specification standardizes such an encoding.
To encode an object, you use the ConditionalPermissionInfo.getEncoded() method, which returns a String representing the associated object. To decode an object, you use the ConditionalPermissionAdmin.newConditionalPermission(String) method, which returns the corresponding decoded ConditionalPermissionInfo object. It can’t get much simpler than that. The encoded format is
access { conditions permissions } name
Here, access is the access decision (either ALLOW or DENY), conditions is zero or more encoded conditions, permissions is one or more encoded permissions, and name is the name associated with the ConditionalPermissionInfo object. Drilling down, the encoded format of a ConditionInfo is
[type "arg0" "arg1" ...]
where type is the fully qualified class name of the condition and the remaining are the quoted arguments for its constructor. In a similar fashion, the encoded format of a PermissionInfo is
(type "name" "actions")
As with conditions, type is the fully qualified class name of the permission, and the remaining are the quoted name and actions for its constructor. A more concrete example looks like this (we’ve added line breaks for readability):
ALLOW {
  [org.osgi.service.condpermadmin.BundleLocationCondition "file:foo.jar"]
  (org.osgi.framework.PackagePermission "*" "IMPORT")
} "allow-all-packages"
With this standard encoding format, you can implement a simple policy-file reader bundle that populates the ConditionalPermissionAdmin service by reading encoded ConditionalPermissionInfo objects from a file upon activation. All you’ll need to do to set and/or change your security policy is to edit your policy file and then start this bundle. More precisely, its start() method looks like the following listing.
Listing 14.3. Policy-file reader bundle activator start() method
public void start(BundleContext context) {
  File policyFile = getPolicyFile(context);
  List<String> encodedInfos = readPolicyFile(policyFile);
  encodedInfos.add(0, "ALLOW {"
    + "[org.osgi.service.condpermadmin.BundleLocationCondition ""

    + context.getBundle().getLocation() + ""]"
    + "(java.security.AllPermission "*" "*")"
    + "} "Management Agent Policy"");
  ConditionalPermissionAdmin cpa =
    getConditionalPermissionAdmin(context);
  ConditionalPermissionUpdate u = cpa.newConditionalPermissionUpdate();
  List infos = u.getConditionalPermissionInfos();
  infos.clear();
  for (String encodedInfo : encodedInfos) {
    infos.add(cpa.newConditionalPermissionInfo(encodedInfo));
  }
  if (!u.commit()) {
    throw new ConcurrentModificationException(
      "Permissions changed during update");
  }
}
This method combines most of your knowledge about the ConditionalPermissionAdmin service. You get the policy file, which defaults to a file called security.policy but can be configured. Next, you read in the encodings of the ConditionalPermissionInfo objects contained in the policy file and add an encoding for an AllPermission at the beginning of the list for the policy-file reader bundle. The previous step is necessary to make sure the policy-reader bundle has sufficient permission to make future changes to the security policy.
After this, you get the ConditionalPermissionAdmin service, create a new ConditionalPermissionUpdate, and use it to get the current list of ConditionalPermissionInfo objects. You clear the existing policy to make sure you’re starting with a clean slate, and then loop through the encoded permissions to decode them and add them to your list of objects. The only thing left to do is commit the update. Because the update may fail if the permissions were changed concurrently, you throw an exception in this case.
To see the full details of this bundle, go to the chapter14/combined-example/ org.foo.policy/ directory of the book’s companion code. This bundle is generic and can be used in any security-enabled framework to put a policy file into effect. You’ll see it in action a little later when we show a complete example with digitally signed bundles and a custom condition. We’ll introduce bundle signing next.
14.5. Digitally signed bundles
Defining a security policy by assigning permissions to bundles is a workable approach, but being able to step up a level can simplify things. For example, you may trust a particular provider, so it’s nice to be able to assign permissions based on the provider rather than individual bundles. Doing so simplifies defining a security policy, because it raises the level of abstraction. Digitally signed bundles can help you achieve this; specifically, they help you do two things:
- Authenticate the provider of a bundle
- Ensure that bundle content hasn’t been modified
The former provides the ultimate goal, but without the latter, the former would be meaningless. You’ll learn about both as we discuss digital signing and certificates. We’ll show you how to create certificates and use them to digitally sign your bundles. Then we’ll introduce BundleSignerCondition, which gives you the ability to grant permissions based on the identity established via certificates. First, let’s get some terminology out of the way.
14.5.1. Learning the terminology
The domain of digital cryptography is complex and sophisticated. Providing a complete and detailed description is beyond the scope of the book, so we’ll focus on describing just enough to have it make sense. With that in mind, table 14.6 introduces some relevant terms we’ll use throughout the remainder of the chapter.
Table 14.6. Digital cryptography terminology
|
Term |
Definition |
|---|---|
| Digital signing | A mathematical approach for verifying the authenticity of digital data. Specifically, used to verify the identity of the provider and that the data hasn’t been modified. |
| Signature | A unique value calculated when data is digitally signed. |
| Public key cryptography | A form of digital signing using two mathematically related keys: a public key and a private key. The private key is a guarded secret used to sign data. The public key is shared with others in the form of a certificate, which they can use to verify that a signature was generated with the private key. This allows you to infer the identity of the provider and determine whether someone has tampered with the data. |
| Certificate | A form of metadata about a public key, binding it to the identity of the private key holder. This binding is achieved by having a well-known (trusted) third party sign the public key/ identity pair. |
| Distinguished name | The identification portion of a certificate; specifically, as defined by the X.509 ITU-IT standard. Identifies the holder of the private key. |
| Certificate chain | A certificate has a reference to the certificate of its third-party signer, which includes a reference to the certificate of its signer, and so on, until the root. This is a certificate chain. The root of the certificate chain is a self-signed certificate. |
A general understanding of these terms should be sufficient. You don’t need a complete understanding of digital cryptography to use the technology effectively. We’ll start looking at the basics.
14.5.2. Creating certificates and signing bundles
You’ll be using digital signing based on public key cryptography, which involves a public key and a private key. The public key is shared with the world in the form of a certificate. The private key is kept secret and used to sign data by performing a computation over it. The resulting value can be verified by performing another calculation over the data using the public key. This verifies that the signer has access to the private key and that the data hasn’t been modified.
In OSGi, the signer of a bundle is associated with it. With this association, you can grant permissions to a bundle based on its signers. For example, you can assign permissions to all bundles from a particular company, if the company signs its bundles. You can also grant permissions to perform operations on bundles signed by specific principles. These approaches provide a simple yet powerful way to control who can do what inside your application.
Effectively, bundle signing creates a powerful delegation model. An administrator can grant a restricted set of permissions to a signer, after which the signer can create bundles that use those permissions or some subset, without any intervention or communication with the administrator for each particular bundle. To understand how this all fits together, consider the following scenario.
Assume you have a system that features a set of core bundles (which we’ll call the core domain) and an arbitrary number of third-party plugin bundles (which we’ll call the third-party domain). This means you expect fully trusted bundles and not completely trusted bundles to exist in your system, but you want to provide a level of isolation between them. Your goal is to create a simple security policy that lets you manage core and third-party bundle domains without knowing the precise bundles in each set. We’ll delve into the details of doing this next.
Certificates and Keystores
To implement the desired security policy for this scenario, you need to create two root certificates for the core and third-party domains. These root certificates will be used by the framework to establish a chain of trust for the two domains. With these two certificates, you can then sign certificates of core and third-party providers with the appropriate certificate. When they use their individual certificates to sign bundles they’ve created, the framework can use the root certificates to establish a chain of trust and determine to which domain a bundle belongs.
The details of all this are based on Java 2 JAR file signing, which means the same tools you use to sign JAR files can be used for OSGi. To create the needed certificates and their associated public and private keys, you’ll use the keytool command provided by the JDK. It can create and manage certificates and keys inside a keystore, which is an encrypted file defined by Java for this purpose. For this scenario, you use key-tool to create two certificates and their associated public/private keys for the core and third-party domains like this:
keytool -genkey -keystore keys.ks -alias core -storepass foobar
  -keypass barbaz -dname "CN=core,O=baz,C=de"
keytool -genkey -keystore keys.ks -alias third-party
  -storepass foobar -keypass barbaz -dname "CN=third-party,O=baz,C=de"
This creates a keystore called keys.ks containing two new key pairs and a certificate for each pair with aliases of core and third-party. The keystore is protected by the password foobar, and the keys themselves have the password barbaz. The -dname switch allows you to specify the distinguished name you use to identify yourself, which in this case is the baz organization in Germany (de).
Distinguished Name
A standard X.509 structured name, officially identifying a node in a hierarchical namespace. For our purposes, it’s sufficient to recognize a distinguished name (DN) as a set of comma-delimited attributes, such as in the example: CN=core,O=baz,C=de. These attributes specify the common name, organization, and country, respectively. The hierarchical aspect of this namespace is that it goes from the least significant (but most specific) attribute to the most significant. The root of the tree for these attributes is the country, which is then divided into organization, and further divided into common names within an organization. Order is significant. Two DNs with the same attributes but different order are different DNs.
The next thing to do is sign your key pair certificates with themselves. It may sound a little strange, but this is how you make them root certificates. It’s a common thing to do, as you can see by the fact that the keytool command has support for it:
keytool -selfcert -keystore keys.ks -alias core -storepass foobar
  -keypass barbaz -dname "CN=core,O=baz,C=de"
keytool -selfcert -keystore keys.ks -alias third-party
  -storepass foobar -keypass barbaz -dname "CN=third-party,O=baz,C=de"
The only difference from the previous command is that you use -selfcert instead of -genkey.
Now you have key pairs that you can use to sign other certificates or bundles to make them part of your trusted certificate chain. To allow other people to verify your signatures, you need to extract the certificates from the keys.ks keystore and import them into a new keystore called certificates.ks. Why? Because the keys.ks key-store contains your private keys; you need another keystore that contains only your public keys to share with the outside world. Currently, your certificates are saved as key entries (a public/private key pair and its certificate) in the keystore. You need to export them and re-import them as certificate-only entries, which you do like this:
keytool -export -v -keystore keys.ks -alias core
  -file core.cert -storepass foobar -keypass barbaz
keytool -export -v -keystore keys.ks -alias third-party
  -file third-party.cert -storepass foobar -keypass barbaz
keytool -import -v -keystore certificates.ks -alias core-cert
  -file core.cert -storepass foobar -keypass barbaz
keytool -import -v -keystore certificates.ks -alias third-party-cert
  -file third-party.cert -storepass foobar -keypass barbaz
You can verify the contents of your keystores like this:
> keytool -list -keystore certificates.ks -storepass foobar

third-party-cert, 08.01.2010, trustedCertEntry,
fingerprint (MD5): 15:9B:EE:BE:E7:52:64:D4:9C:C1:CB:5D:69:66:BB:29
core-cert, 08.01.2010, trustedCertEntry,
fingerprint (MD5): CE:37:F8:71:C9:37:12:D0:F1:C8:2B:F9:85:BE:EA:61

> keytool -list -keystore keys.ks -storepass foobar

core, 08.01.2010, PrivateKeyEntry,
fingerprint (MD5): CE:37:F8:71:C9:37:12:D0:F1:C8:2B:F9:85:BE:EA:61
third-party, 08.01.2010, PrivateKeyEntry,
fingerprint (MD5): 15:9B:EE:BE:E7:52:64:D4:9C:C1:CB:5D:69:66:BB:29
You have everything in place now, which means we can look into signing bundles to make them members of one of your domains.
Signing Bundles
A bundle JAR file can be signed by multiple signers; the signing follows normal Java JAR signing rules. The only additional constraint for a bundle is that all entries inside the bundle must be included in the signature, but entries below the META-INF/ directory aren’t included. Normal Java JAR file signing allows for partially signed JAR files, but OSGi doesn’t. It’s lucky that signing all entries except those below META-INF/ is the default in JAR signing, so you can use the jarsigner tool included in the JDK. The following will sign a bundle with your core private key:
jarsigner -keystore file:keys.ks
  -storepass foobar -keypass barbaz core-bundle.jar core
Signing another bundle with your third-party private key looks very similar. You specify the appropriate alias:
jarsigner -keystore file:keys.ks
  -storepass foobar -keypass barbaz third-party-bundle.jar third-party
For verification, you need the keystore containing the certificates. You can use the jarsigner tool for verification as well:
jarsigner -verify -keystore file:certificates.ks core-bundle.jar
jarsigner -verify -keystore file:certificates.ks third-party-bundle.jar
This command should output jar verified if you’ve correctly signed the bundles. Assuming you have, you now have one bundle in the core domain and one in the third-party domain. This makes it easy for you to grant permissions to either, based on the signer of a bundle, as you’ll see next.
14.5.3. BundleSignerCondition
To assign permissions to bundles based on who signed them, you need a condition. The OSGi specification defines the BundleSignerCondition for certificate matching, which is specifically based on DN matching. DN matching can seem somewhat complicated, but it needn’t be. We’ll discuss the details of it shortly; first, let’s look at how you construct a BundleSignerCondition.
The BundleSignerCondition is initialized with a DN matching expression as its first argument and an optional second argument of !. If you specify the exclamation mark, it negates the result of the DN matching expression. Consider the following snippet of an encoded ConditionalPermissionInfo object containing a BundleSignerCondition:
BundleSignerCondition:

ACCEPT {
[org.osgi.service.condpermadmin.BundleSignerCondition "CN=core,O=baz,C=de"]
...
}
This matches a bundle on the call stack if it’s signed by the core certificate of the example, which means any permissions associated with this entry will be granted to the bundle. On the other hand, the following won’t match a bundle if it was signed by the core certificate:
ACCEPT {
[org.osgi.service.condpermadmin.BundleSignerCondition
  "CN=core,O=baz,C=de" "!"]
...
}
The DN matching expression in these two examples illustrates how simple DN matching can be. It can also be sophisticated, because it supports various flavors of wildcard matching. We’ll describe that next.
Distinguished Name Matching Details
You saw that a DN is composed of multiple attributes, like country, organization, and common name. When performing DN matching, you’re matching against these attributes using a comma-delimited list, such as what you saw earlier with CN=core, O=baz, C=de to match the core certificate. Additionally, because certificates can be signed by other certificates, you can match against the other certificates in the chain: you delimit different certificates with a semicolon.
To match certificates in a chain, use DN matching expressions against the DN associated with each certificate you’re trying to match. For example, consider the following DN matching expression:
CN=extensions,O=bar,C=fr;CN=core,O=baz,C=de
This matches a bundle that was signed by the bar organization from France using its extensions certificate, which was signed by your core certificate. You need to understand two important points about chain matching:
- Matching occurs naturally against the most specific certificate. Certificates further up the chain that aren’t mentioned are ignored.
- Order is important, because reversing it indicates the opposite signing relationship.
When you match certificate chains, you’re specifying an interest from the most specific certificate of the chain onward.
Both attribute matching and certificate chain matching support wildcards, but the rules for comparison are more complicated than string-based wildcard matching. The different cases are described in table 14.7.
Table 14.7. Certificate DN wildcard matching
The rules for certificate matching are also relevant to AdminPermission, discussed in section 14.3.3. If you recall, AdminPermission accepts an LDAP filter over a limited number of attributes to describe target bundles. The value for the signer attribute of the LDAP filter is a DN matching expression.
Establishing Trust
In addition to DN matching, a BundleSignerCondition will only match if all the certificates in the chain are trusted or are signed by a trusted certificate. Certificates are trusted when they’re known by the OSGi framework. How do they become known? Prior to OSGi R4.2 specification, this was implementation-specific; but now the standard way is to specify keystores containing trusted certificates using the org.osgi.framework.trust.repositories framework configuration property. For example:
org.osgi.framework.trust.repositories=
  /var/trust/keystore.jks:~/.cert/certs.jks
The value is a list of file paths, where the paths are separated by the system-specific File.pathSeparator. Each file path must point to a JKS keystore, which can’t have a password. The framework uses the keystores as trust repositories to authenticate certificates of trusted signers. The stores must be used only as read-only trust repositories to access public keys.
You should now understand how to use certificates to sign your bundles and grant permissions based on the bundle signer. With that out of the way, let’s look at how you can use local permissions to know which permissions a bundle needs.
14.6. Local permissions
Bundle signing provides a powerful yet fairly simple mechanism for creating desired security policies. But it doesn’t help address one nagging issue: how do you know which permissions to grant a bundle? Even if you’ve verified a bundle’s signature and know that the bundle comes from a trusted provider, you still need to answer this question. Even if you fully trust a provider, it’s better to limit a bundle’s permissions to a precise set of required permissions to further prevent intended or unintended security breaches.
The standard Java security architecture doesn’t help you here; instead, you must rely on prior knowledge about the code’s requirements or trial and error. OSGi specifically addresses this issue with a concept called local permissions. Local permissions are defined by a resource contained in the bundle, which describes the maximum set of permissions required by the bundle. This set of permission is enforced by the OSGi framework. A bundle can be granted fewer permissions than its local permissions, but it never gets more permissions.
At first blush, it may seem a little odd to have a bundle define its own permissions, but the purpose is more for the deployer to audit and analyze a bundle. Bundles aren’t guaranteed to receive the permissions they request and therefore should be programmed to degrade gracefully when they receive less. As a deployer, though, local permissions simplify your life because you can easily determine what permissions are required and which you’re willing to give. For example, if the local permissions request the use of network sockets, it’s clear that the bundle has the potential to access the wider internet. If you decide this is acceptable, you can trust this audit because it’s enforced by the framework at execution time.
What do local permissions look like in practice? The bundle-permission resource is a file in the bundle’s OSGI-INF/ directory called permissions.perm. It contains a listing of all of the bundle’s required permissions. As a simple example, let’s assume you provide a bundle that only wants to export a single package, org.foo. This bundle’s OSGi-INF/permissions.perm file is as follows:
# Tuesday, Dec 28 2009
# Foo Bundle
( org.osgi.framework.PackagePermission "org.foo" "IMPORT,EXPORT" )
Lines that start with a # are comments. All other non-empty lines describe required permissions as encoded PermissionInfo objects. This is simple but effective when it comes to auditing the security impact of a given bundle.
You’ve now learned about some powerful tools for defining a security policy; but in the infamous words of many infomercials, “Wait! There’s still more!” In the next section, we’ll cover the most advanced tool available: the ability to create custom conditions for your security policy. We’ll explore why you may want to do this and show you how to do it by implementing two custom conditions.
14.7. Advanced permission management
At this point, you’ve seen the two standard conditions defined by the OSGi specification: BundleLocationCondition and BundleSignerCondition. Although these are often sufficient to implement reasonable security policies, in some cases you may want or need more. To address these situations, you can create custom conditions. This extensibility gives you a lot of power. In this section, we’ll show you how to harness this power by creating two custom conditions: a date-based condition and a user-input condition.
14.7.1. Custom conditions overview
As you may imagine, providing custom conditions is a security-sensitive process. You certainly don’t want a malicious bundle to shadow an actual condition with a faulty one. For this reason, providing conditions isn’t possible via normal bundles. Custom conditions are valid only if they’re made available from the framework’s class path (that is, they’re provided by the system bundle). Otherwise, implementing a custom condition is pretty easy.
When you use ConditionInfo to construct a new condition instance, the framework loads the specified condition class from the class path and tries to call a static method on it that looks like this:
public static Condition getCondition(Bundle bundle, ConditionInfo info)
This is a factory method, although it need not return a new instance for each call. If such a method isn’t available, the framework falls back to trying to find a constructor to invoke with the following signature:
public X(Bundle bundle, ConditionInfo info)
Assuming it finds one or the other, it uses the condition as part of the permission check. The custom condition must implement the Condition interface, which is defined as follows:
public interface Condition{
  public static Condition TRUE;
  public static Condition FALSE;
  public boolean isPostponed();
  public boolean isSatisfied();
  public boolean isMutable();
  public boolean isSatisfied(Condition[] conditions, Dictionary context);
}
The static TRUE and FALSE objects are used for conditions that are always true or false, respectively. This may seem odd, but think about BundleLocationCondition. Its get-Condition() method can determine immediately whether the supplied bundle’s location matches; it only needs to return TRUE for matches and FALSE for nonmatches, because these values will never change. Other than that, the interface is reasonably simple, but the best way to explain the remaining methods is by way of some examples.
14.7.2. Date-based condition
Assume you want to restrict certain permission sets to be available before a given point in time, but not after. Imagine that you want to associate permissions with a period of validity, where the ability to perform certain operations expires after some time. The following listing shows a condition you can use to make this possible.
Listing 14.4. BeforeDateCondition example
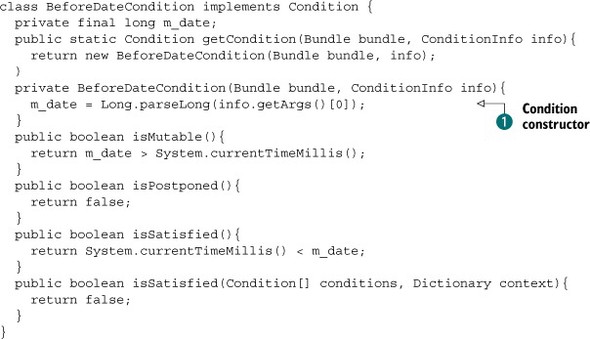
As you can see, this implementation is pretty simple. When the framework evaluates this condition, it uses the static getCondition() method to create an instance for the target bundle. The condition’s constructor ![]() converts its argument to a long, which sets the date. The framework then checks whether the condition is postponed by calling the isPostponed() method. This tells the framework whether the condition should be evaluated immediately or deferred; this condition is immediate,
but you’ll see an opposite example later. Because this condition isn’t postponed, the framework invokes the isSatisfied() method immediately to test the condition. This method checks whether the current time in milliseconds is still lower than
the ending date supplied in the constructor argument. Note that the second isSatisfied() method is only used for postponed conditions and is ignored here.
converts its argument to a long, which sets the date. The framework then checks whether the condition is postponed by calling the isPostponed() method. This tells the framework whether the condition should be evaluated immediately or deferred; this condition is immediate,
but you’ll see an opposite example later. Because this condition isn’t postponed, the framework invokes the isSatisfied() method immediately to test the condition. This method checks whether the current time in milliseconds is still lower than
the ending date supplied in the constructor argument. Note that the second isSatisfied() method is only used for postponed conditions and is ignored here.
The isMutable() method is purely used by the framework to optimize condition evaluation. If a condition is immutable, the framework only needs to call its isSatisfied() method one time and can cache the result. For mutable conditions, the framework needs to evaluate the condition on every check. For this particular condition, you have an interesting case because it’s mutable until the ending date is reached, after which it becomes immutable.
You can now use this custom condition to define your security policy like the standard conditions. For example, in the policy file you can do something like this:
ACCEPT {
  [ org.foo.BeforeDateCondition "1282684888" ]
  ( java.security.AllPermission "*" "*" )
} "DATE CONDITION"
As we mentioned previously, you need to put this condition on the class path of the framework to use it. You can achieve this by adding it directly to your application class path or by using a special kind of bundle called an extension bundle. Because it’s more dynamic, you’ll use an extension bundle.
Extension bundles can deliver optional parts of the framework implementation or provide functionality that must reside on the boot class path. For example, a framework vendor can supply optional services like Conditional Permission Admin and Start Level as framework-extension bundles instead of building them into the framework for more modular framework deployments.
An extension bundle is treated as a fragment of the system bundle. The system bundle has a standard bundle symbolic name, system.bundle, but it also has an implementation-specific alias. For example, the following example uses the Fragment-Host header to specify an extension bundle for the Felix framework implementation:
Fragment-Host: org.apache.felix.framework; extension:=framework
Because extension bundles are special, there are certain restrictions on what you can do with them. For example, extension bundles can’t specify any of the following headers: Import-Package, Require-Bundle, Bundle-NativeCode, DynamicImport-Package, and Bundle-Activator. Typically, they’re used to add stuff to the class path and possibly to export additional packages from the system bundle.
To package this custom condition inside an extension bundle, you create a bundle with the following manifest:
Manifest-Version: 1.0
Bundle-ManifestVersion: 2
Bundle-SymbolicName: org.foo.beforedatecondition
Bundle-Name: Before Date Condition Extension Bundle
Bundle-Version: 1.0.0
Fragment-Host: system.bundle; extension:=framework
Export-Package: org.foo
Now you need to install this bundle into your framework, after which you can use the condition in your security policy. That was fairly easy, so let’s move on to a more sophisticated example.
14.7.3. User-input condition
Often, the only means to determine whether some code is allowed to perform an operation is to ask the user. We see this regularly when running Java applications from a web browser or on a mobile phone. As you may guess, you can implement such a custom condition, but the scenario is trickier. In particular, permission checks tend to be fine-grained, and in this case executing the condition is costly (and potentially annoying to the user). Luckily, the Conditional Permission Admin Service specification defines mechanisms to deal with such situations.
Postponed Conditions
Certain conditions can be costly to evaluate, such as asking the user for permission. In such situations, you should evaluate the conditions as postponed conditions. Doing so causes the framework to delay their verification until the end of the permission check.
A condition informs the framework that it’s postponed by returning true from the Condition.isPostponed() method. A condition must always return the same value for the isPostponed() method, so that the Conditional Permission Admin Service can cache the value. If the method returns false, the no-argument version of the isSatisfied() method checks the permission, which is intended to be used for quick evaluations. On the other hand, if the method returns true, the version of isSatisfied() that takes arguments is used; it’s intended for more costly evaluations.
For example, a condition can verify whether a mobile phone is roaming. This information is readily available in memory, and therefore this condition need not be postponed. Alternatively, a condition obtaining authorization over the network should be postponed to avoid the delay caused by network latency if not necessary.
Looking more closely at the parameters of the isSatisfied() method used to evaluate postponed conditions, you see that it takes an array of Condition objects and a Dictionary. The array always contains a single element: a reference to the receiving condition. This behavior was introduced in the R4.2 specification, because prior specification versions could verify multiple conditions at the same time. As a result, this change makes the array relatively worthless. The method was reused to avoid creating a breaking change for existing custom conditions. The Dictionary parameter is a context object for the condition implementation, which it can use to maintain state between invocations. The same Dictionary object is passed into all postponed conditions of the same type during a single permission check.
From the point of view of the security-policy creator, it doesn’t matter whether a condition is postponed. The impact is in how the framework processes the conditions and/or how the condition implementation optimizes evaluation. The important result is that the framework evaluates postponed conditions only when no immediate condition entry implies the required permission, which allows the framework to avoid costly condition evaluation if possible. When you’re creating a security policy, you can ignore this aspect of conditions.
You now understand the theory behind postponed conditions. Let’s implement an example that asks the user to authorize permissions.
Asking The User
You’ll implement the ask-the-user condition by splitting it into two parts:
- An AskTheUser class that presents the user with a Swing dialog box asking to authorize permission requests
- AskTheUserCondition, which is a postponed condition that uses the AskTheUser class to evaluate its condition
This is a good example for postponed conditions, because you don’t want to bother the user with questions if the check fails for other reasons and user interaction is slow. The following listing shows the AskTheUser implementation.
Listing 14.5. AskTheUser dialog box implementation

The constructor accepts the question to ask ![]() , which you display in the ask() method
, which you display in the ask() method ![]() . In the ask() method, you use a JOptionPane confirmation dialog box to query the user. You return true or false depending on whether the user confirms or rejects the request, respectively. The next listing shows how you implement the
condition itself.
. In the ask() method, you use a JOptionPane confirmation dialog box to query the user. You return true or false depending on whether the user confirms or rejects the request, respectively. The next listing shows how you implement the
condition itself.
Listing 14.6. AskTheUserCondition implementation
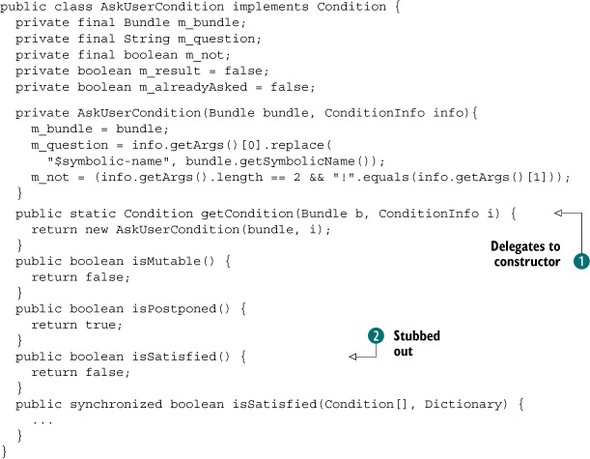
You provide a static factory method ![]() which delegates to the private constructor. The constructor is initialized with the question you need to ask the user, which
comes from the first argument of a corresponding ConditionInfo object. In the constructor, you automatically replace any occurrence of ${symbolic-name} in the question with the symbolic name of the bundle making the permission request. Additionally, if there’s a second argument
in the ConditionInfo of !, you use it as an indication to negate the eventual result.
which delegates to the private constructor. The constructor is initialized with the question you need to ask the user, which
comes from the first argument of a corresponding ConditionInfo object. In the constructor, you automatically replace any occurrence of ${symbolic-name} in the question with the symbolic name of the bundle making the permission request. Additionally, if there’s a second argument
in the ConditionInfo of !, you use it as an indication to negate the eventual result.
The condition is immutable and postponed. Because the condition is postponed, you can stub out the other isSatisfied() method ![]() .
.
Now let’s look at how to implement the postponed isSatisfied() method, which is shown in the following listing.
Listing 14.7. AskTheUserCondition isSatisfied() method implementation
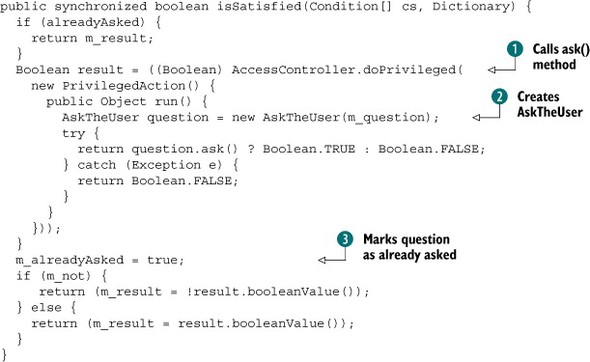
Here you check whether you’ve already asked the user by looking at the m_alreadyAsked flag, which is only necessary to avoid a race condition if multiple threads are trying to set the initial value; after that,
the framework will cache the result because the condition is immutable. If the user hasn’t already been asked, you create
a new AskTheUser object with your question ![]() and call its ask() method. When you get the result, you set the alreadyAsked flag to true
and call its ask() method. When you get the result, you set the alreadyAsked flag to true ![]() to make sure that the user is asked only one time for the given bundle. Finally, you return the result or invert the result
if "!" was specified in the ConditionInfo.
to make sure that the user is asked only one time for the given bundle. Finally, you return the result or invert the result
if "!" was specified in the ConditionInfo.
A slightly complicated part of this example is that you need to perform the call to the ask() method using AccessController.doPrivileged() ![]() . This is because the use of Swing will result in a lot of additional permission checks, so you must limit the protection
domains involved to the protection domain of the condition itself. Because the condition must be on the class path, it’ll
have the protection domain of the framework, which needs to have AllPermission. If, for whatever reason, you get an exception, you return false.
. This is because the use of Swing will result in a lot of additional permission checks, so you must limit the protection
domains involved to the protection domain of the condition itself. Because the condition must be on the class path, it’ll
have the protection domain of the framework, which needs to have AllPermission. If, for whatever reason, you get an exception, you return false.
This completes the AskTheUserCondition implementation. If you package it as an extension bundle or add it to the framework class path, you can use it to let the user make security decisions by including it in your policy file like this:
ACCEPT {
  [ org.foo.AskTheUserCondition "Do you want to allow $symbolic-name to
  provide a shape?" ]
  ( org.osgi.framework.ServicePermission "org.foo.shape.SimpleShape"
  "register")
}
We’ve covered a lot of ground in this chapter, so you should be commended for making it this far. To wrap up the discussion on security, we’ll look at an example that pulls everything together.
14.8. Bringing it all back home
What’s left is to show you how to start a framework with security enabled. You need to make sure a security manager is installed in the system and tell the framework where it can find the trusted root certificates. You can either set a custom security manager or have the framework install its own security manager. Typically, you need to set the following two framework-configuration properties:
- org.osgi.framework.security—Tells the framework to set the security manager
- org.osgi.framework.trust.repositories—As mentioned earlier, specifies the repositories of trusted certificates
The org.osgi.framework.security property value can be either an empty string or osgi. In either case, the framework sets the JVM security manager to an implementation-specific one when started. If the property isn’t specified, the framework doesn’t set the security manager; security will still work if a security manager is already set, but not all features of OSGi security may work. In particular, if the existing security manager uses AccessController, postponed conditions won’t work.
Even though some aspects of enabling security are standardized, not all aspects are. As a result, enabling security is handled a little differently by different framework implementations. We’ll use the Apache Felix framework to show a concrete example. The Felix framework is special because it provides its Conditional Permission Admin Service implementation as an extension bundle. This means that in addition to setting the previous properties, you also need to deploy the security provider bundle. Luckily, this is easy to do with the bundle launcher; add it to the directory containing the bundles you want to launch.
This gets you a framework with security enabled and an initial security policy. If you want to allow for bundles signed by trusted certificates, you can use the org.osgi.framework.trust.repositories property to point to the keystore containing the certificates you trust, but typically a keystore requires the use of a password. Because keystores used with this configuration property can’t have passwords, you need to resort to an implementation-specific means to give you what you want. For the Felix framework, you do the following:
java -Dorg.osgi.framework.security=osgi
    -Dfelix.keystore=file:certificates.ks
    -Dfelix.keystore.pass=foobar
    -Dfelix.keystore.type=jks
    -jar launcher.jar bundles
In this case, the initial security policy file contains the following:
grant { permission java.security.AllPermission; };
This sets up your framework with a keystore and the password necessary to access it.
To illustrate what you can do with all of this, let’s add to the paint program a security policy that uses the security features you’ve learned about. The security policy will allow core providers to provide shapes automatically; all others will require explicit approval from the user. Other than provide shape services, bundles are allowed to do anything. Start by creating a policy file with an entry to grant AllPermission to bundles signed by the core certificate:
ALLOW {
  [ org.osgi.service.condpermadmin.BundleSignerCondition
    "CN=core,O=baz,C=de" ]
   ( java.security.AllPermission "*" "*" )
} "Signed by core"
Next, create an entry to grant all other bundles permission to register a shape service based on the condition that the user approves it. For this, use your custom condition like this:
ALLOW {
  [ org.foo.condition.ask.AskUserCondition
    "Do you want to allow ${symbolic-name} to provide a shape?" ]
  ( org.osgi.framework.ServicePermission
    "org.foo.shape.SimpleShape" "register" )
} "Ask the user"
If a bundle that isn’t signed by your core certificate tries to register a shape service, the user is asked to grant or deny that request. Pretty simple, right? This entry only deals with asking the user to approve shape services from non-core bundles; you still need to create an entry to grant these bundles the ability to do everything else. In that case, you need to grant them AllPermission except for registering shape services. You can use a DENY access decision, like this:
DENY {
  ( org.osgi.framework.ServicePermission
    "org.foo.shape.SimpleShape" "register" )
} "Deny register"
ALLOW {
  ( java.security.AllPermission "*" "*" )
} "All other"
All these entries combined form your defined security policy. You may wonder whether the policy is correct. If you follow the rule ordering in the policy file, it looks like it will always prompt the user if a bundle isn’t signed by the core. But this isn’t the case, because AskUserCondition is a postponed condition. That means it’s evaluated only if no other rule with an immediate condition implies the permission. Your security policy is evaluated like this:
- If a bundle is signed by the core certificate, it immediately matches the first rule, which allows it to do anything.
- If a non-core signed bundle performs any secure operation other than registering a shape service, the first rule doesn’t apply, the second rule is postponed, the third rule doesn’t apply, and ultimately the fourth rule is matched that allows the bundle to do anything.
- If a non-core signed bundle tries to register a shape service, the first rule doesn’t apply, the second rule is postponed, the third rule applies because the permission is implied, and this rule fails due to the DENY access decision. This causes the framework to evaluate the postponed second rule because it logically came before the failed entry, which prompts the user and grants the permission based on the user’s reply.
As you can see, you only ask the user at the end if all other rules don’t provide the needed permission. The DENY access decision of the third rule provides a way to short-circuit the rule evaluation. To see this security policy in action, go into the chapter14/ combined-example/ directory of the book’s companion code; type ant to build it and the following to run it:
java -Dorg.osgi.framework.security=osgi -Djava.security.policy=all.policy
  -Dfelix.keystore=file:certificates.ks -Dfelix.keystore.pass=foobar
  -Dfelix.keystore.type=jks -jar launcher.jar bundles
This starts your shell in a security-enabled framework running your security policy. You first need to install the bundles of the paint program:
-> install file:paint-example/shape-4.0.jar
Bundle: 8
-> install file:paint-example/paint-4.0.jar
Bundle: 9
-> start 9
These bundles were signed by the core certificate and have AllPermission, so you should see an empty paint program (one with no shapes) after starting the paint bundle. Next, install and start the unsigned circle bundle:
-> install file:paint-example/circle-4.0.jar
Bundle: 10
-> start 10
Doing this causes the user to be prompted to grant the permission, as shown in figure 14.3. If you grant the bundle permission, you get a circle shape in the paint program, as shown in figure 14.4.
Figure 14.3. Secured paint program prompting the user to grant the unsigned circle bundle permission to provide a shape service
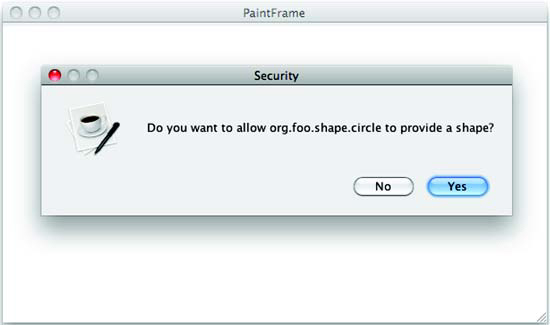
Figure 14.4. Secured paint program after the user has granted permission to the unsigned circle bundle
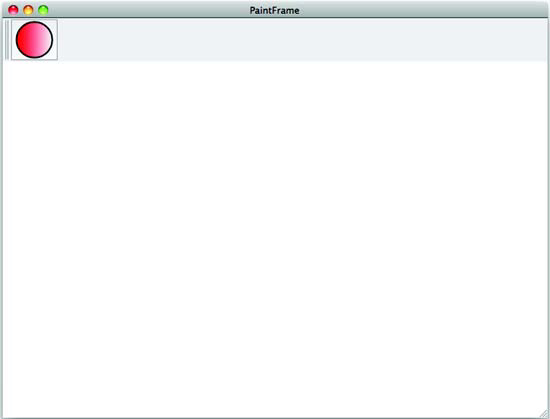
Finally, to show that core-signed bundles can provide shapes without prompting the user, install and start the square bundle:
-> install file:paint-example/square-4.0.jar
Bundle: 11
-> start 11
You should now have a paint program with circle and square shapes, as shown in figure 14.5.
Figure 14.5. Secured paint program with an unsigned circle bundle and a signed square bundle
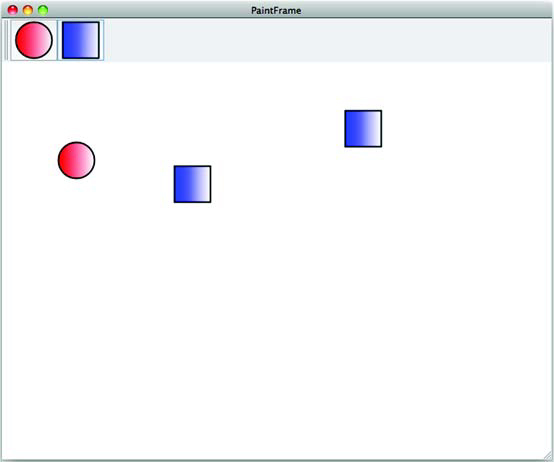
Congratulations! If you’ve made it this far, you know just about everything there is to know about securing your OSGi-based applications. Just do it!
14.9. Summary
In this chapter, we introduced you to the Java security model and showed how OSGi uses it to provide the infrastructure to deploy and manage applications that must run in secure environments. You’ve learned the following:
- It’s important to have security in mind when you’re writing bundles, because otherwise they probably won’t be good citizens in a security-enabled environment.
- Java security provides the foundation of the OSGi security model.
- OSGi provides the necessary permissions to express security policies for bundles with respect to the three key layers of the OSGi framework: module, lifecycle, and services.
- The Conditional Permission Admin Service introduces a new way of managing security by means of conditions that must be satisfied in order for certain permissions to be applicable.
- You can make your life a lot simpler by signing your bundles with certificates and assigning permissions to bundles based on who signed them.
- Specifying local permission inside of bundles provides a convenient and simple way to audit and enforce the permissions needed by a bundle.
- It’s easy to implement and provide custom conditions for use in your security policies.
- Postponed conditions let you defer expensive condition evaluation until the end, which allows you to fine-tune your security policies for efficiency.
With this knowledge under your belt, you can secure your framework according to your specific security policies and develop bundles that can work in security-enabled frameworks. In the next chapter, we’ll look into how you can use and provide web services in OSGi as well as how to build web applications on top of OSGi.