
Chapter 13. Launching and embedding an OSGi framework
- Introducing the OSGi framework launching and embedding API
- Explaining the generic bundle launcher used throughout the book
- Embedding the OSGi framework into an existing application
We’ve spent a lot of time talking about creating, deploying, and managing bundles and services. Interestingly, you can’t do anything with these unless you have a running OSGi framework. For such an important and necessary topic, we’ve spent very little time discussing how precisely to achieve it. Not only is it necessary, but by learning to launch the framework, you’ll have the ability to create custom launchers tailored to your application’s needs. It even opens up new use cases, where you can use an instance of an OSGi framework inside an existing application or even embedded inside a bundle. Interesting stuff.
In this chapter, you’ll learn everything you need to know about launching the OSGi framework. To help you reach this goal, we’ll dissect the generic bundle launcher you’ve been using to run the book’s examples. You’ll also refactor the paint program to see how to embed a framework instance inside an existing application. Let’s get going.
13.1. Standard launching and embedding
As we mentioned back in chapter 3, you face a dilemma when you want to use a bundle you’ve created. You need a BundleContext object to install your bundle into the framework, but the framework only gives a BundleContext object to an installed and started bundle. So you’re in a chicken-and-egg situation where you need an installed and started bundle to install and start your bundle. You need some way to bootstrap the process.
Traditionally, OSGi framework implementations from Apache Felix, Equinox, and Knopflerfish devised implementation-specific means for dealing with this situation. This typically involved some combination of auto-deploy configuration properties for each framework implementations’ custom launchers and/or shells with textual or graphical interfaces. These mechanisms worked reasonably well but weren’t portable across framework implementations.
With the release of the OSGi R4.2 specification, the OSGi Alliance defined a standard framework launching and embedding API. Although this isn’t a major advance in and of itself, it does help you create applications that are truly portable across framework implementations. You may wonder if this is really necessary or all that common. There are two main reasons why you may want to create your own framework instance:
- Your application has custom startup requirements that aren’t met by your framework’s default launcher.
- For legacy reasons, you can’t convert your entire application into a set of bundles that run inside an OSGi framework.
Previously, if either of these applied to your project, you had to couple your project to a specific framework implementation by using its custom API to launch it. Now, R4.2-compliant frameworks share a common API for creating, configuring, and starting the framework. Let’s dive into its details.
13.1.1. Framework API overview
As we previously mentioned, at execution time the OSGi framework is internally represented as a special bundle, called the system bundle, with bundle identifier zero. This means active bundles are able to interact with the framework using the standard Bundle interface, which we reiterate in the following listing.
Listing 13.1. Standard Bundle interface

Although this provides an internal framework API for other bundles, it doesn’t help externally when you want to create and start framework instances. When the R4.2 specification looked to address this situation, the logical place to start was with the Bundle interface. This was a good starting point, but it wasn’t completely sufficient. To address the missing pieces, the R4.2 specification defines a new Bundle subtype, called Framework, which is captured in the following snippet:
public interface Framework extends Bundle {
  void init() throws BundleException;
  FrameworkEvent waitForStop(long timeout) throws InterruptedException;
}
All R4.2-compliant framework implementations implement the Framework interface. Because it extends Bundle, this means framework implementations now look like a bundle externally as well as internally via the system bundle.
Note
Although this new API represents the framework instance internally and externally as a Bundle object, the specification doesn’t require the internal system bundle object to be the same object as the external Framework object. Whether this is or isn’t the case depends on the framework implementation.
As you can see, the Framework interface is a simple extension, so you don’t have too much new API to learn. In the following subsections, we’ll fully explore how to use this API to configure, create, and control framework implementations in a standard way.
13.1.2. Creating a framework instance
It’s great to have a standard interface for framework implementations, but you can’t instantiate an interface; you need a way to get a concrete implementation class. It isn’t possible for the OSGi specification to define a standard class name, so it adopts the standard Java approach of specifying service-provider implementations in JAR files: META-INF/services.
In this case, META-INF/services refers to a directory entry in a JAR file. Just as a JAR’s META-INF/MANIFEST.MF file contains metadata about the JAR file, so does its META-INF/services directory. More specifically, it contains metadata about the service providers contained in a JAR file. Here the term service isn’t referring to an OSGi service, but to well-known interfaces and/or abstract classes in general. All in all, the concept is similar to the OSGi service concept.
The META-INF/services directory in a JAR file contains service-provider configuration files, which refer to a concrete implementation class for a given service. Concrete service implementations are connected to their abstract service type via the name of the file entry in the directory, which is named after the fully qualified service it implements. For example, a service implementation for the java.text.spi.DateFormat-Provider service would be named
META-INF/services/java.text.spi.DateFormatProvider
The content of this file is the name of the concrete service-implementation class:
org.foo.CustomDateFormatProvider
Figure 13.1 depicts this hypothetical example. At execution time, when a service provider is required, the code needing it queries the service-provider configuration file like any normal resource using the well-known service name as the name of the resource file. When a concrete type is obtained from the content of the file, the code needing the service can load and instantiate the associated class.
Figure 13.1. The Java META-INF/services approach discovers service providers at execution time by performing lookups of well-known named resource files to acquire concrete service-implementation class names.

The OSGi specification uses this mechanism to provide a standard way to get the concrete framework implementation class. But rather than directly retrieve a framework implementation class, OSGi defines a framework factory service as follows:
public interface FrameworkFactory {
  Framework newFramework(Map config);
}
This interface provides a simple way to create new framework instances and pass a configuration map into them. As a concrete example, the Apache Felix framework implementation has the following entry in its JAR file declaring its service implementation:
META-INF/services/org.osgi.framework.launch.FrameworkFactory
The content of this JAR file entry is the name of the concrete class implementing the factory service:
org.apache.felix.framework.FrameworkFactory
Of course, these details are only for illustrative purposes, because you only need to know how to get a framework factory service instance. The standard way to do this in Java 6 is to use java.util.ServiceLoader. You obtain a ServiceLoader instance for a framework factory like this:
 ServiceLoader<FrameworkFactory> factoryLoader =
     ServiceLoader.load(FrameworkFactory.class);
Using the ServiceLoader instance referenced by factoryLoader, you can iterate over all available OSGi framework factory services like this:
Iterator<FrameworkFactory> it = factoryLoader.iterator();
In most cases, you only care if there’s a single provider of the factory service; you can invoke it.next() to get the first available factory and use FrameworkFactory. newInstance() to create a framework instance. If you’re not using Java 6, you can also use the ClassLoader.getResource() method as illustrated in the following listing.
Listing 13.2. Retrieving a FrameworkFactory service manually
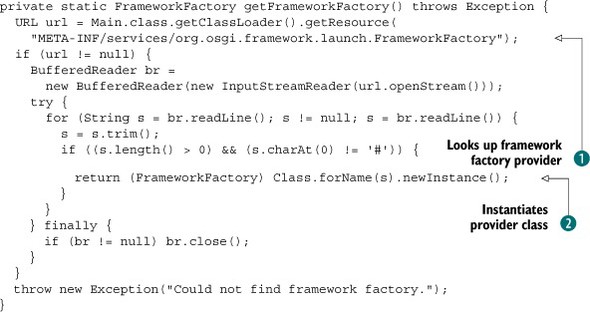
The getFrameworkFactory() method in listing 13.2 isn’t as robust as it could be, but it’s sufficient to get the job done. It queries for the standard service-provider configuration
file ![]() . If it finds one, it reads the content of the file. Within the loop, it searches for the first line not starting with # (the comment character) and assumes that the line contains the name of the concrete class it should instantiate at
. If it finds one, it reads the content of the file. Within the loop, it searches for the first line not starting with # (the comment character) and assumes that the line contains the name of the concrete class it should instantiate at ![]() . The method throws an exception if an error occurs during this process or if a factory provider couldn’t be found.
. The method throws an exception if an error occurs during this process or if a factory provider couldn’t be found.
This method is fairly simple and will work for all R4.2-compliant frameworks; you’ll use it for the generic launcher in section 13.2. Next, we’ll look into how you use the factory service to configure a framework instance.
13.1.3. Configuring a framework
When you have a framework factory service, you can create an instance of Framework. Typically, you don’t use a default framework instance; instead, you often want to configure it in some way, such as setting the directory where the framework should store cached bundles. This is why FrameworkFactory.newInstance() takes a Map, so you can pass in configuration properties for the created framework instance.
You don’t have to pass in configuration properties when creating a framework; null is an acceptable configuration. The OSGi specification says framework implementations must use reasonable defaults, but it doesn’t explicitly define all of them. This means some defaults are implementation-specific. For example, by default the Apache Felix framework caches installed bundles in a felix-cache/ directory in the current directory, whereas the Equinox framework uses configuration/org.eclipse.osgi/ bundles/ in the directory where the Equinox JAR file is located. Be aware that you won’t necessarily get the same behavior unless you explicitly configure it.
Prior OSGi specifications defined a few standard configuration properties; but until the framework factory API, there was no standard way to set them. As part of the R4.2 specification process, several new standard configuration properties were also introduced. Table 13.1 shows some of the standard configuration properties.
Table 13.1. Some standard OSGi framework configuration properties
|
Property name |
Spec |
Meaning |
|---|---|---|
| org.osgi.framework.storage | R4.2 | A file system path to a directory, which will be created if it doesn’t exist. If this property isn’t set, a reasonable default is used. |
| org.osgi.framework.storage.clean | R4.2 | Specifies if and when the storage area for the framework should be cleaned. If no value is specified, the framework storage area isn’t cleaned. Currently, the only possible value is onFirstInit, which causes the framework instance to clean the storage area the first time it’s used. |
| org.osgi.framework.system.packages | R4 | Using standard Export-Package syntax, specifies a list of class path packages to be exported from the system bundle. If not set, the framework must provide a reasonable default for the current VM. |
| org.osgi.framework.system.packages.extra | R4.2 | Specifies a list of class path packages to be exported from the system bundle in addition to those from the previous system-packages property. |
| org.osgi.framework.startlevel.beginning | R4.2 | Specifies the beginning start level of the framework. |
| org.osgi.framework.bootdelegation | R4 | Specifies a comma-delimited list of packages with potential wildcards to make available to bundles from the class path without Import-Package declarations (for example, com.sun.*). By default, all java.* packages are boot delegated. We recommend avoiding this property. |
| org.osgi.framework.bundle.parent | R4.2 | Specifies which class loader is used for boot delegation. Possible values are boot for the boot class loader, app for the application class loader, ext for the extension class loader, and framework for the framework’s class loader. The default is boot. |
| org.osgi.framework.library.extensions | R4.2 | Specifies a comma-separated list of additional library file extensions that must be used when searching for native code. |
| org.osgi.framework.command.execpermission | R4.2 | Specifies an optional OS-specific command to set file permissions on a bundle’s native code. |
The properties listed in table 13.1 can be put into a Map and passed into the Frame-workFactory.newInstance() method to configure the resulting framework instance; property names are case insensitive. We won’t go into the precise details of all the standard configuration properties, so consult the R4.2 specification if you want details not covered here. With this knowledge, you know how to configure and instantiate a framework instance; let’s look at how to start it.
13.1.4. Starting a framework instance
When you have a Framework instance from FrameworkFactory, starting it is easy: invoke the start() method inherited from the Bundle interface. The start() method implicitly initializes the framework by invoking the Framework.init() method, unless you explicitly initialize it beforehand. If the init() method wasn’t invoked prior to calling start(), then it’s invoked by start().
You can relate these methods to the framework lifecycle transitions, similar to the normal bundle lifecycle:
- init() transitions the framework instance to the Bundle.STARTING state.
- start() transitions the framework instance to the Bundle.ACTIVE state.
The init() method gets the framework ready but doesn’t start executing any bundle code yet. It performs the following steps:
1. Framework event handling is enabled.
2. The security manager is installed if it’s enabled.
3. The framework start level is set to 0.
4. All cached bundles are reloaded, and their state is set to Bundle.INSTALLED.
5. A BundleContext object is created for the framework.
6. All framework-provided services are made available (Package Admin, Start Level, and so on).
7. The framework enters the Bundle.STARTING state.
The start() method starts the framework instance and performs the following additional steps:
1. If the framework isn’t in the Bundle.STARTING state, the init() method is invoked.
2. The framework sets its beginning start level to the configured value, which causes all reloaded bundles to be started in accordance with their activation policy and start level.
3. The framework’s state is set to Bundle.ACTIVE.
4. A framework event of type FrameworkEvent.STARTED is fired.
You may wonder why the init() method is necessary and why all the steps aren’t performed in the start() method. In some cases, you may want to interact with the framework instance before restarting cached bundles, but some interactions can only happen via the framework’s BundleContext object. Because bundles (including the framework) don’t have a BundleContext object until they’ve been started, init() is necessary to transition the framework to the Bundle.STARTING state so you can acquire its context with Bundle.getBundleContext().
To summarize, in the normal case, call start(). But if you want to perform some actions before all the cached bundles restart, call init() first to do what you need to do followed by a call to start(). When the framework is active, subsequent calls to init() and start() have no effect.
Next, we’ll look at how you shut down a running framework.
13.1.5. Stopping a framework instance
As you may guess, stopping an active framework involves invoking the stop() method inherited from the Bundle interface. This method asynchronously stops the framework on another thread, so the method returns immediately to the caller. If you want to know when the framework has finished shutting down, call Framework. waitForStop() after calling stop(), which blocks the calling thread until shutdown is complete.
The following steps are performed when you stop a framework:
1. The framework’s state is set to Bundle.STOPPING.
2. All installed bundles are stopped without changing each bundle’s persistent activation state and according to start levels.
3. The framework’s start level is set to 0.
4. Framework event handling is disabled.
5. The framework’s state is set to Bundle.RESOLVED.
6. All resources held by the framework are released.
7. All threads waiting on Framework.waitForStop() are awakened.
Note
Calling waitForStop() doesn’t start the framework shutdown process, it waits for it to occur. If you want to stop the framework, you must call stop() on it first.
The waitForStop() method takes a timeout value in milliseconds and returns a FrameworkEvent object whose type indicates why the framework stopped:
- FrameworkEvent.STOPPED—The framework was stopped.
- FrameworkEvent.STOPPED_UPDATE—The framework was updated.
- FrameworkEvent.ERROR—An error forced the framework to shut down, or an error occurred during shutdown.
- FrameworkEvent.WAIT_TIMEDOUT—The timeout value expired before the framework stopped.
When the framework has successfully stopped, it can be safely discarded or reused. To start the framework again, call start() or init()/start(). The normal startup process will commence, except the bundle cache won’t be deleted again if the storage-cleaning policy is onFirstInit, because that applies only the first time the framework is initialized. Otherwise, you can stop and restart the framework as much as you like.
That’s all there is to creating and launching frameworks with the standard framework launching and embedding API from the R4.2 specification. Let’s explore your newfound knowledge by examining the generic bundle launcher.
Why is this called the framework launching and embedding API? The term launching is largely self explanatory, but the term embedding is less clear. What is the difference between the two? The conceptual difference is that launching refers to creating and starting a framework instance in isolation, whereas embedding refers to creating and starting a framework instance within (embedded in) another application. Technically, there’s very little difference between the two, because creating, configuring, and starting a framework instance with the API is the same in either case.
The main technical differences are in your objectives. When you launch a framework, all functionality is typically provided by installed bundles, and there’s no concern about the outside world. But when you embed a framework, you often have functionality on the outside that you want to expose somehow on the inside or vice versa. Embedding a framework instance has some additional constraints and complications that we’ll discuss later in this chapter.
13.2. Launching the framework
The general steps for launching a framework are straightforward:
1. Set the desired configuration properties.
2. Create a framework instance using the configuration properties.
3. Start the framework instance.
4. Install some bundles.
These are the same basic steps the generic bundle launcher uses, as we’ll introduce in the following subsections by breaking the example into short code snippets. The complete source code for the generic launcher is in the launcher/ directory of the book’s companion code.
13.2.1. Determining which bundles to install
As you’ve seen throughout the book, the generic bundle launcher installs and starts all bundles contained in a directory specified as a command line argument. The launcher is composed of a single class, called Main, which is declared in the following code snippet.
Listing 13.3. Main class declaration for generic bundle launcher
public class Main {
  private static Framework fwk;

  public static void main(String[] args) throws Exception {
    if (args.length < 1 || !new File(args[0]).isDirectory()) {
      System.out.println("Usage: <bundle-directory>");
    } else {
      File[] files = new File(args[0]).listFiles();
      Arrays.sort(files);
      List jars = new ArrayList();
      for (int i = 0; i < files.length; i++)
        if (files[i].getName().toLowerCase().endsWith(".jar"))
          jars.add(files[i]);
      ...
The static member variable holds the framework instance you’re going to create. You verify that a directory was specified as a command line argument. If a directory was specified, you get the files contained in it and save all files ending with .jar into a list to be processed later.
13.2.2. Shutting down cleanly
You can’t always guarantee that the launcher process will exit normally, so it’s a good idea to try to ensure your framework instance cleanly shuts down. Depending on the framework implementation, you can end up with a corrupted bundle cache if you don’t shut down cleanly. The following listing adds a shutdown hook to the JVM process to cleanly shut down your framework instance.
Listing 13.4. Using a shutdown hook to cleanly stop the framework

The JVM shutdown hook mechanism requires a Thread object to perform necessary actions during process exit; you supply a thread to cleanly stop the framework. When the shutdown
thread executes, you verify that a framework instance was created ![]() and, if so, you stop it. Because shutting down the framework happens asynchronously, the call to fwk.stop() returns immediately. You call fwk.waitForStop() to make the thread wait for the framework to completely stop. It’s necessary to have your thread wait; otherwise, there’s
a race condition between the JVM process exiting and your framework stopping.
and, if so, you stop it. Because shutting down the framework happens asynchronously, the call to fwk.stop() returns immediately. You call fwk.waitForStop() to make the thread wait for the framework to completely stop. It’s necessary to have your thread wait; otherwise, there’s
a race condition between the JVM process exiting and your framework stopping.
Using a shutdown hook isn’t strictly necessary. The process is in an awkward state during shutdown, and not all JVM services are guaranteed to be available. There’s also the potential for deadlock and hanging the process. In short, it’s a good idea to try to cleanly shut down the framework, but be aware of the potential pitfalls and do as little work as possible in the shutdown hook.
13.2.3. Configuring, creating, and starting the framework
In section 13.2.1, you determined which bundles you want to install; all you need now is a framework instance. The following snippet shows how you create it:
...
Bundle mainBundle = null;
try {
  List bundleList = new ArrayList();
  Map m = new HashMap();
  m.putAll(System.getProperties());
  m.put(Constants.FRAMEWORK_STORAGE_CLEAN, "onFirstInit");
  fwk = getFrameworkFactory().newFramework(m);
  fwk.start();
  ...
You begin by creating a variable to hold a reference to your main bundle, which is a bundle with a Main-Class entry in its manifest file; we’ll come back to this concept in a couple of sections. After that, you create a list to hold the bundles you successfully install.
In the setup for the framework instance, you create a configuration map for it. For the generic launcher, you copy the system properties in the configuration map as a convenience and only set one configuration, which cleans the bundle cache on first initialization. In most cases, you likely won’t want to do this; but for the purposes of the book examples, this makes sense to be sure you always start with a clean framework instance. Next, you get the framework factory service and use it to create a framework instance using the configuration map. To get the framework factory service, you use the getFrameworkFactory() method introduced in listing 13.2. Finally, you start the framework.
13.2.4. Installing the bundles
Now you have a configured and started framework instance. Because you configured the framework to clean its bundle cache on first initialization, you know your framework has no bundles installed in it. You need to remedy that. The following snippet shows how to install the bundles contained in the directory specified on the command line:
...
BundleContext ctxt = fwk.getBundleContext();
for (int i = 0; i < jars.size(); i++) {
  Bundle b = ctxt.installBundle(
    ((File) jars.get(i)).toURI().toString());
  bundleList.add(b);
  if (b.getHeaders().get("Main-Class") != null) {
    mainBundle = b;
  }
}
...
You first get the BundleContext object associated with the system bundle; this is possible because the Framework object extends Bundle and represents the system bundle. You loop through the JAR files discovered in the specified directory and install them using the system bundle context; any exceptions cause the launcher to fail. After you install a bundle, you add it to the list of installed bundles and probe to see if its manifest contains a Main-Class header, which you’ll use later. If there’s more than one bundle with a Main-Class header, you use the last one you discover.
13.2.5. Starting the bundles
You’ve installed all of the bundles, but they aren’t doing anything yet. You need to start them. You can accomplish this in a simple loop over all installed bundles, invoking start() on each one:

You may wonder why you don’t start each installed bundle right after installing it. It’s better to install and start bundles in two passes: one pass for installing and one pass for starting. This approach helps alleviate ordering issues when it comes to dependency resolution. If you install a bundle and start it immediately, it may fail to resolve because it may depend on some bundle that’s not yet installed. By installing all the bundles first, you stand a better chance of successfully resolving the bundles when you activate them.
Notice also that you don’t call start() on all bundles ![]() ; instead, you only call start() on bundles that aren’t fragment bundles. Fragments can’t be started and will throw an exception if you try to start them,
which is why you avoid doing so. How do you know a bundle is a fragment? This simple approach works:
; instead, you only call start() on bundles that aren’t fragment bundles. Fragments can’t be started and will throw an exception if you try to start them,
which is why you avoid doing so. How do you know a bundle is a fragment? This simple approach works:
private static boolean isFragment(Bundle bundle) {
  return bundle.getHeaders().get(Constants.FRAGMENT_HOST) != null;
}
You check to see if the bundle’s manifest headers contain the Fragment-Host header. If so, it must be a fragment, and you don’t want to start it.
13.2.6. Starting the main bundle
You’ve installed and started all the bundles contained in the specified directory. In most cases, this would be good enough. But for the examples in this book, you need one more step. In chapter 2, we showed how you can use the module layer all by itself to modularize the paint program. In that example, none of the bundles contained a BundleActivator, because activators are part of the lifecycle layer. In such an scenario, you need a way to start your application: you can use the standard Java Main-Class JAR file manifest header as a way to define a main bundle from which you can load the main class and execute its static void main() method.
Note
The notion of a main bundle with a main class isn’t an OSGi convention or a standard. We defined this approach for this book to show that it’s possible to use the OSGi modularity layer to modularize OSGi-unaware applications. You could also consider introducing a custom manifest header for this purpose to avoid confusion with the standard Main-Class header.
The next listing shows how to load the main class and invoke its main() method.
Listing 13.5. Invoking the main class from the main bundle
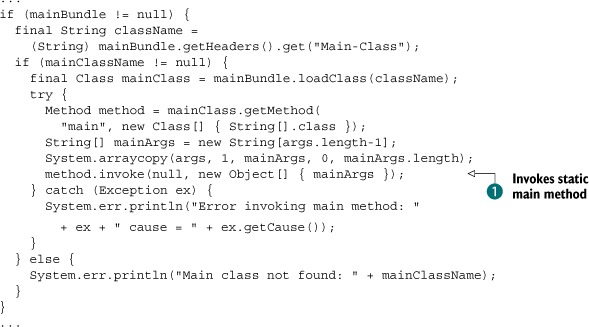
If you have a main bundle, you need to invoke its main class’s main() method; you won’t necessarily have a main bundle if the bundles have activators. First, you get the name of the class from
the Main-Class manifest header. Using this name, you load the class from the main bundle. Then, you use reflection to get the Method object associated with the main class’s main() method. You make an array to contain any additional command line arguments passed into the launcher after the specified directory.
Finally, you use reflection to invoke the main() method ![]() , passing in any command line arguments.
, passing in any command line arguments.
13.2.7. Waiting for shutdown
At this point, your launcher should have your bundled application up and running. What’s left to do? Not much; just sit around and wait for it to finish, like this:
        ...
        fwk.waitForStop(0);
        System.exit(0);
      } catch (Exception ex) {
        System.err.println("Error starting framework: " + ex);
        ex.printStackTrace();
        System.exit(0);
      }
    }
  }
}
You first call Framework.waitForStop(), which doesn’t stop the framework—it waits for it to stop somehow. Why do you do this? Why not let the calling thread run off the end of your main method, similar to what you do with Swing applications? Unlike Swing applications, which result in a non-daemon thread starting for Swing event delivery, you don’t have any guarantee that the OSGi framework will create any non-daemon threads. (If you aren’t familiar with the concept of daemon threads, it’s a fancy way of saying background threads.) For the Java VM, if only daemon threads are present, the VM process terminates. You need to explicitly wait for the framework to stop, because you know the main thread is non-daemon and will keep the VM process alive.
For similar issues, you call System.exit() to end the VM process. If you didn’t call exit() here, and a bundle started a non-daemon thread that wasn’t properly stopped, then the VM process wouldn’t exit after stopping the framework. This is similar to Swing applications, which require an explicit call to exit() because the Swing event thread is non-daemon.
That’s all there is to it. You’ve successfully created a completely generic launcher that will work with any OSGi R4.2 framework implementation. To use this launcher with an arbitrary framework implementation, put it on the class path with the launcher, and you’re good to go. But what about situations where you can’t convert your entire application into bundles? In that case, you may want to embed a framework instance inside your application. We’ll look into that next.
13.3. Embedding the framework
In some situations, it isn’t possible to convert your entire application into bundles, where everything runs inside the OSGi framework. This can happen in legacy situations where conversion into bundles is prohibitively expensive, or in situations where there’s resistance or uncertainty about converting the entire application. Even in these sorts of situations, you can use OSGi technology for specific needs. For example, it’s not uncommon for Java-based applications to provide a plugin mechanism for extensibility purposes. If your application has a plugin mechanism or you’re thinking about adding one, an embedded OSGi framework can do the trick (in chapter 6, you saw how to convert jEdit’s plugin mechanism to use OSGi).
You may be thinking, “Wouldn’t I be better off creating my own simple plugin mechanism in this case?” Typically, the answer is, no. The dynamic class-loading aspects of plugin mechanisms are difficult to get right. Over time, you’ll likely need to add more advanced features, such as support for library sharing, side-by-side versions, or native libraries, at which point you’ll start to enter complicated territory and have to reinvent the wheel. By using OSGi, all this is taken care of for you, so you can concentrate on implementing your application’s core functionality. If you’re concerned about the size of OSGi frameworks, remember that they’re intended to run on embedded devices, and most implementations aren’t too hefty. In addition, you get the benefit of having a known standard, which makes it easier for your plugin developers and provides the opportunity to reuse existing bundles.
Embedding an OSGi framework instance into an application may sound pretty exotic; but thanks to the standard framework launching and embedding API, it’s largely the same as launching the framework. You do need to understand some differences and a few issues; in the remainder of this section, we’ll discuss these issues as well as present an example of embedding a framework instance into an application.
13.3.1. Inside vs. outside
The main issue around embedding a framework instance into an application is the distinction between being on the inside of the framework versus being on the outside of the framework. The bundles deployed into the embedded framework live in a nice insulated world and know nothing about the outside. Conversely, the application lives in the external rough-and-tumble world. Figure 13.2 illustrates the situation.
Figure 13.2. The embedded framework instance forms an isolation boundary between the bundles on the inside and the application objects on the outside.

It’s possible to traverse the isolation boundary provided by the framework, but the inside/outside distinction places some constraints on how the application can interact with installed bundles and vice versa.
The best approach for dealing with the inside/outside divide is to eliminate it by converting your entire application to bundles. If you’re on the fence about this issue, you can start with an embedding approach and later convert the rest of your application to bundles. But if you have a choice up front, start with all bundles.
If you decide to embed a framework instance, what are some of the things you’ll likely want to do with it? You’ll probably want to
- Interact with and manage the embedded framework instance
- Provide services to bundles and use services from bundles
Let’s look at what you need to do in each of these cases.
Interacting With the Embedded Framework
You already know how to interact with an embedded framework instance: through the standard launching and embedding API. When you create an instance of an R4.2-compatible framework implementation, you get an object that implements the Framework interface. As you saw previously, this interface gives you access to all the API necessary to control and inspect the framework instance. The framework instance represents the system bundle and provides you a passage from the outside to the inside of the framework, as depicted in figure 13.3.
Figure 13.3. A framework instance represents the system bundle and provides the means to manage the framework instance as well as interact with deployed bundles.

From the system bundle, you can start and stop the framework as well as deploy, manage, and interact with bundles. If you’re using an embedded framework instance as a plugin mechanism in your application, you use this API to deploy plugin bundles by loading them from a directory or providing a GUI for user access, for example. It’s also through this API that you can provide services to bundles and use services from bundles.
Providing Services and Using Bundle Services
Luckily, there’s no new API to learn when it comes to providing application services to embedded bundles or using services from them. You learned about providing and using services in chapter 4, and that knowledge applies here. The only real difference is that you use the system bundle to do everything, because the application has no bundle associated with it.
Because you need a BundleContext to register or find services, you use the BundleContext associated with the system bundle. You can get access to it by calling getBundleContext() on the framework instance. From there, registering and using services is pretty much the same as if the application were a bundle. Simple, right? As you may expect, there is one main constraint.
Note
An application embedding a framework instance can only interact with contained bundles using objects whose class definition is the same for both the application and bundles.
By default, the application on the outside and the bundles on the inside only share core JVM packages, so it would be possible for the application and bundles to interact using objects from classes defined in core JVM packages. For example, you can provide or use java.lang.Runnable services, because you know the application and the bundles use a common class definition for Runnable. This works out fairly well if everything you need is in a core JVM package, but this isn’t typically the case.
Luckily, there’s a rudimentary way to share packages from the application to the contained bundles via framework configuration. The launching and embedding API defines two previously mentioned configuration properties for this purpose:
- org.osgi.framework.system.packages—Defines the complete set of class path packages exported by the system bundle
- org.osgi.framework.system.packages.extra—Defines an additional set of class path packages that is appended to the former set
Typically, you’ll only use the latter property, because the specification requires the framework to set a reasonable default for the former. For an example, suppose you’re going to create a version of the paint program that used an embedded framework instance. In that case, you likely want to put the SimpleShape interface on the class path so you can share a common definition between the application and the bundles. You configure the framework instance like this:
Map m = new HashMap();
m.put(Constants.FRAMEWORK_SYSTEMPACKAGES_EXTRA, "org.foo.shape");
fwk = getFrameworkFactory().newFramework(m);
fwk.start();
The syntax to use when specifying the property is exactly the same as for the Export-Package manifest header, which means you can specify additional packages by separating them with commas; you can also include version information and attributes.
It’s necessary to specify this configuration property to share class path packages with bundles, but it isn’t sufficient to only do this. You must also ensure that the specified packages are available on the class path when you start your application. You do so the standard way (by specifying them on the JVM class path).
The need to perform this configuration is an extra step for the application, but from the bundle’s perspective it’s business as usual. Bundles need to specify the package on their Import-Package manifest header, as normal, and the framework gives them access to the package following normal OSGi rules.
What about the situation where you don’t have a common class available from the class path? Because the application can’t import packages from bundles, there isn’t much you can do here. The main option is to resort to reflection, which is possible because OSGi service lookup can be performed by the class name. Of course, you should use BundleContext.getAllServiceReferences() instead of BundleContext. getServiceReferences(), because the framework will potentially filter results if it determines that you don’t have access to the published service type. This gives you access to the ServiceReference that you can use to get access to the service object so you can invoke methods on it using reflection.
If you have different definitions of the service class on the outside and inside, you can try to get fancy and use dynamic proxies to bridge the two types in a generic way. But this is beyond the scope of this chapter and can easily be avoided by converting your entire application to bundles.
13.3.2. Who’s in control?
If you’re going to pursue the embedded framework route, you may run into a few other issues related to who’s expecting to be in control. Generally speaking, the OSGi framework assumes it’s in control of the JVM on which it’s running. If you’re embedding a framework, you probably don’t want it to be in control or at least want it to share control with the application in which you’re embedding it. It’s not uncommon to run into issues related to JVM singleton mechanisms, such as URL and content handler factories or security.
Singleton mechanisms like these are only intended to be set once at execution time. OSGi framework implementations need to be responsible for initializing these mechanisms to properly implement specification functionality. When a framework is embedded in another application, often the application assumes it’s in control of these singletons. The OSGi specification doesn’t specifically address these aspects of framework embedding, so how implementations deal with it is undefined. Some frameworks, like Apache Felix, go to lengths to try to do the right thing, but the right thing often depends on the specific use case. If you run into issues in these areas, you’ll have to consult the documentation or support forums for your specific framework implementation.
Another area where issues arise is in the use of the Thread Context Class Loader (TCCL). If you’re not familiar with this concept, each thread in Java has a class loader associated with it, which is its context class loader. The TCCL provides a backdoor mechanism to subvert Java’s normal, strict hierarchical class loading. Application servers and various frameworks use this mechanism to deal with class-loading dependencies that can’t be shoehorned into hierarchical class loading. Unfortunately, this crude attempt at dealing with class-loading dependencies doesn’t mesh well with OSGi modularity.
The TCCL can be both a blessing and a curse. Used correctly, it can enable access to classes in places where it wouldn’t otherwise be possible; but it can have unexpected side effects in cases where modularity is enforced. Embedding an OSGi framework is a typical example of where things may go wrong. This can happen if the outside application or container sets the context class loader. In this case, it’s leaking classes into the class space of bundles being accessed from the outside. Typical examples of situations in which problems can occur include the following:
- Libraries that prefer the TCCL over their own class loader
- Libraries that rely on the TCCL mechanism and don’t attempt to get the correct class loader
- An outside container that expects a certain TCCL on a callback
One prime example for the first case is logging. Consider a situation where you’re embedding an OSGi framework inside a container using log4j for logging. The container will obviously have log4j on its class path. Now, if the container happens to set the TCCL to its own class loader and then calls into the framework, a bundle using log4j may end up with unexpected problems because classes from the container can be found that shouldn’t, or vice versa.
To get around this, bundles can set the TCCL to their own class loader before touching log4j, but this is a fragile solution and can confuse the container.
Dealing with the TCCL is tricky. Because the OSGi specifications don’t address this issue, you can’t be sure it’s handled the same way by different frameworks. For example, Apache Felix doesn’t do anything in regard to the TCCL, whereas other frameworks try to automagically set it to the “correct” bundle class loader.
One piece of useful advice to keep in mind is that the TCCL is inherited by threads. So if you set the TCCL of a given thread, and it in turn creates a new thread, it’ll inherit the same TCCL. Of course, this can be a good or a bad thing, depending on your situation. The important part is to think about what the TCCL will be for any threads created by the framework and/or bundles; it will be implicitly inherited if you don’t explicitly set it.
13.3.3. Embedded framework example
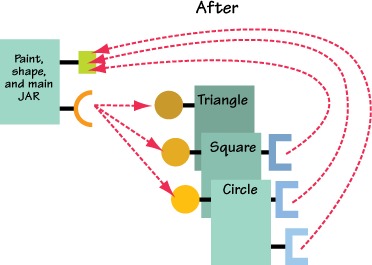
For a simple illustration of framework embedding, you’ll convert the service-based paint program from chapter 4 into a standalone application with an embedded framework instance. Because the service-based paint program is completely composed of bundles, you need to transform it into a Java application. The new standalone paint program uses an embedded framework instance as a plugin mechanism by which it can deploy custom shape implementations. Figure 13.4 shows the before and after states.
Figure 13.4. a) Before The service-based paint program is composed of five bundle sharing packages and services.

Figure 13.4. b) After The standalone paint program combines the core paint program, shape API, and launcher into a single JAR file that provides and shares the API with the bundles and uses their services.
For the standalone paint program, you don’t need to change the shape bundles. What does need to be changed? The original service-based paint program didn’t need a launcher, because the bundle activator in the paint bundle served this purpose. For the standalone paint program, you need a launcher that creates the paint frame and the framework instances and wires everything together. Additionally, because the paint program needs a common class definition to interact with bundles implementing shapes, you must move the shape API into the standalone application so the application and bundles can use the same SimpleShape service-interface definition. Note that figure 13.4 depicts the application as a quasi bundle with an exported package and service dependencies. This is just for illustrative purposes: the application is a normal JAR file. The structure of the modified paint program source code is as follows:
org/foo/paint/
  DefaultShape.java
  Main.java
  PaintFrame.java
  ShapeTracker.java
  ShapeComponent.java
  underc.png
org/foo/shape
  SimpleShape.java
What’s the design of the standalone paint program? Recall the original design of the paint program: the main paint frame was designed in such a way as to be injected with shape implementations. This approach had the benefit of allowing you to limit dependencies on OSGi API and to concentrate your OSGi-aware code in the shape tracker. In keeping with these design principles, you’ll do most of the work in the launcher Main class, which creates the embedded framework instance, deploys the shape bundles, creates the paint frame, and binds the paint frame to the embedded shape services.
Perhaps at this point you’re thinking that this sounds similar to the generic framework launcher you created in the previous section. You’re correct. Using the framework in an embedded way isn’t all that different, other than the issues we outlined previously. As a result, the launcher code for the standalone paint program will bear a striking resemblance to the generic launcher. The different aspects it illustrates are as follows:
- Sharing code from the class path to bundles
- Using services on the outside
- Providing services to the inside
This last aspect doesn’t have an analogue in the original service-based paint program, but we include it to demonstrate that it’s possible to provide services from the outside. As before, we’ll break the launcher into small snippets and describe each one. Let’s get started.
Performing the Main Tasks
Because the paint program is no longer a bundle, you replace its bundle activator with a Main class. The primary tasks this class performs are easy to discern from the main() method.
Listing 13.6. Standalone paint program main() method
public class Main {
  private static Framework fwk;
  private static PaintFrame frame = null;
  private static ShapeTracker shapeTracker = null;

  public static void main(String[] args) throws Exception {
    addShutdownHook();
    fwk = createFramework();
    publishTrapezoidService();
    createPaintFrame();
  }
  ...
The performed functionality is a combination of the generic launcher and the old bundle activator: adding a shutdown hook, creating a framework instance, and creating a paint frame. The only new task is publishing an external trapezoid shape service, which you’ll see is pretty much the same as publishing a normal service.
Let’s continue to look into the details. Because adding a shutdown hook is basically identical to what you did for the generic launcher, we’ll skip that step and go directly to creating the framework instance.
Configuring and Creating the Framework
The createFramework() method follows fairly closely to the launcher, so we’ll go over the details quickly. The method starts, like the launcher, with discovering which bundles it should install into the framework instance:
...
private static Framework createFramework() throws Exception {
  File[] files = new File("bundles").listFiles();
  Arrays.sort(files);
  List jars = new ArrayList();
  for (int i = 0; i < files.length; i++)
    if (files[i].getName().toLowerCase().endsWith(".jar"))
      jars.add(files[i]);
...
Here you get the contents of the bundles directory in the current directory and add all contained JAR files to a list. This is rather simplistic, but it’s sufficient for this example. Now you can create the framework instance and deploy the discovered bundles. The following listing shows these steps.
Listing 13.7. Creating the framework instance and deploying discovered bundles

As with the generic launcher, you configure the framework to clean its bundle cache on first initialization. For performance
reasons, you probably wouldn’t want to do this if you were using the framework as a plugin mechanism, because it’s slower
to repopulate the cache every time. You do it in this case to make sure you’re starting from a clean slate. An important difference
from the launcher, which we alluded to previously, is at ![]() . Here you configure the framework to export the org.foo.shape package from the class path via the system bundle. This allows bundles to import the package from the application, thus ensuring
that they’re both using the same interface definition for shape implementations. You also need to ensure that this package
is on the class path; but because you’re going to package it in the application JAR file, it should definitely be available.
. Here you configure the framework to export the org.foo.shape package from the class path via the system bundle. This allows bundles to import the package from the application, thus ensuring
that they’re both using the same interface definition for shape implementations. You also need to ensure that this package
is on the class path; but because you’re going to package it in the application JAR file, it should definitely be available.
Next, you create the framework with the defined configuration and start it. You get the system bundle’s bundle context, which
you use to install the discovered bundles. Finally, you start all installed bundles ![]() . Any errors cause the JVM to exit.
. Any errors cause the JVM to exit.
Now let’s look at how you publish an external service into the framework instance.
Publishing An External Service
The publishTrapezoidService() method is simple, as the following code snippet illustrates:
...
private static void publishTrapezoidService() {
  Hashtable dict = new Hashtable();
  dict.put(SimpleShape.NAME_PROPERTY, "Trapezoid");
  dict.put(SimpleShape.ICON_PROPERTY,
    new ImageIcon(Trapezoid.class.getResource("trapezoid.png")));
  fwk.getBundleContext().registerService(
    SimpleShape.class.getName(), new Trapezoid(), dict);
}
...
This code is basically the same as what you saw back in chapter 4 for publishing services. The only difference is that you use the system bundle’s bundle context to register the service, because the application doesn’t have its own bundle context. Of course, what makes this possible is the fact that you’re using the same org.foo.shape package on the inside and the outside, which means your trapezoid shape works just like the shapes provided by any of the shape bundles.
Now you’re ready to bind everything together to complete the functioning paint program.
Creating the Paint Frame
The createPaintFrame() method performs nearly the same functionality as the bundle activator for the original paint bundle from chapter 4. The details are shown in the following listing.
Listing 13.8. Creating the paint frame and binding it to the framework instance

You create the paint frame itself and then add a window listener to cleanly stop the embedded framework instance and exit
the JVM process when the frame is closed. Then you display the paint frame; but at this point it isn’t hooked into the embedded
framework instance. You get the system bundle’s bundle context and use it to create a shape tracker for the paint frame ![]() ; this is what binds everything together. Due to the original design, you don’t need to spread OSGi API usage throughout the
application.
; this is what binds everything together. Due to the original design, you don’t need to spread OSGi API usage throughout the
application.
To run the standalone paint program, go into the chapter13/paint-example/ directory. Type ant to build the program and java -jar paint.jar to run it. Figure 13.5 shows the result.
Figure 13.5. The standalone paint program

As you can see, the bundle-provided shape services and the application-provided shape service integrate nicely in the paint frame. You didn’t need to do anything to make this happen, other than ensure that the application and the bundles used the same service interface. Cool.
That’s all there is to the OSGi R4.2 standard launching and embedding API. Don’t be afraid to use it.
13.4. Summary
The OSGi specification doesn’t define a standard launcher with a standard way to configure and launch a framework. Consequently, most OSGi framework implementations provide their own approach. The standard launching and embedding API introduced in OSGi R4.2 is the next best thing to a standard launcher, because it allows you to create a single launcher that works across framework implementations. In this chapter, you learned the following:
- The OSGi R4.2 specification introduced the Framework interface to represent a framework instance.
- The Framework interface extends the existing Bundle interface, which extends your existing knowledge of managing bundles to framework instances.
- The Framework instance represents the system bundle, which provides access to the system bundle’s bundle context for performing normal bundle tasks (such as installing bundles and registering services).
- The META-INF/services approach finds a FrameworkFactory provider, which enables framework creation without knowing a concrete framework implementation class name.
- The OSGi specification defines numerous framework configuration properties to further improve framework implementation independence; you can pass these into FrameworkFactory.newInstance() when creating a framework instance.
- Although using completely bundled applications is the preferred approach, the launching and embedding API also simplifies embedding framework instances into existing applications.
- When you embed a framework instance into an application, the main constraint involves dealing with the difference between being on the outside versus the inside. If direct interaction with bundles is required, you often need to share common class definitions from the class path.
- Other than some additional constraints, embedding a framework instance is nearly identical to launching a framework instance.
With this knowledge under your belt, you can use it to create your own framework launchers for specific purposes and do so in a framework implementation-neutral way. In the next chapter, we’ll look into configuring framework instances to deal with security.