
19 Interacting with the File System and the Server
IN CHAPTER 2,“STORING AND RETRIEVING DATA,” you saw how to read data from and write data to files on the web server. This chapter covers other PHP functions that enable you to interact with the file system on the web server.
Key topics covered in this chapter include
![]() Interacting with files on the server
Interacting with files on the server
![]() Executing programs on the server
Executing programs on the server
![]() Using server environment variables
Using server environment variables
To discuss the uses of these functions, we look at an example. Consider a situation in which you would like your client to be able to update some of a website’s content—for instance, the current news about his company. (Or maybe you want a friendlier interface than FTP or SCP for yourself.) One approach is to let the client upload the content files as plain text. These files are then available on the site, through a template you have designed with PHP, as you did in Chapter 6, “Object-Oriented PHP.”
Before we dive into the file system functions, let’s briefly look at how file upload works.
Uploading Files
One useful piece of PHP functionality is support for uploading files. Instead of files coming from the server to the browser using HTTP, they go in the opposite direction—that is, from the browser to the server. Usually, you implement this configuration with an HTML form interface. The one used in this example is shown in Figure 19.1.
Figure 19.1 The HTML form used for this file upload has different fields and field types from those of a normal HTML form.
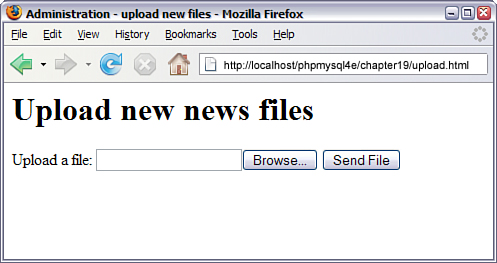
As you can see, the form has a box where the user can enter a filename or click the Browse button to browse files available to him locally. We look at how to implement this form shortly.
After entering a filename, the user can click Send File, and the file will be uploaded to the server, where a PHP script is waiting for it.
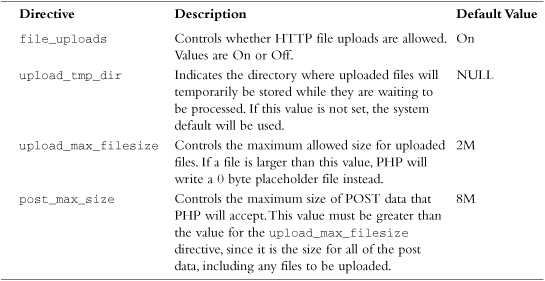
Before we dive into the file uploading example, it is important to note that the php.ini file has five directives that control how PHP will work with file uploading. These directives, their default values, and descriptions are shown in Table 19.1.
Table 19.1 File Upload Configuration Settings in php.ini
HTML for File Upload
To implement file upload, you need to use some HTML syntax that exists specially for this purpose. The HTML for this form is shown in Listing 19.1.
Listing 19.1 upload.html—HTML Form for File Upload
<html>
<head>
<title>Administration – upload new files</title>
</head>
<body>
<h1>Upload new news files</h1>
<form action="upload.php" method="post" enctype="multipart/form-data"/>
<div>
<input type="hidden" name="MAX_FILE_SIZE" value="1000000" />
<label for="userfile">Upload a file:</label>
<input type="file" name="userfile" id="userfile"/>
<input type="submit" value="Send File"/>
</div>
</form>
</body>
</html>
Note that this form uses POST. File uploads also work with the PUT method supported by Netscape Composer and Amaya although you would need to make significant changes to the code. They do not work with GET.
The extra features in this form are as follows:
![]() In the
In the <form> tag, you must set the attribute enctype="multipart/form-data" to let the server know that a file is coming along with the regular information.
![]() You must have a form field that sets the maximum size file that can be uploaded. This is a hidden field and is shown here as
You must have a form field that sets the maximum size file that can be uploaded. This is a hidden field and is shown here as
<input type="hidden" name="MAX_FILE_SIZE" value=" 1000000">
Note that the MAX_FILE_SIZE form field is optional, as this value can also be set server-side. However, if used in the form, the name of this form field must be MAX_FILE_SIZE. The value is the maximum size (in bytes) of files you will allow people to upload. Here, we set this field to 1,000,000 bytes (roughly one megabyte). You may like to make it bigger or smaller for your application.
![]() You need an input of type
You need an input of type file, shown here as
<input type="file" name="userfile" id="userfile"/>
You can choose whatever name you like for the file, but you should keep it in mind because you will use this name to access your file from the receiving PHP script.
Writing the PHP to Deal with the File
Writing the PHP to catch the file is reasonably straightforward.
When the file is uploaded, it briefly goes into the temporary directory that is specified in your php.ini upload_tmp_dir directive. As stated in Table 19.1, if this directive is not set, it will default to the web server’s main temporary directory. If you do not move, copy, or rename the file before your script finishes execution, it will be deleted when the script ends.
The data you need to handle in your PHP script is stored in the superglobal array $_FILES. If you have register_globals turned on, you can also access the information through direct variable names. However, this is probably the area in which it is most important to have register_globals turned off, or at least to act as though it is and use the superglobal array and ignore the globals.
The entries in $_FILES will be stored with the name of the <file> tag from your HTML form. Your form element is named userfile, so the array will have the following contents:
![]() The value stored in
The value stored in $_FILES['userfile']['tmp_name'] is the place where the file has been temporarily stored on the web server.
![]() The value stored in
The value stored in $_FILES['userfile']['name'] is the file’s name on the user’s system.
![]() The value stored in
The value stored in $_FILES['userfile']['size'] is the size of the file in bytes.
![]() The value stored in
The value stored in $_FILES['userfile']['type'] is the MIME type of the file—for example, text/plain or image/gif.
![]() The value stored in
The value stored in $_FILES['userfile']['error'] will give you any error codes associated with the file upload. This functionality was added at PHP 4.2.0.
Given that you know where the file is and what it’s called, you can now copy it to somewhere useful. At the end of your script’s execution, the temporary file will be deleted. Hence, you must move or rename the file if you want to keep it.
For the example, you will use the uploaded files as recent news articles, so you’ll strip out any tags that might be in them and move them to a more useful directory, the /uploads/ directory. Note that you will need to create a folder called uploads in the root of your web server. If this directory does not exist, the file upload will fail.
A script that performs this task is shown in Listing 19.2.
Listing 19.2 upload.php—PHP to Catch the Files from the HTML Form
<html>
<head>
<title>Uploading…</title>
</head>
<body>
<h1>Uploading file…</h1>
<?php
if ($_FILES['userfile']['error'] > 0)
{
echo 'Problem: ';
switch ($_FILES['userfile']['error'])
{
case 1: echo 'File exceeded upload_max_filesize';
break;
case 2: echo 'File exceeded max_file_size';
break;
case 3: echo 'File only partially uploaded';
break;
case 4: echo 'No file uploaded';
break;
case 6: echo 'Cannot upload file: No temp directory specified';
break;
case 7: echo 'Upload failed: Cannot write to disk';
break;
}
exit;
}
// Does the file have the right MIME type?
if ($_FILES['userfile']['type'] != 'text/plain')
{
echo 'Problem: file is not plain text';
exit;
}
// put the file where we’d like it
$upfile = '/uploads/'.$_FILES['userfile']['name'] ;
if (is_uploaded_file($_FILES['userfile']['tmp_name']))
{
if (!move_uploaded_file($_FILES['userfile']['tmp_name'], $upfile))
{
echo 'Problem: Could not move file to destination directory';
exit;
}
}
else
{
echo 'Problem: Possible file upload attack. Filename: ';
echo $_FILES['userfile']['name'];
exit;
}
echo 'File uploaded successfully<br><br>';
// remove possible HTML and PHP tags from the file’s contents
$contents = file_get_contents($upfile);
$contents = strip_tags($contents);
file_put_contents($_FILES['userfile']['name'], $contents);
// show what was uploaded
echo '<p>Preview of uploaded file contents:<br/><hr/>';
echo nl2br($contents);
echo '<br/><hr/>';
?>
</body>
</html>
Interestingly enough, most of this script is error checking. File upload involves potential security risks, and you need to mitigate these risks where possible. You need to validate the uploaded file as carefully as possible to make sure it is safe to echo to your visitors.
Let’s go through the main parts of the script. You begin by checking the error code returned in $_FILES['userfile']['error']. A constant is also associated with each of the codes. The possible constants and values are as follows:
![]()
UPLOAD_ERROR_OK, value 0, means no error occurred.
![]()
UPLOAD_ERR_INI_SIZE, value 1, means that the size of the uploaded file exceeds the maximum value specified in your php.ini file with the upload_max_filesize directive.
![]()
UPLOAD_ERR_FORM_SIZE, value 2, means that the size of the uploaded file exceeds the maximum value specified in the HTML form in the MAX_FILE_SIZE element.
![]()
UPLOAD_ERR_PARTIAL, value 3, means that the file was only partially uploaded.
![]()
UPLOAD_ERR_NO_FILE, value 4, means that no file was uploaded.
![]()
UPLOAD_ERR_NO_TMP_DIR, value 6, means that no temporary directory is specified in the php.ini (introduced in PHP 5.0.3).
![]()
UPLOAD_ERR_CANT_WRITE, value 7, means that writing the file to disk failed (introduced in PHP 5.1.0).
If you want to use an older version of PHP, you can perform a manual version of some of these checks using sample code in the PHP manual or in older editions of this book.
You also check the MIME type. In this case, we want you to upload text files only, so test the MIME type by making sure that $_FILES['userfile']['type'] contains text/plain. This is really only error checking. It is not security checking. The MIME type is inferred by the user’s browser from the file extension and passed to your server. If there were some advantage to be obtained by passing a false one, it would not be hard for a malicious user to do so.
You then check that the file you are trying to open has actually been uploaded and is not a local file such as /etc/passwd. We come back to this topic in a moment.
If that all works out okay, you then copy the file into the include directory. We used /uploads/ in this example; it’s outside the web document tree and therefore a good place to put files that are to be included elsewhere.
You then open up the file, clean out any stray HTML or PHP tags that might be in the file using the strip_tags() function, and write the file back. Finally, you display the contents of the file so the user can see that her file uploaded successfully.
The results of one (successful) run of this script are shown in Figure 19.2.
In September 2000, an exploit was announced that could allow a cracker to fool PHP file upload scripts into processing a local file as if it had been uploaded. This exploit was documented on the BUGTRAQ mailing list. You can read the official security advisory at one of the many BUGTRAQ archives, such as http://lists.insecure.org/bugtraq/2000/Sep/0237.html.
Figure 19.2 After the file is copied and reformatted, the uploaded file is displayed as confirmation to the user that the upload was successful.

To ensure that you are not vulnerable, this script uses the is_uploaded_file() and move_uploaded_file() functions to make sure that the file you are processing has actually been uploaded and is not a local file such as /etc/passwd. This function is available from PHP version 4.0.3 onward.
Unless you write your upload handling script carefully, a malicious visitor could provide his own temporary filename and convince your script to handle that file as though it were the uploaded file. Because many file upload scripts echo the uploaded data back to the user or store it somewhere that it can be loaded, this could lead to people being able to access any file that the web server can read. This could include sensitive files such as /etc/passwd and PHP source code including your database passwords.
Avoiding Common Upload Problems
Keep the following points in mind when performing file uploads:
![]() The previous example assumes that users have been authenticated elsewhere. You shouldn’t allow just anybody to upload files to your site.
The previous example assumes that users have been authenticated elsewhere. You shouldn’t allow just anybody to upload files to your site.
![]() If you are allowing untrusted or unauthenticated users to upload files, it’s a good idea to be paranoid about the contents of the files. The last thing you want is a malicious script being uploaded and run. You should be careful, not just of the type and contents of the file as we are here, but of the filename itself. It’s a good idea to rename uploaded files to something you know to be “safe.”
If you are allowing untrusted or unauthenticated users to upload files, it’s a good idea to be paranoid about the contents of the files. The last thing you want is a malicious script being uploaded and run. You should be careful, not just of the type and contents of the file as we are here, but of the filename itself. It’s a good idea to rename uploaded files to something you know to be “safe.”
![]() To mitigate the risk of users “directory surfing” on your server, you can use the
To mitigate the risk of users “directory surfing” on your server, you can use the basename() function to modify the names of incoming files. This function will strip off any directory paths that are passed in as part of the filename, which is a common attack that is used to place a file in a different directory on your server. An example of this function is as follows:
<?php
$path = "/home/httpd/html/index.php";
$file1 = basename($path);
$file2 = basename($path, ".php");
print $file1 . "<br/>"; // the value of $file1 is "index.php"
print $file2 . "<br/>"; // the value of $file2 is "index"
![]() If you are using a Windows-based machine, be sure to use
If you are using a Windows-based machine, be sure to use \ or / instead of in file paths as per usual.
![]() Using the user-provided filename as we did in this script can cause a variety of problems. The most obvious one is that you run the risk of accidentally overwriting existing files if somebody uploads a file with a name that has already been used. A less obvious risk is that different operating systems and even different local language settings allow different sets of legal characters in filenames. A file being uploaded may have a filename that has illegal characters for your system.
Using the user-provided filename as we did in this script can cause a variety of problems. The most obvious one is that you run the risk of accidentally overwriting existing files if somebody uploads a file with a name that has already been used. A less obvious risk is that different operating systems and even different local language settings allow different sets of legal characters in filenames. A file being uploaded may have a filename that has illegal characters for your system.
![]() If you are having problems getting your file upload to work, check out your
If you are having problems getting your file upload to work, check out your php.ini file. You may need to have the upload_tmp_dir directive set to point to some directory that you have access to. You might also need to adjust the memory_limit directive if you want to upload large files; this determines the maximum file size in bytes that you can upload. Apache also has some configurable timeouts and transaction size limits that might need attention if you are having difficulties with large uploads.
Using Directory Functions
After the users have uploaded some files, it will be useful for them to be able to see what’s been uploaded and manipulate the content files. PHP has a set of directory and file system functions that are useful for this purpose.
Reading from Directories
First, let’s implement a script to allow directory browsing of the uploaded content. Browsing directories is actually straightforward in PHP. Listing 19.3 shows a simple script that can be used for this purpose.
Listing 19.3 browsedir.php—A Directory Listing of the Uploaded Files
<html>
<head>
<title>Browse Directories</title>
</head>
<body>
<h1>Browsing</h1>
<?php
$current_dir = '/uploads/';
$dir = opendir($current_dir);
echo "<p>Upload directory is $current_dir</p>";
echo '<p>Directory Listing:</p><ul>';
while(false !== ($file = readdir($dir)))
{
//strip out the two entries of . and ..
if($file != "." && $file != "..")
{
echo "<li>$file</li>";
}
}
echo '</ul>';
closedir($dir);
?>
</body>
</html>
This script makes use of the opendir(), closedir(), and readdir()functions.
The function opendir() opens a directory for reading. Its use is similar to the use of fopen() for reading from files. Instead of passing it a filename, you should pass it a directory name:
$dir = opendir($current_dir);
The function returns a directory handle, again in much the same way as fopen() returns a file handle.
When the directory is open, you can read a filename from it by calling readdir($dir), as shown in the example. This function returns false when there are no more files to be read. Note that it will also return false if it reads a file called "0"; in order to guard against this, we explicitly test to make sure the return value is not equal to false:
while(false !== ($file = readdir($dir)))
When you are finished reading from a directory, you call closedir($dir) to finish. This is again similar to calling fclose() for a file.
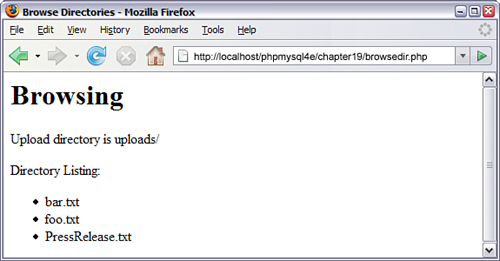
Sample output of the directory browsing script is shown in Figure 19.3.
Figure 19.3 The directory listing shows all the files in the chosen directory.
Typically the . (the current directory) and .. (one level up) directories would also display in the list in Figure 19.3. However, we stripped these directories out with the following line of code:
if($file != "." && $file != "..")
If you delete this line of code, the . and .. directories will be added to the list of files that are displayed.
If you are making directory browsing available via this mechanism, it is sensible to limit the directories that can be browsed so that a user cannot browse directory listings in areas not normally available to him.
An associated and sometimes useful function is rewinddir($dir), which resets the reading of filenames to the beginning of the directory.
As an alternative to these functions, you can use the dir class provided by PHP. It has the properties handle and path, and the methods read(), close(), and rewind(), which perform identically to the nonclass alternatives.
In Listing 19.4 we rewrite the above example using the dir class.
Listing 19.4 browsedir2.php—Using the dir Class to Display the Directory Listing
<html>
<head>
<title>Browse Directories</title>
</head>
<body>
<h1>Browsing</h1>
<?php
$dir = dir("/uploads/");
echo "<p>Handle is $dir->handle</p>";
echo "<p>Upload directory is $dir->path</p>";
echo '<p>Directory Listing:</p><ul>';
while(false !== ($file = $dir->read()))
//strip out the two entries of . and ..
if($file != "." && $file != "..")
{
echo "<li>$file</li>";
}
echo '</ul>';
$dir->close();
?>
</body>
</html>
The filenames in the above example aren’t sorted in any particular order, so if you require a sorted list, you should use a function called scandir() that was introduced in PHP 5. This function can be used to store the filenames in an array and sort them in alphabetical order, either ascending or descending, as in Listing 19.5.
Listing 19.5 scandir.php—Uses the scandir() Function to Sort the Filenames Alphabetically
<html>
<head>
<title>Browse Directories</title>
</head>
<body>
<h1>Browsing</h1>
<?php
$dir = '/uploads/';
$files1 = scandir($dir);
$files2 = scandir($dir, 1);
echo "<p>Upload directory is $dir</p>";
echo '<p>Directory Listing in alphabetical order, ascending:</p><ul>';
foreach($files1 as $file)
{
if($file != "." && $file != "..")
echo "<li>$file</li>";
}
echo '</ul>';
echo "<p>Upload directory is $dir</p>";
echo '<p>Directory Listing in alphabetical, descending:</p><ul>';
foreach($files2 as $file)
{
if($file != "." && $file != "..")
echo "<li>$file</li>";
}
echo '</ul>';
?>
</body>
</html>
Getting Information About the Current Directory
You can obtain some additional information given a path to a file.
The dirname($path) and basename($path) functions return the directory part of the path and filename part of the path, respectively. This information could be useful for the directory browser, particularly if you begin to build up a complex directory structure of content based on meaningful directory names and filenames.
You could also add to your directory listing an indication of how much space is left for uploads by using the disk_free_space($path) function. If you pass this function a path to a directory, it will return the number of bytes free on the disk (Windows) or the file system (Unix) on which the directory is located.
Creating and Deleting Directories
In addition to passively reading information about directories, you can use the PHP functions mkdir() and rmdir() to create and delete directories. You can create or delete directories only in paths that the user the script runs as has access to.
Using mkdir() is more complicated than you might think. It takes two parameters: the path to the desired directory (including the new directory name) and the permissions you would like that directory to have. Here’s an example:
mkdir("/tmp/testing", 0777);
However, the permissions you list are not necessarily the permissions you are going to get. The inverse of the current umask will be combined with this value using AND to get the actual permissions. For example, if the umask is 022, you will get permissions of 0755.
You might like to reset the umask before creating a directory to counter this effect, by entering
$oldumask = umask(0);
mkdir("/tmp/testing", 0777);
umask($oldumask);
This code uses the umask() function, which can be used to check and change the current umask. It changes the current umask to whatever it is passed and returns the old umask, or, if called without parameters, it just returns the current umask.
Note that the umask() function has no effect on Windows systems.
The rmdir() function deletes a directory, as follows:
rmdir("/tmp/testing");
or
rmdir("c:\tmp\testing");
The directory you are trying to delete must be empty.
Interacting with the File System
In addition to viewing and getting information about directories, you can interact with and get information about files on the web server. You previously looked at writing to and reading from files. A large number of other file functions are available.
Getting File Information
You can alter the part of the directory browsing script that reads files as follows:
while(false !== ($file = readdir($dir))) {
echo '<a href="filedetails.php?file='.$file.'">'.$file.'</a><br>';
}
You can then create the script filedetails.php to provide further information about a file. The contents of this file are shown in Listing 19.6.
One warning about this script: Some of the functions used here are not supported under Windows, including posix_getpwuid(), fileowner(), and filegroup(), or are not supported reliably.
Listing 19.6 filedetails.php—File Status Functions and Their Results
<html>
<head>
<title>File Details</title>
</head>
<body>
<?php
$current_dir = '/uploads/';
$file = basename($file); // strip off directory information for security
echo '<h1>Details of file: '.$file.'</h1>';
echo '<h2>File data</h2>';
echo 'File last accessed: '.date('j F Y H:i', fileatime($file)).'<br>';
echo 'File last modified: '.date('j F Y H:i', filemtime($file)).'<br>';
$user = posix_getpwuid(fileowner($file));
echo 'File owner: '.$user['name'].'<br>';
$group = posix_getgrgid(filegroup($file));
echo 'File group: '.$group['name'].'<br>';
echo 'File permissions: '.decoct(fileperms($file)).'<br>';
echo 'File type: '.filetype($file).'<br>';
echo 'File size: '.filesize($file).' bytes<br>';
echo '<h2>File tests</h2>';
echo 'is_dir: '.(is_dir($file)? 'true' : 'false').'<br>';
echo 'is_executable: '.(is_executable($file)? 'true' : 'false').'<br>';
echo 'is_file: '.(is_file($file)? 'true' : 'false').'<br>';
echo 'is_link: '.(is_link($file)? 'true' : 'false').'<br>';
echo 'is_readable: '.(is_readable($file)? 'true' : 'false').'<br>';
echo 'is_writable: '.(is_writable($file)? 'true' : 'false').'<br>';
?>
</body>
</html>
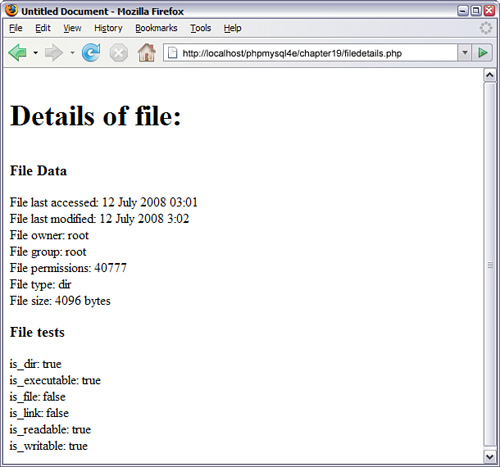
The results of one sample run of Listing 19.6 are shown in Figure 19.4.
Figure 19.4 The File Details view shows file system information about a file. Note that permissions are shown in an octal format.
Let’s examine what each of the functions used in Listing 19.6 does. As mentioned previously, the basename() function gets the name of the file without the directory. (You can also use the dirname() function to get the directory name without the filename.)
The fileatime() and filemtime() functions return the timestamp of the time the file was last accessed and last modified, respectively. We reformatted the timestamp here using the date() function to make it more human readable. These functions return the same value on some operating systems (as in the example) depending on what information the system stores.
The fileowner() and filegroup() functions return the user ID (uid) and group ID (gid) of the file. These IDs can be converted to names using the functions posix_getpwuid() and posix_getgrgid(), respectively, which makes them a bit easier to read. These functions take the uid or gid as a parameter and return an associative array of information about the user or group, including the name of the user or group, as we have used in this script.
The fileperms() function returns the permissions on the file. We reformatted them as an octal number using the decoct() function to put them into a format more familiar to Unix users.
The filetype() function returns some information about the type of file being examined. The possible results are fifo, char, dir, block, link, file, and unknown.
The filesize() function returns the size of the file in bytes.
The second set of functions—is_dir(), is_executable(), is_file(), is_link(), is_readable(), and is_writable()—all test the named attribute of a file and return true or false.
Alternatively, you could use the function stat() to gather a lot of the same information. When passed a file, this function returns an array containing similar data to these functions. The lstat() function is similar, but for use with symbolic links.
All the file status functions are quite expensive to run in terms of time. Their results are therefore cached. If you want to check some file information before and after a change, you need to call
clearstatcache();
to clear the previous results. If you want to use the previous script before and after changing some of the file data, you should begin by calling this function to make sure the data produced is up to date.
Changing File Properties
In addition to viewing file properties, you can alter them.
Each of the chgrp(file, group), chmod(file, permissions), and chown(file, user) functions behaves similarly to its Unix equivalent. None of these functions will work in Windows-based systems, although chown() will execute and always return true.
The chgrp() function changes the group of a file. It can be used to change the group only to groups of which the user is a member unless the user is root.
The chmod() function changes the permissions on a file. The permissions you pass to it are in the usual Unix chmod form. You should prefix them with a 0 (a zero) to show that they are in octal, as in this example:
chmod('somefile.txt', 0777);
The chown() function changes the owner of a file. It can be used only if the script is running as root, which should never happen, unless you are specifically running the script from the command line to perform an administrative task.
Creating, Deleting, and Moving Files
You can use the file system functions to create, move, and delete files.
First, and most simply, you can create a file, or change the time it was last modified, using the touch() function. This function works similarly to the Unix command touch. The function has the following prototype:
bool touch (string file, [int time [, int atime]])
If the file already exists, its modification time will be changed either to the current time or the time given in the second parameter if it is specified. If you want to specify this time, you should give it in timestamp format. If the file doesn’t exist, it will be created. The access time of the file will also change: by default to the current system time or alternatively to the timestamp you specify in the optional atime parameter.
You can delete files using the unlink() function. (Note that this function is not called delete—there is no delete.) You use it like this:
unlink($filename);
You can copy and move files with the copy() and rename() functions, as follows:
copy($source_path, $destination_path);
rename($oldfile, $newfile);
You might have noticed that we used copy() in Listing 19.2.
The rename() function does double duty as a function to move files from place to place because PHP doesn’t have a move function. Whether you can move files from file system to file system and whether files are overwritten when rename() is used are operating system dependent, so check the effects on your server. Also, be careful about the path you use to the filename. If relative, this will be relative to the location of the script, not the original file.
Using Program Execution Functions
Let’s move away from the file system functions now and look at the functions available for running commands on the server.
These functions are useful when you want to provide a web-based front end to an existing command-line–based system. For example, you previously used these commands to set up a front end for the mailing list manager ezmlm. You will use them again when you come to the case studies later in this book.
You can use four main techniques to execute a command on the web server. They are all relatively similar, but there are some minor differences:
![]()
exec()—The exec() function has the following prototype:
string exec (string command [, array &result [, int &return_value]])
You pass in the command that you would like executed, as in this example:
exec("ls -la");
The exec() function has no direct output. It returns the last line of the result of the command.
If you pass in a variable as result, you will get back an array of strings representing each line of the output. If you pass in a variable as return_value, you will get the return code.
![]()
passthru()—The passthru() function has the following prototype:
void passthru (string command [, int return_value])
The passthru() function directly echoes its output through to the browser. (This functionality is useful if the output is binary—for example, some kind of image data.) It returns nothing.
The parameters work the same way as exec()’s parameters do.
![]()
system()—The system() function has the following prototype:
string system (string command [, int return_value])
The function echoes the output of the command to the browser. It tries to flush the output after each line (assuming you are running PHP as a server module), which distinguishes it from passthru(). It returns the last line of the output (upon success) or false (upon failure).
The parameters work the same way as in the other functions.
![]() Backticks—We mentioned backticks briefly in Chapter 1, “PHP Crash Course.” They are actually execution operators.
Backticks—We mentioned backticks briefly in Chapter 1, “PHP Crash Course.” They are actually execution operators.
They have no direct output. The result of executing the command is returned as a string, which can then be echoed or whatever you like.
If you have more complicated needs, you can also use popen(), proc_open(), and proc_close(), which fork external processes and pipe data to and from them. The last two of these functions were added at PHP 4.3.
The script shown in Listing 19.5 illustrates how to use each of the four techniques in an equivalent fashion.
Listing 19.7 progex.php—File Status Functions and Their Results
<?php
chdir('/uploads/'),
///// exec version
echo '<pre>';
// unix
exec('ls -la', $result);
// windows
// exec('dir', $result);
foreach ($result as $line)
echo "$line
";
echo '</pre>';
echo '<br><hr><br>';
///// passthru version
echo '<pre>';
// unix
passthru('ls -la') ;
// windows
// passthru('dir'),
echo '</pre>';
echo '<br><hr><br>';
///// system version
echo '<pre>';
// unix
$result = system('ls -la'),
// windows
// $result = system('dir'),
echo '</pre>';
echo '<br><hr><br>';
/////backticks version
echo '<pre>';
// unix
$result = `ls -al`;
// windows0
// $result = `dir`;
echo $result;
echo '</pre>';
? >
You could use one of these approaches as an alternative to the directory-browsing script you saw earlier. Note that one of the side effects of using external functions is amply demonstrated by this code: Your code is no longer portable. This script uses Unix commands, and the code will clearly not run on Windows.
If you plan to include user-submitted data as part of the command you’re going to execute, you should always run it through the escapeshellcmd() function first. This way, you stop users from maliciously (or otherwise) executing commands on your system. You can call it like this:
system(escapeshellcmd($command));
You should also use the escapeshellarg() function to escape any arguments you plan to pass to your shell command.
Interacting with the Environment: getenv( ) and putenv( )
Before we leave this discussion, let’s look at how to use environment variables from within PHP. Two functions serve this purpose: getenv(), which enables you to retrieve environment variables, and putenv(), which enables you to set environment variables. Note that the environment we are talking about here is the environment in which PHP runs on the server.
You can get a list of all PHP’s environment variables by running phpinfo(). Some are more useful than others; for example,
getenv("HTTP_REFERER");
returns the URL of the page from which the user came to the current page.
You can also set environment variables as required with putenv(), as in this example:
$home = "/home/nobody";
putenv (" HOME=$home ");
If you are a system administrator and would like to limit which environment variables programmers can set, you can use the safe_mode_allowed_env_vars directive in php.ini. When PHP runs in safe mode, users can set only environment variables whose prefixes are listed in this directive.
Further Reading
Most of the file system functions in PHP map to underlying operating system functions of the same name. Try reading the man pages for more information if you’re using Unix.
Next
In Chapter 20, “Using Network and Protocol Functions,” you learn to use PHP’s network and protocol functions to interact with systems other than your own web server. This again expands the horizons of what you can do with your scripts.