
6 Object–Oriented PHP
THIS CHAPTER EXPLAINS CONCEPTS OF OBJECT-ORIENTED (OO) development and shows how they can be implemented in PHP.
PHP’s OO implementation has all the features you would expect in a fully object-oriented language. We point out each of these features as we go through this chapter.
Key topics covered in this chapter include
![]() Classes, attributes, and operations
Classes, attributes, and operations
Understanding Object-Oriented Concepts
Modern programming languages usually support or even require an object-oriented approach to software development. Object-oriented development attempts to use the classifications, relationships, and properties of the objects in the system to aid in program development and code reuse.
Classes and Objects
In the context of OO software, an object can be almost any item or concept—a physical object such as a desk or a customer; or a conceptual object that exists only in software, such as a text input area or a file. Generally, you will be most interested in objects, including both real-world objects and conceptual objects, that need to be represented in software.
Object-oriented software is designed and built as a set of self-contained objects with both attributes and operations that interact to meet your needs. Attributes are properties or variables that relate to the object. Operations are methods, actions, or functions that the object can perform to modify itself or perform for some external effect. (You will hear the term attribute used interchangeably with the terms member variable and property, and the term operation used interchangeably with method.)
Object-oriented software’s central advantage is its capability to support and encourage encapsulation—also known as data hiding. Essentially, access to the data within an object is available only via the object’s operations, known as the interface of the object.
An object’s functionality is bound to the data it uses. You can easily alter the details controlling how the object is implemented to improve performance, add new features, or fix bugs without having to change the interface. Changing the interface could have ripple effects throughout the project, but encapsulation allows you to make changes and fix bugs without your actions cascading to other parts of the project.
In other areas of software development, object orientation is the norm, and procedural or function-oriented software is considered old fashioned. However, most web scripts are still designed and written using an ad hoc approach following a function-oriented methodology.
A number of reasons for using this approach exist. Many web projects are relatively small and straightforward. You can get away with picking up a saw and building a wooden spice rack without planning your approach, and you can successfully complete the majority of web software projects in the same way because of their small size. However, if you picked up a saw and attempted to build a house without formal planning, you wouldn’t get quality results, if you got results at all. The same is true for large software projects.
Many web projects evolve from a set of hyperlinked pages to a complex application. Complex applications, whether presented via dialog boxes and windows or via dynamically generated HTML pages, need a properly thought-out development methodology. Object orientation can help you to manage the complexity in your projects, increase code reusability, and thereby reduce maintenance costs.
In OO software, an object is a unique and identifiable collection of stored data and operations that operate on that data. For instance, you might have two objects that represent buttons. Even if both have a label "OK", a width of 60 pixels, a height of 20 pixels, and any other attributes that are identical, you still need to be able to deal with one button or the other. In software, separate variables act as handles (unique identifiers) for the objects.
Objects can be grouped into classes. Classes represent a set of objects that might vary from individual to individual, but must have a certain amount in common. A class contains objects that all have the same operations behaving in the same way and the same attributes representing the same things, although the values of those attributes vary from object to object.
You can think of the noun bicycle as a class of objects describing many distinct bicycles with many common features or attributes—such as two wheels, a color, and a size—and operations, such as move.
My own bicycle can be thought of as an object that fits into the class bicycle. It has all the common features of all bicycles, including a move operation that behaves the same as most other bicycles’ move—even if it is used more rarely. My bicycle’s attributes have unique values because my bicycle is green, and not all bicycles are that color.
Polymorphism
An object-oriented programming language must support polymorphism, which means that different classes can have different behaviors for the same operation. If, for instance, you have a class car and a class bicycle, both can have different move operations. For real-world objects, this would rarely be a problem. Bicycles are not likely to become confused and start using a car’s move operation instead. However, a programming language does not possess the common sense of the real world, so the language must support polymorphism to know which move operation to use on a particular object.
Polymorphism is more a characteristic of behaviors than it is of objects. In PHP, only member functions of a class can be polymorphic. A real-world comparison is that of verbs in natural languages, which are equivalent to member functions. Consider the ways a bicycle can be used in real life. You can clean it, move it, disassemble it, repair it, or paint it, among other things.
These verbs describe generic actions because you don’t know what kind of object is being acted on. (This type of abstraction of objects and actions is one of the distinguishing characteristics of human intelligence.)
For example, moving a bicycle requires completely different actions from those required for moving a car, even though the concepts are similar. The verb move can be associated with a particular set of actions only after the object acted on is made known.
Inheritance
Inheritance allows you to create a hierarchical relationship between classes using subclasses. A subclass inherits attributes and operations from its superclass. For example, car and bicycle have some things in common. You could use a class vehicle to contain the things such as a color attribute and a move operation that all vehicles have, and then let the car and bicycle classes inherit from vehicle.
You will hear subclass, derived class, and child used interchangeably. Similarly, you will hear superclass and parent used interchangeably.
With inheritance, you can build on and add to existing classes. From a simple base class, you can derive more complex and specialized classes as the need arises. This capability makes your code more reusable, which is one of the important advantages of an object-oriented approach.
Using inheritance might save you work if operations can be written once in a superclass rather than many times in separate subclasses. It might also allow you to more accurately model real-world relationships. If a sentence about two classes makes sense with “is a” between the classes, inheritance is probably appropriate. The sentence “a car is a vehicle” makes sense, but the sentence “a vehicle is a car” does not make sense because not all vehicles are cars. Therefore, car can inherit from vehicle.
Creating Classes, Attributes, and Operations in PHP
So far, we have discussed classes in a fairly abstract way. When creating a class in PHP, you must use the keyword class.
Structure of a Class
A minimal class definition looks like this:
class classname
{
}
To be useful, the classes need attributes and operations. You create attributes by declaring variables within a class definition using keywords that match their visibility: public, private, or protected. We will discuss this later in the chapter. The following code creates a class called classname with two public attributes, $attribute1 and $attribute2:
class classname
{
public $attribute1;
public $attribute2;
}
You create operations by declaring functions within the class definition. The following code creates a class named classname with two operations that do nothing. The operation operation1() takes no parameters, and operation2() takes two parameters:
class classname
{
function operation1()
{
}
function operation2($param1, $param2)
{
}
}
Constructors
Most classes have a special type of operation called a constructor. A constructor is called when an object is created, and it also normally performs useful initialization tasks such as setting attributes to sensible starting values or creating other objects needed by this object.
A constructor is declared in the same way as other operations, but has the special name __construct(). Although you can manually call the constructor, its main purpose is to be called automatically when an object is created. The following code declares a class with a constructor:
class classname
{
function__construct($param)
{
echo "Constructor called with parameter ".$param."<br />";
}
}
PHP supports function overloading, which means that you can provide more than one function with the same name and different numbers or types of parameters. (This feature is supported in many OO languages.) We discuss this later in this chapter.
Destructors
The opposite of a constructor is a destructor. They allow you to have some functionality that will be executed just before a class is destroyed, which will occur automatically when all references to a class have been unset or fallen out of scope.
Similar to the way constructors are named, the destructor for a class must be named __destruct(). Destructors cannot take parameters.
Instantiating Classes
After you have declared a class, you need to create an object—a particular individual that is a member of the class—to work with. This is also known as creating an instance of or instantiating a class. You create an object by using the new keyword. When you do so, you need to specify what class your object will be an instance of and provide any parameters required by the constructor.
The following code declares a class called classname with a constructor and then creates three objects of type classname:
class classname
{
function _construct($param)
{
echo "Constructor called with parameter ".$param."<br />";
}
}
$a = new classname("First");
$b = new classname("Second");
$c = new classname();
Because the constructor is called each time you create an object, this code produces the following output:
Constructor called with parameter First
Constructor called with parameter Second
Constructor called with parameter
Using Class Attributes
Within a class, you have access to a special pointer called $this. If an attribute of your current class is called $attribute, you refer to it as $this->attribute when either setting or accessing the variable from an operation within the class.
The following code demonstrates setting and accessing an attribute within a class:
class classname
{
public $attribute;
function operation($param)
{
$this->attribute = $param
echo $this->attribute;
}
}
Whether you can access an attribute from outside the class is determined by access modifiers, discussed later in this chapter. This example does not restrict access to the attributes, so you can access them from outside the class as follows:
class classname
{
public $attribute;
}
$a = new classname();
$a->attribute = "value";
echo $a->attribute;
It is not generally a good idea to directly access attributes from outside a class. One of the advantages of an object-oriented approach is that it encourages encapsulation. You can enforce this with the use of _get and _set functions. If, instead of accessing the attributes of a class directly, you write accessor functions, you can make all your accesses through a single section of code. When you initially write your accessor functions, they might look as follows:
class classname
{
public $attribute;
function _get($name)
{
return $this->$name;
}
function __set ($name, $value)
{
$this->$name = $value;
}
}
This code provides minimal functions to access the attribute named $attribute. The function named __get() simply returns the value of $attribute, and the function named __set() assigns a new value to $attribute.
Note that __get() takes one parameter—the name of an attribute—and returns the value of that attribute. Similarly, the __set() function takes two parameters: the name of an attribute and the value you want to set it to.
You do not directly call these functions. The double underscore in front of the name shows that these functions have a special meaning in PHP, just like the __construct() and __destruct() functions.
How then do they work? If you instantiate the class
$a = new classname();
you can then use the __get() and __set() functions to check and set the value of any attributes.
If you type
$a->$attribute = 5;
this statement implicitly calls the __set() function with the value of $name set to "attribute", and the value of $value set to 5. You need to write the __set() function to do any error checking you want.
The __get() function works in a similar way. If, in your code, you reference
$a->attribute
this expression implicitly calls the __get() function with the parameter $name set to "attribute". It is up to you to write the __get() function to return the value.
At first glance, this code might seem to add little or no value. In its present form, this is probably true, but the reason for providing accessor functions is simple: You then have only one section of code that accesses that particular attribute.
With only a single access point, you can implement validity checks to make sure that only sensible data is being stored. If it occurs to you later that the value of $attribute should only be between 0 and 100, you can add a few lines of code once and check before allowing changes. You could change the __set() function to look as follows:
function _set ($name, $value)
{
if( ($name="attribute") && ($value >= 0) && ($value <= 100) )
$this->attribute = $value;
}
With only a single access point, you are free to change the underlying implementation. If, for some reason, you choose to change the way $attribute is stored, accessor functions allow you to do this and change the code in only one place.
You might decide that, instead of storing $attribute as a variable, you will retrieve it from a database only when needed, calculate an up-to-date value every time it is requested, infer a value from the values of other attributes, or encode the data as a smaller data type. Whatever change you decide to make, you can simply modify the accessor functions. Other sections of code will not be affected as long as you make the accessor functions still accept or return the data that other parts of the program expect.
Controlling Access with private and public
PHP uses access modifiers. They control the visibility of attributes and methods, and are placed in front of attribute and method declarations. PHP supports the following three different access modifiers:
![]() The default option is
The default option is public, meaning that if you do not specify an access modifier for an attribute or method, it will be public. Items that are public can be accessed from inside or outside the class.
![]() The
The private access modifier means that the marked item can be accessed only from inside the class. You might use it on all attributes if you are not using __get() and __set(). You may also choose to make some methods private, for example, if they are utility functions for use inside the class only. Items that are private will not be inherited (more on this issue later in this chapter).
![]() The
The protected access modifier means that the marked item can be accessed only from inside the class. It also exists in any subclasses; again, we return to this issue when we discuss inheritance later in this chapter. For now, you can think of protected as being halfway in between private and public.
The following sample code shows the use of the public access modifier:
class classname
{
public $attribute;
public function __get($name)
{
return $this->$name;
}
public function __set ($name, $value)
{
$this->$name = $value;
}
}
Here, each class member is prefaced with an access modifier to show whether it is private or public. You could leave out the public keyword because it is the default, but the code is easier to understand with it in if you are using the other modifiers.
Calling Class Operations
You can call class operations in much the same way that you call class attributes. Say you have the class
class classname
{
function operation1()
{
}
function operation2($param1, $param2)
{
}
}
and create an object of type classname called $a as follows:
$a = new classname();
You then call operations the same way that you call other functions: by using their name and placing any parameters that they need in brackets. Because these operations belong to an object rather than normal functions, you need to specify to which object they belong. The object name is used in the same way as an object’s attributes, as follows:
$a->operation1();
$a->operation2(12, "test");
If the operations return something, you can capture that return data as follows:
$x = $a->operation1();
$y = $a->operation2(12, "test");
Implementing Inheritance in PHP
If the class is to be a subclass of another, you can use the extends keyword to specify this use. The following code creates a class named B that inherits from some previously defined class named A:
class B extends A
{
public $attribute2;
function operation2()
{
}
}
If the class A was declared as
class A
{
public $attribute1;
function operation1()
{
}
}
all the following accesses to operations and attributes of an object of type B would be valid:
$b = new B();
$b->operation1();
$b->attribute1 = 10;
$b->operation2();
$b->attribute2 = 10;
Note that because class B extends class A, you can refer to operation1() and $attribute1, although they were declared in class A. As a subclass of A, B has all the same functionality and data. In addition, B has declared an attribute and an operation of its own.
It is important to note that inheritance works in only one direction. The subclass or child inherits features from its parent or superclass, but the parent does not take on features of the child. This means that the last two lines in this code are wrong:
$a = new A();
$a->operation1();
$a->attribute1 = 10;
$a->operation2();
$a->attribute2 = 10;
The class A does not have an operation2() or an attribute2.
Controlling Visibility Through Inheritance with private and protected
You can use the access modifiers private and protected to control what is inherited. If an attribute or method is specified as private, it will not be inherited. If an attribute or method is specified as protected, it will not be visible outside the class (like a private element) but will be inherited.
Consider the following example:
<?php
class A
{
private function operation1()
{
echo "operation1 called";
}
protected function operation2()
{
echo "operation2 called";
}
public function operation3()
{
echo "operation3 called";
}
}
class B extends A
{
function __construct()
{
$this->operation1();
$this->operation2();
$this->operation3();
}
}
$b = new B;
?>
This code creates one operation of each type in class A: public, protected, and private. B inherits from A. In the constructor of B, you then try to call the operations from the parent.
The line
$this->operation1();
produces a fatal error as follows:
Fatal error: Call to private method A::operation1() from context 'B'
This example shows that private operations cannot be called from a child class.
If you comment out this line, the other two function calls will work. The protected function is inherited but can be used only from inside the child class, as done here. If you try adding the line
$b->operation2();
to the bottom of the file, you will get the following error:
Fatal error: Call to protected method A::operation2() from context ' '
However, you can call operation3() from outside the class, as follows:
$b->operation3();
You can make this call because it is declared as public.
Overriding
In this chapter, we have shown a subclass declaring new attributes and operations. It is also valid and sometimes useful to redeclare the same attributes and operations. You might do this to give an attribute in the subclass a different default value to the same attribute in its superclass or to give an operation in the subclass different functionality to the same operation in its superclass. This action is called overriding.
For instance, say you have a class A:
class A
{
public $attribute = "default value";
function operation()
{
echo "Something<br />";
echo "The value of $attribute is ". $this->attribute."<br />";
}
}
If you want to alter the default value of $attribute and provide new functionality for operation(), you can create the following class B, which overrides $attribute and operation():
class B extends A
{
public $attribute = "different value";
function operation()
{
echo "Something else<br />";
echo "The value of $attribute is ". $this->attribute."<br />";
}
}
Declaring B does not affect the original definition of A. Now consider the following two lines of code:
$a = new A();
$a -> operation();
These lines create an object of type A and call its operation() function. This produces
Something
The value of $attribute is default value
proving that creating B has not altered A. If you create an object of type B, you will get different output.
This code
$b = new B();
$b -> operation();
produces
Something else
The value of $attribute is different value
In the same way that providing new attributes or operations in a subclass does not affect the superclass, overriding attributes or operations in a subclass does not affect the superclass.
A subclass will inherit all the attributes and operations of its superclass, unless you provide replacements. If you provide a replacement definition, it takes precedence and overrides the original definition.
The parent keyword allows you to call the original version of the operation in the parent class. For example, to call A::operation from within class B, you would use
parent::operation();
The output produced is, however, different. Although you call the operation from the parent class, PHP uses the attribute values from the current class. Hence, you get the following output:
Something
The value of $attribute is different value
Inheritance can be many layers deep. You can declare a class imaginatively called C that extends B and therefore inherits features from B and from B’s parent, A. The class C can again choose which attributes and operations from its parents to override and replace.
Preventing Inheritance and Overriding with final
PHP uses the keyword final. When you use this keyword in front of a function declaration, that function cannot be overridden in any subclasses. For example, you can add it to class A in the previous example, as follows:
class A
{
public $attribute = "default value";
final function operation()
{
echo "Something<br />";
echo "The value of $attribute is ". $this->attribute."<br />";
}
}
Using this approach prevents you from overriding operation() in class B. If you attempt to do so, you will get the following error:
Fatal error: Cannot override final method A::operation()
You can also use the final keyword to prevent a class from being subclassed at all. To prevent class A from being subclassed, you can add it as follows:
final class A
{…}
If you then try to inherit from A, you will get an error similar to
Fatal error: Class B may not inherit from final class (A)
Understanding Multiple Inheritance
A few OO languages (most notably C++ and Smalltalk) support multiple inheritance, but like most, PHP does not. This means that each class can inherit from only one parent. No restrictions exist for how many children can share a single parent. What this means might not seem immediately clear. Figure 6.1 shows three different ways that three classes named A, B, and C can inherit.
Figure 6.1 PHP does not support multiple inheritance.

The left combination shows class C inheriting from class B, which in turn inherits from class A. Each class has at most one parent, so this is a perfectly valid single inheritance in PHP.
The center combination shows classes B and C inheriting from class A. Each class has at most one parent, so again this is a valid single inheritance.
The right combination shows class C inheriting from both class A and class B. In this case, class C has two parents, so this is a case of multiple inheritance and is invalid in PHP.
Implementing Interfaces
If you need to implement the functionality seen in instances of multiple inheritance, you can do so in PHP through interfaces. They are seen as workarounds for multiple inheritance and are similar to the interface implementation supported by other object-oriented languages, including Java.
The idea of an interface is that it specifies a set of functions that must be implemented in classes that implement that interface. For instance, you might decide that you have a set of classes that need to be able to display themselves. Instead of having a parent class with a display() function that they all inherit from and override, you can implement an interface as follows:
interface Displayable
{
function display();
}
class webPage implements Displayable
{
function display()
{
// …
}
}
This example illustrates a roundabout kind of multiple inheritance because the webPage class can inherit from one class and implement one or more interfaces.
If you do not implement the methods specified in the interface (in this case, display()), you will get a fatal error.
Designing Classes
Now that you know some of the concepts behind objects and classes and the syntax to implement them in PHP, it is time to look at how to design useful classes.
Many classes in your code will represent classes or categories of real-world objects. Classes you might use in Web development might include pages, user interface components, shopping carts, error handling, product categories, or customers.
Objects in your code can also represent specific instances of the previously mentioned classes—for example, the home page, a particular button, or the shopping cart in use by Fred Smith at a particular time. Fred Smith himself can be represented by an object of type
customer. Each item that Fred purchases can be represented as an object, belonging to a category or class.
In the preceding chapter, you used simple include files to give the fictional company TLA Consulting a consistent look and feel across the different pages of its website. Using classes and the timesaving power of inheritance, you can create a more advanced version of the same site.
Now you want to be able to quickly create pages for TLA that look and behave in the same way. You should be able to modify those pages to suit the different parts of the site.
For purposes of this example, you are going to create a Page class. The main goal of this class is to limit the amount of HTML needed to create a new page. It should allow you to alter the parts that change from page to page, while automatically generating the elements that stay the same. The class should provide a flexible framework for creating new pages and should not compromise your freedom.
Because you are generating the page from a script rather than with static HTML, you can add any number of clever things including functionality to
![]() Enable you to alter page elements in only one place. If you change the copyright notice or add an extra button, you should need to make the change in only a single place.
Enable you to alter page elements in only one place. If you change the copyright notice or add an extra button, you should need to make the change in only a single place.
![]() Have default content for most parts of the page but be able to modify each element where required, setting custom values for elements such as the title and metatags.
Have default content for most parts of the page but be able to modify each element where required, setting custom values for elements such as the title and metatags.
![]() Recognize which page is being viewed and alter navigation elements to suit; there is no point in having a button that takes you to the home page located on the home page.
Recognize which page is being viewed and alter navigation elements to suit; there is no point in having a button that takes you to the home page located on the home page.
![]() Allow you to replace standard elements for particular pages. If, for instance, you want different navigation buttons in sections of the site, you should be able to replace the standard ones.
Allow you to replace standard elements for particular pages. If, for instance, you want different navigation buttons in sections of the site, you should be able to replace the standard ones.
Writing the Code for Your Class
Having decided what you want the output from your code to look like and a few features you would like for it, how do you implement it? Later in the book, we discuss design and project management for large projects. For now, we concentrate on the parts specific to writing object-oriented PHP.
The class needs a logical name. Because it represents a page, you can call it Page. To declare a class called Page, type
class Page
{
}
The class needs some attributes. For this example, set elements that you might want changed from page to page as attributes of the class. The main contents of the page, which are a combination of HTML tags and text, are called $content. You can declare the content with the following line of code within the class definition:
public $content;
You can also set attributes to store the page’s title. You will probably want to change this title to clearly show what particular page the visitor is looking at. Rather than have blank titles, you can provide a default title with the following declaration:
public $title = "TLA Consulting Pty Ltd";
Most commercial web pages include metatags to help search engines index them. To be useful, metatags should probably change from page to page. Again, you can provide a default value:
public $keywords = "TLA Consulting, Three Letter Abbreviation,
some of my best friends are search engines";
The navigation buttons shown on the original page in Figure 5.2 (see the preceding chapter) should probably be kept the same from page to page to avoid confusing people, but to change them easily, you can make them an attribute, too. Because the number of buttons might be variable, you can use an array and store both the text for the button and the URL it should point to:
public $buttons = array( "Home" => "home.php",
"Contact" => "contact.php",
"Services" => "services.php",
"Site Map" => "map.php"
);
To provide some functionality, the class also needs operations. You can start by providing accessor functions to set and get the values of the attributes you defined:
public function __set($name, $value)
{
$this->$name = $value;
}
The __set() function does not contain error checking (for brevity), but this capability can be easily added later, as required. Because it is unlikely that you will be requesting any of these values from outside the class, you can elect not to provide a __get() function, as done here.
The main purpose of this class is to display a page of HTML, so you need a function. We called ours Display(), and it is as follows:
public function Display()
{
echo "<html>
<head>
";
$this -> DisplayTitle();
$this -> DisplayKeywords();
$this -> DisplayStyles();
echo "</head>
<body>
";
$this -> DisplayHeader();
$this -> DisplayMenu($this->buttons);
echo $this->content;
$this -> DisplayFooter();
echo "</body>
</html>
";}
The function includes a few simple echo statements to display HTML but mainly consists of calls to other functions in the class. As you have probably guessed from their names, these other functions display parts of the page.
Breaking up functions like this is not compulsory. All these separate functions might simply have been combined into one big function. We separated them out for a number of reasons.
Each function should have a defined task to perform. The simpler this task is, the easier writing and testing the function will be. Don’t go too far; if you break up your program into too many small units, it might be hard to read.
Using inheritance, you can override operations. You can replace one large Display() function, but it is unlikely that you will want to change the way the entire page is displayed. It will be much better to break up the display functionality into a few self-contained tasks and be able to override only the parts that you want to change.
This Display() function calls DisplayTitle(), DisplayKeywords(), DisplayStyles(), DisplayHeader(), DisplayMenu(), and DisplayFooter(). This means that you need to define these operations. You can write operations or functions in this logical order, calling the operation or function before the actual code for the function. In many other languages, you need to write the function or operation before it can be called. Most of the operations are fairly simple and need to display some HTML and perhaps the contents of the attributes.
Listing 6.1 shows the complete class, saved as page.inc to include or require into other files.
Listing 6.1 page.inc—The Page Class Provides an Easy and Flexible Way to Create TLA Pages
<?php
class Page
{
// class Page’s attributes
public $content;
public $title = "TLA Consulting Pty Ltd";
public $keywords = "TLA Consulting, Three Letter Abbreviation,
some of my best friends are search engines";
public $buttons = array("Home" => "home.php",
"Contact" => "contact.php",
"Services" => "services.php",
"Site Map" => "map.php"
);
// class Page’s operations
public function __set($name, $value)
{
$this->$name = $value;
}
public function Display()
{
echo "<html>
<head>
";
$this -> DisplayTitle();
$this -> DisplayKeywords();
$this -> DisplayStyles();
echo "</head>
<body>
";
$this -> DisplayHeader();
$this -> DisplayMenu($this->buttons);
echo $this->content;
$this -> DisplayFooter();
echo "</body>
</html>
";
}
public function DisplayTitle()
{
echo "<title>".$this->title."</title>";
}
public function DisplayKeywords()
{
echo "<meta name= "keywords "
content= "".$this->keywords." "/>";
}
public function DisplayStyles()
{
?>
<style>
h1 {
color:white; font-size:24pt; text-align:center;
font-family:arial,sans-serif
}
.menu {
color:white; font-size:12pt; text-align:center;
font-family:arial,sans-serif; font-weight:bold
}
td {
background:black
}
p {
color:black; font-size:12pt; text-align:justify;
font-family:arial,sans-serif
}
p.foot {
color:white; font-size:9pt; text-align:center;
font-family:arial,sans-serif; font-weight:bold
}
a:link,a:visited,a:active {
color:white
}
</style>
<?php
}
public function DisplayHeader()
{
?>
<table width="100%" cellpadding="12"
cellspacing="0" border="0">
<tr bgcolor ="black">
<td align ="left"><img src = "logo.gif" /></td>
<td>
<h1>TLA Consulting Pty Ltd</h1>
</td>
<td align ="right"><img src = "logo.gif" /></td>
</tr>
</table>
<?php
}
public function DisplayMenu($buttons)
{
echo "<table width= "100% " bgcolor= "white "
cellpadding="4 " cellspacing= "4 ">
";
echo "<tr>
";
//calculate button size
$width = 100/count($buttons);
while (list($name, $url) = each($buttons)) {
$this -> DisplayButton($width, $name, $url,
!$this->IsURLCurrentPage($url));
}
echo "</tr>
";
echo "</table>
";
}
public function IsURLCurrentPage($url)
{
if(strpos($_SERVER['PHP_SELF'], $url )==false)
{
return false;
}
else
{
return true;
}
}
public function
DisplayButton($width,$name,$url,$active = true)
{
if ($active) {
echo "<td width = "".$width."% ">
<a href= "".$url." ">
<img src= "s-logo.gif " alt= "".$name." " border= "0 " /></a>
<a href= "".$url." "><span class= "menu ">".$name."</span></a>
</td>";
} else {
echo "<td width= "".$width."% ">
<img src= "side-logo.gif ">
<span class= "menu ">".$name."</span>
</td>";
}
}
public function DisplayFooter()
{
?>
<table width="100%" bgcolor="black" cellpadding="12" border="0">
<tr>
<td>
<p class="foot">© TLA Consulting Pty Ltd.</p>
<p class="foot">Please see our <a href ="">legal
information page</a></p>
</td>
</tr>
</table>
<?php
}
}
?>
When reading this class, note that DisplayStyles(), DisplayHeader(), and DisplayFooter() need to display a large block of static HTML, with no PHP processing. Therefore, you simply use an end PHP tag (?>), type your HTML, and then re-enter PHP with an open PHP tag (<?php) while inside the functions.
Two other operations are defined in this class. The operation DisplayButton() outputs a single menu button. If the button is to point to the page you are on, you display an inactive button instead, which looks slightly different and does not link anywhere. This way, you can keep the page layout consistent and provide visitors with a visual location.
The operation IsURLCurrentPage() determines whether the URL for a button points to the current page. You can use several techniques to discover this information. Here, you use the string function strpos() to see whether the URL given is contained in one of the server set variables. The statement strpos( $_SERVER['PHP_SELF'], $url ) returns a number if the string in $url is inside the superglobal variable $_SERVER['PHP_SELF'] or false if it is not.
To use this Page class, you need to include page.inc in a script and call Display().
The code in Listing 6.2 creates TLA Consulting’s home page and gives output similar to that previously generated in Figure 5.2. The code in Listing 6.2 does the following:
1. Uses require to include the contents of page.inc, which contains the definition of the class Page.
2. Creates an instance of the class Page. The instance is called $homepage.
3. Sets the content, consisting of some text and HTML tags to appear in the page. (This implicitly invokes the __set() method.)
4. Calls the operation Display() within the object $homepage to cause the page to be displayed in the visitor’s browser.
Listing 6.2 home.php—This Home Page Uses the Page Class to Do Most of the Work Involved in Generating the Page
<?php
require("page.inc");
$homepage = new Page();
$homepage->content ="<p>Welcome to the home of TLA Consulting.
Please take some time to get to know us.</p>
<p>We specialize in serving your business needs
and hope to hear from you soon.</p>";
$homepage->Display();
?>
You can see in Listing 6.2 that you need to do very little work to generate new pages using this Page class. Using the class in this way means that all your pages need to be very similar.
If you want some sections of the site to use a variant of the standard page, you can simply copy page.inc to a new file called page2.inc and make some changes. This means that every time you update or fix parts of page.inc, you need to remember to make the same changes to page2.inc.
A better course of action is to use inheritance to create a new class that inherits most of its functionality from Page but overrides the parts that need to be different. For the TLA site, require that the services page include a second navigation bar. The script shown in Listing 6.3 does this by creating a new class called ServicesPage that inherits from Page. You provide a new array called $row2buttons that contains the buttons and links you want in the second row. Because you want this class to behave in mostly the same ways, you override only the part you want changed: the Display() operation.
Listing 6.3 services.php—The Services Page Inherits from the Page Class but Overrides Display() to Alter the Output
<?php
require ("page.inc");
class ServicesPage extends Page
{
private $row2buttons = array(
"Re-engineering" => "reengineering.php",
"Standards Compliance" => "standards.php",
"Buzzword Compliance" => "buzzword.php",
"Mission Statements" => "mission.php"
);
public function Display()
{
echo "<html>
<head>
";
$this -> DisplayTitle();
$this -> DisplayKeywords();
$this -> DisplayStyles();
echo "</head>
<body>
";
$this -> DisplayHeader();
$this -> DisplayMenu($this->buttons);
$this -> DisplayMenu($this->row2buttons);
echo $this->content;
$this -> DisplayFooter();
echo "</body>
</html>
";
}
}
$services = new ServicesPage();
$services -> content ="<p>At TLA Consulting, we offer a number
of services. Perhaps the productivity of your employees would
improve if we re-engineered your business. Maybe all your business
needs is a fresh mission statement, or a new batch of
buzzwords.</p>";
$services -> Display();
?>
The overriding Display() is similar but contains one extra line:
$this -> DisplayMenu($this->row2buttons);
This line calls DisplayMenu() a second time and creates a second menu bar.
Outside the class definition, you create an instance of the ServicesPage class, set the values for which you want nondefault values, and call Display().
As you can see, Figure 6.2 shows a new variant of the standard page. You needed to write new code only for the parts that were different.
Figure 6.2 The services page is created using inheritance to reuse most of the standard page.

Creating pages via PHP classes has obvious advantages. With a class to do most of the work for you, you need to do less work to create a new page. You can update all your pages at once by simply updating the class. Using inheritance, you can derive different versions of the class from the original without compromising the advantages.
As with most things in life, these advantages do not come without cost. Creating pages from a script requires more computer processor effort than simply loading a static HTML page from disk and sending it to a browser. On a busy site, this will be important, and you should make an effort to either use static HTML pages or cache the output of your scripts where possible to reduce the load on the server.
Understanding Advanced Object-Oriented Functionality in PHP
In the following sections, we discuss PHP’s advanced OO features.
Using Per-Class Constants
PHP allows for per-class constants. This constant can be used without your needing to instantiate the class, as in this example:
<?php
class Math {
const pi = 3.14159;
}
echo "Math::pi = ".Math::pi."
";
?>
You can access the per-class constant by using the :: operator to specify the class the constant belongs to, as done in this example.
Implementing Static Methods
PHP allows the use of the static keyword. It is applied to methods to allow them to be called without instantiating the class. This is the method equivalent of the per-class constant idea. For example, consider the Math class created in the preceding section. You could add a squared() function to it and invoke it without instantiating the class as follows:
class Math
{
static function squared($input)
{
return $input*$input;
}
}
echo Math::squared(8);
Note that you cannot use the this keyword inside a static method because there may be no object instance to refer to.
Checking Class Type and Type Hinting
The instanceof keyword allows you to check the type of an object. You can check whether an object is an instance of a particular class, whether it inherits from a class, or whether it implements an interface. The instanceof keyword is effectively a conditional operator. For instance, with the previous examples in which you implemented class B as a subclass of class A, then
($b instanceof B) would be true.
($b instanceof A) would be true.
($b instanceof Displayable) would be false.
All these examples assume that A, B, and Displayable are in the current scope; otherwise, an error will be triggered.
Additionally, you can use class type hinting. Normally, when you pass a parameter to a function in PHP, you do not pass the type of that parameter. With class type hinting, you can specify the type of class that ought to be passed in, and if that is not the type actually passed in, an error will be triggered. The type checking is equivalent to instanceof. For example, consider the following function:
function check_hint(B $someclass)
{
//…
}
This example suggests that $someclass needs to be an instance of class B. If you then pass in an instance of class A as
check_hint($a);
you will get the following fatal error:
Fatal error: Argument 1 must be an instance of B
Note that if you had hinted A and passed in an instance of B, no error would have occurred because B inherits from A.
Late Static Bindings
Introduced in PHP 5.3, late static bindings allow references to the called class within the context of a static inheritance; parent classes can use static methods overridden by child classes. The following basic example from the PHP Manual shows a late static binding in action:
<?php
class A {
public static function who() {
echo __CLASS__;
}
public static function test() {
static::who(); // Here comes Late Static Bindings
}
}
class B extends A {
public static function who() {
echo __CLASS__;
}
}
B::test();
?>
The above example will output:
B
Allowing references to classes called at runtime, regardless if they have been overridden, brings additional object functionality to your classes.
For more information and examples of late static bindings, please see the PHP Manual at http://www.php.net/manual/en/language.oop5.late-static-bindings.php.
Cloning Objects
The clone keyword, which allows you to copy an existing object, can also be used in PHP. For example,
$c = clone $b;
creates a copy of object $b of the same class, with the same attribute values.
You can also change this behavior. If you need nondefault behavior from clone, you need to create a method in the base class called __clone(). This method is similar to a constructor or destructor in that you do not call it directly. It is invoked when the clone keyword is used as shown here. Within the __clone() method, you can then define exactly the copying behavior that you want.
The nice thing about __clone() is that it will be called after an exact copy has been made using the default behavior, so at that stage you are able to change only the things you want to change.
The most common functionality to add to __clone() is code to ensure that attributes of the class that are handled as references are copied correctly. If you set out to clone a class that contains a reference to an object, you are probably expecting a second copy of that object rather than a second reference to the same one, so it would make sense to add this to __clone().
You may also choose to change nothing but perform some other action, such as updating an underlying database record relating to the class.
Using Abstract Classes
PHP offers abstract classes, which cannot be instantiated, as well as abstract methods, which provide the signature for a method but no implementation. For instance:
abstract operationX($param1, $param2);
Any class that contains abstract methods must itself be abstract, as shown in this example:
abstract class A
{
abstract function operationX($param1, $param2);
}
The main use of abstract methods and classes is in a complex class hierarchy where you want to make sure each subclass contains and overrides some particular method; this can also be done with an interface.
Overloading Methods with __call ( )
We previously looked at a number of class methods with special meanings whose names begin with a double underscore (__), such as __get(), __set(), __construct(), and __destruct(). Another example is the method __call(), which is used in PHP to implement method overloading.
Method overloading is common in many object-oriented languages but is not as useful in PHP because you tend to use flexible types and the (easy-to-implement) optional function parameters instead.
To use it, you implement a __call() method, as in this example:
public function _call($method, $p)
{
if ($method == "display") {
if (is_object($p[0])) {
$this->displayObject($p[0]);
} else if (is_array($p[0])) {
$this->displayArray($p[0]);
} else {
$this->displayScalar($p[0]);
}
}
}
The __call() method should take two parameters. The first contains the name of the method being invoked, and the second contains an array of the parameters passed to that method. You can then decide for yourself which underlying method to call. In this case, if an object is passed to method display(), you call the underlying displayObject() method; if an array is passed, you call displayArray(); and if something else is passed, you call displayScalar().
To invoke this code, you would first instantiate the class containing this __call() method (name it overload) and then invoke the display() method, as in this example:
$ov = new overload;
$ov->display(array(1, 2, 3));
$ov->display('cat'),
The first call to display() invokes displayArray(), and the second invokes displayScalar().
Note that you do not need any underlying implementation of the display() method for this code to work.
Using __autoload ( )
Another of the special functions in PHP is __autoload(). It is not a class method but a standalone function; that is, you declare it outside any class declaration. If you implement it, it will be automatically called when you attempt to instantiate a class that has not been declared.
The main use of __autoload() is to try to include or require any files needed to instantiate the required class. Consider this example:
function __autoload($name)
{
include_once $name.".php";}
This implementation tries to include a file with the same name as the class.
Implementing Iterators and Iteration
One clever feature of the object-oriented engine in PHP is that you can use a foreach() loop to iterate through the attributes of an object as you would an array. Here’s an example:
class myClass
{
public $a = "5";
public $b = "7";
public $c = "9";
}
$x = new myClass;
foreach ($x as $attribute) {
echo $attribute."<br />";
}
(At the time of writing, the PHP manual suggests that you need to implement the empty interface Traversable for the foreach interface to work, but doing so causes a fatal error. Not implementing it seems to work just fine, though.)
If you need more sophisticated behavior than this, you can implement an iterator. To do this, you make the class that you want to iterate over implement the IteratorAggregate interface and give it a method called getIterator that returns an instance of the iterator class. That class must implement the Iterator interface, which has a series of methods that must be implemented. An example of a class and iterator is shown in Listing 6.4.
Listing 6.4 iterator.php—A Sample Base Class and Iterator Class
<?php
class ObjectIterator implements Iterator {
private $obj;
private $count;
private $currentIndex;
function __construct($obj)
{
$this->obj = $obj;
$this->count = count($this->obj->data);
}
function rewind()
{
$this->currentIndex = 0;
}
function valid()
{
return $this->currentIndex < $this->count;
}
function key()
{
return $this->currentIndex;
}
function current()
{
return $this->obj->data[$this->currentIndex];
}
function next()
{
$this->currentIndex++;
}
}
class Object implements IteratorAggregate
{
public $data = array();
function __construct($in)
{
$this->data = $in;
}
function getIterator()
{
return new ObjectIterator($this);
}
}
$myObject = new Object(array(2, 4, 6, 8, 10));
$myIterator = $myObject->getIterator();
for($myIterator->rewind(); $myIterator->valid(); $myIterator->next())
{
$key = $myIterator->key();
$value = $myIterator->current();
echo $key." => ".$value."<br />";}
?>
The ObjectIterator class has a set of functions as required by the Iterator interface:
![]() The constructor is not required but is obviously a good place to set up values for the number of items you plan to iterate over and a link to the current data item.
The constructor is not required but is obviously a good place to set up values for the number of items you plan to iterate over and a link to the current data item.
![]() The
The rewind() function should set the internal data pointer back to the beginning of the data.
![]() The
The valid() function should tell you whether more data still exists at the current location of the data pointer.
![]() The
The key() function should return the value of the data pointer.
![]() The
The value() function should return the value stored at the current data pointer.
![]() The
The next() function should move the data pointer along in the data.
The reason for using an iterator class like this is that the interface to the data will not change even if the underlying implementation changes. In this example, the IteratorAggregate class is a simple array. If you decide to change it to a hash table or linked list, you could still use a standard Iterator to traverse it, although the Iterator code would change.
Converting Your Classes to Strings
If you implement a function called __toString() in your class, it will be called when you try to print the class, as in this example:
$p = new Printable;
echo $p;
Whatever the __toString() function returns will be printed by echo. You might, for instance, implement it as follows:
class Printable
{
public $testone;
public $testtwo;
public function __toString()
{
return(var_export($this, TRUE));
}
}
(The var_export() function prints out all the attribute values in the class.)
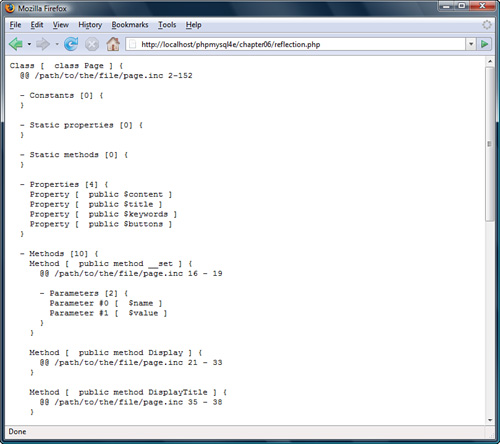
Using the Reflection API
PHP’s object-oriented features also include the reflection API. Reflection is the ability to interrogate existing classes and objects to find out about their structure and contents. This capability can be useful when you are interfacing to unknown or undocumented classes, such as when interfacing with encoded PHP scripts.
The API is extremely complex, but we will look at a simple example to give you some idea of what it can be used for. Consider the Page class defined in this chapter, for example. You can get all the information about this class from the Reflection API, as shown in Listing 6.5.
Listing 6.5 reflection.php—Displays Information About the Page Class
<?php
require_once("page.inc");
$class = new ReflectionClass("Page");
echo "<pre>".$class."</pre>";
?>
Here, you use the __toString() method of the Reflection class to print out this data. Note that the <pre> tags are on separate lines so as not to confuse the __toString() method.
The first screen of output from this code is shown in Figure 6.3.
Figure 6.3 The output from the reflection API is surprisingly detailed.
Next
The next chapter explains PHP’s exception handling capabilities. Exceptions provide an elegant mechanism for dealing with runtime errors.