filters
essential skills
- Apply filter effects to a picture.
- Use the Filter Gallery feature to apply several filters cumulatively.
- Use filters with text and shape layers.
- The ‘Smart’ way to apply filters.
- Filter a section of a picture.
- Paint with a filter effect.
- Install and use third party filters. essential skills filters.
Filtering in Photoshop
Traditionally the term filter, when used in a photography context, referred to a small piece of plastic or glass that was screwed onto, or clipped in front of, the camera’s lens. Placing the filter in the imaging path changed the way that the picture was recorded. During the height of their popularity there were literally hundreds of different filter types available for the creative photographer to use. The options ranged from those that simply changed the color of the scene, to graduated designs used for darkening skies to multi-faceted glass filters that split the image in many fragments. Even now when their popularity has waned most photographers still carry a polarizing filter, maybe a couple of color conversion filters and perhaps the odd graduated filter as well. But apart from these few examples, much of the creative work undertaken by in-front-of-camera filters is now handled by the digital filters that are shipped with your imaging program. These options, like the filters of old, are designed to change the way that your picture looks, but you will find that it is possible to create much more sophisticated effects with the digital versions than was ever possible before.
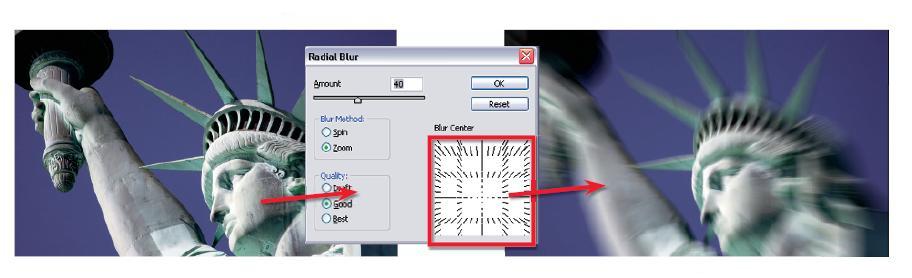
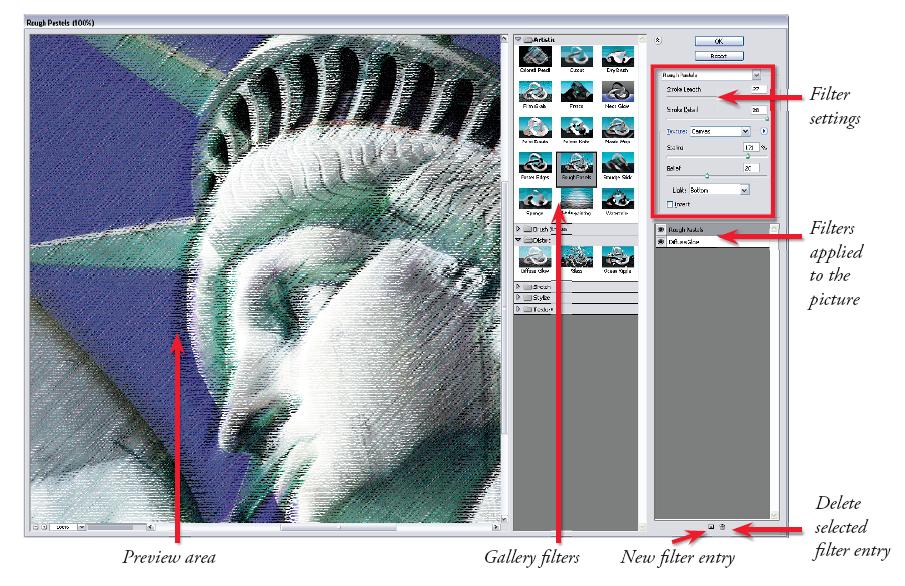
Statue of Liberty – Jeremy Edwards
Applying a filter is a simple process. After opening the image simply select the filter option from those listed under the Filter menu. This approach applies the effects of the filter to the whole of the photo, changing it forever. So be sure to keep a back-up copy of the original picture (or a copy of the background layer) just in case you change your mind later. Better still, use the Smart Filter option to apply your filter changes losslessly.
To get you started, I have included a variety of examples from the range that comes free with Photoshop that you will use most regularly. I have not shown Gaussian Blur or all the sharpening filters as these are covered in techniques elsewhere in the text, but I have tried to sample a variety that, to date, you might not have considered using. I have also included an overview of the updated Lens Correction filter which provides correction of three of the most common lens errors automatically. If you are unimpressed by the results of your first digital filter foray, try changing some of the variables or mixing a filtered layer (using the layer’s Blending Mode or Opacity controls) with an unfiltered version of the image. An effect that might seem outlandish at first glance could become usable after some simple adjustments of the in-built sliders contained in most filter dialog boxes or with some multiple layer variations.
The ‘Smart’ way to filter
The concept of non-destructive editing for photographers and is ever growing in popularity and acceptance. Now many dedicated amateurs are working like professionals by embracing ways of enhancing and editing that don’t destroy or change the original pixels in the end result. Masking techniques, Adjustment Layers and the use of Smart Objects are the foundation technologies of many of these techniques. But try as we may some changes have just not been possible to apply non–destructively.
Filtering is one area in particular where this is the case. For example, applying a sharpening filter to a picture irreversibly changes the pixels in the photo forever. For this reason, for many years, the smart photographer applied filters to copies of their photos in order to maintain the integrity of the original capture. Photoshop CS3 changed this way of working by including for the first time a new filtering option called Smart Filters and yes, you guessed it, this technology allowed users to apply a filter to an image non-destructively. Cool!
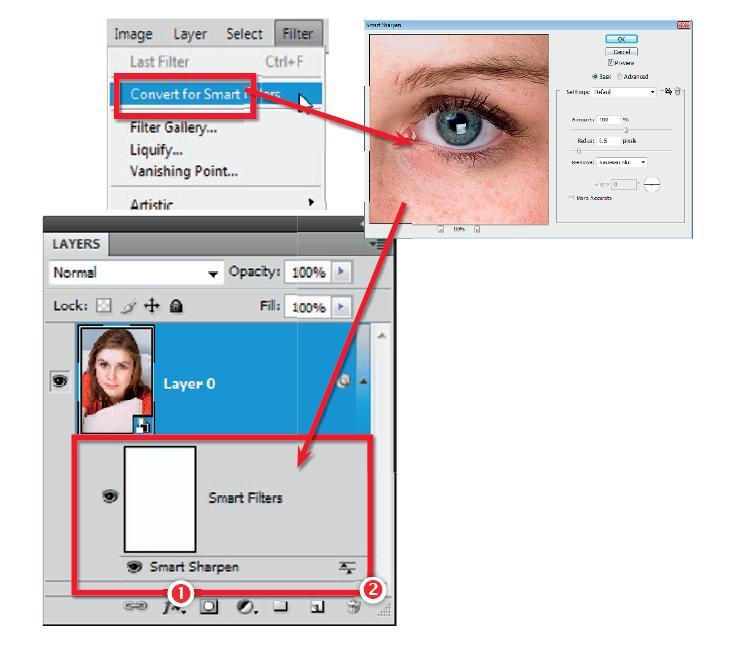
Based around the Smart Object technology, applying a Smart Filter is a two-step process. First the image layer needs to be converted to a Smart Object. This can be done via the new entry in the Filter menu, Convert for Smart Filters, or by selecting the image layer and then choosing Layer > Smart Object > Convert to Smart Object. Next pick the filter you want to apply and adjust the settings as you would normally before clicking OK.
Applying Smart Filters
Applying a filter to a Smart Object layer will automatically create a Smart Filter entry in the Layers palette. Multiple filters with different settings can be added to a single Smart Object layer. The settings for any Smart Filter can be adjusted by doubleclicking the filter’s name (1) in the Layers palette. The blending mode of the Smart Filter can be changed by double-clicking the settings icon (2) at the right end of the entry. This changes the way that the filter is applied to the image. To apply a filter to several layers, convert the multi-selected layers to a Smart Object first and then filter.
Smart Filters are added as an extra entry beneath the Smart Object in the Layers palette. The entry contains both a mask as well as a separate section for the filter entry and its associated settings. Like Adjustment Layers, you can change the setting of a Smart Filter at any time by double-clicking the filter’s name in the Layers palette. The blending mode of the filter is adjusted by double–clicking the settings icon at the right end of the filter entry.
The Smart Filter mask can be edited to alter where the filter effects are applied to the photo. In this release multiple Smart Filters can be added to a photo but they all must use the one, common mask.
Finally, with the Smart Filter technology we have a way to apply such things as sharpness or texture non-destructively.
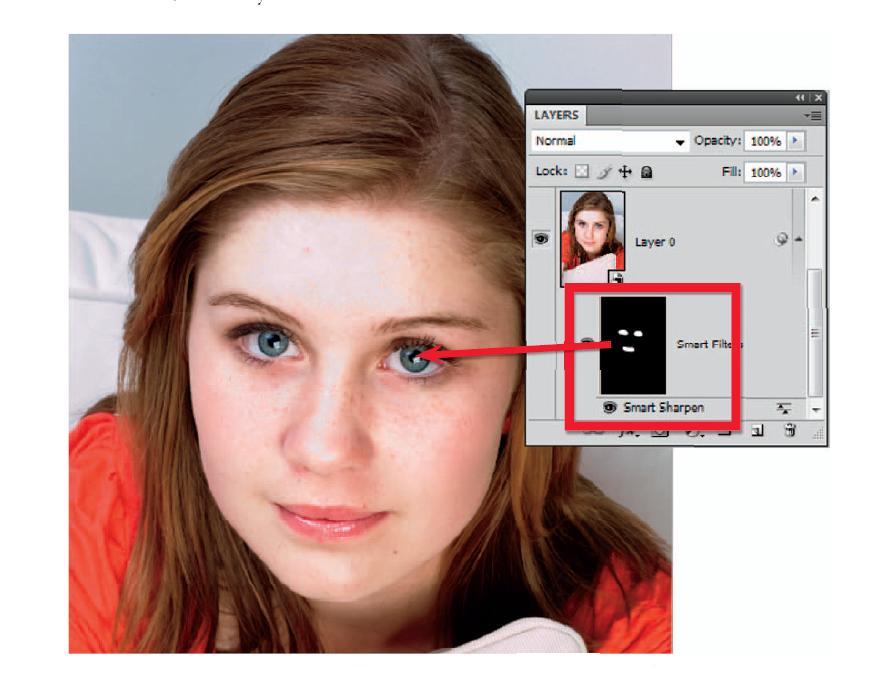
Sharpness applied locally using a masked Smart Object.
Masking Smart Filters
You can easily localize the effects of a Smart Filter by painting directly onto the mask associated with the entry. Here the mask thumbnail was selected first and then inverted using the Image > Adjustments > Inverse option. Keep in mind that black sections of a mask do not apply the filter to the picture so inverting the thumbnail basically removes all filtering effects from the image. Next white was selected as the foreground color and the Brush Tool chosen. The opacity of the tool was reduced and with the mask thumbnail still selected, the areas to be sharpened are then painted in.
The Filter Gallery
Most Photoshop filters are applied using the Filter Gallery feature. Designed to allow the user to apply several different filters to a single image, it can also be used to apply the same filter several times. The dialog consists of a preview area, a collection of filters that can be used with the feature, a settings area with sliders to control the filter’s effect and a list of filters that are currently being applied to the image. The gallery is faster and provides previews that are much larger than those contained in individual filter dialogs. Filters are arranged in the sequence that they are applied. Filters can be moved to a different spot in the sequence by click-dragging up or down the stack. Click the ‘eye’ icon to hide the effect of the selected filter from preview. Filters can be deleted from the list by dragging them to the dustbin icon at the bottom of the dialog.
Filters that can’t be used with the Filter Gallery feature are either applied directly to the picture with no user settings or make use of a filter preview and settings dialog specific to that particular filter, and they generally cannot be used on 16-bit images.
Fade Filter command
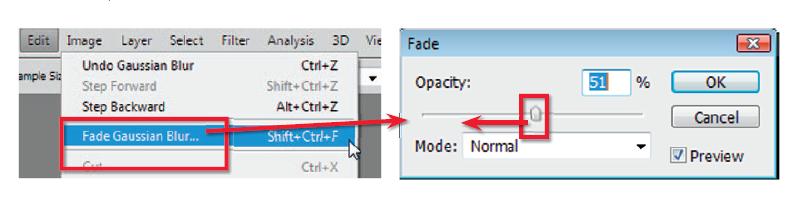
The opacity, or strength, of a standard filter effect can be controlled by selecting the Edit > Fade command when selected directly after the filter is applied. With a value of 0% the filter changes are not applied at all, whereas a setting of 100% will apply the changes fully. As well as controlling opacity the Fade dialog also provides the option to select a different blend mode for the filter changes. Note that the actual entry for the Fade command will change depending on the last filter applied and this option is not available when using Smart Filters.

Note > When using Smart Filters you can change the Blend_mode and filter amount (use the Opacity slider) via the Blending Options dialog. This is displayed by double-clicking the settings icon on the right of the filter entry in the Layers palette.
Improving filter performance
A lot of filters make changes to the majority of the pixels in a picture. This level of activity can take considerable time, especially when working with high-resolution pictures or underpowered computers. Use the following tips to increase the performance of applying such filters:
- Free up memory by using the Edit > Purge command before filtering.
- Allocate more memory to Photoshop via the Edit > Preferences > Performance (Windows) or Photoshop > Preferences > Performance (Mac) option before filtering.
- Try out the filter effect on a small selection before applying the filter to the whole picture.
- Apply the filter to individual channels separately rather than the composite image.
Installing and using third party filters
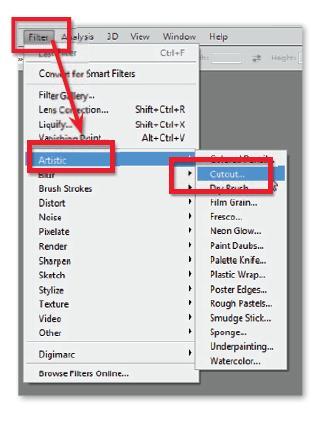
Ever since the early versions of Photoshop, Adobe provided the opportunity for third party developers to create small pieces of specialist software that could plug into Photoshop. The modular format of the software means that Adobe and other software manufacturers can easily create extra filters that can be added to the program at any time. In fact, some of the plug–ins that have been released over the years have became so popular that Adobe themselves incorporated their functions into successive versions of Photoshop. This is how the Drop Shadow layer effect came into being.
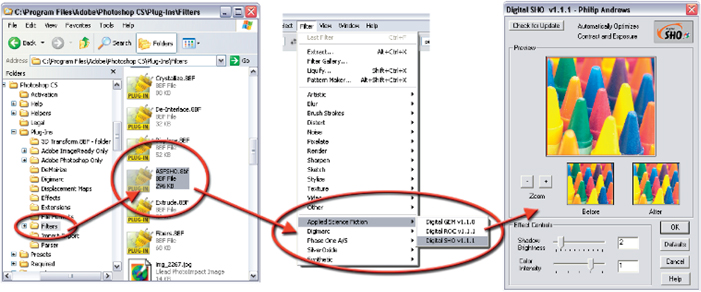
Most plug-ins register themselves as extra options in the Filter menu where they can be accessed just like any other Photoshop feature. The Digital SHO filter from Applied Science Fiction is an example of such plug-in technology. Designed to automatically balance the contrast and enhance the shadow detail in digital photographs, when installed it becomes part of a suite of filters supplied by the company that are attached to the Filter menu (see above). Other filters like those supplied by Pixel Genius Suite are automation filters and are therefore placed in the Automate folder.

Filtering a shape or text (vector) layer
Filters only work with bitmap or pixel-based layers and pictures. As text, vector masks and shape layers are all created with vector graphics (non-pixel graphics), these layers need to be converted to bitmap (pixel-based picture) before a filter effect can be applied to them.
Photoshop uses a Rasterize function to make this conversion. Simply select the text or shape layer and then choose the Layer > Rasterize option. Alternatively, if you inadvertently try to filter a vector layer Photoshop will display a warning dialog that notifies you that the layer needs to be converted before filtering and offers to make the conversion before proceeding.
Note > Especially in the case of text, you may want to create a copy of the vector layer as a backup, to avoid the need to recreate the layer if the text layer needs to be edited again later.
The great filter round–up
The filter examples on the next few pages will give you an idea of how this type of technology can be used to enhance, change and alter your photos. Keep in mind that there are many more filters that ship with Photoshop or are available online. In fact, Photoshop also includes an option in the Filter menu (Filter > Browse Filters Online) that allows you to search for other Photoshop filters on the web.
Liquify filter
The Liquify filter is a very powerful tool for warping and transforming your pictures. The feature contains its own sophisticated dialog box complete with a preview area and no less than ten different tools (eight warp and two mask tools) that can be used to twist, warp, push, pull and reflect your pictures with such ease that it is almost as if they were made of silly putty. Since CS3 the filter has worked with 16-bit images but not Smart Objects. The effects obtained with this feature can be subtle or extreme depending on how the changes are applied. Stylus and tablet users have extra options and control based on pen pressure.
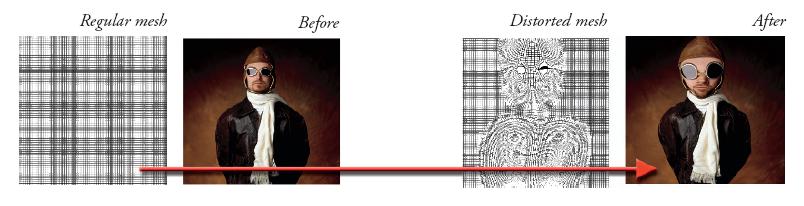
Liquify works by projecting the picture onto a grid or mesh. In an unaltered state, the grid is completely regular; when liquifying a photo the grid lines and spaces are intentionally distorted, which in turn causes the picture to distort. As the mesh used to liquify a photo can be saved and reloaded, the distortion effects created in one picture can also be applied to an entirely different image.
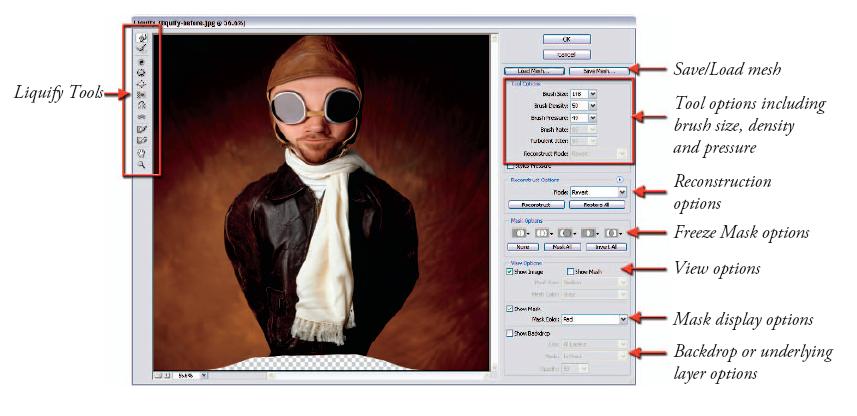
The tools contained in the filter’s toolbox are used to manipulate the underlying mesh and therefore distort the picture. Areas of the picture can be isolated from changes by applying a Freeze Mask to the picture part with the Freeze Mask Tool. While working inside the filter dialog, it is possible to selectively reverse any changes made to the photo by applying the Reconstruct Tool. When applied to the surface of the image the distorted picture parts are gradually altered back to their original state (the mesh is returned to its regular form). Like the other tool options in the filter, the size of the area affected by the tool is based on the Brush Size setting and the strength of the change is determined by the Brush Pressure value.
Usage summary
- Open an example image and then the Liquify filter (Filter > Liquify). The dialog opens with a preview image in the center, tools to the left and tool options to the right. The Size, Pressure, Rate and Jitter options control the strength and look of the changes, whereas the individual tools alter the type of distortion applied. In order to create a caricature of the example picture we will exaggerate the perspective of the figure. Select the Pucker Tool and increase the size of the Brush to cover the entire bottom of the subject. Click to squeeze inwards the lower part of the subject.
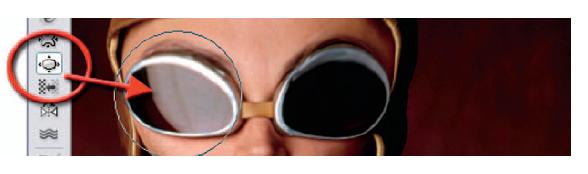
- Now select the Bloat Tool and place it over the head; click to expand this area. If you are unhappy with any changes you can use the keyboard shortcuts for Edit > Undo (Ctrl + Z) to remove the last changes. Use a smaller brush size to bloat the goggles.
- To finish the caricature switch to the Forward Warp Tool and push in the cheek areas. You can also use this tool to drag down the chin and lift the cheekbones.
- The picture can be selectively restored at any point by choosing the Reconstruct Tool and painting over the changed area. Click OK to apply the distortion changes.
Liquify tools
 |
Forward Warp Tool – used to push pixels in the direction you drag the cursor across the picture surface. |
 |
Reconstruct Tool – restores the picture and mesh back to its original appearance before any distortion was applied. |
 |
Twirl Clockwise Tool – used for rotating pixels in a clockwise direction. Use with the Alt key to twirl in an anticlockwise direction. |
 |
Pucker Tool – designed to suck or pinch the pixels towards the center of the brush. |
 |
Bloat Tool – balloons the pixels away from the center of the brush towards the outside edges. |
 |
Push Left Tool – used to move the pixels to the left or to the right (Alt–drag) of the drag. |
 |
Mirror Tool – used to copy and reflect the pixels perpendicular to the direction of the stroke. Use Alt-drag to reflect the pixels in the opposite direction. |
 |
Turbulence Tool – used for creating clouds, fire and waves by smoothly scrambling pixels. |
 |
Freeze Mask Tool – adds a mask that protects the masked area from liquify changes. |
 |
Thaw Mask Tool – acts as an eraser for the Freeze Mask Tool. |
The Vanishing Point filter edits and enhances using the perspective of the picture.
Vanishing Point
The Vanishing Point filter was first introduced in CS2 as an addition to the specialist filter line-up that includes Extract, Lens Blur and Liquify. Like the others, the feature has its own dialog complete with preview image, toolbox and options bar. The filter allows the user to copy and paste and even Clone Stamp portions of a picture whilst maintaining the perspective of the original scene. The filter evolved in CS3 so that it could be used in many more situations as that version allowed perspective plans to be linked at any angle (rather than just 90° as was the case in CS2). Vanishing Point cannot be used in conjunction with Smart Objects. Using the filter is a two-step process:
Step 1: Define perspective planes
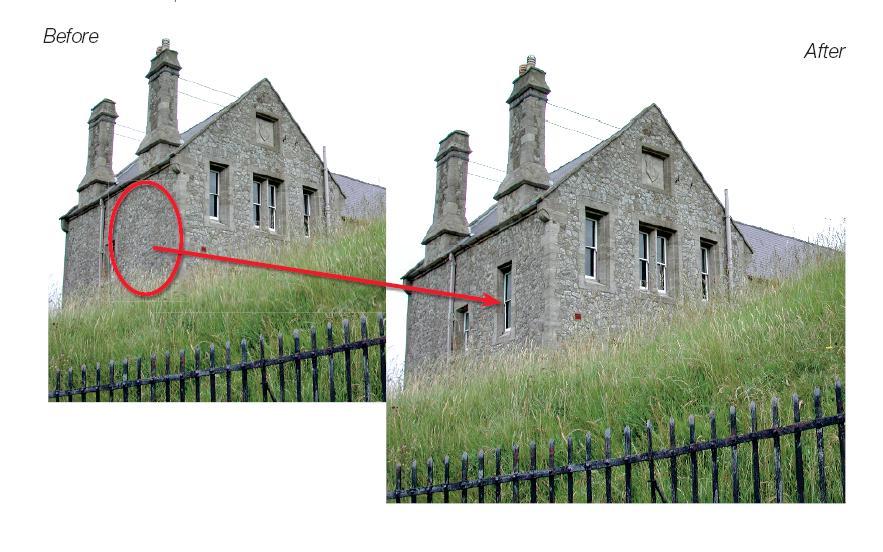
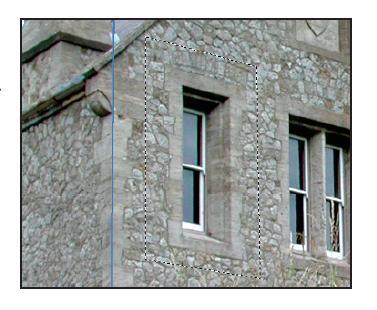
To start, you must define the perspective planes in the photo. This is achieved by selecting the Create Plane Tool and marking each of the four corners of the rectangular-shaped feature that sits in perspective on the plane. A blue grid means that it is correct perspective, yellow that it is borderline, and red that it is mathematically impossible. In the example, the four corners of a window were used to define the plane of the building’s front face. Next, a second plane that is linked to the first at an edge is dragged onto the surface of the left side wall.
Step 2: Copy and paste or stamp
With the planes established the Marquee Tool can be used to select image parts which can be copied, pasted and then dragged in perspective around an individual plane and even onto another linked plane. All the time the perspective of the copy will alter to suit the plane it is positioned on. The feature’s Stamp Tool operates like a standard stamp tool except that the copied section is transformed to account for the perspective of the plane when it is applied to the base picture.

Usage summary
- Create a new layer above the image layer to be edited (Layer > New > Layer) and then choose the Vanishing Point filter from the Filter menu.
- Select the Create Plane Tool and click on the top left corner of a rectangle that sits on the plane you wish to define. Locate and click on the top right, bottom right and bottom left corners. If the plane has been defined correctly the corner selection box will change to a perspective plane grid. In the example, the front face of the building was defined first.
- To create a second, linked, plane, Ctrl/Cmd-click the middle handle of the plane and drag away from the edge. The left side of the building was defined using the second plane.
- To copy the window from the building’s front face, select the Marquee Tool first, set a small feather value to soften the edges and then outline the window to be copied. Choose Ctrl/ Cmd + C (to copy) and then Ctrl/Cmd + V (to paste). This pastes a copy of the window in the same position as the original marquee selection.
- Click–drag the copy from the front face around to the side plane. The window (copied selection) will automatically snap to the new perspective plane and will reduce in size as it is moved further back in the plane. Position the window on the wall surface and choose Heal > Luminance from the Marquee options bar.
- Press ‘T’ to enter the Transform mode and select Flip from the option bar to reorientate the window so that the inside edge of the frame work matches the other openings on the wall. Click OK to complete the process.
Vanishing Point tips
- Use the Edit Plane Tool to click and drag the corners of the grid if grid lines do not match up with the edges of the picture parts that are sitting on the perspective plane.
- In order to copy and paste in full perspective the source plane and destination plane must be joined by a series of linked perspective planes.
- Use the Heal option to help match tones of the copied parts and their new locations.
- Grids can be output as layers, are 16-bit capable, text can be pasted into a grid and are auto-saved as part of the PSD file format.
Vanishing Point goes askew
When the Vanishing Point filter first appeared in Photoshop CS2 there were many admirers of its power to manipulate objects in three–dimensional space but comparatively few people who could find a use for it in their day–to–day workflows. One reason for this lack of popularity was that the feature assumed that all adjoining perspective planes met at a 90° angle. This is fine for buildings and boxes but is limited when it comes to a good many other surfaces.
The version of Vanishing Point that appears in both CS3, CS4 and CS5 can create perspectivebased planes at almost any angle, making the feature much more usable in a variety of everyday images.
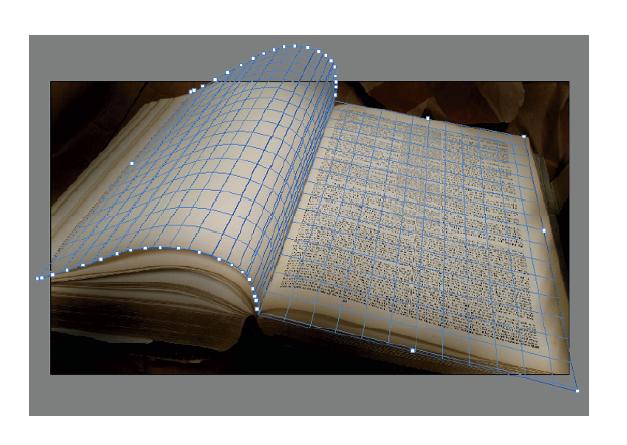
Vanishing Point 2.0 provides the ability to create perspective planes that join at angles other than 90° In this example, the curve of the page was recreated with a series of small angled planes.
Usage summary
1. In the example image some text (or an image) needed to be added to the blank page on the left–hand side of the book. The text was photographed from another part of the book, the file opened in Photoshop and then copied to memory (Ctrl/Cmd + A, Ctrl/Cmd + C).
2. Next the book picture was opened into the Vanishing Point filter (Filter > Vanishing Point). To start, a new plane was created on the right side of the book using the edge of the text as a guide. The Create Plane Tool was selected and then the four corners of the plane dragged out to align with the edges of the text.

With the new version of the Vanishing Point filter it is possible to edit images containing more complex perspective planes.
3. Once the plane is created the tool reverts to the Edit Plane mode for fine-tuning. The corners of the plane were then adjusted so that it extended to the edges of the page and, more importantly, the spine of the book.
4. To create a linked plane for the other side of the book, the Create Plane Tool was chosen a second time (or you could hold down the Ctrl/Cmd key whilst in Edit Plane mode) and a new plane was dragged from the center handle on the edge of the existing plane.
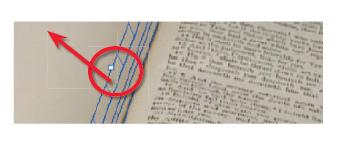
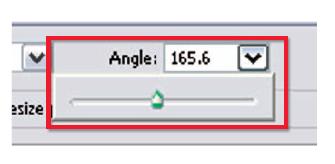
5. Next the new Angle slider in the top of the dialog was used to rotate the plane so that it ran along the face of the curved page.
6. Using the page edge as a guide, add a series of small linked planes to the picture. Each need to be rotated and realigned to duplicate the perspective of the surface of the page.
7. Next the copied text was pasted (Ctrl/Cmd + V) into the Vanishing Point workspace and dragged to the first perspective plane.
8. The size of the text was then adjusted in the Transform mode (press T to enter) by clickdragging the corners of the marquee around the text before dragging into position on the curved page.
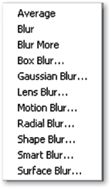
Blur filters
The Blur filters are designed to add a degree of softness to the photo. The most basic filters in this group are the Blur and Blur More options. These apply a set level of blur to your picture quickly and easily. For a more sophisticated and controllable Blur filter try Gaussian Blur or the Box, Shape, Smart and Surface Blur versions. They all contain controls that alter the style and strength of the effect.
The Lens Blur filter
One popular application for the Blur filters is to recreate a shallow focus photo where the main subject is sharp and the rest of the picture is unsharp. By selecting the areas to blur and then applying a filter you can create a crude shallow focus result. This approach does create a simple in–focus and out–of–focus effect but it would be hard to say that the results are totally convincing. To achieve a depth of field (DOF) effect that is more realistic and believable, the basic idea of this technique needs to be coupled with the Lens Blur filter.
Spiral Staircase by Bart Broek (www.iStockphoto.com)
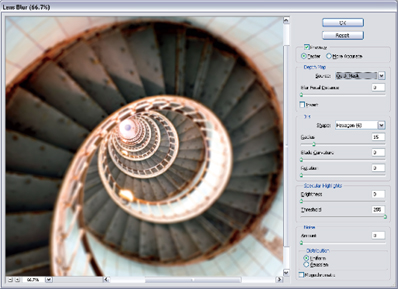
Photoshop’s Lens Blur filter is a dedicated feature designed to create realistic DOF effects in your pictures.
Since CS2 the feature has been 16-bit enabled.
If realism is your goal then it is necessary to look a little closer at how camera–based DOF works and, more importantly, how it appears in our images. Imagine an image shot with a long lens using a large aperture. The main subject situated midway into the image is pin sharp. Upon examination it is possible to see that those picture elements closest to the main subject are not as ‘unsharp’ as those further away. In effect the greater the distance from the point of focus, the more blurry the picture elements become.
This fact, simple though it is, is the key to a more realistic digital DOF effect. The application of a simple one–step blurring process does not reflect what happens with traditional camerabased techniques. The Lens Blur filter (Filter > Blur > Lens Blur) is designed specifically to help replicate this gradual change in sharpness. The filter uses selections or masks created before entering the feature to determine which parts of the picture will be blurred and which areas will remain sharp. In addition, if you use a mask that contains areas of graduated gray (rather than just black and white) the filter will adjust the degree of sharpness according to the level of gray in the mask.
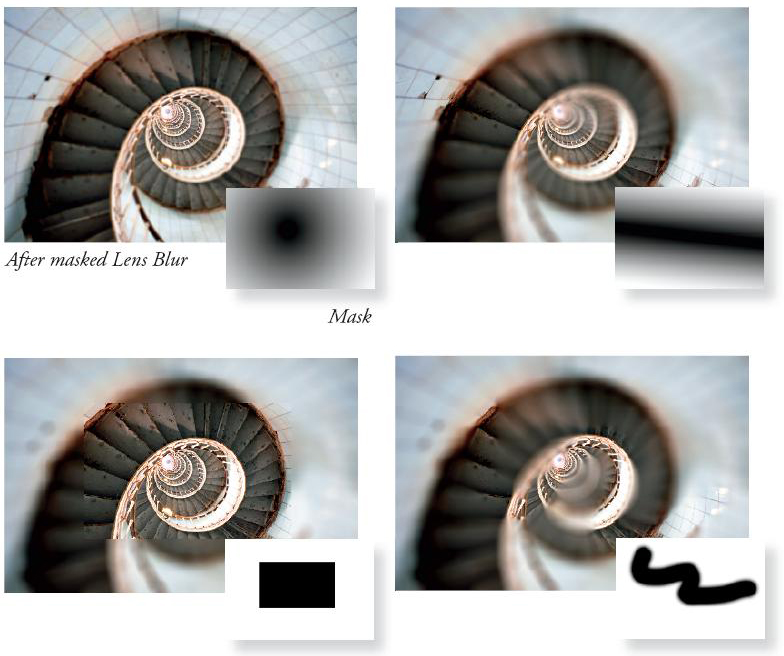
The Lens Blur filter uses a mask or selection to determine which parts of the picture will remain sharp and which areas will be blurred. In addition, the level of sharpness is directly related to the density of the mask. Graduated masks will produce graduated sharpness similar to that found in photographs with camera-based shallow DOF techniques.
Lens Blur filter options
Preview – Faster to generate quicker previews. More accurate to display the final version of the image.
Depth Map Source – Select the mask or selection that you will use for the filter from the drop-down list.
Invert – Select this option to inverse the alpha channel mask or selection.
Iris Shape – Determines the way the blur appears. Iris shapes are controlled by the number of blades they contain.
Gaussian or Uniform – Select one of these options to add noise to the picture to disguise the smoothing and loss of picture grain that is a by-product of applying the Lens Blur filter.
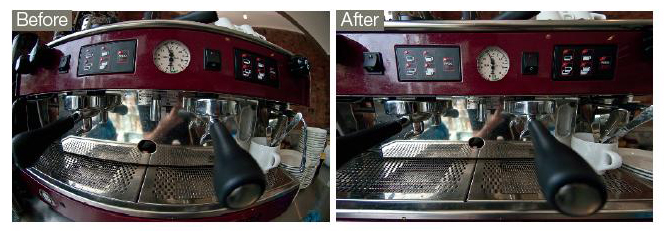
The Lens Correction filter in Photoshop CS5 automatically corrects three typical lens based errors including the extreme barrel distortion seen here.
Correcting lens distortion with filters
We have already seen that the new version of Adobe Camera Raw contains a sophisticated lens correction system. The core technology used to correct raw files in ACR can also be employed inside Photoshop CS5 with the Lens Correction filter (Filter > Lens Correction). The feature is specifically designed to correct the three key imaging problems that can occur when shooting with different lenses. Apart from correcting barrel and pincushion distortion, the filter can also fix the color fringing (color outlines around subject edges) and vignetting (darkening of the corners) problems that can also occur as a result of poor lens construction.
As is the case in ACR, the corrections can be applied automatically by matching the lens used to take the picture, with a custom Lens Correction profile. This occurs in the Auto Correction section of the filter. The filter will try to locate such a profile automatically by matching the lens information recorded in the metadata of the photo with one of the profiles contained in the filter. For those times when an exact match can’t be found, it is also possible to search for a suitable filter on the net using the Search Online button at the bottom of the dialog. You can choose to correct all three error types (Geometric Distortion, Chromatic Aberration and Vignette) or select only those options you wish to apply.
The controls located in the Custom section of the filter can be used to manually apply lens correction adjustments or to fine-tune those already applied with a correction profile. Extra controls located here can be used for changing the perspective of the picture (great for eliminating the issue of converging verticals) and manual handling of the vacant areas of the canvas that are created after distortion correction has been applied.
Lens Correction in action
To demonstrate the power of this feature I ran one of the images from a series of photos taken with a Nikkor DX 10.5mm f2.8 lens through the Lens Correction filter. With no manual adjustments at all the results were amazing. Yes the final image was cropped a fair bit but the photo was completely usable. A few more seconds fine-tuning the results with the controls in the Custom panel produced an even squarer result that still retained the feeling of exaggerated perspective but had lost the barrel distortion. Use these steps to correct your images.
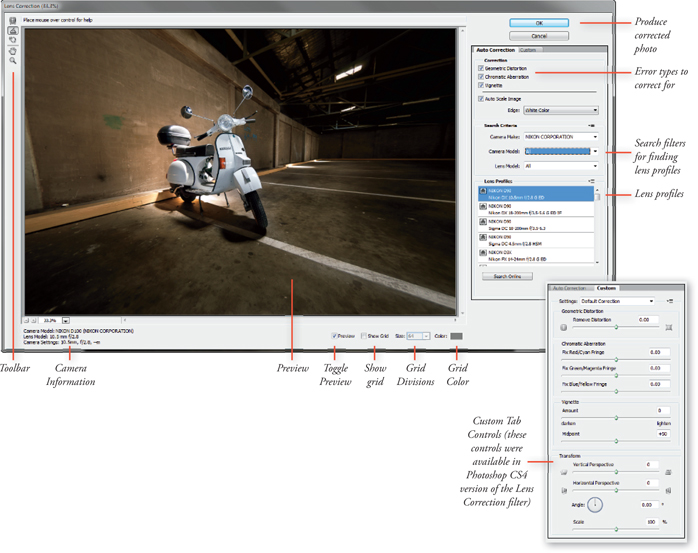
Lens Correction Dialog Box (Filter > Lens Correction): The Lens Correction dialog box has been revamped for Photoshop CS5 to include the new Auto Correction features. The manual slider controls found in the previous versions of the program are still available and are stored under the Custom tab. Photoshop attempts to locate the appropriate Lens Correction Profile based on the camera and lens metadata stored with the photo. In this case the Nikon DX 10.5mm f2.8 lens on a D90 body was the closest match for this image which was shot with a D100 and the 10.5mm lens.

Start by opening an example image in Photoshop CS5. Next, choose Filter > Lens Correction, and click onto the Auto Correction tab.
To ensure correction of all error types select Geometric Distortion, Chromatic Aberration, and Vignette in the Correction section of the panel on the right side of the dialog box.
To straighten the photo select the Straighten tool from the left of the dialog box and drag it along an image part that is meant to be horizontal or vertical.

Next, choose the Transparency mode from the Edge menu. This will produce the corrected image with transparent areas around the reshaped photo.
In this case the appropriate lens-correction profile was automatically matched with the example image, and the preview updated to display the corrected photo. If this doesn’t happen with your photos you can select other profiles by Camera Make, Camera Model, and Lens Model, or locate them on the web by pressing the Search Online button at the bottom of the dialog box.

To fine tune the results switch over to the manual controls by clicking on the Custom tab. In this example a small change to the Geometric Distortion (−2) and Horizontal Perspective (+8) controls straightened the picture further.
Switching back to the Auto Correction panel make sure that the Auto Scale Image option is checked before clicking OK to process the corrected photo.
Batch Processing Your Lens Corrections
Correcting a single image at a time is all well and good when you only have a few files to process, but if your shooting session has amassed several hundred photos then any type of automated correction would be most welcome. Well the Adobe guys must have read my thoughts as there is a new Lens Correction batch tool in Bridge CS5.
The feature works like other Photoshop tools in Bridge, you multi-select the photos from the Content panel first and then choose the option from the Tools > Photoshop menu. This action opens a new Lens Correction dialog box in Photoshop and automatically adds the selected files.
The dialog contains sections to choose the destination folder for the corrected photos, settings to either automatically locate the best profile for the images or manually choose your own, and a series of check boxes to determine correction type and scaling. After working your way through the settings all you need to do is click the OK button to process the files.
Note > You can also display this batch processing dialog box by selecting File > Automate > Lens Correction from within Photoshop. It is then possible to add files that are already open in the program or to browse for the images you want to correct.
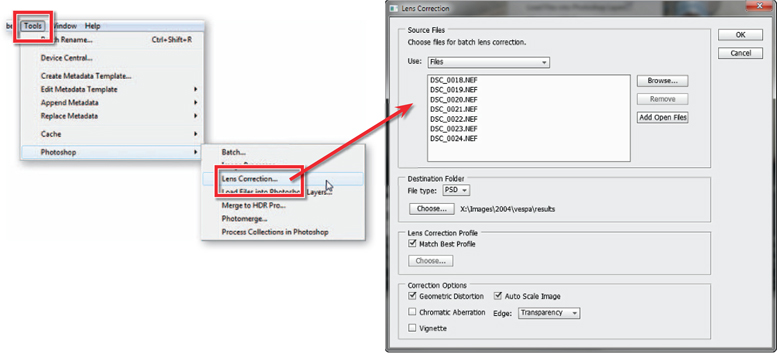
Photoshop CS5 and Bridge CS5 both include the ability to batch correct a group of images using the Lens Correction option in the Tools > Photoshop menu in Bridge and the File > Automate menu in Photoshop.
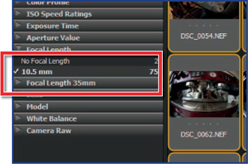
Start by locating the folder containing the photos inside Bridge CS5. In this example it is fastest to display the Filter panel (Window > Filter) and then select the 10.5 mm entry from the Focal Length section. This action displayed just the photos taken with this lens type in the Content panel.
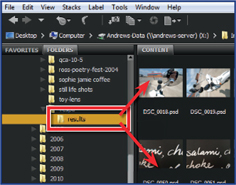
Next multi-select several images by click-dragging a marquee around the thumbnails before selecting the Lens Correction entry from the Tools > Photoshop menu.

Photoshop opens and the files are listed in the batchprocess Lens Correction dialog box. You can add or remove images using the buttons listed next to the file list. Now, select a destination folder and File Type. By default Photoshop stores the process photos in a folder titled Results.
Check the Match Best Profile option to instruct Photoshop to locate the best profile for each photo and finally choose the error type to be corrected. In this case, I chose all three of the available corrections.
With all the options set, click the OK button. The Lens Correction dialog box closes and one-by-one the photos are opened into Photoshop. Each image is then corrected and saved off to the folder in the format selected. And that’s it! Job done!
Noise filters
The Noise filters group contains tools that are used for either adding noise (randomly colored pixels) to, or reducing the existing noise in, a photo. Dust & Scratches is designed to automatically hide picture faults such as hairs or scratches in scanned photos. Despeckle, Median and the Reduce Noise filter remove or hide the noise associated with high ISO pictures and the Add Noise filter is used to create and add noise to photos. All the filters in this group, except Despeckle, are applied via their own filter dialog.
Note > With the substantial upgrading of the Noise Removal technology in Adobe Camera Raw 6 it is generally better practise to remove noise at the Raw processing stage than to wait until the image is opened in Photoshop.
The Reduce Noise filter
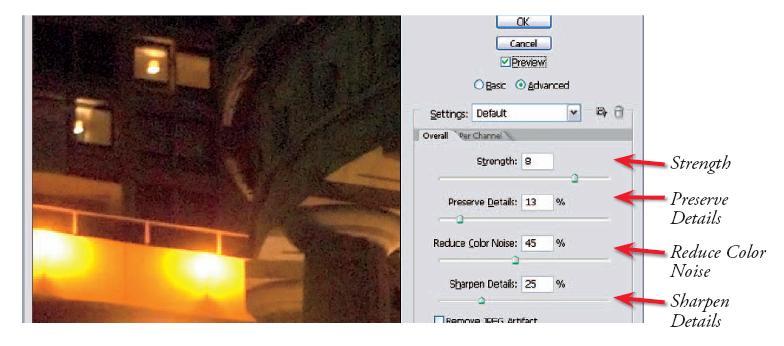
The feature includes a preview window, a Strength slider, a Preserve Details control and a Reduce Color Noise slider. As with the Dust & Scratches filter you need to be careful when using this filter to ensure that you balance removing noise while also retaining detail.
The best way to guarantee this is to set your Strength setting first, ensuring that you check the results in highlights, midtone and shadow areas. Next gradually increase the Preserve Details value until you reach the point where the level of noise that is being reintroduced into the picture is noticeable and then back off the control slightly (make the setting a lower number).
For photographs with a high level of color noise (random speckles of color in an area that should be a smooth flat tone) you will need to adjust this slider at the same time as you are playing with the Strength control.
When the Advanced mode is selected the noise reduction effect can be applied to each channel (Red, Green, Blue) individually. This filter also works in 16-bit mode and contains saveable/loadable settings. There is also a special option for removal of JPEG artifacts. One of the side effects of saving space by compressing files using the JPEG format is the creation of box–like patterns in your pictures. These patterns or artifacts are particularly noticeable in images that have been saved with maximum compression settings. With the Remove JPEG Artifact option selected in the Reduce Noise dialog, Photoshop attempts to smooth out or camouflage the box–like pattern created by the over compression. The feature does an admirable job but the results are never as good as if a lower compression rate was used initially.
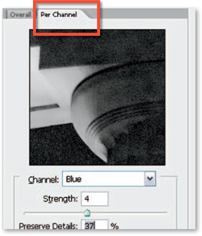
Per Channel mode (Advanced section)
The Per Channel option provides the ability to adjust the noise reduction independently for each of the Red, Green and Blue channels. This allows the user to customize the filter for the channel(s) that have the most noise. The Strength setting controls the amount of Luminance or noncolor noise reduction applied to each channel. The Preserve Details slider maintains the appearance of edge details at the cost of lowering the noise reduction effect. The best results balance both these options for each channel.
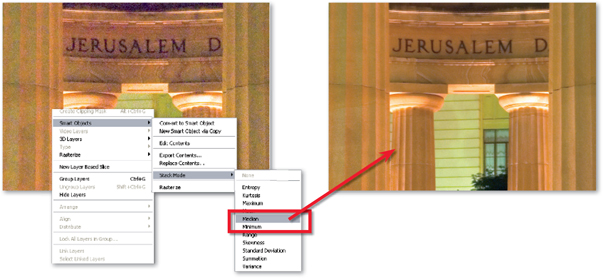
After creating an Image Stack Smart Object in the Extended Version of CS5 you can apply a rendering option such as Median to the stack. In this example this has the effect of reducing noise.
Reducing noise with Image Stacks
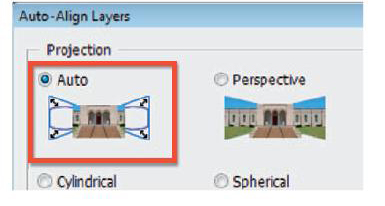
Another way to reduce noise is to take a series of images of the same scene in quick succession and then use the combined information from all the photos to produce a new, less noisy, composite picture. The process of achieving this outcome became possible in Photoshop CS3 Extended as Adobe introduced the concept of Image Stacks as well as the ability to apply functions, such as the Median command, to these stacks. The process involves layering the sequential source images in a single document, applying the Auto-Align option (to ensure registration) and then converting the layers into a Smart Object. Once in this Image Stack form it is possible to select one of a range of rendering options from those listed in the Layer > Smart Objects > Stack Mode menu. These options manage how the content of each of the layers will interact with each other.
In the noise reduction technique shown here the Median command creates the composite result by retaining only those image parts that appear (in the same spot) in more than 50% of the frames (layers). As noise tends to be pretty random, its position, color and tone change from one frame to the next and so are removed from the rendered photo, leaving just the good stuff – the picture itself.
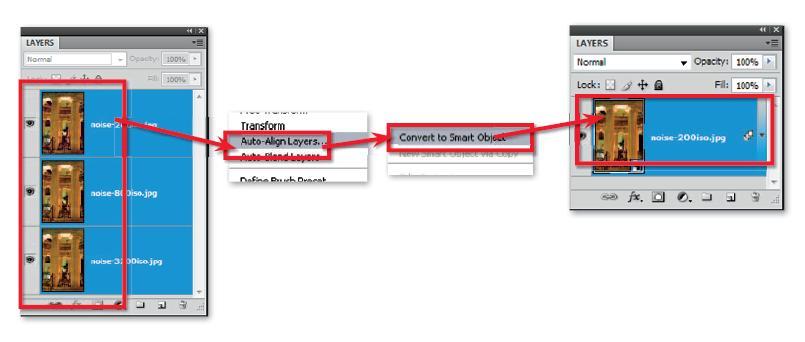
Image Stacks are created by first layering separate photos in a single document, applying the Auto-Align command and then converting all layers to a single Smart Object.
In another example of how this technology can be used, in order to remove tourists from in front of your favorite statue there is no need to wait until they have all gone home, instead simply capture multiple pictures of the monument, group them together in an Image Stack and apply the Median function to the group. Hey presto, tourists be gone!
Using Image Stacks to remove noise in Photoshop Extended
1. Reducing noise using this technique is a multi–step affair that starts at the time of capture. If you are confronted with a scene where it is essential that you use either a long exposure or high ISO setting (or both) then you can be pretty sure that your resultant images will contain some noise. So in these circumstances shoot several photos of the same scene. For best results maintain the same camera settings and camera position throughout the whole sequence.
2. Next open all photos into Photoshop and drag each picture onto a single document, creating a multi–layer file containing all the photos in the sequence.
3. Multi–select all the layers and choose the AUTO–ALIGN option (Auto Projection) from the Edit menu. Photoshop will arrange all the layers so that the content is registered.
4. With the multiple layers still selected choose Layer > Smart Objects > Convert to Smart Object. This places all the layers in a single Smart Object.
5. The last step in the process is to select the Smart Object layer and then choose how you want to render the composite image. Do this by selecting one of the options from the Layer > Smart Objects > Stack Mode menu. To reduce noise we choose the Median entry.
Sharpen filters
Photoshop provides a variety of sharpening filters designed to increase the clarity of digital photographs. The options are listed in the Filter > Sharpen menu and include the Sharpen, Sharpen Edges, Sharpen More, Unsharp Mask filters as well as the Smart Sharpen option.
Digital sharpening techniques are based on increasing the contrast between adjacent pixels inthe image. When viewed from a distance, this change makes the picture appear sharper. The Sharpen and Sharpen More filters are designed to apply basic sharpening to the whole of the image and the only difference between the two is that Sharpen More increases the strength of the sharpening effect.
One of the problems with sharpening is that sometimes the effect is detrimental to the image, causing areas of subtle color or tonal change to become coarse and pixelated. These problems are most noticeable in image parts such as skin tones and smoothly graded skies. To help solve this issue, Adobe included the Sharpen Edges filter, which concentrates the sharp ening effects on the edges of objects only. Use this filter when you want to stop the effect being applied to smooth image parts.
Customizing your sharpening
Out of all the sharpening options in Photoshop the Smart Sharpen and Unsharp Mask filters provide the greatest control over the sharpening process by giving the user a variety of slider controls that alter the way the effect is applied to their pictures. Both filters contain Amount and Radius controls. The Unsharp Mask filter includes a Threshold slider and the Smart filter contains controls for adjusting sharpness in Shadows and Highlights independently (in Advanced mode) as well as a Removal option for ridding images or specific blur types (Gaussian, Motion or Lens Blur).
Sharpening controls
The Amount slider controls the strength of the sharpening effect. Larger numbers will produce more pronounced results, whereas smaller values will create more subtle effects.

The Radius slider value determines the number of pixels around the edge that are affected by the sharpening. A low value only sharpens edge pixels. High settings can produce noticeable halo effects around your picture so start with a low value first.
The Threshold slider is used to determine how different the pixels must be before they are considered an edge and therefore sharpened.

The Remove setting locates and attempts to neutralize different blur types.
The Shadow and Highlight tabs contain options for adjusting the sharpening effects in these tonal areas.
Texture filters
The Texture filter group provides a range of ways of adding texture to your photos. Most of the filters apply a single texture type and include controls for varying the strength and style of the effect, but the Texturizer filter adds to these possibilities by allowing users to add textures they create themselves to a photo. All filters in this group are applied via the Filter Gallery dialog.
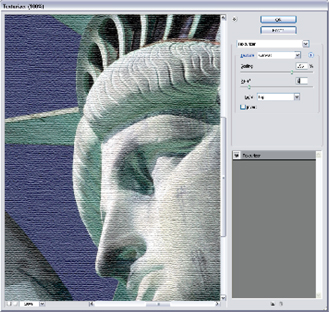
The Texturizer filter
When applying the Texturizer filter the picture is changed to give the appearance that the photo has been printed onto the surface of the texture. The Scaling and Relief sliders control the strength and visual dominance of the texture, while the Light Direction menu alters the highlight and shadow areas. Different surface types are available from the Texture drop–down menu. The feature also contains the option to add your own files and have these used as the texture that is applied by the filter to the image.
Making your own textures
Any Photoshop file (.PSD) can be loaded as a new texture via the Load Texture option in the setting menu, top right of the Texturizer dialog. Simply shoot, scan or design a texture image and save as a Photoshop file (.PSD).
Other filters
The filters grouped together under the Other heading include the Custom filter, which is used for creating you own filter effects (see opposite page), the edge–finding High Pass filter, the Offset filter that shifts picture pixels by a set amount, and the Maximum and Minimum filters, which are most often used for modifying masks.
Filters in this group are not applied via the Filter Gallery dialog but rather have their own specific dialog containing both controls and preview.
Sharpening with the High Pass filter
The High Pass filter isolates the edges in a picture and then converts the rest of the picture to mid gray. The filter locates the edge areas by searching for areas of high contrast or color change. The filter can be used to add contrast and sharpening to a photo.

- To start, make a copy of the picture layer that you want to sharpen, then filter the copied layer with the High Pass filter. Adjust the After High Pass Sharpening Radius so that you isolate the edges of the image only against the gray background and then click OK.
- Next select the filtered layer and switch the blend mode to Hard Light.
- Finally, adjust the opacity of this layer to govern the level of sharpening being applied to the picture layer.
The ten commandments for filter usage
- Subtlety is everything. The effect should support your image not overpower it.
- Try one filter at a time. Applying multiple filters to an image can be confusing.
- View at full size. Make sure that you view the effect at full size (100%) when deciding on filter settings.
- Filter a channel. For a change try applying a filter to one channel only – Red, Green or Blue.
- Print to check effect. If the image is to be viewed as a print, double–check the effect when printed before making final decisions about filter variables.
- Fade strong effects. If the effect is too strong try fading it. Use the ‘Fade’ selection under the ‘Edit’ menu.
- Experiment. Try a range of settings before making your final selection.
- Mask then filter. Apply a gradient mask to an image and then use the filter. In this way you can control what parts of the image are affected.
- Try different effects on different layers. If you want to combine the effects of different filters try copying the base image to different layers and applying a different filter to each. Combine effects by adjusting the opacity of each layer.
- Did I say that subtlety is everything?
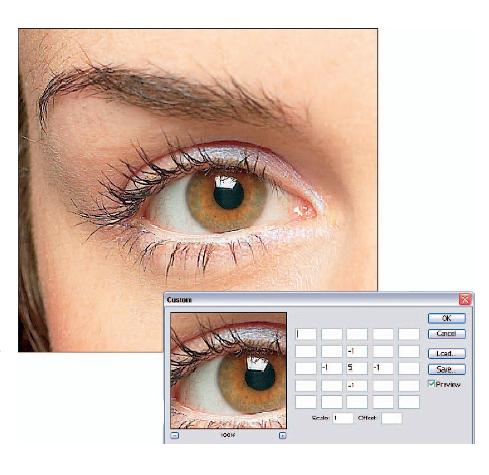
Filter DIY
Can’t find exactly what you are looking for in the hundreds of filters that are either supplied with Photoshop or are available for download from the Net? I could say that you’re not really trying, but then again some people have a compulsion to do it for themselves’. Well, all is not lost. Photoshop provides you with the opportunity to create your own filtration effects by using its Filter > Other > Custom option.
By adding a sequence of positive/negative numbers into the 25 variable boxes provided you can construct your own filter effect. Add to this the options of playing with the ‘Scale’ and ‘Offset’ of the results and I can guarantee hours of fun. Best of all your labors can be saved to use again when your specialist customized touch is needed.