
2. The Basics
Before you start really working in Photoshop Elements, it’s good to take a look around the work area to familiarize yourself with the program’s tools and menus.
If you’re new to the software, this chapter will orient you to the work area, which includes the document window, where you’ll view your images, along with many of the tools, menus, and panels you’ll use as you get better acquainted with the program.
If you’re upgrading from an earlier version of Photoshop Elements, take a spin to get comfortable with Adobe’s redesign of your favorite photo editor.
Understanding the Work Area
The Photoshop Elements work area is designed like a well-organized workbench, making it easy to find and use menus, panels, and tools.
The Welcome screen
When you first start Photoshop Elements, the Welcome screen automatically appears. Click Organizer to open the Adobe Elements 11 Organizer application, or click Photo Editor to open the Adobe Photoshop Elements Editor application. (You can bypass the Welcome screen by opening either of those apps by themselves.)
The Organizer and the Editor
Photoshop Elements is made up of two separate components: the Organizer and the Editor, which can be (and often are) open simultaneously. The conventions in this chapter primarily apply to the Editor; the Organizer’s unique interface items are covered in Chapter 3.
Click the Settings button (the gear icon) at the upper-right corner of the Welcome screen to set how Elements starts up ![]() .
.

![]() Choose which parts of Photoshop Elements should launch at startup.
Choose which parts of Photoshop Elements should launch at startup.
Menus, panels, and tools
The menu bar offers drop-down menus for performing common tasks, editing images, and organizing your work area. Each menu is organized by topic ![]() .
.
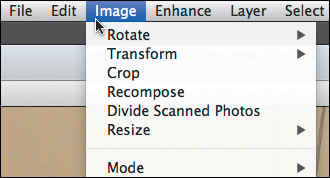
![]() The menu bar offers myriad drop-down menus, with commands you choose to help perform tasks.
The menu bar offers myriad drop-down menus, with commands you choose to help perform tasks.
The Tool Options bar, running above the work area, provides unique settings and options for each tool in the Tools panel. For instance, when you’re using the Marquee selection tool, you can choose to add to or subtract from the current selection ![]() .
.

![]() The Tool Options bar changes its display depending on the tool you select in the Tools panel.
The Tool Options bar changes its display depending on the tool you select in the Tools panel.
The Photo Bin, located at the bottom of the work area, serves as a convenient holding area for all of your open images ![]() . In addition to providing a visual reference for any open image files, the bin allows you to perform several basic editing functions. Click to select any photo thumbnail in the Project Bin, and right-click to display a pop-up menu. From the thumbnail menu you can get file information, minimize or close the file, duplicate it, and rotate it in 90-degree increments.
. In addition to providing a visual reference for any open image files, the bin allows you to perform several basic editing functions. Click to select any photo thumbnail in the Project Bin, and right-click to display a pop-up menu. From the thumbnail menu you can get file information, minimize or close the file, duplicate it, and rotate it in 90-degree increments.

![]() The Photo Bin is a holding area where you can access all of your open images.
The Photo Bin is a holding area where you can access all of your open images.
The Panel Bin (also referred to as the Task Pane in the Organizer) groups common tasks and controls into the right edge of the window ![]() . Clicking a heading displays the panels for editing, creating, and sharing. To temporarily hide this area and make more room for working, click the Hide Panel button (Quick edit mode) or choose Window > Panel Bin.
. Clicking a heading displays the panels for editing, creating, and sharing. To temporarily hide this area and make more room for working, click the Hide Panel button (Quick edit mode) or choose Window > Panel Bin.

![]() The Panel Bin holds controls for the Quick (shown here) and Guided edit modes, and items such as layers and effects in the Expert mode.
The Panel Bin holds controls for the Quick (shown here) and Guided edit modes, and items such as layers and effects in the Expert mode.
When you’re in the Expert edit interface, the Panel Bin contains the Layers, Effects, Graphics, and Favorites panels. The More button reveals a host of other panels that float outside the Panel Bin ![]() .
.
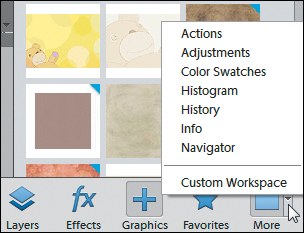
![]() Reveal other panels in the Expert edit mode by clicking the drop-down portion of the More button.
Reveal other panels in the Expert edit mode by clicking the drop-down portion of the More button.
The Panel Bin’s default arrangement is known as the Basic workspace, but you can customize it (which makes it act a bit more like earlier versions of Photoshop Elements). From the More drop-down menu, choose Custom Workspace. Instead of buttons, the four main panels are arranged as tabs, which you can manipulate in several ways. See “Working with Panels,” three pages ahead.
Selecting Tools
The Tools panel contains all the tools you need for editing and creating your images. You can use them to make selections, paint, draw, and easily perform sophisticated photo retouching operations. To view information about a tool, rest the pointer over it until a tool tip appears showing the name and keyboard shortcut (if any) for that tool.
To use a tool, first select it from the Tools panel ![]() . Some tools hide additional tools.
. Some tools hide additional tools.

![]() The Tools panel contains the tools to edit your images.
The Tools panel contains the tools to edit your images.
To select a hidden tool
Do one of the following:
• Hold Alt/Option and click any tool that displays a small triangle in the corner of the tool icon. The next tool is enabled.
• With a tool selected, go to the Tool Options bar and click an alternate ![]() .
.

![]() Hidden tools, indicated by a triangle in the Tools panel, are available in the Tool Options bar.
Hidden tools, indicated by a triangle in the Tools panel, are available in the Tool Options bar.
For easier access to tools, just use keyboard shortcuts. You’ll find them in tool tips and in the online help. For example, press T on your keyboard to activate the Type tool. (Note that when you press a letter to select a tool with a hidden tool group, Elements selects the tool from the group that was used most recently.)
Opening and Closing Files
It’s easy to open photos, depending on whether you’re working in the Organizer or the Editor. (If you need to import photos into the Organizer, see Chapter 3.)
To edit a file from the Organizer
• Select a thumbnail and choose Edit > Edit with Photoshop Elements Editor; the image opens in the Editor. You can also right-click an image and choose the same item from the contextual menu, or press Ctrl+I/Command-I.
• With a thumbnail selected, click the Editor button in the task bar at the bottom of the screen.
To open a file in the Editor
1. To find and open a file, choose Open from the File menu, click the Open button above the Tools panel, or press Ctrl+O/Command-O. The Open dialog appears ![]() .
.
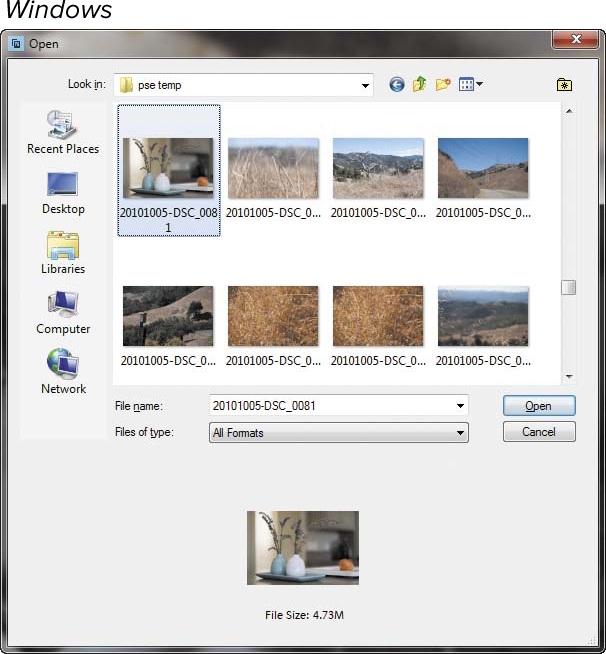

![]() The Open dialog displays all files that match formats Elements understands.
The Open dialog displays all files that match formats Elements understands.
2. Browse to the folder that contains your images.
3. To open the file you want, do one of the following:
• Double-click the file.
• Select the file and click the Open button.
The image opens in its own document window.
To close a file in the Editor
• Click the close button on the title bar for the active window.
• From the File menu, choose Close, or press Ctrl+W/Command-W.
If several files are open, you can close them all at once by choosing Close All from the File menu or by pressing Ctrl+Alt+W/Command-Option-W.
Working with Panels
The Editor is designed so it doesn’t overwhelm you with options. The Quick and Guided edit modes feature just the one Panel Bin that includes editing tools. The Expert edit mode, as you would expect, offers many more options, including the ability to arrange panels outside the bin.
The following options apply to the Expert edit mode. As mentioned a few pages back, you can also switch to the Custom Workspace, which groups panels in the Panel Bin as a group of tabs.
To display a panel
Do one of the following:
• Click the respective button in the lower-right corner to view the Layers, Effects, Graphics, or Favorites panel.
• Click the More button to display a floating tab group that contains most of the other panels ![]() . (The Adjustments panel is a little snooty and prefers to appear in its own window.)
. (The Adjustments panel is a little snooty and prefers to appear in its own window.)

![]() A floating tab group appears when you click the More button.
A floating tab group appears when you click the More button.
• From the Window menu, choose any panel to display it.
To switch to the Custom Workspace
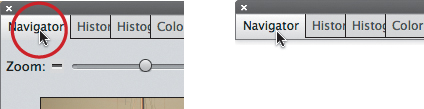
Click the drop-down menu attached to the More button and choose Custom Workspace. The panels appear as tabs at the top of the Panel Bin ![]() .
.

![]() When the Custom Workspace is enabled, panels appear as tabs in the Panel Bin.
When the Custom Workspace is enabled, panels appear as tabs in the Panel Bin.
To move a panel into its own window
1. Click the tab of the panel that you want to liberate.
2. Drag the tab until the panel is in the desired location in your work area ![]() . This action also works for tabs in the Panel Bin under the Custom Workspace.
. This action also works for tabs in the Panel Bin under the Custom Workspace.

![]() To move a panel into its own window, drag the tab outside the group.
To move a panel into its own window, drag the tab outside the group.
To use panel options menus
Click the panel options menu in the upper-right corner of any panel to access settings specific to the panel ![]() .
.

![]() The panel options menu includes more actions. To close a panel, click the close icon on the title bar (at left on the Mac, at right in Windows).
The panel options menu includes more actions. To close a panel, click the close icon on the title bar (at left on the Mac, at right in Windows).
To close a panel
Do one of the following:
• From the Window menu, choose any open panel; open panels are indicated by a check mark.
• If the panel is open in your work area (outside the Panel Bin), click the close box on the panel title bar. In Windows, it’s on the right side; on the Mac, it’s on the left side.
To return a panel to a tab group
Click the panel tab and drag the panel back into the Panel Bin. A horizontal blue line appears in the bin to indicate where the panel will end up when you drop it ![]() .
.

![]() Drag a panel tab into another tab group to return it to the group, or to create a new tab group.
Drag a panel tab into another tab group to return it to the group, or to create a new tab group.
You can also use this technique to create your own custom tab groups
To collapse panels to titles
Double-click the panel tab or title bar ![]() . Double-click again to reveal the panel.
. Double-click again to reveal the panel.
![]() Double-click the panel tab to collapse a panel or panel group.
Double-click the panel tab to collapse a panel or panel group.
If you choose to close a single panel residing in a panel group, the entire panel group will close. However, making one panel in the group visible using the Window menu makes the entire group visible again.
To dock panels
Drag any panel’s tab to the bottom of any panel outside the Panel Bin. Drag the panel by its title bar to successfully dock it to the top or bottom of another panel; a horizontal blue line indicates a connection ![]() .
.

![]() Docking one panel below another can help remove clutter in your work area.
Docking one panel below another can help remove clutter in your work area.
To undock a panel, click on one panel’s tab and drag it away from the other panel.
To return panels to their default positions
Click the Reset Panels button at the top of the Photoshop Elements window; or, from the Window menu, choose Reset Panels.
To hide the Panel Bin entirely
From the Window menu, choose Panel Bin (so its checkbox goes away) to gain the most screen space for your image.
To do the same thing in the Organizer, choose Window > Hide Task Pane.
Pay attention to the blue line that appears when adding panels to the Panel Bin. A horizontal line indicates that the panel will be stacked with the rest. An outline means the panel will be added to a panel group.
Using the Zoom Tool
You’ll never want to view your images at just one magnification level—editing out dust, for example, requires a close-up view. The Zoom tool magnifies and reduces your view, which you can control using a variety of methods.
The current level of magnification is shown in the document status bar at the lower-left corner, and, when the Zoom tool is selected, in the Tool Options bar. You can adjust the magnification either with the Zoom slider or by entering a value in the Zoom text field ![]() .
.
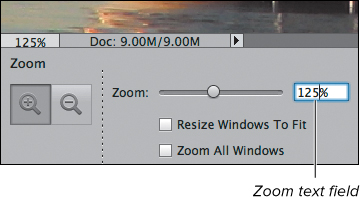
![]() With the Zoom tool selected, adjust the magnification level using the Tool Options bar.
With the Zoom tool selected, adjust the magnification level using the Tool Options bar.
To zoom in
1. In the Tools panel, select the Zoom tool, or press Z on the keyboard. The pointer changes to a magnifying glass when you move it into the document window.
2. Be sure that a plus sign appears in the center of the magnifying glass. If you see a minus sign (–), click the Zoom In button in the Tool Options bar ![]() .
.

![]() To zoom in on an image, check that the Zoom In button is selected in the Tool Options bar.
To zoom in on an image, check that the Zoom In button is selected in the Tool Options bar.
3. Click the area of the image you want to magnify.
With a starting magnification of 100 percent, each click with the Zoom In tool increases the magnification in 100 percent increments up to 800 percent. From there, the magnification levels jump to 1200 percent, then 1600 percent, and finally to 3200 percent!
If you turned on the “Allow Floating Documents in Expert Mode” setting in the Elements preferences, you can automatically resize the document window to fit the image when zooming in or out (see “Arranging Windows,” later in the chapter). With the Zoom tool selected, click the Resize Windows to Fit checkbox in the Tool Options bar. To maintain a constant window size, deselect the option.
To zoom out
1. In the Tools panel, select the Zoom tool, or press Z on the keyboard.
2. Click the Zoom Out button in the Tool Options bar, and then click in the area of the image that you want to zoom out from.
With a starting magnification of 100 percent, each click with the Zoom Out tool reduces the magnification as follows: 66.7 percent; 50 percent; 33.3 percent; 25 percent; 16.7 percent; and so on, down to 1 percent.
To zoom in on a specific area
1. In the Tools panel, select the Zoom tool; if necessary, click the Zoom In button in the Tool Options bar to display the Zoom tool with a plus sign.
2. Drag over the area of the image that you want to zoom in on.
A selection marquee appears around the selected area ![]() . When you release the mouse button, the selected area is magnified and centered in the image window.
. When you release the mouse button, the selected area is magnified and centered in the image window.

![]() Drag with the Zoom tool to zoom in on a specific area of an image.
Drag with the Zoom tool to zoom in on a specific area of an image.
3. To move the view to a different area of the image, hold the spacebar until the hand pointer appxears. Then drag to reveal the area you want to see. For more information on navigating through the document window, see “Moving Around in an Image” two pages ahead.
You can also change the magnification level from the zoom-percentage text field in the lower-left corner of the document window. Double-click the text field to select the zoom value, and then type in the new value.
To display an image at 100 percent
To display an image at 100 percent (also referred to as displaying actual pixels), do one of the following:
• In the Tools panel, double-click the Zoom tool.
• In the Tools panel, select either the Zoom or Hand tool, and then click the 1:1 button in the Tool Options bar ![]() .
.

![]() Clicking the 1:1 button in the Tool Options bar returns the image view to 100 percent.
Clicking the 1:1 button in the Tool Options bar returns the image view to 100 percent.
• From the View menu, choose Actual Pixels, or press Ctrl+Alt+0/Command-Option-0 (that’s a zero, not an O). I use this method more than any other zoom technique.
• Enter 100 in the Zoom text field in the Tool Options bar, and then press Enter.
• Enter 100 in the status bar at the bottom of the document window, and then press Enter ![]() .
.

![]() Entering 100 in the status bar also changes the image view to 100 percent.
Entering 100 in the status bar also changes the image view to 100 percent.
With any other tool selected in the toolbar, you can toggle to the Zoom tool. Hold down Ctrl+spacebar/Command-spacebar to zoom in or Alt+spacebar to zoom out.
To change the magnification of the entire image, press Ctrl++/Command-+ (Ctrl or Command and the plus sign) to zoom in or Ctrl+–/Command-– (Ctrl or Command and the minus sign) to zoom out.
Toggle the Zoom tool between zoom in and zoom out by holding down the Alt/Option key before you click.
You can automatically resize the document window to fit the image (as much as possible) when zooming in or out. With the Zoom tool selected, click the Resize Windows to Fit checkbox in the Tool Options bar. To maintain a constant window size, deselect the Resize Windows to Fit option.
Moving Around in an Image
When working in Photoshop Elements, you’ll often want to move your image to make a different area visible in the document window. This can happen when you’re zoomed in on one part of an image or when an image is just too large to be completely visible within the document window.
To view a different area of an image
Do one of the following:
• From the Tools panel, select the Hand tool and drag to move the image around in the document window ![]() .
.
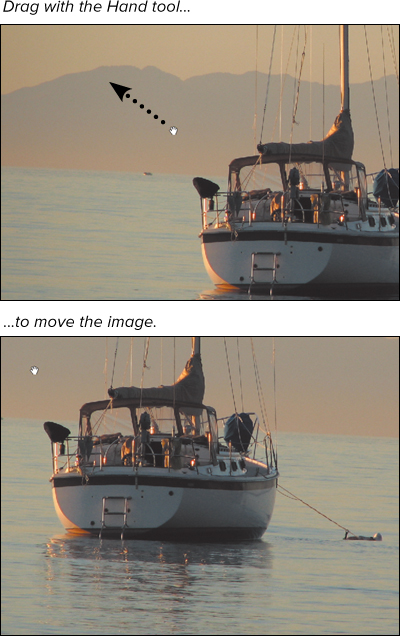
![]() To view a different area of the same image, drag with the Hand tool.
To view a different area of the same image, drag with the Hand tool.
• Use the scroll arrows at the bottom and right side of the document window to scroll to the left or right and up or down. You can also drag the scroll bars to adjust the view.
To change the view using the Navigator panel
1. Choose Window > Navigator to open the Navigator panel.
2. Drag the view box in the image thumbnail ![]() .
.
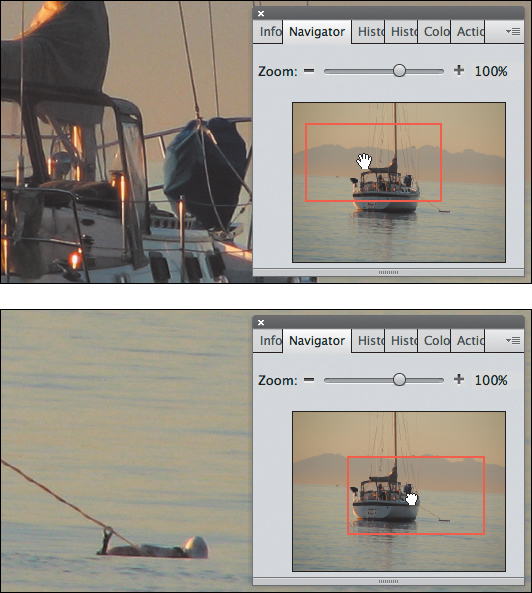
![]() You can also use the Navigator panel to view a different area of the same image.
You can also use the Navigator panel to view a different area of the same image.
The view in the document window changes accordingly.
With any other tool selected in the toolbar, press the spacebar to give you temporary access to the Hand tool.
Drag the slider in the Navigator panel to adjust the magnification level in the document window.
Arranging Windows
Photoshop Elements takes a different approach to arranging open file windows than many applications. Instead of windows floating on top of each other, they occupy the entire work area, with tabs that indicate open files ![]() .
.

![]() Open documents occupy the main workspace and are only visible one at a time. Click a tab to bring a document to the front.
Open documents occupy the main workspace and are only visible one at a time. Click a tab to bring a document to the front.
If you prefer overlapping windows, a preference enables them to float like traditional windows in Expert edit mode.
To arrange multiple windows
1. Click the Layout button in the task bar.
2. From the menu that appears, click a preset layout icon ![]() .
.

![]() Click the Arrange Documents button to set how multiple files appear in the Editor.
Click the Arrange Documents button to set how multiple files appear in the Editor.
To enable floating windows
Go to Edit > Preferences > General and enable the option titled Allow Floating Documents in Expert Mode. (On the Mac, access the Preferences menu from the Adobe Photoshop Elements Editor menu.)
With that active, you can drag a window’s title bar away from the workspace edge to make it appear as a free-floating window.
The options in the next section assume you’ve enabled floating windows; otherwise, many of those options are not available.
Arranging Multiple Views
You can open multiple windows with different images, or, if you prefer, you can open multiple views of the same image. This is a handy way to work on a detailed area of your image while viewing the full-sized version of the image at the same time. It’s especially useful when you’re doing touch-up work, such as correcting red eye or erasing a blemish in a photo.
To open multiple views of an image
From the Arrange Documents menu, choose New Window. The window appears as a new tab or, if you enabled the Allow Floating Documents in Expert Mode preference, as a new floating window. You can also look in the Photo Bin to see the new view.
To arrange multiple views
Do one of the following:
• To create cascading, overlapping windows, choose Float All in Windows.
• If the windows are floating, position them by dragging their title bars, or use the commands under Window > Images to tile or cascade them ![]() .
.

![]() Multiple image views let you work on a detailed area (left) while at the same time allowing you to see how the changes affect the overall image (right).
Multiple image views let you work on a detailed area (left) while at the same time allowing you to see how the changes affect the overall image (right).
To close multiple view windows
Do one of the following:
• To close a single window, click the close button on that window’s title bar.
• To close all document windows, from the File menu choose Close All or press Ctrl+Alt+W/Command-Option-W.
You can set different levels of magnification for each window to see both details and the big picture at the same time.
When you’re working on a zoomed-in image, it’s easy to get lost. Choose Window > Images > Match Zoom to set all open windows to the same zoom level. Or, choose Match Location to make the same visible pixels appear in all windows. That’s a quicker option than scrolling around looking for a match or using the Navigator panel.
Using Rulers
Customizable rulers, along the top and left sides of the document window, can help you scale and position graphics and selections. The rulers are helpful if you are combining photos with text (in a greeting card, for example) and want to be precise in placing and aligning the various elements. Interactive tick marks in both rulers provide constant feedback, displaying the position of any tool or pointer as you move it through the window. You can also change the ruler origin, also known as the zero point, to measure different parts of your image.
To show or hide the rulers
From the View menu, choose Rulers to turn the rulers on and off, or press Ctrl+Shift+R/Command-Shift-R.
To change the zero point
1. Place the pointer over the zero point crosshairs in the upper-left corner of the document window ![]() .
.
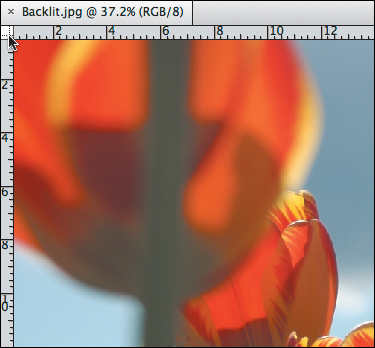
![]() The rulers’ zero point establishes the origin of the rulers.
The rulers’ zero point establishes the origin of the rulers.
2. Drag the zero point to a new position in the document window.
As you drag, a set of crosshairs appears, indicating the new position of the zero point ![]() .
.

![]() Drag the zero point to a new location anywhere in the document window.
Drag the zero point to a new location anywhere in the document window.
3. Release the mouse button to set the new zero point.
To change the units of measure
Right-click on either ruler. A contextual menu appears, from which you can choose a new measurement unit.
To reset the zero point to its original location, double-click the crosshairs in the upper-left corner of the document window.
Setting Up the Grid
A nonprinting, customizable grid appears as an overlay across the entire document window. As with the rulers, it can be used for scaling and positioning, but it can be especially helpful for maintaining symmetry in your layout and design, or for occasions when you’d like objects to snap to specific points in the window.
To show or hide the grid
From the View menu, choose Grid to turn the grid on and off.
To change the grid settings
1. From the Edit menu (or, on the Mac, the Adobe Photoshop Elements Editor menu), choose Preferences > Guides & Grid to open the Guides & Grid Preferences.
2. From the Color drop-down menu, choose a preset grid color, or choose Custom ![]() .
.

![]() Choose a grid color from the list of preset colors or create a custom color.
Choose a grid color from the list of preset colors or create a custom color.
Choosing Custom displays the Color Picker, where you can select a custom grid color.
3. From the Style drop-down menu, choose a line style for the major grid lines ![]() .
.

![]() Examples of grid line styles.
Examples of grid line styles.
4. In the Gridline every drop-down menu, choose a unit of measure; then enter a number in the accompanying field to define the spacing of the major grid lines.
5. In the Subdivisions field, enter a number to define the frequency of minor grid lines ![]() .
.
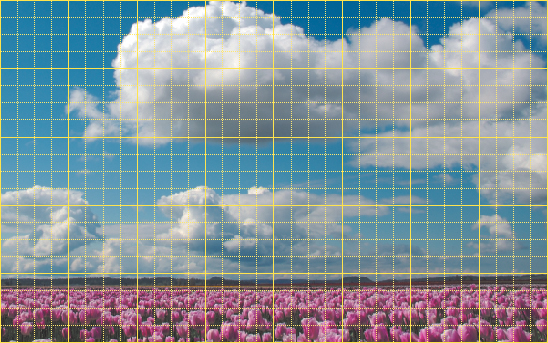
![]() This figure shows a document grid with major grid lines set every inch, subdivided by four minor grid lines.
This figure shows a document grid with major grid lines set every inch, subdivided by four minor grid lines.
6. Click OK.
Getting Information about Your Image
The Info panel displays measurement and color information as you move a tool over an image. In addition, you can customize the status bar at the bottom of the Info panel to display different file and image information.
To use the Info panel
1. From the Window menu, choose Info to view the Info panel.
2. Select a tool and then move the pointer over the image. Depending on the tool you are using, the following information appears:
• The numeric values for the color beneath the pointer. You can view any two sets of color modes at the same time ![]() . Choose which modes to display by clicking the drop-down lists
. Choose which modes to display by clicking the drop-down lists ![]() .
.

![]() Any two sets of color information (RGB, HSB, Web Color, or Grayscale) can be viewed at once.
Any two sets of color information (RGB, HSB, Web Color, or Grayscale) can be viewed at once.

![]() Color modes (and other settings) can be changed from drop-down lists in the panel.
Color modes (and other settings) can be changed from drop-down lists in the panel.
• The x and y coordinates of the pointer, and the starting x and y coordinates of a selection or layer, along with the change in distance as you move the pointer over your image ![]() .
.
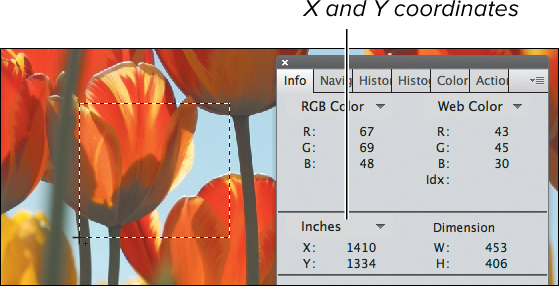
![]() The x and y coordinates of the pointer are shown in the Info panel.
The x and y coordinates of the pointer are shown in the Info panel.
• The width and height of a selection or shape and the values relating to transformations, such as the percentage of scale, angle of rotation, and skew (which distorts a selection along the horizontal or vertical axis) ![]() .
.

![]() Any change in the scale or transformation of a selection or layer is visible in the Info panel.
Any change in the scale or transformation of a selection or layer is visible in the Info panel.
It’s usually quicker to change units of measure using the Info panel rather than by going into the Elements preferences.
Using the History Panel
The History panel lets you move backward and forward through a work session, allowing you to make multiple undos to any editing changes you’ve made to your image. Photoshop Elements records every change and then lists each as a separate entry, or state, on the panel. With one click, you can navigate to any state and then choose to work forward from there, return to the previous state, or select a different state from which to work forward.
To navigate through the History panel
1. To open the History panel, choose History from the Window menu.
2. To move to a different state in the History panel, do one of the following:
• Click the name of any state ![]() .
.

![]() Move to virtually any point in time in the creation of your project using the History panel.
Move to virtually any point in time in the creation of your project using the History panel.
• Drag the panel slider up or down to a different state.
The default number of states that the History panel saves is 50. After 50, the first state is cleared from the list, and the panel continues to list only the 50 most recent states. The good news is you can bump the number of saved states up to 1000, provided that your computer has enough memory. In the Photoshop Elements preferences, choose Performance. In the History & Cache box enter a larger number in the History States field.
If memory is at a premium (and you’d rather Photoshop Elements not clog up your precious RAM by remembering your last 50 selections, brushstrokes, and filter effects), set the number in the History States field to 1. You can still undo and redo your last action as you work along, but for all practical purposes, the History panel is turned off.
To delete a state
Click the name of any state, then choose Delete from the panel menu ![]() .
.

![]() Delete any state by selecting it and choosing Delete from the panel menu.
Delete any state by selecting it and choosing Delete from the panel menu.
The selected state and all states following it are deleted.
To clear the History panel
Do one of the following:
• From the panel menu, choose Clear History ![]() .
.
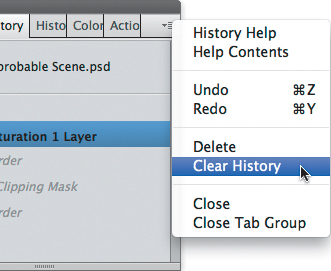
![]() If system memory is a concern, you can periodically clear the panel of all states.
If system memory is a concern, you can periodically clear the panel of all states.
This action can be undone, but it doesn’t reduce the amount of memory used by Photoshop Elements.
• Hold down the Alt/Option key, then choose Clear History from the panel menu.
This action cannot be undone, but it does purge the list of states from the memory buffer. This can come in handy if a message appears telling you that Photoshop Elements is low on memory.
Deletion of a state can be undone, but only if no changes are applied to the image in the interim. If you make a change to the image that creates a new state on the panel, all deleted states are permanently lost.
Sometimes—when you’re working on an especially complex piece, for instance—the History panel may become filled with states that you no longer need to manage or return to, or that begin to take their toll on your system’s memory. At any time, you can clear the panel’s list of states without changing the image.
Using Multitouch Gestures
If you own a device that accepts touch input—such as a laptop’s trackpad or a touch-sensitive screen—Photoshop Elements supports multitouch gestures that let you work in a more hands-on manner.
To rotate an image
1. Place two fingers on the multitouch surface.
2. Turn your fingers clockwise or counter-clockwise, like you’re turning a physical knob, to rotate the image 90 degrees in that direction ![]() .
.

![]() Rotate your hand to turn an image 90 degrees.
Rotate your hand to turn an image 90 degrees.
To zoom
1. Place two fingers on the surface.
2. Pinch outward to enlarge the image (zoom in), or pinch inward to reduce the image (zoom out) ![]() .
.

![]() Pinch out to zoom.
Pinch out to zoom.
To scroll in an image
1. Place two fingers on the surface.
2. Drag in the direction you wish to move the visible portion of the image ![]() .
.

![]() Drag two fingers to scroll.
Drag two fingers to scroll.