
3. Managing Photos in the Organizer
In This Chapter
Understanding the Organizer Work Area
Displaying and Changing Information for Your Photos
Using Keyword Tags to Sort and Identify Photos
Using Categories to Organize Tagged Photos
Identifying and Locating People
Using Albums to Arrange and Group Photos
Using Stacks to Organize Similar Photos
Using Catalogs to Store Your Photos
Digital photography can be a double-edged sword. Ironically, its greatest advantage to the amateur photographer—the ability to quickly and easily capture a large number of images, and then instantly download them to a computer—can also be its greatest source of frustration. Once hundreds of images have been downloaded, photographers find themselves faced with the daunting task of sorting through myriad files, with incomprehensible file names, to find those dozen or so “keepers” to assemble into an album or post to the Web for friends.
The Organizer workspace comes to the rescue with a relatively simple and wonderfully visual set of tools and functions to help you locate, identify, and organize your photos. And once your photos are organized, you can import categories and collections of images that you assemble directly into projects like slide shows, calendars, flipbooks, and online albums.
Because we need some source material to work with, this chapter jumps right into importing photos from a digital camera and opening images already on your hard disk.
Importing Images
Digital cameras have revolutionized photography and are a main force driving the need for products like Photoshop Elements. Typically, these cameras come with their own software to help you browse and manage photos—but don’t bother breaking the seal on the disc’s envelope. You can access your camera from within Elements and then download your images, or download photos from the camera to your hard drive and then open them in Elements.
To import images from a digital camera (Standard dialog)
1. Connect your digital camera to your computer using the instructions provided by the camera manufacturer.
If the Photo Downloader launches automatically, skip to step 3. If you don’t see the Photo Downloader dialog, continue to step 2.
2. If you’re in the Editor, click the Organizer button to launch the Organizer.
If you’re in the Organizer already, click the Import button and choose From Camera or Card Reader ![]() . You can also go to File > Get Photos and Videos, or press Ctrl+G/Command-G.
. You can also go to File > Get Photos and Videos, or press Ctrl+G/Command-G.
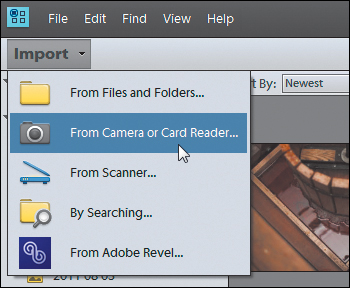
![]() Choose From Camera or Card Reader to download photos from your digital camera.
Choose From Camera or Card Reader to download photos from your digital camera.
The Photo Downloader dialog opens in its Standard mode ![]() . For more importing options, see “To import images from a digital camera (Advanced dialog),” just ahead in this chapter.
. For more importing options, see “To import images from a digital camera (Advanced dialog),” just ahead in this chapter.
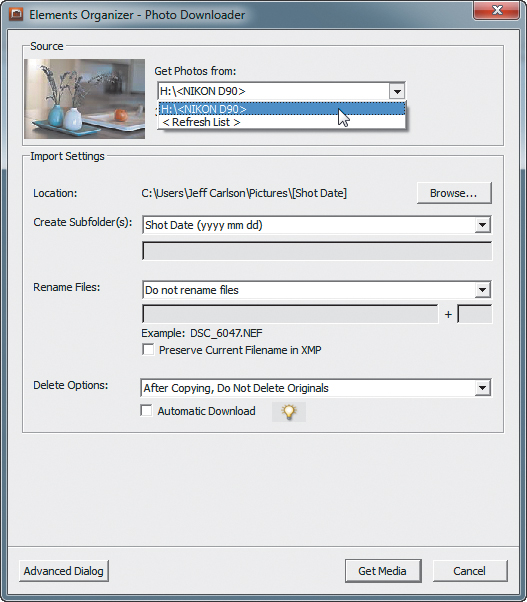
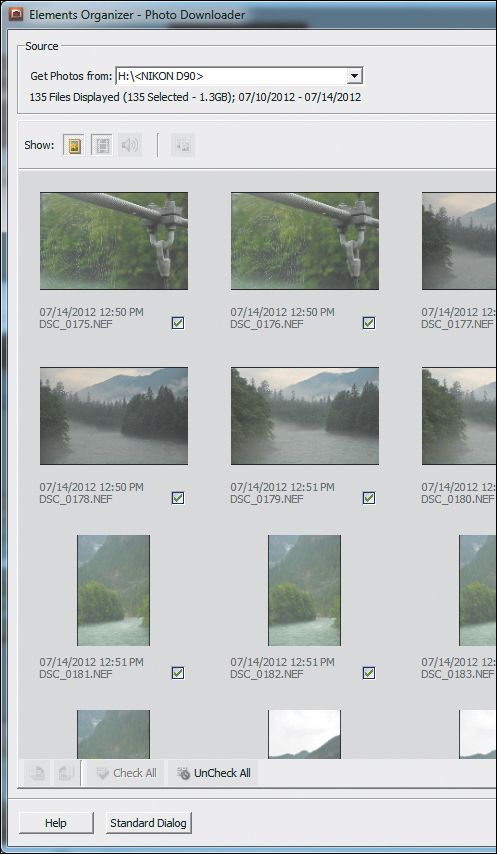
![]() The Photo Downloader’s Standard dialog makes it easy to import all photos in one fell swoop.
The Photo Downloader’s Standard dialog makes it easy to import all photos in one fell swoop.
3. Your camera will likely be selected in the Get Photos from drop-down menu, but if not, choose your camera.
Listed below the menu are the number of pictures, and their combined size.
4. By default, images are saved to your Pictures folder; hold your mouse pointer over the truncated path listed next to Location to view the full destination.
If you want to save the files to a different location, click the Browse (Windows)/Choose (Mac) button and select a folder or create a new one. Then click OK.
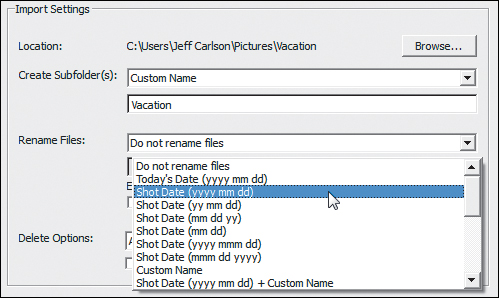
5. The Photo Downloader dialog is set to create new subfolders to store each batch of imported images, named according to the shot dates. From the Create Subfolder(s) drop-down menu, you can customize this behavior by choosing one of the following options:
• None saves the files in the folder specified by Location, normally your My Pictures folder.
• Custom Name creates a folder with a name that you enter ![]() .
.

![]() To make it easier to find images on disk later, specify a custom name for subfolders.
To make it easier to find images on disk later, specify a custom name for subfolders.
• Today’s Date automatically creates a folder named with the current date.
• Shot Date creates folders with the date the images were captured; choose your preferred date format from one of the options ![]() .
.
![]() Choose a date format for naming subfolders with the images’ shot dates.
Choose a date format for naming subfolders with the images’ shot dates.
6. The Rename Files drop-down menu gives you the option of automatically naming the imported files something more descriptive than what your camera assigns. Choose an option from the drop-down menu.
For example, your camera’s default naming scheme is probably something like “IMG_1031.JPG.” With a Rename Files option selected, you can name and number a set of photos “Vacation,” for instance. Then your photos will be saved and named “Vacation001.jpg,” “Vacation002.jpg,” and so on.
7. In the Delete Options area, choose what happens to the files on the memory card. Just to be safe, I like to leave the option set to After Copying, Do Not Delete Originals, and then erase the card in-camera later.
Under Windows, the Automatic Download option is useful if you want to offload pictures onto the computer without going through the Photo Downloader. Images download automatically when a camera or other device is attached. You can turn it off later in the program’s preferences.
8. Click the Get Media button to download the selected images to your computer.
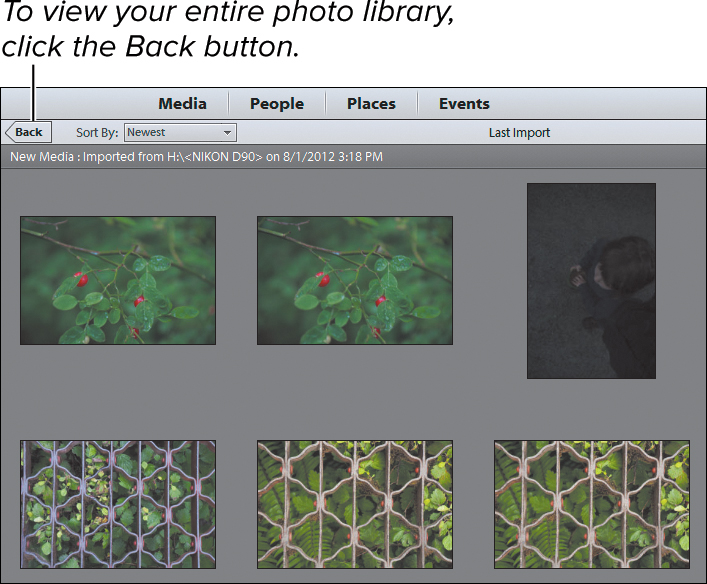
Your downloaded photos first appear in their own Organizer window. Click the Back button (which sometimes reads All Media, depending on context) to return to the main Organizer window ![]() .
.
![]() Photos downloaded from the camera or memory card appear in the Organizer.
Photos downloaded from the camera or memory card appear in the Organizer.
To import images from a digital camera (Advanced dialog)
1. Follow steps 1 through 8 in the previous sequence, but click the Advanced Dialog button in step 2 to view the Advanced options ![]() .
.
![]() Preview all photos on your camera before importing them in the Advanced dialog (left side of window shown here).
Preview all photos on your camera before importing them in the Advanced dialog (left side of window shown here).
2. Click to deselect the checkbox under any photos you do not want to download.
By default, Elements assumes you want to download every image.
3. In the Advanced Options area, choose to enable or disable the following ![]() :
:
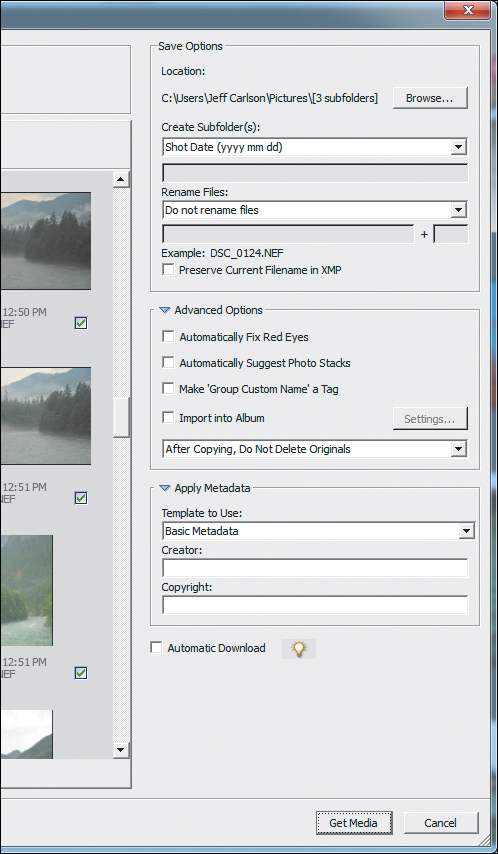
![]() Further customize the importing process in the Advanced dialog (right side of window here).
Further customize the importing process in the Advanced dialog (right side of window here).
• Automatically Fix Red Eyes attempts to correct red eye problems in your photos as they’re downloaded.
• Automatically Suggest Photo Stacks groups similar photos together for easy organization and review later (see “Using Stacks to Organize Similar Photos,” later in this chapter).
• Make ‘Group Custom Name’ a Tag takes the name you specified in step 5 two pages back and creates a keyword tag (see “Creating Keyword Tags,” later in this chapter).
• Import into Album assigns the photos to a photo album you’ve previously set up (see “Using Albums to Arrange and Group Photos,” later in this chapter).
4. Type your name (or the name of whoever took the photos) and a copyright notice in the Apply Metadata fields. This text is embedded with the image files.
5. If you want to rotate an image as it’s imported, select it and click the Rotate Left or Rotate Right button at the lower-left corner ![]() . You can also press Control and the left or right arrow key.
. You can also press Control and the left or right arrow key.
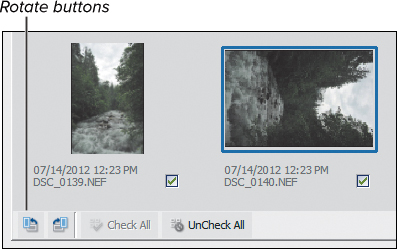
![]() Rotate images during import so you won’t have to do it later.
Rotate images during import so you won’t have to do it later.
For a fast way to select just a few photos for import, first click the UnCheck All button, and then click on the photos you want—don’t worry about clicking their individual checkboxes. With the images selected, click just one checkbox to enable the boxes of your selections.
Photoshop Elements can import photos stored in Camera RAW formats, which are the unprocessed versions of the captured images. RAW enables more adjustment possibilities than JPEG (which is processed and compressed in the camera). Elements brings RAW files into the Organizer without editing the image information. When you edit the photo, Elements first brings up the Camera Raw dialog to set initial edits before opening the image in the Editor. For more information, see Chapter 9.
The contents of the Creator and Copyright metadata fields are applied to all photos imported in that batch. If you want different authors for the pictures, for example, either import them in several batches or edit the metadata after they’ve been added to the catalog.
To import images from files or folders
1. In the Organizer, go to the File menu, highlight Get Photos, and choose From Files and Folders.
Under Windows, If you insert media that contains photos, such as a CD, you may be asked what action you’d like to take (if you haven’t specified it already). Click the icon labeled Organize and Edit using Adobe Photoshop Elements 11.0, which opens a dialog to locate files.
2. Select the files you want to import ![]() ; Shift-click to select a consecutive range of files, or Ctrl-click/Command-click to select noncontiguous files.
; Shift-click to select a consecutive range of files, or Ctrl-click/Command-click to select noncontiguous files.
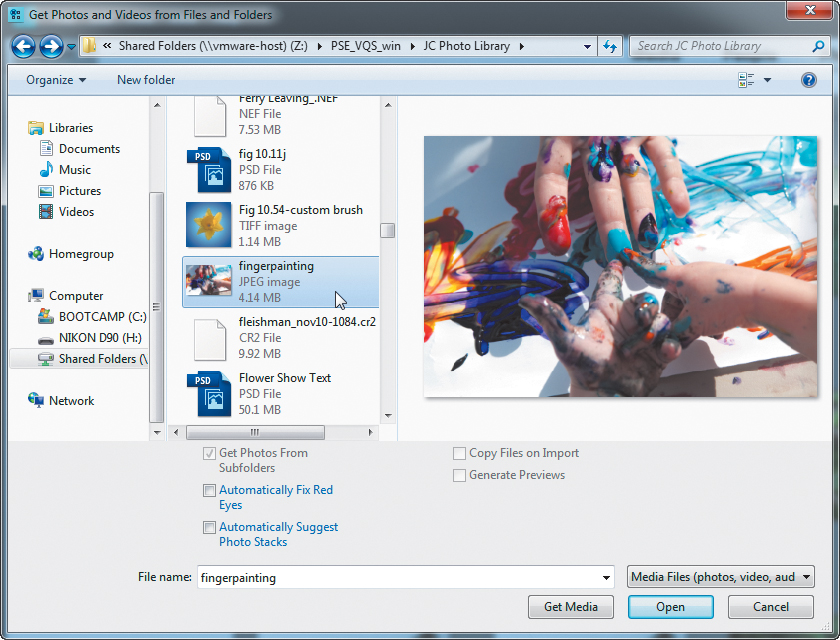
![]() Import images from other areas of your hard disk or from removable media such as CDs.
Import images from other areas of your hard disk or from removable media such as CDs.
3. If the images are stored on removable media and you want to import only low-resolution versions, disable the Copy Files on Import option and enable the Generate Previews option (see the sidebar for more information).
4. As in the Advanced dialog mentioned on the previous pages, select from the processing options below the preview.
5. Click the Get Media button to import the photos. If the photos already include keyword tags, you have the option to import them.
Offline images are designated with an icon in the upper-left corner of the image in the Organizer ![]() . You can apply tags, build collections, and perform other tasks. However, if you want to edit the image, Elements asks you to insert the original media. If it’s not available, you can still edit the low-res proxy, but the results won’t look good. Once you make the original available again, Elements copies the source image to your catalog as an online image.
. You can apply tags, build collections, and perform other tasks. However, if you want to edit the image, Elements asks you to insert the original media. If it’s not available, you can still edit the low-res proxy, but the results won’t look good. Once you make the original available again, Elements copies the source image to your catalog as an online image.
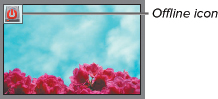
![]() Offline images are denoted by a corner icon.
Offline images are denoted by a corner icon.
Now that we’ve gotten those steps out of the way and you understand what’s going on, here’s a much quicker method: Simply drag image files from a folder on your hard disk to the Organizer’s window. Elements imports them without fuss.
If you know some photos exist on your hard disk but can’t find them, let Elements hunt for them instead. Under the Get Photos submenu of the File menu, choose By Searching, enter criteria about the files, and click the Search button.
To import images using Watch Folders (Windows only)
1. You can specify one or more folders that Elements watches in the background for new files. In the Organizer, choose Watch Folders from the File menu.
2. Click the Add button and navigate to the folder you wish to watch ![]() . Repeat for as many folders as you’d like.
. Repeat for as many folders as you’d like.
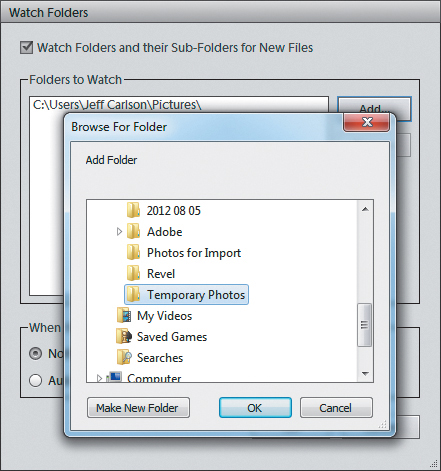
![]() Elements can keep an eye on one or more folders and import photos when they’re added.
Elements can keep an eye on one or more folders and import photos when they’re added.
3. Select an action under When New Files are Found in Watched Folders; Elements can notify you when files are found, or add them to the Organizer automatically.
4. Click OK when you’re done.
5. When you add photos to your watched folder, Elements asks if you want to import them (if you opted to be notified in step 3). Click Yes to add the photos, which are moved from the watched folder to the directory where Elements stores your catalog.
To scan an image into the Organizer (Windows only)
1. Connect the scanner to your computer using the instructions provided by the scanner manufacturer.
2. In the Organizer, click the Import button and choose From Scanner. Or, you can choose File > Get Photos and Videos > From Scanner (or press Ctrl+U).
3. Select your scanner software from the Scanner pop-up menu.
4. Choose an image format and quality level.
5. Click the OK button. Elements hands off the actual scanning duties to the scanner’s software for you to complete the scan.
6. When you complete the scan and exit the scanner’s software, Elements imports the image to your catalog.
If you’re planning to use only part of an image, you’ll save a lot of time by using your scanning software to crop your image before importing it into Photoshop Elements.
On the off chance that you want to scan an image in black and white (not grayscale), well, don’t. Elements doesn’t recognize bitmap images.
Importing photos from iPhoto (Mac only)
Elements offers a feature to move your iPhoto library into the Organizer. This is a one-way operation, which attempts to import all of your iPhoto photos; there’s no way to specify just a few photos or albums. If you want to completely switch from iPhoto to the Organizer, here are the steps.
To import photos from iPhoto (Mac only)
From the File menu, choose Get Photos and Videos > From iPhoto.
Elements copies the media to its catalog. Depending on the size of your iPhoto library, the process could take a while.
To capture frames from video footage
1. In the Editor, go to the File menu and choose Import > Frame From Video. (This feature appears only in the Editor, not the Organizer.)
The Frame From Video dialog appears.
2. Click the Browse button to locate the file you want, and then click Open to see the video footage.
The video clip appears in the dialog ![]() .
.
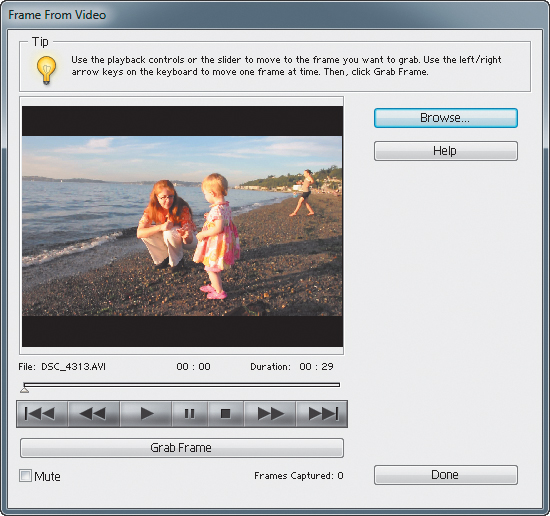
![]() The Frame From Video dialog enables you to snag shots from video footage you captured.
The Frame From Video dialog enables you to snag shots from video footage you captured.
3. To view your footage, click the Play button. When you see the frame you want, click the Grab Frame button or press the spacebar.
To grab the frame you want, you can also use the Pause button to stop the video at the desired frame. Another useful option is to simply move the slider to the correct frame in the video.
4. Grab as many video frames as you want, one by one, and then click Done.
As you click the Grab Frame button, the images appear as new files in the Editor ![]() .
.
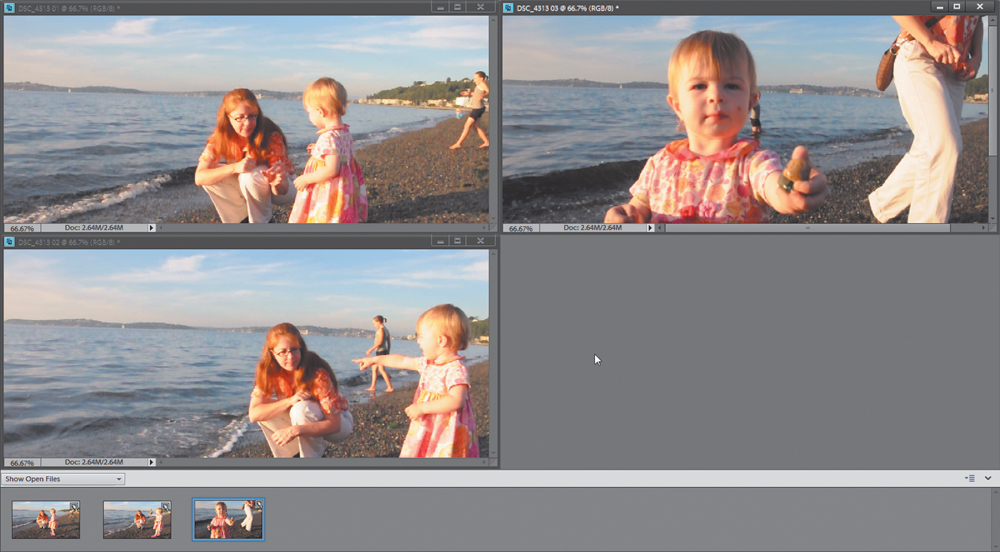
![]() I grabbed three frames from the video clip, which appear in the Editor as three separate image files.
I grabbed three frames from the video clip, which appear in the Editor as three separate image files.
5. Once you’ve captured the frames, you can save and edit them just like other images.
You’ll likely encounter a greater variety of exposure problems with video frames than with the still shots you take with a digital camera. You can easily fix contrast and tonal problems with a few of Photoshop Elements’ correction tools, which you’ll explore more in Chapter 8.
Understanding the Organizer Work Area
The Organizer is dominated by the Media Browser, which is used to find and view thumbnail representations of your photos. It’s flanked by two panels that you use to group and organize your image files ![]() , which can be hidden to make room for more photos.
, which can be hidden to make room for more photos.
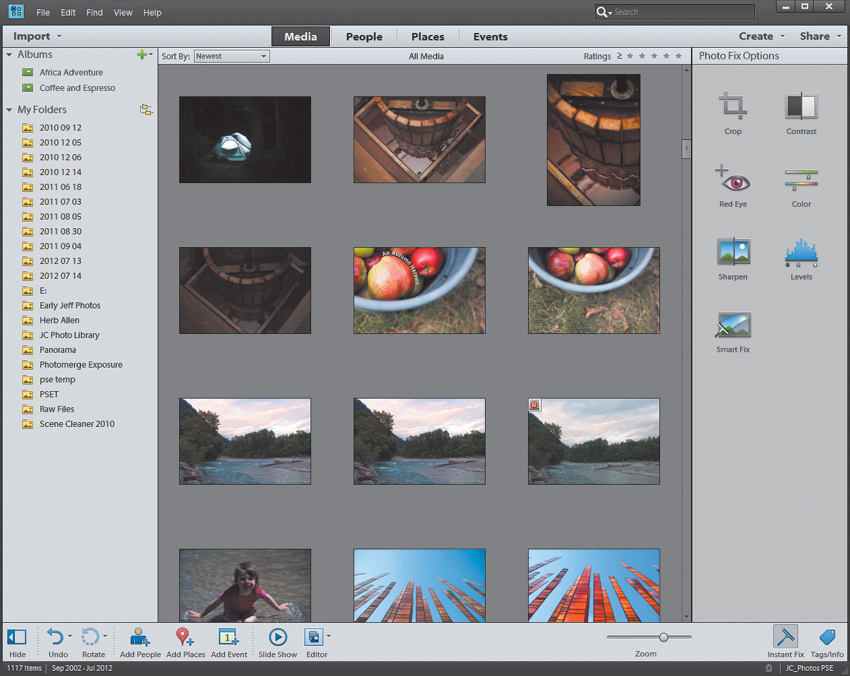
![]() The Organizer workspace makes it easy to browse your entire photo collection.
The Organizer workspace makes it easy to browse your entire photo collection.
The Media Browser
At the core of the Organizer is the Media Browser. Every digital photo or video downloaded into Photoshop Elements is automatically added there. Resizable thumbnails in the Media Browser window make it easy to scan through even a large number of images.
Media is typically organized according to the dates the photos or videos were captured, but you can also view images grouped by the people in them, by places where they’ve occurred (using geotagging information embedded in the files or locations you’ve specified on a map), or by time-based events. I cover each mode in this chapter.
The Folders List
The pane at left displays albums you create to organize your media, as well as a Folders List that reveals where the files are stored on disk. Click a folder name to view its contents ![]() .
.
![]() The Folders List reveals directories where your photos are located.
The Folders List reveals directories where your photos are located.
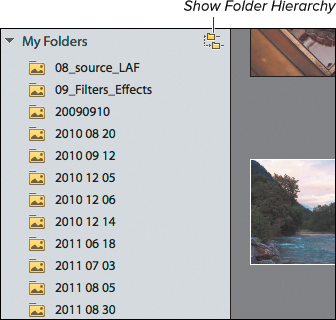
You can also click the Show Folder Hierarchy button to expose your drive’s structure. This approach is more comfortable for people who like to keep track of where their files are, but is also useful for organizing. For example, in this view you can move images between drives so the Organizer properly keeps track of them.
To move files in the Folder List
1. Click the Show Folder Hierarchy button.
2. Drag a folder to a new location ![]() ; or, select images in the Media Browser and drag them to a folder.
; or, select images in the Media Browser and drag them to a folder.
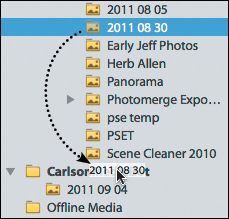
![]() Move photos or folders using the Folder Hierarchy List.
Move photos or folders using the Folder Hierarchy List.
The timeline
An optional, but helpful, way to quickly navigate your photos by date is the timeline, located just above the Media Browser. Choose Timeline from the Window menu, or press Ctrl+L/Command-L. For example, when a Date viewing option is selected in the Browser window, the timeline uses date and time information embedded in each image to construct bars (month markers) to represent sets of photos taken within specific months and years. When a month marker is selected in the timeline, that month’s photos are displayed at the top of the Media Browser ![]() .
.
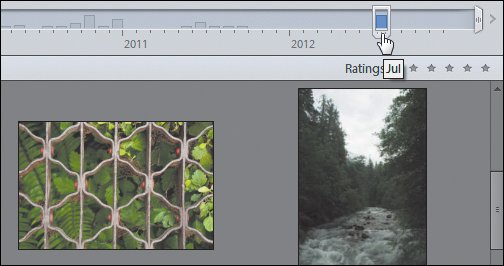
![]() Click a month marker in the Organizer timeline to view that month’s photos on the Media Browser.
Click a month marker in the Organizer timeline to view that month’s photos on the Media Browser.
Instant Fix and information
The pane at right includes either a collection of Instant Fix operations—such as Crop, Red Eye, and Smart Fix ![]() —or keyword tags and general information about selected images.
—or keyword tags and general information about selected images.
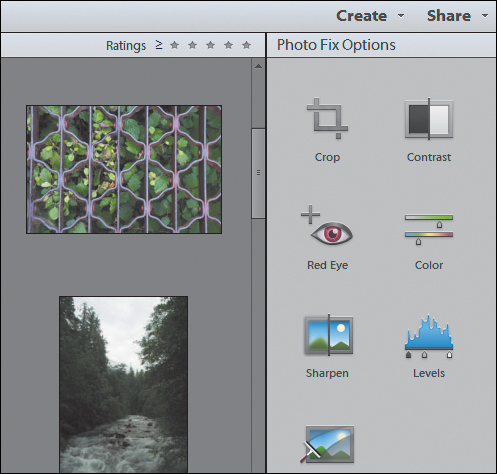
![]() Make quick fixes in the Organizer.
Make quick fixes in the Organizer.
Working in the Media Browser
The centerpiece of the Organizer is the Media Browser, a flexible workspace that provides a number of options for customizing the way you manage and view your image files. Throughout this chapter I’ll cover a variety of ways to work in the Media Browser to label, identify, and organize your photos. But first it’s important to know how best to select, sort, and display the image thumbnails.
To select photo thumbnails
Do one of the following:
• Click to select a thumbnail in the Media Browser. The frame around it becomes light blue, indicating that the thumbnail is selected ![]() .
.
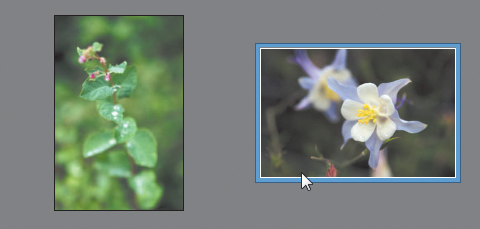
![]() A selected thumbnail appears with a light blue frame around it.
A selected thumbnail appears with a light blue frame around it.
• Ctrl-click/Command-click to select non-adjacent thumbnails at once ![]() .
.
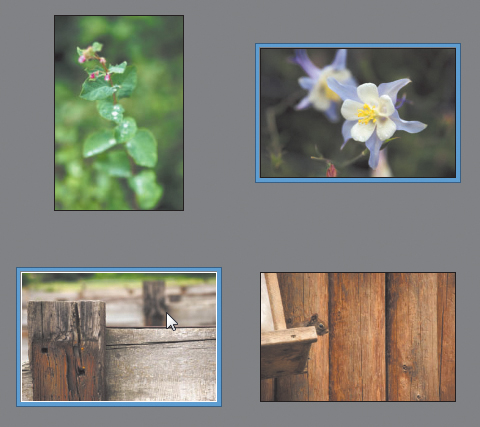
![]() Ctrl-click/Command-click to select thumbnails that are not consecutive.
Ctrl-click/Command-click to select thumbnails that are not consecutive.
• Shift-click to select a group of thumbnails in sequence ![]() .
.
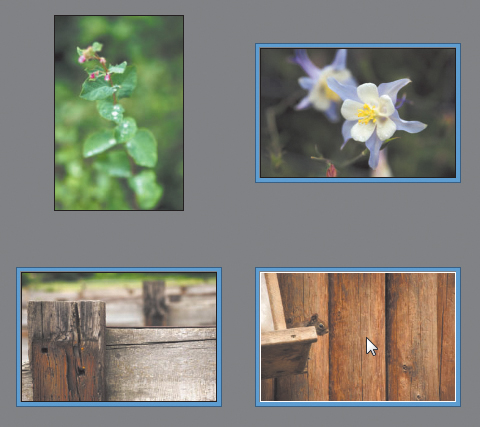
![]() Shift-click to select thumbnails that are consecutive.
Shift-click to select thumbnails that are consecutive.
• From the Edit menu, choose Select All, or press Ctrl+A/Command-A to select every thumbnail in the Media Browser.
To deselect photo thumbnails
Do one of the following:
• Ctrl-click/Command-click to deselect a single thumbnail.
• From the Edit menu, choose Deselect, or press Ctrl+Shift+A/Command-Shift-A to deselect every thumbnail in the Media Browser.
You can tweak the appearance of the Media Browser. From the View menu, choose to display details such as grid lines, file names, ratings, timestamps, and people recognition.
To sort photo thumbnails
• From the Sort By drop-down menu above the Media Browser, choose a sorting option ![]() :
:
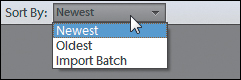
![]() Select an option to sort thumbnails in the Media Browser.
Select an option to sort thumbnails in the Media Browser.
• Newest displays the most recent photos at the top, judged by the images’ creation dates.
• Oldest displays photos in order, with the oldest at the top.
• Import Batch groups photos into the batches they were imported in ![]() .
.
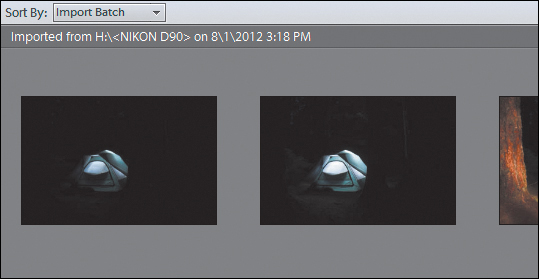
![]() When you select the Import Batch option, thumbnails in the Media Browser are displayed in grouped batch sets.
When you select the Import Batch option, thumbnails in the Media Browser are displayed in grouped batch sets.
To resize photo thumbnails
• Below the Media Browser, drag the Zoom slider to the right to increase the size of the thumbnails, or to the left to make them smaller ![]() .
.
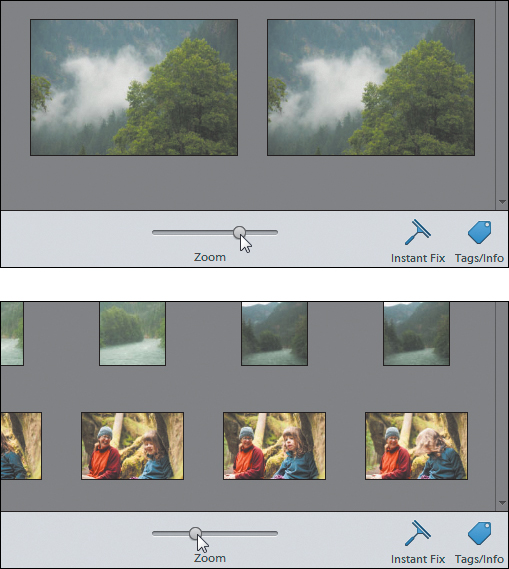
![]() When you drag the thumbnail slider to the right, the thumbnails grow larger (top). When you drag the slider to the left, they become smaller (bottom).
When you drag the thumbnail slider to the right, the thumbnails grow larger (top). When you drag the slider to the left, they become smaller (bottom).
• Click the far left of the Zoom slider to display the thumbnails at their smallest possible size.
• Click the far right of the Zoom slider to display just one large photo thumbnail at a time (also known as Single Photo View).
Double-click on any thumbnail to change to Single Photo View. Double-click the image to return to your most recent multiple thumbnail view settings.
Displaying and Changing Information for Your Photos
Images you import carry embedded file information—everything from the date and time a photo was shot or scanned to whether or not the camera’s flash fired. The Organizer uses that date and time information to determine the display order of the photo thumbnails in the Media Browser.
If your camera’s clock wasn’t set properly before shooting (a problem especially if the batteries die), the Adjust Date and Time dialog lets you substitute a new date and time for any image file. You can also easily adjust for time zone differences by shifting the time a set number of hours.
To adjust the date and time
1. From the View menu, check that the Details option is enabled to display date and file name information below the image thumbnails ![]() .
.
![]() The Details option displays title and date information in the Media Browser.
The Details option displays title and date information in the Media Browser.
2. In the Media Browser, click to select the thumbnails whose date and time you would like to change.
3. From the Edit menu, choose Adjust Date and Time (or Adjust Date and Time of Selected Items if more than one thumbnail is selected), or press Ctrl+J/Command-J.
4. In the dialog that appears, choose one of the options and click OK ![]() :
:

![]() The Adjust Date and Time dialog offers different options for changing an image’s date and time information.
The Adjust Date and Time dialog offers different options for changing an image’s date and time information.
• Change to a specified date and time opens the Set Date and Time dialog where you can set a specific year, month, day, and time ![]() .
.
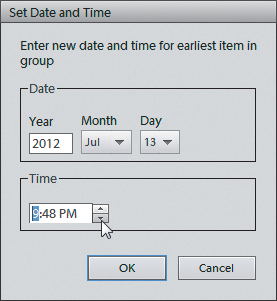
![]() The Set Date and Time dialog.
The Set Date and Time dialog.
To view hidden photos, choose View > Visibility and choose either Show All Files or Show Only Hidden Files. An eye icon with a strikethrough mark appears on the face of each photo thumbnail ![]() . You can hide them again by choosing View > Visibility > Hide Hidden Files. To make a photo permanently visible, choose Edit > Visibility > Mark as Visible, which removes the Hidden attribute.
. You can hide them again by choosing View > Visibility > Hide Hidden Files. To make a photo permanently visible, choose Edit > Visibility > Mark as Visible, which removes the Hidden attribute.
![]() Hidden files display an eye icon when viewed.
Hidden files display an eye icon when viewed.
• Change to match file’s date and time reverts the date and time information to what is embedded in the original image file.
Remember, date and time changes you enter here are only for sorting and organizing your images within the Photo Organizer.
• Shift to new starting date and time appears only when multiple files are selected, and maintains their relative time information, offset from what you enter.
• Shift by set number of hours (time zone adjust) adjusts the time of selected images forward or backward by the number of hours you specify.
A preference enables you to open the Adjust Date and Time dialog by simply clicking on the date in the Media Browser. From the Edit menu, choose Preferences > General, and then select the Adjust Date and Time by Clicking on Thumbnail Dates option.
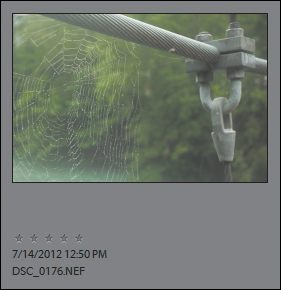
To rate a photo
1. If you have Details enabled in the Media Browser, position your mouse pointer over the gray star icons ![]() .
.
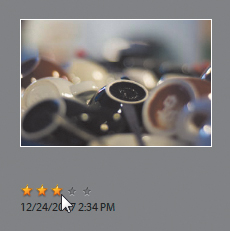
![]() Apply a rating to quickly identify your higher-quality photos.
Apply a rating to quickly identify your higher-quality photos.
Otherwise, click the Tags/Info button in the Task bar to bring up the Information pane.
2. Click to select the rating you wish to apply: One star typically denotes a low-quality photo, while five stars is excellent. (You can choose your own values, of course; this feature provides an easy way to separate good from bad photos, as you’ll see later in “Finding Photos.”)
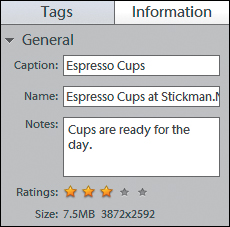
To add a caption to a photo
1. Click to select an image thumbnail.
2. Click the Tags/Info button in the Task bar to view the Information pane.
(You can also choose Edit > Add Caption, or press Ctrl+Shift+T/Command-Shift-T, to bring up the Add Caption dialog. But I despise single-purpose dialogs like that, especially now that the Information pane is available.)
3. In the Caption field, type a caption for your image ![]() . Although captions don’t display with images in the Media Browser, they do appear along with your photos when you share the photos online.
. Although captions don’t display with images in the Media Browser, they do appear along with your photos when you share the photos online.
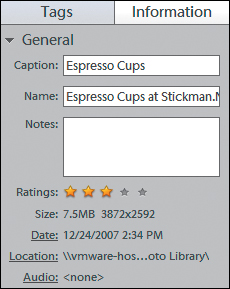
![]() Add a caption in the Information pane.
Add a caption in the Information pane.
You can also add and edit captions in Single Photo View. In Single Photo View, click the Click here to add caption text. The text changes to a text field where you can type a new caption. If you’ve previously entered a caption, click on the text to edit or delete it.
To rename a photo
1. In the Media Browser, click to select an image thumbnail.
2. Click the Tags/Info button in the Task bar to reveal the Information pane.
3. Enter a new name for your image file in the Name field.
To add a note to a photo
1. Select an image thumbnail.
2. Click the Tags/Info button in the Task bar to reveal the Information pane (if it’s not already visible).
3. In the Notes field, enter the text you want to include with your photo ![]() .
.
![]() Notes entered for images are accessible only in the Information pane.
Notes entered for images are accessible only in the Information pane.
To add IPTC information to images
1. To embed IPTC data (metadata for identifying and categorizing photos), first select two or more images in the Media Browser.
2. Click the Tags/Info button to reveal the Information pane.
3. Click the Add IPTC information button that appears ![]() .
.
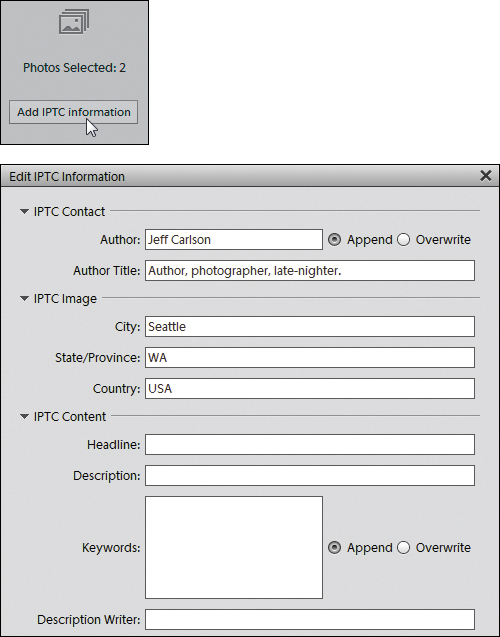
![]() Enter IPTC information to include even more data about the photo.
Enter IPTC information to include even more data about the photo.
4. Enter any information you choose into the Edit IPTC Information dialog, and then click Save.
You can add the same caption to multiple images at the same time. Select a group of images in the Media Browser, and then from the Edit menu choose Add Caption to Selected Items. The caption you enter in the Add Caption to Selected Items dialog is applied to the selected images.
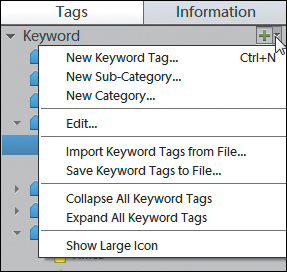
Creating Keyword Tags
The humble little tag serves as the foundation for the Organizer’s sorting and filing system. You can create a tag from scratch or create one based on a set of photos grouped within a folder. Click the Tags/Info button to reveal the panel along the right side of the screen, and then click the Keyword Tags tab.
To create a new keyword tag
1. Click the New button (the plus sign) at the top of the Tags pane ![]() , or press Ctrl+N/Command-N to bring up the Create Keyword Tag dialog.
, or press Ctrl+N/Command-N to bring up the Create Keyword Tag dialog.
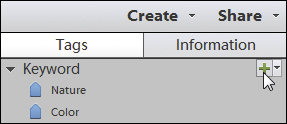
![]() Click the New button at the top of the Tags pane to create a new tag.
Click the New button at the top of the Tags pane to create a new tag.
2. From the Category menu, choose the category or sub-category in which you want to place your new tag ![]() . (I go into more depth about categories a few pages ahead.)
. (I go into more depth about categories a few pages ahead.)
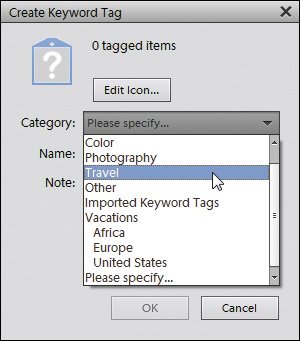
![]() All tags reside in categories. Define a category for your new tag in the Create Keyword Tag dialog.
All tags reside in categories. Define a category for your new tag in the Create Keyword Tag dialog.
3. In the Name text field, enter a name for your tag.
4. In the Note text field, enter information relevant to the photos that will have the tag applied.
5. Click OK to close the dialog.
Your new tag appears in the Tags pane within the category you chose ![]() .
.

![]() Tags appear nested below their categories in the pane.
Tags appear nested below their categories in the pane.
The first photo to which you attach a new tag automatically becomes the icon for that tag. This is an easy and convenient way to assign tag icons, so I’ll ignore the Edit Icon button for now.
To import tags from other images
1. Using the steps outlined earlier, import photos from your hard disk that may already contain keywords (for example, if someone sent you the images or you used another program to assign tags).
2. In the Import Attached Keyword Tags dialog, choose which tags you want to add to your list. Click OK. The tags can be applied to any photos in your library.
Click the Advanced button to access more options such as renaming the tags before they’re imported ![]() .
.
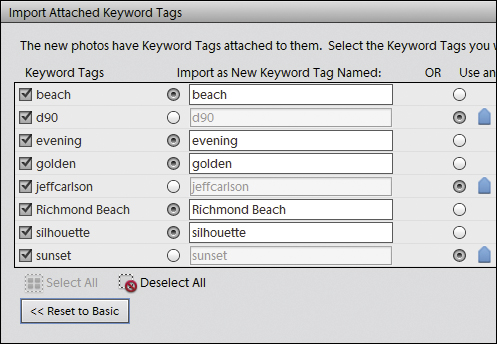
![]() When you import photos that already contain keyword tags, you can opt to add them to the list in the Tags pane.
When you import photos that already contain keyword tags, you can opt to add them to the list in the Tags pane.
To create a tag using the Image Keywords field
1. Select one or more images in your library.
2. Type a keyword in the Add Custom Keywords field ![]() .
.
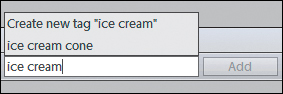
![]() Type a word into the Add Custom Keywords field to create a new tag for it.
Type a word into the Add Custom Keywords field to create a new tag for it.
Better yet, type several keywords, separated by commas, to create and apply them together.
3. Press Enter or click Add. The new tag is created and applied to the selected image(s).
I’m happy to detail the different methods of creating and applying keyword tags in this chapter, but for me, the capability to do it from the Tag selected media field trumps the other methods. It’s quick and promises to make keyword tagging much less of a chore than in the past.
To change a tag’s properties
1. In the Tags pane, select the tag you want to edit.
2. Click the drop-down menu attached to the New button (the plus sign) and choose Edit ![]() .
.
![]() Edit a tag’s properties.
Edit a tag’s properties.
Or
1. In the Tags pane, right-click the tag whose properties you would like to change.
2. From the tag contextual menu, choose Edit.
3. In the Edit Keyword Tag dialog, make the desired changes and click OK.
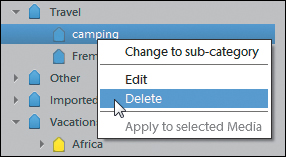
To delete a tag
In the Tags pane, select the tag you want to delete and press the Delete key.
Or
1. In the Tags pane, right-click on the tag you would like to delete.
2. From the tag contextual menu, choose Delete ![]() .
.
![]() Delete a keyword tag you don’t want to use.
Delete a keyword tag you don’t want to use.
3. In the Confirm Keyword Tag Deletion warning box, click OK.
The tag is removed from the Tags pane, from any photos tagged in the Media Browser, and any saved searches that use it.
To merge tags
1. Select tags with similar terms (or other criteria you want to simplify).
2. Right-click on the tags and choose Merge Keyword Tags.
3. In the dialog that appears, choose one tag to keep ![]() ; the others are deleted and the photos get the chosen tag.
; the others are deleted and the photos get the chosen tag.
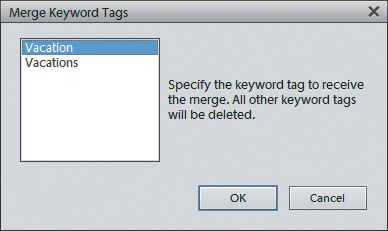
![]() Merge tags to remove duplicate terms.
Merge tags to remove duplicate terms.
Using Keyword Tags to Sort and Identify Photos
Tags operate independent of where photos are located on your computer, which means you can attach a tag to photos in different folders—even on different hard drives—and then use that tag to quickly find and view those photos all at once.
To attach a tag to a single photo
• Drag a tag from the Tags pane onto any photo in the Media Browser ![]() .
.
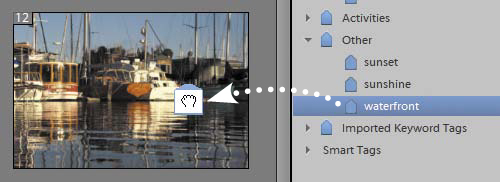
![]() To attach a tag to a photo, drag it from the Tags pane to a thumbnail image in the Media Browser.
To attach a tag to a photo, drag it from the Tags pane to a thumbnail image in the Media Browser.
• Type a term into the Add Custom Keywords field; if the tag already exists, click it from the pop-up list that appears ![]() .
.
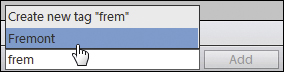
![]() Existing tags appear as you type into the Image Keywords field.
Existing tags appear as you type into the Image Keywords field.
A category icon appears below the photo to indicate that it has been tagged.
To attach a tag to multiple photos
1. In the Media Browser, Ctrl-click/Command-click to select any number of photos.
2. From the Tags pane, drag a tag onto any one of the selected photos ![]() .
.
![]() You can select multiple photos, and then tag them all by dragging a tag icon over just one.
You can select multiple photos, and then tag them all by dragging a tag icon over just one.
A category icon appears below all of the selected photos in the Browser window to indicate that they have been tagged.
Tags normally appear with a generic blue icon, but they can also display a photo thumbnail for its tag icon ![]() . With a tag selected, click the the Add (+) drop-down menu, and choose Show Large Icon.
. With a tag selected, click the the Add (+) drop-down menu, and choose Show Large Icon.
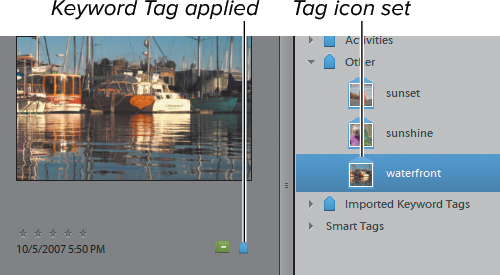
![]() When you use a tag for the first time, the photo you attach it to is used for the tag’s icon.
When you use a tag for the first time, the photo you attach it to is used for the tag’s icon.
To view a set of tagged photos
In the Tags pane, position your mouse pointer over a tag and click the angle-bracket (>) button that appears ![]() .
.
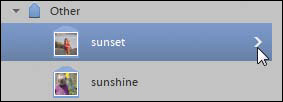
![]() When the binoculars icon is visible next to a tag in the Tags pane, only that tag’s photos appear in the Media Browser.
When the binoculars icon is visible next to a tag in the Tags pane, only that tag’s photos appear in the Media Browser.
That activates the Organizer’s Advanced search mode with the keyword selected and results displayed ![]() . You can click other keywords to expand the selection if you choose. (See “Finding Photos” later in this chapter for more details.)
. You can click other keywords to expand the selection if you choose. (See “Finding Photos” later in this chapter for more details.)
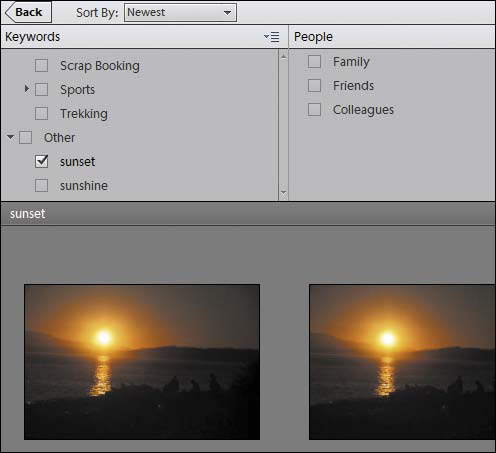
![]() When a tag is selected in the Advanced search pane, only that tag’s photos appear.
When a tag is selected in the Advanced search pane, only that tag’s photos appear.
To view all photos again, click the Back button, or click the X button in the Advanced search pane to collapse the search criteria.
To remove a tag from a photo
Select a photo thumbnail in the Media Browser, and then do one of the following:
• Right-click a photo thumbnail; then, from the contextual menu, choose Remove Keyword Tag > (name of tag).
• Right-click on the category icon below the photo thumbnail and select Remove (name of tag) Keyword Tag from the contextual menu ![]() .
.
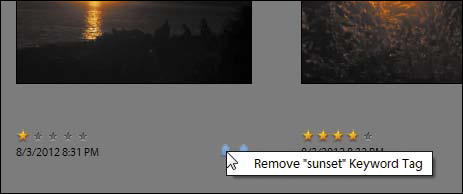
![]() Remove a tag from a photo by right-clicking on the category icon below the thumbnail in the Media Browser.
Remove a tag from a photo by right-clicking on the category icon below the thumbnail in the Media Browser.
If you’re viewing photos by import batch (choose Import Batch from the Sort By drop-down menu), click the batch’s heading to select all of its photos, then apply tags to them all at once.
To change a tag’s icon
1. In the Tags pane, right-click on the tag you would like to change.
2. From the tag drop-down menu, choose Edit.
3. In the Edit Keyword Tag dialog, click the Edit Icon button.
To assign a new icon image in the Edit Tag Icon dialog, you can select from any of the photos to which the tag has been applied, or you can import a completely new photo.
4. To select a different tagged photo, click the Find button ![]() .
.
![]() Click the Find button in the Edit Tag Icon dialog to browse for a new photo to use as the source for your tag icon.
Click the Find button in the Edit Tag Icon dialog to browse for a new photo to use as the source for your tag icon.
5. In the Select Icon for (name of tag) Keyword Tag dialog, click to select a photo thumbnail and click OK ![]() .
.
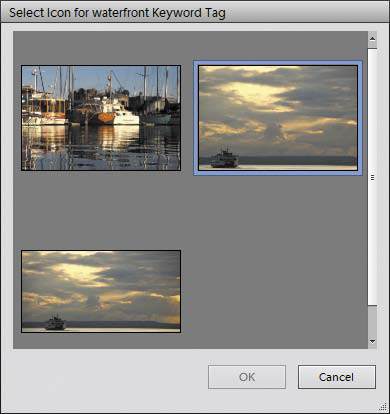
![]() The Select Icon dialog.
The Select Icon dialog.
The new image appears in the preview window of the Edit Tag Icon dialog.
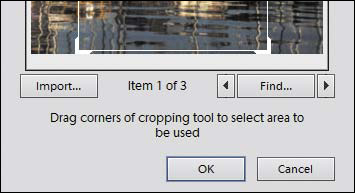
6. To crop the area of the photo that will appear on the tag icon, click and drag any of the four cropping handles in the image preview ![]() .
.
![]() Resize the selection rectangle in the Edit Tag Icon dialog to choose the visible area of the icon.
Resize the selection rectangle in the Edit Tag Icon dialog to choose the visible area of the icon.
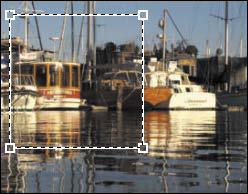
7. To select a different cropped area of the photo to appear on the tag icon, click inside the crop box and drag it in the preview window ![]() .
.
![]() Drag the selection rectangle to choose a different area of a photo to use for the tag icon.
Drag the selection rectangle to choose a different area of a photo to use for the tag icon.
8. When you’re satisfied with the look of your icon, click OK to close the Edit Tag Icon dialog, and then click OK again to close the Edit Keyword Tag dialog. The new icon appears on the tag in the Tags pane.
If you don’t want to use any of your tagged photos for a particular keyword icon, click the Import button in the Edit Tag Icon dialog to browse your computer and select a different image.
Using Categories to Organize Tagged Photos
All tags must reside in either a category or sub-category. The Organizer starts you off with a few ready-made categories, but you can create as many new categories and subcategories as you want. Tags can be easily moved from one category to another and also converted to a sub-category that contains its own set of tags.
To create a new category
1. Click the drop-down menu accompanying the New button at the top of the Tags pane ![]() .
.
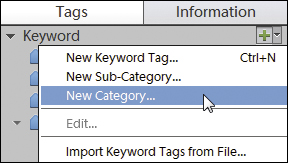
![]() Use the New menu in the Tags pane to open the Create Category dialog.
Use the New menu in the Tags pane to open the Create Category dialog.
2. Choose New Category to open the Create Category dialog.
3. In the Create Category dialog, enter a name in the Category Name text field.
4. In the Category Icon area of the dialog, optionally click to select a category icon that appears when icons are visible ![]() .
.
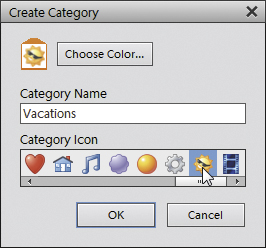
![]() The Create Category dialog includes a variety of icons you can use to represent your new category.
The Create Category dialog includes a variety of icons you can use to represent your new category.
5. Also optional, but if you’d like to color-code your categories, click the Choose Color button to open the Color Picker. Colors are applied to sub-category and tag icons within the category.
6. Click to select the color and then click OK ![]() .
.
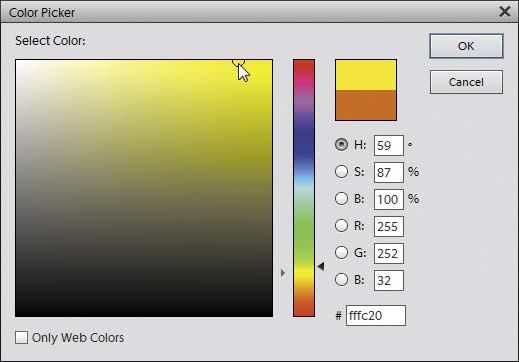
![]() The color you choose in the Color Picker appears on the icons for tags in your new category.
The color you choose in the Color Picker appears on the icons for tags in your new category.
7. If you’re satisfied with your other category settings, click OK to close the dialog. Your new category appears in the panel.
To create a new sub-category
1. From the New drop-down menu, choose New Sub-Category to open the Create Sub-Category dialog.
2. In the Create Sub-Category dialog, enter a name in the Sub-Category Name text field.
3. From the Parent Category or Sub-Category drop-down menu, choose a location in which to place your new sub-category ![]() .
.
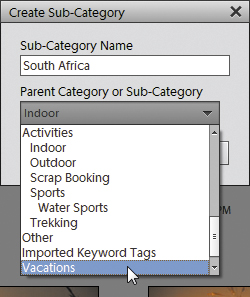
![]() Sub-categories can be nested within categories or other sub-categories.
Sub-categories can be nested within categories or other sub-categories.
4. Click OK to close the dialog.
5. Your new sub-category appears in the Tags pane, within the category or sub-category you selected.
To convert a tag to a sub-category
1. In the Tags pane, right-click on the tag you want to convert.
2. From the tag contextual menu, choose Change to sub-category ![]() . The tag icon changes to a sub-category icon.
. The tag icon changes to a sub-category icon.
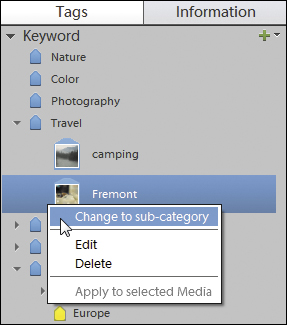
![]() Convert a tag to a sub-category from the tag contextual menu in the Tags pane.
Convert a tag to a sub-category from the tag contextual menu in the Tags pane.
If you decide you’d like to convert a sub-category (that was formerly a tag) back to a tag, go to the Sub-Category contextual menu and choose the Change sub-category to a tag option. All the tag’s properties, including its icon, are retained.
To assign a tag to a new category or sub-category
1. In the Tags pane, right-click the tag you want to place and choose Edit.
2. From the Category menu in the Edit Keyword Tag dialog, choose the category or sub-category in which you want to place the tag ![]() .
.
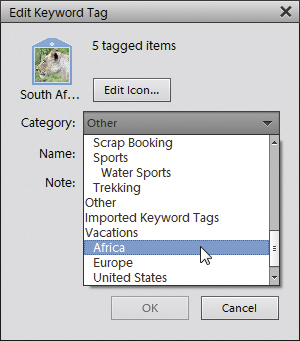
![]() You can easily move a tag from one category to another using the Edit Keyword Tag dialog.
You can easily move a tag from one category to another using the Edit Keyword Tag dialog.
3. Click OK to close the Edit Keyword Tag dialog. In the Tags pane, the tag appears within the category and sub-category you defined ![]() .
.
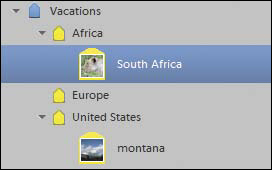
![]() Changes you make to a tag’s placement in the Edit Keyword Tag dialog appear instantly in the Tags pane.
Changes you make to a tag’s placement in the Edit Keyword Tag dialog appear instantly in the Tags pane.
If you’ve already applied the tag to a photo or photos in the Media Browser, the category icons below the photo thumbnails will automatically update to display the icon of the new category.
You can also move tags into new categories or sub-categories right in the Tags pane. With both the tag and the category or sub-category visible, simply click to select a tag and then drag it onto a category or sub-category icon. The tag will nest beneath the category or sub-category you choose. The disadvantage of this method (as compared to the one outlined in the procedure) is that you must be able to see the tag and category or sub-category in the Tags pane. Since the Tags pane can get filled with categories quickly, it may require that you do quite a bit of scrolling and searching, whereas the Category menu in the Edit Keyword Tag dialog gives you a list of every category and sub-category in one convenient place.
To view photos belonging to a category or sub-category
In the Tags pane, position your mouse pointer over a category or sub-category and click the angle-bracket (>) button that appears to activate the Advanced search mode. All tags in that category appear.
To view all photos again, click the Back button, or click the X button in the Advanced search pane to collapse the search criteria.
To delete a category or sub-category
In the Tags pane, click a category or sub-category, and then right-click and select Delete ![]() .
.
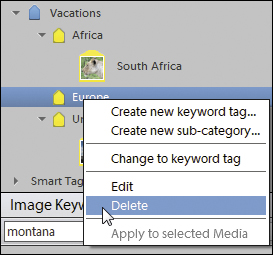
![]() Delete a category or tag from the Tags pane by clicking the Delete button.
Delete a category or tag from the Tags pane by clicking the Delete button.
However, before you delete a category or sub-category, bear in mind that you will also delete all related sub-categories and tags and will remove those tags from all tagged photos. In some circumstances, a better alternative may be to change a category or sub-category’s properties to better match the content or theme of related tagged photos.
Auto-Analyzing Photos
The Organizer’s Auto-Analyzer feature scans your library and applies Smart Tags for characteristics such as High Contrast, Blurred, and more. You can then locate images matching those criteria using keyword tags.
To analyze selected photos
1. Select one or more photos in the library.
2. Choose File > Run Auto-Analyzer, or right-click on a photo and choose Run Auto-Analyzer from the contextual menu.
3. After the Organizer analyzes the files, click OK.
The photos gain a Smart Tag icon; hold your pointer over the icon or right-click to reveal which tags were applied ![]() .
.
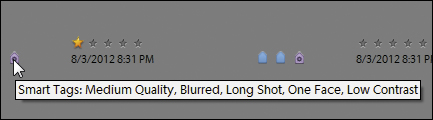
![]() The Organizer can apply tags based on its analysis of an image.
The Organizer can apply tags based on its analysis of an image.
To analyze photos automatically
1. Go to Edit > Preferences > Media-Analysis to view controls for the feature.
2. Enable the Analyze Media for Smart Tags Automatically option ![]() .
.

![]() Choose which attributes are considered in the image analysis.
Choose which attributes are considered in the image analysis.
You can also choose which filters to apply; disabling the Brightness and Contrast filter, for example, won’t point out pictures that are too dark. Click OK.
Hover over the Auto-Analyzer status icon to check or pause the analysis ![]() .
.
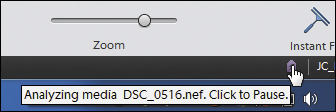
![]() Auto-Analyze can take a while, but you can check its status.
Auto-Analyze can take a while, but you can check its status.
If you’ve installed only Photoshop Elements, just three filters are available in the preferences: Blur, Brightness & Contrast, and Face. With Premiere Elements also installed, additional filters appear.
Identifying and Locating People
The People feature offers an easy way to sort, identify, and tag photos based on the people in them.
Identifying people
The Organizer does a good job finding areas of photos that resemble faces. With your help, it can also determine who those people are.
To identify one person
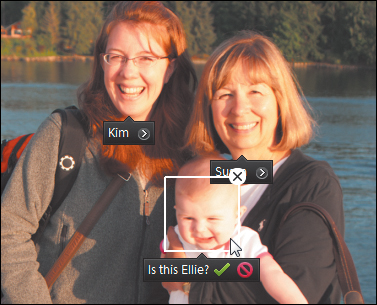
1. Double-click a photo containing a person to view it full-size.
2. When the Organizer displays a “Who is this?” field, click it and do one of the following:
• Type a name ![]() . If it’s a new person, a new keyword tag is created under the People category and applied to the photo.
. If it’s a new person, a new keyword tag is created under the People category and applied to the photo.

![]() When the Organizer asks, click and enter a name in the “Who is this?” field.
When the Organizer asks, click and enter a name in the “Who is this?” field.
• Click the name of an existing tag that appears below the field.
• The Organizer will start to make suggestions as the database of faces grows ![]() . Click the green check mark button if the suggestion is correct; click the red button to enter a different name.
. Click the green check mark button if the suggestion is correct; click the red button to enter a different name.
![]() As the database of recognized photos builds, the Organizer attempts matches.
As the database of recognized photos builds, the Organizer attempts matches.
• If the Organizer suggests an area that isn’t a face, click the Close button (X) to dismiss it ![]() .
.

![]() Well, no one ever said computers were perfect.
Well, no one ever said computers were perfect.
3. If a person is in the picture but wasn’t identified, click the Mark Face button in the Task bar, draw a box around their face, and then enter the person’s name.
To identify several people
1. Click the People button at the top of the screen.
2. In the Task bar, click the Add People button. The Organizer scans your library for photos it has previously identified as containing people.
3. In the Label People dialog, type the names of people who are identified ![]() .
.

![]() The Organizer find faces but needs your help identifying them.
The Organizer find faces but needs your help identifying them.
4. In the next dialog, the Organizer attempts to match other photos with the one you identified. If a face doesn’t match, click the drop-down menu that appears when you position the mouse pointer over the thumbnail and choose Not [name] ![]() . You don’t need to identify thumbnails that are positive matches.
. You don’t need to identify thumbnails that are positive matches.

![]() Exclude photos that don’t match the person.
Exclude photos that don’t match the person.
If it’s helpful, choose Show in Full Size View to see the person in context.
5. Click the Save button to view more potential matches.
6. When you’re finished, click the Cancel button.
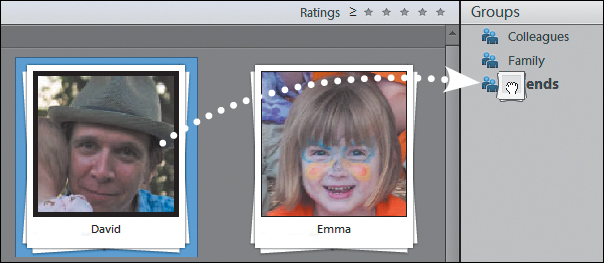
To assign people to groups
1. In the People view, click the Group toggle switch to reveal the Groups pane.
2. Three suggested groups already exist (Colleagues, Family, and Friends), but if you want to create your own, click the New (+) button. In the Add Group dialog, enter a name for the group and click OK.
3. Drag one or more people to a group name ![]() .
.
![]() To better locate people, add them to groups.
To better locate people, add them to groups.
In the Label People dialog, speed through the selections by pressing Tab to advance to the next person.
The Organizer can bring in some extra help identifying people, if you want. In the Label People dialog, click the Download/Update Facebook Friends’ List to Name People button. After you authorize Elements to use information from Facebook, people from your Friends’ list show up as options when you type a person’s name.
To remove people
1. Switch to the People view.
2. Select a person you wish to remove from the People feature. This action disassociates a name from the photos it’s been tagged with; the images themselves are not deleted.
3. Click the Remove button in the Task bar.
4. Confirm that you want to remove the person by clicking Yes in the dialog that appears.
Locating people
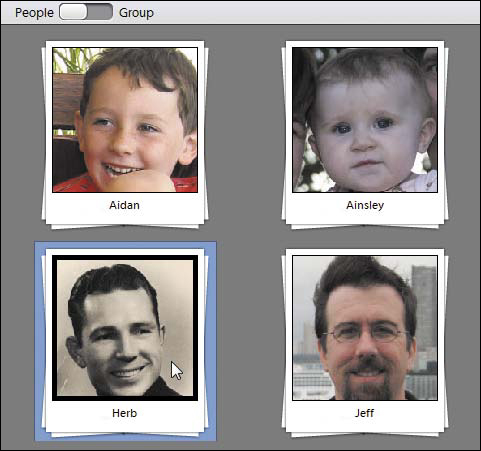
Once the Organizer identifies people, use the People view to quickly locate photos in which they appear.
To locate people
1. Switch to the People view.
2. Double-click a person’s stack to view the photos tagged with their name ![]() .
.
![]() Find people easily in the People view.
Find people easily in the People view.
3. To toggle between thumbnails of the faces and full images, click the Faces/Photos switch ![]() .
.
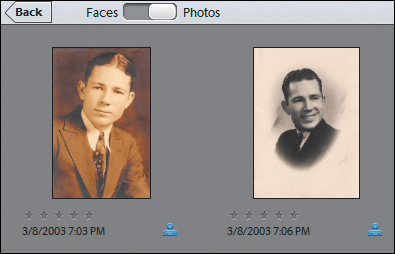
![]() Sometimes it’s not helpful to view just a closeup of someone’s face. Switch to the Photos view to see the entire picture.
Sometimes it’s not helpful to view just a closeup of someone’s face. Switch to the Photos view to see the entire picture.
For a quick preview of which photos are marked with each person, move your mouse pointer horizontally across their thumbnail.
Is it time to show off photos of kids or friends? Select one or more names in the People view, click the Slide Show button, sit back, and enjoy.
Using Albums to Arrange and Group Photos
Although photos have gone digital, we don’t have to discard our analog thinking. Just as you store Polaroids and prints in a photo album, you can collect your digital photos in Elements albums.
An album can be composed of photos from several different tags or categories. Plus, the photos within albums can be sorted and reordered, independent of their date or folder structure.
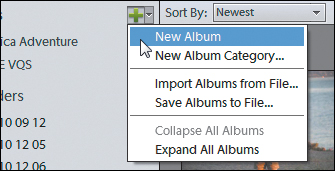
To create a new album
1. Click the New button at the top of the Albums list.
2. From the New drop-down menu, choose New Album ![]() . The Add New Album pane appears along the right side of the Media Browser
. The Add New Album pane appears along the right side of the Media Browser ![]() .
.
![]() Use the New menu in the Albums list to open the Create Album dialog.
Use the New menu in the Albums list to open the Create Album dialog.
![]() Give the album a descriptive name.
Give the album a descriptive name.
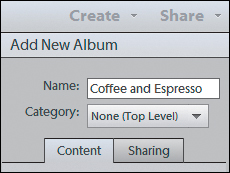
3. Leave the Category menu set to None (Top Level). You’ll learn more about album categories later in this section.
4. In the Name field, enter a name for your album.
5. Drag the photos you want to add to the album to the Items field ![]() .
.
![]() Populate the album by dragging photos to it or by selecting them and clicking the Add button.
Populate the album by dragging photos to it or by selecting them and clicking the Add button.
6. Click OK to close the pane. Your new album appears in the Albums pane at the left side of the Media Browser. By default, albums are sorted in alphabetical order.
To create an album from a folder
1. Right-click a folder in the Folders List.
2. Choose Create an Instant Album ![]() . The album is created with the name of the folder.
. The album is created with the name of the folder.
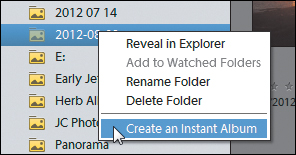
![]() Every folder group in the Media Browser has its own Create an Instant Album button.
Every folder group in the Media Browser has its own Create an Instant Album button.
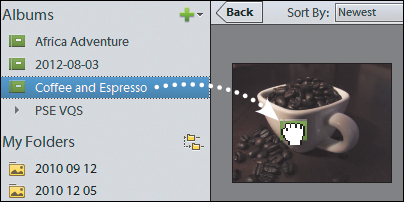
To view a photo album
Click an album name in the Albums list. The Media Browser displays only the photos in that album ![]() .
.
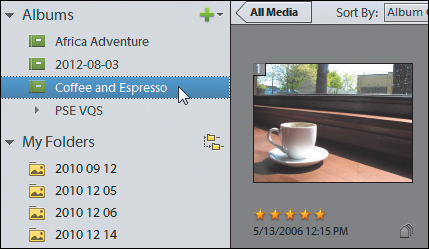
![]() Click an album name to view only its photos.
Click an album name to view only its photos.
To view your entire catalog, click the Show All button.
To add more photos to an album
Do one of the following:
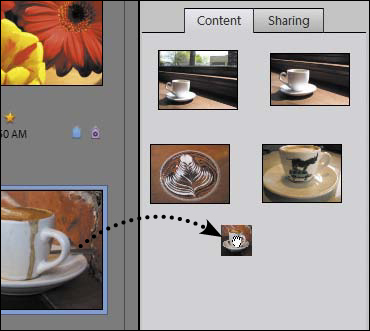
• From the Media Browser, drag one or more photos onto the appropriate album in the Albums list.
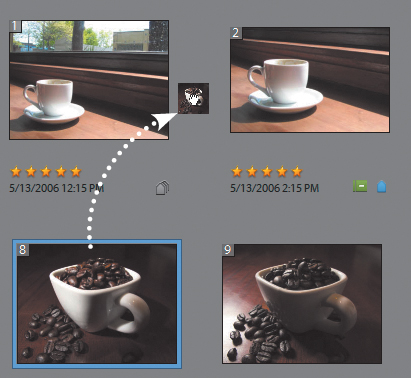
• From the Albums list, drag an album onto a photo thumbnail in the Media Browser ![]() . An album icon appears below the photo in the Browser window to indicate it is part of an album.
. An album icon appears below the photo in the Browser window to indicate it is part of an album.
![]() One way to populate an album is to drag its icon from the Albums list to one or more photos.
One way to populate an album is to drag its icon from the Albums list to one or more photos.
• Select one or more photos, and choose Add Selected Media to Album from the contextual menu.
Or
1. In the Edit Album pane, select an album and choose Edit from the contextual menu.
2. Drag photos to the Content area of the pane.
3. Click OK.
To rename an album
1. In the Albums list, select an album and choose Rename from the contextual menu.
2. Enter a new name in the dialog that appears and click OK.
Or
1. In the Albums list, choose Edit from the contextual menu.
2. Change the text in the Name field and click OK.
To arrange photos within an album
1. In the Albums list, click an album name.
2. In the Media Browser, click to select a photo, and then drag it to a new location ![]() .
.
![]() To reorder photos within an album, drag a thumbnail to a new location in the Media Browser. The numbers on the thumbnails indicate their order.
To reorder photos within an album, drag a thumbnail to a new location in the Media Browser. The numbers on the thumbnails indicate their order.
Or
1. In the Albums list, select an album choose Edit from the contextual menu.
2. Drag to rearrange the photos in the Edit Album pane and click OK.
To remove photos from an album
With an album displayed in the Media Browser, select a photo thumbnail and then do one of the following:
• Right-click on the album icon below the photo thumbnail and select Remove from (name of album) Album ![]() .
.

![]() Right-click a photo’s album icon to remove it from the album.
Right-click a photo’s album icon to remove it from the album.
• Right-click inside a photo thumbnail, and then choose Remove from Album > (name of album).
Or
1. In the Albums list, select an album and click the Edit icon.
2. Select one or more photos and click the Remove (–) button.
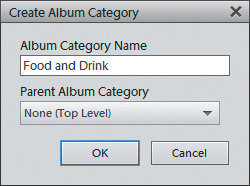
To create an album category
1. Click the New button at the top of the Albums list and choose New Album Category to open the Create Album Category dialog.
2. In the Album Category Name text field, enter a name ![]() .
.
![]() The Create Album Category dialog.
The Create Album Category dialog.
3. Leave the Parent Album Category option set to None (Top Level).
4. Click OK to close the Create Album Category dialog. The category appears at the bottom of the list.
To add an album to a category
In the Albums list, drag an album icon onto the name of the album category ![]() .
.
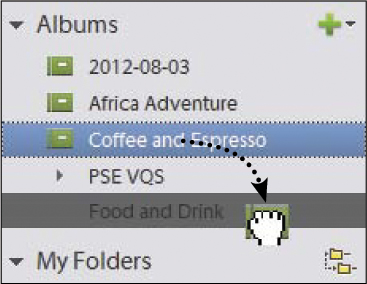
![]() Once you’ve created an album category, you can add albums to it from the Albums list.
Once you’ve created an album category, you can add albums to it from the Albums list.
Or
1. In the Albums list, right-click the album you want to include.
2. From the album contextual menu, choose Edit.
3. In the Edit Album pane, click the Category drop-down manu and choose an existing category.
4. Click OK.
To delete an album
1. In the Albums list, right-click the album you would like to delete.
2. From the contextual menu, choose Delete.
3. In the Confirm Album Deletion warning box, click OK. The album is removed from the Albums list, but the images within the album remain untouched.
It’s possible to group one album category within another when creating a category. If you’ve already created an album category, its name appears in the Parent Album Category menu of the Create Album Category dialog. You then have the option of nesting your new album category within the existing one.
You can’t drag an album out of an album category to take it back to the top level. Instead, click the Edit Album button, and then choose None (Top Level) from the Album Category drop-down menu.
Using Events
A photo by itself is a momentary slice of time, but a collection of photos cover many spans of time. Unless you’re the type to capture just a single shot every few hours, your images are probably grouped according to events—a birthday party, an afternoon cruise, or even just breakfast.
Rather than scroll through all thumbnails, you may find it easier to locate images based on events you create, or events the Organizer suggests based on the photos’ time information (called Smart Events).
Create a new event
The Organizer initially opts to let you create your own custom events. Did you spend two weeks on vacation? That’s an ideal event. Here’s how to create it.
To create a new event
1. In the Events view, click the Add Event button in the Task bar. The right pane of the Media Browser becomes the Add New Event pane.
Or, in the Media view, select a range of photos and click the Add Event button.
2. Type a title for the event in the Name field.
3. Drag photos for the event from the Media Browser to the pane ![]() .
.
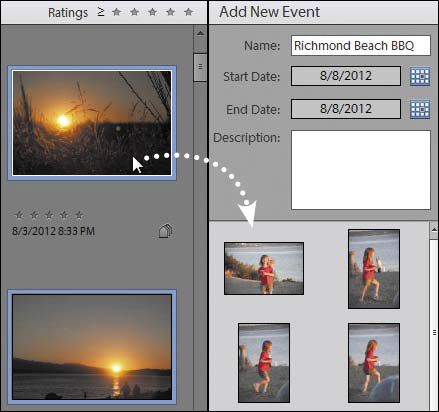
![]() Drag photos to the Add New Event pane to populate the event you just created.
Drag photos to the Add New Event pane to populate the event you just created.
4. Click Done. The event appears as a new stack ![]() .
.

![]() The new event appears in the Events view.
The new event appears in the Events view.
When you create an event from the Media view, the Organizer updates the start and end dates automatically. If you start from the Events view, those fields show only the current date—you need to update them manually by clicking the calendar buttons to the right of each field.
To view an event’s photos
• Double-click an event.
• Click the Calendar button in the Task bar (if the Calendar isn’t visible) and then choose a year, month, and day ![]() .
.
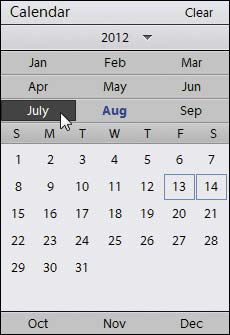
![]() Months and dates that contain photos appear highlighted.
Months and dates that contain photos appear highlighted.
To change an event’s cover image
1. Double-click an event to view its photos. Or, better yet, move the mouse pointer over the event to preview its contents.
2. When you find the photo you want to use as the thumbnail, right-click and choose Set As Cover ![]() .
.
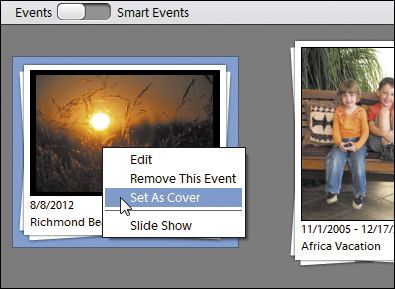
![]() Choose which photo appears as the cover.
Choose which photo appears as the cover.
Use Smart Events
The advantage of creating your own events is the ability to specify any time range you like. But I find that’s sometimes too much work—let the computer figure it out instead. Click the Events toggle to switch it to Smart Events, and the Organizer displays photos in stacks based on the date they were captured ![]() .
.
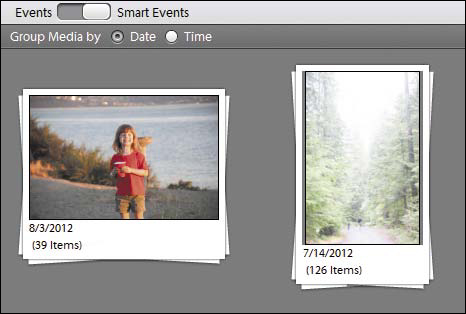
![]() Smart Events are grouped by date.
Smart Events are grouped by date.
There’s also a more clever method. Change the Group Media By option from Date to Time, and use the slider to view fewer events (move to the left) or more events (move to the right) ![]() .
.
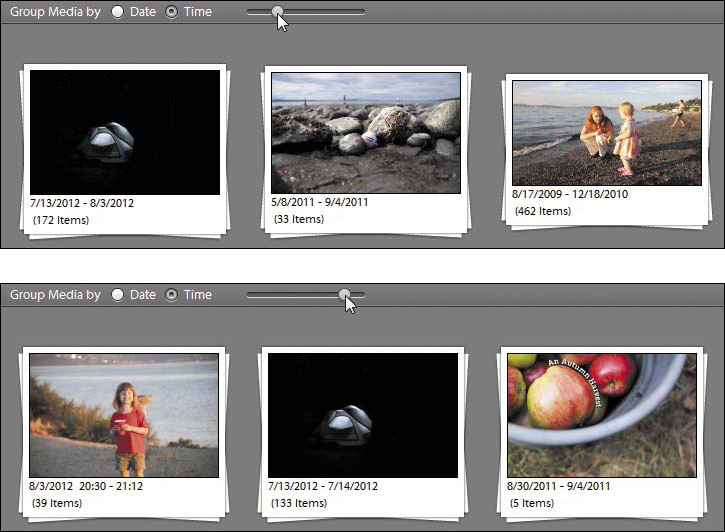
![]() The Time slider lets you view fewer (top) or more (bottom) events; note the dates for each event.
The Time slider lets you view fewer (top) or more (bottom) events; note the dates for each event.
Clicking an album, folder, or ratings in the Events view narrows the visible matches to events that include only those criteria.
Smart Events appear as dates, but you can give them custom names, too. Select an event, click the Name Event(s) button in the Task bar, and enter a name. The name doesn’t appear in the Events view, but will come up when you perform a search for the text.
Reviewing Photos Full Screen
When you’re looking over a set of photos, you want to see the photos, not everything else around them. The full-screen reviewing option lets you see just your images, with a minimal set of controls for ranking and sorting, and even for applying basic edits.
To review photos full screen
1. Choose View > Full Screen, or press Ctrl+F11/Command-F11. If you have a photo selected, it fills the screen; if not, the first item in your library appears ![]() .
.
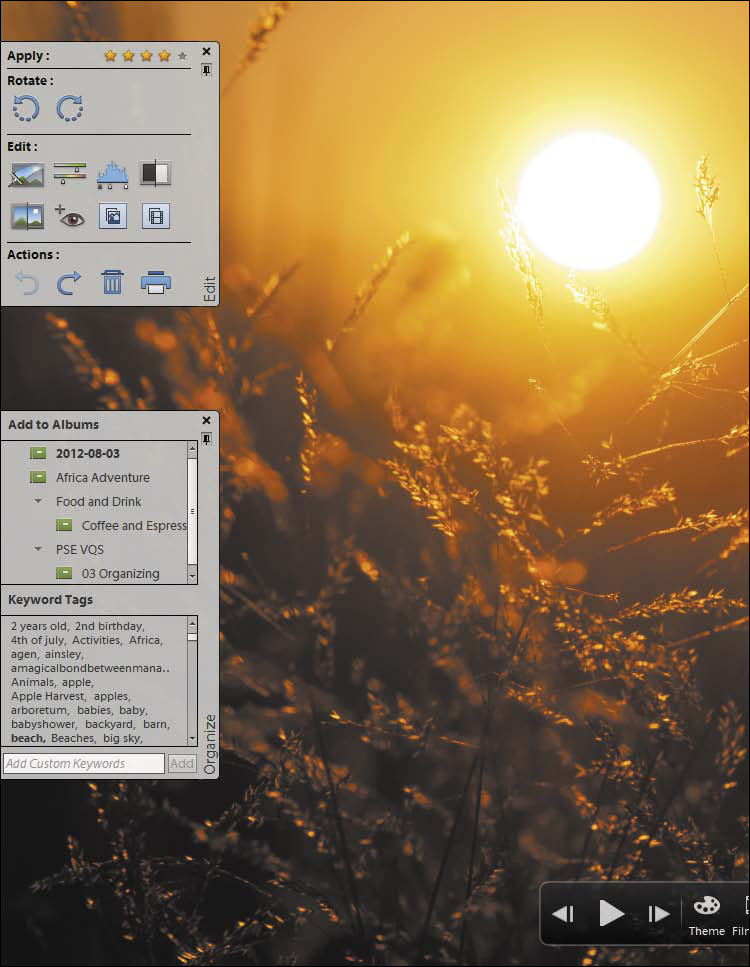
![]() The full-screen review includes panels that automatically hide when not being used.
The full-screen review includes panels that automatically hide when not being used.
2. Use the navigation controls at the bottom of the screen to switch between files, play a slideshow, or hide or show the Quick Organize and Quick Edit panels ![]() .
.
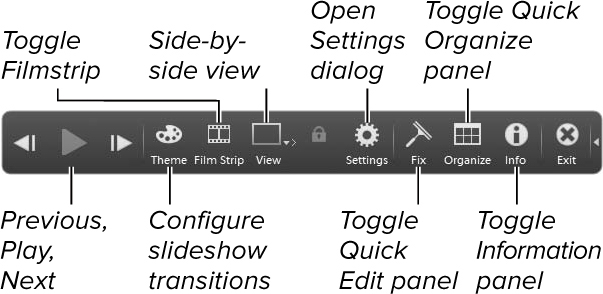
![]() The full-screen control bar.
The full-screen control bar.
3. Use the Quick Organize panel to apply keyword tags and create new tags: click tag names in the Keyword Tags field to apply them.
You can also use the Quick Edit panel to make basic adjustments if you’re in a hurry.
4. Press Esc or click the Exit button to leave full-screen mode when you’re finished reviewing.
If you apply a QuickEdit to a RAW image, you’re asked to save the edited version in a different file format, such as JPEG.
Click the tiny pushpin icon on the panels to toggle between remaining visible and automatically retracting to the edge of the screen.
To sort and rate your photos quickly, forget the panels and just type the keys 1-5 to apply ratings.
Finding Photos
In addition to locating photos using keyword tags and albums, the Organizer offers a host of other options for finding and viewing photos in your catalog. I’ll touch on just a few of the more popular methods here for locating photos by their embedded date information. For example, the text search capability takes advantage of the keyword tags you applied earlier.
To find photos using a text search
• Type a term in the Search field. The Media Browser searches the photos’ metadata and displays matches (including keywords) as you type ![]() .
.
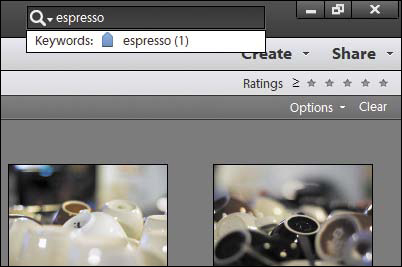
![]() Type a word in the Search field to view photos that include that term.
Type a word in the Search field to view photos that include that term.
• The Organizer is smart enough to understand the operators AND, OR, and NOT, which allow you to quickly narrow your search ![]() .
.
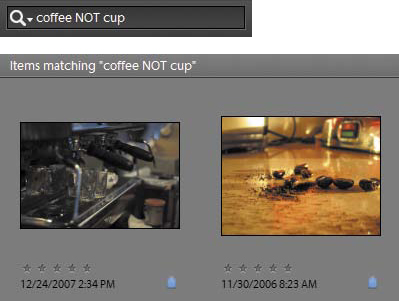
![]() You can omit terms by specifying NOT in the Search field.
You can omit terms by specifying NOT in the Search field.
• For more specific searching, enter any of the following search tags into the field. For example, typing make:canon (note the lack of a space after the colon) finds all photos in my library shot using a Canon camera. You can also group tags to narrow the results ![]() .
.
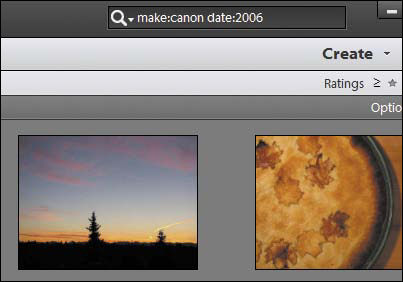
![]() Here I’ve used two terms to define a more specific search (photos shot with a Canon camera sometime in 2006).
Here I’ve used two terms to define a more specific search (photos shot with a Canon camera sometime in 2006).
• tag:
• filename:
• caption:
• make:
• model:
• author:
• notes:
• date:##/## (month/day, depending on date preferences in Organizer)
• date:#### (year)
• date:(today, yesterday, lastweek, thisyear, or lastyear)
To find photos using Advanced Search
1. Click the Search field’s drop-down menu and choose Advanced Search ![]() , or choose Find > Advanced Search.
, or choose Find > Advanced Search.
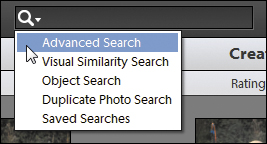
![]() Access the Advanced Search pane from the Search field.
Access the Advanced Search pane from the Search field.
If you’re viewing the Tags pane, you can also click the search button (>) that appears to the right of a tag when your mouse pointer is over it.
2. In the Advanced Search pane that opens above the Media Browser, select specific keywords, people, places, and events to narrow the search results ![]() .
.
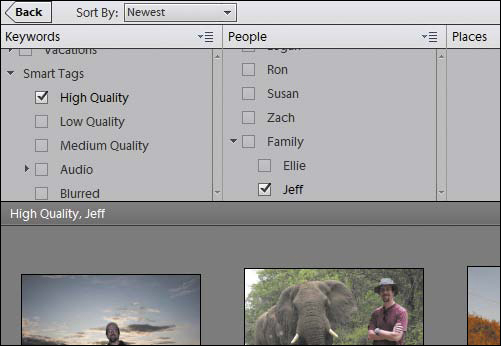
![]() Specify multiple criteria to locate photos.
Specify multiple criteria to locate photos.
3. If the results don’t pull up what you were expecting, click the Options drop-down menu and choose Show close match results ![]() .
.
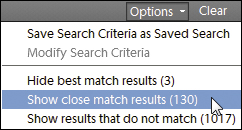
![]() It’s okay to be close when searching.
It’s okay to be close when searching.
4. To hide the pane temporarily, click the collapse button (^) ![]() .
.
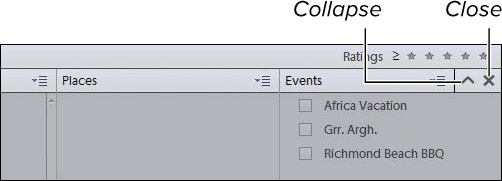
![]() The Advanced Search pane’s minimalist collapse and close buttons.
The Advanced Search pane’s minimalist collapse and close buttons.
You can also click the Clear button above the results to reset the Advanced Search choices and start fresh.
5. Click the close button (X) to exit the Advanced Search pane.
Advanced searches are inclusive, meaning the Organizer looks for items that contain each item you select (an AND search). You can also exclude items, as in the text example on the previous page: Right-click a criterion, such as a tag, and choose Exclude. That returns results that specifically do not include the tag.
To find photos by details (metadata)
1. Choose Find > By Details (Metadata).
2. In the Search Criteria section of the dialog, choose an attribute from the first drop-down menu and specify details (such as “Camera Make Contains canon”).
3. Click the Add button (+) to add more criteria (such as Capture Date) ![]() . Repeat this step until you’ve added all the attributes you want.
. Repeat this step until you’ve added all the attributes you want.
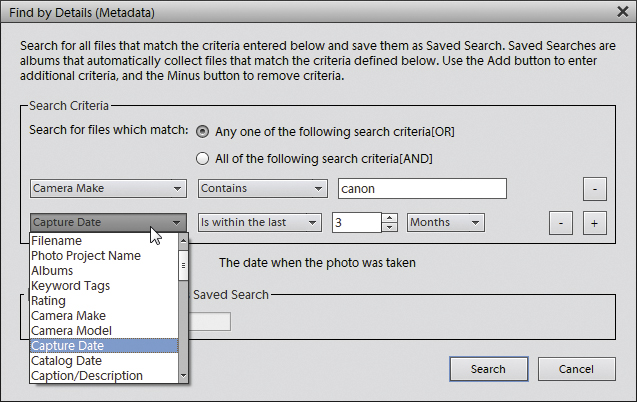
![]() Find files using more specific metadata.
Find files using more specific metadata.
4. Using the “Search for files which match” buttons, choose whether results should include any or all of the criteria.
5. Click Search to display results.
To find photos using the timeline
1. If the timeline isn’t visible, choose Window > Timeline (Ctrl+L/Command-L).
2. In the timeline, click on a bar that corresponds to a specific month and year ![]() . The Media Browser automatically scrolls to display the photos for the month you selected.
. The Media Browser automatically scrolls to display the photos for the month you selected.
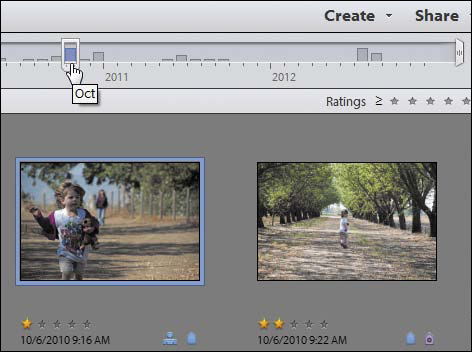
![]() Bars (month markers) in the timeline represent sets of images shot or acquired in specific months. Click a timeline marker to view its photos.
Bars (month markers) in the timeline represent sets of images shot or acquired in specific months. Click a timeline marker to view its photos.
To display photos within a date range
1. From the Find menu, choose Set Date Range, or press Ctrl+Alt+F/Command-Option-F.
2. In the Set Date Range dialog, use the text fields and drop-down menus to enter your dates.
3. The timeline highlights just the range of dates you selected ![]() .
.
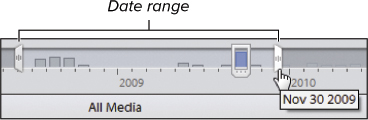
![]() After you set a date range, only those photos that fall within the specified range are visible.
After you set a date range, only those photos that fall within the specified range are visible.
From the Find menu, you can search photos by a number of different criteria. Some that you’ll probably use most often are by caption or note; by file name; by history (imported on date, and printed on date, among others); and by media type (photos, video, audio, and creations). Just choose an option and then fill in its dialog (when applicable) to refine your search.
Finding photos using visual information
A text search doesn’t help if your photos don’t include any keyword tags or file names that point to their contents. When you want to locate a photo that looks a lot like another one—whether the similiarity is in color scheme or objects that appear—turn to a trio of Organizer features.
To find visually similar photos
1. Select a photo that you want to use as a starting point.
2. Choose Find > By Visual Searches > Visually similar photos and videos. Or, click the drop-down menu in the Search field and choose Visual Similarity Search.
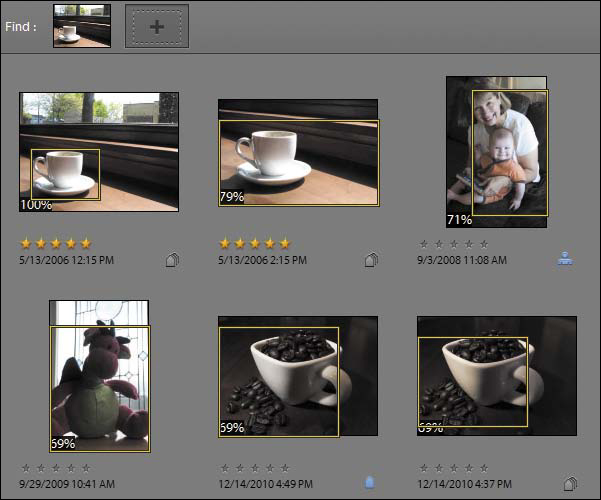
The Media Browser displays photos that are like the one you selected, with a percentage badge indicating how similar it thinks the photo is ![]() .
.
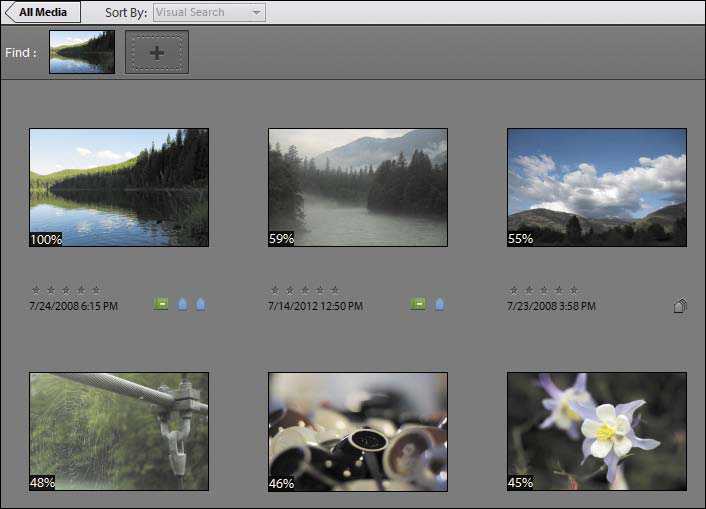
![]() Visual search brings up related photos.
Visual search brings up related photos.
3. Drag the Refine Search slider to display more photos that match the original in terms of color or shape ![]() .
.
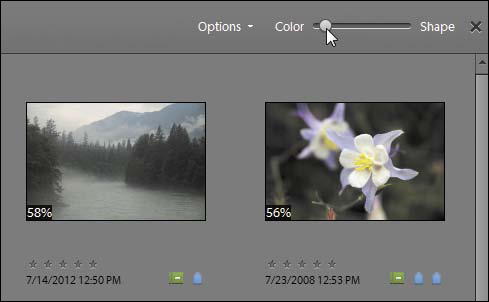
![]() Moving the slider toward Color locates photos with similar colors to the reference image.
Moving the slider toward Color locates photos with similar colors to the reference image.
4. Another way to refine the search is to add more photos for the Organizer to compare: Drag an image to the placeholder that appears next to the first photo ![]() .
.
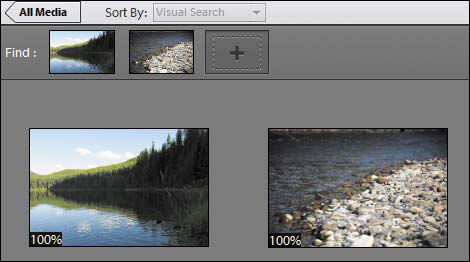
![]() Add photos to the Find bar to bring up more visually similar results.
Add photos to the Find bar to bring up more visually similar results.
You can remove a photo from the search criteria by double-clicking it in the Find bar. (Or, right-click it and choose Remove from search.)
You don’t need to select a photo first. You can also start by choosing Visual Similarity Search from the Search drop-down menu and then add a photo to the Find bar.
To find similar objects in photos
1. Select a photo that contains an object you want to locate.
2. Choose Find > By Visual Searches > Objects within photos.
The Media Browser adds a selection box to the photo.
3. Click the center of the box, drag it to an object in the photo, and resize the box as needed ![]() .
.
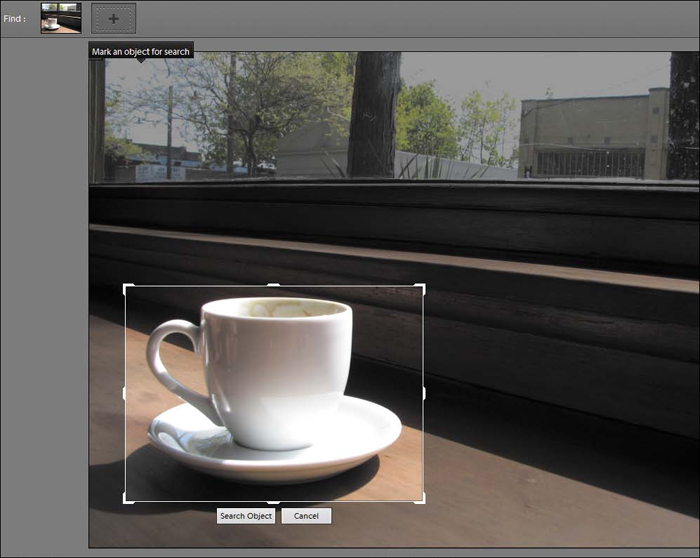
![]() Select an object to locate photos containing similar-looking objects.
Select an object to locate photos containing similar-looking objects.
4. Click the Search Object button to view the results.
5. If necessary, drag the Refine Search slider to prioritize the hunt between color or shape ![]() .
.
![]() The Organizer identifies photos and areas that (roughly) match your source object.
The Organizer identifies photos and areas that (roughly) match your source object.
To find duplicate images
1. Choose Find > By Visual Searches > Duplicate photos. Elements searches your entire collection and brings up the Visually Similarity Photo Search dialog, which arranges the images in rows ![]() .
.
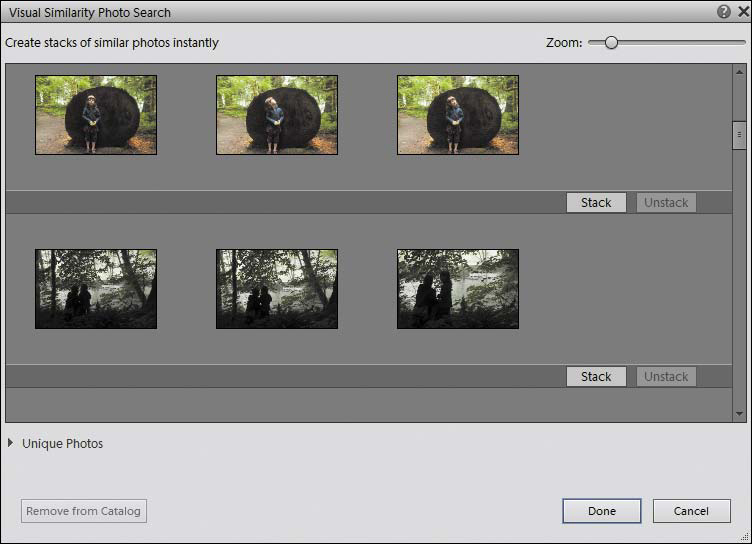
![]() Find duplicates—or photos that are visually very similar—and put them into stacks.
Find duplicates—or photos that are visually very similar—and put them into stacks.
2. To remove a duplicate photo, select it and click the Remove from Catalog button, and then confirm the deletion.
To group a row of photos, click the Stack button. (See “Using Stacks to Organize Similar Photos,” later in this chapter.)
3. Click Done when you’re finished.
Make sure no photo is selected before you look for duplicates; otherwise you get an error message.
Find photos using Saved Searches
One of my grandmother’s cupboards was filled with photo albums, organized roughly chronologically, along with a bunch of envelopes and stacks of free-floating pictures that weren’t in any order. The problem with lots of photos is that there’s only so much time you can spend sorting them.
But what if you had an assistant who could do the organizing for you? Not just once, but ongoing, changing the albums based on new photos or keyword tags or other criteria? Saved Searches operate just like that (and they don’t mind the workload).
To create a Saved Search
1. Click the Search drop-down list and choose Saved Searches.
2. Click the New Search Query button.
3. Type a descriptive title in the Name field.
4. Specify photo attributes using the drop-down menus in the Search Criteria section ![]() .
.
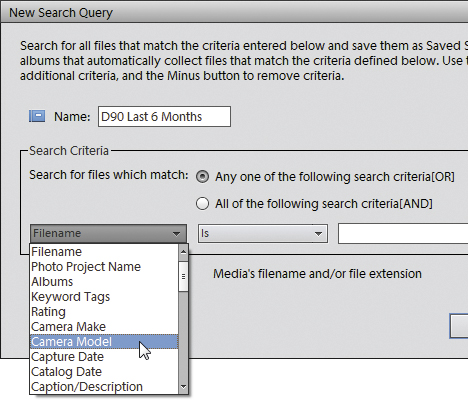
![]() Choose from several attributes to start building the saved search.
Choose from several attributes to start building the saved search.
The other drop-down menu and field change depending on the criteria. For example, choosing Keyword Tags presents a list of tags.
5. To add more criteria, click the plus button ![]() and specify the attributes.
and specify the attributes.
![]() Click here to add additional criteria.
Click here to add additional criteria.
6. By default, the search picks up photos containing any of the criteria you specify. To view only photos that match every attribute, choose the radio button labeled All of the following search criteria [AND] ![]() .
.
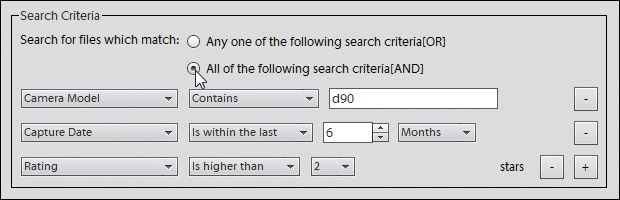
![]() This Saved Search will display only photos shot with a Nikon D90 within the last six months and having a rating of 3, 4, or 5 stars.
This Saved Search will display only photos shot with a Nikon D90 within the last six months and having a rating of 3, 4, or 5 stars.
7. Click OK. Only the images matching the criteria are displayed ![]() .
.
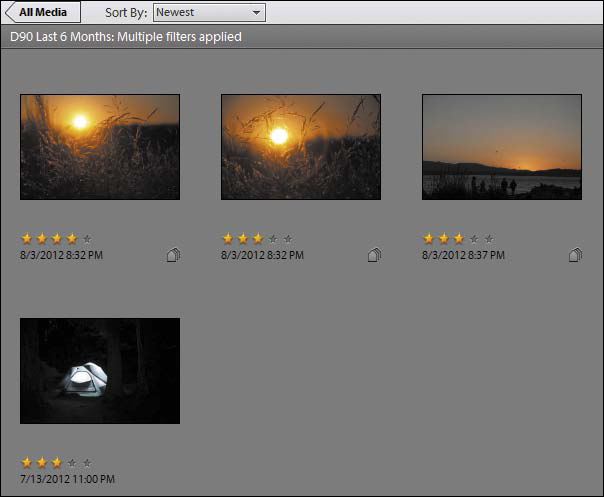
![]() After the Saved Search is created, the pictures that match its criteria are displayed.
After the Saved Search is created, the pictures that match its criteria are displayed.
To modify a Saved Search
1. Select a search in the Saved Searches and click Open to view its contents.
2. From the Options drop-down menu, choose Modify Search Criteria ![]() .
.
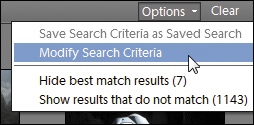
![]() Choose Modify Search Criteria when you’re viewing the contents of a Saved Search.
Choose Modify Search Criteria when you’re viewing the contents of a Saved Search.
3. In the Find by Details (Metadata) dialog that appears, edit the attributes you set up originally.
4. To keep the new criteria, mark the checkbox labeled Save this Search Criteria as Saved Search ![]() .
.
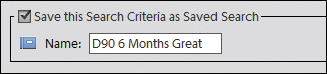
![]() Make sure you mark the criteria as a Saved Search, or Elements will modify the search for that instance only.
Make sure you mark the criteria as a Saved Search, or Elements will modify the search for that instance only.
5. Enter a name for the search (and see the tip below).
6. Click Search to save the settings. The images in the Media Browser reflect the new criteria.
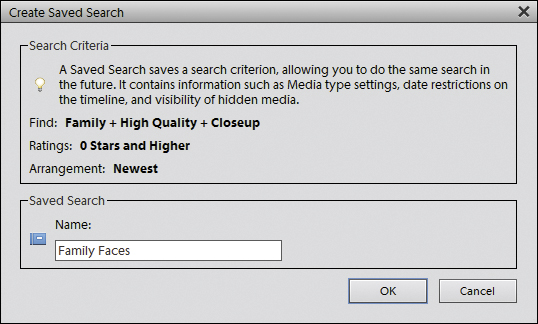
To create a Saved Search from search results
1. Perform a search using any of the techniques described on the preceding pages.
2. From the Options drop-down menu, choose Save Search Criteria as Saved Search.
3. In the Create Saved Search dialog, give the search a name and click OK ![]() .
.
![]() A Saved Search can be built using the criteria of a regular album.
A Saved Search can be built using the criteria of a regular album.
If you give a modified Saved Search the same title as the original album you’re editing, Elements creates a brand-new search instead of replacing the old one.
To easily view all photos except those in the Saved Search, go to the Options drop-down menu and choose Show results that do not match.
Using Stacks to Organize Similar Photos
You’ve spent a day on the valley floor of Yosemite shooting picture after picture, and when you return home in the evening and download all of those photos to your Media Browser, you realize you have about a dozen shots of the same waterfall: some lit a little differently than others; some with different zoom settings; but all similar.
Stacks serve as a convenient way to group those related photos together. They not only save valuable space in the Media Browser, they also make assigning tags much faster, because tagging a stack automatically tags every photo in the stack. When you’re ready to take a careful look at all of those waterfalls and weed out the greats from the not-so-greats, you simply expand the stack to view all of the stacked photos at once.
To create a stack
1. In the Media Browser, Ctrl-click/Command-click to select the photos you want to include in a stack ![]() .
.
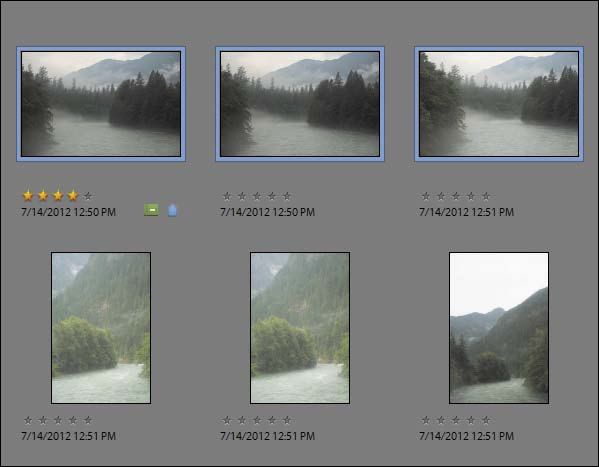
![]() Select similar photos to organize them into a stack.
Select similar photos to organize them into a stack.
2. Choose Edit > Stack > Stack Selected Photos, or press Ctrl+Alt+S/Command-Option-S.
The photos are stacked together, indicated by a Stack icon in the upper-right corner of the top photo in the stack ![]() .
.
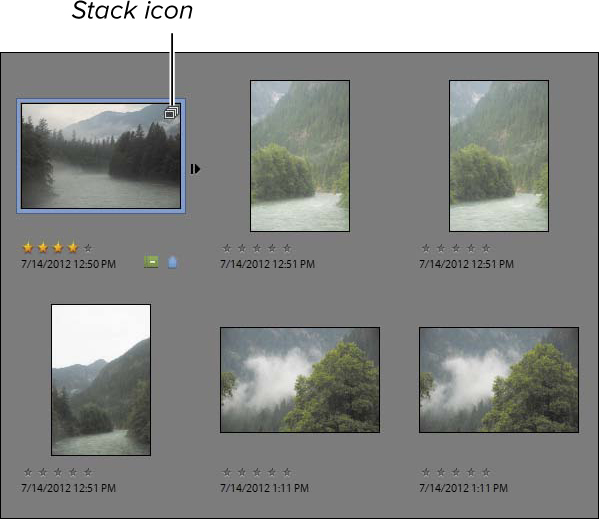
![]() When stacked, the photos occupy just one thumbnail, and are indicated by the Stack icon.
When stacked, the photos occupy just one thumbnail, and are indicated by the Stack icon.
To view all photos in a stack
In the Media Browser, click the arrow icon at the right of the stack. Or, choose Edit > Stack > Expand Photos in Stack (press Ctrl+Alt+R/Command-Option-R). The photos in the stack appear ![]() .
.
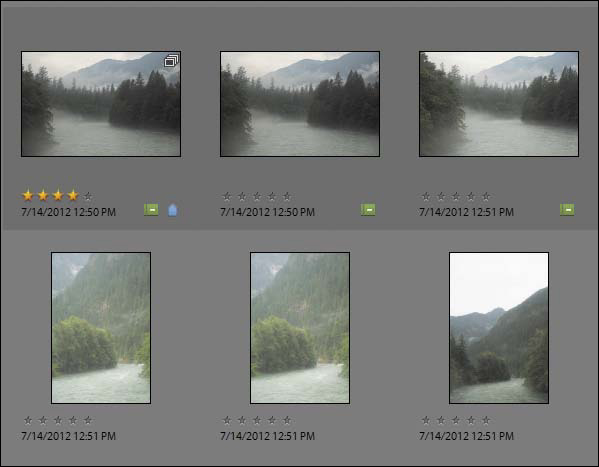
![]() An expanded stack reveals the photos that have been grouped together.
An expanded stack reveals the photos that have been grouped together.
To unstack photos in a stack
Choose Edit > Stack > Unstack Photos.
The stacked photos return to their original locations in the Media Browser window.
To flatten a stack
1. If you’re certain you don’t want any photo in a stack except for the top one, you can “flatten” the stack and delete the others. Choose Edit > Stack > Flatten Stack.
2. In the warning dialog that appears, click OK to delete all of the photos except for the top photo in the stack ![]() .
.
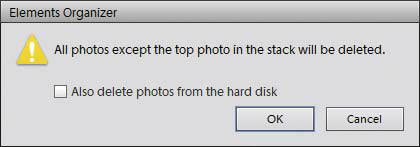
![]() A warning box reminds you that you are about to delete all but the top photo in your stack.
A warning box reminds you that you are about to delete all but the top photo in your stack.
You can also choose to delete the associated image files from your hard disk.
While you’re viewing the expanded stack, you can also remove specific photos from a stack, or designate a new photo to be the top photo (the photo that appears at the top of the stack in the Media Browser). Just right-click on any stacked photo and then, from the thumbnail contextual menu, select an option from the Stack submenu.
Locating Photos Using Places
Sometimes where you took a photo is as important as what’s in the image. The Places feature lets you associate locations with your photos, or pull geographic data from photos whose cameras embed it.
To view photos on a map
1. Click the Places button. All photos that have been tagged with geolocation information appear in the Media Browser ![]() .
.
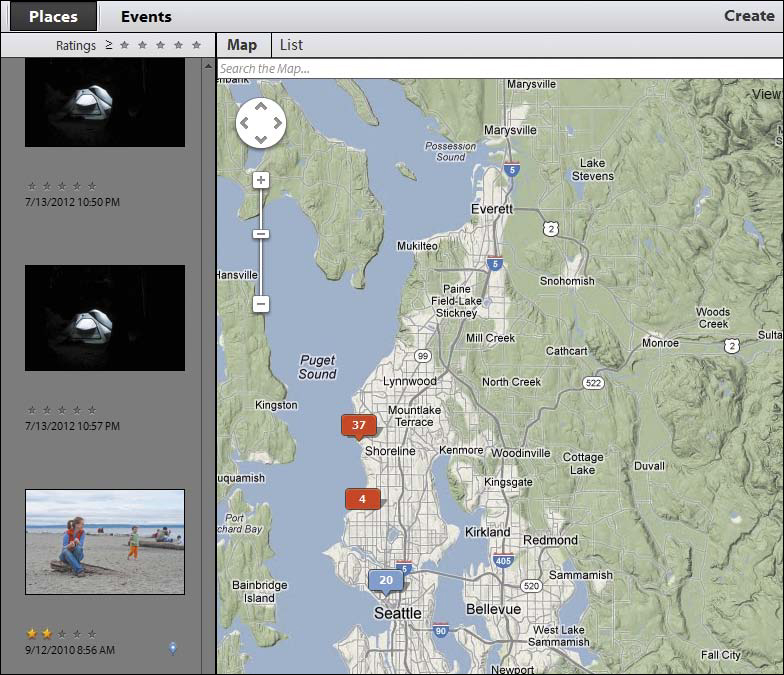
![]() The Places view lets you plot photos anywhere on the globe.
The Places view lets you plot photos anywhere on the globe.
2. Select one or more photos to locate them on the map.
Or, click a pin and then click the Show Media button that appears ![]() .
.
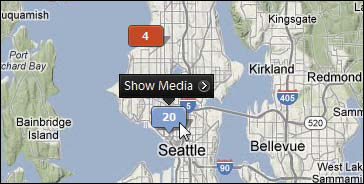
![]() Select a pin to display the photos at its location.
Select a pin to display the photos at its location.
You can also type a destination into the Search the Map field to see if any images are tagged with that location.
3. Use the map controls to zoom in, if needed. Click and drag to reposition the map, or use the navigation controls.
Or
1. In the Places view, click the List button.
2. Select a location from the list to view all photos assigned to that place ![]() .
.
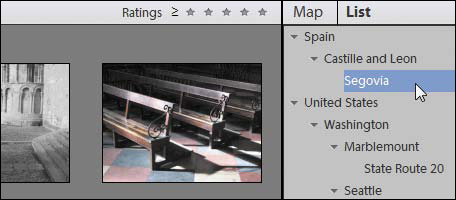
![]() You may find the List view to be a quicker way to locate photos.
You may find the List view to be a quicker way to locate photos.
To place photos on the map
1. Select one or more photos in the Media Browser.
2. Click Add Places on the Task bar. The Organizer opens the Add Places dialog.
3. Type an address in the Search the Map field and click Search; or, if a possible result is found, select it from the list that appears ![]() . The location is highlighted.
. The location is highlighted.
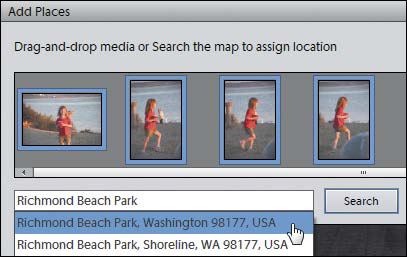
![]() Type a location to pull up Google Maps results.
Type a location to pull up Google Maps results.
You can also drag photos from the filmstrip directly onto the map.
4. When asked, “Place Media Here?” click the Accept button (the green check mark) to assign that location to the selected photos ![]() .
.
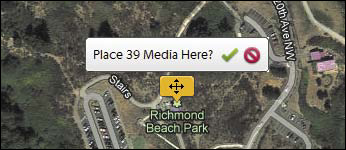
![]() Confirm that you want to the photos’ Place information to be that location.
Confirm that you want to the photos’ Place information to be that location.
5. If you want to refine the location, drag the placeholder to a new spot and then confirm you want to use it ![]() .
.
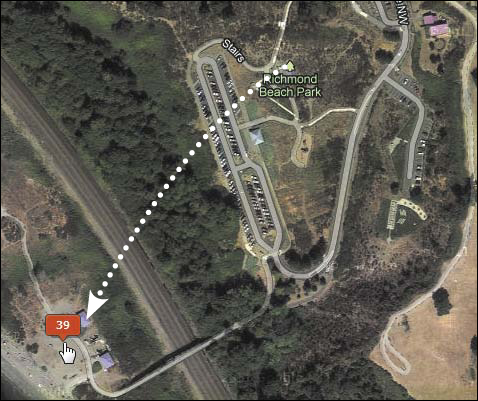
![]() Drag the pin to a new location to refine the Place information.
Drag the pin to a new location to refine the Place information.
6. Click Done to exit the dialog. You can then click the Places button to see the photos in the Places view.
To remove Place information from a photo
1. In the Places view, select the photo(s) you want to remove.
2. Click the Remove button in the Task bar.
3. Click OK in the dialog that appears to confirm that you want to remove the Place information from the photo.
Select the “Limit search to map area” checkbox to view photos that appear only in the current visible portion of the map.
The View pop-up menu at the upper-right corner of the Map pane lets you display the map with different appearances, such as a Hybrid combination of satellite imagery and street names.
You can also start in the Places view to specify new Places, but that can be confusing at first because the only photos you see are ones that already have location information applied. Click the Add Places button in the Task bar, and then choose the photos you want to assign in the filmstrip. But be careful—if you don’t choose photos before finding a location, the Organizer will want to assign every image in your catalog to that place!
Using Catalogs to Store Your Photos
Catalogs are the behind-the-scenes backbone of the Organizer workspace, where all the information for tags and categories and albums are stored. When you install Elements, the program sets up a default catalog (called My Catalog) for you. That might be enough to work with, but you can also create additional catalogs—for example, if more than one person is using the same computer. Or, you may want discrete catalogs for each person’s photos: Bob’s Catalog, Sara’s Catalog, and so on.
To create a new catalog
1. From the File menu choose Catalog, or press Ctrl+Shift+C/Command-Shift-C.
2. In the Catalog Manager dialog, click a radio button to specify whether the catalog is available to all user accounts on the computer, just the current user, or saved to a custom location ![]() .
.
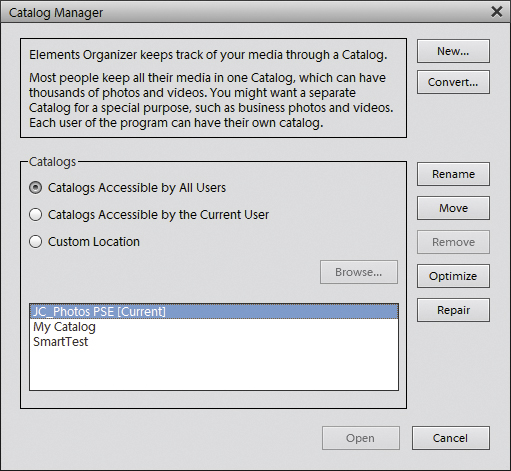
![]() Choose which users can access the catalogs, as well as the catalogs’ locations.
Choose which users can access the catalogs, as well as the catalogs’ locations.
3. Click the New button.
4. In the File name text field, enter a name for your new catalog ![]() .
.

![]() Make sure your new catalog name is different from any existing catalog names.
Make sure your new catalog name is different from any existing catalog names.
At the bottom of the naming dialog is the Import free music into this catalog checkbox. Leave this option selected so the music files you received with Elements (to use as background tracks for PDF slide shows and other creations) will be available in the new catalog.
5. Click OK to create your new catalog.
To switch to a different catalog
1. From the File menu choose Catalog, or press Ctrl+Shift+C/Command-Shift-C.
2. Select the name of the saved catalog you want to open.
3. Click the Open button.
To make a backup of a catalog
1. Since you obviously don’t want to lose your photos, choose File > Backup Catalog.
2. In the Backup dialog, choose Full Backup to make a complete copy of the catalog. On subsequent backups, you can choose Incremental Backup to copy only new and changed image files.
3. Click Next.
4. Select a destination drive ![]() , and optionally specify a location by clicking the Browse button for Backup Path.
, and optionally specify a location by clicking the Browse button for Backup Path.
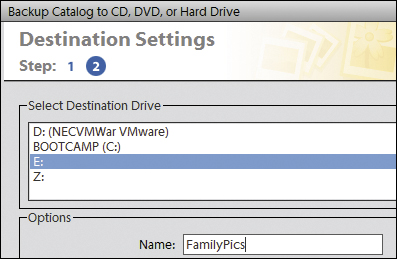
![]() Specify where your backup files are to be copied.
Specify where your backup files are to be copied.
5. Click Save Backup when you’re ready. Elements copies the image files and catalog information to the drive.
To restore a catalog from backup
1. In the unfortunate event that your catalog becomes unreadable, choose File > Restore Catalog from Hard Drive.
2. In the Restore dialog, choose the media on which the backup is stored ![]() ; click the Browse button to locate the
; click the Browse button to locate the .tly file that accompanies the backup.
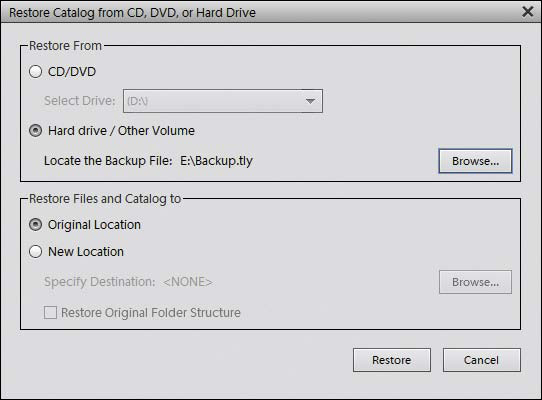
![]() If you need to reconstruct a catalog from your backup, use the Restore Catalog command.
If you need to reconstruct a catalog from your backup, use the Restore Catalog command.
3. Choose where to copy the restored files: the catalog’s original location or another location.
4. Click Restore.
The downside to the Organizer’s catalog backup scheme is that making an incremental backup creates a new file. So, to restore your catalog, you must have the original backup and all of the incremental ones at hand. Make sure you have another backup of your data as well, using commercial backup software (which is a fantastic idea anyway).