
11
Working with Model Object, Optimized (MOJO)
As we learned in Chapter 10, Working with Plain Old Java Objects (POJOs), when working with production systems, we need portable software that we can easily deploy to our production servers. It is especially important in Machine Learning (ML) services that ML models be portable and self-sufficient. This helps engineers deploy new models regularly without worrying about breaking their systems in production because of any dependency issues.
H2O’s model POJOs were a good solution to this problem. Model POJOs are H2O models that can be extracted in the form of Java POJOs that you can directly run using Java Virtual Machine (JVM) with the help of h2o-genmodel.jar.
However, model POJOs have certain drawbacks that prevent them from being the best solution to all these problems. When it comes to the portability of software packages, including POJOs, the smaller the object, the faster it is to deploy it. POJOs have an inherent limit on the size of the source files, which is up to 1 GB. Thus, models larger than 1 GB cannot be extracted as POJOs and at the same time, large models can be slow to deploy and perform.
That is why the team at H2O.ai created an alternative to POJOs called Model Object, Optimized (MOJO). MOJOs are low-latency, self-sufficient, and standalone objects that can be easily deployed in production. They are smaller and faster counterparts to POJOs and are as easy to extract and use as POJOs.
In this chapter, we will cover the following topics:
- Understanding what a MOJO is
- Extracting H2O models as MOJOs
- Viewing model MOJOs
- Using H2O AutoML model MOJOs to make predictions
By the end of this chapter, you will be able to understand the difference between POJOs and MOJOs, extract trained models in the form of MOJOs using Python, R, or H2O Flow, and then use those MOJO models to load your ML program to make predictions.
Technical requirements
In this chapter, you will need the following:
- The latest version of your preferred web browser
- An Integrated Development Environment (IDE) of your choice
- (Optional) Jupyter Notebook by Project Jupyter (https://jupyter.org/)
All the experiments conducted in this chapter are performed on a Terminal. You are free to follow along using the same setup or perform the same experiments using any IDE of your choice. All code examples for this chapter can be found on GitHub at https://github.com/PacktPublishing/Practical-Automated-Machine-Learning-on-H2O/tree/main/Chapter%2011.
Understanding what a MOJO is
MOJOs are counterparts to H2O model POJOs and technically work in the same way. H2O can build and extract models trained in the form of MOJOs, and you can use the extracted MOJOs to deploy and make predictions on inbound data.
So, what makes MOJOs different from POJOs?
POJOs have certain drawbacks that make them slightly less than ideal to use in a production environment, as follows:
- POJOs are not supported for source files larger than 1 GB, so any models with a size larger than 1 GB cannot be compiled to POJOs.
- POJOs do not support stacked ensemble models or Word2Vec models.
MOJOs, on the other hand, have the following additional benefits:
- MOJOs have no size restrictions
- MOJOs solve the large size issue by removing the ML tree and using a generic tree walking algorithm to navigate the model computationally
- MOJOs are smaller in size and faster than POJOs
- MOJOs support all types of models trained using H2O AutoML
As per H2O’s in-house experiments and testing, as stated at https://docs.h2o.ai/h2o/latest-stable/h2o-docs/productionizing.html#benefits-of-mojos-over-pojos, it was noticed that MOJO models are roughly 20-25 times smaller in disk space than the respective POJO models. MOJOs were also twice as fast as POJOs when hot scoring, which is when scoring is done after the JVM has been able to optimize the execution paths. During cold scoring, which is when scoring is done before the JVM has optimized the execution path, MOJOs showed around 10-40 times faster execution compared to POJOs. MOJOs are more efficient compared to POJOs as the size of the model increases.
H2O’s in-house testing also showed that when tested with 5,000 trees with a depth of 25, POJOs performed better when running binomial classification on very small trees of around 50 with 5 depths, but MOJOs performed better for multinomial classification.
Now that we know what MOJOs are, as well as their benefits, let’s see how we can extract models trained using H2O’s AutoML as MOJOs using simple examples.
Extracting H2O models as MOJOs
Just like POJOs, you can extract models trained using H2O’s AutoML using any of the H2O-supported languages.
In the following sub-sections, we shall learn how to extract the model MOJOs using the Python and R programming languages, as well as see how we can extract model MOJOs using H2O Flow.
Extracting H2O models as MOJOs in Python
Let’s see how we can extract models as MOJOs using Python. We shall use the same Iris flower dataset for running AutoML.
Follow these steps to train models using H2O AutoML. Then, we shall extract the leader model and download it as a MOJO:
- Import the h2o module and spin up your H2O server:
import h2o
h2o.init()
- Import the Iris dataset by passing the appropriate location of the dataset in your system. Execute the following command:
data_frame = h2o.import_file("Dataset/iris.data")
- Set the feature and label names by executing the following command:
features = data_frame.columns
label = "C5"
features.remove(label)
- Initialize the H2O AutoML object by setting the value of the max_model parameter to 10 and the seed value to 5 by executing the following commands:
aml=h2o.automl.H2OAutoML(max_models=10, seed = 5)
- Start the AutoML process by passing the training dataset, the feature columns, and the label column as parameters, as follows:
aml.train(x = features, y = label, training_frame = data_frame)
- Once training has finished, you can view the AutoML leaderboard by executing the following command:
print(aml.leaderboard)
You should get the following leaderboard:

Figure 11.1 – AutoML leaderboard for extracting MOJOs
- You can use aml.leader to get the leader model of the AutoML training. All models have an inbuilt function, download_mojo(), that extracts and downloads the model MOJO file:
aml.leader.download_mojo()
This should download the model MOJO to your device. You can also download a specific model from the leaderboard using model_id. Let’s download the DRF model, which is ranked fourth on the leaderboard. Execute the following command:
DRF_model = h2o.get_model(aml.leaderboard[3,0])
DRF_model.download_mojo()
You can also specify the path where you want the MOJO file to be downloaded by passing the path parameter, along with the location, to the download_mojo() function. You can also download h2o-genmodel.jar, along with the MOJO file, by passing get_genmodel_jar as True in the download_mojo() function.
Let’s see how we can do the same in the R programming language.
Extracting H2O models as MOJOs in R
Similar to how we can extract a model from the AutoML leaderboard in Python, we can do the same in the R programming language. We shall use the same Iris flower dataset again to train models using H2O AutoML and then extract the leader model to download it as a POJO. Follow these steps:
- Import the h2o module and spin up your H2O server:
library(h2o)
h2o.init()
- Import the dataset by passing the location of the dataset in your system. Execute the following command:
data_frame <- h2o.importFile("Dataset/iris.data")
- Set the feature and label names by executing the following commands:
label <- "C5"
features <- setdiff(names(data), label)
- Trigger AutoML by passing the training dataset, the feature columns, and the label columns as parameters. Also, set max_models to 10 and the seed value to 5:
aml <- h2o.automl(x = features, y = label, training_frame = data_frame, max_models=10, seed = 5)
- Once training has finished and you have the leaderboard, you can access the leader model using aml@leaderboard. Using the same command, we can download the leader model as a MOJO, like so:
h2o.download_pojo(aml@leaderboard)
This will start downloading the model MOJO ZIP file to your device. Similar to Python, in R, you can specify the download path as well as set the get_genmodel_jar parameter to True to download the h2o-genmodel.jar file, along with the MOJO ZIP file.
Now that we know how to extract a model MOJO in the R programming language, let’s learn how to do the same in H2O Flow.
Extracting H2O models as MOJOs in H2O Flow
Downloading model MOJOs in H2O Flow is just as easy as it was with POJOs. Right beside the Download POJO button, you have another button to download MOJO models.
As you learned in Chapter 2, Working with H2O Flow (H2O’s Web UI), in the Working with Model Training Functions in H2O Flow section, you can access specific model information.
In the Actions subsection, you have an interactive button titled Model Deployment Package (MOJO), as shown in the following screenshot:

Figure 11.2 – The Download Model Deployment Package (MOJO) button
Simply clicking on this button will download the model as a MOJO. All models can be downloaded this way by using this interactive button in H2O Flow.
Unlike POJOs, where you have a single Java file, MOJOs can be downloaded as ZIP files that contain a collection of certain configuration settings, among other files. You can extract and explore these files if you wish, but from an implementation perspective, we will be using the whole ZIP file and using it in our services.
But regardless of the difference between the type of file, whether it is a Java file or a ZIP file, h2o-genmodel.jar has interpreters and readers for both types of files that you can use to read the models and make predictions.
Now that we have extracted the model MOJO, let’s explore a special feature in MOJOs where we can graphically view the contents of a trained model.
Viewing model MOJOs
You can view MOJO models as simple human-readable graphs by using a Java tool called Graphviz. Graphviz is a piece of visualization software that is used for graphically visualizing structural information in the form of diagrams or graphs. It is a handy tool that is often used to show technical details in networks, web designs, and ML as simple images.
You can install the Graphviz library in different operating systems, as follows:
- Linux: You can download the library by just running the following command in your Terminal:
sudo apt install graphviz
- Mac: You can use brew to install this library in your Mac system. Execute the following command in your Mac Terminal:
brew install graphviz
- Windows: Graphviz has a Windows installer that you can download from http://www.graphviz.org/download/.
Once you have installed Graphviz, you can view the model graphically by using the PrintMojo function from the Terminal to make a PNG file.
Let’s try it out. Execute the following steps:
- Once you have downloaded your model MOJO file and installed Graphviz, you will need the h2o.jar file to be in the same path to access the printMojo() function in the hex class. You can download the h2o.jar file from http://h2o-release.s3.amazonaws.com/h2o/rel-zumbo/2/index.html.
- Once your files are ready, open your Terminal in the same directory and execute the following command:
java -cp h2o.jar hex.genmodel.tools.PrintMojo --tree 0 -i "DRF_1_AutoML_4_20220801_225630.zip" -o model.gv -f 20 -d 3
We are using the DRF model we downloaded from the experiment we did in the Extracting H2O model as MOJO in Python section. This command generates a model.gv file that the Graphviz visualization tool can use to visualize the model.
- Now, use the Graphviz tool to build a PNG file using the model.gv file. Execute the following code:
dot -Tpng model.gv -o model.png
This generates the model.png file.
- Now, open the model.png file; you should see an image of the model. The model should look as follows:
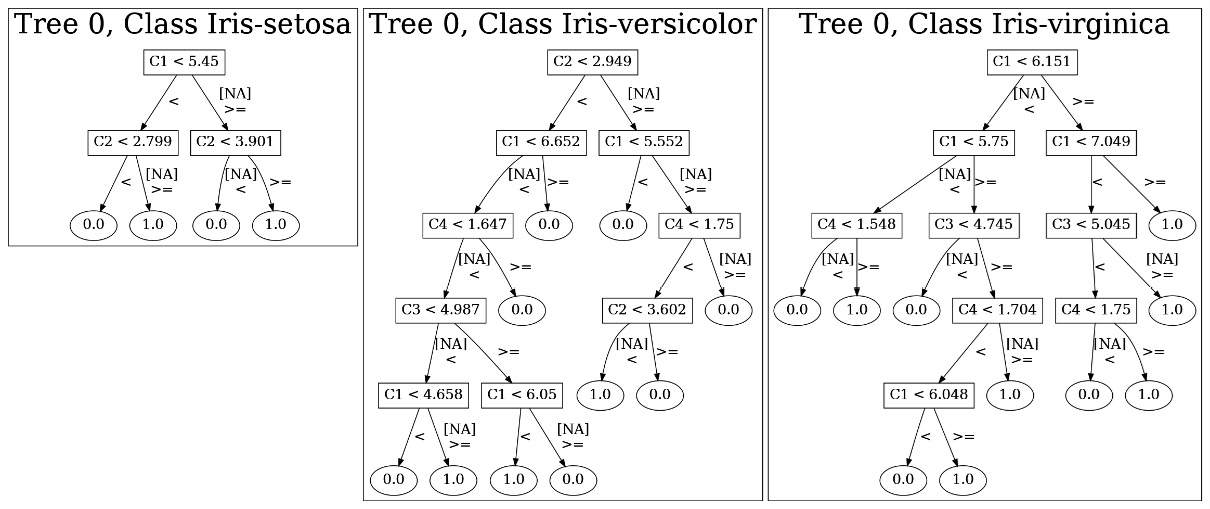
Figure 11.3 – Model image generated from MOJO using Graphviz
The preceding diagram is a nice graphical representation of how the decision tree of the Distributed Random Forest (DRF) model branches. You can also generate the model image directly with the PrintMojo function without needing the Graphviz library. However, this option is only available in Java 8 and higher versions.
- Let’s try using the PrintMojo function to generate the model image. Execute the steps in sequence to generate an image of the model without using Graphviz.
- Similar to the previous experiment, where we printed the model MOJO using Graphviz, make sure that you have downloaded the model MOJO and copied it into a directory, along with your h2o.jar file. Now, open a Terminal in the same folder and execute the following command:
java -cp h2o.jar hex.genmodel.tools.PrintMojo --tree 0 -i "DRF_1_AutoML_7_20220622_170835.zip" -o tree.png --format png
The output of this command should generate a tree.png folder with images of the decision tree inside it. The diagram should look as follows:

Figure 11.4 – Graphical images for class Iris-setosa using PrintMojo without Graphviz
Since we were using an ML model that has been trained on the Iris dataset, we have a multinomial classification model. Thus, inside the tree.png file, you will have individual images for every class – one for Iris-setosa, one for Iris-virginica, and one for Iris-versicolor.
Note that this feature is only available for tree-based algorithms such as DRF, GBM, and XGBoost. Linear models such as GLM and deep learning models are not supported for viewing.
Now that we know how to view the models from model MOJOs, let’s learn how to use MOJOs to make predictions.
Using H2O AutoML model MOJOs to make predictions
Making predictions using MOJOs is the same as how we make predictions using model POJOS, albeit with some minor changes. Similar to POJOs, there is a dependency on the h2o-genmodel.jar file to compile and run the model MOJO to make predictions.
So, let’s go ahead and quickly run an experiment where we can use the model MOJO with the h2o-genmodel.jar file to make predictions. We shall write a Java program that imports the h2o-genmodel.jar file and uses its classes to load and use our model MOJO to make predictions.
So, let’s start by creating a folder where we can keep the H2O MOJO file needed for the experiment and then write some code that uses it.
Follow these steps:
- Open your Terminal and create an empty folder by executing the following command:
mkdir H2O_MOJO
cd H2O_MOJO
- Now, copy your model MOJO file to the folder by executing the following command:
mv ~/Downloads/DRF_1_AutoML_7_20220622_170835.zip .
Make sure that you change the name of the model MOJO, DRF_1_AutoML_7_20220622_170835.zip, to the model MOJO you are using.
- Then, you need to download the h2o-genmodel.jar file. As you learned in Chapter 10, Working with Plain Old Java Objects (POJOs), there are two ways that you can do this. Either you can download the h2o-genmodel.jar file from your currently running local H2O server or, if you are working on a Maven project, you can just add the Maven dependency for h2o-genmodel, as follows:
<dependency>
<groupId>ai.h2o</groupId>
<artifactId>h2o-genmodel</artifactId>
<version>3.35.0.2</version>
</dependency>
The Maven repository for this can be found here: https://mvnrepository.com/artifact/ai.h2o/h2o-genmodel.
- Now, let’s create the Java program that will be making predictions using the model MOJO. Create a Java program called main.java by executing the following command in your Terminal:
vim main.java
This should open the vim editor, where you can write your code.
- Let’s start writing our Java program:
- First, import the necessary dependencies, as follows:
import hex.genmodel.easy.RowData;
import hex.genmodel.easy.EasyPredictModelWrapper;
import hex.genmodel.easy.prediction.*;
import hex.genmodel.MojoModel;
- Then, create the main class, as follows:
public class main { }
- Then, inside the main class, create a main function, as follows:
public static void main(String[] args) throws Exception { }
- Inside this main function, create the EasyPredictModelWrapper object by loading the MOJO model using the MojoModel.load() function and passing the location of your model MOJO. The code for this is as follows:
EasyPredictModelWrapper modelMOJO = new EasyPredictModelWrapper(MojoModel.load("DRF_1_AutoML_7_20220622_170835.zip"));
- Now that we have our model MOJO loaded and wrapped in EasyPredictModelWrapper, let’s create the sample data that we will use for making predictions. Add the following code to your file:
RowData row = new RowData();
row.put("C1", 5.1);
row.put("C2", 3.5);
row.put("C3", 1.4);
row.put("C4", 0.2);
- Similar to how we did when making predictions using model POJOs, we need a prediction handler to store the prediction results from the model MOJOs. The prediction handler that’s used for POJOs also works with MOJOs. So, let’s create an appropriate multinomial prediction handler object, as follows:
MultinomialModelPrediction predictionResultHandler = modelMOJO.predictMultinomial(row);
- Now, let’s add the necessary print statements so that we have a clean and easy way to understand the output. Add the following print statements:
System.out.println("Predicted Class of Iris flower is: " + predictionResultHandler.label);
predictionResultHandler.label will contain the predicted label value.
- Let’s also print out the different class probabilities. Add the following code:
System.out.println("Class probabilities are: ");
for (int labelClassIndex = 0; labelClassIndex < predictionResultHandler.classProbabilities.length; labelClassIndex++) {
System.out.println(predictionResultHandler.classProbabilities[labelClassIndex]);
}
- Make sure all your braces are closed correctly and save the file.
- Once your file is ready, just compile the file by executing the following command:
javac -cp h2o-genmodel.jar -J-Xmx2g -J-XX:MaxPermSize=128m main.java
- Once the compilation is successful, execute the compiled file by running the following command in your Terminal:
java -cp .:h2o-genmodel.jar main
You should get the following output:

Figure 11.5 – Prediction results from the H2O model MOJO implementation
As you can see, using the model MOJO is just as easy as using POJOs. Both are easy to extract and use in production. However, MOJOs benefit from being smaller and faster for large-sized models, which gives them a slight edge compared to POJOs.
Congratulations! You now know how to build, extract, and deploy model MOJOs to make predictions.
Summary
In this chapter, we started by understanding what the drawbacks of POJOs are. Then, we learned that H2O created a counterpart to POJOs called MOJOs, which do not have the same issues that POJOs have. Then, we learned what MOJOs are and the benefits of using them over POJOs. We learned that MOJOs are smaller and faster than POJOs. In H2O’s internal experimentation, it was found that MOJOs performed better when working with large ML models.
After that, we learned how to practically extract ML models trained using AutoML as MOJOs. We understood how MOJOs can be downloaded in Python, R, and H2O Flow. Another benefit that we came across with MOJOs was that there is a special function called PrintMojo that can be used to create graphical pictures of ML models that can be read by humans. This also makes understanding the contents of the ML model easy.
Building on top of this knowledge, we implemented an experiment where we used the h2o-genmodel.jar file, along with the model MOJO, to make predictions on sample data, thus helping us get a better understanding of how we can use MOJOs in production.
In the next chapter, we shall explore the various design patterns that we can use to implement H2O AutoML. This will help us understand how to implement ideal ML solutions using H2O AutoML.