
12
Working with H2O AutoML and Apache Spark
In Chapter 10, Working with Plain Old Java Objects (POJOs), and Chapter 11, Working with Model Object, Optimized (MOJO), we explored how to build and deploy our Machine Learning (ML) models as POJOs and MOJOs in production systems and use them to make predictions. In the majority of real-world problems, you will often need to deploy your entire ML pipeline in production so that you can deploy as well as train models on the fly. Your system will also be gathering and storing new data that you can later use to retrain your models. In such a scenario, you will eventually need to integrate your H2O server into your business product and coordinate the ML effort.
Apache Spark is one of the more commonly used technologies in the domain of ML. It is an analytics engine used for large-scale data processing using cluster computing. It is completely open source and widely supported by the Apache Software Foundation.
Considering the popularity of Spark in the field of data processing, H2O.ai developed an elegant software solution that combines the benefits of both Spark and AutoML into a single one-stop solution for ML pipelines. This software product is called H2O Sparkling Water.
In this chapter, we will learn more about H2O Sparkling Water. First, we will understand what Spark is and how it works and then move on to understanding how H2O Sparkling Water operates H2O AutoML in conjunction with Spark to solve fast data processing needs.
In this chapter, we will cover the following topics:
- Exploring Apache Spark
- Exploring H2O Sparkling Water
By the end of this chapter, you should have a general idea of how we can incorporate H2O AI along with Apache Spark using H2O Sparkling Water and how you can benefit from the best of both these worlds.
Technical requirements
For this chapter, you will require the following:
- The latest version of your preferred web browser.
- An Integrated Development Environment (IDE) of your choice or a Terminal.
- All experiments conducted in this chapter have been performed on a Terminal. You are free to follow along using the same setup or perform the same experiments using any IDE of your choice.
So, let’s start by understanding what exactly Apache Spark is.
Exploring Apache Spark
Apache Spark started as a project in UC Berkeley AMPLab in 2009. It was then open sourced under a BSD license in 2010. Three years later, in 2013, it was donated to the Apache Software Foundation and became a top-level project. A year later, it was used by Databricks in a data sorting competition where it set a new world record. Ever since then, it has been picked up and used widely for in-memory distributed data analysis in the big data industry.
Let’s see what the various components of Apache Spark are and their respective functionalities.
Understanding the components of Apache Spark
Apache Spark is an open source data processing engine. It is used to process data in real time, as well as in batches using cluster computing. All data processing tasks are performed in memory, making task executions very fast. Apache Spark’s data processing capabilities coupled with H2O’s AutoML functionality can make your ML system perform more efficiently and powerfully. But before we dive deep into H2O Sparkling Water, let’s understand what Apache Spark is and what it consists of.
Let’s start by understanding what the various components of the Spark ecosystem are:

Figure 12.1 – Apache Spark components
The various components of the Spark ecosystem are as follows:
- Spark Core: The Spark Core component is the most vital component of the Spark ecosystem. It is responsible for basic functions such as input-output operations and scheduling and monitoring jobs. All the other components are built on top of this component. This component supports the Scala, Java, Python, and R programming languages using specific interfaces. The Spark Core component itself is written in the Scala programming language.
- Spark SQL: The Spark SQL component is used to leverage the power of SQL queries to run data queries on data stored in Spark nodes.
- Spark Streaming: The Spark Streaming component is used to batch as well as stream data in the same application.
- Spark MLlib: Spark MLlib is the ML library used by Spark to develop and deploy scalable ML pipelines. It is also used to perform ML analytics tasks such as feature extraction, feature engineering, dimensionality reduction, and so on.
- GraphX: The GraphX component is a library that is used to perform data analytics on graph-based data. It is used to perform graph data construction and traversals.
- Spark R: The Spark R component is an R package that provides a front-end shell for users to communicate with Spark via the R programming language. All data processing done by R is carried out on a single node. This makes R not ideal for processing large amounts of data. The Spark R component helps users perform these data operations on huge datasets in a distributed manner by using the underlying Spark cluster.
Understanding the Apache Spark architecture
Apache Spark has a well-defined architecture. As mentioned previously, Spark is run on a cluster system. Within this cluster, you will have one node that is assigned as the master while the others act as workers. All this work is performed by independent processes in the worker nodes and the combined effort is coordinated by the Spark context.
Refer to the following diagram to get a better understanding of the Apache Spark architecture:

Figure 12.2 – Apache Spark architecture
The Spark architecture comprises the following components:
- Spark Cluster Manager: The Spark cluster manager is responsible for managing the allocation of resources to nodes and monitoring their health. It is responsible for maintaining the cluster of machines on which the Spark application is running. When you start a Spark application, the cluster manager will start up different nodes in the cluster, depending on the specified configuration, and restart any services that fail in the middle of execution.
The Spark cluster manager comes in three types:
- Standalone: This is a simple cluster manager that comes bundled with Spark and is very easy to set up and use.
- Hadoop YARN: Yet Another Resource Negotiator (YARN) is a resource manager that comes with the Hadoop ecosystem. Spark, being a data processing system, can integrate with many data storage systems. Hadoop Distributed File System (HDFS) is one of the most commonly used distributed filesystems in the big data industry and using Spark with HDFS has been a common setup in companies. Since YARN comes with the Hadoop ecosystem, you can use the same resource manager to manage your Spark resources.
- Kubernetes: Kubernetes is an open source container orchestration system for automating deployment operations, scaling services, and other forms of server management. Kubernetes is also capable of managing Spark cluster resources.
- Spark Driver: The Spark driver is the main program of the Spark application. It is responsible for controlling the execution of the application and keeps track of the different states of the nodes, as well as the tasks that have been assigned to each node. The program can be any script that you run or even the Spark interface.
- Spark Executors: The Spark executors are the actual processes that perform the computation task on the worker nodes. They are pretty simple processes whose aim is to take the assigned task, compute it, and then send back the results to the Spark Context.
- SparkContext: The Spark Context, as its name suggests, keeps track of the context of the execution. Any command that the Spark driver executes goes through this context. The Spark Context communicates with the Spark cluster manager to coordinate the execution activities with the correct executor.
The Spark driver program is the primary function that manages the parallel execution of operations on a cluster. The driver program does so using a data structure called a Resilient Distributed Dataset (RDD).
Understanding what a Resilient Distributed Dataset is
Apache Spark is built on the foundation of the RDD. It is a fault-tolerant record of data that resides on multiple nodes and is immutable. Everything that you do in Spark is done using an RDD. Since it is immutable, any transformation that you do eventually creates a new RDD. RDDs are partitioned into logical sets that are then distributed among the Spark nodes for execution. Spark handles all this distribution internally.
Let’s understand how Spark uses RDDs to perform data processing at scale. Refer to the following diagram:

Figure 12.3 – Linear RDD transformations
So, RDDs are immutable, which means that once the dataset has been created, it cannot be modified. So, if you want to make changes in the dataset, then Spark will create a new RDD from the existing RDD and keeps track of the changes. Here, you have your initial data stored in RDD 1, so you must assume you need to drop a column and convert the type of another column from a string into a number. Spark will create RDD 2, which will contain these changes, as well as make note of the changes it has made. Eventually, as you further transform the data, Spark will contain many RDDs.
You may be wondering what happens if you need to perform many transformations on the data; will Spark create that many RRDs and eventually run out of memory? Remember, RDDs are resilient and immutable, so if you have created RDD 3 from RDD 2, then you will only need to keep RDD2 and the data transformation process from RDD 2 to RDD 3. You will no longer need RDD 1 so that can be removed to free up space. Spark does all the memory management for you. It will remove any RDDs that are not needed.
That was a very simplified explanation for a simple problem. What if you are creating multiple RDDs that contain different transformations from the same RDD? This can be seen in the following diagram:
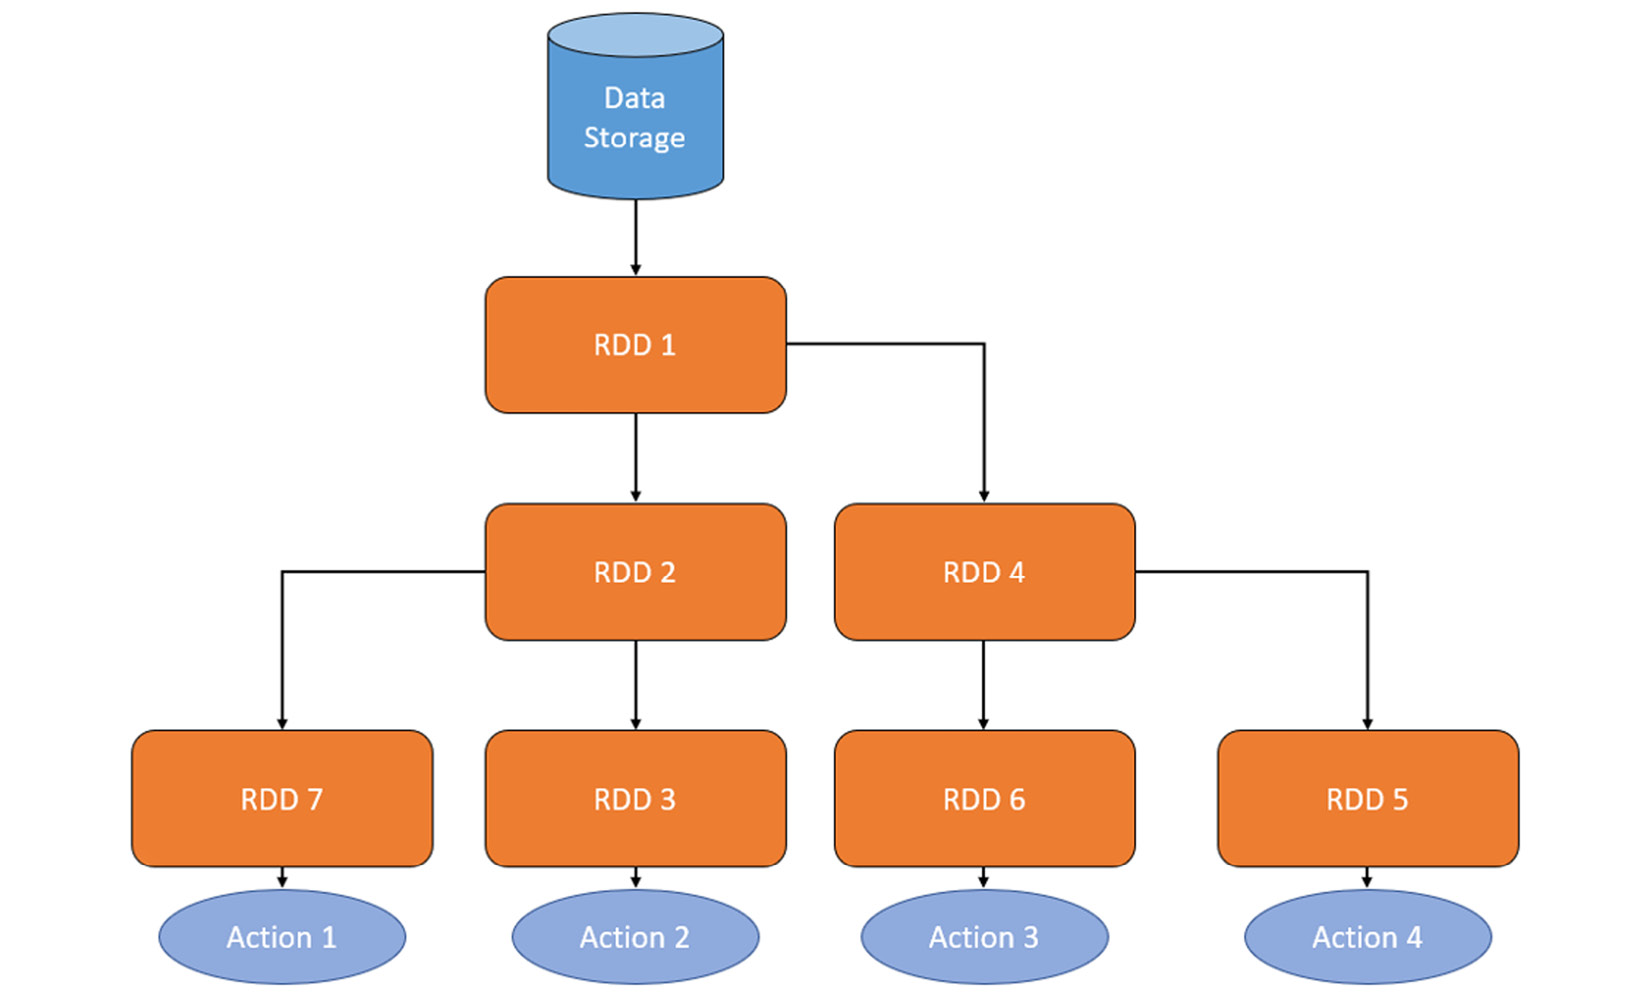
Figure 12.4 – Branched RDD transformations
In this case, you will need to keep all the RDDs. This is where Spark’s lazy evaluation comes into play. Lazy evaluation is an evaluation technique where evaluation expressions are delayed until the resultant value is needed. Let’s understand this better by looking into RDD operations. There are two types of operations:
- Transformations: Transformations are operations that produce a new RDD from an existing RDD that contains changes in the dataset. These operations mostly consist of converting raw datasets into a refined final dataset that can be used to extract evaluation metrics or other processes. This mostly involves data manipulation operations such as union operations or groupby operations.
- Actions: Actions are operations that take an RDD as input but don’t generate a new RDD as output. The output value derived from the action operation is sent back to the driver. This mostly involves operations such as count, which returns the number of elements in the RDD, or aggregate, which performs aggregate operations on the contents of the RDD and sends the result back.
Transformation operations are lazy. When performing transformation operations on an RDD, Spark will keep a note of what needs to be done but won’t do it immediately. It will only start the transformation process when it gets an action operation, hence the name lazy evaluation.
Let’s understand the whole process with a simple example. Let’s assume you have an RDD that contains a raw dataset of all the employees of a company and you want to calculate the average salary of all the senior ML engineers. Your transformation operations are to filter all the ML engineers into RDD 2 and then further filter by seniority into RDD 3 When you pass this transformation operation to Spark, it won’t create RDD 3 It will just keep a note of it. When it gets the action operation – that is, to calculate the average salary – that is when the lazy evaluation kicks in and Spark starts performing the transformation and, eventually, the action.
Lazy evaluation helps Spark understand what required transformation operations are needed to perform the action operation and find the most efficient way of doing the transformation while keeping the space complexity in mind.
Tip
Spark is a very sophisticated and powerful technology. It provides plenty of flexibility and can be configured to best suit different kinds of data processing needs. In this chapter, we have just explored the tip of the iceberg of Apache Spark. If you are interested in understanding the capabilities of Spark to their fullest extent, I highly encourage you to explore the Apache Spark documentation, which can be found at https://spark.apache.org/.
Now that we have a basic idea of how Spark works, let’s understand how H2O Sparkling Water combines both H2O and Spark.
Exploring H2O Sparkling Water
Sparkling Water is an H2O product that combines the fast and scalable ML of H2O with the analytics capabilities of Apache Spark. The combination of both these technologies allows users to make SQL queries for data munging, feed the results to H2O for model training, build and deploy models to production, and then use them for predictions.
H2O Sparkling Water is designed in a way that you can run H2O in regular Spark applications. It has provisions to run the H2O server inside of Spark executors so that the H2O server has access to all the data stored in executors for performing any ML-based computations.
The transparent integration between H2O and Spark provides the following benefits:
- H2O algorithms, including AutoML, can be used in Spark workflows
- Application-specific data structures can be transformed and supported between H2O and Spark
- You can use Spark RDDs as datasets in H2O ML algorithms
Sparkling Water supports two types of backends:
- Internal Backend: In this type of setup, the H2O application is launched inside the Spark executor once the H2O context is initialized. H2O then starts its service by initializing its key-value store and memory manager inside each of the executors. It is easy to deploy H2O Sparkling Water as an internal backend, but if Spark’s cluster manager decides to shut down any of the executors, then the H2O server running in the executor is also shut down. The internal backend is a default setup used by H2O Sparkling Water. The architecture of the internally running H2O Sparkling Water looks as follows:

Figure 12.5 – Sparkling Water internal backend architecture
As you can see, the H2O service resides inside each of the Spark executors.
- External Backend: In this type of setup, the H2O service is deployed separately from the Spark executors and the communication between the H2O servers and the Spark executors is handled by the Spark driver. The architecture of H2O Sparkling Water as an external backend works as follows:

Figure 12.6 – Sparkling Water external backend architecture
As you can see, the H2O cluster is run separately from the Spark executor. The separation has benefits since the H2O clusters are no longer affected by the shutting down of Spark Executors. However, this adds the overhead of the H2O driver needing to coordinate the communication between the H2O cluster and the Spark Executors.
Sparkling Water, despite being built on top of Spark, uses an H2OFrame when performing computations using the H2O server in the Sparkling Water cluster. Thus, there is a lot of data exchange and interchange between the Spark RDD and the H2OFrame.
DataFrames are converted between different types as follows:
- H2OFrame into RDD: When converting an H2OFrame into an RDD, instead of recreating the data into a different type, Sparkling Water creates a wrapper around the H2OFrame that acts like an RDD API. This wrapper interprets all RDD-based operations into identical H2OFrame operations.
- RDD into H2OFrame: Converting an RDD into an H2OFrame involves evaluating the data in the RDD and then converting it into an H2OFrame. The data in the H2OFrame, however, is heavily compressed. Data being shared between H2O and Spark depends on the type of backend used for deployment.
- Data Sharing in Internal Sparkling Water Backend: In the internal Sparkling Water backend, since the H2O service is launched inside the Spark Executor, both the Spark service and the H2O service inside the executor use the same Java Virtual Machine (JVM) and as such, the data is accessible to both the services. The following diagram shows the process of data sharing in the internal Sparkling Water backend:
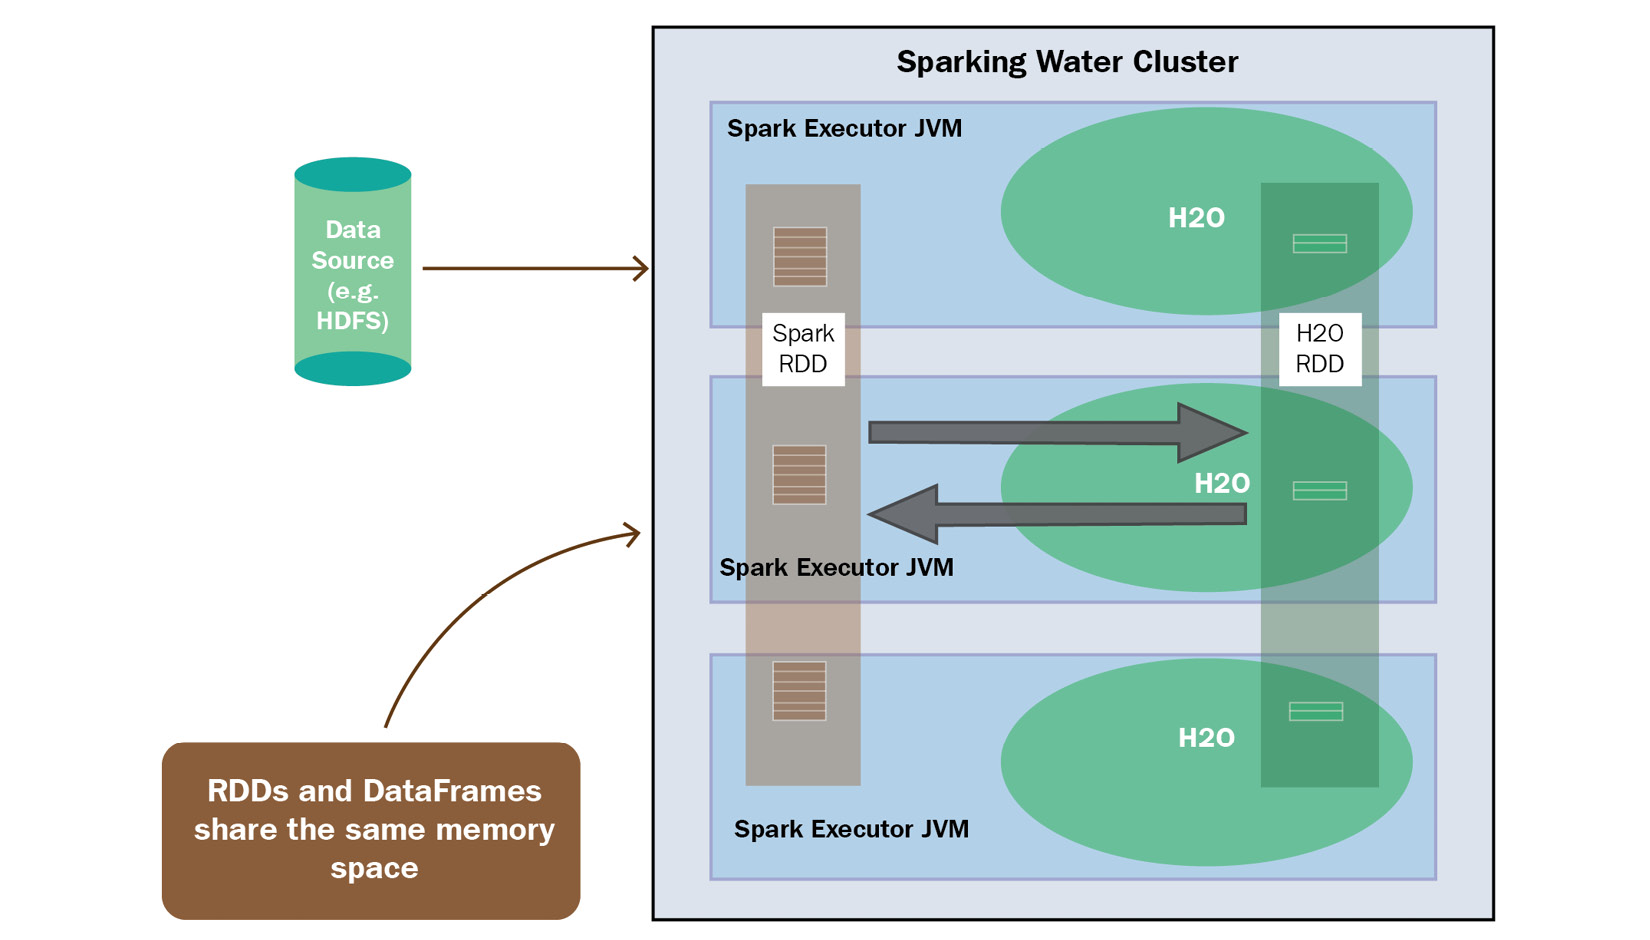
Figure 12.7 – Data sharing in the internal Sparkling Water backend
Since both services are on the same executor, you need to consider memory when converting DataFrames between the two types. You will need to allocate enough memory for both Spark and H2O to perform their respective operations. Spark will need the minimum memory of your dataset, plus additional memory for any transformations that you wish to perform. Also, converting RDDs into H2OFrames will lead to duplication of data, so it’s recommended that a 4x bigger dataset should be used for H2O.
- Data Sharing in External Sparkling Water Backend: In the external Sparkling Water backend, the H2O service is launched in a cluster that is separate from the Spark Executor. So, there is an added overhead of transferring the data from one cluster to another over the network. The following diagram should help you understand this:

Figure 12.8 – Data sharing in the external Sparkling Water backend
Since both services reside in their own cluster (if you have allocated enough memory to the respective clusters), you don’t need to worry about memory constraints.
Tip
H2O Sparkling Water can be run on different types of platforms in various kinds of ways. If you are interested in learning more about the various ways in which you can deploy H2O Sparkling Water, as well as getting more information about its backends, then feel free to check out https://docs.h2o.ai/sparkling-water/3.2/latest-stable/doc/design/supported_platforms.html.
Now that we know how H2O Sparkling Water works, let’s see how we can download and install it.
Downloading and installing H2O Sparkling Water
H2O Sparkling Water has some specific requirements that need to be satisfied before you can install it on your system. The requirements for installing H2O Sparkling Water version 3.36 are as follows:
- Operating System: H2O Sparkling Water is only supported for Linux, macOS, and Windows.
- Java Version: H2O Sparkling Water supports all Java versions above Java 1.8.
- Python Version: If you plan to use the Python version of Sparkling Water, known as PySparkling, then you will need a Python version above 3.6 installed on your system.
- H2O Version: H2O Sparkling Water version 3.36.1 requires the same version of H2O installed on your system. However, H2O Sparkling Water comes prepackaged with a compatible H2O version, so you don’t need to separately install H2O to use H2O Sparkling Water.
- Spark Version: H2O Sparkling Water version 3.36.1 strictly supports Spark 3.2. Any Spark version above or below version 3.2 may cause issues with installation or how H2O Sparkling Water works. Spark 3.2 has its own dependencies, which are as follows:
- Java Version: Spark 3.2 strictly supports Java 8 and Java 11
- Scala Version: Spark 3.2 strictly runs on Scala 2.12/2.13
- R Version: Spark 3.2 supports any R version above 3.5
- Python Version: Spark 3.2 supports any Python version above 3.6
- Environment Variables: You will need to set the SPARK_HOME environment variable to point to your local Spark 3.2 installation.
Now, let’s set up our system so that we can download and install H2O Sparkling Water. Follow these steps to set up H2O Sparkling Water:
- We will start by installing Java 11, which is needed for both Spark and H2O Sparkling Water. Even though Spark supports Java 8 as well, it is preferable to use Java 11 since it is the newer version with improvements and security patches. You can download and install Java 11 by executing the following command:
sudo apt-get install openjdk-11-jdk
- Optionally, if you wish to use the PySparkling Python interpreter, then install Python version 3.10. You can do so by executing the following command:
sudo apt install python3
- Now that we have the basic languages installed, let’s go ahead and download and install Spark version 3.2. You can download the specific version for Spark from the Apache Software Foundation official download page (https://www.apache.org/dyn/closer.lua/spark/spark-3.2.1/spark-3.2.1-bin-hadoop3.2.tgz) or by directly running the following command in your Terminal:
wget https://downloads.apache.org/spark/spark-3.1.2/spark-3.1.2-bin-hadoop3.2.tgz
If you are using the Maven project, then you can directly specify the Spark core Maven dependency, as follows:
<dependency>
<groupId>org.apache.spark</groupId>
<artifactId>spark-core_2.13</artifactId>
<version>3.1.2</version>
</dependency>
You can find the Maven repository for Spark at https://mvnrepository.com/artifact/org.apache.spark/spark-core.
- Then, you can extract the .tar file by executing the following command in your Terminal:
sudo tar xzvf spark-*
- Now that we have extracted the Spark binaries, let’s set our environment variables, as follows:
export SPARK_HOME="/path/to/spark/installation"
- We must also set the MASTER environment variable to local[*] to launch a local Spark cluster:
export MASTER="local[*]"
- Now that we have all the dependencies of H2O Sparkling Water installed and ready, let’s go ahead and download H2O Sparkling Water. You can download the latest version from https://h2o.ai/products/h2o-sparkling-water/. Upon clicking the Download Latest button, you should be redirected to the H2O Sparkling Water repository website, where you can download the H2O Sparkling Water version 3.36 ZIP file.
- Once the download has finished, you can unzip the ZIP file by executing the following command in your Terminal:
unzip sparkling-water-*
- You can see if everything is working fine by starting the H2O Sparkling Water shell by executing the following command inside your Sparkling Water installation folder:
bin/sparkling-shell
- By doing this, you can see if Sparkling Water has integrated with Spark by starting an H2O cloud inside the Spark cluster. You can do so by executing the following commands inside sparkling-shell:
import ai.h2o.sparkling._
val h2oContext = H2OContext.getOrCreate()
You should get an output similar to the following:

Figure 12.9 – Successfully starting up H2O Sparkling Water
Now that we have successfully downloaded and installed both Spark and H2O Sparkling Water and ensured that both are working correctly, there is some general recommended tuning that you must do, as per H2O.ai’s documentation. Let’s take a look:
- Increase the available memory for the Spark driver as well as the Spark Executors from the default value of 1G to 4G. You can do so by passing the following config parameter when starting the Sparkling shell:
bin/sparkling-shell --conf spark.executor.memory=4g spark.driver.memory=4g
If you are using YARN or your cluster manager, then use config spark.yarn.am.memory instead of spark.driver.memory. You can also set these values as default configuration properties by setting the values in the spark-defaults.conf file. This can be found among your Spark installation files.
- Along with cluster memory, it is also recommended to increase the PermGen size of your Spark nodes. The default PermGen size often proves to be very small and can lead to OutOfMemoryError. PermGen is a special heap space that is separate from the main memory heap. It is used by the JVM to keep track of loaded class metadata. You can set this value using the spark.driver.extraJavaOptions and spark.executor.extraJavaOptions configuration options, as follows:
bin/sparkling-shell --conf spark.driver.extraJavaOptions -XX:MaxPermSize=384 -XX:PermSize=384m spark.executor.extraJavaOptions -XX:MaxPermSize=384 -XX:PermSize=384m
- It is also recommended to keep your cluster homogeneous – that is, both the Spark driver and Executor have the same amount of resources allocated to them.
- The following configurations are also recommended to speed up and stabilize the creation of H2O services on top of the Spark cluster:
- Increase the number of seconds to wait for a task launched in data-local mode so that H2O tasks are processed locally with data. You can set this as follows:
bin/sparkling-shell --conf spark.locality.wait=3000
- Enforcing Spark starts scheduling jobs only when it is allocated 100% of its resources:
bin/sparkling-shell --conf spark.scheduler.minRegisteredResourcesRatio=1
- Don’t retry failed tasks:
bin/sparkling-shell --conf spark.task.maxFailures=1
- Set the interval between each executor’s heartbeats to the driver to less than Spark’s network timeout – that is spark.network.timeout – whose default value is 120 seconds. So, set the heartbeat value to around 10 seconds:
bin/sparkling-shell --conf spark.executor.heartbeatInterval=10s
- Increase the number of seconds to wait for a task launched in data-local mode so that H2O tasks are processed locally with data. You can set this as follows:
Now that we have appropriately configured Spark and H2O Sparkling Water, let’s see how we can use these technologies to solve an ML problem using both Spark and H2O AutoML.
Implementing Spark and H2O AutoML using H2O Sparkling Water
For this experiment, we will be using the Concrete Compressive Strength dataset. You can find this dataset at https://archive.ics.uci.edu/ml/datasets/Concrete+Compressive+Strength.
Here are more details on the dataset: I-Cheng Yeh, Modeling of strength of high performance concrete using artificial neural networks, Cement and Concrete Research, Vol. 28, No. 12, pp. 1797-1808 (1998).
Let’s start by understanding the problem statement we will be working with.
Understanding the problem statement
The Concrete Compressive Strength dataset is a dataset that consists of 1,030 data points consisting of the following features:
- Cement: This feature denotes the amount of cement added in kg in m3 of the mixture
- Blast Furnace Slag: This feature denotes the amount of slag added in kgs in m3 of the mixture
- Fly Ash: This feature denotes the amount of fly ash added in kgs in m3 of the mixture
- Water: This feature denotes the amount of water added in kgs in m3 of the mixture
- Superplasticizer: This feature denotes the amount of superplasticizer added in kgs in m3 of the mixture
- Coarse Aggregate: This feature denotes the amount of coarse aggregate – in other words, stone – added in kgs in m3 of the mixture
- Fine Aggregate: This feature denotes the amount of fine aggregate – in other words, sand – added in kgs in m3 of the mixture
- Age: This feature denotes the age of the cement
- Concrete compressive strength: This feature denotes the compressive strength of the concrete in Megapascals (MPa)
The ML problem is to use all the features to predict the compressive strength of the concrete.
The content of the dataset is as follows:

Figure 12.10 – Concrete Compressive Strength dataset sample
So, let’s see how we can solve this problem using H2O Sparkling Water. First, we shall learn how to train models using H2O AutoML and Spark.
Running AutoML training in Sparkling Water
Once you have successfully installed both Spark 3.2 and H2O Sparkling Water, as well as set the correct environment variables (SPARK_HOME and MASTER), you can start the model training process.
Follow these steps:
- Start the Sparkling shell by executing the command inside the H2O Sparkling Water extracted folder:
./bin/sparkling-shell
This should start a Scala shell in your Terminal. The output should look as follows:

Figure 12.11 – Scala shell for H2O Sparkling Water
You can also perform the same experiment in Python using the PySparkling shell. You can start the PySparkling shell by executing the following command:
./bin/PySparkling
You should get an output similar to the following:
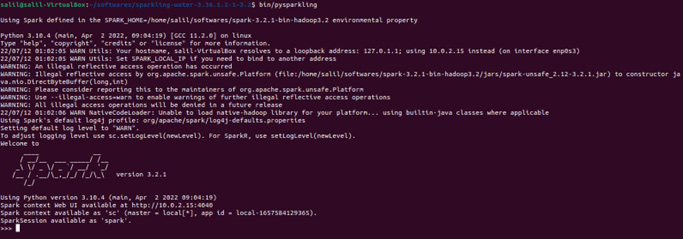
Figure 12.12 – Python shell for H2O Sparkling Water
- Now, we need to start an H2O cluster inside the Spark environment. We can do this by creating an H2OContext and then executing its getOrCreate()function. So, execute the following code in your Sparkling shell to import the necessary dependencies and execute the H2O context code:
import ai.h2o.sparkling._
import java.net.URI
val h2oContext = H2OContext.getOrCreate()
In the PySparkling shell, the code will be as follows:
from PySparkling import *
h2oContext = H2OContext.getOrCreate()
You should get an output similar to the following that states that your H2O context has been created:
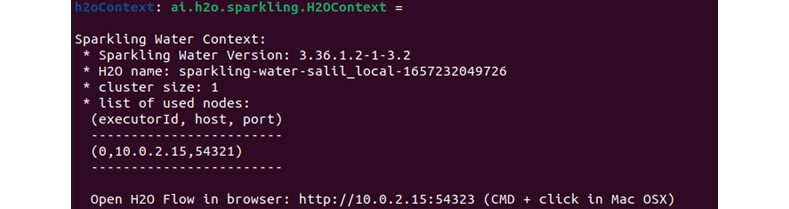
Figure 12.13 – H2O context created successfully
- Now, we must ensure that our Concrete Compressive Strength dataset can be downloaded on every node using Spark’s built-in file I/O system. So, execute the following commands to import your dataset:
import org.apache.spark.SparkFiles
spark.sparkContext.addFile("/home/salil/Downloads/Concrete_Data.csv")
In the PySparkling shell, we must import the dataset using H2O’s import function. The Python code will be as follows:
import h2o
h2oFrame = h2o.import_file("/home/salil/Downloads/Concrete_Data.csv")
- Once added, we must parse the dataset into a Spark Dataframe by executing the following commands in the Scala shell:
val sparkDataFrame = spark.read.option("header", "true").option("inferSchema", "true").csv(SparkFiles.get("Concrete_Data.csv"))
In the PySparkling shell, the equivalent code will be as follows:
sparkDataFrame = hc.asSparkFrame(h2oFrame)
- Now, sparkDataFrame contains the dataset as a Spark DataFrame. So, let’s perform a train-test split on it to split the DataFrame into testing and training DataFrames. You can do so by executing the following commands in the Sparkling shell:
val Array(trainingDataFrame, testingDataFrame) = sparkDataFrame.randomSplit(Array(0.7, 0.3), seed=123)
In the PySparkling shell, execute the following command:
[trainingDataFrame, testingDataFrame] = sparkDataFrame.randomSplit([0.7, 0.3], seed=123)
- We now have trainingDataFrame and testingDataFrame ready for training and testing, respectively. Let’s create an H2OAutoML instance to auto-train models on trainingDataFrame. Execute the following commands to instantiate an H2O AutoML object:
import ai.h2o.sparkling.ml.algos.H2OAutoML
val aml = new H2OAutoML()
In PySparkling, when initializing the H2O AutoML object, we also set the label column. The code for this is as follows:
from PySparkling.ml import H2OAutoML
aml = H2OAutoML(labelCol=" Concrete compressive strength ")
- Let’s see how we can set the label of the dataset so that the AutoML object is aware of which columns from the DataFrame are to be predicted in the Scala shell. Execute the following command:
aml.setLabelCol("Concrete compressive strength")
H2O will treat all the columns of the DataFrame as features unless explicitly specified. It will, however, ignore columns that are set as labels, fold columns, weights, or any other explicitly set ignored columns.
H2O AutoML distinguishes between regression and classification problems depending on the type of the response column. If the response column is a string, then H2O AutoML assumes it is a classification problem, whereas if the response column is numerical, then H2O AutoML assumes that it is a regression problem. You can override this default behavior by explicitly specifying this during instantiation by either instantiating the ai.h2o.sparkling.ml.algos.classification.H2OAutoMLClassifier object or the ai.h2o.sparkling.ml.algos.regression.H2OAutoMLRegressor object instead of ai.h2o.sparkling.ml.algos.H2OautoML, as we did in this example.
- Now, let’s limit AutoML model training to only 10 models. Execute the following command:
aml.setMaxModels(10)
The equivalent Python syntax for this code is the same, so execute this same command in your PySparkling shell.
- Once we have our AutoML object all set up, the only thing remaining is to trigger the training. To do so, execute the following command:
val model = aml.fit(trainingDataFrame)
The equivalent code for Python is as follows:
model = aml.fit(trainingDataFrame)
Once training is finished, you should get an output similar to the following:

Figure 12.14 – H2O AutoML result in H2O Sparkling Water
As you can see, we got a stacked ensemble model as the leader model with the model key below it. Below Model Key is Model summary, which contains the training and cross-validation metrics.
As we did in Chapter 2, Working with H2O Flow (H2O’s Web UI), we have not set the sort metric for the aml object, so by default, H2O AutoML will use the default metrics. This will be deviance since it is a regression problem. You can explicitly set the sort metric using automl.setSortMetric()and pass in the sort metric of your choice.
- You can also get a detailed view of the model by using the getModelDetails()function. Execute the following command:
model.getModelDetails()
This command will work on both the PySparkling and Scala shells and will output very detailed JSON about the model’s metadata.
- You can also view the AutoML leaderboard by executing the following command:
val leaderboard = aml.getLeaderboard()
leaderboard.show(false)
The equivalent Python code for the PySparkling shell is as follows:
leaderboard = aml.getLeaderboard("ALL")
leaderboard.show(truncate = False)
You should get an output similar to the following:

Figure 12.15 – H2O AutoML leaderboard in H2O Sparkling Water
This will display the leaderboard containing all the models that have been trained and ranked based on the sort metric.
- Making predictions using H2O Sparkling Water is also very easy. The prediction functionality is wrapped behind a simple, easy-to-use wrapper function called transform. Execute the following code to make predictions on the testing DataFrame:
model.transform(testingDataFrame).show(false)
In the PySparkling shell, it is slightly different. Here, you must execute the following code:
model.transform(testingDataFrame).show(truncate = False)
You should get an output similar to the following:

Figure 12.16 – Prediction results combined with the testing DataFrame
The output of the transform function shows the entire testDataFrame with two additional columns on the right-hand side called detailed_prediction and prediction.
- Now, let’s download this model as a MOJO so that we can use it for the next experiment, where we shall see how H2O Sparkling Water loads and uses MOJO models. Execute the following command:
model.write.save("model_dir")
This command is the same for both the Scala and Python shells and should download the model MOJO in your specified path. If you are using the Hadoop filesystem as your Spark data storage engine, then the command uses HDFS by default.
Now that we know how to import a dataset, train models, and make predictions using H2O Sparkling Water, let’s take it one step further and see how we can reuse existing model binaries, also called MOJOs, by loading them into H2O Sparkling Water and making predictions on them.
Making predictions using model MOJOs in H2O Sparkling Water
When you train models using H2O Sparkling Water, the models that are generated are always of the MOJO type. H2O Sparkling Water can load model MOJOs generated by H2O-3 and is also backward compatible with the different versions of H2O-3. You do not need to create an H2O context to use model MOJOs for predictions, but you do need a scoring environment. Let’s understand this by completing an experiment.
Follow these steps:
- To make predictions using imported model MOJOs, you need a scoring environment. We can create a scoring environment in two ways; let’s take a look:
- Use Sparkling Water prepared scripts, which set all the dependencies that are needed to load MOJOs and make predictions on the Spark classpath. Refer to the following commands:
The following command is for a Scala shell:
./bin/spark-shell --jars jars/sparkling-water-assembly-scoring_2.12-3.36.1.3-1-3.2-all.jar
The following command is for a Python shell:
./bin/pyspark --py-files py/h2o_PySparkling_scoring_3.2-3.36.1.3-1-3.2.zip
- Use Spark directly and set the dependencies manually.
- Once we have our scoring environment set up, we can load the model MOJOs. Model MOJOs loaded into Sparkling Water are immutable. So, making any configuration changes is not possible once you have loaded the model. However, you can set the configurations before you load the model. You can do so by using the H2OMOJOSettings()function. Refer to the following example:
import ai.h2o.sparkling.ml.models._
val modelConfigurationSettings = H2OMOJOSettings(convertInvalidNumbersToNa = true, convertUnknownCategoricalLevelsToNa = true)
For PySparkling, refer to the following code:
from PySparkling.ml import *
val modelConfigurationSettings = H2OMOJOSettings(convertInvalidNumbersToNa = true, convertUnknownCategoricalLevelsToNa = true)
- Once you have set the configuration settings, you can load the model MOJO using the createFromMojo() function from the H2OMOJOModel library. So, execute the following code to load the model MOJO that you created in the Running AutoML training in Sparkling Water section and pass the configuration settings:
val loadedModel = H2OMOJOModel.createFromMojo("model_dir/model_mojo", modelConfigurationSettings)
The Python equivalent is as follows:
loadedModel = H2OMOJOModel.createFromMojo("model_dir/ model_mojo", modelConfigurationSettings)
If you specify the model MOJO path as a relative path and if HDFS is enabled, Sparkling Water will check the HDFS home directory; otherwise, it will search for it from the current directory. You can also pass an absolute path to your model MOJO file.
You can also manually specify where you want to load your model MOJO. For the HDFS filesystem, you can use the following command:
loadedModel = H2OMOJOModel.createFromMojo("hdfs:///user/salil/ model_mojo")
For a local filesystem, you can use the following command:
loadedModel = H2OMOJOModel.createFromMojo("file:///Users/salil/some_ model_mojo")
- Once successfully loaded, you can simply use the model to make predictions, as we did in the Running AutoML training in Sparkling Water section. So, execute the following command to make predictions using your recently loaded model MOJO:
val predictionResults = loadedModel.transform(testingDataframe)
- The prediction results are stored as another Spark DataFrame. So, to view the prediction values, we can just display the prediction results by executing the following command:
predictionResults.show()
You should get an output similar to the following:
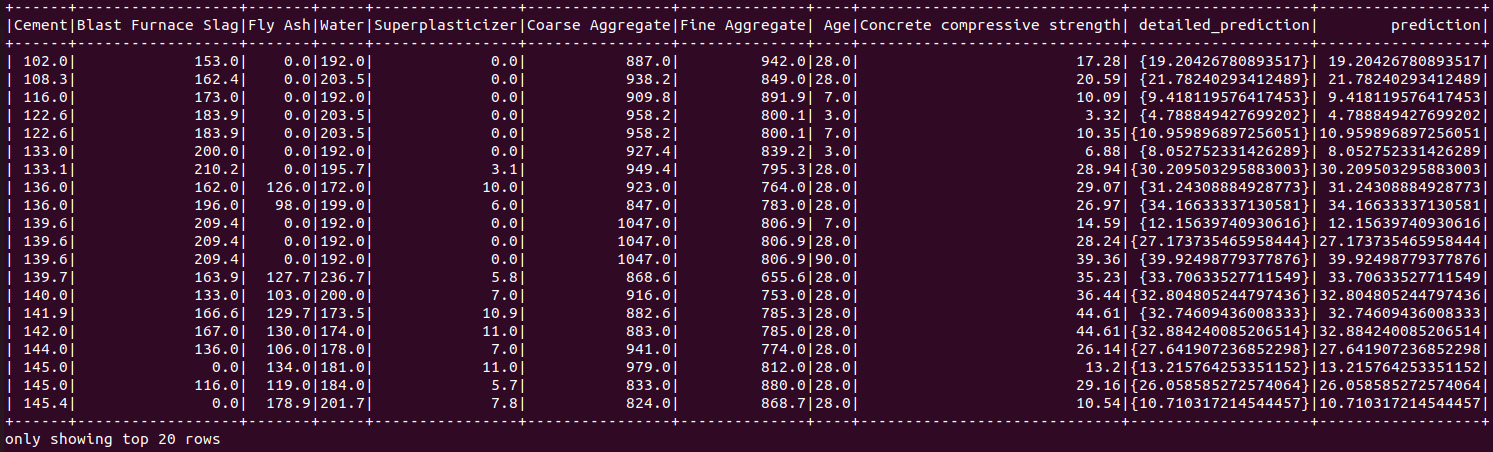
Figure 12.17 – Prediction results from the model MOJO
As you can see, we had specifically set withDetailedPredictionCol to False when loading the MOJO. That is why we can’t see the detailed _prediction_column in the prediction results.
Tip
There are plenty of configurations that you can set up when loading H2O model MOJOs into Sparkling Water. There are also additional methods available for MOJO models that can help gather more information about your model MOJO. All these details can be found on H2O’s official documentation page at https://docs.h2o.ai/sparkling-water/3.2/latest-stable/doc/deployment/load_mojo.html#loading-and-usage-of-h2o-3-mojo-model.
Congratulations – you have just learned how to use Spark and H2O AutoML together using H2O Sparkling Water.
Summary
In this chapter, we learned how to use H2O AutoML with Apache Spark using an H2O system called H2O Sparkling Water. We started by understanding what Apache Spark is. We investigated the various components that make up the Spark software. Then, we dived deeper into its architecture and understood how it uses a cluster of computers to perform data analysis. We investigated the Spark cluster manager, the Spark driver, Executor, and also the Spark Context. Then, we dived deeper into RDDs and understood how Spark uses them to perform lazy evaluations on transformation operations on the dataset. We also understood that Spark is smart enough to manage its resources efficiently and remove any unused RDDs during operations.
Building on top of this knowledge of Spark, we started exploring what H2O Sparkling Water is and how it uses Spark and H2O together in a seamlessly integrated system. We then dove deeper into its architecture and understood its two types of backends that can be used to deploy the system. We also understood how it handles data interchange between Spark and H2O.
Once we had a clear idea of what H2O Sparkling Water was, we proceeded with the practical implementation of using the system. We learned how to download and install the system and the strict dependencies it needs to run smoothly. We also explored the various configuration tunings that are recommended by H2O.ai when starting H2O Sparkling Water. Once the system was up and running, we performed an experiment where we used the Concrete Compressive Strength dataset to make predictions on the compressive strength of concrete using H2O Sparkling Water. We imported the dataset into a Spark cluster, performed AutoML using H2O AutoML, and used the leading model to make predictions. Finally, we learned how to export and import model MOJOs into H2O Sparkling Water and use them to make predictions.
In the next chapter, we shall explore a few case studies conducted by H2O.ai and understand the real-world implementation of H2O by businesses and how H2O helped them solve their ML problems.