
Assembly
The NDK allows you to use C and C++ in your Android applications. Chapter 2 showed you what native code would look like after the C or C++ code is compiled and how you could use objdump –d to disassemble a file (object file or library). For example, the ARM assembly code of computeIterativelyFaster is shown again in Listing 3–1.
Listing 3–1. ARM Assembly Code of C Implementation of computeIterativelyFaster
00000410 <computeIterativelyFaster>:

 410:   e3500001       cmp     r0, #1  ;  0x1

 414:   e92d0030       push    {r4, r5}

 418:   91a02000       movls   r2, r0

 41c:   93a03000       movls   r3, #0; 0x0

 420:   9a00000e       bls     460 <computeIterativelyFaster+0x50>
 424:   e2400001       sub     r0, r0, #1     ; 0x1

 428:   e1b010a0       lsrs    r1, r0, #1

 42c:   03a02001       moveq   r2, #1  ; 0x1

 430:   03a03000       moveq   r3, #0  ; 0x0

 434:   0a000009       beq     460 <computeIterativelyFaster+0x50>

 438:   e3a02001       mov     r2, #1  ; 0x1

 43c:   e3a03000       mov     r3, #0  ; 0x0

 440:   e0024000       and     r4, r2, r0

 444:   e3a05000       mov     r5, #0  ; 0x0

 448:   e0944002       adds    r4, r4, r2

 44c:   e0a55003       adc     r5, r5, r3

 450:   e0922004       adds    r2, r2, r4

 454:   e0a33005       adc     r3, r3, r5

 458:   e2511001       subs    r1, r1, #1     ; 0x1

 45c:   1afffff9       bne     448 < computeIterativelyFaster+0x38>

 460:   e1a01003       mov     r1, r3

 464:   e1a00002       mov     r0, r2

 468:   e8bd0030       pop     {r4, r5}

 46c:   e12fff1e              bx       lr
In addition to allowing you to use C or C++ in your application, the Android NDK also lets you to write assembly code directly. Strictly speaking, such a feature is not NDK-specific as assembly code is supported by the GCC compiler, which is used by the Android NDK. Consequently, almost everything you learn in this chapter can also be applied to other projects of yours, for example in applications targeting iOS devices like the iPhone.
As you can see, assembly code can be quite difficult to read, let alone write. However, being able to understand assembly code will allow you to more easily identify bottlenecks and therefore more easily optimize your applications. It will also give you bragging rights.
To familiarize yourself with assembly, we will look at three simple examples:
- Computation of the greatest common divisor
- Conversion from one color format to another
- Parallel computation of average of 8-bit values
These examples are simple enough to understand for developers who are new to assembly, yet they exhibit important principles of assembly optimization. Because these examples introduce you to only a subset of the available instructions, a more complete introduction to the ARM instruction set will follow as well as a brief introduction to the überpowerful ARM SIMD instructions. Finally, you will learn how to dynamically check what CPU features are available, a mandatory step in your applications that target features not available on all devices.
Greatest Common Divisor
The greatest common divisor (gcd) of two non-zero integers is the largest positive integer that divides both numbers. For example, the greatest common divisor of 10 and 55 is 5. An implementation of a function that computes the greatest common divisor of two integers is shown in Listing 3–2.
Listing 3–2. Greatest Common Divisor Simple Implementation
unsigned int gcd (unsigned int a, unsigned int b)

{

    // a and b must be different from zero (else, hello infinite loop!)


    while (a != b) {

        if (a > b) {

            a -= b;

        } else {

            b -= a;

        }

    }

    return a;

}
If you define APP_ABI in your Application.mk file such that x86, armeabi, and armeabi-v7 architectures are supported in your application, then you will have three different libraries. Disassembling each library will result in three different pieces of assembly code. However, since you have the option to compile in either ARM or Thumb mode with the armeabi and armeabi-v7a ABIs, there are actually a total of five pieces of code you can review.
TIP: Instead of specifying each individual ABI you want to compile a library for, you can define APP_ABI as “all” (APP_ABI := all) starting with NDK r7. When a new ABI is supported by the NDK you will only have to execute ndk-build without having to modify Application.mk.
Listing 3–3 shows the resulting ×86 assembly code while Listing 3–4 and Listing 3–5 show the ARMv5 and ARMv7 assembly code respectively. Because different versions of compilers can output different code, the code you will observe may be slightly different than the that shown here. The generated code will also depend on the optimization level and other options you may have defined.
Listing 3–3. x86 Assembly Code
00000000 <gcd>:

   0:    8b 54 24 04  mov    0x4(%esp),%edx

   4:    8b 44 24 08  mov    0x8(%esp),%eax

   8:    39 c2        cmp    %eax,%edx

   a:    75 0a        jne    16 <gcd+0x16>

   c:    eb 12        jmp    20 <gcd+0x20>

   e:    66 90        xchg   %ax,%ax

  10:    29 c2        sub    %eax,%edx

  12:    39 d0        cmp    %edx,%eax

  14:    74 0a        je     20 <gcd+0x20>

  16:    39 d0        cmp    %edx,%eax

  18:    72 f6        jb     10 <gcd+0x10>

  1a:    29 d0        sub    %edx,%eax

  1c:    39 d0        cmp    %edx,%eax
  1e:    75 f6        jne    16 <gcd+0x16>

  20:    f3 c3        repz ret
If you are familiar with the x86 mnemonics, you can see that this code makes heavy use of the jump instructions (jne, jmp, je, jb). Also, while most instructions are 16-bit (for example, “f3 c3”), some are 32-bit.
NOTE: Make sure you use the right version of objdump to disassemble object files and libraries. For example, using the ARM version of objdump to attempt to disassemble an x86 object file will result in the following message:
   arm-linux-androideabi-objdump: Can't disassemble for architecture

UNKNOWN!
Listing 3–4. ARMv5 Assembly Code (ARM Mode)
00000000 <gcd>:

   0:    e1500001    cmp    r0, r1

   4:    e1a03000    mov    r3, r0

   8:    0a000004    beq    20 <gcd+0x20>

   c:    e1510003    cmp    r1, r3

   10:   30613003    rsbcc    r3, r1, r3

   14:   20631001    rsbcs    r1, r3, r1

   18:   e1510003    cmp    r1, r3

   1c:   1afffffa    bne    c <gcd+0xc>

   20:   e1a00001    mov    r0, r1

   24:   e12fff1e    bx    lr
Listing 3–5. ARMv7a Assembly Code (ARM Mode)
00000000 <gcd>:

   0:    e1500001    cmp    r0, r1

   4:    e1a03000    mov    r3, r0

   8:    0a000004    beq    20 <gcd+0x20>

   c:    e1510003    cmp    r1, r3

   10:   30613003    rsbcc    r3, r1, r3

   14:   20631001    rsbcs    r1, r3, r1

   18:   e1510003    cmp    r1, r3

   1c:   1afffffa    bne    c <gcd+0xc>

   20:   e1a00001    mov    r0, r1

   24:   e12fff1e    bx    lr
As it turns out, the GCC compiler generates the same code for the armeabi and armeabi-v7a ABIs when the code shown in Listing 3–2 is compiled in ARM mode. This won't always be the case though as the compiler usually takes advantage of new instructions defined in newer ABIs.
Because you could decide to compile the code in Thumb mode instead of ARM mode, let's also review the code that would be generated in Thumb mode. Listing 3–6 shows the ARMv5 assembly code (armeabi ABI in Application.mk) while Listing 3–7 shows the ARMv7 assembly code (armeabi-v7a ABI in Application.mk).
Listing 3–6. ARMv5 Assembly Code (Thumb Mode)
00000000 <gcd>:

   0:    1c03    adds    r3, r0, #0

   2:    428b    cmp    r3, r1

   4:    d004    beq.n    10 <gcd+0x10>

   6:    4299    cmp    r1, r3

   8:    d204    bcs.n    14 <gcd+0x14>

   a:    1a5b    subs    r3, r3, r1

   c:    428b    cmp    r3, r1

   e:    d1fa    bne.n    6 <gcd+0x6>

  10:    1c08    adds    r0, r1, #0

  12:    4770    bx    lr

  14:    1ac9    subs    r1, r1, r3

  16:    e7f4    b.n    2 <gcd+0x2>
All instructions in Listing 3–6 are 16-bit (that is, “e7f4,” the last instruction of the listing) and the twelve instructions therefore require 24 bytes of space.
Listing 3–7. ARMv7 Assembly Code (Thumb Mode)
00000000 <gcd>:

   0:    4288        cmp    r0, r1

   2:    4603        mov    r3, r0

   4:    d007        beq.n    16 <gcd+0x16>

   6:    4299        cmp    r1, r3

   8:    bf34        ite    cc

   a:    ebc1 0303   rsbcc    r3, r1, r3

   e:    ebc3 0101   rsbcs    r1, r3, r1

  12:    4299        cmp    r1, r3

  14:    d1f7        bne.n    6 <gcd+0x6>

  16:    4608        mov    r0, r1

  18:    4770        bx    lr

  1a:    bf00        nop
This time, the two listings are different. While the ARMv5 architecture uses the Thumb instruction set (all 16-bit instructions), the ARMv7 architecture supports the Thumb2 instruction set and instructions can be 16- or 32-bit.
As a matter of fact, Listing 3–7 looks a lot like Listing 3–5. The main difference is with the use of the ite (if-then-else) instruction in Listing 3–7, and the fact that the ARM code is 40-byte long while the Thumb2 code is only 28-byte long.
NOTE: Even though the ARM architecture is the dominant one, being able to read x86 assembly code cannot hurt.
Usually, the GCC compiler does a pretty good job and you won't have to worry too much about the generated code. However, if a piece of code you wrote in C or C++ turns out to be one of the bottlenecks of your application, you should carefully review the assembly code the compiler generated and determine whether you could do better by writing the assembly code yourself. Very often the compiler will generate high-quality code and you won't be able to do better. That being said, there are cases where, armed with both an intimate knowledge of the instruction set and a slight taste for suffering, you can achieve better results than the compiler.
NOTE: Consider modifying the C/C++ code to achieve better performance as it is often much easier than writing assembly code.
The gcd function can indeed be implemented differently, resulting in code not only faster but also more compact, as shown in Listing 3–8.
Listing 3–8. Hand-crafted Assembly Code
.global gcd_asm

.func gcd_asm


gcd_asm:

    cmp   r0, r1

    subgt r0, r0, r1

    sublt r1, r1, r0

    bne   gcd_asm

    bx    lr

.endfunc

.end
Not including the final instruction to return from the function, the core of the algorithm is implemented in only four instructions. Measurements also showed this implementation as being faster. Note the single call to the CMP instruction in Listing 3–8 compared with the two calls in Listing 3–7.
This code can be copied in a file called gcd_asm.S and added to the list of files to compile in Android.mk. Because this file is using ARM instructions, it obviously won't compile if the target ABI is x86. Consequently, your Android.mk file should make sure the file is only part of the list of files to compile when it is compatible with the ABI. Listing 3–9 shows how to modify Android.mk accordingly.
Listing 3–9. Android.mk
LOCAL_PATH := $(call my-dir)


include $(CLEAR_VARS)

LOCAL_MODULE := chapter3

LOCAL_SRC_FILES := gcd.c


ifeq ($(TARGET_ARCH_ABI),armeabi)

LOCAL_SRC_FILES += gcd_asm.S

endif


ifeq ($(TARGET_ARCH_ABI),armeabi-v7a)

LOCAL_SRC_FILES += gcd_asm.S

endif


include $(BUILD_SHARED_LIBRARY)
Because gcd_asm.S is already written using assembly code, the resulting object file should look extremely similar to the source file. Listing 3–10 shows the disassembled code and indeed, the disassembled code is virtually identical to the source.
Listing 3–10. Disassembled gcd_asm Code
00000000 <gcd_asm>:

   0:    e1500001          cmp    r0, r1

   4:    c0400001          subgt    r0, r0, r1

   8:    b0411000          sublt    r1, r1, r0

   c:    1afffffb          bne    0 <gcd_asm>

  10:    e12fff1e          bx    lr
NOTE: The assembler may in some cases substitute some instructions for others so you may still observe slight differences between the code you wrote and the disassembled code.
By simplifying the assembly code, we achieved better results without dramatically making maintenance more complicated.
Color Conversion
A common operation in graphics routines is to convert a color from one format to another. For example, a 32-bit value representing a color with four 8-bit channels (alpha, red, green, and blue) could be converted to a 16-bit value representing a color with three channels (5 bits for red, 6 bits for green, 5 bits for blue, no alpha). The two formats would typically be referred to as ARGB8888 and RGB565 respectively.
Listing 3–11 shows a trivial implementation of such a conversion.
Listing 3–11. Implementation of Color Conversion Function
unsigned int argb888_to_rgb565 (unsigned int color)

{

    /*

        input:  aaaaaaaarrrrrrrrggggggggbbbbbbbb

        output: 0000000000000000rrrrrggggggbbbbb

    */


    return

        /* red   */ ((color >> 8) & 0xF800) |

        /* green */ ((color >> 5) & 0x07E0) |

        /* blue  */ ((color >> 3) & 0x001F);

}
Once again, five pieces of assembly code can be analyzed. Listing 3–12 shows the x86 assembly code, Listing 3–13 shows the ARMv5 assembly code in ARM mode, Listing 3–14 shows the ARMv7 assembly code in ARM mode, Listing 3–15 shows the ARMv5 assembly code in Thumb mode, and finally Listing 3–16 shows the ARMv7 assembly code in Thumb mode.
Listing 3–12. x86 Assembly Code
00000000 <argb8888_to_rgb565>:

   0:    8b 54 24 04          mov    0x4(%esp),%edx

   4:    89 d0                mov    %edx,%eax

   6:    89 d1                mov    %edx,%ecx

   8:    c1 e8 05             shr    $0x5,%eax

   b:    c1 e9 08             shr    $0x8,%ecx

   e:    25 e0 07 00 00       and    $0x7e0,%eax

  13:    81 e1 00 f8 00 00    and    $0xf800,%ecx

  19:    c1 ea 03             shr    $0x3,%edx

  1c:    09 c8                or      %ecx,%eax

  1e:    83 e2 1f             and    $0x1f,%edx

  21:    09 d0                or      %edx,%eax

  23:    c3                   ret
Listing 3–13. ARMv5 Assembly Code (ARM Mode)
00000000 <argb8888_to_rgb565>:

   0:    e1a022a0          lsr    r2, r0, #5

   4:    e1a03420          lsr    r3, r0, #8

   8:    e2022e7e          and    r2, r2, #2016    ; 0x7e0

   c:    e2033b3e          and    r3, r3, #63488    ; 0xf800

  10:    e1a00c00          lsl    r0, r0, #24

  14:    e1823003          orr    r3, r2, r3

  18:    e1830da0          orr    r0, r3, r0, lsr #27

  1c:    e12fff1e          bx    lr
Listing 3–14. ARMv7 Assembly Code (ARM Mode)
00000000 <argb8888_to_rgb565>:

   0:    e7e431d0          ubfx    r3, r0, #3, #5

   4:    e1a022a0          lsr    r2, r0, #5

   8:    e1a00420          lsr    r0, r0, #8

   c:    e2022e7e          and    r2, r2, #2016    ; 0x7e0

  10:    e2000b3e          and    r0, r0, #63488    ; 0xf800

  14:    e1820000          orr    r0, r2, r0

  18:    e1800003          orr    r0, r0, r3

  1c:    e12fff1e          bx    lr
Listing 3–15. ARMv5 Assembly Code (Thumb Mode)
00000000 <argb8888_to_rgb565>:

   0:    23fc          movs    r3, #252

   2:    0941          lsrs    r1, r0, #5

   4:    00db          lsls    r3, r3, #3

   6:    4019          ands    r1, r3

   8:    23f8          movs    r3, #248

   a:    0a02          lsrs    r2, r0, #8

   c:    021b          lsls    r3, r3, #8

   e:    401a          ands    r2, r3

  10:    1c0b          adds    r3, r1, #0

  12:    4313          orrs    r3, r2

  14:    0600          lsls    r0, r0, #24

  16:    0ec2          lsrs    r2, r0, #27

  18:    1c18          adds    r0, r3, #0

  1a:    4310          orrs    r0, r2

  1c:    4770          bx    lr

  1e:    46c0          nop            (mov r8, r8)
Listing 3–16. ARMv7 Assembly Code (Thumb Mode)
00000000 <argb888_to_rgb565>:

   0:    0942          lsrs    r2, r0, #5

   2:    0a03          lsrs    r3, r0, #8

   4:    f402 62fc     and.w    r2, r2, #2016    ; 0x7e0

   8:    f403 4378     and.w    r3, r3, #63488    ; 0xf800

   c:    4313          orrs    r3, r2

   e:    f3c0 00c4     ubfx    r0, r0, #3, #5

  12:    4318          orrs    r0, r3

  14:    4770          bx    lr

  16:    bf00          nop
Simply looking at how many instructions are generated, the ARMv5 code in Thumb mode seems to be the least efficient. That being said, counting the number of instructions is not an accurate way of determining how fast or how slow a piece of code is going to be. To get a closer estimate of the duration, one would have to count how many cycles each instruction will need to complete. For example, the “orr r3, r2” instruction needs only one cycle to execute. Today's CPUs make it quite hard to compute how many cycles will ultimately be needed as they can execute several instructions per cycle and in some cases even execute instructions out of order to maximize throughput.
NOTE: For example, refer to the Cortex-A9 Technical Reference Manual to learn more about the cycle timings of instructions.
Now, it is possible to write a slightly different version of the same conversion function using the UBFX and BFI instructions, as shown in Listing 3–17.
Listing 3–17. Hand-crafted Assembly Code
.global argb8888_ro_rgb565_asm

.func argb8888_ro_rgb565_asm


argb8888_ro_rgb565_asm:

    // r0=aaaaaaaarrrrrrrrggggggggbbbbbbbb

    // r1=undefined (scratch register)


    ubfx r1, r0, #3, #5


    // r1=000000000000000000000000000bbbbb


    lsr r0, r0, #10


    // r0=0000000000aaaaaaaarrrrrrrrgggggg


    bfi r1, r0, #5, #6


    // r1=000000000000000000000ggggggbbbbb


    lsr r0, r0, #9


    // r0=0000000000000000000aaaaaaaarrrrr


    bfi r1, r0, #11, #5


    // r1=0000000000000000rrrrrggggggbbbbb


    mov r0, r1


    // r0=0000000000000000rrrrrggggggbbbbb


    bx    lr

.endfunc

.end
Since this code uses the UBFX and BFI instructions (both introduced in the ARMv6T2 architecture), it won't compile for the armeabi ABI (ARMv5). Obviously it won't compile for the x86 ABI either.
Similar to what was shown in Listing 3–9, your Android.mk should make sure the file is only compiled with the right ABI. Listing 3–18 shows the addition of the rgb.c and rgb_asm.S files to the build.
Listing 3–18. Android.mk
LOCAL_PATH := $(call my-dir)


include $(CLEAR_VARS)

LOCAL_MODULE := chapter3

LOCAL_SRC_FILES := gcd.c rgb.c


ifeq ($(TARGET_ARCH_ABI),armeabi)

LOCAL_SRC_FILES += gcd_asm.S

endif


ifeq ($(TARGET_ARCH_ABI),armeabi-v7a)

LOCAL_SRC_FILES += gcd_asm.S rgb_asm.S

endif


include $(BUILD_SHARED_LIBRARY)
If you add rgb_asm.S to the list of files to compile with the armeabi ABI, you will then get the following errors:
Error: selected processor does not support `ubfx r1,r0,#3,#5'
Error: selected processor does not support `bfi r1,r0,#5,#6'
Error: selected processor does not support `bfi r1,r0,#11,#5'
Parallel Computation of Average
In this example, we want to treat each 32-bit value as four independent 8-bit values and compute the byte-wise average between two such values. For example, the average of 0×10FF3040 and 0×50FF7000 would be 0×30FF5020 (average of 0×10 and 0×50 is 0×30, average of 0×FF and 0×FF is 0×FF).
An implementation of such function is shown in Listing 3–19.
Listing 3–19. Implementation of Parallel Average Function
unsigned int avg8 (unsigned int a, unsigned int b)

{

    return

        ((a >> 1) & 0x7F7F7F7F) +

        ((b >> 1) & 0x7F7F7F7F) +

        (a & b & 0x01010101);

}
Like with the two previous examples, five pieces of assembly code are shown in Listings 3–20 to 3–24.
Listing 3–20. x86 Assembly Code
00000000 <avg8>:

   0:    8b 54 24 04          mov    0x4(%esp),%edx

   4:    8b 44 24 08          mov    0x8(%esp),%eax

   8:    89 d1                mov    %edx,%ecx

   a:    81 e1 01 01 01 01    and    $0x1010101,%ecx

  10:    d1 ea                shr    %edx

  12:    21 c1                and    %eax,%ecx

  14:    81 e2 7f 7f 7f 7f    and    $0x7f7f7f7f,%edx

  1a:    d1 e8                shr    %eax

  1c:    8d 14 11             lea    (%ecx,%edx,1),%edx

  1f:    25 7f 7f 7f 7f       and    $0x7f7f7f7f,%eax

  24:    8d 04 02             lea    (%edx,%eax,1),%eax

  27:    c3                   ret
Listing 3–21. ARMv5 Assembly Code (ARM mode)
00000000 <avg8>:

   0:    e59f301c          ldr    r3, [pc, #28]    ; 24 <avg8+0x24>

   4:    e59f201c          ldr    r2, [pc, #28]    ; 28 <avg8+0x28>

   8:    e0003003          and    r3, r0, r3

   c:    e0033001          and    r3, r3, r1

  10:    e00200a0          and    r0, r2, r0, lsr #1

  14:    e0830000          add    r0, r3, r0

  18:    e00220a1          and    r2, r2, r1, lsr #1

  1c:    e0800002          add    r0, r0, r2

  20:    e12fff1e          bx    lr

  24:    01010101          .word    0x01010101

  28:    7f7f7f7f          .word    0x7f7f7f7f
Because the ARMv5 MOV instruction cannot simply copy the value to the register, an LDR instruction is used instead to copy 0×01010101 to register r3. Similarly, an LDR instruction is used to copy 0×7f7f7f7f to r2.
Listing 3–22. ARMv7 Assembly Code (ARM Mode)
00000000 <avg8>:

   0:    e3003101          movw    r3, #257    ; 0x101

   4:    e3072f7f          movw    r2, #32639    ; 0x7f7f

   8:    e3403101          movt    r3, #257    ; 0x101

   c:    e3472f7f          movt    r2, #32639    ; 0x7f7f

  10:    e0003003          and    r3, r0, r3

  14:    e00200a0          and    r0, r2, r0, lsr #1

  18:    e0033001          and    r3, r3, r1

  1c:    e00220a1          and    r2, r2, r1, lsr #1

  20:    e0830000          add    r0, r3, r0

  24:    e0800002          add    r0, r0, r2

  28:    e12fff1e          bx    lr
Instead of using an LDR instruction to copy 0x01010101 to r3, the ARMv7 code uses two MOV instructions: the first one, MOVW, is to copy a 16-bit value (0x0101) to the bottom 16 bits of r3 while the second one, MOVT, is to copy 0×0101 to the top 16 bits of r3. After these two instructions, r3 will indeed contain the 0×01010101 value. The rest of the assembly code looks like the ARMv5 assembly code.
Listing 3–23. ARMv5 Assembly Code (Thumb Mode)
00000000 <avg8>:

   0:    b510          push    {r4, lr}

   2:    4c05          ldr    r4, [pc, #20]    (18 <avg8+0x18>)

   4:    4b05          ldr    r3, [pc, #20]    (1c <avg8+0x1c>)

   6:    4004          ands    r4, r0

   8:    0840          lsrs    r0, r0, #1

   a:    4018          ands    r0, r3

   c:    400c          ands    r4, r1

   e:    1822          adds    r2, r4, r0

  10:    0848          lsrs    r0, r1, #1

  12:    4003          ands    r3, r0

  14:    18d0          adds    r0, r2, r3

  16:    bd10          pop    {r4, pc}

  18:    01010101     .word    0x01010101

  1c:    7f7f7f7f     .word    0x7f7f7f7f
Since this code makes use of the r4 register, it needs to be saved onto the stack and later restored
Listing 3–24. ARMv7 Assembly Code (Thumb Mode)
00000000 <avg8>:

   0:    f000 3301     and.w    r3, r0, #16843009    ; 0x1010101

   4:    0840          lsrs    r0, r0, #1

   6:    400b          ands    r3, r1

   8:    f000 307f     and.w    r0, r0, #2139062143    ; 0x7f7f7f7f

   c:    0849          lsrs    r1, r1, #1

   e:    1818          adds    r0, r3, r0

  10:    f001 317f     and.w    r1, r1, #2139062143    ; 0x7f7f7f7f

  14:    1840          adds    r0, r0, r1

  16:    4770          bx    lr
The Thumb2 assembly code is more compact as only one instruction is needed to copy 0×01010101 and 0×7f7f7f7f to r3 and r0.
Before deciding to write optimized assembly code, you may stop and think a little bit about how the C code itself could be optimized. After a little bit of thinking, you may end up with the code shown in Listing 3–25.
Listing 3–25. Faster Implementation of Parallel Average Function
unsigned int avg8_faster (unsigned int a, unsigned int b)

{

    return (((a ^ b) & 0xFEFEFEFE) >> 1) + (a & b);

}
The C code is more compact that the first version and would appear to be faster. The first version used two >>, four &, and two + operations (total of eight “basic” operations) while the new version uses only five “basic” operations. Intuitively, the second implementation should be faster. And it is indeed.
Listing 3–26 shows the ARMv7 Thumb resulting assembly code.
Listing 3–26. ARMv7 Assembly Code (Thumb Mode)
00000000 <avg8_faster>:

   0:    ea81 0300     eor.w    r3, r1, r0

   4:    4001          ands    r1, r0

   6:    f003 33fe     and.w    r3, r3, #4278124286    ; 0xfefefefe

   a:    eb01 0053     add.w    r0, r1, r3, lsr #1

   e:    4770          bx    lr
This faster implementation results in faster and more compact code (not including the instruction to return from the function, four instructions instead of eight).
While this may sound terrific, a closer look at the ARM instruction set reveals the UHADD8 instruction, which would perform an unsigned byte-wise addition, halving the results. This happens to be exactly what we want to compute. Consequently, an even faster implementation can easily be implemented and is shown in Listing 3–27.
Listing 3–27. Hand-crafted Assembly Code
.global avg8_asm

.func avg8_asm


avg8_asm:

    uhadd8 r0, r0, r1

    bx    lr

.endfunc

.end
Other “parallel instructions” exist. For example, UHADD16 would be like UHADD8 but instead of performing byte-wise additions it would perform halfword-wise additions. These instructions can improve performance significantly but because compilers have a hard time generating code that uses them, you will often find yourself having to write the assembly code manually in order to take advantage of them.
NOTE: Parallel instructions were introduced in the ARMv6 architecture so you won't be able to use them when compiling for the armeabi ABI (ARMv5).
Writing whole functions using assembly code can quickly become tedious. In many cases, only parts of a routine would benefit from using assembly code while the rest can be written in C or C++. The GCC compiler lets you mix assembly with C/C++, as shown in Listing 3–28.
Listing 3–28. Assembly Code Mixed With C Code
unsigned int avg8_fastest (unsigned int a, unsigned int b)

{

#if defined(__ARM_ARCH_7A__)

    unsigned int avg;


    asm("uhadd8 %[average], %[val1], %[val2]"

        : [average] "=r" (avg)

        : [val1] "r" (a), [val2] "r" (b));


    return avg;

#else

   return (((a ^ b) & 0xFEFEFEFE) >> 1) + (a & b); // default generic implementation

#endif

}
NOTE: Visit http://gcc.gnu.org/onlinedocs/gcc/Extended-Asm.html for more information about extended asm and http://gcc.gnu.org/onlinedocs/gcc/Constraints.html for details about the constraints. A single asm() statement can include multiple instructions.
The updated Android.mk is shown in Listing 3–29.
Listing 3–29. Android.mk
LOCAL_PATH := $(call my-dir)


include $(CLEAR_VARS)

LOCAL_MODULE := chapter3

LOCAL_SRC_FILES := gcd.c rgb.c avg8.c


ifeq ($(TARGET_ARCH_ABI),armeabi)

LOCAL_SRC_FILES += gcd_asm.S

endif


ifeq ($(TARGET_ARCH_ABI),armeabi-v7a)

LOCAL_SRC_FILES += gcd_asm.S rgb_asm.S avg8_asm.S

endif


include $(BUILD_SHARED_LIBRARY)
This example shows that sometimes, good knowledge of the instruction set is needed to achieve the best performance. Since Android devices are mostly based on ARM architectures, you should focus your attention on the ARM instruction set. The ARM documentation available on the ARM website (infocenter.arm.com) is of great quality so make sure you use it.
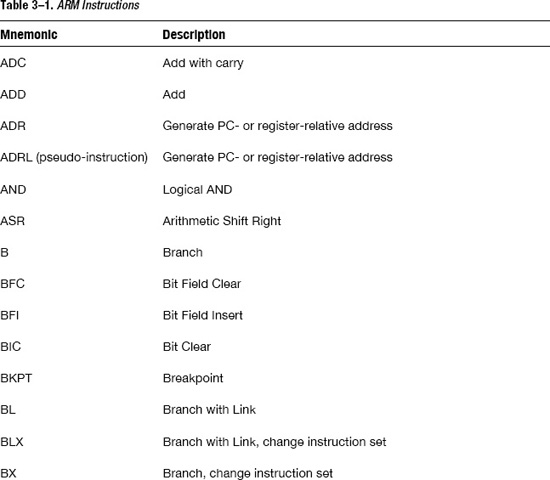
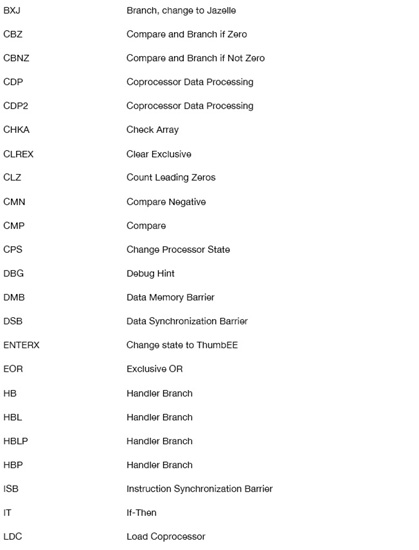
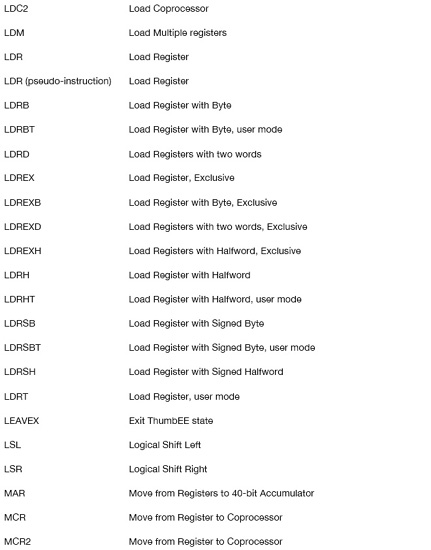
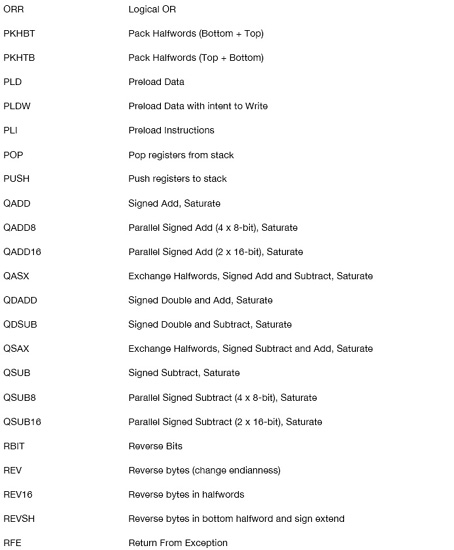
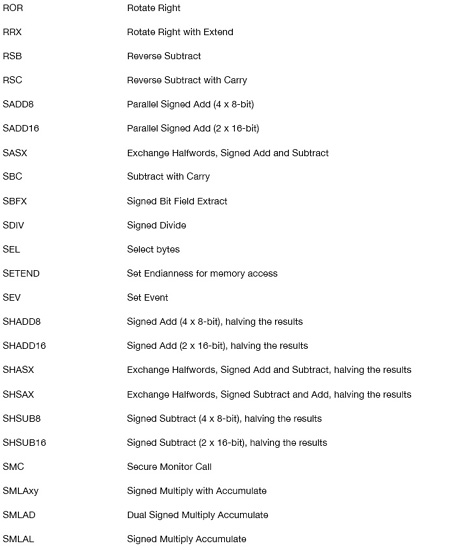
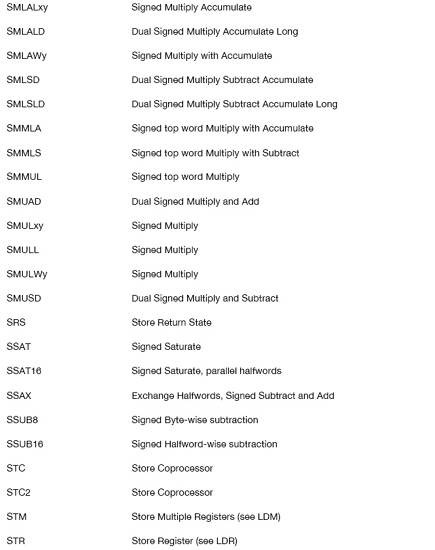
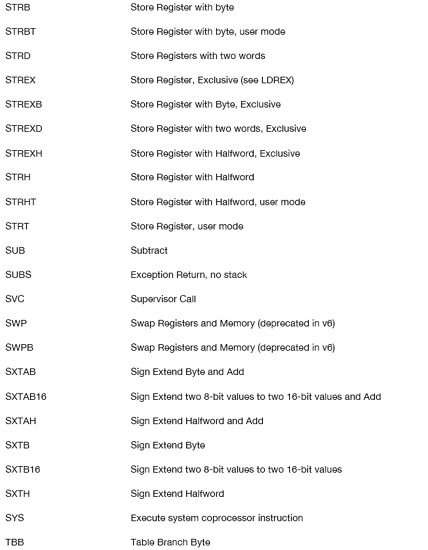
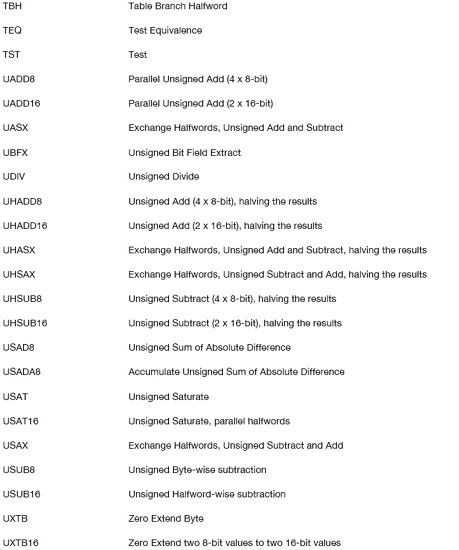
ARM Instructions
ARM instructions are plentiful. While the goal is not to document in great detail what each one does, Table 3-1 shows the list of available ARM instructions, each one with a brief description.
As you become familiar with them, you will learn that some of them are used much more often than others, albeit the more obscure ones are often the ones that can dramatically improve performance. For example, the ADD and MOV are practically ubiquitous while the SETEND instruction is not going to be used very often (yet it is a great instruction when you need to access data of different endianness).
NOTE: For detailed information about these instructions, refer to the ARM Compiler Toolchain Assembler Reference document available at http://infocenter.arm.com.


ARM NEON
NEON is a 128-bit SIMD (Single Instruction, Multiple Data) extension to the Cortex A family of processors. If you understood what the UHADD8 instruction was doing in Listing 3–27, then you will easily understand NEON.
NEON registers are seen as vectors. For example, a 128-bit NEON register can be seen as four 32-bit integers, eight 16-bit integers, or even sixteen 8-bit integers (the same way the UHADD8 instruction interprets a 32-bit register as four 8-bit values). A NEON instruction would then perform the same operation on all elements.
NEON has several important features:
- Single instruction can perform multiple operations (after all, this is the essence of SIMD instructions)
- Independent registers
- Independent pipeline
Many NEON instructions will look similar to ARM instructions. For example, the VADD instruction will add corresponding elements in two vectors, which is similar to what the ADD instruction does (although the ADD instruction simply adds two 32-bit registers and does not treat them as vectors). All NEON instructions start with the letter V, so identifying them is easy.
There are basically two ways to use NEON in your code:
- You can use NEON instructions in hand-written assembly code.
- You can use NEON intrinsics defined in arm-neon.h, a header file provided in the NDK.
The NDK provides sample code for NEON (hello-neon), so you should first review this code. While using NEON can greatly increase performance, it may also require you to modify your algorithms a bit to fully take advantage of vectorization.
To use NEON instructions, make sure you add the .neon suffix to the file name in Android.mk's LOCAL_SRC_FILES. If all files need to be compiled with NEON support, you can set LOCAL_ARM_NEON to true in Android.mk.
A great way to learn about NEON is to look at the Android source code itself. For example, SkBlitRow_opts_arm.cpp (in the external/skia/src/opts directory) contains several routines using NEON instructions, using asm() or intrinsics. In the same directory you will also find SkBlitRow_opts_SSE2.cpp, which contains optimized routines using ×86 SIMD instructions. The Skia source code is also available online at http://code.google.com/p/skia.
CPU Features
As you have seen already, not all CPUs are the same. Even within the same family of processors (for example, ARM Cortex family), not all processors support the same features as some are optional. For example, not all ARMv7 processors support the NEON extension or the VFP extension. For this reason, Android provides functions to help you query what kind of platform the code is running on. These functions are defined in cpu-features.h, a header file provided in the NDK, and Listing 3–30 shows you how to use these functions to determine whether a generic function should be used or one that takes advantage of the NEON instruction set.
Listing 3–30. Checking CPU Features
#include <cpu-features.h>


static inline int has_features(uint64_t features, uint64_t mask)

{

    return ((features & mask) == mask);

}


static void (*my_function)(int* dst, const int* src, int size); // function pointer


extern void neon_function(int* dst, const int* src, int size); // defined in some other file

extern void default_function(int* dst, const int* src, int size);


int init () {

    AndroidCpuFamily cpu = android_getCpuFamily();


    uint64_t features = android_getCpuFeatures();


    int count = android_getCpuCount(); // ignore here


    if (cpu == ANDROID_CPU_FAMILY_ARM) {

        if (has_features(features,

                         ANDROID_CPU_ARM_FEATURE_ARMv7|

                         ANDROID_CPU_ARM_FEATURE_NEON))

        {

            my_function = neon_function;

        }

        else

        {

            // use default functions here

            my_function = default_function; // generic function

        }

    }

    else
    {

        my_function = default_function; // generic function

    }

}


void call_function(int* dst, const int* src, int size)

{

    // we assume init() was called earlier to set the my_function pointer


    my_function(dst, src, size);

}
To use the CPU features functions, you will have to do two things in your Android.mk:
- Add “cpufeatures” to the list of static libraries to link with (
LOCAL_STATIC_LIBRARIES :=cpufeatures). - Import the android/cpufeatures module by adding
$(call import-module,android/cpufeatures)at the end of Android.mk.
Typically, probing the capabilities of the platform will be one of the first tasks you will have to perform in order to use the best possible functions.
If your code depends on the presence of the VFP extension, you may have to check also whether NEON is supported. The ANDROID_CPU_ARM_FEATURE_VFPv3 flag is for the minimum profile of the extension with sixteen 64-bit floating-point registers (D0 to D15). If NEON is supported, then thirty-two 64-bit floating-point registers are available (D0 to D31). Registers are shared between NEON and VFP and registers are aliased:
- Q0 (128-bit) is an alias for D0 and D1 (both 64-bit).
- D0 is an alias for S0 and S1 (S registers are single-precision 32-bit registers).
The fact that registers are shared and aliased is a very important detail, so make sure you use registers carefully when hand-writing assembly code.
NOTE: Refer to the NDK's documentation and more particularly to CPU-FEATURES.html for more information about the APIs.