
Optimizing Layouts
By now you should already be familiar with XML layouts and the setContentView() method. A typical use of this method is shown in Listing 8–1. Even though many consider layouts to be simple to define, especially with the graphical layout interface in Eclipse, it is easy to get carried away and define far from optimal layouts. This section provides several easy ways to simplify layouts and accelerate layout inflation.
Listing 8–1. Typical setContentView() Call
public class MyActivity extends Activity {

    private static final String TAG = "MyActivity";


    /** Called when the activity is first created. */

    @Override

    protected void onCreate(Bundle savedInstanceState) {

        super.onCreate(savedInstanceState);


        // call to setContentView() to inflate and set layout (defined in main.xml)

        setContentView(R.layout.main);
        ...

    }


    ...

}
While this is a very simple call, a few things happen under the hood when setContentView() is called:
- Android reads the application's resource data (in the APK file, stored either on internal storage or SD card).
- The resource data is parsed and the layout is inflated.
- The inflated layout becomes the top-level view of the activity.
How much time this call will take depends on the complexity of the layout: the bigger the resource data the slower the parsing is, and the more classes to instantiate the slower the layout instantiation.
When you create an Android project in Eclipse, a default layout is generated in main.xml, as shown in Listing 8–2. The TextView's text is defined in strings.xml.
Listing 8–2. Default Layout
<?xml version="1.0" encoding="utf-8"?>

<LinearLayout xmlns:android="http://schemas.android.com/apk/res/android"

    android:layout_width="fill_parent"

    android:layout_height="fill_parent"

    android:orientation="vertical" >


    <TextView

        android:layout_width="fill_parent"

        android:layout_height="wrap_content"

        android:text="@string/hello" />


</LinearLayout>
A call to setContentView() as shown in Listing 8–1 using this particular layout takes about 17 milliseconds to complete on a Samsung Galaxy Tab 10.1. While this is quite quick, it is also an extremely simple layout that is not really representative of a typical Android application: only two classes will be instantiated (LinearLayout and TextView) and very few properties are specified in the XML file.
NOTE: Layouts can be created programmatically as well but XML is usually preferred.
After adding multiple widgets to the default layout to reach a total of thirty widgets (including ScrollView, EditText, and ProgressBar), the call to setContentView() took more than 163 milliseconds to complete.
As you can see, the time it takes to inflate a layout grows almost linearly with the number of widgets to create. Moreover, the call to setContentView() represented almost 99% of the time spent between the beginning of onCreate() and the end of onResume().
You can perform your own measurements by simply adding widgets to or removing widgets from the layout. Using the graphical layout view of the XML files in Eclipse makes it very easy. If you already have defined your application's layout, the first thing you should do is to measure how much time it takes to inflate it. Because the layout is typically inflated in your activity's onCreate() method, the time it takes to inflate it will have a direct impact on your activity's start-up time, as well as your application's. It is therefore recommended you try to minimize the time spent inflating layouts.
To achieve this, several techniques are available, most of them based on the same principle: reducing the number of objects to create. You can do this by using different layouts while still achieving the same visual result, by eliminating unnecessary objects, or by deferring the creation of objects.
RelativeLayout
Linear layouts are typically the first layout application developers learn to use. As a matter of fact, this layout is part of the default layout shown in Listing 8–1 and therefore is one of the first ViewGroups developers get familiar with. It is also an easy layout to understand as a linear layout is basically a container for widgets that are aligned either horizontally or vertically.
Most developers who are new to Android start nesting linear layouts to achieve the desired result. Listing 8–3 shows an example of nested linear layouts.
Listing 8–3. Nested Linear Layout
<?xml version="1.0" encoding="utf-8"?>

<LinearLayout xmlns:android="http://schemas.android.com/apk/res/android"

    android:layout_width="fill_parent"

    android:layout_height="fill_parent"

    android:orientation="vertical" >


    <LinearLayout xmlns:android="http://schemas.android.com/apk/res/android"

        android:layout_width="fill_parent"

        android:layout_height="wrap_content"

        android:orientation="horizontal" >

        <TextView

            android:id="@+id/text1"

            android:layout_width="wrap_content" android:layout_height="wrap_content"

            android:text="str1"

android:textAppearance="?android:attr/textAppearanceLarge" />

        <TextView

            android:id="@+id/text2"

            android:layout_width="wrap_content" android:layout_height="wrap_content"

            android:text="str2"

android:textAppearance="?android:attr/textAppearanceLarge" />

    </LinearLayout>


    <LinearLayout xmlns:android="http://schemas.android.com/apk/res/android"

        android:layout_width="fill_parent"

        android:layout_height="wrap_content"

        android:orientation="horizontal" >

        <TextView
            android:id="@+id/text3"

            android:layout_width="wrap_content" android:layout_height="wrap_content"

            android:text="str3"

android:textAppearance="?android:attr/textAppearanceLarge" />

        <TextView

            android:id="@+id/text4"

            android:layout_width="wrap_content" android:layout_height="wrap_content"

            android:text="str4"

android:textAppearance="?android:attr/textAppearanceLarge" />

    </LinearLayout>


    <LinearLayout xmlns:android="http://schemas.android.com/apk/res/android"

        android:layout_width="fill_parent"

        android:layout_height="wrap_content"

        android:orientation="horizontal" >

        <TextView

            android:id="@+id/text5"

            android:layout_width="wrap_content" android:layout_height="wrap_content"

            android:text="str5"

android:textAppearance="?android:attr/textAppearanceLarge" />

        <TextView

            android:id="@+id/text6"

            android:layout_width="wrap_content" android:layout_height="wrap_content"

            android:text="str6"

android:textAppearance="?android:attr/textAppearanceLarge" />

    </LinearLayout>


</LinearLayout>
This layout's core views are the six text views. The four linear layouts are simply here to help with positioning.
This layout exposes two issues:
- As linear layouts are nested, the layout hierarchy becomes deeper (causing layout and key handling to be slower).
- Out of ten objects, four exist only for positioning.
These two issues are easily solved by replacing all these linear layouts with a single relative layout, as shown in Listing 8–4.
Listing 8–4. Relative Layout
<?xml version="1.0" encoding="utf-8"?>

<RelativeLayout xmlns:android="http://schemas.android.com/apk/res/android"

    android:layout_width="fill_parent"

    android:layout_height="fill_parent"

    android:orientation="vertical" >


    <TextView

        android:id="@+id/text1"

        android:layout_width="wrap_content" android:layout_height="wrap_content"

        android:layout_alignParentLeft="true"

        android:layout_alignParentTop="true"

        android:text="@string/str1"

android:textAppearance="?android:attr/textAppearanceLarge" />

    <TextView
        android:id="@+id/text2"

        android:layout_width="wrap_content" android:layout_height="wrap_content"

        android:layout_toRightOf="@id/text1"

        android:layout_alignParentTop="true"

        android:text="@string/str2"

android:textAppearance="?android:attr/textAppearanceLarge" />

    <TextView

        android:id="@+id/text3"

        android:layout_alignParentLeft="true"

        android:layout_below="@id/text1"

        android:layout_width="wrap_content" android:layout_height="wrap_content"

        android:text="@string/str3"

android:textAppearance="?android:attr/textAppearanceLarge" />

    <TextView

        android:id="@+id/text4"

        android:layout_width="wrap_content" android:layout_height="wrap_content"

        android:layout_toRightOf="@id/text3"

        android:layout_below="@id/text2"

        android:text="@string/str4"

android:textAppearance="?android:attr/textAppearanceLarge" />

    <TextView

        android:id="@+id/text5"

        android:layout_alignParentLeft="true"

        android:layout_below="@id/text3"

        android:layout_width="wrap_content" android:layout_height="wrap_content"

        android:text="@string/str5"

android:textAppearance="?android:attr/textAppearanceLarge" />

    <TextView

        android:id="@+id/text6"

        android:layout_width="wrap_content" android:layout_height="wrap_content"

        android:layout_toRightOf="@id/text5"

        android:layout_below="@id/text4"

        android:text="@string/str6"

android:textAppearance="?android:attr/textAppearanceLarge" />


</RelativeLayout>
As you can see, all six text views are now within a single relative layout, and therefore only seven objects are created instead of 10. The layout is also not as deep as it used to be: the text views are now one level higher. The key to positioning the widgets is in the layout_*** attributes. Android defines many such attributes that you can use to determine the positioning of the various elements in your layout:
- layout_above
- layout_alignBaseline
- layout_alignBottom
- layout_alignLeft
- layout_alignRight
- layout_alignTop
- layout_alignParentBottom
- layout_alignParentLeft
- layout_alignParentRight
- layout_alignParentTop
- layout_alignWithParentIfMissing
- layout_below
- layout_centerHorizontal
- layout_centerInParent
- layout_centerVertical
- layout_column
- layout_columnSpan
- layout_gravity
- layout_height
- layout_margin
- layout_marginBottom
- layout_marginLeft
- layout_marginRight
- layout_marginTop
- layout_row
- layout_rowSpan
- layout_scale
- layout_span
- layout_toLeftOf
- layout_toRightOf
- layout_weight
- layout_width
- layout_x
- layout_y
NOTE: Some attributes are specific to a certain type of layout. For example, the layout_column, layout_columnSpan, layout_row, and layout_rowSpan are to be used with the grid layout.
Relative layouts are especially important in list items as it is quite common for applications to show ten or more such items on the screen at any given time.
Merging Layouts
Another way to reduce the height of the layout hierarchy is to merge layouts with the <merge /> tag. Quite often the top element of your own layout will be a FrameLayout, as shown in Listing 8–5.
Listing 8–5. Frame Layout
<?xml version="1.0" encoding="utf-8"?>

<FrameLayout xmlns:android="http://schemas.android.com/apk/res/android"

    android:layout_width="fill_parent"

    android:layout_height="fill_parent"

    android:id="@+id/my_top_layout" >


    <ImageView

        android:layout_width="fill_parent"

        android:layout_height="fill_parent"/>


    <TextView

        android:layout_width="fill_parent"

        android:layout_height="wrap_content"

        android:text="@string/hello" />


</FrameLayout>
Because the parent of an activity's content view is also a FrameLayout, you would end up with two FrameLayout objects in the layout:
- Your own
FrameLayout - The parent of the activity's content view, another
FrameLayout, which has only one child (your ownFrameLayout)
Figure 8–1 shows the layout you would obtain assuming your own FrameLayout had two children: an ImageView and a TextView.
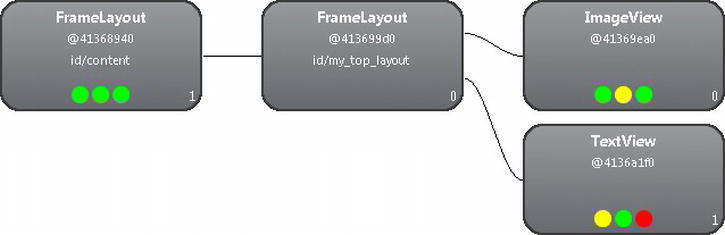
Figure 8–1. FrameLayout child of another FrameLayout
This is one FrameLayout too many, and you can reduce the height of the layout by replacing your own FrameLayout with a <merge /> tag. By doing so, Android simply attaches the children of the <merge /> tag to the parent FrameLayout. Listing 8–6 shows the new XML layout.
Listing 8–6. Merge Tag
<?xml version="1.0" encoding="utf-8"?>

<merge xmlns:android="http://schemas.android.com/apk/res/android">


    <ImageView

        android:layout_width="fill_parent"

        android:layout_height="fill_parent" />


    <TextView

        android:layout_width="fill_parent"

        android:layout_height="wrap_content"

        android:text="@string/hello" />


</merge>
As you can see, it is just a matter of replacing the <FrameLayout /> tag with a <merge /> tag. Figure 8–2 shows the resulting layout.
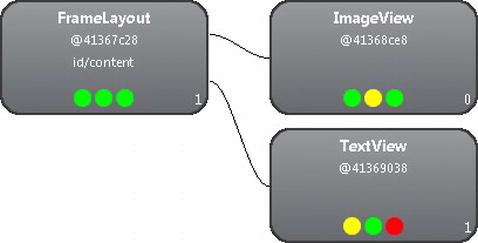
Figure 8–2. <FrameLayout /> replaced With <merge />
Reusing Layouts
Similar to the #include directive in C or C++, Android supports the <include /> tag in the XML layouts. Simply put, the <include /> tag includes another XML layout, as shown in Listing 8–7.
The <include /> tag can be used for two purposes:
- You want to use the same layout multiple times.
- Your layout has a common part and also parts that depend on the device configuration (for example, screen orientation—landscape or portrait).
Listing 8–7 shows how you can include a layout multiple times while overriding some of the included layout's parameters.
Listing 8–7. Including Layout Multiple Times
<LinearLayout xmlns:android="http://schemas.android.com/apk/res/android"

    android:layout_width="fill_parent"

    android:layout_height="fill_parent"

    android:orientation="vertical" >


    <include android:id="@+id/myid1" android:layout="@layout/mylayout"

android:layout_margin="9dip" />

    <include android:id="@+id/myid2" android:layout="@layout/mylayout"

android:layout_margin="3dip" />

    <include android:id="@+id/myid3" android:layout="@layout/mylayout" />


    </LinearLayout>
Listing 8–8 shows how you can include a layout just once, but depending on the device's screen orientation, either layout-land/mylayout.xml or layout-port/mylayout.xml will be included. (It is assumed here there are two versions of mylayout.xml, one in the res/layout-land directory and the other in the res/layout-port directory.)
Listing 8–8. Including Layout Depending On Screen Orientation
<LinearLayout xmlns:android="http://schemas.android.com/apk/res/android"

    android:layout_width="fill_parent"

    android:layout_height="fill_parent"

    android:orientation="vertical" >


    <include android:id="@+id/myid" android:layout="@layout/mylayout"/>


</LinearLayout>
When a layout is included, it is possible to override some of the layout's parameters, such as:
- The root view's id (
android:id) - The layout parameters (
android:layout_*)
NOTE: Overriding the layout's parameters is optional. Only the android:layout attribute is mandatory in the <include /> tag.
As Listing 8–8 demonstrates, the inclusion of the layout is done dynamically when the layout is inflated. Should the inclusion be done at compile time Android would not know which of the two layouts to include (layout-land/mylayout.xml or layout-port/mylayout.xml). This is different from the #include directive in C or C++, which is handled by the preprocessor at compile time.
View Stubs
As we saw in Chapter 1, lazy initialization is a convenient technique to defer instantiations, improve performance, and potentially save memory (when objects never have to be created).
Android defines the ViewStub class for that purpose. A ViewStub is a lightweight invisible view that you can use in your layout to allow you to lazily inflate layout resources when you need them. Listing 8–9, a modified version of Listing 8–8, shows how to use ViewStub in an XML layout.
Listing 8–9. ViewStub In XML
<LinearLayout xmlns:android="http://schemas.android.com/apk/res/android"

    android:layout_width="fill_parent"

    android:layout_height="fill_parent"

    android:orientation="vertical" >


    <ViewStub

        android:id="@+id/mystubid"

        android:inflatedId=”@+id/myid”

        android:layout="@layout/mylayout"/>


</LinearLayout>
When the LineaLayout is inflated, it will contain only one child, a ViewStub. The layout the ViewStub is referring to, @layout/mylayout, could be a very complicated layout, requiring significant time to be inflated, but it is not inflated yet. To inflate the layout defined in mylayout.xml, you have two options in your code, as shown in Listing 8–10 and Listing 8–11.
Listing 8–10. Inflating Layout In Code
    ViewStub stub = (ViewStub) findViewById(R.id.mystubid);

    View inflatedView = stub.inflate(); // inflatedView will be the layout defined in

    mylayout.xml
Listing 8–11. Inflating Layout In Code Using setVisibility()
    Viewview = findViewById(R.id.mystubid);

    view.setVisibility(View.VISIBLE); // view stub replaced with inflated layout

    view = findViewById(R.id.myid); // we need to get the newly inflated view now
While the first way of inflating the layout (in Listing 8–10) seems more convenient, some may argue it has a slight problem: the code is aware of the fact that the view is a stub and explicitly needs to inflate the layout. In most cases, this won't be an issue though, and it will be the recommended way of inflating a layout when your application uses ViewStub in its layout.
The second way of inflating the layout, shown in Listing 8–11, is more generic as it does not refer to the ViewStub class. However, the code as shown above is still aware of the fact that it uses a ViewStub since it uses two distinct ids: R.id.mystubid and R.id.myid. To be fully generic, the layout should be defined as shown in Listing 8–12, and inflating the layout should be done as shown in Listing 8–13. Listing 8–12 is identical to Listing 8–9 except for the fact that only one id is created, R.id.myid, instead of two. Similarly, Listing 8–13 is identical to Listing 8–11 except for R.id.mystubid being replaced with R.id.myid.
Listing 8–12. ViewStub In XML Without Overriding ID
<LinearLayout xmlns:android="http://schemas.android.com/apk/res/android"

    android:layout_width="fill_parent"

    android:layout_height="fill_parent"

    android:orientation="vertical" >


    <ViewStub

        android:id="@+id/myid"

        android:layout="@layout/mylayout"/>


</LinearLayout>
Listing 8–13. Inflating Layout In Code Using setVisibility()
    Viewview = findViewById(R.id.myid);

    view.setVisibility(View.VISIBLE); // view stub replaced with inflated layout

    view = findViewById(R.id.myid); // we need to get the newly inflated view now
As a matter of fact, Listing 8–13 would be valid whether or not a ViewStub is used in the layout. If it is important for your code to be generic and work fine regardless of the use of ViewStub in the layout, then this approach is preferred. However, the two calls to findViewById() would affect performance negatively. To partially fix this problem, since a ViewStub will be removed from its parent when setVisibility(View.VISIBLE) is called, you could first check whether the view still has a parent before calling findViewById() the second time. While this is not optimal as a second call to findViewById() would still be needed when you used a ViewStub in your layout, it would guarantee that findViewById() is only called once when you did not use a ViewStub. The modified code is shown in Listing 8–14.
Listing 8–14. Calling findViewById() Once When Possible
    Viewview = findViewById(R.id.myid);

    view.setVisibility(View.VISIBLE); // view stub replaced with inflated layout (if

stub is used in layout)

    if (view.getParent() == null) {

        // a stub was used so we need to find the newly inflated view that replaced it

        view = findViewById(R.id.myid);

    } else {

        // nothing to do, the view we found the first time is what we want

    }
What is shown in Listing 8–13 and Listing 8–14 is uncommon, and you usually won't have to follow this approach. Typically, it will be acceptable for your code to know that ViewStubs are used in the layouts and therefore the simple way of inflating stubs shown in Listing 8–10 will be sufficient.