
![]()
Basic Thread Safety
In the last two chapters, we looked at numerous ways of starting work that will run asynchronously. However, in all of the examples, that work has been relatively self-contained. Asynchrony opens up a whole new class of bugs that can infect your code: race conditions, deadlocks, and data corruption to name just three. We will look at how you debug asynchronous code in Chapters 13 and 14, but our starting point has to be how to prevent these issues in the first place. In this chapter, we will examine the need for thread safety and then introduce the primary tools used to achieve it. In Chapter 5, we will take this idea further and look at the constructs introduced in .NET 4.0 that take some of the work off our shoulders.
Asynchrony and Data
Data is where the trouble starts in asynchronous programming. Not all data is troublesome, of course; but data is at the heart of every asynchrony bug. So first you need to understand where the danger lies: what kinds of data will potentially cause us issues?
It’s Not Always Good to Share
Children’s author Brittany Hudson wrote a book called It’s Good to Share. She is obviously not an asynchronous programmer. If two threads are working on completely independent states, then they are not going to interfere with each other and you will not have thread safety issues (however, what we mean by “completely independent” may be more far-reaching than you expect, as we shall see).
It is shared state that lies behind thread safety issues, so one common approach is to copy any data that needs to be used by two threads. Sometimes the amount of data you copy can be quite large, but the performance hit of copying the data is offset by the simplicity and efficiency of not sharing data. As an example, consider background printing in a word processor: the document is copied and the copy is printed. Why does this help? It means that the printing doesn’t somehow have to be interleaved with the user typing into the document, and no special processing is required to ensure that the document is coherent (the print should represent the document as it existed at the point the print request was made).
If copying were always a viable solution to all data issues, then life would be very simple. What if you need to process terabytes of data? Copying it all would be impractical, so there must be other options.
If no one is changing the state, then it doesn’t matter if it is shared. So if you have to analyze terabytes of data with a number of different algorithms, then, as long as those algorithms don’t update the data, they can all be run concurrently on the same data without copying it.
You may argue that this is unrealistic for many situations, and you would be right, if this model only worked for total immutability. But if you can run most of the algorithm with immutable data, and isolate the areas that change the state, then you can run most of the algorithm concurrently and just worry about dealing with thread safety issues in a small part of the processing.
As an example, in 1995 an algorithm was discovered to calculate the nth hexadecimal digit of pi. This is a great opportunity for concurrency as you can calculate as many concurrent digits as you have cores available. Now, you could organize the processing so that each digit was concatenated on to a result as calculated, but this would present an issue: each core would be continuously fighting over the mutable combined result. Another way you could organize this processing is to give each core a range of values to calculate and only combine when the full range had been determined. This model allows the cores to run freely for most of their execution and only pay the cost of thread safety when they occasionally have to combine results.
But even this model doesn’t fit with every scenario; sometimes there is a shared state that has to be written to by one or more of the parties—cache refreshes, for example. Whether you have to take any action over thread safety at such points depends on whether the state transition is atomic from the perspective of users of the state.
First you need a definition of “atomic” when related to state transitions. For this discussion I’ll define “atomic” as follows:
An atomic operation is one that, from the perspective of observers, transitions state from one valid value to another valid value without the state having a temporary invalid value.
In general, without resorting to thread safety techniques, this means that a value can be changed in a single processor instruction. On 32-bit machines, state of length 32 bits or less can be written in a single processor instruction, and on 64-bit machines state of length 64 bits or less can be written in a single processor instruction. For example, a double can be written atomically on a 64-bit machine but not on some 32-bit machines. An important feature of the CLR is that a reference can always be written atomically, as a reference’s size matches the “bit-ness” of the runtime.
With this definition in mind, you can see that as long as updates are atomic, readers will not see invalid states and writers will not collide as they change state. Therefore, in thread safety terms, mutable shared state is safe as long as all updates are atomic.
With this definition of atomic state transition, it is quite easy to see what a nonatomic transition is: one that enters an observable invalid value during transition. For example, if you write a double on the 32-bit CLR, then each 32-bit word needs to be updated separately. If a thread reads the double when another thread has only written one of the two words, then it may see a corrupt state.
If only one thread ever writes to a piece of state, then a thread that reads may see an invalid value, but the state will always return to a valid value once the write is complete. So there is a chance of an observed temporary corruption. If you only care about the state at the end of all processing, then the fact that there is temporary corruption may be irrelevant to your processing.
As soon as we have more than one writer, state can get permanently corrupted, and this is always a problem. To illustrate this, consider the code in Listing 4-1. This code is currently performing a series of increments on an integer using a single task, and the increment is being performed using the postincrement operator (++). Now, as this code runs the increment on a single thread, it would hopefully be surprising if the actual value did not match the expected value.
Listing 4-1. Incrementing an int on a Single Thread
static void Main(string[] args)
{
    const int iterations = 100000000;
    const int numTasks = 1;
    List<Task> tasks = new List<Task>();
    int value = 0;

    for (int nTask = 0; nTask < numTasks; nTask++)
    {
        Task t = Task.Factory.StartNew(() =>
        {
            IncrementValue(ref value, iterations);
        });

        tasks.Add(t);
    }

    Task.WaitAll(tasks.ToArray());
    Console.WriteLine("Expected value: {0}, Actual value: {1}", numTasks * iterations, value);
}

private static void IncrementValue(ref int value, int iterations)
{
    for (int i = 0; i < iterations; i++)
    {
        value++;
    }
}
But what if you were to amend the code in Listing 4-1 so that you were using two tasks rather than one (by setting numTasks to 2). What would you expect to see then? Figure 4-1 shows the output; you are losing increments, so what is going on?

Figure 4-1. Output from incrementing on two threads
Remember that only atomic writes will work reliably. Here you have two threads that are both performing writes to the value variable, and it turns out that the ++ operator is not atomic. In fact, ++ is three operations because computation is performed in registers, not in main memory. The three steps are as follows:
- Copy the value from the variable into a register
- Increment the value in the register
- Copy the new value to the variable
Imagine thread T0 starts the process and completes up to step 2. Now a second thread, T1, completes step 1 before thread T0 performs step 3. Thread T1 will have read the old value so it will also increment the old value. This results in both threads writing the same value back to the variable so, in effect, you lose one of the updates. This is why the actual value is lower than what is expected. Figure 4-2 shows this in action.

Figure 4-2. Losing updates with simple increment
Correctness Is Not the Only Problem
The code in Listing 4-1 shows threads updating a single piece of data. If you make the number of threads two or more, then on some processors the code will run slower on multiple cores than on a single core. To increase performance, processing cores use multiple levels of caching (see sidebar on processor caches). As far as the cores are concerned, they want to read data out of their cache and will only go to main memory (much slower) if a cached value is no longer valid. The problem is that when a thread running on a core writes a cached value, if another core is using the same value then its cached value will be invalidated, forcing it to go back to main memory for the next read. When only a single core is used, then all reads are from the cache. The performance difference can be significant in highly concurrent code.
Unfortunately, protecting the cached values is not as simple as making sure that different threads use different variables. Data is loaded into the cache in cache lines. These are generally 64 bytes (at least on Intel processors) and so will contain not just a single item of data, but also those adjacent to it in memory. This is normally a good thing as data that is close in memory is often used together, and so when the next item of data is needed, the processor finds it is already in the cache. In multithreaded processing, however, this can cause seemingly unrelated pieces of data to cause mutual cache invalidation because they are in the same cache line.
The processor is connected to main memory via the data bus. As processors have become faster, the speed of main memory and the data bus has become a limiting factor in execution speed when data is required. As a result, chip manufacturers started putting caches on their processors so the processor didn’t have to keep going back to main memory if it had recently worked on the data. This initial cache was kept small to make it as fast as possible.
Over time, the manufacturers realized that they could back up this very fast cache with a slower, larger cache; even if the data wasn’t in the fastest cache, the hope was that it would be in the slower cache, which was still significantly faster than going back to main memory. These caches became known as level 1 (L1) and level 2 (L2) caches. Some modern chips even have an L3 cache.
As multiple cores were placed on processors, additional decisions had to be made about whether any of the caches were going to be shared (L3 commonly is) and, if not, how to prevent stale values from being used. Different chips use different designs and these optimizations can mean that the same code runs very differently on different processors.
Ensuring that data is not corrupted is known as thread safety and is often achieved by synchronizing threads to make sure that any updates are atomic. .NET provides a set of primitives to synchronize between threads, but it is up to developers to use the primitives correctly and thus achieve thread safety.
In fact, achieving thread safety can be quite straightforward: all you need to do is have one global synchronization construct, then every piece of code will be assured of gaining ownership of the construct before it does anything. The problem is we are doing asynchronous programming for a reason: we want different parts of our code to run concurrently. This global synchronization construct would cause all operations to happen serially. So there is a balancing act: we need just enough synchronization to ensure thread safety but not enough to kill concurrency. As a result we should always aim to use the cheapest construct that does the job that we can. The rest of this chapter will introduce the synchronization toolkit that .NET provides to get the job done.
The Interlocked Class
The Interlocked static class provides methods to turn nonatomic operations into atomic ones. It is fairly restricted in scope in that it generally only works on single pieces of data up to 64 bits in length (rather than more general data structures). However, as we shall see, there are special rules for using Interlocked with 64-bit values on 32-bit systems.
Basic Operations
Interlocked has three basic operations: Increment, Decrement, and Add (notice there is no Subtract, as you can simply Add a negative number). These methods turn their nonatomic counterparts into atomic operations. You can rewrite the IncrementValue method from Listing 4-1 to use Interlocked.Increment, and the resulting code (Listing 4-2) will always produce the expected value.
Listing 4-2. Using Interlocked.Increment
private static void IncrementValue(ref int value, int iterations)
{
    for (int i = 0; i < iterations; i++)
    {
        Interlocked.Increment(ref value);
    }
}
Now this functionality doesn’t come for free; this code will run significantly slower than the original version (4 to 10 times slower depending on hardware). However, we are being quite unfair on Interlocked.Increment as people don’t generally write code (or at least they shouldn’t) where two threads continually battle to update a value. Interlocked.Increment is cheap if there is no contention with another thread, but becomes more expensive if there is.
As for the other two methods: we hope Interlocked.Decrement is now fairly obvious; and Interlocked.Add takes two values and adds the second to the first atomically.
We have already seen an example where Interlocked functionality has been taken advantage of: in Chapter 2 we talked about how the thread pool queue had been remodeled from a linked list (which requires fairly heavy synchronization) to a linked list of arrays. While within an array segment, the “next item” pointer can be moved using Interlocked.Increment and Interlocked.Decrement.
![]() Caution Care should be taken if you are looking to see an Interlocked function change the data item to a specific value. If you check the data item after using an Interlocked function, you will have a race condition: another thread may have just called an Interlocked function to change the data item again. Instead you should use the return value from the call to the Interlocked function, as this will contain the new value for the data item.
Caution Care should be taken if you are looking to see an Interlocked function change the data item to a specific value. If you check the data item after using an Interlocked function, you will have a race condition: another thread may have just called an Interlocked function to change the data item again. Instead you should use the return value from the call to the Interlocked function, as this will contain the new value for the data item.
The Interlocked class has two other methods: Exchange and CompareExchange. Although they may seem quite innocuous, they can be used to build very lightweight synchronization primitives.
Interlocked.Exchange
Interlocked.Exchange assigns a value to a variable and returns the old value in an atomic operation. Simple assignment is normally atomic anyway, so why is this interesting? Because the old value is returned, which allows us to create richer constructs—for example, a SpinLock. A SpinLock is a mutual-exclusion synchronization primitive. If the SpinLock is already owned, another thread attempting to Lock will simply cause that thread to spin on the processor until the lock is available. For short-lived locking operations in highly concurrent systems, this is far better than, say, a Monitor (which we shall discuss shortly) because the thread doesn’t lose its timeslice while waiting. Listing 4-3 shows a SpinLock implemented with Interlocked.Exchange. The interesting line is in the body of the Lock method: if already locked, then the lock field will have a value of 1. That means that when we use Interlocked.Exchange it will return 1 while the lock is already owned. As soon as the locked field is set to 0 (in the Unlock method), Interlocked.Exchange will return 0 as it sets the locked field back to 1. Now the Lock method returns and the SpinLock is locked again.
Listing 4-3. A SpinLock Using Interlocked.Exchange
public struct SpinLock
{
    private int locked;

    public void Lock()
    {
        while (Interlocked.Exchange(ref locked, 1) != 0) ;
    }

    public void Unlock()
    {
        locked = 0;
    }
}
As it happens, .NET already ships with a SpinLock class, but you can see how primitives such as this are built using fairly rudimentary building blocks.
Interlocked.CompareExchange
The semantics of Interlocked.CompareExchange are not obvious when first seen. Here is the method signature (there are other overloads for different value types):
public static T CompareExchange<T>(
                ref T location,
                T value,
                T comparand) where T : class
The method compares the location and comparand and, if they are the same, it assigns value to location, returning the original value of location. So how is this useful? One place you can use this is in building Singletons. If the crucial factor is that you don’t mind more than one being created, but only one must be used, then CompareExchange can give you a lightweight tool for achieving this. Listing 4-4 shows how you can ensure that you only assign the new instance if the existing reference is null. Obviously you will create an instance each time we enter the if block, but only one will ever be used.
Listing 4-4. A Loose Form of Singleton with CompareExchange
public class Highlander
{
   private Highlander()
   {
      Console.WriteLine("created");
   }

   private static Highlander theInstance;

   public static Highlander GetInstance()
   {
       if (theInstance == null)
       {
           Interlocked.CompareExchange(ref theInstance, new Highlander(), null);
       }

       return theInstance;
    }
}
![]() Caution Although the Interlocked class can manipulate 64-bit values safely, on a 32-bit system you are only guaranteed to see correct data if you also read the 64-bit value using Interlocked.Read.
Caution Although the Interlocked class can manipulate 64-bit values safely, on a 32-bit system you are only guaranteed to see correct data if you also read the 64-bit value using Interlocked.Read.
So for quite a simple class, you can see that you can achieve some powerful lightweight synchronization. However, Interlocked is still limited to single items of data as a target; what if you need to manipulate state composed of multiple fields in a thread-safe way? For this you need something more flexible.
Monitor: The Workhorse of .NET Synchronization
Multistage transition means you need a way of protecting access to data that allows you to control access to arbitrary data. The SmallBusiness class in Listing 4-5 is an example of multistage transition. In this code you can see that when a payment comes in we have to change two separate items of data. Interlocked can’t help us here: not only is decimal too large, but Interlocked only protects access to a single piece of data. The danger with the code in Listing 4-5 is that during ReceivePayment, the state of an instance is temporarily in an invalid state where we have increased the cash but not yet decreased the receivables. If another thread were to access the NetWorth property at that point they would see a value that is too high by the value of the amount parameter.
Listing 4-5. Example of Multistage State Transition
public class SmallBusiness
{
    private decimal cash;
    private decimal receivables;

    public SmallBusiness(decimal cash, decimal receivables)
    {
        this.cash = cash;
        this.receivables = receivables;
    }

    public void ReceivePayment(decimal amount)
    {
        cash += amount;
        receivables -= amount;
    }

    public decimal NetWorth
    {
        get { return cash + receivables; }
    }
}
To fix this, you have to somehow enforce a protocol that ensures that only one thread at a time has access to this composite state of cash and receivables. The CLR has a construct that can be used for just this purpose; it is known as a Sync Block. Sync Blocks are held in the Sync Block Table in the CLR internal data structures. Every instance of a reference type has an object header. One of the parts of this header is a reference to an entry in the Sync Block Table, which is empty by default. On demand, it will cause an entry in the Sync Block Table to be allocated. The object header will refer to this newly allocated Sync Block.
The Monitor class has a static method called Enter, which will try to take ownership of a Sync Block on behalf of the currently executing thread, potentially triggering allocation of the Sync Block. As a result, from now on we will use the shorthand term of a thread “owning the monitor” to refer to a thread having ownership of a specific Sync Block. A thread relinquishes ownership of a monitor by calling Monitor.Exit.
If a thread, A, calls Monitor.Enter and another thread, B, already owns the specified monitor, then Monitor.Enter blocks until thread B calls Monitor.Exit. When Monitor.Enter returns, thread A will now have ownership of the monitor (see Figure 4-3).
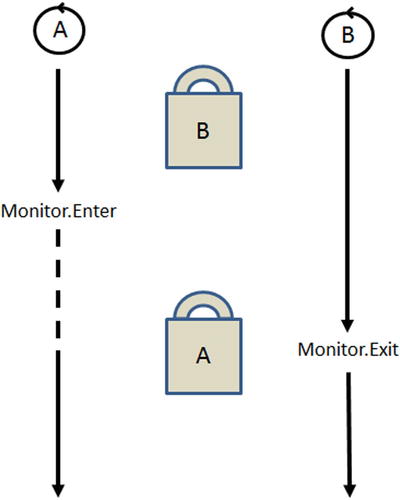
Figure 4-3. Monitor.Enter blocks if another thread owns the monitor
Monitor can therefore be used to prevent concurrent access to state as long as everyone conforms to the protocol. Listing 4-6 shows how we can apply the use of a Monitor to the SmallBusiness class we saw in Listing 4-5. Notice that both the ReceivePayment and NetWorth members need to use the Monitor to ensure no readers ever see the state midtransition.
Listing 4-6. Thread-Safe SmallBusiness
public class SmallBusiness
{
    private decimal cash;
    private decimal receivables;
    private readonly object stateGuard = new object();

    public SmallBusiness(decimal cash, decimal receivables)
    {
        this.cash = cash;
        this.receivables = receivables;
    }

    public void ReceivePayment(decimal amount)
    {
        Monitor.Enter(stateGuard);
        cash += amount;
        receivables -= amount;
        Monitor.Exit(stateGuard);
    }

    public decimal NetWorth
    {
        get
        {
            Monitor.Enter(stateGuard);
            decimal netWorth = cash + receivables;
            Monitor.Exit(stateGuard);
            return netWorth;
        }
    }
}
This seems quite straightforward but there is a potential problem: what if the code between the Enter and Exit throws an exception? In that case the owning thread would not call Exit and so would leave the monitor in a locked state forever. You therefore need to ensure that you always release the monitor, and for that you can use a try . . . finally block as the code in Listing 4-7 demonstrates.
Listing 4-7. Releasing the Monitor Using a Finally Block
public void ReceivePayment(decimal amount)
{
    Monitor.Enter(stateGuard);
    try
    {
        cash += amount;
        receivables -= amount;
    }
    finally
    {
        Monitor.Exit(stateGuard);
    }
}
Now, what if Monitor.Enter were to throw an exception? You really need to bring this call inside the try block. But then you need to cater for two possibilities: the exception happening before the monitor was acquired and the exception being thrown after the monitor was acquired. So you need to have some way of telling whether or not you should release the monitor. Fortunately, in version 4.0 of .NET a new overload was introduced that allows users to verify, one way or the other, whether the lock was taken. Listing 4-8 shows the code necessary to use this new overload.
Listing 4-8. Monitor.Enter Inside the try Block
public void ReceivePayment(decimal amount)
{
    bool lockTaken = false;
    try
    {
        Monitor.Enter(stateGuard, ref lockTaken);
        cash += amount;
        receivables -= amount;
    }
    finally
    {
        if (lockTaken)
        {
            Monitor.Exit(stateGuard);
        }
    }
}
If this is the code you should write to use monitors correctly, you have a problem: the chances of getting developers to write this every time and get it right every time are not great. And so the C# language has a keyword that makes the compiler emit the code in Listing 4-8.
The lock Keyword
The idea of the lock keyword is to allow you to concentrate on the work that needs to be protected rather than the semantics of using monitors correctly. Listing 4-9 shows how the lock keyword makes the code in Listing 4-8 much simpler. This is surely something you can expect developers to write.
Listing 4-9. Using the lock Keyword
public void ReceivePayment(decimal amount)
{
    lock(stateGuard)
    {
        cash += amount;
        receivables -= amount;
    }
}
WHAT SHOULD I LOCK?
In the early days of .NET it was very common to see people write code like the following:
lock(this)
{
// change state here
}
In fact, this is also what the event keyword generated until .NET 4.0. The problem is that an object’s this reference is really a public field, in that anyone with a reference to the object is looking at the same thing. This means that, although you are using this for your own internal synchronization, other code may also choose your object for synchronization. You then end up in needless contention at best and with hard-to-diagnose deadlocks at worst.
Objects are cheap to allocate, and so the simplest way to ensure you only have contention where necessary is to use private instance or static variables, depending on whether the state to be protected is instance or static data, respectively.
Even though the lock keyword appears to be a big improvement on manually manipulating the monitor, there is still a fundamental problem: when trying to acquire synchronization primitives it’s a very good idea to be able to time out of a wait. Failing to do this can result in hard-to-identify deadlocks and other synchronization bugs (such as a thread failing to release a monitor). The problem is that neither Monitor.Enter nor lock supports the passing of a timeout.
Timing Out of Monitor Acquisition
Fortunately, the Monitor class supports another method, TryEnter, which can take a timeout. You can see how to use it in Listing 4-10.
Listing 4-10. Timeout out of Waits Using Monitor.TryEnter
public void ReceivePayment(decimal amount)
{
    bool lockTaken = false;

    try
    {
        Monitor.TryEnter(stateGuard, TimeSpan.FromSeconds(30), ref lockTaken);
        if (lockTaken)
        {
            cash += amount;
            receivables -= amount;
        }
        else
        {
            throw new TimeoutException("Failed to acquire stateGuard");
        }
    }
    finally
    {
        if (lockTaken)
        {
            Monitor.Exit(stateGuard);
        }
    }
}
![]() Note Sometimes you hear it argued that timeouts introduce their own problems, as you don’t know how long you should wait. In many cases the timeout is pretty clear: on the server side there is no point in waiting longer than a request timeout, as the caller already will have gone if you wait longer. But on the client side there are reasonable rules of thumb because the key is to timeout, not to wait for the exact optimal time. Take a figure for a reasonable time for the wait to be resolved, and then multiply it by 10. Of course you may end up waiting longer than necessary, but at least you are not waiting forever. The result is you will be able to proactively flag that there is a problem.
Note Sometimes you hear it argued that timeouts introduce their own problems, as you don’t know how long you should wait. In many cases the timeout is pretty clear: on the server side there is no point in waiting longer than a request timeout, as the caller already will have gone if you wait longer. But on the client side there are reasonable rules of thumb because the key is to timeout, not to wait for the exact optimal time. Take a figure for a reasonable time for the wait to be resolved, and then multiply it by 10. Of course you may end up waiting longer than necessary, but at least you are not waiting forever. The result is you will be able to proactively flag that there is a problem.
So we have a technical solution to acquiring monitors with timeouts, but unfortunately it’s currently one that developers are unlikely to use in its raw form. However, we can package this very conveniently using IDisposable and using blocks, as Listing 4-11 demonstrates. Lock is an extension method on System.Object (not something generally encouraged as it pollutes the members of everything; however, it is probably justified in this occasion). The code pass Lock the timeout, which it forwards to Monitor.TryEnter. If the monitor is successfully acquired, then a LockHelper is used to provide the implementation of IDisposable so it can release the monitor in Dispose. The LockHelper is a struct to prevent another heap allocation (as it’s a value type). Last, in Lock, if Monitor.TryEnter throws an exception, then the monitor is released (if it has been acquired) before rethrowing the exception.
Listing 4-11. Wrapping up Monitor.TryEnter
public static class LockExtensions
{
    public static LockHelperLock(this object obj, TimeSpan timeout)
    {
        bool lockTaken = false;

        try
        {
            Monitor.TryEnter(obj, TimeSpan.FromSeconds(30), ref lockTaken);
            if (lockTaken)
            {
                return new LockHelper(obj);
            }
            else
            {
                throw new TimeoutException("Failed to acquire stateGuard");
            }
        }
        catch
        {
            if (lockTaken)
            {
                Monitor.Exit(obj);
            }
            throw;
        }
    }

    private struct LockHelper : IDisposable
    {
        private readonly object obj;

        public LockHelper(object obj)
        {
            this.obj = obj;
        }

        public void Dispose()
        {
            Monitor.Exit(obj);
        }
    }
}
Now, for developers, acquiring monitors with timeouts is almost as convenient as using the lock keyword, as Listing 4-12 shows quite clearly.
Listing 4-12. Acquiring Monitors with a using Block
public void ReceivePayment(decimal amount)
{
    using(stateGuard.Lock(TimeSpan.FromSeconds(30)))
    {
        cash += amount;
        receivables -= amount;
    }
}
A synchronization construct or lock is said to be recursive, or re-entrant, if the same thread can acquire it when it already holds it. Generally a lock will hold a count to ensure that acquisition calls are balanced by relinquish calls to prevent premature release of the lock.
Monitors support recursion, and so a thread can call Monitor.Enter without blocking if it already holds the monitor. However, the thread must call Monitor.Exit the same number of times as it calls Enter/TryEnter before the monitor is released to another thread.
Controlling access to data is a primary concern with thread synchronization. However, another important aspect is the ability for threads to coordinate their actions by signaling to each other. So, in addition to providing a mechanism for mutually exclusive access to state, monitors also provide an API for signaling.
The goal of signaling is for one thread to be able to inform one or more other threads that a particular event has occurred. The Monitor class exposes three methods—Wait, Pulse, and PulseAll—for precisely this purpose. All three of these methods can only be invoked when the calling thread owns the monitor. Wait gives up the monitor but leaves the thread in a waiting, alertable state. Pulse wakes up one alertable thread. PulseAll wakes up all threads that have called Wait on the monitor in question.
To illustrate Wait and Pulse, let’s look at an example by implementing the producer/consumer pattern: one thread produces work to be performed and enqueues it; another thread pulls the data off the queue and processes it. The key job that signaling will do is to ensure that the consumer thread consumes resources only when there is actually work available on the queue. Listing 4-13 shows the implementation with a monitor.
Listing 4-13. Producer/Consumer with Monitor
private static void Produce(object obj)
{
    var queue = (Queue<int>)obj;
    var rnd = new Random();

    while (true)
    {
        lock (queue)
        {
            queue.Enqueue(rnd.Next(100));

            Monitor.Pulse(queue);
        }

        Thread.Sleep(rnd.Next(2000));
     }
}

private static void Consume(object obj)
{
    var queue = (Queue<int>)obj;

    while (true)
    {
        int val;
        lock (queue)
        {
            while (queue.Count == 0)
            {
                Monitor.Wait(queue);
            }

            val = queue.Dequeue();
        }

        ProcessValue(val);
    }
}
The Produce method generates the work and then acquires the queue’s monitor so it can safely enqueue the work (Queue<T> is not internally thread safe). Once enqueued it calls Pulse on the monitor to wake up a waiting thread, in this case the consumer. Note that at this point the Producer still owns the monitor. Last, the producer releases the monitor and sleeps before enqueuing more work.
Meanwhile the Consume method starts its processing loop. The queue’s Count and Dequeue must be bundled into an atomic operation to avoid a race condition (Count returning 1, then another thread dequeuing before we get to the call to Dequeue), so Consume first acquires the queue’s monitor. However, if there is nothing on the queue then we need to give up the monitor so the producer can enqueue some work. If we simply called Monitor.Exit, then the only way we would know if there was work on the queue would be to poll, which would be inefficient. Therefore, you call Wait to give up the monitor but remain alertable by a Pulse. When Wait returns, the consumer once again owns the monitor and so can Dequeue safely. Once the data is dequeued, Consume releases the monitor so it can process the data without blocking the producer.
One possibly strange detail in Listing 4-13 is the use of a while loop around the Wait in the Consume method; what is that for? Well, there is another subtle race condition: sequencing of operations is nondeterministic, so in theory the producer could end up reacquiring the monitor before the consumer has been rescheduled. The effect of this is that Pulse would be called twice, waking more than one consumer thread. One of the threads could consume both items, so when the second consumer finally comes out of Wait, it will own the monitor but there will be nothing on the queue. Therefore, instead of immediately dequeuing it needs to check that there is still work to do on the queue by checking the Count.
Now that you have a signaling mechanism, you can use it to build richer synchronization constructs. A semaphore is used to control access to data, but unlike a monitor it doesn’t enforce mutual exclusion, but rather allows a constrained number of concurrent threads to own it. Semaphores are commonly used to control access to resource pools (whether those resources be threads, objects, or something else). Listing 4-14 shows an implementation of a rudimentary semaphore using a monitor with its signaling capability.
Listing 4-14. Implementing a Semaphore with Monitor
public class MonitorSemaphore
{
    private int currentCount;
    private readonly int maxCount;
    private readonly object guard = new object();

    public MonitorSemaphore(int initialCount, int maxCount)
    {
        this.currentCount = initialCount;
        this.maxCount = maxCount;
    }

    public void Enter()
    {
        lock (guard)
        {
            while (currentCount == maxCount)
            {
                Monitor.Wait(guard);
            }
            currentCount++;
        }
    }

    public void Exit()
    {
        lock (guard)
        {
            currentCount--;
            Monitor.Pulse(guard);
        }
    }

    public int CurrentCount{get { return currentCount; }}
}
Optimizing for Read
So far we have been focusing on achieving thread safety via mutual exclusion: only one thread accessing thread sensitive code at a time. In situations of low contention, where it is unusual for two threads to want to access state at the same time, this is often the optimal approach, as you just use a lightweight guard to ensure those rare occasions are safe.
Sometimes, however, you will find yourself in a very different usage pattern, where many threads want to read a piece of state concurrently and occasionally a thread will need to perform an update. Because of this update you need to ensure thread safety via synchronization, but if you use mutual exclusion only one reader will be able to access the state at a time. We know that if every thread were reading, there would be no thread safety concerns, so the ideal situation would be if you could let lots of readers in at the same time, but then shut them out to allow a single writer access to the state. This is the role of a reader/writer lock.
There are two reader/writer locks in the .NET framework: ReaderWriterLock and ReaderWriterLockSlim. Why are there two? Well, let’s look at their behavior.
ReaderWriterLock
The ReaderWriterLock class was introduced in .NET 2.0 to allow a synchronization strategy that was optimized for high read contention with occasional writes. Readers call AcquireReadLock and ReleaseReadLock; writers call AcquireWriteLock and ReleaseWriteLock. Listing 4-15 shows an example from a reader’s perspective. One thing to notice in the listing is that the Acquire methods take a timeout but return void. The Acquire methods throw an ApplicationException if the timeout is exceeded before the lock is acquired. ReaderWriterLock supports re-entrancy so the same thread can acquire the same lock type multiple times without blocking. In addition, a writer can happily acquire a read lock without blocking. However, a thread holding a read lock may not be able to acquire a write lock without blocking as there may be other readers in progress.
Listing 4-15. Using a ReaderWriterLock
var rwLock = new ReaderWriterLock();

rwLock.AcquireReaderLock(TimeSpan.FromSeconds(3));
try
{
    ReadState();
}
finally
{
    rwLock.ReleaseReaderLock();
}
What if you already hold a read lock and you discover you also need to write? For example, you are accessing the cache and you find one of the items you need is not present and needs to be added to the cache. You could attempt to gain an additional write lock, but it would be convenient to be able to promote your read lock to a write lock. This is the concept of upgradable locks and is supported by the UpgradeToWriteLock method of ReaderWriterLock (this also takes a timeout, as the call may block due to other readers in progress).
Problems with ReaderWriterLock
ReaderWriterLock appears to have the necessary functionality, but there are two key issues with the implementation that are problematic. The first issue is that ReaderWriterLock is comparatively slow—four times slower than a monitor. However, the biggest problem is that ReaderWriterLock can be subject to writer starvation. What is writer starvation? Consider a ReaderWriterLock with active readers. Now, along comes a writer who gets blocked because of the readers. However, with ReaderWriterLock new readers are still allowed in, so if there is a sufficient flow of new readers, the writer will never obtain its lock.
ReaderWriterLockSlim
The deficiencies in ReaderWriterLock were such that with .NET 3.5, Microsoft introduced another reader/writer lock: ReaderWriterLockSlim. This is twice as fast as ReaderWriterLock and also does not suffer from writer starvation, as new readers get queued up behind a waiting writer. Listing 4-16 demonstrates its use.
Listing 4-16. Basic API for ReaderWriterLockSlim
var rwLock = new ReaderWriterLockSlim();

rwLock.EnterReadLock();
try
{
    ReadState();
}
finally
{
    rwLock.ExitReadLock();
}
Notice that we cannot pass a timeout to EnterReadLock. To use timeouts we need to use TryEnterReadLock, which takes a timeout and returns a Boolean that states whether or not the lock was acquired within the timeout. The usage is very similar to TryEnter on the Monitor class.
The priority for ReadWriterLockSlim’s behavior is speed over functionality. By default, therefore, it does not support recursive acquisition. To enable recursion the constructor must be passed the LockRecursionPolicy.SupportsRecursion flag. Enabling recursion slows the lock down, but even then it is still significantly faster than ReaderWriterLock. Another area where the default behavior is less functional than ReaderWriterLock is in terms of upgradable locks. With ReaderWriterLockSlim, read locks are not automatically upgradable to write locks. To enable lock upgrade we need to call EnterUpgradableReadLock rather than EnterReadLock.
![]() Note ReaderWriterLockSlim only supports one upgradable lock at a time (although it can be held at the same time as other read locks). In other words, if one thread already has an upgradable read lock, a second thread calling EnterUpgradableReadLock will block until the first thread exits its upgradable lock.
Note ReaderWriterLockSlim only supports one upgradable lock at a time (although it can be held at the same time as other read locks). In other words, if one thread already has an upgradable read lock, a second thread calling EnterUpgradableReadLock will block until the first thread exits its upgradable lock.
A more practical example of the use of a reader/writer lock is shown in Listing 4-17. Here we have a cache of news items that are tagged according to subject. Users can hit our site and ask for various kinds of news items (e.g., business news) via the GetNews method, and new NewsItems are added to the cache via the AddNewsItem method. The danger here is that a new NewsItem will arrive during the enumeration of the results of GetNews, causing an InvalidOperationException due to the collection being modified during iteration. So use a ReaderWriterLockSlim to guard the query using a read lock and the update to the cache with a write lock. This means you can have lots of users getting news from the cache concurrently, but when new NewsItems arrive they can be added in a thread-safe way.
Listing 4-17. ReaderWriterLockSlim in Action
public class Cache
{
    private readonly List<NewsItem> items = new List<NewsItem>();

    ReaderWriterLockSlim guard = new ReaderWriterLockSlim();

    public IEnumerable<NewsItem> GetNews(string tag)
    {
        guard.EnterReadLock();
        try
        {
            return items.Where(ni => ni.Tags.Contains(tag)).ToList();
        }
        finally
        {
            guard.ExitReadLock();
        }
    }

    public void AddNewsItem(NewsItem item)
    {
        guard.EnterWriteLock();
        try
        {
           items.Add(item);
        }
        finally
        {
            guard.ExitWriteLock();
        }
    }
}
One complication is that the GetNews method uses Linq to get the appropriate results. Linq’s Where extension method will return an IEnumerable<NewsItem>, which is only processed when the consumer iterates the results. You therefore need to force immediate execution of the query within the confines of the lock by calling ToList on the result of Where.
A Semaphore Out of the Box
Earlier in this chapter you implemented a semaphore using the Wait and Pulse methods of the Monitor class. In .NET 4.0 the .NET framework team shipped a managed semaphore as part of the System.Threading namespace. There was already a Semaphore class (we’ll come to this in a little while), so the new class was called SemaphoreSlim (you might be able to see a pattern emerging here). Internally, SemaphoreSlim uses the Wait and Pulse methods of the Monitor class, in a similar way to our version, so it is a very lightweight synchronization primitive. As explained earlier, semaphores are typically used to guard access to a limited resource such as a thread pool. Let’s look at an example by implementing a Large Object Heap buffer pool.
WHY POOL LARGE OBJECT HEAP BUFFERS?
In interop scenarios it is not uncommon to pass unmanaged code a buffer for it to fill with data. When objects are passed across the interop barrier, the unmanaged code will see a raw memory address. This means we cannot allow the GC to move the object during a collection; this is known as pinning. Pinned objects make life a lot harder for the GC during the compact phase, so it would be good to allocate these pinned buffers somewhere that isn’t compacted.
The Large Object Heap (LOH) is used for objects that are around 85,000 bytes and larger, and because the objects are large, it isn’t compacted. Therefore, it can be a good idea to use buffers on the LOH for interop. However, it is expensive to allocate and collect LOH objects, so reusing the buffers can be an effective optimization. To reuse LOH buffers efficiently, you should pool them to make sure you constrain the number in use and centrally manage them.
To start with, we’ll model the buffer by a pair of abstractions: one to model the actual buffer and the other to help us with resource management. You can see these in Listing 4-18. IBufferRegistration allows the user of the buffer to say they are finished with it, so it can be returned to the pool.
Listing 4-18. Abstractions for the Buffer Pool
public interface IBuffer
{
    byte[] Buffer { get; }
}
public interface  IBufferRegistration : IBuffer, IDisposable
{
}
Next you need an implementation of a buffer that will reside on the LOH. To ensure this, make sure the buffer is 85,000 bytes (the actual limit is slightly lower, but 85,000 is a nice round number). Listing 4-19 shows the implementation. Note the InUse flag: this allows you to locate pooled buffers that are not currently in use.
Listing 4-19. Wrapping a LOH Buffer
public class LOHBuffer : IBuffer
{
    private readonly byte[] buffer;
    private const int LOHBufferMin = 85000;
    internal bool InUse { get; set; }

    public LOHBuffer()
    {
        buffer = new byte[LOHBufferMin];
    }

    public byte[] Buffer { get { return buffer; } }
}
Last, you need the actual pool; this uses a semaphore to ensure that if we are using the maximum number of buffers, then the next attempt to obtain one will block until one becomes free. We wrap the LOHBuffer in a BufferRegistration class that returns the buffer to the pool when disposed. The code for the pool is shown in Listing 4-20, and although the semaphore is only a small part of the code, it is critical to ensure that we constrain the pool and block requestors that exceed the maximum concurrent buffers.
Listing 4-20. The BufferPool Implementation
public class BufferPool
{
    private SemaphoreSlim guard;
    private List<LOHBuffer> buffers;

    public BufferPool(int maxSize)
    {
        guard = new SemaphoreSlim(maxSize);
        buffers = new List<LOHBuffer>(maxSize);
    }

    public IBufferRegistration GetBuffer()
    {
        // this blocks until a buffer is free
        guard.Wait();
        // can now get buffer so make sure we're the only thread manipulating
        // the list of buffers
        lock (buffers)
            {
                IBufferRegistration freeBuffer = null;

                // look for a free buffer
                foreach (LOHBuffer buffer in buffers)
                {
                    if (!buffer.InUse)
                    {
                        buffer.InUse = true;
                        freeBuffer = new BufferReservation(this, buffer);
                    }
                }

                // no free buffer so allocate a new one
                if (freeBuffer == null)
                {
                    var buffer = new LOHBuffer();
                    buffer.InUse = true;
                    buffers.Add(buffer);
                    freeBuffer = new BufferReservation(this, buffer);
                }

                return freeBuffer;
            }
        }

        private void Release(LOHBuffer buffer)
        {
            // flag buffer as no longer in use and release the semaphore
            // to allow more requests into the pool
            buffer.InUse = false;
            guard.Release();
        }

        class BufferReservation : IBufferRegistration
        {
            private readonly BufferPool pool;
            private readonly LOHBuffer buffer;

            public BufferReservation(BufferPool pool, LOHBuffer buffer)
            {
                this.pool = pool;
                this.buffer = buffer;
            }

            public byte[] Buffer
            {
                get { return buffer.Buffer; }
            }

            public void Dispose()
            {
                pool.Release(buffer);
            }
        }
    }
![]() Note SemaphoreSlim’s Wait method can also take a timeout. The code in Listing 4-20 should really pass a timeout to the call to Wait to ensure that any waiting thread can recover should the pool somehow become deadlocked or unresponsive. However, to constrain the amount of code in the listing, the timeout processing has been omitted.
Note SemaphoreSlim’s Wait method can also take a timeout. The code in Listing 4-20 should really pass a timeout to the call to Wait to ensure that any waiting thread can recover should the pool somehow become deadlocked or unresponsive. However, to constrain the amount of code in the listing, the timeout processing has been omitted.
Raising the Starting Gate: ManualResetEventSlim
We saw how the Monitor class can be used to raise notifications with Pulse and PulseAll. These APIs are, however, fairly low level, requiring the thread wanting notification to take special actions. .NET 4.0 introduced the ManualResetEventSlim class that wraps up the low-level API into something easier to use.
A ManualResetEventSlim has two states: Set and Unset. If the event is Set, then a thread calling Wait will return immediately. If the event is Unset, then calling Wait will block until the event transitions to the Set state. The constructor takes the initial state (default to Unset) and the Set and Reset methods change the event’s state to Set and Unset, respectively.
ManualResetEventSlim can be used for general purpose signaling between threads, but is also commonly used to ensure that a group of threads does not proceed beyond a certain point until some initialization work has been completed.
For example, imagine you have a set of threads that load data from various data sources for processing. The exact processing required is based on a configuration file that is generated from another system, so once the threads have loaded the initial data, they cannot proceed until the configuration file is available. A ManualResetEventSlim is the ideal synchronization primitive here, as the processing threads call Wait after the initial data load, which will block. Once the configuration file is available, Set is called, which wakes up the processing threads. They now read the file, obtain the processing parameters they need, and start processing. Listing 4-21 shows the controlling thread that sets the event, and Listing 4-22 shows the processing thread that performs its initial work and then waits for the control file by waiting on the event.
Listing 4-21. Processing Control Thread
static void Main(string[] args)
{
    var matchers = new[] {"dowjones", "ftse", "nasdaq", "dax"};
    var controlFileAvailable = new ManualResetEventSlim();
    var tasks = new List<Task>();

    foreach (string matcherName in matchers)
    {
        var matcher = new Matcher(matcherName, MatchesFound, controlFileAvailable);
        tasks.Add(matcher.Process());
    }

    Console.WriteLine("Press enter when control file ready");
    Console.ReadLine();

    controlFileAvailable.Set();

    Task.WaitAll(tasks.ToArray());
}
Listing 4-22. Processing Thread
private void InternalProcess()
{
    IEnumerable<TradeDay> days = Initialize();

    controlFileAvailable.Wait();

    ControlParameters parameters = GetControlParameters();
    IEnumerable<TradeDay> matchingDays = null;
    if (parameters != null)
    {
        matchingDays = from d in days
                       where d.Date >= parameters.FromDate &&
                             d.Date <= parameters.ToDate && d.Volume >= parameters.Volume
                       select d;
    }

    matchesFound(dataSource, matchingDays);
}
CountdownEvent: Simplifying Fork and Join
You saw in Chapter 3 that parent/child tasks can be used to model the fork-and-join pattern, where the parent splits up a complex task into a set of child tasks that can run concurrently. The parent task is then not deemed complete until all the child tasks have finished. This allows code interested in the completion of the entire process to simply wait for the parent to complete. However, what if it isn’t completion that is of interest, but rather an intermediate state, or whether it’s impractical for a single task to spawn the other tasks? In this case it would be useful to have another primitive that could keep a count of completions.
CountdownEvent was introduced in .NET 4.0 to give a flexible way for a “controller” to synchronize with a set of subordinate tasks. We could achieve a similar effect by associating each subordinate task with a ManualResetEventSlim and then have the controller wait on all of the events, but this becomes ungainly with many subordinate tasks. CountdownEvent provides a single primitive that keeps track of a count internally. When a controller calls Wait it blocks until this internal count reaches zero. The count is decreased by a subordinate task calling Signal on the CountdownEvent.
Returning to the data-matching example from Listings 4-21 and 4-22, if the requirement changes so the controller (Main in Listing 4-21) should not change the control file until all the matchers have finished their initialization, then we can use a CountdownEvent to provide this coordination. Main waits on the CountdownEvent before replacing the control file, and the matchers signal the CountdownEvent when they have finished their initialization. We can see the updated code in Listing 4-23 and 4-24.
Listing 4-23. Controller Waiting on CountdownEvent
static void Main(string[] args)
{
    var matchers = new[] {"dowjones", "ftse", "nasdaq", "dax"};
    var controlFileAvailable = new ManualResetEventSlim();
    var tasks = new List<Task>();

    var initializationComplete = new CountdownEvent(matchers.Length);

    foreach (string matcherName in matchers)
    {
        var matcher = new Matcher(matcherName,
                                  MatchesFound,
                                  controlFileAvailable,
                                  initializationComplete);
        tasks.Add(matcher.Process());
    }

    initializationComplete.Wait();

    Console.WriteLine("Press enter when control file ready");
    Console.ReadLine();

    controlFileAvailable.Set();

    Task.WaitAll(tasks.ToArray());
}
Listing 4-24. Worker Signalling CountdownEvent
private void InternalProcess()
{
    IEnumerable<TradeDay> days = Initialize();

    initializationComplete.Signal();

    controlFileAvailable.Wait();

    ControlParameters parameters = GetControlParameters();
    IEnumerable<TradeDay> matchingDays = null;
    if (parameters != null)
    {
        matchingDays = from d in days
                       where d.Date >= parameters.FromDate &&
                             d.Date <= parameters.ToDate &&
                             d.Volume >= parameters.Volume
                       select d;
    }
    matchesFound(dataSource, matchingDays);
}
As with all of the synchronization primitives introduced in .NET 4.0, the Wait method can take a timeout and a CancellationToken. The CountdownEvent’s internal count can be manipulated by the AddCount and TryAddCount method, which increase it, and the Reset method, which returns it to the original, or a specific, value.
Barrier: Rendezvous-Based Synchronization
Both ManualResetEvent and CountdownEvent are used when an external controller or coordinator are involved with asynchronous work. However, for some kinds of work, we need the workers to coordinate their activity between themselves. A common situation where this is necessary is when using geometric decomposition to evaluate the state of a system over a series of time intervals (for example calculating the weather).
GEOMETRIC DECOMPOSITION
Geometric decomposition is a pattern for parallelizing execution of an algorithm over a set of data by splitting the data into chunks and concurrently applying the algorithm to each chunk. Commonly the calculation for a specific chunk will require data from other chunks (e.g., edge conditions). Geometric decomposition can be applied to a wide variety of problems such as heat diffusion, matrix multiplication, and weather calculation.
The issue is that, because of the edge conditions, each new time interval can only be calculated once all concurrent calculations for the current time interval have completed. The individual tasks, therefore, need a way to ensure that, once they have completed the current time interval, they wait until everyone has gotten to the same stage—essentially arranging a rendezvous point.
Listing 4-25 shows an example of calculating heat diffusion over a series of iterations using geometric decomposition. The Material class models the material over which heat is diffusing, and two Material buffers are alternatively used as the source data and new generated values. The Range class is used to break the material into the chunks on which to apply the diffusion algorithm. Last, the Barrier is used to ensure that each Task has finished its current iteration before any of the Tasks move on to the next iteration.
Listing 4-25. Geometric Decomposition Controlled with a Barrier
Material DiffuseHeat(Material material, int iterations)
{
    Material[] materials = new Material[2];
    materials[0] = material;
    materials[1] = new Material(materials[0].Width);
    materials[1][0] = material[0];
    materials[1][material.Width - 1] = material[material.Width - 1];

    double dx = 1.0 / (double)material.Width;
    double dt = 0.5 * dx * dx;

    int nCores = 4;
    Range range = new Range() { Start = 1, End = material.Width - 1 };

    Barrier barrier = new Barrier(nCores);

    Task[] tasks = new Task[nCores];
    int nTask = 0;

    foreach (Range subRange in range.CreateSubRanges(nCores))
    {
        Range localRange = subRange;
        tasks[nTask++] =
        Task.Factory.StartNew(() =>
        {
            for (int nIteration = 0; nIteration < iterations; nIteration++)
            {
                Material src = materials[nIteration%2];
                Material dest = materials[(nIteration + 1)%2];

                for (int x = localRange.Start; x <= localRange.End; x++)
                {
                    dest[x] = src[x] + (dt/(dx*dx))*(src[x + 1] - 2*src[x] + src[x - 1]);
                }

                barrier.SignalAndWait();
            }
        });

   }
   Task.WaitAll(tasks);

   return material;
}
The Barrier can also be passed an Action<Barrier> delegate, which gets executed once all of the tasks have arrived at the rendezvous but before they are all released from their wait. This allows the delegate exclusive access to the data so it can retrieve any required interim results. The number of participants in the coordination (passed to the Barrier constructor) can vary over time via the AddParticipant and RemoveParticipant methods on the Barrier class. Last, as usual, the SignalAndWait method can take a timeout and a CancellationToken.
Crossing the AppDomain Boundary with WaitHandle
So far every synchronization construct that we have looked at is implemented fully in managed code. On that basis none of these primitives can be used to coordinate activity between AppDomains and separate processes. Sometimes you will need to be able to control access or signal beyond a single AppDomain. For example, if two applications both needed to update the same file then you would need to control access to the file between the processes. If the code was running in the same AppDomain, you could quite easily use a Monitor, but that isn’t going to work cross-process. Another quite common requirement is to have only one instance of an application running, so that attempting to start another instance in fact just brings the existing instance to the fore. To achieve a single instance, you need some kind of signaling mechanism between the existing instance and the new instance.
The kernel has its own synchronization primitives: Mutex, Semaphore, ManualResetEvent, and AutoResetEvent. As these are kernel mode constructs they can be used for synchronization across the AppDomain and process boundaries. They all have the concept of being in a signaled and nonsignaled state.
Mutex
Mutex stands for Mutual Exclusion. It is conceptually very similar to a Monitor, though it does have some differences in functionality. Only one thread at a time can own a mutex, and the mutex is signaled when it has no owner and is nonsignaled when it is owned.
Unlike other synchronization primitives, mutexes support the concept of abandonment. A mutex is deemed abandoned if the thread that owns it terminates. An abandoned mutex is either a sign of abrupt termination of a process or a software bug where a code path does not release the mutex.
Semaphore
The kernel semaphore is very similar in functionality to SemaphoreSlim, but is not bound to a single AppDomain; it provides a counted lock for a pool of resources. Like mutexes, semaphores are shared between processes by naming them. A semaphore is deemed signaled while the current count is less than the maximum count and nonsignaled when the maximum count is reached.
Events
Kernel events provide a cross-AppDomain signaling mechanism. They are signaled when set and nonsignaled when reset. The idea is very similar to ManualResetEventSlim, although not limited to an AppDomain. However, there are actually two types of event in the kernel, Manual Reset Event and Auto Reset Event. Manual Reset Event is what ManualResetEventSlim was based on and so has the same behavior—that is, it moves between its set and reset states by explicit method calls. On the other hand, Auto Reset Event will, as the name suggests, automatically reset once one waiting thread has been woken up.
WaitHandle—The Kernel Synchronization Abstraction
The .NET framework models these kernel synchronization objects with an abstraction called WaitHandle. The key method on WaitHandle is the WaitOne method, which returns immediately if the kernel object is in a signaled state and blocks if in an unsignaled state. The System.Threading classes Mutex, Semaphore, ManualResetEvent, and AutoResetEvent all derive directly or indirectly from WaitHandle. You can see the inheritance model in Figure 4-4.
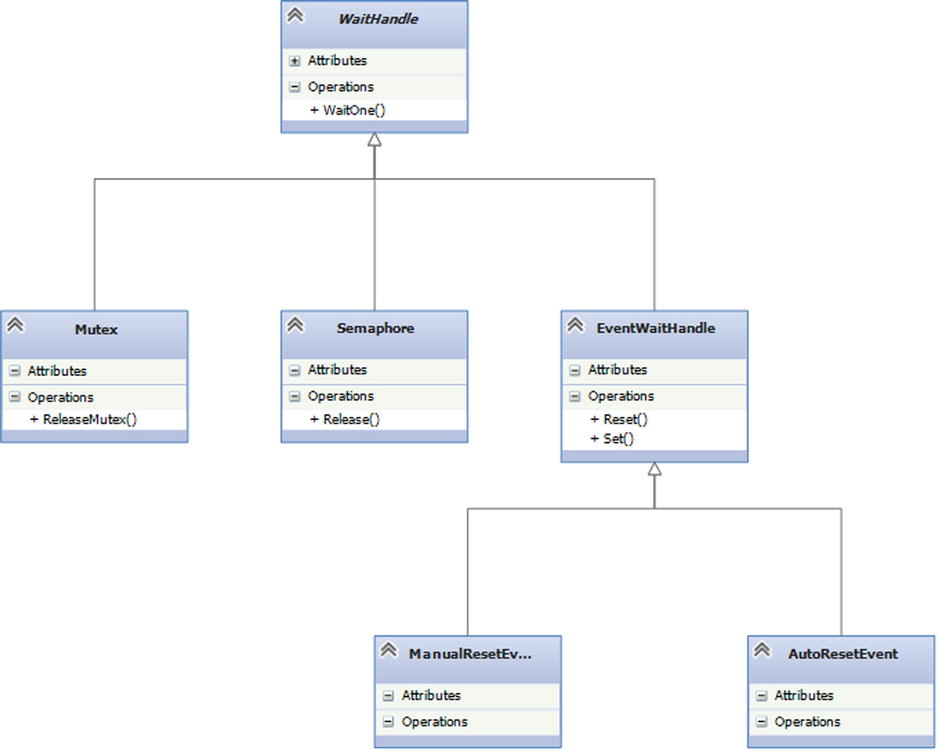
Figure 4-4. WaitHandle-based class hierarchy
To use a WaitHandle-based primitive across processes, you must give it a name when you create it. Both processes intending to access the same primitive must use the same name to ensure they both reference the same kernel object. The first process to attempt to create the primitive will create the kernel object; the second will just obtain a reference (a handle under the covers) to the existing one. If code needs to know whether or not it created the primitive, it can pass a Boolean out parameter to the constructor, which is set to true or false depending on whether the primitive was created or not, respectively. Also, if the process should always attach to an existing primitive, then it can call OpenExisting or TryOpenExisting on the named primitive.
EventWaitHandle is where all the real functionality of kernel events is based. ManualResetEvent and AutoResetEvent are only really façades that configure the EventWaitHandle in a specific way. In fact, if you want to create a named event, which is required for cross-process synchronization, you need to use EventWaitHandle directly rather than either ManualResetEvent or AutoResetEvent.
![]() Note In general the behavior of these classes shouldn’t be too surprising. However, it’s worth calling out the potentially confusing behavior of the Mutex class when a mutex is abandoned. Because an abandoned mutex can indicate a coding bug, since version 2.0 of .NET the WaitOne method on a Mutex throws an AbandonedMutexException so you can record the fact that the mutex was abandoned. The waiting thread, though, does actually now have ownership of the mutex, and it must remember to release it. This is an unusual use of an exception, where the attempted function actually works even though the exception was thrown.
Note In general the behavior of these classes shouldn’t be too surprising. However, it’s worth calling out the potentially confusing behavior of the Mutex class when a mutex is abandoned. Because an abandoned mutex can indicate a coding bug, since version 2.0 of .NET the WaitOne method on a Mutex throws an AbandonedMutexException so you can record the fact that the mutex was abandoned. The waiting thread, though, does actually now have ownership of the mutex, and it must remember to release it. This is an unusual use of an exception, where the attempted function actually works even though the exception was thrown.
To see WaitHandles in action, let’s look at an example of a single instance application. The idea is that we use a named auto reset event (via an EventWaitHandle). If the event is actually created, then the application knows it’s the first instance, so it runs as normal but also asynchronously waits for the event to signal. A second instance will find that the kernel event already exists, so it simply sets the event and exits. Now the first instance wakes up and makes itself the active application, giving us the behavior we are looking for. An example of this, in Windows Presentation Foundation (WPF), is shown in Listing 4-26.
Listing 4-26. Single Instance Application Using an Auto Reset Event
public partial class App : Application
{
    private const string eventName = "84bb9974-fb13-4927-bf47-91f9fca1601c";
    private EventWaitHandle singleInstanceEvent;

    protected override void OnStartup(StartupEventArgs e)
    {
        bool created;
        singleInstanceEvent = new EventWaitHandle(false,
                                                  EventResetMode.AutoReset,
                                                  eventName,
                                                  out created);

        if (!created)
        {
            singleInstanceEvent.Set();
            Shutdown();
        }
        else
        {
            SynchronizationContext ctx = SynchronizationContext.Current;
            Task.Factory.StartNew(() =>
                    {
                        while (true)
                        {
                            singleInstanceEvent.WaitOne();
                            ctx.Post(_ => MakeActiveApplication(), null);
                        }
                    });
        }

        base.OnStartup(e);
    }

    private void MakeActiveApplication()
    {
        MainWindow.Activate();
        MainWindow.Topmost = true;
        MainWindow.Topmost = false;
        MainWindow.Focus();
    }
}
Working with Multiple WaitHandles
Sometimes you need to be able to work with more than one WaitHandle at a time; for example, to gain ownership of two mutexes or take action if either of two events signals. For this purpose the WaitHandle class has three static methods: WaitAll, WaitAny, and SignalAndWait.
WaitHandle.WaitAll
The WaitAll method takes an array of WaitHandles and, optionally, a timeout. It blocks until all of the WaitHandles signal or the timeout elapses. The benefits of this over simply sequentially calling WaitOne on the individual WaitHandles are twofold. First, you can have an overall timeout for waiting for all of the kernel objects; but, probably more important in the case of mutexes and semaphores, the WaitAll method will obtain all or none of the synchronization objects—in other words, the lock acquisition is guaranteed deadlock free. The maximum number of items that can be passed in the array is 64.
WaitHandle.WaitAny
Similar to WaitAll, WaitAny takes an array of WaitHandles and an optional timeout. However, as the name suggests, WaitAny returns as soon as one of the WaitHandles signals. It returns the index of the signaled WaitHandle in the array or the discrete value defined by the constant WaitHandle.WaitTimeout if the timeout is reached before any of the WaitHandles signal. One common use of WaitAny is to spin up a set of asynchronous operations, all trying to achieve the same end but by different means. You can then use WaitAny to signal which one has achieved the goal first so the results can be retrieved. The other main use is to take a set of asynchronous operations and process their results as they finish by repeatedly calling WaitAny, removing the completed operation from the list and then calling WaitAny again.
WaitHandle.SignalAndWait
SignalAndWait takes two WaitHandles and an optional timeout as parameters. It signals the first WaitHandle and waits on the second up to the timeout. SignalAndWait is really a convenience wrapper rather than providing functionality that can’t otherwise be achieved, as it does not guarantee atomicity between the signal and the wait.
![]() Caution WaitHandles can seem the most flexible option for synchronization. However, be aware that, because they require a kernel transition, they are much more expensive than fully managed primitives—one to two orders of magnitude slower.
Caution WaitHandles can seem the most flexible option for synchronization. However, be aware that, because they require a kernel transition, they are much more expensive than fully managed primitives—one to two orders of magnitude slower.
Integrating Standard Primitives and Kernel Objects
What if you needed to wait on a mutex and, say, a SemaphoreSlim? At first glance these seem to be two separate families of synchronization objects. However, nearly all of the primitives introduced in .NET 4.0 can provide a WaitHandle that can be used with WaitHandle.WaitAll and WaitHandle.WaitAny. ManulResetEventSlim and CountdownEvent have a WaitHandle property, and SemaphoreSlim has an AvailableWaitHandle property. Only Barrier is missing this facility. All three synchronization classes wrap up, directly or indirectly, a demand-allocated ManualResetEvent that provides the WaitHandle if required.
Synchronization Is Not the Only Answer
Cast your mind back to the start of this chapter. Remember, we only need synchronization when we have shared, mutable data with nonatomic update. Sometimes it is possible to restructure an algorithm to take advantage of this fact rather than having to introduce synchronization primitives.
In Listing 4-17 we reviewed using ReaderWriterLockSlim to optimize a news cache for high read and low write concurrency. This is obviously a huge improvement over using a Monitor that serializes all of the reads, but the reader is still paying a cost both in terms of having to take a read lock and, more importantly, having to create a copy of the matching news items using ToList. In an ideal world you could have the readers all free-running, even if we have to make the write operation much more expensive, as reads are far more frequent than writes.
The CLR gives you a very important guarantee: reference assignment is always atomic. On 32-bit CLR, references are 32 bit, and on 64-bit CLR, they are 64 bit. This means they can be assigned in a single processor instruction. You can therefore rewrite the AddNewsItem method to copy the existing news cache items (this is a read operation on the list), add the new item to the copy, and then assign the copy as the new items list. At this point the GetNews method is no longer affected by the AddNewsItem and so does not need synchronization. If you want to support multiple writers, you will still need synchronization in the AddNewsItem to ensure only one item is added at a time, but you can use a Monitor for this. You can see an implementation in Listing 4-27. Note that GetNews no longer needs to use ToList to copy the matching news items.
Listing 4-27. Lock-Free Implementation of the News Cache
public class LockFreeCache
{
    private List<NewsItem> items = new List<NewsItem>();

    readonly object writeGuard = new object();

    public IEnumerable<NewsItem> GetNews(string tag)
    {
        return items.Where(ni => ni.Tags.Contains(tag));
    }

    public void AddNewsItem(NewsItem item)
    {
        lock (writeGuard)
        {
            var copy = new List<NewsItem>(items);
            copy.Add(item);
            items = copy;
        }
    }
}
Before you get too excited and go and attempt to change all of your code to lock-free algorithms, some notes of caution.
- Not all algorithms can be written lock free; there are often inherent issues in the functionality that force synchronization.
- Writing lock-free algorithms is very often far more complex than the example in Listing 4-27. There can be many subtle race conditions and they commonly require the use of Interlocked.Exchange and Interlocked.CompareAndExchange.
- Most code won’t benefit from being lock free, as the level of contention is, in reality, very small. Synchronization is needed to ensure correct behavior, but the code very rarely ends up waiting for a lock. In this case there is no real advantage in using a lock-free algorithm.
Conclusion
As soon as you create multithreaded code, you have to take thread safety into consideration. As you have seen, the .NET framework provides many tools, with different costs and approaches, to help you achieve thread safety, but it only provides the tools. It is up to us, as developers, to use the appropriate approach correctly to achieve safety at a minimum cost.
In some ways it would be good if the framework classes themselves were inherently thread safe, but in reality this would add a big overhead for code that often doesn’t need that feature. However, from .NET 4.0 on there has been a set of data structures that are, in fact, designed for concurrency—but that is the subject of the next chapter.