
SharePoint owes a lot of its momentum in the marketplace to the way it empowers end users. Users can post documents, customize pages, launch workflows, and create lists without requiring the intervention of IT staff. One of the more powerful features is the ability to create sites and site collections. Given this power, a user can choose a title, select a location for the site, specify a description, and choose a site template. However, many organizations struggle with exactly how much power to give users and how much of the environment IT should take responsibility for. This balance can determine whether an organization ends up with a SharePoint environment that grows out of control or becomes a frustration point due to lack of responsiveness from IT. This topic is the focus of a lot of the governance material and discussion that started with the SharePoint 2007 release. One way to ease this is with workflows that take such issues into account. In this chapter, we will show you how as a developer you can enable site collection administrators to incorporate workflow processes into how IT responds to requests for new sites. We will also show you how Visio, SharePoint Designer, and Visual Studio all come together in SharePoint workflows.
Lots of organizations we have met with have expressed an interest in how to still empower users, but also add approval points, an audit trail, and some order to the decision-making process. Imagine a consulting firm that is creating an extranet where each site collection represents a customer. Within this site collection, subsites are created for each project the consulting firm takes on for that customer. While the site collections are created by an internal IT process, ideally the managers of projects for that customer should be able to self-provision their subsites to share their work. Though this permission can certainly be granted, the organization, and therefore IT, would likely want some constraints. A project manager, for instance, might be restricted to always choosing a specific site template designed for this extranet. She might not have a choice in the URL for the site; it could be a requirement that the URL be based on the project number. Concerns also usually arise about how long the site may be active and the percentage of quota space it will take from the rest of the site collection.
To provide some context for our solution, we've decided to focus on a story line where a rather SharePoint-savvy department gets the idea to automate the site creation decision-making process within its department site collection. The department starts with a Visio flow diagram depicting the desired paths, approvals, and decision points, then turns the diagram over to a worker skilled with SharePoint Designer. Before any workflow can be created, the first observation is that SharePoint Designer does not provide a workflow action for creating sites. This department and the organization's development staff come together and the development team agrees to build a new workflow activity for site creation. With this in hand, the department goes back to SharePoint Designer to create the workflow, using the Visio diagram to visualize the status of a processing workflow.
In this solution, we will start in Visio by roughing out the decision-making process. Within this diagram, we will use the new SharePoint workflow-specific shapes, which will enable us to later import the diagram into SharePoint Designer to build the skeleton of the workflow. We will then shift gears to the development team where we will build a new workflow activity and a web application-level feature for deploying it. We will dive deep into SharePoint Designer, building out the workflow, in the process making some improvements in the decision paths that were proposed as part of the Visio diagram. The solution will conclude with the publishing of the workflow, which will update the Visio diagram and use it to visualize the workflow's status.
This section describes the major elements of the solution and the decisions that were made in coding it. The walkthrough will show you how to create the Visio diagram and explain the desired decision paths. We will go into detail about how to code a custom workflow activity that will support its use in SharePoint Designer. This will include how to templatize the workflow activity so that the SharePoint Designer user can supply input parameters during the workflow design process. We will then show you how you can leverage a web application-level SharePoint feature to get the activity's files in place, as well as the necessary web.config changes. We will then walk you through the workflow creation in SharePoint Designer, which will include steps to configure conditions, actions, workflow variables, calculations, and email, as well as how to gather additional information from downstream approvers. Finally, we will publish the workflow for testing in a site collection, and in the process use the Visio diagram for visualizing the status of a workflow instance.
With the SharePoint 2010 release, Microsoft Visio plays an increased role for organizations. In this chapter, we will first use Visio to plan a SharePoint workflow. This is done with a set of new shapes that represent the set of conditions and actions you typically find in a SharePoint-specific workflow. As a benefit, you can import such a diagram into SharePoint Designer to jump-start the building of the workflow. In addition, SharePoint Portal Server 2010 introduces Visio Services, which lets us process a Visio diagram on the server, connect it to data, and use the diagram to produce an interactive visualization for the user. In this chapter, we will use Visio Services to show the state and path of a specific site request as it goes through the decision points. However, visualizing workflows is not the only use of Visio Services. For more information about how you can leverage this feature, take a look at the solution in Chapter 13.
For this solution, you can either take the time to follow the detail here about how to create the diagram, or simply grab it from the code download on the Apress web site. To get started, launch Microsoft Visio 2010. Visio will launch in the backstage interface, asking you what type of diagram you want to create. From the Template Categories area, select Flowchart. From this group, select the Microsoft SharePoint Workflow template, specify US units, and click Create.
When Visio opens to your empty drawing, you'll notice several categories of shapes in the toolbox. The default group is called Quick Shapes, which holds some of the more commonly used shapes in SharePoint workflows. However, let's take a moment to look through the entire toolset. The easiest group of shapes to understand is the SharePoint Workflow Terminators shown in Figure 11-1. These shapes simply depict where the workflow starts and stops. It is important to realize that you are limited to sequential workflows that move from step to step as they are being processed, as opposed to event-based state machines. Most workflow diagrams will have one start and one terminate shape.

The SharePoint Workflow Conditions group, shown in Figure 11-2, includes shapes that enable you to branch your decision process when some conditions are met. The shapes here allow you to check to see if the item the workflow is operating on is created by a specific user, is a certain type of file, is of a certain file size, or has a title with a certain keyword, plus several more. The generic Compare data source shape lets you pick some target you'll compare against and is a commonly used shape in workflows.

The SharePoint Workflow Actions group, partially shown in Figure 11-3, includes shapes that enable you to have the workflow perform an action. This is a rather large set, so Figure 11-3 shows only the first few shapes in the group. These shapes represent the work your workflow is going to do. Does it need to send emails to notify certain users? Does it need to ask a user for approval or gather additional information? Do you need the workflow to copy, update, edit, or create a SharePoint list item? The Log to history list shape is popular as it allows your workflow to leave behind an audit trail.

In our story line, the department itself uses Visio to outline the proposed decision-making process in order to govern the site creation process. It is important to realize that this flowchart is really an outline of how a business user might depict the process. As we'll see later, when a developer or IT-savvy user begins constructing the workflow, they often find other steps that need to be added or efficiencies that can be used to remove duplications in logic or process. Figure 11-4 shows a diagram of the decision-making process we will be working with.

The department's diagram begins with the Start terminator and kicks off by first auditing that a request for a new site was received. This is done using the Log to history list shape. The next shape shows that the decision-making process will depend on how much of the department's site collection quota has been allocated. As we'll see later, the department will simply keep a running total in a separate SharePoint list. We will stick with this type of record-keeping solution. However, as we discuss in the Extension Points section of this chapter, this information could be obtained through SharePoint's API.
The next condition is a Compare data source shape that will divert the path based on whether or not the department has reached a 50 percent threshold in its allocations. If it has not, the left-most branch of the diagram executes. This includes the following shapes:
A Comment shape, which you can find in the Workflow Actions group, for the creation of the site (since this will be the custom activity we will code later).
An Update list item shape to increase the running total for the quota
A Send an email to notify the requestor that the site has been provisioned
A Log to history list to record the result of the workflow
If the department has already accounted for 50 percent of its site collection quota, approval of the site collection administrator is required. The first shape in this path is the Collect data from a user shape, which results in a task and form being created to decide whether this request should be approved. The Compare data source shape after this enables us to determine the result of the approval. If the request is not approved, the shapes in the middle column execute, including the Send an email and Log to history shapes to record the denial. If the request is approved by the site collection administrator, the shapes in the right-most column, which are similar to those in the first column, execute. Note that you can't simply draw a line from the approved shape to the first column. SharePoint workflow flowcharts impose limits that you also see enforced in SharePoint Designer. In particular, your workflow must be sequential and can't backtrack or jump to a previous step. You can verify that you haven't broken these rules by clicking the Check Diagram button in the Process tab of Visio's ribbon. You should always do this before using the diagram in SharePoint Designer.
To wrap up, you should definitely save your work. In addition to creating a Visio (.vsd) file, we also need to export the diagram into a format that SharePoint Designer can read. In the same Process ribbon tab, you'll see an Export button. Name the file ProposedSiteCreationExport.vwi and remember the location you saved it to.
As described in Chapter 3, with the 2010 releases Microsoft took major steps to help developers be more productive in building customizations for SharePoint with Visual Studio. For this example, we will start with an empty SharePoint 2010 solution and project so we can help you become familiar with all the new tools and functionality. This SharePoint project is going to be more of a deployment vehicle to get our custom workflow activity into the environment. The activity itself will be another project that we will add in just a bit. Use the following steps to create the SiteProvisionFeature Visual Studio 2010 project:
Open Visual Studio 2010 and start a new project.
Expand SharePoint and select the 2010 node for the SharePoint 2010 project types.
Using the drop-downs above the project types, make sure you are targeting the .NET Framework 3.5.
Select Empty SharePoint Project from the list of project types.
Name the project SiteProvisionFeature and leave the default choices of creating a new solution with the same name. Your completed dialog should look like Figure 11-5.
Click OK.
For our environment it was
http://edhild3/sites/workflow.

You can't add a custom workflow activity directly to the SharePoint project. This is because workflow activities are really a Windows Workflow Foundation feature and can have a much broader scope than living in a SharePoint host. Workflow activities also have their own Visual Studio project type, so you need to add another project to the solution. This time choose the Workflow node and select the Workflow Activity Library template. Verify you are still targeting the .NET Framework 3.5 and name this project SiteProvisionActivity. This is the project we will focus on here, and come back to the SharePoint project in the next section.
Before jumping into the actual code of the workflow activity, let's get a few other things out of the way. First, there are a few other assemblies we need to add references to: Microsoft.SharePoint.dll and Microsoft.SharePoint.WorkflowActions.dll. These should be in the .NET tab of the Add References dialog. If not, their default location is C:Program FilesCommon FilesMicrosoft SharedWeb Server Extensions14ISAPI. We also want to rename the Activity1.cs default workflow activity file that Visual Studio placed in the project for you. Just right-click and choose to rename it to ProvisionActivity.cs. We also want the using statements shown in Listing 11-1. Most of these are so we can interact with the SharePoint site our workflow is running within. To add them, just right-click on the file and choose to view the code of the workflow activity.
Example 11-1. Using Statements for the Custom Workflow Activity
using Microsoft.SharePoint;
using Microsoft.SharePoint.Workflow;
using Microsoft.SharePoint.WorkflowActions;
using Microsoft.SharePoint.Navigation;
using System.Diagnostics;
We also need to change the base class for this workflow activity. By default, the base class is SequenceActivity. It needs to be changed to just Activity. The main difference here is that we don't need our custom activity to contain other activities. It will be a black box performing the single operation of creating a subsite under the site where the workflow is executing. The code in Listing 11-2 shows the modified class declaration.
Example 11-2. Changing the Base Class of the Workflow Activity
namespace SiteProvisionActivity
{
    public partial class ProvisionActivity : Activity
    {
        public ProvisionActivity()
        {
            InitializeComponent();
        }
When our workflow activity is used in SharePoint Designer, we want the builder of the workflow to be able to pass in values for the site creation process. Builders should be able to specify the title of the site, the URL it should have, a site description, the site template to use, a language locale identifier, whether or not the site should inherit permissions, and if it should overwrite a site that already exists. These are all parameters to the method of creating a new site in a site collection. Again, we wouldn't want to hard-code any of these, so they need to be variables that get passed into the workflow. To accomplish this, we will declare a set of dependency properties. You might not have seen dependency properties before. They are very similar to normal class properties. The difference is that these properties leverage a framework included in the .NET Framework 3.0 that enables them to support enhanced features such as change notifications, validation, and value resolution. Both Windows Presentation Foundation and Windows Workflow Foundation take advantage of this framework, though they use it slightly differently. You can read more about dependency properties using the links provided in the Further Reading section of this chapter. We won't show every property here in the text; we'll just focus on some important traits. You can get the whole set in the code download for this chapter. Listing 11-3 includes a string dependency property for the title of the site.
Example 11-3. The SiteTitle Dependency Property
public static DependencyProperty SiteTitleProperty =
        DependencyProperty.Register("SiteTitle", typeof(string),
                                    typeof(ProvisionActivity));
[Description("SiteTitle")]
[Category("Site Provision Actions")]
[Browsable(true)]
[DesignerSerializationVisibility(DesignerSerializationVisibility.Visible)]
public string SiteTitle
{
  get
  {
    return ((string)(base.GetValue(ProvisionActivity.SiteTitleProperty)));
  }
  set
  {
    base.SetValue(ProvisionActivity.SiteTitleProperty, value);
  }
}
Note
With it taking a whole block of code to declare a dependency property, you might think you are in for a lot of typing. The good news is that Visual Studio includes a code snippet to write the skeleton for you. Just type wdp where you want the property and TAB twice. Then just customize the inserted code with your property-specific name and data type.
In addition to the parameters we want to include to create the desired site, there is one other dependency property we want to add, named __ContextProperty. By placing this property in our custom workflow activity, our workflow code can access the context of the host it is running in. This lets our activity know in which site collection it should create the new site. Without the context, we would have to make our workflow builder pass in the URL of the site collection as well. This approach makes more sense since it implies that the site collection for the new site is the same as the one where the workflow is running. The code in Listing 11-4 shows this dependency property.
Example 11-4. Declaring the __Context Dependency Property
public static DependencyProperty __ContextProperty =
      DependencyProperty.Register("__Context", typeof(WorkflowContext),
                                  typeof(ProvisionActivity));
[Description("Context")]
[ValidationOption(ValidationOption.Required)]
[Browsable(true)]
[DesignerSerializationVisibility(DesignerSerializationVisibility.Visible)]
public WorkflowContext __Context
{
get
{
return ((WorkflowContext)(base.GetValue(ProvisionActivity.__ContextProperty)));
}
set
{
base.SetValue(ProvisionActivity.__ContextProperty, value);
}
}All of the real action happens in the Execute method of the custom workflow activity. This code is shown in Listing 11-5. With all the buildup, this may seem a bit anticlimactic. Through the context dependency property we just defined, the workflow discovers the site collection and web it is running within. In our story line, this would be the root web of the department's site collection. We then create a new subsite by adding a new entry. The Add method used here leverages all of the other dependency properties declared in the workflow activity. Should any error occur, we capture the exception in the Event Log. Finally, we return an ActivityExecutionStatus object to signal that our activity has completed its work.
Example 11-5. The Workflow Activity's Execute Method
protected override ActivityExecutionStatus Execute(ActivityExecutionContext
                                                   executionContext)
{
  try
  {
    using (SPSite sourceSite = new SPSite(this.__Context.Web.Site.ID))
    {
      using (SPWeb currentWeb = sourceSite.AllWebs[this.__Context.Web.ID])
      {
        SPWeb newWeb = currentWeb.Webs.Add(SiteUrl, SiteTitle, SiteDescription,
                       LocaleID, SiteTemplate, bool.Parse(UseUniquePermissions),
                       bool.Parse(ConvertIfThere));
      }
    }
  }
  catch (Exception ex)
  {
     EventLog.WriteEntry("ProvisionActivity", ex.ToString());
  }
  return ActivityExecutionStatus.Closed;
}
Note
If you are locking down the permissions for users who may be using this workflow, you may want to wrap the site creation code in a RunWithElevatedPriveledges delegate. You can read more about this here: http://msdn.microsoft.com/en-us/library/microsoft.sharepoint.spsecurity.runwithele.
Since this workflow activity's assembly will be deployed to the GAC by the SharePoint feature we will describe in the next section, you will need to configure it to have a strong name. Use the following steps to complete that configuration:
Right-click on the SiteProvisionActivity project and select Properties.
Click on the Signing tab and check the checkbox to Sign the assembly.
Select New from the drop-down under the Choose a strong name key file instruction.
Name the file key. Clear the checkbox to protect the key file with a password and click OK.
Click Save and Build your project.
Now we are going to go back to the SharePointFeature project we created earlier and use it to deploy the custom workflow activity. For our workflow activity to work within SharePoint Portal Server and be available for SharePoint Designer workflows, we have to deploy the assembly to the Global Assembly Cache and make sure it is registered in the web application's web.config file as a safe control and authorized type. We also need to publish an .ACTIONS XML file. This file is read by SharePoint Designer to construct the user interface for the activity while the workflow is being built.
For several deployment steps we will need to know the strong name of our assembly that contains the workflow activity. Strong names are a lot like fully qualified domain names. They include all of the details necessary to uniquely identify the assembly. In our environment, the strong name of the workflow activity's assembly is SiteProvisionActivity, Version=1.0.0.0, Culture=neutral, PublicKeyToken= d5c639ac57ef5dbf. The strong name is made up of the name of the assembly itself, the version number, the culture, and the assembly's public key token. This token was given when you signed the assembly with the key file. Use the following steps to retrieve your assembly's public key token which you will need in later steps. Be sure to copy it to the clipboard or Notepad for later use.
From your start menu, open the Visual Studio Command Prompt (2010). You'll find it in the Visual Studio Tools folder within the Microsoft Visual Studio 2010 folder.
Navigate to your workflow activity's project folder and locate the DLL, which should be in the Debug folder of the Bin directory.
Use the sn.exe command to output the public key token. This command should take the form
sn.exe -T SiteProvisionActivity.dll. If your command window is in QuickEdit mode, you can highlight and right-click to copy the value to the clipboard.
Let's first start with the .ACTIONS file. This file will be read by SharePoint Designer as it discovers what workflow activities have been published to the SharePoint server. SharePoint Designer looks for these files in a specific location. To reference this location in our project, we'll add a mapped folder, which will tell Visual Studio where the file should be published so it can act accordingly when building the solution package. To do this, right-click on the SharePointFeature project and choose Add SharePoint Mapped Folder. You should see a dialog like the one in Figure 11-6, allowing you to select the Template1033Workflow folder from the 14-hive.

With the Workflow mapped folder in your project, now add an XML file to it named ProvisionActivity.ACTIONS. If you like, you can just grab it from the code download. This file defines the action for SharePoint Designer, specifies how the activity should be rendered in the SharePoint Designer workflow builder, and details the activities parameters. Listing 11-6 contains the initial part of this file, which defines the action. Be sure to use your public key token value instead of the one in the listing.
Example 11-6. Defining the Action in an .ACTIONS file
<WorkflowInfo>
  <Actions Sequential="then" Parallel="and">
    <Action Name="Create SubSite" ClassName="SiteProvisionActivity.ProvisionActivity"
            Assembly="SiteProvisionActivity, Version=1.0.0.0, Culture=neutral,
                      PublicKeyToken=<YourPublicKeyToken>"
            AppliesTo="all" Category="Site Provision Actions">
PublicKeyToken=<YourPublicKeyToken>"
AppliesTo="all" Category="Site Provision Actions">The next section of this file controls how the activity will be rendered in SharePoint Designer as the user builds the workflow. This really comes down to a human-readable sentence with placeholders for the various parameters that can be passed into the activity. As shown in Listing 11-7, the sentence is specified as an attribute of the RuleDesigner element. Within the string, we can add placeholders that represent the parameters. Within the RuleDesigner element, we can further define binding rules that tell SharePoint Designer how to display the placeholder and what parameter it corresponds to. In some cases we simply give the user a textbox, but notice that with the UseUniquePermissions and ConvertIfThere parameters, we can provide drop-down choices.
Example 11-7. The Rule Designer Portion of the .ACTIONS file
<RuleDesigner Sentence="Create site named %1 at the URL %2 described as %3.Use template %4 with locale %5. %6 use unique Permissions. %7 convert ifthe site exists."> <FieldBind Field="SiteTitle" DesignerType="TextArea" Id="1"/> <FieldBind Field="SiteUrl" DesignerType="TextArea" Id="2"/> <FieldBind Field="SiteDescription" DesignerType="TextArea" Id="3"/> <FieldBind Field="SiteTemplate" DesignerType="TextArea" Id="4"/> <FieldBind Field="LocaleID" DesignerType="TextArea" Id="5"/> <FieldBind Field="UseUniquePermissions" DesignerType="Dropdown" Text="choose" Id="6"> <Option Name="Do" Value="True"/> <Option Name="Do not" Value="False"/> </FieldBind> <FieldBind Field="ConvertIfThere" DesignerType="Dropdown" Text="choose" Id="7"> <Option Name="Do" Value="True"/> <Option Name="Do not" Value="False"/> </FieldBind> </RuleDesigner>
The last portion of this file is shown in Listing 11-8 and includes the definition of the parameters for our activity. Notice that this list includes the __Context parameter. There is no need for it to be presented to the user through the RuleDesigner we defined earlier. We also use this section to define an initial default value for the LocaleID parameter.
Example 11-8. The Parameters Portion of the .ACTIONS file
<Parameters> <Parameter Name="__Context" Type="Microsoft.SharePoint.WorkflowActions.WorkflowContext, Microsoft.SharePoint.WorkflowActions" Direction="In"/> <Parameter Name="SiteTitle" Type="System.String, mscorlib" Direction="In" /> <Parameter Name="SiteUrl" Type="System.String, mscorlib" Direction="In" /> <Parameter Name="SiteDescription" Type="System.String, mscorlib" Direction="In" /> <Parameter Name="SiteTemplate" Type="System.String, mscorlib" Direction="In" /> <Parameter Name="LocaleID" Type="System.UInt32, mscorlib" Direction="In" InitialValue="1033" /> <Parameter Name="UseUniquePermissions" Type="System.String, mscorlib" Direction="In" /> <Parameter Name="ConvertIfThere" Type="System.String, mscorlib" Direction="In" /> </Parameters> </Action> </Actions> </WorkflowInfo>
Another task we must perform with this deployment-focused feature is to have it deploy our custom workflow activity's assembly to the Global Assembly Cache. To accomplish this, we will use the Package Designer. If you expand the Package node of your project in Visual Studio's Solution Explorer, you'll see a Package.package element. Double-click it to open the designer for the package. This tool allows us to control the SharePoint solution's manifest, which SharePoint will use during deployment to place the files in their correct locations. Since our assembly is not part of this project, we have to use the advanced functionality of the designer. Use the following steps to have this feature deploy our workflow activity assembly.
With the Package Designer interface open, click the Advanced button near the bottom of the designer.
Click the Add button.
Choose the option to Add Assembly from Project Output.
Choose the SiteProvisionActivity project from the drop-down for Source Project.
Make sure the Deployment Target is set to Global Assembly Cache. Do not close the dialog yet.
As it turns out, the Package Designer can also accomplish one of our other tasks—registering the class as a Safe Control in the web application where our feature will be activated. Add a new item to the Safe Controls section of this dialog and use Table 11-1 to complete the entry. Make sure you use your public key token value. Click OK when you are finished.
Table 11-1. Registering the Workflow Activity as a Safe Control
Property | Value |
|---|---|
Namespace | SiteProvisionActivity |
Type Name | * |
Assembly Name | SiteProvisionActivity, Version=1.0.0.0, Culture=neutral, PublicKeyToken=<YourPublicKeyToken> |
Safe | Checked |
Safe Against Script | Checked |
To complete this SharePoint project, we also need to make a change to the web.config file to register our workflow activity assembly as an authorized type. Authorized types are validated during the compilation step of a workflow, whereas a Safe Control entry simply confirms that the class or control is safe for invocation from a SharePoint ASPX page. The Package Designer does not perform this function. Instead, we will include a web-application-scoped feature that will make this modification when the feature is activated. Note that we are going to make these changes using code so we don't need developers or IT professionals trying to paste content into the web.config file directly. Use the following steps to add the feature to the SharePointFeature project.
Right-click on the Features node of the SiteProvisionFeature project and select Add Feature.
Right-click on the Feature1 node that was added and select Rename. Enter SiteProvisionFeature as the name.
Open the Feature Designer and change the scope of the feature to Web Application.
This new feature is not going to deploy any SharePoint customizations. Instead, we will simply use it to make the necessary web.config file change when the feature is activated in a web application. To be able to write code in response the activation, we need to add an event receiver for the feature. You can do this by right-clicking on the SiteProvisionFeature node and choosing Add Event Receiver. This adds a new SiteProvisionFeature.EventReceiver.cs file within the node. Here is where we can place code that will run in response to one of the feature's events, such as activated, deactivating, installed, or uninstalling. Open the code file. Before dealing with the code in the FeatureActivated event, you will need to add one using statement: using Microsoft.SharePoint.Administration;
The change is made to the configuration file through the SPWebConfigModification class, which allows you to define a new entry for the web.config file. In addition, SharePoint will be able to tell you the set of modifications that were made in this manner, enabling you to find and remove them should it be necessary—like when your feature is deactivated or uninstalled. In this scenario, we want to use this technique to add an authorizedType entry.
Note
You should not use this technique for making SafeControl changes. As we saw earlier, the Package Designer facilitates those changes.
The code in Listing 11-9 shows the declaration of the necessary modification. The Owner property is particularly important as it is the field you typically examine when looking for modifications to remove. To assist SharePoint in finding this modification for removal, the Name property is actually an XPath query that will uniquely identify the line that we want removed. The Path property specifies where in the web.config file the entry is to be placed. Make sure in the Value property that you are using the strong name of your assembly with the correct public key token.
Example 11-9. Changing the web.config File upon Feature Activation
public override void FeatureActivated(SPFeatureReceiverProperties properties)
{
   SPWebApplication currentWebApp = (SPWebApplication)properties.Feature.Parent;
   SPWebConfigModification configMod = new SPWebConfigModification();
   configMod.Name = "authorizedType[@Assembly='SiteProvisionActivity, Version=1.0.0.0,
Culture=neutral,PublicKeyToken=<YourPublicKeyToken>'][@Namespace='SiteProvisionActivity']
             [@TypeName='*'][@Authorized='True']";

   configMod.Owner = "SiteProvisionFeature";
   configMod.Path = "configuration/System.Workflow.ComponentModel.WorkflowCompiler/authorizedTypes";
   configMod.Type = SPWebConfigModification.SPWebConfigModificationType.EnsureChildNode;
   configMod.Value = @"<authorizedType Assembly='SiteProvisionActivity, Version=1.0.0.0,
            Culture=neutral, PublicKeyToken=<YourPublicKeyToken>'
            Namespace='SiteProvisionActivity' TypeName='*' Authorized='True' />";
   currentWebApp.WebConfigModifications.Add(configMod);
   currentWebApp.Update();
   currentWebApp.WebService.ApplyWebConfigModifications();
}
Likewise, we will want to remove this web.config file change whenever the feature is deactivated for the web application. This can also be done in the feature's event receiver in the FeatureDeactivating event. The code in Listing 11-10 loops through the modifications that have been committed in this manner in the past looking for any modification that is owned by SiteProvisionFeature. Once those modifications have been found, they are removed and committed to the web application and farm.
Example 11-10. Changing the web.config File when the feature is deactivating
public override void FeatureDeactivating(SPFeatureReceiverProperties properties)
{
   SPWebApplication currentWebApp = (SPWebApplication)properties.Feature.Parent;
   Collection<SPWebConfigModification> modificationCollection = currentWebApp.WebConfigModifications;
   Collection<SPWebConfigModification> removeCollection = new Collection<SPWebConfigModification>();

   int count = modificationCollection.Count;
   for (int i = 0; i < count; i++)
   {
       SPWebConfigModification modification = modificationCollection[i];
        if (modification.Owner == "SiteProvisionFeature")
        {
            // collect modifications to delete
            removeCollection.Add(modification);
        }
   }

   // now delete the modifications from the web application
   if (removeCollection.Count > 0)
   {
       foreach (SPWebConfigModification modificationItem in removeCollection)
       {
           currentWebApp.WebConfigModifications.Remove(modificationItem);
       }

     // Commit modification removals to the specified web application
     currentWebApp.Update();
     // Push modifications through the farm
     currentWebApp.WebService.ApplyWebConfigModifications();
   }
}
This is the last change we will make in this feature, so you can build and deploy your project. You can look at the web.config files for the new entries. You can also confirm that the feature has been activated by looking at your web application's features in Central Administration, as shown in Figure 11-7. If you want to know more about using the SPWebModification class, you can find more information at http://msdn.microsoft.com/en-us/library/microsoft.sharepoint.administration.spwebconfigmodification(office.14).aspx.

There are a few things we want to do to prepare the SharePoint environment for building the workflow. According to our story line, we really want the developers involved as little as possible, yet we would also like the solution to be reusable in case this solution evolves into a best practice within the organization. So, for this chapter, we will define a SiteRequest content type that our workflow will operate on. This content type will be placed within a SharePoint Content Type Hub. A content type hub is a new SharePoint 2010 feature that enables the reuse of a content type throughout a SharePoint environment. In SharePoint 2007, content types were locked to site collections. By placing the content type in a hub, it will be published to other site collections in any web applications that use the same Managed Metadata Service Application. Another approach would have been to have a SharePoint developer wrap such a content type into a SharePoint feature. In fact, that technique is used in Chapter 14. A content type hub is really nothing but a site collection with that feature turned on. In our environment, the hub was the site collection at the root of the web application. Use the following steps to turn on this functionality.
Go to the site you want to be the content type hub (
http://edhild3in our environment) and go to its Site Settings.In the Site Collection Administration group, click the Site collection features link.
Activate the Content Type Syndication Hub feature.
Return to the Site Settings screen. You should notice new links for Content type publishing and the Content type service application error log. In fact, if you now look at the content types, there is a new Manage publishing option for this content type link. You can use this to control publishing as well to see its publishing history.
In addition to setting up the hub, you must also configure the Managed Metadata Service Application to push and pull content types. To configure these settings, follow these steps:
From Central Administration, click the Manage Service Applications link in the Application Management group.
Click just to the right of the Managed Metadata Service item to highlight it and choose Properties in the ribbon.
Scroll down to the bottom of the dialog and enter the URL of the site collection you selected as the hub and click the check box to report syndication errors. Figure 11-8 shows this option after it has been set.
Click OK and return to the list of service applications. Select the Managed Metadata Service proxy, which is the connection item directly below the row you selected earlier.
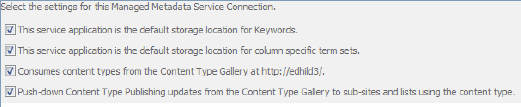
Click Properties in the ribbon. Check the Consumes content types from the Content Type Gallery option. All of the check boxes should be checked as in Figure 11-9.

This completes the configuration of the content type hub and the managed metadata service application. So now when you define a content type in the hub site collection, that content type will be replicated out to other site collections in web applications that use the same managed metadata service. Note that this does not happen immediately. There are two timer jobs that manage the syndication process: Content Type Hub and Content Type Subscriber. If you want your content types to syndicate after you create them, run these two jobs from Central Administration in that order.
Within the content type hub you created, define a new content type named SiteRequest. The parent type for this should be the Item content type, which you can find in the List Content Types group. Use Table 11-2 to define the columns of SiteRequest.
Table 11-2. The SiteRequest Content Type
Column Name | Data Type | Notes |
|---|---|---|
Title | Single line of text | Inherited from the Item content type |
SiteDescription | Multiple lines of text | New site column. Optional. Plain Text |
Reason | Multiple lines of text | New site column. Optional. Plain Text |
End Date | Date and Time | Existing site column. Optional |
SizeMB | Number | New site column. Optional. Zero decimal places |
Now let's look at the site where you will test the provisioning workflow. In our environment, this is http://edhild3/sites/workflow. Make sure that the SiteRequest content type has been replicated from the content type hub. We will setup two lists that the workflow will interact with, one to store the site requests, and the other for the site collection administrator to keep a running total of the amount of quota that has been allocated. Use the following steps to create the Site Requests list:
From within your site collection to test the workflow, click All Site Content in the left-hand navigation.
Click Create.
Choose the Custom List template and specify the name of the list to be Site Requests. Click Create.
Click List Settings in the ribbon of the Site Requests list.
Click Advanced settings.
Click the radio button to Allow management of content types. Click OK.
In the Content Types area of List Settings, choose to Add from existing site content types.
Add your SiteRequest content type and click OK.
Click the Item content type in the Content Types area. Choose to Delete this content type so that it is no longer associated with the Site Requests list.
The second list will also be a custom list, named Quota Management. We will use this list to help the site collection administrator keep track of the amount of space she has allocated. For this test, let's assume the site collection is brand-new with a 100GB quota (102400 MB). From the List Settings area, add two new Number columns named Quota and Allocated, each with zero decimal places. Once you have created the list, add just one new item. This item will be a record-keeping place for the department to keep track of how much of its quota has already been used. For the new item, specify the values in Table 11-3.
In our story line, we are now back in the department as a user who is not a developer, but is tasked with taking the new site provisioning workflow activity and implementing the process roughed out in the Visio diagram. To accomplish the task, we will rely heavily on SharePoint Designer 2010. Launch SharePoint Designer and open the site where you created the lists in the previous section. In the left-hand navigation, click Workflows. You will notice an option in the ribbon to Import from Visio. This is a powerful option that lets us jump-start the workflow creation process by importing the flowchart created in the beginning of this chapter. Click the button and choose the exported (.vwi) version of that Visio document. Name the workflow SiteRequestsWorkflow and select the Reusable Workflow option that will operate on any item of SiteRequest content type. By choosing reusable workflow here, we are indicating that we may well use this workflow in other sites and site collections. Therefore, SharePoint Designer will not embed list identifiers into the workflow, making it more portable. Your settings should look like Figure 11-10. Click Finish.

After the import completes, you'll see that the flow that was depicted in Visio is now roughed out in the SharePoint Designer workflow editor. Workflows in SharePoint Designer are basically sequential flows of conditions and actions. The possible building blocks of these workflows are available through the Condition and Action buttons of the ribbon. Take some type to scroll through each of these to get familiar with the set. Notice in the set of actions that there is a new Site Provision Actions group with a Create SubSite action, as shown in Figure 11-11. This is the custom workflow activity we built in Visual Studio earlier in the chapter.

The first step we want to take in the workflow is to log in the history list that the workflow has started. Click the this message link in the action and then the ellipses button. For the text areas of many items you'll find in a workflow (task descriptions, email, history list items, etc.), SharePoint Designer lets you templatize the string that will be used. This means that when building the workflow, you can use placeholders that will be filled in with the actual values when the workflow is executing. You can find the set of possible lookups by using the Add or Change Lookup button at the bottom of this tool. Figure 11-12 shows an appropriate message that includes placeholders for the name of the site and the person who made the request. In both cases, we are using the current item for the lookup since these values are a stored in the Site Requests list.

The next item imported by our Visio diagram informs us that we should be performing a calculation. The intent of this calculation is to determine how much of the quota space the site collection administrator has already allocated. This is where the Quota Management list comes in handy. However, we need to add some actions to store the quota and currently allocated values in variables before we can perform the calculation. As this indicates, we can deviate from the Visio diagram; in fact, this is a common occurrence. Often when using the structures provided by SharePoint Designer, the builder of the workflow will see ways to add to or even streamline the process.
Here we'll use two of the Set Workflow Variable actions to retrieve the Quota and Allocated columns from the Quota Management list. These should be placed just before the calculation step. In each case, declare a new variable of Number data type. When specifying the value, click the function button. You can then choose the Quota Management list as the source and the corresponding column as the field. When retrieving an item from a list, we do need to specify a filter as to which item we want. In this case, specify that we will filter for an item whose Title field has the value Current. Figure 11-13 shows these settings for the Quota workflow variable.

With these values retrieved, we can perform the calculation depicted in the Visio diagram. For the calculation, we want to divide the Allocated workflow variable by the Quota workflow variable and store the result in the variable PercentageUsed, which is also of type Number. The beginning of your workflow should now look like Figure 11-14.

Collecting data from a user is a very common step for SharePoint workflows and is accomplished by defining a task that is saved to the workflow's task list. This task is assigned to a user and captures the required additional data. SharePoint Designer provides a wizard for defining this task and the data we want to capture. We can then specify who we want to collect it from. Click the data hyperlink in the action to start the wizard. The following steps should be used to complete it.
Click Next.
Specify the Name of the task to be SiteRequestTask. Enter the description Site request requires approval. Click Next.
The next step of the wizard lets you specify the data you'd like to collect from the user. In this case, we want to know if the user gives us a thumb up or down as to whether we should create the site. Click the Add button. Give this field the name IsApproved and the description Should this site be created. Set the information type to Yes/No (check box). Your dialog should look like Figure 11-15. Click Next.
Set the default value to No so it will not be checked on the form. Click Finish twice.

Now use the this user hyperlink. This dialog lets you specify the user or group this task should be assigned to. The site collection administrator could enter his name or email address. In this case, we used the People/Groups from SharePoint Site option to search for the site's Owners group.
To complete this action, define a variable to store the list item ID of the task. We named ours taskId. It is important to realize that you do not get the value the user entered as part of this action. This is because it may take the assigned user some time to complete the task. So to get the actual value, we need to set a workflow variable to pull it out of the task list. We named this variable RequestApproved and set its data type to be Boolean. Getting the correct value out of the task we assigned to the user is a bit tricky so be careful and follow these steps closely.
Click the value hyperlink and then the fx button.
For the Data source, choose the Association: Task List option. This represents the task list the workflow is configured to use.
For the Field from source setting, choose IsApproved.
Again, when choosing an item from a list, we need to specify how we want to select the specific item in that list. In this case, set the Field setting to be ID.
Remember that the ID of the task item we want to retrieve is stored in the
taskIdworkflow variable. To retrieve this, click the fx button for the Value setting.Choose Workflow variables and Parameters for the Data source.
Choose the taskId variable and set the Return field as setting to Item Id since it is storing the list item identifier of the task. Click OK. Your dialog should look like Figure 11-16. Click OK again to close the dialog.

Moving on to the next condition in the workflow, we want to test if the RequestApproved variable has been set to Yes. But before we jump into the steps of creating the site, sending emails, etc., notice that this block of actions is really the same as the set at the end of the workflow that runs if the administrator hasn't allocated at least 50 percent of the quota. In fact, the only difference is updating the running quota, which is something that was accidentally left out of the first block of site creation actions. It is easier to see this in the workflow designer than the Visio diagram, and in fact we can streamline our steps by only having to configure the site creation actions once. So instead of performing all the actions laid out in this initial set, we will just use a variable to test whether we need to do them later. You can delete the actions that are currently there using the drop-down menu that appears when you select the action. We created a new Boolean variable named CreateSite and used it in the remaining flow markup that was imported from Visio. This portion of the workflow should look like Figure 11-17.

Now we'll add an additional If condition below the portion in Figure 11-17. From the Condition button on the ribbon, select the option to add an If any value equals any value shape. We will use this to compare the CreateSite workflow variable. If the value is Yes, we will perform the actions to create the site, update the running total of quota allocated, log the action, and email the user. Clicking the Else-If button in the ribbon gives you an area to lay out the controls for the other possibility—a denial. This area will have a log shape along with a corresponding email.
Focusing on the success scenario, the first shape we'll add is the Create SubSite action. Use the current item's title for the name of the site and its URL. Use the SiteDescription field for the description. Specify the string STS#0 as the site template. This string corresponds to the out-of-the-box SharePoint team site template. Leave the locale set to 1033. Specify to not use unique permissions and to not convert if the site exists.
The next shape in the success scenario will update the Allocated workflow variable to include the amount for this requested site. Use the Do Calculation action and set the calculation to be the Allocated workflow variable plus the current item's SizeMB field. This field represents the amount of quota the user is requesting for the new site. Store the result in the Allocated workflow variable.
The next step is to update the Quota Management list with the new value. This can be accomplished with the Update List Item action. Choose the Quota Management list as the one to update. Add the value assignment that sets the Allocated field to the value of the Allocated workflow variable. Just like earlier, filter on the Title field for a value of Current to specify which item should be updated. This dialog should look like Figure 11-18.

Finish up the success scenario by adding a Log to history list action and a Send an email action. Use these to record that the site was created and inform the requesting user that it is ready to use. Both are similar to steps done earlier so we won't detail them. For the email, you can select User who created current item as the recipient. Likewise, the denial scenario also includes both log and email actions. Figure 11-19 shows most of this section of the workflow. The Create SubSite action is so long it cuts off the edge of the screen. Go ahead and click Save in the ribbon to save your workflow.

Just a couple more steps before we test the workflow. If you still have the workflow editor open in SharePoint Designer, use the breadcrumb navigation and click on the name of the workflow. This takes you to some general settings and information about the workflow. Considering our story line, it would probably be appropriate for the workflow builder to go back to the team to show what has been done. The good news is that the team would not have to know how to interpret the SharePoint Designer workflow editor. We can use the Export to Visio button to generate another Visio Workflow Interchange File that could be loaded into Visio, graphically showing the team the workflow process that was built. Remember, it won't be exactly the rough flow that was sent in since we made a few changes along the way.
We can also use the Visio diagram as a visualization on the SharePoint site to show users exactly the process the workflow has taken for their site request. This leverages the fact that SharePoint Portal Server 2010 includes Visio Services. To have the workflow provide this functionality, simply check the Show workflow visualization on status page check box in the Settings group. Now click the Publish button in the ribbon, which will make your workflow available in the test site.
We also want to build an association with the SiteRequest content type. From the ribbon, click the Associate to Content Type button, then choose SiteRequest. This association is what binds the Workflow to a specific task and history list. In the web page that launches, click OK.
It is now time to test your complete site provisioning workflow. Go to your Site Requests list and create a new item. Remember the value you specify for SizeMB as this should be the updated Allocated value once the workflow completes. Right now our Allocated value is zero so this site should be created without administrator intervention. Once the item has been created, use the Workflows button to launch the SiteRequestsWorkflow. In a production environment, there would be no reason to show the user a screen where they simply click Start. The workflow could be configured to start automatically, in which case this screen would never be seen. Start the workflow. You should see that it finished without requiring a task to be completed by a user. Clicking the Completed link will take you to the workflow status screen. Notice how the Visio diagram is used to show the path the workflow took and that the history list is populated with the correct entries. This is also shown in Figure 11-20, though we had to zoom out to see the whole diagram.

Also confirm that the Allocated column of the Quota Management list was updated. You can edit this item and artificially up the allocated amount so that the other path through the workflow will trigger (a number greater than 51200). Adding another test item should result in the workflow pausing In Progress until the site collection administrator approves or declines the task. When you complete the task, SharePoint renders the form with the IsApproved field we defined in the SharePoint Designer wizard. This is shown in Figure 11-21.

You may wonder where your sites actually are. If you click All Site Content in the left-hand navigation of the site, you can see the sites at the bottom of the list.
This chapter incorporated several key techniques that are worth highlighting as they could easily be reused in other projects.
- Creating a Custom Workflow Activity:
The solution detailed how you can create a new building block for SharePoint workflows that also supports the SharePoint Designer workflow editor. This enables developers to extend the set of tools their power users have in SharePoint Designer.
- Using a Web Application Feature to Change the Web.Config file:
The solution used a SharePoint feature scoped at the web application level to not only deploy the workflow activity, but also to make a custom configuration change to the
web.configfile. This technique could be used for other such changes, such as appSettings entries for certain customizations.- Using Visio to Mock up a SharePoint Workflow:
In this solution, we demonstrated that Visio 2010 includes SharePoint-specific workflow shapes that make it a prime candidate for mock-ups. These shapes also jump-start the workflow construction process as their flow can be imported into SharePoint Designer.
- The SharePoint Designer Workflow Editor:
This editor has been dramatically improved from the 2007 version and is a tool that developers as well as end users will leverage for workflows. It provides a rapid workflow design experience that enables you to control the decision flow, create tasks for users, send emails, and interact with the SharePoint site. Moreover, the ability to export your workflows provides an opportunity for reuse that was not present in earlier releases.
- Using Visio to Visualize the Workflow:
In this solution, we showed you that you can use Visio Services to enhance the workflow status page with a depiction of where the user is in the process.
While coding this example, we thought of several variations to the solution that we didn't incorporate. Mostly, these were not included because they distracted from the overall objective of the solution. We call them out now as extension points since they may be applicable to a specific project you are working on.
- Include an option to add the site to navigation controls:
In our solution, the site does indeed get created in the site collection, but the average end user might never know it is there. This is because our custom workflow activity did not include any options or code to add this site into the navigation structure of the site collection.
- Base the workflow on the actual quota:
In our solution, we used a list to keep track of the quota for the site collection and the amount allocated. You could change the workflow to use the site collection's actual quota, which is available through the object model, and use a property bag of the root web site to store the amount allocated. Of course, you would have to create additional workflow activities if you wanted these values to be available in SharePoint Designer.
- Reuse the workflow:
In the solution we created a reusable workflow, but didn't leverage it anywhere else. In SharePoint Designer, you can use the Save as Template button in the ribbon to export the workflow. This will persist the workflow to a SharePoint solution file (wsp) that you can reuse to create other solutions in the future. You will get a warning that this workflow contains lookups to other lists; this is because of our Quota Management list. Click OK, which saves it to Site Assets. You could then import the wsp file into a Visual Studio to create a SharePoint feature that included the workflow, its association, the quota management list, and its data. When performing this action, do not use the Import Reusable Workflow Visual Studio template, but rather the one that lets you import any wsp solution. This is because you are not interested in converting the declarative SharePoint Designer workflow into a Visual Studio code-based workflow. You just want to wrap it in another deployment vehicle. The solution in Chapter 14 has some steps similar to this approach.
The following links are to resources that we think a reader interested in the material presented in this chapter would find useful:
The Basics on Content Type Syndication in SharePoint 2010
http://sharepoint.mindsharpblogs.com/Bill/archive/2010/01/23/The-Basics-on-Content-Type-Syndication-in-SharePoint-2010.aspxCreating SharePoint 2010 Workflows with Visio 2010
http://www.wictorwilen.se/Post/Creating-SharePoint-2010-workflows-with-Visio-2010.aspxSharePoint Workflow Authoring in Visio Premium 2010 Part 1
http://blogs.msdn.com/visio/archive/2009/11/23/sharepoint-workflow-authoring-in-visio-premium-2010-part-1.aspxSharePoint Workflow Authoring in Visio Premium 2010 Part 2
http://blogs.msdn.com/visio/archive/2010/01/19/sharepointHow to modify the web.config file in SharePoint using SPWebConfigModification
http://www.crsw.com/mark/Lists/Posts/Post.aspx?ID=32How To: Programmatically Add and Remove web.config values
http://msdnmicrosoft.com/en-us/library/cc768610.aspxVisio Services Overview
http://technet.microsoft.com/en-us/library/ee663485(office.14).aspx