
Windows SharePoint Services (WSS) provides the enterprise with easily creatable workspaces where information can be collected and shared among users working toward a common goal. This goal could be many different things—preparation for an event, execution of a business process, or even creating materials for a project. Often, organizations build presentations as an output of this collaboration or for routinely reporting on the status of the team. Microsoft PowerPoint gives users a powerful canvas for constructing presentations. Too often, however, information workers expend too much effort and time to locate, duplicate, and organize information into the presentation. Moreover, the presentation's authors are likely retyping, cutting and pasting, or otherwise manually importing content. Not only are we looking to reduce this effort, we also want to increase its accuracy. So for this chapter, we will detail how, as a developer, you can extend PowerPoint to provide a tool that is capable of building out slides populated with content stored in a SharePoint site.
Just about any time you have a chain of command in an organization, people farther down are collecting, summarizing, and reporting up. Not surprisingly, this happens often in the military. Each of our branches spends a considerable amount of resources aggregating information from outside content repositories and applications to construct briefings for higher officers. It is not unheard of for a team to get an extremely early start every day to gather the information required for a commander's briefing. These efforts are far too manual today, requiring authors to dig through old e-mails in organizational mailboxes, search file shares, and copy data from the user interfaces of multiple applications. The commercial world is not too different in this regard. Just look at any company that has projects and managers responsible for them. They're equally mired in the manual creation of presentations, whether to report the status of a project internally or to present to the customer.
We will extend Microsoft PowerPoint to create a tool that lets presentation authors import data from a SharePoint site. To provide some context for our solution, we have focused our efforts on building a briefing presentation made of imported items that reside in a typical meeting workspace. When the custom import tool is launched, it will examine a user-supplied site to see if it contains an objectives list, a list of agenda items, or any slide libraries. The objectives and agenda lists are a part of the default template for meeting workspaces in SharePoint. In this sample, we added slide libraries because it is not too farfetched to think that users who are a part of this collaboration may have built slides of their own that should be included in the briefing output. Once the site has been examined, the custom import tool will walk the user through a wizard process, offering to build slides for the content it finds in the site. Note that this tool will provide more functionality than the out-of-the-box slide library integration, enabling the creation of slides for list data.
This application should be flexible enough to support the construction of slides in any presentation the author may be working on. To meet this requirement, the solution will be an application-level add-in. As an add-in, this tool will always be available from within PowerPoint. To provide a launching point, the tool will add controls to the Microsoft Office Ribbon interface. From the Ribbon, the author will be able to start the tool, which presents itself as a custom task pane. This pane presents the user with the wizard experience of steps and prompts, building slides as instructed in the current presentation.
As the wizard executes, it asks the user if she wishes to have a presentation slide built for the content it finds on the site. If the user chooses to build a slide for the objectives, the add-in will query the SharePoint site for the objectives list items and place them in a new slide as a bulleted list. If the user chooses to build a slide with the agenda, the add-in will query the SharePoint site for the agenda list items and place them in a new slide displayed within a table. In addition, the add-in will populate the Notes page of the slide with additional details, such as owner of the agenda item or any notes contained in the SharePoint site. Lastly, the add-in will display a list of links to slide libraries it finds on the site. Each link will open the library in the browser so the user can select slides to import into her presentation using the slide library import process.
Now we will detail the major elements of the solution and the decisions that were made in coding it. The walkthrough will show you how to get started with Visual Studio to create the Briefing PowerPoint add-in. We will take a look at how you can use Visual Studio Tools for Office (VSTO) to extend the Office Ribbon interface, and we'll examine the wizard process so you can see how we simplified coding an experience where the user moves through a series of steps, each representing a specific function with its own interface and actions. We will then explain the work that goes into building each of the PowerPoint slides for our briefing. This work includes creating new slides, placing content as a bulleted list, inserting and populating a table, placing content on a slide's notes page, and linking in the SharePoint slide libraries.
Using Visual Studio to build a PowerPoint add-in project is made very straightforward by VSTO's project types. Simply start Visual Studio and select to create a new project. Under the C# language node, select Office and then 2010 to display the VSTO project templates.
From the list of Visual Studio installed templates, select PowerPoint 2010 Add-in. Name the project BuildBriefing. Leave the default option of creating a new solution and confirm that the .NET framework drop-down at the top of the dialog is set to .NET Framework 4. As discussed in Chapter 4, there are several advantages to using version 4 of the framework for Office development, such as C# support for optional parameters. We want to make sure these advantages are available to us. Your New Project dialog should look like Figure 8-1.

Once the new project is created, your solution will already have a few files by default, which are visible in the Solution Explorer window of Visual Studio. There will be a PowerPoint node that you can expand to see a code file named ThisAddIn.cs. This file is the main entry point for add-ins. It is where developers can write code for events at the add-in's application-level scope. Common events include items like Startup and Shutdown.
It is important to understand that this PowerPoint add-in will not have access to the same SharePoint assemblies that make up the server-side object model. This is because the add-in will run within the PowerPoint application on a user's desktop, and therefore remote to the SharePoint server. As you will see a bit later, SharePoint 2010 provides a client-side library to assist with communication. The communication between our add-in and the SharePoint server will be over HTTP. However, the current setting of the project will prevent us from leveraging code that references the System.Web assembly. Let's remove this restriction by changing the Target Framework setting for the project so that the client-side library will be permitted. Follow these instructions:
Right-click on the BuildBriefing project and choose Properties.
On the Application tab, locate the Target Framework selection dialog.
Change this setting from .NET Framework 4 Client Profile to .NET Framework 4.
Click Yes in the confirmation dialog.
Now we can add the references to the SharePoint 2010 client-side library and runtime for .NET applications. As discussed in Chapter 3, SharePoint 2010 provides several different types of client-side libraries, enabling communication from solutions not running on the server. For this project, add the Microsoft.SharePoint.Client and Microsoft.SharePoint.Client.Runtime assemblies to the project. These assemblies may be on your .NET tab of the Add Reference dialog. If not, you can find them in the C:Program FilesCommon FilesMicrosoft SharedWeb Server Extensions14ISAPI folder in a default installation.
First we need a way for the user to launch the Briefing application from within PowerPoint. To provide this starting point, we will focus our attention on the user interface of the Microsoft Office 2010 system—the Ribbon. The Ribbon interface occupies the top portion of most of the Office applications and presents a different experience from the layered menus and toolbars of Office releases before 2007. This interface is simpler, improving the organization of commands and providing a more graphical representation of options. One of its primary goals is to surface functionality that users desired but didn't know was there because of how buried or obscure many menu items were.
In earlier versions of Office, developers spent significant effort writing code utilizing the CommandBars object to create new buttons, extend menus, hide existing options, and make other user interface customizations. By using compiled code to make these changes, developers found themselves writing lengthy code for a relatively simple result. Moreover, the code was typically not portable from project to project and couldn't be reused across different Office applications. So, in addition to providing an enhanced experience for the end user, the Ribbon interface offers the developer an improved programming model for manipulating it.
The biggest difference in the Ribbon programming model is that customizations to the user interface are defined using XML, not compiled code. Through a custom XML file, a developer can manipulate the Ribbon interface, controlling its tabs, groups, and controls, and adding new elements as well as hiding default ones. Since the customizations are stored in an XML file, they are easier to reuse in different projects and different Office applications. Typically, an add-in also includes a class that implements the proper interfaces to serve up the XML markup to the Office application, as well as code for callbacks. These callbacks are code that will run in response to the user interacting with the Ribbon. You might think you are in for writing a ton of code to get your add-in, XML file, and class to align properly. Fortunately, with the VSTO 2010 release, you have the option of simply ignoring this plumbing and using a ribbon designer to make your customizations. As you will see, though, you still have the option of reverting to the traditional XML-only/non-designer approach that is sometimes necessary with more advanced changes, such as customizations to context menus or backstage (discussed in Chapter 4).
Before getting started with the Briefing project, let's take a look at the desired end-state of our ribbon customizations. Figure 8-2 shows that the Briefing add-in has customized the Office Ribbon to include new items on the Add-Ins tab. On this tab there is a SharePoint group with a toggle button control that displays Briefing with a custom graphic. When the user presses this button, the application displays a custom task pane to walk her through the wizard process.

To implement this in your Briefing project, first add a new item. From the Add New Item dialog, select the Office installed templates node and choose Ribbon (Visual Designer). Notice the other option to build your ribbon customization through the XML method discussed earlier. Leave the name Ribbon1.cs and click Add. When the designer opens within Visual Studio, it will default to placing your customization on the PowerPoint built-in Add-Ins tab. We will use this tab, but you could choose to create your own. Right-click in the grey area of the ribbon next to the Add-Ins tab and you will see the commands to add or remove tabs. For now, just click on the group control, group1, and you will be able to change its label property to SharePoint. From the toolbox, double-click the ToggleButton control to add our button to the group. A ToggleButton is similar to regular Windows forms buttons except that it remains in an on or off (pressed or not pressed) state rather than reacting as to a single click. Change the following properties of the button:
Set the toggle button's
ControlSizeproperty toRibbonControlSizeLarge.Use the images property to add the icon. Clicking the "..." button will open a dialog that lets you import an image into this add-in's resource file. For our solution, we used a gear image from the Visual Studio graphics library. If you installed the graphics library, it is a zip file whose default location is
C:Program Files (x86)Microsoft Visual Studio 10.0Common7VS2010ImageLibrary1033. After you open the file, you can find this graphic in theObjectspng_formatWinVistafolder.Set the toggle button's
Labelproperty to Briefing.Set the toggle button's
ScreenTipto Import SharePoint items to create a briefing. This text will appear when the user hovers over the button.Make sure the
ShowImageproperty is set to True so your gear graphic displays.
Now the toggle button needs to actually do something. With the ribbon designer, adding this activity is the same as with most controls in Visual Studio. Double-click the toggle button to create a click event handler in the code-behind file. This code will take on the responsibility of hiding or showing the custom task pane interface to the user. We will match the pressed state of the button with whether or not the task pane should be visible. The complete event handler is shown in Listing 8-1.
Example 8-1. The toggle button's click event handler
private void toggleButton1_Click(object sender, RibbonControlEventArgs e)
{
   Globals.ThisAddIn.ctp.Visible = toggleButton1.Checked;
}
Now this code will not resolve since we have not defined the custom task pane ctp object in the ThisAddIn class. In VSTO projects, a task pane can simply be a Windows Forms user control. Add one to the project—we named ours ucTaskPane. You can also use Windows Presentation Foundation (WPF) user controls, which are often useful to respond to resizing of a task pane or Office application. Listing 8-2 shows the code in the ThisAddin.cs file that loads our task pane during the add-in's startup event.
Example 8-2. Creating the custom task pane
public CustomTaskPane ctp;

private void ThisAddIn_Startup(object sender, System.EventArgs e)
{
  ctp = Globals.ThisAddIn.CustomTaskPanes.Add(new ucTaskPane(), "Custom Briefing");
  ctp.DockPosition = Office.MsoCTPDockPosition.msoCTPDockPositionRight;
  ctp.Width = 250;
}
With the ribbon customization, task pane user control, and startup code, you should be able to test your solution. Running the project will launch PowerPoint. Find your customizations to the Ribbon and see how the toggle button controls the visibility of the task pane.
The Briefing add-in presents its user interface through a custom task pane that loads to the right-hand side of PowerPoint's application window. The wizard experience for the user is a series of steps. The necessary logic and actions for each of these steps is wrapped into a single user control. Here is the primary goal of each step.
Receive the URL of the SharePoint site and examine its contents.
Build a presentation slide for the items in the objectives list.
Build a presentation slide for the items in the agenda list.
Display a list of slide libraries so the user can import presentation slides from the site.
Display a conclusion message.
The user may not actually need to do each of these five steps. Based on the examination of the site entered in step 1, it may be appropriate for the wizard to skip certain subsequent steps. For example, if the site does not contain any slide libraries, the user should not even be exposed to step 4. For this reason, our architecture compartmentalizes each of the steps into its own user control. A step user control is responsible for displaying an interface, gathering input from the user, doing its work, and reporting back. The task-pane control serves as a controller, with the responsibility of orchestrating the step controls and collecting the information they report back that may be necessary further down the process. This approach is known as the Model-View-Controller (MVC) pattern. You can read more about this pattern at http://msdn.microsoft.com/en-us/library/ms978748.aspx.
To provide uniformity to the step user controls, we defined an object interface with some common elements that each control must implement. This makes it easier for our task-pane controller to interact with them since it can be guaranteed that the elements of the interface are a part of the step control. Listing 8-3 details the contents of the interface.
Example 8-3. The IStep interface
interface IStep
{
  ucTaskPane ParentPane
  {
    get;
  }
  event EventHandler Completed;
  void WorkComplete();
  void Start();
}
The IStep interface requires that each step user control have the following:
A read-only property that provides a reference to the task pane.
An event named
Completedthat will be used to inform the task pane that a particular step has done its work and the task pane should move on.A
WorkComplete()method where theCompletedevent will be fired.A
Start()method that will be called by the task pane, telling the step control that it is its turn in the process.
The task pane controller is a user control but with very little interface. For the most part, it is simply a container that will orchestrate the step controls presenting themselves to the user. The only control placed on the step control at design time is a StatusStrip control with a label for displaying status messages while the step controls do their work. The step controls are loaded during runtime. In the code-behind file for ucTaskPane, you will see an instance of each of the Stepn controls loaded into an array named steps (where n represents the sequence number) in its controls collection. Since these are loaded from code, each has a default visibility property of false and is associated with a wizard_Completed event handler. In the task pane's load event, the first step control is told to start.
Most of the remaining code in the task pane is dedicated either to orchestrating the hiding or showing of step controls or to collecting information from the work they do. At this point, we recommend you grab the code download from the Apress web site and follow along as we will not be listing every line of code in this chapter. The text here will focus on the most interesting sections of code that warrant explanation and leave some of the mundane but necessary code lines (such as declaring variables) for you to view in the download. Listing 8-4 details the critical elements of the step orchestration process.
Example 8-4. Task pane orchestration of steps
private IStep[] steps = new wizardSteps.IStep[] {new step1(),
       new step2(), new step3(), new step4(), new step5() };

private int currentStep = 1;

void wizard_Completed(object sender, EventArgs e)
{
  if (currentStep < steps.length) this.MoveToNextStep();
}

private void MoveToNextStep()
{
  this.Controls[currentStep].Visible = false;
  currentStep++;
  IStep step = (IStep) this.Controls[currentStep];
  step.Start();
}
The currentStep variable from Listing 8-4 is the task pane's internal cursor that keeps track of which step is being shown to the user. The wizard_Completed event handler is a code block that runs when any of the steps have finished their work. Notice that when the controls are loaded into the task pane, each of them is matched with the same event handler. Since the code we are going to run in response is the same for each step, there is no reason to have an event handler code block for each of them individually. The MoveNextStep() procedure performs the orchestration. It first hides the control that is currently being displayed. The currentStep is used here since the Controls collection is zero-based and the StatusStrip we added earlier is at position 0. The MoveToNextStep() routine then finds the next control. We convert the control to the IStep interface it implements. This gets us access to the Start() method. You may be wondering with this code how we account for a step needing to be skipped. The answer is that the Start() method of each of the step controls first determines whether it has work to do before showing itself. Listing 8-5 is a representative Start() method from step 2.
Example 8-5. A Sample Step Control Start() Method
public void Start()
{
 //get reference to the custom task pane
 taskpane = (ucTaskPane)this.Parent;
 if (ParentPane.HasObjectivesList)
 {
   //show this step
   this.Visible = true;
 }
 else
 {
   //skip over this step
   this.WorkComplete();
 }
}
The task pane control also maintains some information obtained from a step control that will be used later on in the process. This includes the URL of the SharePoint site the user entered, whether or not it had any of the lists it could build content from, as well as a collection of information about the slide libraries contained in the site.
The first step control is responsible for examining the SharePoint site specified by the URL the user entered. For our example, we simply created a meeting workspace to act as a test environment and populated it with content. Specifically, the control is looking to see if the site contains a list named Objectives, a list named Agenda, and information on any slide libraries. The Objectives and Agenda lists are there by default, but you will have to create at least one slide library if you want to see that piece in action. Take the following steps to add a slide library to your site:
Navigate to your basic meeting workspace site.
From the Site Actions menu, choose the View All Site Content link.
Click the Create button.
Use the Libraries filter and click the Slide Library object. Click the Create button.
Enter a name for the slide library. As an example, enter Meeting Slides.
Since we want the slide library to be the same across all instances of this meeting (if, for example, it had a recurring schedule), choose the Yes radio button in the Change items into a series question.
Leave the Versioning radio button at No and click Create.
You will be redirected to a page that displays the library's items.
Now you will want to have a sample PowerPoint 2010 presentation to upload here. Any presentation with a few slides will do. Save the presentation locally before you publish the slides. Then, from the backstage interface, which is accessible by clicking the File button, choose Save and Send. Select Publish Slides and click the Publish Slides button.
This walks you through a wizard that publishes your PowerPoint presentation to the SharePoint site. Be sure to select the checkboxes of the slides you want sent to the site. Click Browse to locate the destination. You will need to specify the URL of your meeting workspace and then select the slide library you created earlier. In our environment, this was
http://edhild3/sites/meeting1. When finished, the library should contain an item for every slide in your presentation. The slide library breaks apart your presentation into individual slides, which would allow different users to work on different slides at the same time. Be sure to wait for the Publish Slides progress bar located at the bottom of the PowerPoint application window to complete before moving on.
The step control is designed to first ask the user for the URL of the meeting workspace. When the user clicks the Next button, the step control goes to work. To discover information about the lists and libraries contained in the site, the Briefing application will rely on the SharePoint client-side .NET managed API. This API is one of several new libraries to ease the developer experience for building applications that need to talk to SharePoint and are not running on the actual SharePoint server. There are three new client-side APIs: .NET managed, Silverlight, and ECMAScript. Since the PowerPoint add-in is managed code, we will use the corresponding client-side .NET managed API. These new libraries are meant to reduce the complexity that developers often encountered when using the web services provided by SharePoint 2007. Those web services usually did not match the object model hierarchy found in server-side code and often the responses were simply XML fragments that had to be parsed. This meant that a developer could not take the skills and knowledge obtained from writing server code to the client. With the client-side APIs of SharePoint 2010, this problem is solved since these libraries present the same object-model hierarchy. There are subtle differences around data retrieval. Let's start with Listing 8-6, which establishes the client-side context and retrieves the lists that exist within the meeting workspace.
Example 8-6. Retrieving the site's lists and libraries
private void btnNext_Click(object sender, EventArgs e)
{
  this.btnNext.Enabled = false;
  this.ParentPane.Message = "Examining Site";
  this.UseWaitCursor = true;

  this.ParentPane.SiteUrl = this.txtSiteUrl.Text;
  //establish client context for accessing SharePoint content
 using (SPClient.ClientContext ctx = new
                SPClient.ClientContext(this.ParentPane.SiteUrl))
    {
      SPClient.Web web = ctx.Web;
      SPClient.ListCollection coll = web.Lists;
      ctx.Load(coll);
      //gather default properties about all lists in the site
      ctx.ExecuteQuery();
The first two lines of code make the user aware that the application is doing some work. We disable the button to keep users from pressing it multiple times, change the cursor, and display a meaningful message in the status strip of the task pane. The next section is all about getting information on the lists that exist in the meeting workspace. Much like code you would write on the server-side, the first step is to establish a context. On the server this would be a SPContext object, but in the .NET managed client-side API, the equivalent is a ClientContext object. Just like its server-side counterpart, the context is established by passing in the URL of the site you will be examining. Since this code isn't running on the server, the client-side APIs are much more explicit about when the server will be queried to retrieve data. In fact, if you set a breakpoint at the beginning of the btnNext_Click event handler and debug this code, you'll notice that web.Lists is actually empty until after the context's ExecuteQuery method is called. With the client-side API, you must specify what it is you want retrieved, and then an execute method retrieves it. In this example, we are only passing in that we would like info on the Lists collection of the meeting workspace. Since we didn't provide any more detail, the resulting ListCollection object will be populated with the lists that exist and their default properties, but not any list items. Once that has been done, the method continues with the code in Listing 8-7, which shows how you can use a LINQ query to see if the site contains an Agenda list. The same technique is used for finding the Objectives list.
Example 8-7. Looking for the list named Agenda
var q1 = from list in coll
         where list.Title == "Agenda"
         select list;
if (q1 != null) this.ParentPane.HasAgendaList = true;
Looking for libraries that are actually slide libraries is just as easy. In this case, we can't go by the title of the library since the libraries could be named anything. Fortunately, all slide libraries are based on the same template, which has an ID of 2100. This ID was found by digging through the out-of-the-box features of the SharePoint environment, located at C:Program FilesCommon FilesMicrosoft SharedWeb Server Extensions14TEMPLATEFEATURES. If you locate the SlideLibrary folder, you'll find a SlideLibrary.xml element file that defines the list template and its ID of 2100. So Listing 8-8 shows how to locate these libraries in the SharePoint meeting workspace site.
Example 8-8. Looking for slide libraries
var q3 = from list in coll
         where list.BaseTemplate == 2100
         select list;
if (q3 != null)
{
   this.ParentPane.HasSlideLibrary = true;
For slide libraries, our application is going to need more information than simply the fact that there are some in the site. We would like to have URLs and names for these libraries so we can provide links directly to them in the task pane. So the remainder of this method iterates through the libraries, capturing this information in a struct helper class called LibraryItem. As Listing 8-9 shows, we have to do a little manipulation to make sure we are capturing a full URL that our client application can use.
Example 8-9. Recording URLs and names for slide libraries
Uri link = new Uri(this.ParentPane.SiteUrl);
foreach (SPClient.List list in coll)
{
  if (list.BaseTemplate == 2100)
  {
    LibraryItem slideLibrary = new LibraryItem();
    slideLibrary.Name = list.Title;
    if (link.Port == 80 || link.Port == 443)
    {
      slideLibrary.Url = link.Scheme + "://" + link.Host + list.DefaultViewUrl;
    }
    else
    {
slideLibrary.Url = link.Scheme + "://" + link.Host + ":" +
link.Port + list.DefaultViewUrl;
}
this.ParentPane.SlideLibraries.Add(slideLibrary);
}Now the control has completed its examination of the site and informed the task pane of the information it found. As you can see in the code download, this control then wraps up its work in the same manner as the others. It sets a status message for the task pane and calls the WorkComplete() method. From there, the step control raises its Completed event so the task pane can take control and move the processes along to the next step.
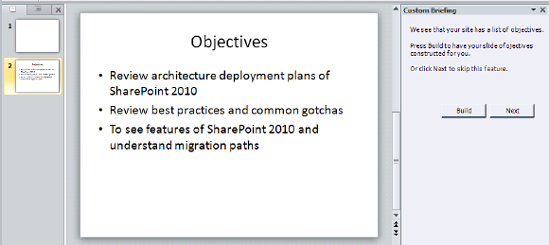
The step2 user control is responsible for building a presentation slide containing the content in the SharePoint site's Objectives list. The task pane will shift control over to this step by calling its Start method. In this method, the control checks to see if the Briefing add-in had previously found an Objectives list on the user's site. If so, the step exposes its user interface to the user. If not, the control simply calls WorkComplete to raise its Completed event, skipping itself and moving on to the next step in the process. Assuming the user interface is displayed, the user is presented with two options. The first is for the application to build a presentation slide containing a bulleted list of the objectives items from the site. The second is to simply skip this feature and move onto the next step.
If the user chooses to have an objectives slide built, the add-in again uses the SharePoint client-side .NET managed API. This time, we are interested in getting all the items in the Objectives list. The process is the same as before—we tell the API what we would like retrieved and then call the context's ExecuteQuery method. Notice how the code in Listing 8-10 specifies that we want the Objectives list along with a Collaborative Application Markup Language (CAML) query. CAML queries are not new to SharePoint developers. They involve writing what look like SQL select statements in an XML-based string format. However, you won't see that in Listing 8-10, because the client-side object model has a CamlQuery class that makes it easier to write these queries, especially when all you want is all of the default properties of all the items.
Example 8-10. Requesting items in the Objectives list
SPClient.Web web = ctx.Web;
SPClient.ListCollection coll = web.Lists;
SPClient.List objectivesList = coll.GetByTitle("Objectives");
SPClient.CamlQuery query = SPClient.CamlQuery.CreateAllItemsQuery();
SPClient.ListItemCollection items = objectivesList.GetItems(query);
ctx.Load(items);
ctx.ExecuteQuery();
At this point, the objectivesList object contains each individual objective from the site and we are ready to build our PowerPoint slide in the user's presentation. Listing 8-11 details how the new slide is added and how the Objectives are populated as a bulleted list.
Example 8-11. Requesting Items in the Objectives List
PowerPoint.Slide slide; PowerPoint.Presentation presentation; presentation = Globals.ThisAddIn.Application.ActivePresentation; PowerPoint.CustomLayout layout = presentation.SlideMaster.CustomLayouts[PowerPoint.PpSlideLayout.ppLayoutText]; slide = presentation.Slides.AddSlide(presentation.Slides.Count+1,layout); slide.Shapes.Title.TextFrame.TextRange.Text = "Objectives"; StringBuilder sBuilder = new StringBuilder(); foreach (SPClient.ListItem item in items) { sBuilder.Append((string)item.FieldValues["Objective"]); sBuilder.Append(" "); } slide.Shapes[2].TextFrame.TextRange.Text = sBuilder.ToString().TrimEnd(' '), Globals.ThisAddIn.Application.ActiveWindow.View.GotoSlide(slide.SlideIndex);
To construct the slide, the code obtains a reference to the user's active presentation and uses its slide collection's AddSlide method. The AddSlide method takes two parameters: the index where the new slide should be placed and the layout the slide should use. The line before this shows how to grab the particular layout you want using the SlideMaster's CustomLayouts collection. In this case, we want the slide to be at the end of the presentation, and the layout should be the one that has only a title and textbox. With the slide created, the content is placed on it by accessing its various shapes. Because of our layout selection, there are two shapes that need our attention. The first is at index one and it represents the title of the slide. This shape is easily accessed by the Title property of the slide's shapes collection, which is set to the literal string "Objectives". The second shape, at index two, is populated using a StringBuilder. The text of the StringBuilder is the text of each objective, separated by a carriage return (
). Placing the carriage return character is what gives us each objective as a bullet item. Of course, we do need to clean up the carriage return after the last item. The last line of Listing 8-11 directs PowerPoint to make our new slide the current one. The end result is shown in Figure 8-3.
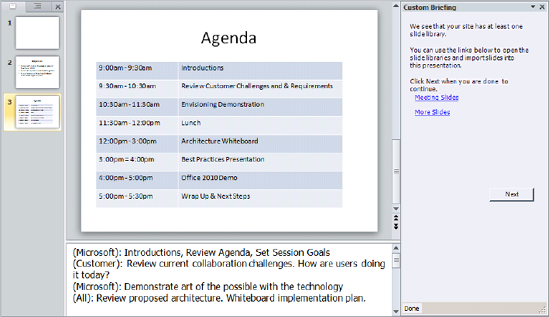
The step3 user control is not much different from step2. In its Start method, it also decides whether or not to show itself. Assuming the site has an Agenda list and the user chooses to build a presentation slide, step3's Next button-click event handler again uses the SharePoint client-side .NET managed API. This time the control queries for all of the items in the Agenda list.
Instead of simply building another bulleted list, this slide ambitiously presents the agenda items in a PowerPoint table, while also providing more detailed content in the Notes portion of the slide. To get the slide setup for a table, the layout used in the AddSlide method is still the one that has only a title and a content area. But this time, we then find the corresponding placeholder of the large content area in order to use its size and position for the placement of our table. The table is added by accessing the slide's Shapes collection and calling its AddTable method. This method expects several parameters: the number of rows, which in this case in the number of agenda list items, the number of columns, and position information (top, left, width, and height). In this example, we will populate the table with two columns of information: the time and title of the agenda item. Finally, the width of each column is set appropriately and the FirstRow property is set to False since our table will not have any column headings. Listing 8-12 presents this code segment.
Example 8-12. Adding a Table to the Presentation's Slide
slide = presentation.Slides.AddSlide(presentation.Slides.Count+1,layout); slide.Shapes.Title.TextFrame.TextRange.Text = "Agenda"; PowerPoint.Shape placeholderTable = slide.Shapes.Placeholders[2]; PowerPoint.Shape tblAgenda = slide.Shapes.AddTable(items.Count, 2,placeholderTable.Left, placeholderTable.Top,placeholderTable.Width, placeholderTable.Height); tblAgenda.Table.Columns[1].Width = 200; tblAgenda.Table.Columns[2].Width = 400; tblAgenda.Table.FirstRow = false;
With the table on the slide, our attention focuses on the processing of agenda items. As with objectives, we will cycle through a collection built using each item we retrieved from the query. With this information we will not only place content into the table, we will also keep a running StringBuilder that will be used to write text to the Notes portion of the slide. Listing 8-13 details this processing where content is placed in the table and there is some additional processing of the Notes field.
Example 8-13. Processing the agenda items
StringBuilder notesText = new StringBuilder();
for (int i = 1; i<=items.Count; i++)
{
  string time = (string) items[i-1].FieldValues["Time"];
  string title = (string) items[i-1].FieldValues["Title"];
  string owner = (string) items[i-1].FieldValues["Owner"];
  string notes = string.Empty;
//we need to make another request to get the notes field stripped of HTML markup
  SPClient.FieldStringValues values = items[i-1].FieldValuesAsText;
  ctx.Load(values);
ctx.ExecuteQuery();
if (values["Notes"] != null && values["Notes"] != string.Empty)
{
notesText.Append(string.Format("({0}): {1}", owner, values["Notes"]));
notesText.Append("
");
}
tblAgenda.Table.Cell(i,1).Shape.TextFrame2.TextRange.Text = time;
tblAgenda.Table.Cell(i, 2).Shape.TextFrame2.TextRange.Text = title;
}
slide.NotesPage.Shapes.Placeholders[2].TextFrame2.TextRange.Text =  notesText.ToString();
If you look carefully at Listing 8-13, you will see another use of the context's ExecuteQuery method. This might seem odd since we told you earlier that we retrieved all the default fields of the list. The reason for this is that the Notes field is a bit different from the others we have been working with. In SharePoint, this field is one that is allowed to support rich text formatting. Therefore, its default values contain HTML markup within a <div> tag. This HTML would make no sense and a lot of noise in our Notes section of the slide, so this query is actually asking the server to clean this up and give us the field's value without HTML. If any text remains after the HTML is removed, it is added to the StringBuilder, which is used in the last line of Listing 8-13 to populate the placeholder in the slide's NotesPage.
The result of our efforts is a slide that presents the time and title of each agenda item in a nicely formatted table. In addition, more detailed content is added to the Notes portion of the slide to help the presenter deliver the material. Figure 8-4 shows a sample result.
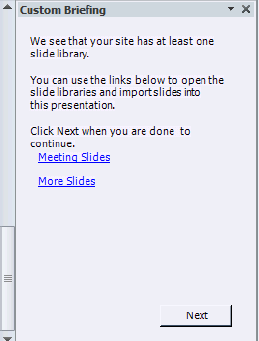
The step4 user control is responsible for informing the user of the slide libraries that exist on the SharePoint site. A slide library is a SharePoint library type that allows users to work on individual slides. This granularity enables a great collaboration experience as users can work on just their portion while others simultaneously edit theirs. The slide library also promotes slide reuse as the slides can be imported into other decks. Our assumption with this example is that the meeting workspace has at least one slide library that includes existing slides to be imported into the presentation.
Like the other steps, step4 checks to see if at least one slide library was discovered previously and only shows itself if that was the case. In addition, this control's Start method includes a call to the ListSlideLibraryLinks method. This method will populate a panel with LinkLabel controls for each of the slide libraries discovered on the site. The experience we are going for is that the Briefing application's task pane will provide links that open the user's browser directly to the chosen slide library. From there, the user can select the desired slides and import them into the presentation. Listing 8-14 details the construction of the LinkLabel controls.
Example 8-14. Building LinkLabel controls for slide libraries
private void ListSlideLibraryLinks()
{
  pnlLinks.Controls.Clear();
  LinkLabel[] linkControls = new LinkLabel[ParentPane.SlideLibraries.Count];
  for (int i=0; i<this.ParentPane.SlideLibraries.Count; i++)
  {
    linkControls[i] = new LinkLabel();
    linkControls[i].Location = new Point(5, 25 * i);
    linkControls[i].LinkClicked +=new
            LinkLabelLinkClickedEventHandler(step4_LinkClicked);
    linkControls[i].LinkBehavior = LinkBehavior.AlwaysUnderline;
    LibraryItem item = (LibraryItem) ParentPane.SlideLibraries[i];
    linkControls[i].Text = item.Name;
    LinkLabel.Link link = linkControls[i].Links.Add(0, item.Name.Length);
    link.LinkData = item.Url;
  }
  pnlLinks.Controls.AddRange(linkControls);
}
In Listing 8-14, linkControls is an array of LinkLabels containing enough controls for the number of slide libraries previously discovered. Within the loop, a new LinkLabel control is created for each slide library. The LinkLabel's Location property specifies the horizontal and vertical placement of the control. Since we will be creating a number of these controls, the vertical position is a calculation based on the iteration of the loop. The next line of code sets up an event hander for LinkLabel so that we can run code in response to the user clicking on it. The LinkLabel's LinkBehavior is set to always present its text as underlined, and the actual text value is set to be the name of the slide library. In addition to these properties, the LinkLabel control needs to have a link created within it that specifies which portion of its text should be the active link. In this case, we want the link to be the entire length of the slide library's name. We also place the URL that the browser should open to as LinkData that will be retrieved in our event handler. Figure 8-5 shows what this step looks like in the task pane, which shows two slide libraries in the meeting workspace.
When the user clicks on one of the LinkLabels, our event handler responds by opening the browser and directing the user to the URL of the slide library. This event handler launches the browser automatically by using the System.Diagnostics namespace and starting a process with the URL as a parameter. This opens the browser to the location we specify. The URL of the slide library is obtained by accessing the LinkData of the event argument. Listing 8-15 shows this event handler's code.
Example 8-15. Launching the browser to a selected slide library
void step4_LinkClicked(object sender, LinkLabelLinkClickedEventArgs e)
{
  System.Diagnostics.Process.Start(e.Link.LinkData.ToString());
}
Once in the browser, the user will be able to use out-of-the-box functionality to select slides and import them into the current presentation. To perform this operation, the user must select the checkboxes next to the slides he wants to import and click the Copy Slide to Presentation button. The user is then asked if he want to send it to a new or open presentation. This is shown in Figure 8-6.

Select the open presentation option to have the slides imported into the presentation you have been constructing. Notice there is also an option to receive notifications if the slide in the site were to change after this import has occurred. This is the "Tell me when this slide changes" option. If selected, the slide will be imported/copied into the current presentation, but with a pointer back to the site. Each time the user opens the presentation, PowerPoint will check to see if the source slide has been modified since the import. If so, the user will be alerted and asked if he wishes to update the presentation. This is a powerful feature that enhances the reuse of content within the organization.
Though there is a step5 user control, this is the last step where presentation slides are constructed. The last step user control simply informs the user that he has completed the Briefing application and that he can close the task pane by clicking the button in the Ribbon interface.
The PowerPoint Briefing application incorporated several key techniques that are worth highlighting as they could easily be reused in other projects.
- Launching the task pane from the Ribbon interface:
The Briefing add-in utilized VSTO's Ribbon support to add a toggle button to launch and close its task pane. This integrated the custom application into the common Office experience.
- Creating a wizard-like experience in the task pane:
To complete the process of building slides based on site content, the Briefing add-in leads the user through a series of steps. This application designates the task pane as a controller of the process and gives it the responsibility of orchestrating the step controls. Other projects you construct with a similar experience can benefit from the architecture used in this solution. Specifically, this Briefing add-in streamlined the amount of code that needed to be written by defining a common interface for all step controls and encapsulating each step's functionality into its respective control. The task pane then became trivial to code as it only moves the user from step to step, storing any necessary data during the process.
- Discovering a site's lists and libraries:
One of the main interaction points this application has with SharePoint is to query the site to discover what lists and libraries it contained. This was accomplished through SharePoint's client-side .NET managed API. This API followed the pattern of establishing a client-side context object, specifying the data to be gathered, and then executing the query.
- Retrieving a particular list's items:
The other interaction point with SharePoint is when the Briefing add-in requests all the items of a specific list. This was used to obtain the content of both the Objectives and Agenda lists. Again, the application accomplished this through SharePoint's client-side .NET managed API.
While coding this example, we thought of several variations to the solution that we didn't incorporate. Mostly, they were not included because they distracted from the overall objective of the solution. We call them out now as extension points since they may be applicable to a project you are working on.
- Include check boxes to allow a user to select which items to import:
In our example, the user was only presented with the options to build the slide with all of the objectives or to skip them entirely. There could be a rather elegant third option in which the Briefing add-in could query to get the items and display them in the task pane with check boxes. The user could then select which of the objective or agenda items should be placed into the new slide. Coding this option would be very similar to the technique used to build the collection of
LinkLabelsin step 4.- Add an update operation:
Currently, the Briefing add-in simply creates new slides in the open presentation. Other than the built-in notifications for slide libraries, it does not have an update operation. An update may allow for the application to check if the lists have changed and incorporate those changes into existing slides. For this to be successful, the application would first need to store the URL that was initially used to construct the slides. This URL could be stored in a custom property of the PowerPoint application or simply in a Notes page of one of the slides. Assuming that the titles of the slides had not changed, the add-in could iterate through to find the right slide, use the stored URL to get the new items, and repopulate the necessary shapes.
- Publish to a PowerPoint Broadcast Site:
SharePoint 2010 includes a PowerPoint broadcast site that allows users to simultaneously view a delivery of the presentation through the PowerPoint web application. The last step in the wizard process could allow the user to specify his enterprise's PowerPoint broadcast site and then deliver the presentation there while setting the appropriate permissions.
- Add an Excel Services Chart:
SharePoint 2010 provides a REST interface for retrieving items from an Excel spreadsheet that has been published to Excel Services. Having a REST interface means that a properly formatted URL would be all that is necessary to retrieve chart from the spreadsheet as an image. Given this easy mode of access, you could create a slide that has an image shape with such a URL. Chapters 5 and 10 contain more information on Excel Services.
If you found the material presented in this chapter interesting, we think you'll find the following resources helpful as well.
CODE Magazine article on interacting with PowerPoint from managed code
http://www.code-magazine.com/Article.aspx?quickid=0607151Video on how to create an add-in for Microsoft PowerPoint
http://msdn.microsoft.com/en-us/vsto/bb964496.aspxMSDN's Ribbon Overview
http://msdn.microsoft.com/en-us/library/bb386097(VS.100).aspxSharePoint's Managed Client Object Model
http://msdn.microsoft.com/en-us/library/ee537247(office.14).aspxData Retrieval Overview
http://msdn.microsoft.com/en-us/library/ee539350(v=office.14).aspxIntroducing Broadcast Slide Show
http://blogs.msdn.com/powerpoint/archive/2009/10/09/introducing-broadcast-slide-show.aspxPowerPoint FAQ
http://pptfaq.com