
Microsoft Access has always been an excellent Rapid Application Development (RAD) tool for building data-centric desktop applications—but it has also been challenged when the need arises to move an application to the Web or to support a shared, multi-user environment. There are many reasons to move an application to the Web—centralized management of policy and data, centralized deployment for updates, and to enable browser-based access for users. Previous releases of Access have been able to meet some of these needs with mechanisms like linked tables, which allow data to be stored externally, or by using SharePoint for centralized storage of resources while retaining Access as the primary client application. With the release of Office 2010, the combination of SharePoint, Access, and Access Services now lets you publish an Access database application to the Web, requiring only a browser to use your Access Database applications. It also provides a much better experience when it comes to manageability.
All organizations need to track and manage information, and Access has been the tool of choice among business and power users because they could quickly build an end-to-end application—from the tables used to store the raw data, to the forms used to manage and interact with the data, to reporting. And by using linked tables, users can even build applications driven by data residing in repositories across the enterprise, even those external to Access. Access is extremely powerful, but it is also a challenge to manage and support for many IT departments. All too often, solutions written in Access become business-critical applications but reside outside the boundaries of what is managed by IT; many times, these solutions are unknown to the technical team until some sort of failure arises.
Access targets two primary use cases—data workbenches and departmental tracking applications. Tracking applications were the focus of web databases in the 2010 release, and they are the focus of our solution for this chapter. We will use Access to build a fully featured Asset Tracking System that stores which assets exist in an organization, who owns them, and when the assets will be fully depreciated. When we finish building our application, we'll use the combination of Access, Access Services, and SharePoint to publish our solution to the Web, allowing users to interact with our application using only a browser.
This section will detail the major elements of the Asset Tracking System and the decisions we made as we developed it. The walkthrough will show you how to use Access to create a web-based, data-centric tracking application, including storage for the application data, forms to interact with the data and navigate the application, and reports. Once we have finished building our application in Access, we will share it by publishing our Asset Tracking System to the Web using SharePoint and Access Services. We won't write much code during this exercise, and the code we do write will be based on the Access macro language, but we expect you will be pleasantly surprised by just how much you can get done using Access as a RAD tool.
When you open Access you see the Backstage View, which allows you to create a new database. Take the time to browse through the available Office.com templates, as well as Access's included Sample templates. Among the Sample templates you'll notice an Assets Web Database template. Why are we not using that out-of-box sample? Well, we could use this template for our solution, but we want to start from scratch in order to walk through the creation of a web database end to end. The purpose of this chapter is to develop such a solution, but it is also to illustrate a common use case, and attaching people to things and reporting against this relationship is very common across most (if not all) organizations. Follow the steps below to create your Assets web database.
Select the Blank web database template. Using one of the web database templates ensures compatibility when we go to publish our database to SharePoint by enabling only features supported by Access Services and SharePoint.
Name your database AssetTrackingSystem.accdb and set the file system location to wherever you want to save your local copy of the database.
Your screen should look similar to Figure 12-1. Click the Create button to continue.

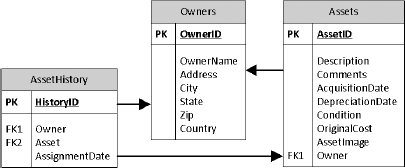
Just as the template name implies, we now have a blank database. You actually get one table, named Table1, with one column, ID, and this table will open in datasheet view once the database is created; however if you close Table1, which you can do now, you'll notice the table was created but never saved, so now you truly do have a blank database. We now need to create and configure the three tables we'll be using to support tracking our assets. Once we publish our database to SharePoint, the tables we are getting ready to create will be saved as custom SharePoint lists; so, as you'll see, only SharePoint-compatible types will be allowed as fields for our tables. The following steps will walk you through getting the tables created and configured, beginning with the Owners table. Figure 12-2 shows a database diagram illustrating the tables we'll be building and using for our solution.
If you did not close the default Table1 created with the database, you can skip to step 2. Otherwise, click the Create tab on the ribbon and select Table. This will open a new table in datasheet view. In case you're wondering, design view is not supported for web objects. Instead, you must use options available on the ribbon or within the datasheet view to design and build your tables.
With the Fields tab of the ribbon selected, you should see a view similar to Figure 12-3. Right click on the ID column heading and select Rename Field; rename the field to OwnerID and press Enter.
Tip
After you finish editing the last column in a table, press Enter or Tab and Access will automatically bring up the Add Column menu, reducing the number of necessary clicks and speeding creation of your new table.
Add a new column of type Text named OwnerName and press Enter.
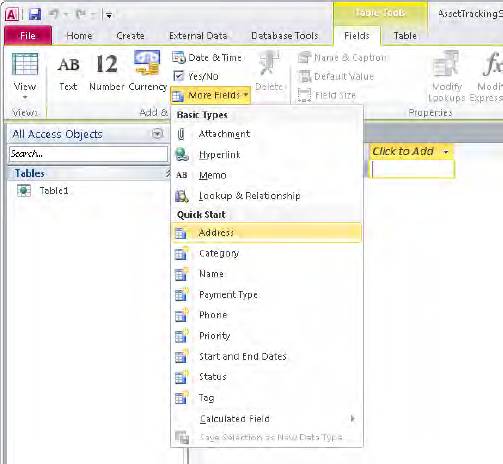
Based on the diagram, the remaining columns in the Owners table are related to address information. Rather than creating each column individually, we can use the Quick Start data types to create multiple columns at once based on a template. With the Fields tab of the ribbon selected, choose More Fields and then click on Address in the Quick Start section of the drop-down menu. This adds the fields Address, City, State Province, Zip Postal, and Country Region; you can rename these fields to match those in the database diagram in Figure 12-2 or keep the default names provided by the Quick Start template. Figure 12-4 shows some of the additional Quick Start data types available with the default install.
Tip
To create your own Quick Start data type, select the columns you'd like to use as a template, click on the More Fields menu item found on the Fields tab of the ribbon, and select Save Selection as New Data Type.
Save the table by clicking the save icon above the ribbon or by right-clicking the Table1 tab in the editor window and selecting Save; name this table Owners. Close the Owners table

With the Owners table created, let's work on the Assets table, which will store the majority of the data we'll be tracking. The Assets table will be used to store details for each asset being tracked, including who owns the asset by referencing the OwnerID field from the Owners table.
Click the Create tab on the ribbon and select Table. Right click on the ID column heading and select Rename Field; rename the field to AssetID and press Enter.
Add a new column of type Text named Description and press Enter.
Add a new column of type Memo named Comments and press Enter. Click on the Comments column heading to select it and choose the Append Only option from the Memo Settings menu item on the Fields tab of the ribbon; this setting lets you keep a historical record of all comments for the asset that allows viewing all the comments together at once.
Add a new column of type Date & Time named AcquisitionDate and press Enter.
Add a column specifying the date the asset will be fully depreciated. We will use a very simple formula for depreciation here, assuming all assets are fully depreciated after the first day of the acquisition month plus three years; this lets us create a simple calculated value field. To add a new calculated value column, select the type Calculated Field with a subtype of Date/Time; this will display the Expression Builder dialog. Type the formula
DateSerial(Year([AcquisitionDate]) + 3, Month([AcquisitionDate]), 1)noticing the IntelliSense as you type. Click the OK button to close the Expression Builder, Access will validate your expression to ensure it is web-compatible. Name your new column DepreciationDate and press Enter.Add a new column of type Lookup & Relationship, which brings up the Lookup Wizard dialog as shown in Figure 12-5. Choose the option I will type in the values that I want and click Next. Keep the default of a single column and add the lookup values Excellent, Good, Fair, and Poor, then click Next to continue. On the final screen of the wizard enter Condition for the label of the lookup field and select the Limit to List check box. Click Finish. If you have not saved your Assets table, you'll be prompted to do so now. In this case, provide the table name Assets and click OK.
Add a new column of type Currency named OriginalCost and press Enter.
Add a new column of type Attachment, which we'll use to store images of our assets. You can set the name of the attachment column by clicking the Name & Captions button on the Fields tab of the Ribbon and typing AssetImage for the Name.

We are just about done with the Assets table, except for adding the foreign key column for the asset owner. For this we need to associate the Owners table to the Assets table, and to implement referential integrity.
Add a new column of type Lookup & Relationship, which brings up the Lookup Wizard dialog. Choose the option I want the lookup field to get the values from another table and click Next.
Select Table: Owners and click Next.
Specify both the OwnerID and OwnerName as selected fields and click Next.
For sort order, select OwnerName, leave the order ascending, and click Next.
Ensure the Hide key column (Recommended) option is checked and click Next.
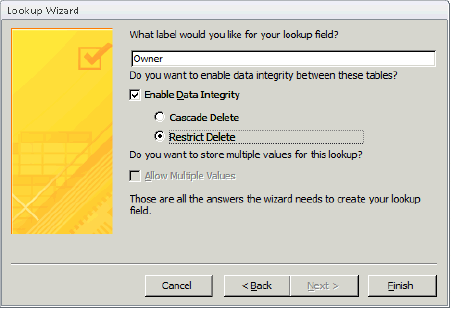
Enter Owner as the label of the lookup field and select the Enable Data Integrity check box with the Restrict Delete option enabled as shown in Figure 12-6. This ensures that users are unable to delete an owner from the Owners table if the record is identified as owning at least one asset. Save and close the Assets table.
Note
Because all of the web tables in our database will end up being SharePoint lists, implementing referential integrity would have been difficult, if not impossible, without the new data integrity features that have been added to SharePoint 2010. For additional information on features that support relationships and constraints, see http://msdn.microsoft.com/en-us/library/ee724401(v=office.14).aspx.
The final table we need to create is the AssetHistory table, which will store the historical record of ownership for each asset. A bit later we will use data macros to automatically add records to this table any time a new asset is added to our system or if ownership of an asset is changed.
Click the Create tab on the ribbon and select Table. Right-click on the ID column heading and select Rename Field; rename the field to AssetHistoryID and press Enter.
Follow steps 1–6 above to create Lookup & Relationship columns for the Owner and Asset fields, associated to the Owners and Assets tables respectively. When prompted to save your table, provide the name AssetHistory and click OK.
Add a new column of type Date & Time named AssignmentDate and press Enter.
Save the AssetHistory table and then close it.
At this point we have created all of the tables we need to store data related to our assets. Now we need to build the user interface elements, such as forms, navigation, and reports, to provide a user-friendly way to interact with our data.
Forms let users interact with the tables in our database, supporting operations such as view, sort, list, filter, and add. For our Asset Tracking System, we'll create forms to work with the table data in a tabular form (the datasheet or list view) and forms to create and edit individual entries (the detail view). Furthermore, we'll add a navigation form to allow users to easily move between the various interface elements. Access will do much of the work for us by auto-generating most of what we need to create. After we publish our database to SharePoint, the forms will be saved as .ASPX pages, so ultimately we're using Access to help generate custom web forms. Let's start with simple datasheet and detail forms for our Owners table and a detail form for the Assets table.
Select the Owners table within the object window.
Select the Create tab on the ribbon and click the Datasheet button. Access automatically generates a new datasheet form based on the Owner table (since it is the currently selected table), then opens the form so you can edit the default configuration.
Note
There are a few buttons on the Create tab prefixed with the word Client, such as Client Forms. This prefix denotes elements that will run only in the Access client; they are referred to as client-only objects and will not open in a browser. It is perfectly acceptable to create client-only objects in cases where you need enhanced functionality currently unavailable in Access Services, such as interaction with linked tables. You still get centralized storage of the objects in SharePoint; just be aware of the differences in how users will be able to interact with these objects.
Accept the defaults and save the form as Owners.
Select the Create tab on the ribbon, this time clicking the Form button. Access now generates a form with the detail for an individual item based on the Owner table.
Accept the defaults or experiment a bit and customize the layout. Save the form as OwnerDetail.
Select the Assets table within the object window.
Select the Create tab on the ribbon and click the Form button. Access now generates a form with the detail for an individual item based on the Assets table.
Accept the defaults or again feel free to experiment a bit. Save the form as AssetDetail. Figure 12-7 shows a slightly customized asset detail form with the default labels and controls repositioned and resized.

The default Datasheet and Form templates we've used so far provide a quick way to generate some basic forms and include all the necessary functionality to navigate among records, even to search and filter the active dataset. We still need a tabular type form to view our list of assets, but this time let's build something with a bit more visual appeal than the simple datasheet we used for the Owners table.
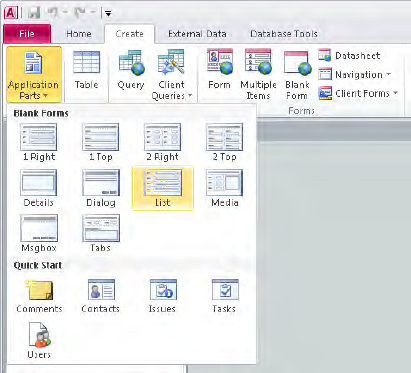
Select the Create tab on the ribbon and click the Application Parts button. This brings up a menu displaying available prebuilt starter forms and quick start items, as shown in Figure 12-8. Select the List item from the Blank Forms section. Access will create and save a new form named List that should be visible in your object window. Depending on your security settings, you may get a warning that some active content has been disabled. Click the Enable Content button to continue.
Right-click the List form in the object window, select Rename, and rename the form Assets.
Right-click the Assets form in the object window and select Layout View to open the form in design mode. Once the form is open, click the Design tab on the ribbon if it is not already the active selection.
The Application Parts templates don't automatically bind the form to a table so we need to set this binding behavior ourselves. If the property sheet is not already visible, open it by clicking the Property Sheet button on the ribbon. In the Property Sheet, select Form from the drop-down and then click the Data tab. On the Data tab select Assets for the Record Source.
Click the Add Existing Fields button on the ribbon to bring up the field selector. Drag one or more of the fields from the Assets table onto the form. Again, spend as much time as you want customizing the layout and other properties of the form, such as the caption. When you're done, save and close the form. Figure 12-9 shows a sample layout with the AssetImage, Description, AcquistionDate, and Condition fields added. Also included are the default Add New, edit, and delete buttons that are part of the Application Part template; we will add some substance to the buttons a bit later.

We now have list and detail forms for two of our tables; we'll skip creating any forms for the AssetHistory table. As mentioned earlier, we will use data macros to create records in this table so we don't need to give users a form to add or update information. That said, we still need one more form to make it easier for users to navigate around our database application, and Access does a lot to get us started here as well. Let's create a navigation form that uses horizontal tabs to let users quickly move between the two list-view forms we just created; we'll also add a tab for the report we will be creating.
Select the Create tab on the ribbon and click the Navigation button to open the menu shown in Figure 12-10, which allows you to select the type of navigation form you want to create. Take a moment to look at the different options available and then select Horizontal Tabs, 2 Levels. Access will generate a new navigation form based on that selection.
Drag the Assets and Owners forms from the object window to the [Add New] tab of your newly created navigation form, which will create a new tab for each of the forms.
Click the [Add New] tab and type Reports, press Enter to create the new tab. We will use the second level of our two- level navigation control to list the available reports once we have them created.
Just to make the form a bit less generic, let's change the caption and the theme. For the caption, click the default title of the form, Navigation Form, and change it to Asset Tracking System. You can also change the default value by updating the Caption attribute in the properties window.
To change the theme, which will adjust elements such as the fonts and colors, click the Themes button on the Design tab of the ribbon to bring up the drop-down and make a selection. Changing the theme here will also set the theme for any of the other objects in our database where themes are supported, providing for a consistent look and feel.
Save your navigation form as Main.

Note
We are only scratching the surface when it comes to developing forms, and this is really one of the more powerful features of Access as a RAD tool for web applications. It is worth spending some time looking at each of the different types of forms available on the Create tab and exploring the various ways you can customize attributes such as layout, color, etc. For some additional information related to creating forms in Access, take a look at http://office2010.microsoft.com/en-us/access-help/CH010369205.aspx.
Since we took the time to create a navigation form, we should set this form to open by default when a user accesses our application on the web or within Access. To set the default form, we need to update the database options.
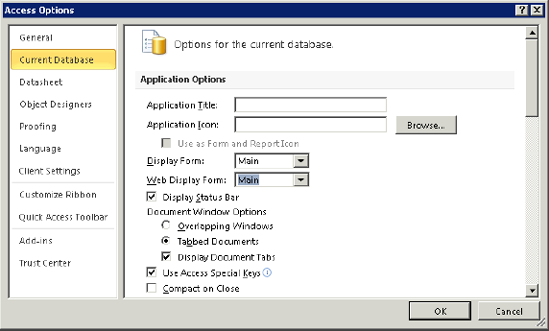
Click the File tab on the Ribbon to open the Backstage View and click Options on the lower left side of the window to bring up the Access Options window.
Select Current Database from the list on the left to bring up the options specific to our Assets Tracking System database.
Set the Display Form and Web Display Form options to Main as shown in Figure 12-11. Click OK to save your changes; you'll be prompted to close and reopen the database before the changes take effect.
Since this is a web database containing web objects, we don't have the ability to write traditional VBA code. However, we can write macros, and Access actually provides a high degree of flexibility using this approach. Access supports two types of macros—UI macros and data macros. UI macros are associated with specific user interface elements, such as buttons, and are implemented as client-side JavaScript functions in the browser. Data macros are associated with tables, similar to traditional database triggers, and provide an excellent mechanism to ensure certain data-centric behaviors are executed regardless of the source of the action. When published to the web, data macros are implemented as custom SharePoint workflows.
Up to this point we've used the navigation form to allow users to navigate to the Assets and Owners forms, but we haven't provided a way for users to open the detail forms. While these forms by default allow users to edit and add items directly (this behavior can be modified by changing the Allow Edits and Allow Additions attributes of the form), a more user-friendly approach would be use the item detail form for these types of actions. Let's begin our exploration of macros by adding the ability to click on an item in our Owners form to bring up the corresponding OwnerDetail form in edit mode; additionally, clicking on an empty row should bring up the same OwnerDetail form in add mode.
Double-click the Owners form in the object window to open it.
Open the property sheet if it is not already open by clicking on the Property Sheet button on the Datasheet tab of the ribbon.
In the property sheet for the form, select OwnerID from the drop-down.
First we want to change the OwnerID column to be displayed as a hyperlink so users will know the element is clickable. Still in the property sheet, click the Format tab and set the Display As Hyperlink property to Always.
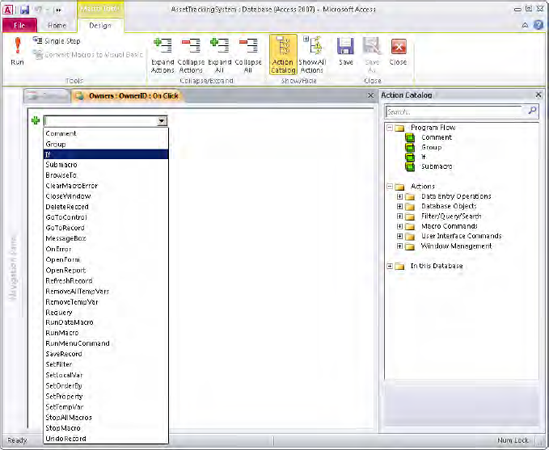
Next we need to create the macro that will bring up our detail item form when a user clicks on an OwnerID. Click on the Events tab on the property sheet to display the events we can add behaviors for; in this case we want to create a macro for the On Click event so select the On Click event in the property window, then click the ellipsis to the right of the property value to bring up the macro design surface shown in Figure 12-12.
Note
Macros are how you "write code" in Access for web objects being published to SharePoint. One of the goals of Access Services was to enable business users, not developers, to publish databases to SharePoint without the intervention of IT. As a result, the Access team had to provide a safe no-code deployment model, and macros provide a safe and predictable set of actions. That said, macros can be very powerful, so don't underestimate them. For more information about macros in Access and what is possible check out http://office2010.microsoft.com/en-us/access-help/CH010369212.aspx.
The macro design surface lets you quickly build behaviors. Adding new actions, such as the If block shown in Figure 12-13, can be accomplished by typing the command if you know what it is, by selecting the command from the Add New Action drop-down on the design surface, or by double-clicking or dragging the command from the Action Catalog browser to the right of the design surface. Access will guide you through the creation of your macro using a fill-in-the-blank metaphor each time a new action is selected; and it provides IntelliSense, also shown in Figure 12-13, to speed development. The macro we'll build will help us accomplish three basic tasks. First, if edits have been made on the Owners form, we want to save those before continuing. Next, we'll open the item detail form in either edit or add mode, depending on which row the user clicked. Finally, once the item detail form window is closed, we need to refresh the Owners form to reflect our changes. Let's walk through each of these tasks.

Start by adding a new If action with the condition
[Form].[Dirty]; theDirtyproperty is a Boolean value set by Access that reflects whether the current record has unsaved edits. Within the If block add a SaveRecord action. The completed block is shown in Figure 12-14. Notice the comment block; you can insert comments using the Comment action type.Now we'll add a second If block. Add a new If action with the condition
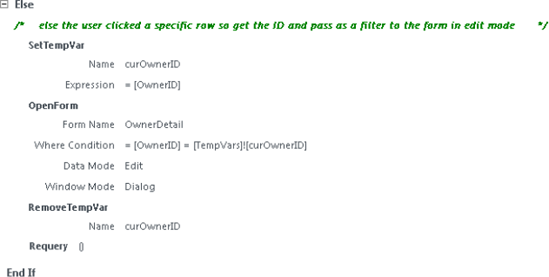
IsNull(OwnerID). This will return true if the user clicks on (new) rather than on an existing row in the Owners form. Within the body of the If block add an OpenForm action with the Form NameOwnerDetail; Data ModeAdd; and Window ModeDialog, the dialog setting causes the form to open in a modal popup window. Finally, add a Requery action; this executes once the OwnerDetail form is closed to refresh the Owner form with the new record details. The Requery action will accept the control to refresh as an argument, which you can leave blank since we are refreshing the form. The completed block is shown in Figure 12-15.The last piece of the macro supports edits of existing records. Click the If block we just created to select and highlight the entire block, then click the Add Else link in the lower right of the selected region. Within the Else block add a SetTempVar action with the name
curOwnerIDand the Expression[OwnerID].This will store the OwnerID the user clicked on in a temporary variable we will use as a filter. Next add an OpenForm action with the Form NameOwnerDetail, the Where Condition[OwnerID] = [TempVars]![curOwnerID], the Data ModeEditand the Window ModeDialog. Lastly add a RemoveTempVar action with namecurOwnerIDand a Requery action to refresh the Owners form when the OwnerDetail form is closed. The completed block is shown in Figure 12-16. Save the macro and close the designer then save and close the Owners form.


Note
You may be wondering why we need the RemoveTempVar action. In the managed world we would expect the resource to be released once execution of the macro is complete and the variable is out of scope. In Access, however, temporary variables are global and stay in memory until released. This, along with the constraint that we are limited to a maximum of 255 temporary variables at any one time, means removing a variable once we are done with it is a best practice.
We now need to take a similar approach for the Assets and AssetDetail forms, except we'll be adding behaviors for events attached to the default buttons, Add New, edit and delete, provided as part of the List template.
Right-click the Assets form in the object window and select Layout View.
Right-click the edit button and select Build Event...,which will open the macro design surface.
Again, start by adding a new If action with the condition
[Form].[Dirty]. Within the If block add a SaveRecord action.This time we don't need an If block since we are only dealing with edits. Add a SetTempVar action with the name
curAssetIDand the Expression[AssetID]. Next add an OpenForm action with the Form NameAssetDetail, the Where Condition[AssetID] = [TempVars]![curAssetID], the Data ModeEditand the Window ModeDialog. Lastly add a RemoveTempVar action with namecurAssetIDand a Requery action to refresh the Assets form when the AssetDetail form is closed. The completed block for steps 3 and 4 is shown in Figure 12-17. Save the macro and close the designer.Right-click the delete button and select Build Event...,which will again open the macro design surface.
Add a DeleteRecord action. That's it for this one; the completed macro is shown in Figure 12-18. Save the macro and close the designer.
Right-click the Add New button and select Build Event.... This time you'll notice a default macro has been created to add a new record within the current form. We want to change this behavior to bring up the same details form we used for editing.
Remove the GoToRecord action and replace it with an OpenForm action with the Form Name
AssetDetail.Leave the Where Condition blank and set the Data Mode toAddand the Window ModeDialog. Below the OpenFom action add a Requery action to refresh the Assets form when the AssetDetail form is closed. The completed block is shown in Figure 12-19, including the error handler provided as part of the default macro. Save the macro and close the designer then save and close the Assets form.


So far we have built only UI macros. Let's now add one more macro, and this time we'll make it a data macro. As discussed earlier, data macros are somewhat analogous to triggers in SQL Server, with one key difference being data macros do not execute within the context of a transaction. This means we have no ability to treat the entire macro as a single atomic operation or to automatically rollback changes. However, just as is the case with triggers, data macros do provide an excellent means of associating business rules directly with the relevant data, ensuring consistency. Data macros are associated with a specific table and can be built as standalone reusable objects or can be triggered by the Before Change, Before Delete, After Insert, After Update, or After Delete events. In this case, we'll add an After Update data macro to the Assets table, which will create a new AssetHistory record any time a new owner is assigned to an asset. Repeat the following steps (minus adding the If block) to create an After Insert macro to capture the initial owner.
Double-click the Assets table to open it in Datasheet view.
Select the Table tab on the ribbon and then click the After Update button to open the macro design surface.
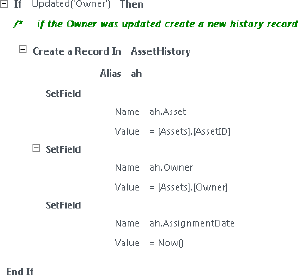
Add a new If action with the condition
Updated(['Owner']).Within the If block, add a CreateRecord action using
AssetHistoryas the table name andahfor the Alias field.Within the CreateRecord block (displayed as Create a Record In), add three SetField commands using the following values for the Name and Value attributes.
Name:
ah.AssetValue =:
[Assets].[AssetID]Name:
ah OwnerValue =:
[Assets].[Owner]Name:
ah AssignmentDateValue =:
Now()
The completed block is shown in Figure 12-20. Save the macro and close the designer.
We have created the tables to store our data and the forms to work with our data; now we need some reports to summarize our data. A great feature of Access is how it enables business users to quickly create very rich reports, and luckily this capability is available for web databases as well. In the case of web-based reports, Access Services relies on SQL Server Reporting Services to generate the output. Let's add a simple report to our Asset Tracking System to display the fully depreciated assets grouped by the owner of the asset.
Note
Running reports in Access Services requires installation of the SQL Server 2008 R2 Reporting Services Add-In. The add-in can be run in connected or local mode. Connected mode requires a Reporting Services server and provides server features such as scheduling of reports. Local mode does not require a separate Reporting Services server but you can't access the server-only features. See http://technet.microsoft.com/en-us/library/ee662542(office.14).aspx for information on setting up and configuring the add-in.
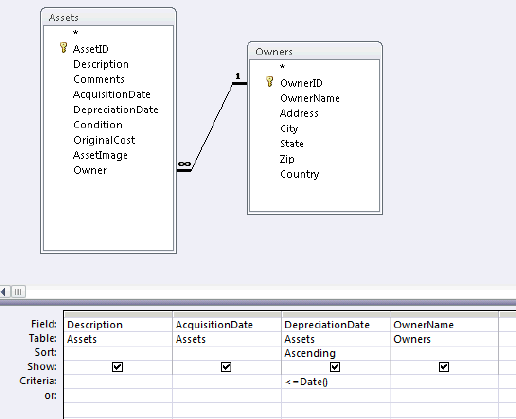
First we need to create a new query that our report will be based on. Select the Create tab on the ribbon and click the Query button. This opens a new query in design view and brings up the Show Table dialog window. Select the Assets and Owners tables, click the Add button, then click the Close button.
In the lower section of the query designer, add the fields Description, AcquisitionDate, and DepreciationDate from the Assets table, and OwnerName from the Owners table; you can add the fields using the drop-down within the Field cell, by double-clicking the fields in each table, or by dragging the fields from the table to the lower section.
Add the expression
<= Date()as the criteria for the DepreciationDate field and set the sort order to be Ascending; this will filter our results to return only assets that have met or surpassed their date of full depreciation.Save your query as DepreciatedAssets. Your completed query in design view should look similar to Figure 12-21. Close the query designer.
With the completed query we can now add a new report showing fully depreciated assets.
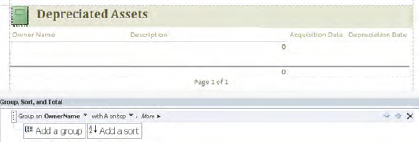
With the DepreciatedAssets query selected in the object navigation window, select the Create tab on the ribbon and this time click the Report button. Access will generate a new report based on the currently selected table or query, in this case the DepreciatedAssets query, and then open the report in design view.
As mentioned, we want to group our report by owner. Click the Add Group button in the Group, Sort, and Total section of the report design surface to bring up the group-on selector. If this section of the designer is not currently visible you can open it by clicking the Group & Sort button on the Design tab of the ribbon. Choose OwnerName from the drop-down. Click More to see the additional settings you can specify.
By default, our report includes a Totals field showing the number of all assets included in the report. Let's add another Totals field showing the total number of assets for each owner. On the report, select the cell just below the OwnerName column heading, then select the Design tab from the Report Layout Tools tab group of the ribbon. Click Totals from the Grouping & Totals section of the Ribbon and select Count Records as shown in Figure 12-22. This will add a new Totals field to the left of the default existing totals field; drag the newly created Totals field to the topmost cell under the Description heading. By moving the Totals cell here, we'll get the value for each grouping of owner.

One other feature we can add to web reports is conditional formatting, which allows us to create some simple rules to change the formatting of a cell based on its value or an expression. Let's add some conditional formatting to the totals field we just added to change the background and font colors of the cell if the value is greater than or equal to 5; that is, the owner owns 5 of more fully depreciated assets.
With the new Totals cell we just created highlighted, select the Format tab from the Report Layout Tools tab group of the ribbon, then click the Conditional Formatting button to bring up the Conditional Formatting Rules Manager window.
Click the New Rule button to bring up the New Formatting Rule window. In the first two drop-downs of the rule builder, select Field Value Is and greater than or equal and then enter 5 in the text box. Next, use the formatting tools below the rule description to change the format of the cell for cases where the rule evaluates to true; we set the background color to blue and the font color to white. Your completed rule should look similar to Figure 12-23. Click OK to close the rule window and OK again to close the rule manager window.
Save your report as DepreciatedAssets. Your completed report in design view should look similar to Figure 12-24. Take some time to customize the look of your report by adjusting cell size and margins, changing column headings, or by adding a custom title or logo. Again, Access provides the ability to quickly create some great-looking reports; for more information on building reports in Access, have a look at
http://office2010.microsoft.com/en-us/access-help/CH010369220.aspx.Note
Access provides a live preview of the report while in design view, so if you have data in your database you'll see the data as it will look in context while you are designing your report, which is also the case with forms in design view. This really speeds the design process since you don't need to switch between views to see what the final result will look like. Add a few assets to your Asset Tracking System to see this in action.
Now let's add the report to the Main form so users will have quick access to it. Right-click the Main form in the object window and select Layout View. In the design window select the Reports tab; drag the DepreciatedAssets report from the object window to the [Add New] area on the heading below the tab group. Additional reports could be added to this area as well, providing users an easy way to navigate between reports. Save and close the Main form.

Now for the moment we have all been waiting for—it is time to publish our Asset Tracking System to SharePoint via Access Services. Publishing our database entails Access launching the compatibility checker, which runs through a set of checks to ensure our web objects comply with all requirements and constraints, and then the creation of a new site where all the web objects will be created and managed. To make all of this magic happen, all you need is a SharePoint instance with Access Services and an existing site collection where you have rights to create a new site. Now let's walk though the publishing process so we can get our application to the web.
Click the File tab on the Ribbon to open Backstage View. The Info section of Backstage should be active by default; otherwise, select it now and click the Publish to Access Services button.
Set the Server URL to the location of the site collection where you'll be publishing your database and the Site Name to a unique site name within the site collection that will be used by Access Services during site creation.
Note
You can click the Run Compatibility Checker button to confirm compatibility before publishing; however, Access will run through the checks as part of the publishing process so you will know if there are any issues. The compatibility checker is also a great tool to use during migration of an existing Access database to the web. The blog post at
http://blogs.msdn.com/access/archive/2009/12/21/access-2010-web-compatibly-checker.aspxprovides some additional information on how the tool works and how to address any identified issues.Click the Publish to Access Services button to save and publish your database to the Web. Once this completes, a dialog window will be displayed with the link to your newly created site. Click the link to open your newly published Asset Tracking System in your browser, where you should see a view similar to Figure 12-25. Notice the Options drop-down, which lets you interact with your application in the context of the site beyond the functionality provided by the application itself; this is a reduced set of options compared with a traditional SharePoint site.

Note
You can also open a form directly, without the SharePoint header, by using the form's URL. In this case, if we wanted to open the Main form we could use http://[serverurl]/[sitename]/AccessServices/Forms/Main.aspx.
There are likely several questions popping into your mind at this point related to the possibility of working with and extending the Asset Tracking System beyond what is possible in Access. It is just a SharePoint site after all, isn't it? It is, but there are some boundaries we must operate in. Any modifications to the application, such as adding forms or modifying forms and reports, must still be done in Access; any changes will then be synchronized back to SharePoint through Access Services. Some changes, such as modification to table structure, require as well that you be online and connected to the SharePoint site to ensure consistency. Many of the traditional mechanisms we have available to us when working with normal SharePoint sites are not supported for sites created and managed by Access services; for example, SharePoint designer support is disabled for our site by default.
Fear not, there are still some options for customization; we do have the ability to interact with the lists (tables) using a few of the traditional approaches for customizing a SharePoint environment, such as building custom workflows in Visual Studio or writing custom event receivers. One point to remember here is that customizations developed in this way execute outside the boundaries of Access, so users running Access in a disconnected state will not trigger the events until synchronization occurs when the user is online and transitions to a connected state.
Also worth noting is the work the Access team has done to extend the capabilities offered by SharePoint; Access Services includes the Access Database Service, which provides enhanced caching, paging, filtering and sorting specific to Access applications.
The Assets web database solution incorporated several key techniques worth highlighting as they could easily be reused in other projects.
- Access as a RAD tool:
Using Access to develop SharePoint applications allows us to take advantage of the best of both worlds. Access provides the tools and the environment to quickly build data-centric applications, while SharePoint provides the ability to easily manage and secure and access those applications. We see limitless possibility with the combination of Access, Access Services, and SharePoint, especially with some of the options to customize the out-of-the-box experience as discussed in the Extension Points section below.
While coding this example, we thought of several variations to the solution we didn't incorporate. Mostly, these were not included because they distracted from the overall objective of the solution. We call them out now as extension points since they may be applicable to a specific project you are working on.
- Add search capabilities:
Most of the default form templates provide a search box to filter the current dataset. If you are building custom forms you can quickly add this functionality by simply using a textbox, a button, and a custom macro to filter the result set, giving users the ability to search within the context of the specific dataset currently being worked with.
- Add a custom workflow:
Ideally we want to automate and support integration where it makes sense as part of a business process, without the need for manual human intervention; this approach makes for a much more predictable and reliable process. Using a workflow is a great way to enable this automation, and by building custom SharePoint workflows in Visual Studio you can extend capabilities beyond what you can do with Access alone.
- Add a custom event receiver:
To continue the integration and automation theme, you can also use custom event receivers to execute business logic based on certain events, such as a new asset being added to the Asset Tracking System—which is ultimately a new item being added to a SharePoint list.
The following links are to resources that we think a reader interested in the material presented in this chapter would find useful:
Creating Web Databases with Access 2010 and Access Services
http://msdn.microsoft.com/en-us/library/ff402351(office.14).aspxThe official blog of the Microsoft Access product team
http://blogs.msdn.com/accessSet up and configure Access Services
http://technet.microsoft.com/en-us/library/ee748653(office.14).aspxThe Access Show on Channel 9
http://channel9.msdn.com/shows/AccessWhitepaper: Improving the Reach and Manageability of Access
http://technet.microsoft.com/en-us/library/ff397963(office.14).aspx