
Windows SharePoint Services provides an enhanced storage system that facilitates collaboration. This system improves upon old collaboration techniques of simply e-mailing documents back and forth or dropping them in a file share. Relying on e-mail is awkward, as team members are never sure they have the most up-to-date version of the document, and consolidating the changes becomes an ongoing, laborious task. File shares are also limited in that the files may be difficult to find, users have no idea if they are currently being edited by another team member, and versioning is reduced to Save As/Rename operations. In contrast, SharePoint's system of Web-enabled content databases provides a rich experience for the team working on the document. The environment provides check-in/check-out functionality, versioning, metadata, search, and an entire web site for storing lists of data related to the creation of the document.
However, even this system becomes strained in scenarios in which the team's documents are really collections of separate components. Frequently, these components are independent and different team members are responsible for different pieces. Under these circumstances, team members ideally should be able to submit their contributions whenever completed. Yet this work often takes place serially because the file in a SharePoint library can be checked out by only one user at a time. In this chapter, we will detail how, as a developer, you can enhance this experience to provide an automated method of document assembly. We will have a master document that a user may markup with requests for supplemental contributions by other team members. This will result in tasks being created in a SharePoint team site. Contributors can then attach their contributions to the task and when they mark it complete, we will merge their contribution back into the correct place of the master document.
The key identifier that makes this solution applicable to an organization is any process in which different team members work on specific sections of a document. Consulting firms often have a sales resource, a project manager, and a development lead working on distinct portions of a proposal. The sales resource focuses on background information on the company, case studies, and pricing. The project manager is responsible for documenting the project lifecycle, creating a high-level project plan, and detailing the change/review mechanisms. Meanwhile, the developer is taking the customer's functional requirements and outlining a proposed solution. You also typically have individual résumés that need to be collected from specific members of the organization. All of these pieces have to be put together to complete the proposal. This problem is rather generic and can be found across many different customer types. In the construction industry, different team members are often responsible for certain sections of a contract. Even in the military, different organizations or levels are tasked with completing specific sections of a deliverable, such as in a policy review from different functional areas of the organizational branch. By allowing the team to divide and conquer the work, the solution in this chapter enables an efficient process that reduces the amount of time and level of effort it takes to complete an entire document.
To provide some context for our automated document assembly solution, we've focused on a scenario in which a sales person in an organization is constructing a proposal that requires updated résumés from key individuals in the company. We will give this sales person a tool that will help identify the correct people to include, as well as mark up the document with placeholders for their contributions. This tool will be a Visual Studio Tools for Office (VSTO) Microsoft Word 2010 template. By extending a Word template with VSTO, we will be able to add an actions pane specific to the document where we can place additional controls for the sales person to use. These controls will let the sales person search for individuals in the company, using functionality that leverages SharePoint 2010's search web service to look through the profile repository for matching individuals. (This is the same profile repository that surfaces in the enterprise's My Sites and People search functionality.) Once a desired person is found, the actions pane will enable the sales person to insert a placeholder for the employee's résumé and specify a due date by which it must be provided.
After the sales person has marked up the proposal document with résumé placeholders, she will save it to a Proposals document library in a SharePoint site. When the proposal lands in this library, several things will happen. First, we will leverage SharePoint 2010's Document ID service to assign a unique identifier to the document. We will use this in several ways—to allow us to easily find the file, but also in the body of the document, a practice in many enterprises that lets users relate a printed document back to its electronic counterpart.
Besides assigning the Document ID, we will also develop an event handler that will parse the document looking for the résumé placeholders. For each of these résumé requests, we will create a corresponding task in the SharePoint site. This task will be for the identified person, have the delivery date indicated by the sales person, and contain information so that we can relocate the document and specific placeholder in the proposal once the contribution has been submitted.
Our scenario then shifts from the sales person to the individual identified as needing to provide an updated résumé. This person will be notified that a new résumé has been requested. Completing the task involves attaching a Microsoft Word document containing the updated résumé, along with marking the task as complete. An event handler monitoring the task list will see that the task has been completed and merge the attachment into the correct location of the proposal document. This merge won't just be text; we will incorporate other embedded items such as pictures and smart art. It is important to realize that when we are working on the Word documents on the server, this is made possible by the Open XML file format. In both cases, we are able to perform these operations on the server—interacting with streams and XML documents. At no time are we automating Microsoft Word on the server. In fact, Microsoft Word doesn't even need to be installed on the server for this solution to work.
Lastly, it isn't really appropriate for our proposal VSTO solution to be the end result that we would send directly to a customer. This is because the document has references back to our custom VSTO assembly that would then require installation and trust outside of our enterprise. Therefore, we will enable the organization to convert the constructed proposal from Microsoft Word to PDF format. This conversion will be done on the server using SharePoint 2010's Word Automation Services.
The following section will detail the major elements of the solution and the decisions that were made in coding it. The walkthrough will show you how we set up the SharePoint site to support the proposals and their corresponding tasks. We will demonstrate how to turn on the Document ID service and how to take the default document library's Word template as a starting point to a Word 2010 template project in Visual Studio 2010. We will explain how content controls can be used to surface metadata properties of the file into the body of the document, as well as to how to add them dynamically as content placeholders. With the Visual Studio Tools for Office solution, we will show you how to build a document actions pane and how to have that pane interact with SharePoint's search web service. Our VSTO solution will also extend the backstage interface so that a user can easily check on the status of the tasks from the proposal document. When the proposal template tool is complete, we will demonstrate how to deploy it so it is available as the default document template of the site's document library.
We will also walk you through the creation of the two event handlers that will use the Open XML file format to operate on the proposal. The first event handler will be responsible for parsing the proposal and creating tasks for each résumé request. The second one will respond to a completed résumé submission, merging the contents of the résumé back into the proposal. The walkthrough will also show you how to provide a workflow that converts the final proposal from a Word format to PDF using SharePoint's Word Automation Services. As in most of our chapters in the book, not every line of code will be explained. Since there are so many moving pieces to this chapter, we want to focus on the major elements of the solution design. We highly recommend you download the accompanying code for this chapter from Apress's site in order to follow along and reuse some of the objects.
For the solution, you will need a site for building out the components. In our environment, we chose the root web of a site collection. Its URL is http://edhild3/sites/sales. It is this site that will contain the document library and task list we will discuss in just a bit. Within your SharePoint environment you will also need a Search center. Most enterprises have their search center deployed as part of their root intranet site collection or as a site collection unto itself. In our environment, the enterprise search center is located at http://edhild3/search. If you don't have a search center, take the time to create one. If you are going to add it to an existing site collection, just be sure to activate the SharePoint Server Publishing Infrastructure site collection feature before creating the search center.
You also need to make sure you have some individuals in the profile repository. In our environment, we have two accounts that we will request résumés from: northamericaedhild and northamericachadwach. These accounts exist in Active Directory and have been granted access to the site where we will be creating the tasks and proposal. They also have profiles in the profile repository. You can have SharePoint import attributes from AD or simply go the User Profile Service Application and create the accounts there. If you have not seen this interface, use the following steps to navigate there to either create or confirm your user data. Of course, with the user data in place, make sure you perform a new search crawl and that you can actually find a person by performing a people search through your search center.
Open SharePoint's Central Administration site.
Under the Application Management heading, click Manage service applications.
Locate the User Profile Service Application and click it to highlight that application. Click the Manage button in the ribbon.
Under the People heading, click Manage User Profiles.
From here, you should be able to search through existing profiles. Clicking the New Profile button lets you to manually create profiles for your accounts. Be sure to define something worth searching for. For example, for Ed Hild we used the title of Development Team Lead with a description that he likes Visual Basic and C#.
Getting back to the sales site where we'll be developing the proposals solution, one of the first things we will want to do is turn on the Document ID service. If you go to the site's settings and look at the Site Collection's features, you'll find a Document ID Service feature that needs to be activated. You can see this option in Figure 7-1.
Activating this feature extends the Document and Document Set content types with additional capability. Mainly, there is a new Document ID column that for each new file (or each new document set) will hold a unique value that can be used to retrieve the file through a static URL, regardless of where the file is located. You have some out-of-the-box influence on the format of these identifiers and even more if you want to code your own document ID provider. Once the Document ID Service has been turned on, the Site Collection settings will have a new option entitled Document ID Settings. Figure 7-2 shows some of the options there. Notice that you can determine what characters you want the identifiers to begin with.

The word "begin" here is important as SharePoint will append an identifier for the list as well as the list item, leaving your complete identifiers to look something like: WSYWUWA3HUJ7-1-12. This means that the document could be retrieved through a static URL in the format of http://edhild3/sites/sales/_layouts/DocIdRedir.aspx?ID=WSYWUWA3HUJ7-1-12. The following URL gives you more detail on Document IDs, including what happens when you move or copy files: http://msdn.microsoft.com/en-us/library/ee559302(office.14).aspx.
Now in your development site, create a new document library called Proposals. To this library, add a new column named ProposalID that will hold a single line of text and make sure it is placed in the default view. You may be wondering why we would need a ProposalID when the Document ID Service has already added a Document ID column to the Document content type. The reason is that the Document ID column is a bit locked down internally within the product. For example, you won't actually see it in the definition of site columns or in use in the content types. It also is not available as a quick part in Microsoft Word, which is what we normally would use to get the identifier into the body of the document unless there's already a value assigned. This won't work with our approach of providing a template tool, since no Document ID would be present until the file is saved to the library and we don't want our sales person to have to know how to place quick parts onto a document. We will therefore use the ProposalID column for most of our work, and add a bit of code later to make sure its value stays in sync with the Document ID.
We will also need a tasks list. Create one in the site named ResumeTasks. Extend this list by adding ProposalID and RequestID columns. Both of these are single lines of text and present in the default view. The ProposalID in the task list will help us remember which proposal document the task is referring to. The RequestID column will contain a GUID value that matches a placeholder control inside the proposal document where the résumé content is to be placed.
Now let's turn our attention to the document template of the Proposals library; this will be the central part of the tool for the sales person working on the proposal. By default, each document library has a blank Word template that we can modify to represent a typical proposal. Use the following steps to open the document template so you can enter the boilerplate text along with a content control for the value of the ProposalID field.
Click on the Proposals library in the left-hand navigation of your site.
Open up the Library tab in the ribbon and click on the Library Settings button.
In the General Settings section, click Advanced Settings.
In the Document Template setting, click the (Edit Template) link. This will launch Microsoft Word so you can edit the template and save the changes back to the library.
We want to enter some boilerplate text, a control to hold the value of the ProposalID field, and a Résumés heading that will be the beginning of the section where the résumé contributions will be inserted. The boilerplate text can really be anything. Make sure the Résumés heading is the last paragraph in the document as we will use that as a marker when we write some code a bit later. Use the following steps to insert the control for the ProposalID field. The end result should look like Figure 7-3.

Place your cursor where you want the ProposalID field control to be placed and make sure you have any styles you'd like applied selected. In our example, the first line is right-aligned and uses the Heading 1 style.
Click the Insert tab in the ribbon.
In the Text group, click the down-arrow to access the options of the Quick Parts button. Quick Parts are already configured content controls in Microsoft Word that enable you to surface the file's data (in this case, properties) in the body of the document.
Choose the Document Property menu option.
Select ProposalID.
Now just click Save to commit your changes so this document becomes the template for the document library. You can test this out by going to the Proposals library and from the Document tab, choosing New Document.
This completes the non-code portion of preparing the document template. We now want to export the template from the SharePoint site so we can use it as the starting point for our Visual Studio solution in the next section. An easy way to export this file is to use SharePoint Designer. Simply open your site in SharePoint Designer and choose the All Files option in the Navigation menu. Browse to the Proposals library and open its Forms folder, where you'll see our template.dotx file. Select it and choose the Export Files button in the ribbon. Save the exported template.dotx file to your local Documents folder. Figure 7-4 shows this export option in SharePoint Designer.

In this section of the walkthrough, we will move over to Visual Studio and create a document-level Visual Studio Tools for Office project out of the Microsoft Word template. Start Visual Studio and choose to create a New Project. Under the C# language node, select Office and then 2010 to display the VSTO project templates.
From the listing of Visual Studio installed templates, select Word 2010 Template. Name the project templateProject. Leave the default option of creating a new solution and confirm that the .NET framework drop-down at the top of the dialog is set to .NET Framework 4. As we discussed in Chapter 4, there are several advantages to using version 4 of the framework for Office development, such as C# support for optional parameters. We want to make sure that these advantages are available to us. Your New Project dialog should look like Figure 7-5.

Clicking OK starts a project wizard that asks if you wish to create a brand new Word template for the basis of the project or use a copy of an existing template. Choose Copy an existing document and browse to the template.dotx file that you exported from the site earlier.
When the new project is created, your solution will contain a few files by default. These are visible in the Visual Studio Solution Explorer window. You'll find a template.dotx node with a code file named ThisDocument.cs, which is the main entry point for document-level projects. This file is where developers can write code for events and where we will wire up our actions pane in the next section. You can go ahead and close the designer that is surfacing Microsoft Word. Our work in Visual Studio will supplement the work we have already done inside the document.
Before we get to coding away, let's take care of one other item at the project level. We will need a web service reference to the SharePoint search functionality since our document will be remote from the server (on the user's desktop) when it is being used. SharePoint 2010 contains a search.asmx web service that will be our entry point for issuing a remote search query and getting results. This search API remains unchanged from SharePoint 2007—good news for developers who built solutions leveraging it in the previous release. This also means that most of the references and examples you find describing this web service for SharePoint 2007 will be useful in building solutions for the 2010 version. You interact with search.asmx using the ASP.NET 2.0 style of web services, so it will take us a few steps to get the appropriate reference into our Visual Studio 2010 project. Follow the steps below to set the web service reference.
Right-click on the templateProject and choose Add Service Reference.
Click the Advanced button in the bottom left-hand corner of the dialog.
Click the Add Web Reference button in the bottom left-hand corner of the dialog since we need to add an ASP.NET 2.0 asmx style reference.
Enter the URL for the
search.asmxweb service, which should be off the Search center you identified earlier in the chapter. In our environment the URL ishttp://edhild3/search/_vti_bin/search.asmx.Click the green arrow.
Once you can see the operations of the web service in the window, name the service reference SPQueryService in the textbox to the right.
Click the Add Reference button. Your project structure in Visual Studio's Solution Explorer should look like Figure 7-6.

In the next few sections, we will walk through the major elements of the VSTO solution, which creates a tool out of the Microsoft Word proposal template. As in our other chapters, we won't detail every line of code so we highly recommend you download the code for this chapter from the Apress web site and follow along.
Most people are familiar with the task pane in Microsoft Office applications. In Microsoft Word, the Research pane is an example of a task pane that enables a user to search registered repositories for more information without having to leave the Word application. Task panes provide another surface (usually located to the right of the document) for a developer to build additional user interface elements that add capability to the Word application. While task panes are application-level and can be called on regardless of the document that is open, document actions panes present similar user interface options but are available only for a specific document or document template. This is exactly why we chose to create a document-level project in the last section. Our pane makes sense only if the user is working with the proposal template. You can create a custom document actions pane using a Windows Forms user control. Figure 7-7 shows the design surface of the ProposalPane user control.

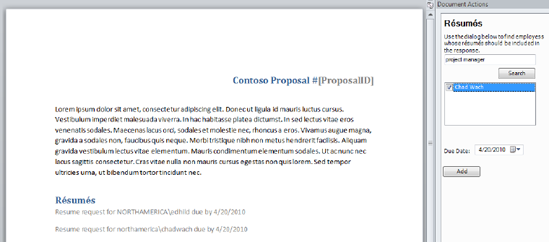
The ProposalPane user control contains some labels at the top for instructions. The txtKeywords textbox will enable the user to enter a search query that will perform the people search against the profile repository. The search button is responsible for executing the web service call and populating the CheckedListBox control below with results. Our sales person user can then select the desired individuals, choose a due date using the DateTimePicker control and click the Add button. This button will dynamically place a content control at the end of the document, below the Résumés heading, for each checked individual. The content of this control will specify whose résumé is requested along with the due date so we can create the correct tasks. With the user control created, the code in Listing 7-1 in the ThisDocument class loads it up as a document actions pane when our template is opened.
Example 7-1. Adding the ProposalPane as a Document Actions Pane
private ProposalPane proposalPane = new ProposalPane();

private void ThisDocument_Startup(object sender, System.EventArgs e)
{
   this.ActionsPane.Controls.Add(proposalPane);
}
The next bit of code we want to draw attention to is the code that runs in response to the user clicking the Search button. The initial portion of this code is presented in Listing 7-2. First, the proxy for SharePoint's search web service is configured with the URL of the search center, the current user's credentials, and a timeout value of 20 seconds in case the server is too busy for our request. Next, a queryPacketTemplate string variable shows the structure of the XML envelope our query must be wrapped in that we pass to the web service. The most important attribute here is that the query type is set to MSSQLFT. There are two types of search queries we could submit through this API—a keyword style and a style that resembles SQL Select statements, which is the style we will use here. We won't delve into all of the options here and turn this into a reference on search query syntax; if this is an area of interest, you'll find some reference links in the Further Reading section at the end of this chapter.
Example 7-2. Building the Search Request
private void btnSearch_Click(object sender, EventArgs e)
{
  SPQueryService.QueryService service = new SPQueryService.QueryService();
  service.Url = "http://edhild3/Search/_vti_bin/search.asmx";
  service.PreAuthenticate = true;
  service.Credentials = System.Net.CredentialCache.DefaultCredentials;
  service.Timeout = 20000; //wait 20 secs

  string queryPacketTemplate = "<?xml version="1.0" encoding="utf-8" ?>"
    + "<QueryPacket xmlns="urn:Microsoft.Search.Query">"
    + "<Query domain="QDomain"><SupportedFormats>"
    + "<Format>urn:Microsoft.Search.Response.Document.Document</Format>"
    + "</SupportedFormats>"
    + "<Context><QueryText language="en-US" type="MSSQLFT">"
    + "{0}</QueryText></Context>"
    + "</Query></QueryPacket>";
In the next section of code shown in Listing 7-3, you can see our actual SQL statement in the sqlQueryTemplate string variable where we ask for the PreferredName and AccountName of any person who has the user-entered keyword in any of the indexed properties of the profile repository. The next two lines simply package everything together as one XML string. You may wonder how we came to know about the PreferredName and AccountName properties. The answer to that lies in the User Profile Service Application you accessed earlier in this chapter. Using the Manage User Properties option in the service application takes you to a listing of the properties in the profile store. Note that the display name you see here is not always the internal property name. Edit the property to see its internal name. This listing of profile properties is shown in Figure 7-8.
Example 7-3. The SQL Search Query
string sqlQueryTemplate = "SELECT PreferredName, AccountName FROM SCOPE() "
    + "WHERE "Scope" = 'People' AND CONTAINS(*,'{0}') ";

string enteredText = txtKeywords.Text.Replace(' ', '+'),
string sqlQuery = string.Format(sqlQueryTemplate, enteredText);string queryXml =
string.Format(queryPacketTemplate, sqlQuery);
Note
Pay particular attention to the fact that we are replacing any space character with a plus symbol. There are several characters the user can enter that would present a problem for our code. We are accounting for the spaces, but, for example, a query for a user with the last name of O'Brian would also be a problem because of the apostrophe. Use the links in the Further Reading portion of this document to get a fuller explanation of characters that cause problems and how you can handle for them.

Before we look at the section of the search button's click event handler where we process the results, we wanted to call out a helper class we constructed simply to make placing the people in the results list easier. The PersonResultItem class we placed at the bottom of the code-behind of the user control is just a class that contains the returned PreferredName and AccountName information for a specific search result (see Listing 7-4). The reason we created the class was to be able to specify the ToString() method that will be used by the CheckedListBox for the display value of the item. In this case, we want the PreferredName, which is the display name for the account.
Example 7-4. The PersonResultItem Helper Class for Reading Results
internal class PersonResultItem
{
  public string PreferredName { get; set; }
  public string AccountName { get; set; }
  public PersonResultItem(string preferredName, string accountName)
  {
    PreferredName = preferredName;
    AccountName = accountName;
  }
  public override string ToString()
  {
    return this.PreferredName;
  }
}
So the last piece of code for our Search button, shown in Listing 7-5, executes the query and adds the results to the list box. In this instance, we are using the QueryEx method of the search web service, which returns the results as a dataset with a table named RelevantResults. We are using a WaitCursor here to keep things simple; a more advanced approach would be to make an asynchronous web service call.
Example 7-5. Executing the Query and Processing the Results
this.UseWaitCursor = true;
DataSet ds = service.QueryEx(queryXml);
DataTable tbl = ds.Tables["RelevantResults"];
lstResults.Items.Clear();
foreach (DataRow r in tbl.Rows)
{
  lstResults.Items.Add(new PersonResultItem(
     r["PreferredName"].ToString(),
     r["AccountName"].ToString()));
}
this.UseWaitCursor = false;
}
r["PreferredName"].ToString(),
r["AccountName"].ToString()));
}
this.UseWaitCursor = false;
}So far, our ProposalPane enables the sales person to perform a people search from within the Word template. Once the results have been gathered and the user selects which people to request résumés for, the control needs to place résumé requests into the document in the Résumés section. To accomplish this, the code in Listing 7-6 finds the Résumés section by knowing that it is the last paragraph in the document. For each selected individual, we insert a paragraph containing a rich-text content control. When this control is created, we name it with the string Resume along with a GUID so we can guarantee uniqueness. The control is titled Resume Request and the same GUID is placed in its tag property for us to retrieve later. This tag value allows us to tell the résumé requests apart and relate the corresponding tasks we need to create in the SharePoint site later. Lastly, we place some formatted text in the control so that it will fit the format of "Resume request for northamericaedhild due by 4/20/2010". Figure 7-9 shows the end result running in Microsoft Word.
Example 7-6. Inserting Content Controls for Resume Requests
foreach (PersonResultItem person in lstResults.SelectedItems)
{
  Microsoft.Office.Interop.Word.Paragraph last =
    Globals.ThisDocument.Paragraphs[Globals.ThisDocument.Paragraphs.Count];
  last.Range.InsertParagraphAfter();

  Globals.ThisDocument.Paragraphs[Globals.ThisDocument.Paragraphs.Count]
    .Range.Select();
  Microsoft.Office.Tools.Word.RichTextContentControl ctl;
  Guid id = Guid.NewGuid();
  ctl = Globals.ThisDocument.Controls.AddRichTextContentControl(
    "Resume " + id.ToString());
  ctl.Title = "Resume Request";
  ctl.Tag = id.ToString();
  ctl.PlaceholderText = string.Format("Resume request for {0} due by {1}",
    person.AccountName, dtDueDate.Value.ToShortDateString());
}
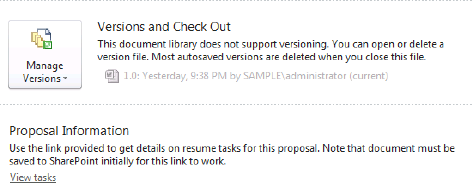
As described in Chapter 4, Microsoft Office 2010 provides a new extension point for developers called the backstage. This interface replaces the old-style, drop-down file menu, bringing a ribbon-like treatment to operations users will perform on their documents, or a way to present information about the document. The new interface opens up a lot of real-estate for providing useful information. Our solution will provide a click link to the SharePoint site's résumé tasks list, filtering the list for the tasks specific to the open proposal. We point out in the Extensions section of this chapter how you could make this much more elaborate by actually bringing the task details into this interface. The Further Reading section also includes links for more details about advanced options, and more controls you could utilize in the backstage environment.
To get started with our customization, add a new project item to the Visual Studio templateProject. Choose the Ribbon (XML) item template and name the file backstagecustomization.cs. As mentioned in Chapter 4, there is no designer for backstage customizations; however, these extensions leverage the same ribbon infrastructure as the ribbon items the user sees while authoring the document. When the new project item process completes, two files will have been added—an xml file and a class file. Both of these in concert will be used to build our backstage extension. Let's start with the XML file, which is shown in Listing 7-7.
Example 7-7. The Backstage Customization Ribbon XML
<?xml version="1.0" encoding="UTF-8"?>
<customUI xmlns="http://schemas.microsoft.com/office/2009/07/customui"
          onLoad="Ribbon_Load">
  <backstage>
    <tab idMso="TabInfo">
      <firstColumn>
        <group id="ProposalInfoGroup"
               label="Proposal Information"
               helperText="Use the link provided to get details on resume
                           tasks for this proposal. Note that document must
                           be saved to SharePoint initially for this link to
                           work.">
          <topItems>
            <hyperlink id="taskLink" label="View tasks"
                       getTarget="GetHyperLink"/>
          </topItems>
        </group>
      </firstColumn>
    </tab>
  </backstage>
</customUI>
Notice that this ribbon XML uses a different namespace than the one that was added by default. In the backstage, the tabs are listed vertically on the left-hand side of the screen. By specifying the idMso of TabInfo, we are telling Word to place our customization on the out-of-the-box Info tab. We then define a new Group that will be placed in the first column of that tab. This group has a label, description, and an inner hyperlink control. The text for this hyperlink will always be "View Tasks", but the URL for the hyperlink will be dynamically determined using a ribbon callback technique. This is because we want the URL to filter the résumé tasks list for tasks specific to this proposal. Since this will be different for different proposals, we add a callback method into the backstagecustomization.cs file named GetHyperLink, which will return the correct URL string. Use the following URL for more details on building ribbon customizations and, in particular, for figuring out what controls can be loaded there and the method signature of callbacks for their properties: http://msdn.microsoft.com/en-us/library/ee691833(office.14).aspx. Listing 7-8 shows our GetHyperLink callback method.
Example 7-8. The GetHyperLink Ribbon Callback
public string GetHyperLink(Office.IRibbonControl control)
{
  string url = "http://edhild3/sites/sales/Lists/ResumeTasks/AllItems.aspx";
  string filterTemplate = "?FilterField1=ProposalID&FilterValue1={0}";
  string id = Globals.ThisDocument.plainTextContentControl1.Text;
  if (id != string.Empty)
  {
    return url + string.Format(filterTemplate, id);
  }
  else
  {
    return url;
  }
}
The GetHyperLink method builds a URL to the résumé tasks list in the SharePoint site. Assuming the proposal has been saved to the site at least once, it will have a Document ID and therefore a ProposalID. We will show you later how to synchronize those values. If a ProposalID exists, we can access its value through the quick part content control that we added in the very beginning. We didn't name the control, so it is referenced here as plainTextContentControl1. Notice how we can filter the list for the user by specifying both the field to filter by as well as the filter value as query parameters in the URL. If this ProposalID content control does not have a value, we need our hyperlink to do something so we send the user to the résumé tasks default all items view.
Last but not least, we need to inform Word of our ribbon customization when the document-level project loads. This is accomplished with the code in Listing 7-9 which is placed in the ThisDocument.cs file. Figure 7-10 shows the end result of our customization alongside the versioning group on the Info tab.
Now that the proposal template tool is complete, we want to deploy it so that is available as the default template of the Proposals SharePoint library. Remember, though, since this is a document-level project, we are really talking about deploying the template.dotx file along with the assembly that has our VSTO customizations. Visual Studio Tools for Office solutions are usually deployed using ClickOnce, which means the user accesses the solution from a central location such as a web site or a file share. The solution installs the first time the user accesses the document, and then the application has the ability to reach back to this installation point to check for updates.
You may be skeptical about SharePoint as a deployment destination. SharePoint is not your typical web application and we really don't want assemblies treated as content in its databases. Storing the assembly outside of the content database is not a requirement, just more of a general practice. A more accurate description of what we are going to do is to deploy the solution through ClickOnce to a file share, but distribute the template.dotx file via SharePoint. This approach is valid since the template file maintains a reference to where its VSTO components were deployed. So our users will be able to access the document as they normally would and if it is the first time the file is accessed, it will reach back to the deployment file share to install the solution. This also increases the flexibility of the solution, as you could deploy the document to many different sites, but have a single point of maintenance for the code-behind assembly.
To get started, we need to first get our templateProject solution deployed. Right-click on the project and choose Properties. Within the Visual Studio dialog, as seen in Figure 7-11, select the Publish tab.

Now ClickOnce deployment is a topic that goes far beyond the scope of this book, so we include some references for you to do more research in the Further Reading section of this chapter. For now, we will just explain enough to get this project integrated with your SharePoint environment. In Figure 7-11, notice that we have specified a file share for the publishing location and the installation folder. For our approach of using the SharePoint library to deploy the solution, these should be the same. Please make sure this is actually a valid path in your environment. You will likely also want to change the default Updates option. Clicking the Updates button lets you set the application to check for updates every time it is loaded. This is useful if you expect to still be doing some debugging. Finally, click the Publish Now button to publish the VSTO solution, template.dotx file, and other application settings information to the shared folder.
Remember when we used SharePoint Designer to export the library's template file so we could use it to create the Visual Studio project? Use the same technique now, but import the template.dotx file that was placed in the deployment shared folder.
Chances are you need to adjust the Trust Settings in Microsoft Word before it will even attempt to load the solution. There are many different ways to establish trust, such as by location or publisher (using a signing certificate). Since location is the easiest to set up in a development environment, we will take that approach. Launch Microsoft Word and use the following steps to set up the trust settings.
Launch a new instance of Microsoft Word.
Click the File menu and choose Options.
Click Trust Center in the left-hand navigation.
Click Trust Locations in the left-hand navigation.
Check the checkbox at the bottom of the dialog to Allow Trusted Locations on My Network.
Click the Add New Location button.
Enter your deployment file share location (for our environment, this was
\edhild3deployed). Choose the checkbox so that Subfolders of this location are also trusted.Repeat the previous step for the SharePoint location where the
template.dotxfile is deployed. We simply added the root of the site collectionhttp://edhild3/sites/salesand selected to trust all the subfolders.Click OK twice.
Depending on your environment, you may also want to disable opening the document in Protected View. This is also done in the Trust Center settings of Microsoft Word. You should now be able to go to the SharePoint site and choose New Document, which will retrieve the template. Since this is the first time you are launching the customization from its deployment location, the installer for the customization will be launched. You will only see this step the first time. Subsequent requests simply check for updates. Your proposal template should now load along with your document actions pane.
Note
A few issues have surfaced in our development environment, making us have to run the setup.exe in the deployment folder as an additional step. From a clean client machine, this doesn't appear to be a problem, but just in case you are using a single virtual machine as both server and client, we thought it worth mentioning. Again, please look to the Further Reading section of the chapter if you want more ClickOnce and SharePoint deployment details.
In the next two sections of this chapter we'll focus on the event handlers that will respond to proposal documents being stored in the library and the résumé task requests being completed. Since we will be writing code against the lists in our SharePoint site, we will take a moment to generate a helper class to streamline the amount of code we need to write. SPMetal is a command line tool that generates code that is an alternative to the SharePoint object model. By default, the tool is located at C:Program FilesCommon FilesMicrosoft SharedWeb Server Extensions14BIN. Simply point it at a SharePoint team site and the resulting code file will contain strongly-typed entity classes for all of the site's lists and libraries as they are configured at the moment in time that you run the tool. This code is often easier to use than the SharePoint object model equivalents. The best example of this is querying the list for a specific item. Using the SharePoint object model, you could issue a query for specific items of a list using an XML-formatted CAML query such as the one in Listing 7-10. Notice that the query is just in the form of a string with no IntelliSense provided for structure, field names, or possible values.
Example 7-10. Querying for Specific List Items using CAML
SPList list = m_web.Lists["ResumeTasks"];
SPQuery query = New SPQuery();
query.Query = "<Where><Eq><FieldRef Name='ProposalID'/><Value
                          Type='Text'>12345</Value></Eq></Where>";
SPListItemCollection items = list.GetItems(query);
Instead, the entity classes created by SPMetal support LINQ. So the query in Listing 7-10 becomes less code to write, even easier to understand, and definitely less prone to spelling a field or value incorrectly. Listing 7-11 shows the transformed query, which also gets only the collection of the title fields we're interested in.
Example 7-11. Query for Specific List Items using SPMetal and Linq
using (EntitiesDataContext dc = new EntitiesDataContext(webUrl))
{
  var q = from resumetask in dc.ResumeTasks
          where resumetask.ProposalID == "12345"
          select resumetask.Title;
A developer would typically use SPMetal during the coding phase, running the tool and adding the generated file into the Visual Studio project. To run the tool, launch a command window and type a command similar to SPMetal /web:http://edhild3/sites/sales /code:ProposalEntities.cs /language:csharp. In this command we have specified three parameters. The first, web, specifies the site you'd like to use as the source. The generated code file will contain classes for working against a similarly structured site. In this case, we chose our team site where we are building the solution. The second parameter, code, specifies the name of the file you want the generated code to be placed in. This file will be placed in the same directory as the SPMetal tool. Once you have it, copy it and add it to the Visual Studio project we will create in the next section. The last parameter, language, specifies the .NET language you'd like the generated code to be in. There are many more parameters to this file and if you are going to be spending a lot of time coding against SharePoint data sources, we recommend spending some time to get to know all of its options. We have added a link in the Further Reading section of this chapter.
Note
It is important to realize that this code runs in the context of the developer running the command unless another user is specified as a parameter. Since SharePoint security trims what a user has access to, make sure the user running this tool actually has access to the data you are planning to code against.
In this next section of the walkthrough, we will add a new Visual Studio SharePoint project to the solution that will contain the event handlers that run in response to both the proposal being saved to the document library as well as a user completing her résumé task. With Visual Studio select to add a new project to the current solution. Under the C# language node, select SharePoint and then 2010 to display the SharePoint 2010 project templates.
From the listing of Visual Studio installed templates, select EventReceiver. Name the project ProposalEvents. Leave the default option of creating a new solution and confirm that the .NET framework drop-down at the top of the dialog is set to .NET Framework 3.5. Your New Project dialog should look like Figure 7-12.

Clicking OK will start the SharePoint Customization Wizard, which will ask a few questions about the solution you are going to build. The first dialog in this wizard asks for the SharePoint site you want Visual Studio to deploy to when you debug your code. Stick with the same site you used earlier in the chapter, http://edhild3/sites/sales.
You are also asked whether your solution is a farm or sandboxed solution. This alludes to security restrictions that will be placed on your solution and whether it is a part of the enterprise (farm) or a customization for a specific site collection (sandboxed). Since our code will be operating on files using Open XML, it falls outside the typical restrictions of sandboxed solutions, so choose the farm level option. The wizard's next screen asks how to bind your event handler. We will be starting with the code that generates the résumé tasks when the proposal is saved. In this case, we want to bind it to a List, so choose List Item Events. We then get to pick a particular list type—choose Document Library.
Note
You might be curious why we are not asked to specifically pick the Proposals document library. This is because, declaratively, we can only bind an event handler to a list type or content type. So our event handler will actually run in response to this action for any document library in the site. If you wanted to scope this down to a specific list or library, you would write code in a feature receiver so that upon activation, the feature binds the specific list and event handler. Another option would be to define the proposals as their own content type and bind the receiver that way. This approach is an Extension Point for the chapter.
Lastly, we get to select which events we wish to respond to. You will notice that most of these events either have "is being" or "was" in their description. This refers to whether you want your event handler to be called synchronously with the action or asynchronously after it has taken place. Since the generation of résumé tasks can happen after the document is saved, select both the An item was added and An item was updated options. Click Finish.
Once the new project is created, your solution will already have a few files by default, including an event receiver named EventReceiver1. Right-click and rename this to ProposalDocumentReceiver. When you expand this node, you will see an Elements.xml file, which has the registration information that this SharePoint customization is an event handler, the class that contains the code that should be run, and the events it is responding to. The class EventReceiver1.cs already has the ItemAdded and ItemUpdated events stubbed out for you.
Before jumping into the actual code that will parse the document and create the résumé tasks, let's get a few other things out of the way. First, don't forget to add the ProposalEntities class we created with SPMetal earlier. Also, there are a few assemblies we need to add references to:
WindowsBase: This assembly gives us access to the System.IO.Packaging namespace, which is used to open up Office files that use the Open XML file format.
DocumentFormat.OpenXml: This assembly is provided by the Open XML Format SDK 2.0. For this chapter we are using the March 2010 release, which you can download and install from:
http://msdn.microsoft.com/en-us/office/bb265236.aspx. DocumentFormat.OpenXml allows us to manipulate the content of the presentation without having to write XML nodes directly. The SDK provides an object model that is an abstraction from the actual XML, making our code easier to read and write.Microsoft.SharePoint.Linq: This assembly is included in the SharePoint install, though you may have to browse to it when adding the reference. Its default location is
C:Program FilesCommon FilesMicrosoft SharedWeb Server Extensions14ISAPIMicrosoft.SharePoint.Linq.dll. Microsoft.SharePoint.Linq allows us to query the list for specific items using LINQ instead of the old CAML used in previous versions of SharePoint. It is used by the SPMetal class we generated earlier.
Now that the appropriate references have been added, you can add the using statements into the event receiver code file we will be modifying. These statements are the key namespaces we will use in the code, and they keep us from having to fully qualify their class names. If you notice that the namespaces are not resolving, you may have missed adding a reference to an assembly. Listing 7-12 details the using statements that need to be added to the code-behind file of the class EventReceiver1.cs.
Example 7-12. Using Statements
using DocumentFormat.OpenXml.Wordprocessing;
using DocumentFormat.OpenXml;
using DocumentFormat.OpenXml.Packaging;
using System.Linq;
using System.Collections.Generic;
using System.Text;
using System.IO;
The code in the ItemAdded and ItemUpdated methods is almost identical. Looking at Listing 7-13, you see that we first make sure it is the Proposals library that we are working with. Had you bound the event handler with a content type or through a feature receiver, this would not have been necessary. We then retrieve a reference to the file and web we are working with and call the method where most of the work will happen—ProcessFile.
Example 7-13. Handling the ItemAdded Event for the Proposal Library
public override void ItemAdded(SPItemEventProperties properties)
{
  if (properties.List.Title != "Proposals") return;
  SPFile file = properties.ListItem.File;
  SPWeb web = properties.ListItem.Web;
  ProcessFile(file, web);
  base.ItemAdded(properties);
}
The ProcessFile method begins by addressing the fact that we really want the Document ID to be synchronized with our ProposalID field. You might think that, ideally, this should have happened as part of a synchronous event; however, the Document ID field simply isn't available for you to retrieve at that moment. Therefore, we have to perform this action in the after event, being very careful that we don't cause any events to run again as part of the change, or trigger the creation of any new versions. Listing 7-14 contains this part of the ProcessFile method. We determined this property's internal name by attaching Visual Studio's debugger and looking at the properties collection.
Example 7-14. Syncing the ProposalID and Document ID fields
if (!file.Name.EndsWith(".docx")) return;
this.EventFiringEnabled = false;
file.Item.Properties["ProposalID"] = file.Properties["_dlc_DocId"].ToString();
file.Item.SystemUpdate(false);
this.EventFiringEnabled = true;
Listing 7-14 starts by confirming that we are operating on a Microsoft Word document that has been saved using the Open XML file format. Using the EventFiringEnabled property allows us to make sure that this update of properties will not cause any new events to be raised. Notice that instead of updating the file, we are focused on the file's SharePoint item. This is because we are not changing the file itself, just its metadata. Using the SystemUpdate method with a false parameter tells the system not to create a new version as a result of the update. It is important to realize that we are only updating the property of the proposal document and not its body. This property will be retrieved by Microsoft Word upon opening and then displayed in our content control, but if the property isn't saved again, its value isn't really part of the document. This isn't much of an issue in this solution as we expect our sales person would still be working on the file as the résumés are coming in, but we wanted to make sure you clearly got the action that was being performed here.
The next portion of the ProcessFile method is going to tackle finding those content controls we placed under the Résumés heading so that we can create the correct tasks. The fact that we have saved this document using the Open XML file format allows us to perform this action without having to have Microsoft Word on the server. As explained in Chapter 4, the Microsoft Office desktop tools have switched from proprietary binary-formatted files to formats based on Open XML specifications. Now each file—whether it be a spreadsheet, presentation, or document—is really a package of parts and items. Parts are pieces of content for the file, whereas items are metadata describing how the parts should be assembled and rendered. Most of these pieces are XML files, making it possible for them to be manipulated through code. You can gain insight into the structure of an Open XML–based file by replacing its file extension with .zip, since the file is really an ordinary Zip archive. Figure 7-13 shows the root of the archive for a test proposal document.

The XML file in the root is named [Content_Types].xml and it stores content-type directives for all the parts that appear in the archive. A content type contains metadata about a particular part or groups of parts and, more importantly, contains a directive about how the application should render that part. For example, Listing 7-15 shows just a few lines from the file, but clearly delineates how the file tells the rendering application which parts are styles, relationships, settings, and even the main document.
Example 7-15. The Document's Content Types
<Default Extension="rels" ContentType="application/vnd.openxmlformats-package.relationships+xml"/> <Default Extension="xml" ContentType="application/xml"/> <Override PartName="/word/document.xml" ContentType="application/vnd.openxmlformats-officedocument.wordprocessingml.document.main+xml"/>
<Override PartName="/word/settings.xml" ContentType="application/vnd.openxmlformats-officedocument.wordprocessingml.settings+xml"/> <Override PartName="/word/styles.xml" ContentType="application/vnd.openxmlformats-officedocument.wordprocessingml.styles+xml"/>
Pay particular attention to the Override element for the part named /word/document.xml. This file contains the document's contents, and by inspecting it we can see the impact of tagging the document with the custom schema elements. Figure 7-14 shows the document.xml file in Visual Studio. We have collapsed a few of the XML nodes to focus in on one of the résumé request controls.

Notice that the entire portion of the control we are interested in is wrapped with an sdt (structured document tag) element, which is how the text content control is persisted in XML. There are a series of properties (sdtPr), which includes our name of the control (alias) as well as our tag. Later on, the actual content of the control is specified; this includes a paragraph containing our formatted text indicating whose résumé we want and the due date.
Now the good news is that if all this XML is making your eyes glaze over, help is on the way. Remember that the Open XML Format SDK we installed earlier is going to provide an object model that moves us up a layer from manipulating this XML directly. In addition, we will get LINQ support to make finding these nodes in the document relatively painless.
Moving back to the ProcessFile method, the code in Listing 7-16 opens the proposal document as a stream and uses the Open XML classes to declare a Word-processing document, letting us find the main document part. By using the alias property in the XML, we use a LINQ query to generate the list of résumé request controls. This LINQ query is looking for SdtBlocks within the document that have an alias property with the value of "Resume Request".
Example 7-16. Finding the Resume Requests in the Proposal
using (Stream stream = file.OpenBinaryStream())
{
  using (WordprocessingDocument wpDoc = WordprocessingDocument.Open(stream, true))
  {
    MainDocumentPart docPart = wpDoc.MainDocumentPart;
    DocumentFormat.OpenXml.Wordprocessing.Document doc = docPart.Document;
    //find all resume requests
    string alias = "Resume Request";
    List<SdtBlock> requests = new List<SdtBlock>();
    requests = (from w in doc.Descendants<SdtBlock>()
               where w.Descendants<SdtAlias>().FirstOrDefault() != null &&
               w.Descendants<SdtAlias>().FirstOrDefault().Val.Value == alias
               select w).ToList();
Once we have the list of controls, we then want to enumerate through them. For each one, we need to retrieve the GUID that was the unique identifier we put in the tag property of the control. We will use this as a RequestID for the tasks so we can tell if we already created a corresponding task in the résumé tasks list. The code in Listing 7-17 retrieves the tag property, then uses the SPMetal-generated ProposalEntitiesDataContext to look for any list items in the task list that may have that RequestID.
Example 7-17. Looking to See if a Resume Task Already Exists
foreach (SdtBlock request in requests)
{
 //get the tag for this request
 string tag = request.GetFirstChild<SdtProperties>().GetFirstChild<Tag>().Val.Value;

//is there a task list item with that GUID as a RequestID field
using (ProposalEntitiesDataContext dc = new ProposalEntitiesDataContext(web.Url))
{
  var resumeTasks = dc.GetList<Item>("ResumeTasks").Cast<ResumeTasksTask>();
  var foundTasks = from task in resumeTasks
                   where task.RequestID == tag
                   select task;
  if (foundTasks == null || foundTasks.Count<ResumeTasksTask>() == 0)
  {
If we don't find a task with the corresponding RequestID, then this is the first time we are seeing it in the proposal document and a task should be created. The code in Listing 7-18 creates a new task item, sets its properties, and persists it back to the ResumeTasks list. We perform some string manipulation to parse the text of the control in order to set the task properties appropriately. Notice that to resolve the user accounts, we simply look at the AllUsers collection of the web. This means that the users must have visited the site or been explicitly granted permission in order for this code to work. There are several different ways to try to resolve user accounts. Chapter 11 provides alternatives if you are interested.
Example 7-18. Creating a Resume Task
SPList resumeTaskList = web.Lists["ResumeTasks"]; SPListItem newTask = resumeTaskList.Items.Add(); newTask["Title"] = "Your resume is requested"; newTask["Body"] = "Please attach your latest resume for inclusion in a proposal"; //parse current content for assigned person and date string instruction = request.GetFirstChild<SdtContentBlock>().GetFirstChild<Paragraph>().GetFirstChild<Run>().GetFirstChild<Text>().Text; // Resume request for sampleadministrator due by 12/12/2009 string account = instruction.Substring(19, instruction.IndexOf(" ", 19) - 19); string dateDue = instruction.Substring(instruction.LastIndexOf(" ") + 1, instruction.Length - instruction.LastIndexOf(" ") - 1); SPUser person = web.AllUsers[account]; newTask["AssignedTo"] = person; newTask["DueDate"] = dateDue; newTask["ProposalID"] = file.Properties["_dlc_DocId"].ToString(); newTask["RequestID"] = tag; //save the task newTask.Update(); } } }
You have completed enough now to go ahead and deploy the ProposalEvents project. You can just right-click on the project and choose Deploy. Or, just running the project will deploy the feature to your site, activate it, and attach the debugger. Remember that your code will run for a brief period after a proposal has been successfully saved to the site. Be sure to check for résumé tasks as well as the setting of the ProposalID. Figure 7-15 shows the ResumeTasks list for the two requests we made in a test run.

Using what you learned in the previous section. Add an additional SharePoint 2010 event receiver to the ProposalEvents project named ProposalTaskReceiver. You can do this through the add new item option of the project. This event handler will be tied to the ItemUpdated event of task lists in the site. We only need the updated event this time since our earlier code is responsible for adding the task. We now need to respond when the user completes the task and attaches a résumé in the form of an Open XML-based Word document. Since much of code is concerned with checking to make sure the task is related to a proposal, the task is complete, and there is indeed a Word attachment, we won't include every line of code here. Again, please download the accompanying code for this chapter so you can follow along.
The code in Listing 7-19 starts the heavy lifting by retrieving the attached résumé as a stream and then uses the ProposalID field to query the Proposals library for the corresponding proposal document.
Example 7-19. Retrieve the Attachment and Find the Proposal Document
//retrieve attachment
string resumeAttachment = String.Empty;
resumeAttachment = properties.ListItem.Attachments.UrlPrefix +
                   properties.ListItem.Attachments[0];
SPFile resumeFile = properties.Web.GetFile(resumeAttachment);
//make sure it is a word document
if (resumeAttachment.EndsWith(".docx"))
{
  //get the proposal document
  SPFile proposalFile = null;
  using (ProposalEntitiesDataContext dc = new ProposalEntitiesDataContext(
     properties.WebUrl))
  {
     Microsoft.SharePoint.Linq.EntityList<ProposalsDocument> proposals =
        dc.GetList<ProposalsDocument>("Proposals");
     var found = from doc in proposals.ToList()
                 where doc.DocumentIDValue ==
                       properties.ListItem["ProposalID"].ToString()
                 select doc.Name;
     string name = found.First<String>();
     proposalFile = properties.Web.Folders["Proposals"].Files[name];
  }
Next, the method opens the proposal document as a stream and uses the Open XML Format SDK classes to access the main document part. The LINQ query shown in Listing 7-20 is then used to find the résumé request using the alias and the tag property, which needs to match the RequestID field of the task.
Example 7-20. Finding the Corresponding Resume Request Control in the Proposal
//find the resume request
string alias = "Resume Request";
List<SdtBlock> requests = new List<SdtBlock>();
requests = (from w in doc.Descendants<SdtBlock>()
            where w.Descendants<SdtAlias>().FirstOrDefault() != null &&
            w.Descendants<SdtAlias>().FirstOrDefault().Val.Value == alias &&
            w.Descendants<Tag>().FirstOrDefault() != null &&
            w.Descendants<Tag>().FirstOrDefault().Val.Value ==
                properties.ListItem["RequestID"].ToString()
            select w).ToList();
Once we have found the correct location for the résumé, we prepare for the insertion by creating an AltChunk. An AltChunk in Word is a way of inserting additional content without having the merge all the XML yourself. This is even more time-saving when you consider that the posted résumé might contain embedded object like images, smart art, and so forth that would only be referred to using relationships in the document part's XML. AltChunks do all the hard work for you. As you can see in Listing 7-21, we create a new AltChunk with a unique name, feed it the résumé using the résumé's stream, and then remove the request content control we had as a placeholder. This is the line of code that calls the Remove method. Since the résumé has been provided, there is no need to keep the placeholder around that told us of the request. The last two lines simply commit the changes we have made back to the stream of the proposal document.
Example 7-21. Inserting the Résumé into the Proposal
//build the addition
string chunkId = String.Format("AltChunkId{0}", properties.ListItemId.ToString());
AlternativeFormatImportPart chunk = docPart.AddAlternativeFormatImportPart
   (AlternativeFormatImportPartType.WordprocessingML, chunkId);
chunk.FeedData(resumeFile.OpenBinaryStream());
AltChunk altChunk = new AltChunk();
altChunk.Id = chunkId;
SdtBlock newBlock = new SdtBlock();
newBlock.AppendChild(altChunk);
requests[0].InsertBeforeSelf(newBlock);
//remove the request content control
requests[0].Remove();
//save the result
doc.Save();
wpDoc.Close();
Finally, we need to save the modified stream back to document in the proposals library. There is a bit of an issue in that the document could be locked while we are trying to make this change. The possibilities are: no lock at all, a shared lock, or an exclusive lock. An exclusive lock is placed on the file if a user has explicitly checked it out. A shared lock occurs if, say, the sales person still has the proposal open in Microsoft Word, but hasn't checked out the file. The reason for the shared lock is that Microsoft Word actually supports co-authoring. This is new functionality to the 2010 stack that allows multiple users to work on a Word document at the same time and, as they save back to the library, they pick up each other's changes. In this scenario, co-authoring is not really happening with another user, but rather with our code running on the server. It is worth pointing out that in a production system, you should probably code this portion as a workflow so you can set a timer and retry if there is an exclusive lock. This chapter is complex enough already, though, so let's go with the assumption that are sales people are trained not to check out proposals exclusively. (See Listing 7-22.) Redeploy the ProposalEvents project. Figure 7-16 shows a résumé merged back into the proposal.

Since our scenario involves sending this constructed proposal to a customer, we have to address the fact that it isn't appropriate to send the Word document because of its relationship to the VSTO solution. Even if we could strip away the assembly, it is not a given that the destination customer has the ability to read our Open XML-formatted file. Though it's possible to detach a VSTO customization (http://msdn.microsoft.com/en-us/library/bb772099(VS.100).aspx), it requires some more code and only solves half of the problem. Instead, we are going to use this opportunity to build a SharePoint workflow that leverages the new SharePoint 2010 Word Automation Services to create a PDF version of the document. Word Automation Services is server-side functionality that solves a key problem for enterprises related to doing bulk format conversions of files. Basically think of the ability to perform Save As operations on Word documents to other formats. This SharePoint Service is able to do this on sets of files, and to do it as a background process so it will not have a significant impact on the server. This is, of course, without having the Microsoft Word desktop application installed. We do need to write some code, however, to schedule our proposal document for conversion, and in this solution we have decided to encapsulate this functionality in a workflow. The choice of a workflow is a bit arbitrary, but looking at the big picture, this conversion would likely be the last step of a human-oriented approval process. We will add this workflow project to the solution that contained our other projects earlier. So right-click on the solution and choose to add a new project. Under the C# language node, select SharePoint and then 2010 to display the SharePoint 2010 project templates. From the list of Visual Studio installed templates, select the Sequential Workflow template. Name the project PublishToPDF. Your New Project dialog should look like Figure 7-17.

Clicking OK will start the SharePoint Customization Wizard. Specify the SharePoint site we have been working with (such as http://edhild3/sites/sales) and select a farm-level solution. Name the workflow PublishToPDF and, since this workflow will be operating on our proposal documents, select a List Workflow. The next screen configures the association of the workflow with the library. Be sure in the first drop-down to choose Proposals. The defaults for the other settings are fine. Since we are focused on building the solution in a development environment, on the next dialog, choose to allow the workflow only to be manually started. Click Finish and Visual Studio will add the project to the solution.
Once the new project is created, the solution will already have a few files by default. The Workflow1 node will be the focus of most of our attention. Workflows in Visual Studio are really a function of Windows Workflow Foundation and are presented in Visual Studio with a flow-chart type of design experience. There are entire books on Windows Workflow Foundation and, in fact, SharePoint-specific workflows so we will only provide enough information to complete the necessary tasks here. Chapter 11 has a larger focus on workflows and goes into much more detail.
Before jumping into the actual code that communicates with Word Automation Services, let's get a few other things out of the way. There are a few assemblies we need to add references to:
Microsoft.Office.Word.Server: This assembly gives us access Word Automation Services functionality. By default, it is located at
C:Program FilesCommon FilesMicrosoft SharedWeb Server Extensions14ISAPI. You may receive a warning about a version of the .NET Framework and the System.Web.DataVisualization. Just continue adding the reference; we will take care of that warning with the next few references.System.Web: This assembly is part of the .NET Framework and should show up in the .NET tab of the references dialog. Be sure to choose the version from the 2.0 framework. The runtime version should be version 2.0.50727.
System.Web.DataVisualization: Be careful adding this reference as we do not need the version of this assembly that ships as part of version 4.0 of the .NET Framework. Instead, we need to look for the one tied to version 3.5. It may be listed in your .NET Add Reference tab. If it is not, the good news is that this was part of the prerequisites for your SharePoint installation as it is required for the Chart controls. You should be able to find this assembly at
C:Program Files (x86)Microsoft Chart ControlsAssemblies. You only needSystem.Web.DataVisualization.dll, not the additional Design assembly.
Now that the appropriate references have been added, you can add the using statement for Word Automation Services into the code-behind file of Workflow1. This statement is: using Word = Microsoft.Office.Word.Server;
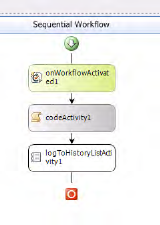
Figure 7-18 shows the design surface of the workflow you need to build. Basically, there are only two shapes that need to be added. A code activity shape will contain our code for communicating to the Word Automation Services functionality. You can find this shape in the Visual Studio toolbox under the Windows Workflow v3.0 heading. The second shape is SharePoint-specific. It is a LogToHistoryListActivity shape and can be found in the toolbox under the SharePoint Workflow heading. This shape allows us to record entries in the history list of the SharePoint site as a form of audit trail. If you look at the example in the code download, you'll see that this shape has a History Description property that we set to "Document submitted for conversion" in order to inform users that their request was received and recorded.
Double-clicking on the code activity will create an event handler for the code in Listing 7-23. The code begins by building a URL for the proposal document that we would like converted. A new conversion job object is then configured with a name, user context, and the source and destination file names. You might wonder how the service knows that we want a PDF file. The conversion job can automatically determine the output format by looking at the destination URL, which in our case ends in ".pdf". You can gain finer control over the conversion using a ConversionJobSettings object as described at http://msdn.microsoft.com/en-us/library/microsoft.office.word.server.conversions.conversionjobsettings_properties(office.14).aspx . Lastly, the conversion job is started, which requires us to run as the system account since the current user may not have enough permission to kick it off. Go ahead and deploy your workflow and manually start it on a test proposal.
Example 7-23. Code to Schedule Conversion using Word Automation Services
private void codeActivity1_ExecuteCode(object sender, EventArgs e)
{
  string file = workflowProperties.WebUrl + "/" + workflowProperties.ItemUrl;
  //schedule the conversion
  Word.Conversions.ConversionJob conversionJob = new
       Word.Conversions.ConversionJob("Word Automation Services");
  conversionJob.Name = "Proposal Conversion";
  //run under the user that ran the workflow
  conversionJob.UserToken = workflowProperties.OriginatorUser.UserToken;
  conversionJob.AddFile(file, file.Replace(".docx", ".pdf"));
  SPSecurity.RunWithElevatedPrivileges(delegate { conversionJob.Start(); });
}
It is important to realize that when this workflow completes, all we have done is successfully scheduled a task that informs Word Automation Services that it has work to do. In fact, you can go ahead and deploy the project and run the workflow on a proposal document. Don't be surprised that the workflow will report a completed status without a new PDF file showing up in your document library. This is because Word Automation Services runs on a schedule (default every 15 minutes) and won't create that PDF until its next execution time. This feature is to help keep this functionality from overwhelming server resources; however, it really impacts demonstrations. The good news is that you can manually tell this timer job to run. Use the following steps to make the job run on demand and you should get your PDF file. You could also do this via code or Windows PowerShell commands. Of course make sure you have Adobe Acrobat Reader installed if you want to open it.
Open SharePoint 2010's Central Administration.
Under the Monitoring heading, click Check job status.
Click Job Definitions in the left-hand navigation.
Locate the Word Automation Services Timer Job which may require you to page through the listing of jobs since they are in alphabetical order. Click the name of the timer job.
Click the Run Now button to force this service to process your conversion request.
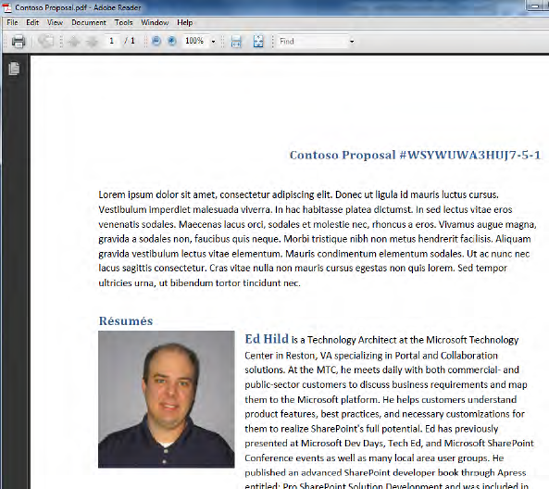
You should be able to see this job execute by looking at either the Running Jobs or Job History portions of this administration tool. When it is complete, you should have the PDF file shown in Figure 7-19.
This proposal document-assembly solution incorporated several key techniques that are worth highlighting as they can easily be reused in other projects.
- Content controls in the body of a document:
Content controls are a Microsoft Word feature that allow you to promote data into the body of the document. In this case, we used quick parts, which are already configured content controls for metadata properties of the document.
- VSTO document-level project:
In this solution we extended the document library's Microsoft Word template file with custom functionality that turned the document into a tool for building proposals. Since our extensions only make sense for the specific template, we created the solution as a document-level project. The extensions included a document actions pane as well as new backstage functionality.
- Event handlers that process the document using Open XML:
In this solution, we needed to parse the document on the server to look for résumé request controls whenever the document was saved or modified. SharePoint event handlers enabled us to respond to these events, and the Open XML SDK eased the task of querying through the XML of the file.
- SPMetal:
This solution used the SPMetal tool to construct entity classes for working with SharePoint site data. By using these classes, we were able to make LINQ-style queries on SharePoint lists and refer to fields of list items with IntelliSense. This resulted in fewer lines of code that were less error-prone.
- Merging document chunks into a central document:
This solution needed to be able to take résumés and inject them into the proposal document. This work had to be done on the server. We were able to use the AltChunks technique to streamline the necessary Open XML notation to perform the merge.
- Scheduling document conversions with Word Automation Services:
SharePoint 2010 has a new service that can perform scheduled conversions of Microsoft Word documents. In this solution we used a workflow as the scheduling mechanism.
While coding this example, we thought of several variations to the solution that we didn't incorporate. Mostly, these were not included because they distracted from the overall objective of the solution. We call them out now as extension points since they may be applicable to a specific project you are working on.
- Convert the résumé task event handler into the workflow:
In our example, we just created another event handler for merging the résumé into the proposal document since we had just taken a large part of the chapter to teach you the details of event handlers. The only issue is that the proposal document could potentially be exclusively locked by a user. You would need a way of waiting and retrying to get a successful shared lock. Changing this part of the solution into a workflow would be a way to accomplish this.
- Make the people-search web service call asynchronous:
Currently, the actions pane only uses a wait cursor as the method to inform the user that work is being performed. Also, all of the work is being performed on the same thread. A better approach would be to use the async version of the web service call and specify a delegate that should be called when the call is complete.
- Incorporate BCS quick parts from an external list:
You may well have some sort of CRM database whose data would be part of this proposal. You can use the business connectivity services functionality of SharePoint to register this repository and create an external list in the SharePoint site. By adding external data columns as metadata properties of the Proposals library, you would gain quick parts for embedding the external customer data into the document. Chapter 10 contains a good starting point for building this extension.
Here are a number of links to resources we think you'll find useful:
How to Query Search using the Web Service
http://www.dotnetmafia.com/blogs/dotnettipoftheday/archive/2008/07/17/how-to-query-search-using-the-web-service.aspxUsing SharePoint Web Services
http://www.obacentral.com/en/Learn/Recommended%20Reading/Using%20SharePoint%20Web%20Services.pdfAdding References for Word Automation Services
http://msdn.microsoft.com/en-us/library/ee559644(office.14).aspxVSTO Deployment via SharePoint
http://www.craigbailey.net/vsto-deployment-via-sharepoint/Word Automation Services
http://msdn.microsoft.com/en-us/library/ee558278(office.14).aspxBrian Jones: Open XML Formats Blog
http://blogs.msdn.com/brian_jones/Intro to Word XML
http://blogs.msdn.com/brian_jones/archive/2005/07/05/435772.aspxSPMetal
http://msdn.microsoft.com/en-us/library/ee538255(office.14).aspxOpenXMLDeveloper.org
http://openxmldeveloper.org/Introduction to the Office 2010 Backstage View for Developers
http://msdn.microsoft.com/en-us/library/ee691833(office.14).aspxCustomizing the Office 2010 Backstage View for Developers
http://msdn.microsoft.com/en-us/library/ee815851(office.14).aspxHow to Use altChunk for Document Assembly
http://blogs.msdn.com/ericwhite/archive/2008/10/27/how-to-use-altchunk-for-document-assembly.aspx