
With the release of SharePoint 2007, the product matured from a set of out-of-the-box features to a platform enterprises could build on and adapt to meet their exact needs. Successful platforms deliver value to an organization through a rich set of capabilities that can be extended and customized to align with key business processes and objectives. The quality of tooling to support development against the platform is a critical ingredient of this success as well. Development targeting SharePoint 2007 can be challenging at times, due largely to the lack of integrated and familiar tool support. SharePoint 2007 developers were required to hand-code large XML files, master multiple tools, and have deep understanding of the intricacies of the platform to perform even the simplest of tasks. Fortunately, SharePoint 2010 and Visual Studio 2010 together ease development significantly with features such as enhanced APIs, integrated tooling, and expanded deployment options that allow developers to focus more on the solution and less on the plumbing. In fact, there are so many new features, an entire book could easily (and likely will) be written on this topic alone.
For the professional developer, writing code is a critical aspect of the daily routine, and for many, it can even be a form of art and personal expression. Moreover, most developers hate to write the same code twice; we continually look for ways to be more productive and to accelerate development to bring our solution to market more quickly. As discussed in Chapter 2, SharePoint delivers a rich set of capabilities across six key workloads: Sites, Communities, Content, Search, Insights and Composites. SharePoint also provides a common foundation in support of these workloads to answer common crosscutting concerns, such as authentication and authorization, storage, scale, provisioning of services, and governance controls. SharePoint 2010 and the associated tools promote the increased productivity and accelerated development developers are looking for.
Some aspect of these six workloads will surface in most applications being developed today. For example, an approval process could be managed in SharePoint before orders are routed through an ERP system. The value in building such applications in whole or in part as SharePoint solutions is that you don't have to continually reinvent the wheel. By taking advantage of SharePoint as an application platform, you can focus your attention on the differentiating and business-value aspects of your solutions.
Windows SharePoint Services (WSS) 3.0 and SharePoint 2007 were released in late November of 2006, and while they offered developers an extremely rich platform on which to build some very compelling solutions, there was a gap—the toolset developers have come to expect and depend on when building .NET applications was limited and disjointed for projects targeting SharePoint. The initial development experience included manually editing XML files and running command-line tools and scripts for packaging and deployment. What the professional developer wanted and needed was the richness that Visual Studio provides, including IntelliSense and the familiar build, deploy, and debug process often referred to as the F5 experience.
In March of 2007, Microsoft released Visual Studio Extensions for WSS (VSeWSS) version 1.0 for Visual Studio 2005. The extensions provided SharePoint-specific project and item templates within Visual Studio as well as the familiar F5 behavior, but the experience was clunky compared with developing a typical ASP.NET application; still required lots of manual editing of XML files; and hid too much from the developer to the extent that some configuration files could not be accessed without breaking the project. And while the install package included a standalone application called the SharePoint Solution Generator that enabled developers to point to an existing site to generate a VSeWSS project based on the source site, many items, such as workflows, were not covered by the tool's examination of site elements.
In February of 2008, VSeWSS 1.1 was made available for download. The new version introduced several key enhancements based on community feedback, including a new Web Solution Package (WSP) view that provided access to files previously hidden from developers; the ability to create empty features; support for Visual Basic; additional item templates; and general bug fixes. Around this same time, many developers were transitioning to Visual Studio 2008, which was not supported by the 1.1 release though Visual Studio 2008 did introduce two workflow templates targeted for SharePoint as part of the standard install. A few months later, in June of 2008, the release of VSeWSS 1.2 provided version 1.1 capabilities for the Visual Studio 2008 developer.
The current and final build of VSeWSS is version 1.3. Version 1.3 was released as a community technology preview in March of 2009 with an update expected soon, this version is for Visual Studio 2008 only and includes several key enhancements such as 64-bit support; more granular control over the build process; command-line build commands that could be included in an automated software development lifecycle (SDLC) process; conflict resolution; and support for external assemblies. Going forward, VSeWSS 1.3 and Visual Studio 2008 are Microsoft's recommended solution for developers continuing to work with WSS 3.0 and SharePoint 2007.
So far, we have focused on the tools and guidance provided by Microsoft, but the solutions developed by the community in support of the SharePoint developer are definitely worth noting. A quick search for SharePoint on http://www.CodePlex.com, Microsoft's open source project hosting website, returns hundreds of results, many of which are both standalone solutions and extensions tied into the Visual Studio environment, all designed to make developers more productive. The importance of contributions from the community will continue even with the updated tooling provided in SharePoint and Visual Studio 2010.
Tooling aside for a moment, SharePoint 2010 delivers a number of enhancements further solidifying its place as a robust application platform.
For one, the options for architecting and building custom solutions targeting SharePoint have been greatly expanded. In addition to the server-side APIs available in SharePoint 2007, SharePoint 2010 introduces the concept of a Client Object Model (Client OM). The Client OM takes many of the same capabilities offered by the server-side APIs and exposes them outside the boundaries of the server, packaged as libraries for .NET, Silverlight, and JavaScript. SharePoint is then exposed to the client-side APIs via web services, Windows Communication Foundation (WCF) services, and REST-based interfaces. Moreover, until now, when it came to retrieving data from SharePoint, complex Collaborative Application Markup Language (CAML) queries were the only choice. Now LINQ support has been added, allowing developers to work with a much more familiar query language.
From a UI perspective, the most noticeable change is the Ribbon interface, which is now consistent across all the Office 2010 servers and clients. The Ribbon includes support for features such as contextual tabs and, of course, is extensible, allowing you to customize buttons and behaviors. In addition, enhancements around master pages, CSS processing, and a new theming engine enable you to more easily create a rich and intuitive user experience; a new AJAX-style page overlay dialog substantially reduces the need for full page roundtrips; and Silverlight is supported out of the box with the Silverlight Web Part.
On the deployment side, SharePoint 2010 continues to use WSPs as the packaging and deployment mechanism, but extends this model to answer a resounding need for isolation. Isolation is critical for multi-tenancy scenarios or even for cases where discrete development teams within the same organization are targeting a shared instance of SharePoint. This isolation is supported through sandboxed solutions that provide governance controls and the ability to deploy a WSP to a specific site collection, ensuring that code is unable to reach beyond the scope of the site collection. In addition, once our solutions are deployed, we need to ensure they are meeting performance expectations. For this, SharePoint 2010 introduces the Developer Dashboard (Figure 3-1) to provide insight into the processing and performance metrics for each page request. Developers have the option of enabling verbose tracing for step –by-step execution details.
These are just a few of the highlights. For a more detailed look at what is new for developers, you can browse to http://msdn.microsoft.com/en-us/sharepoint/ee514561.aspx.

While the platform enhancements are exciting and will greatly enhance productivity and flexibility when building solutions targeting SharePoint, the real news for the professional developer is the integration of the SharePoint tools into Visual Studio. When it comes to building tools for the professional developer, Microsoft's goal is to provide a productive environment by delivering a powerful and intuitive toolbox full of features like IntelliSense, visual designers, build and debugging support, rich project and item templates and wizards—in fact, all the tools we have come to expect and depend when we create a new Visual Studio project, regardless of the deployment target. This goal was a driving force behind the SharePoint tools for Visual Studio 2010; the key difference now is that the SharePoint tools are part of the Visual Studio release rather than a separate set of downloadable extensions. Just as was the case with VSeWSS, the SharePoint tools aim to abstract some of the complex implementation details from the developer, such as disregarding the structure of the 14 hive at design time and focusing more on logical groupings of related artifacts. Of course, developers always have direct access to the raw files when necessary.
Within Visual Studio 2008, developers were able to create SharePoint-specific sequential and state machine workflows, but this was the extent of the out-of-the-box template support. To those workflow templates, Visual Studio 2010 adds project template support for site definitions, list definitions, event receivers, content types, modules, visual Web Parts, Business Connectivity Services (BCS) models, and for creating a project by importing from an existing WSP or workflow. This last item is one of the most interesting—while the VSeWSS Solution Generator provided some ability to import from existing sources, the list of items available for import was limited. Selecting one of the new import project templates launches a wizard that lets a developer choose the site elements included in a WSP (which could be exported from an existing site) to be used to generate the initial project files. This could include conversion of declarative workflows, making a tool like SharePoint Designer a much more interesting option for prototyping before bringing a project into Visual Studio.
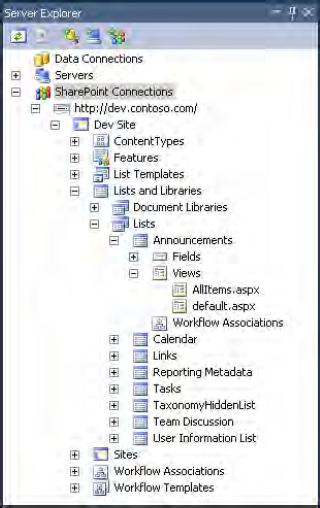
The most noticeable change is the support for visual design tools, providing a better experience around development and configuration of a SharePoint solution. By creating a visual Web Part, you no longer need to perform tasks such as adding controls in code. Package and feature configuration is now accomplished using the properties window and related designer, though the developer still has direct control over the generated XML. Package Explorer provides quick access to the structure of the WSP as it will be constructed by the packaging engine. Finally, Server Explorer (Figure 3-2) now natively supports SharePoint so browsing through and interacting with your local instance can be accomplished right inside Visual Studio.
We are limited only by our imagination. With the SharePoint 2007 release, the community built and shared some very compelling tools to support the SharePoint developer, and the expectation is the community will continue to do so to fill the void where gaps exist. To support this scenario, Visual Studio exposes an extensibility framework for the SharePoint tools, providing a mechanism for the community to continue to enrich the toolset while taking advantage of functionality provided out-of-the-box.
Developers will also be happy to hear that the ability to install and run all requirements for SharePoint 2010 development on a client OS is now supported, thus removing the need to develop in a virtual environment or install a server OS on your development machine. Support is provided for 64-bit versions of Vista SP1 (or greater) and Windows 7.
For additional information on the SharePoint tools delivered as part of Visual Studio 2010, see http://msdn.microsoft.com/en-us/library/ee330921(v=VS.100).aspx.
OK, enough talk about all the great new tooling. Let's build and deploy a custom feature using the new SharePoint tools in Visual Studio. For this example we will create a new SharePoint feature that, when activated, will change the associated site title to Hello World, as well as create a new button on the Library tab of the Ribbon within the context of document libraries. This will not be a complex coding exercise, but should give you enough hands-on experience with the toolset for you to feel comfortable with the exercises in the remaining chapters, as well as serve as a starting point for projects you create on your own. Use the following steps to create your Visual Studio 2010 SharePoint tools project:
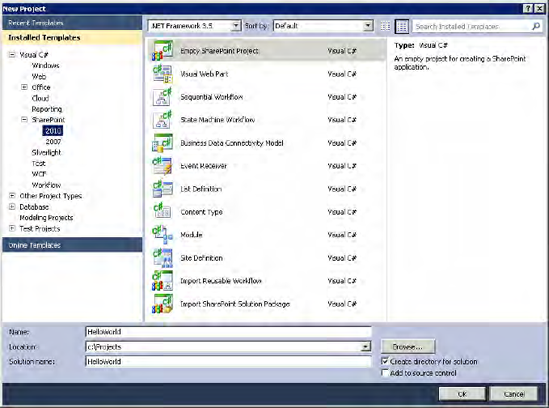
Launch Visual Studio 2010 and create a new project based on the SharePoint 2010 Empty Project template, which you can find by browsing the Installed Templates tree using the path Visual C#

Tip
You may need to open Visual Studio with elevated privileges in order for Visual Studio to properly attach to the SharePoint worker process when debugging. To do this, right click on the Visual Studio icon in the start menu and select Run as administrator.
Using the drop-down above the project types, ensure you are targeting the .NET Framework 3.5.
Name your project HelloWorld and leave the default choice of creating a new solution with the same name. Your completed New Project dialog should look similar to Figure 3-3. Click OK to continue.
Next the SharePoint Customization Wizard will prompt you for some additional information related to debugging and deployment. Enter the complete URL for the local site you will be using to debug this project and select the Deploy as a full-trust solution option as shown in Figure 3-4. Click Finish.

Your new project will be created with the appropriate references set, as well as the default files and folders as defined by the project template. By expanding the folders visible within the Solution Explorer, you should see a view similar to Figure 3-5. The Properties and References folders are common to all Visual Studio projects, whereas the Features and Package folders are specific to SharePoint projects. The SharePoint tools in Visual Studio provide an excellent mechanism for organizing SharePoint artifacts in a very logical way; we will add a few additional SharePoint-specific folders shortly.

To explore a bit further, right-click on the HelloWorld project node, and notice a few additional menu options specific to SharePoint projects. The Deploy, Package, and Retract options give you more granular control over what actions of the build process you want to perform, and in fact the deploy option can be fully customized by modifying configuration settings in the properties window for the project. Open the project properties window and click on the SharePoint tab to view and customize the deployment steps. If you look at the Add menu item for the project, you'll see options to create some of the additional SharePoint-specific folders, such as Images and Layouts. By selecting the SharePoint Mapped Folder... option, you can create and manage any of the folders in the SharePoint install directory (often referred to as the 14 hive) as part of the project using a simple and intuitive dialog to make your selection.
As previously mentioned, we want our feature to do two things when activated: change the title of the site and add a button to the Ribbon. The first task can be accomplished using an event receiver; the second requires a custom element. We will also want to reset all of our changes to their original state if the feature is deactivated. Let's begin by configuring a few properties of the Feature itself, then we will add an event receiver class and a custom elements file.
Note
A Feature in SharePoint is simply a logical container used to package related code, resources, and configuration files. SharePoint then provides a framework for deploying and managing each feature within the environment. You can find additional information about SharePoint Features at http://msdn.microsoft.com/en-us/library/ee537350(v=office.14).aspx.
In Solution Explorer, right-click the Features node and select Add Feature. This will create a new feature named Feature1 and open the Feature Designer window.
Right-click on Feature1, select Rename, and change the name to HelloWorldFeature. This will rename all associated files as well.
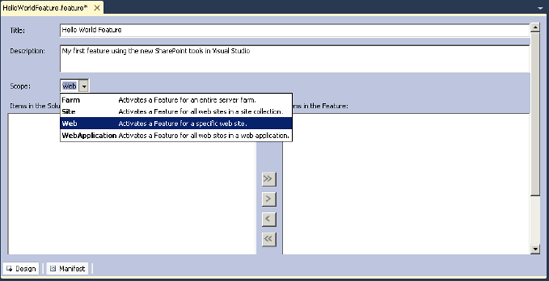
In the Feature Designer window modify the Title, Description and Scope using the following values:
Title: Hello World Feature
Description: My first feature using the new SharePoint tools in Visual Studio.
Scope: Web
When you're done, you should see a view similar to Figure 3-6.
Note
The Feature Designer window is one of the many visual designers provided as part of the SharePoint tools in Visual Studio. The visual designers allow you to update many of the settings without having to delve into the raw XML. Of course, you still have easy access to the XML by clicking on the Manifest tab in the lower left corner of the designer window for those cases when you require direct control over the XML.
Right-click HelloWorldFeature and select Add Event Receiver. A new class of type
SPFeatureReceiverwill be generated and opened in the code window. Make sure you don't change theGuidattribute value on the class as this is used during the packaging process to ensure this class is correctly associated with the Feature.The Event Receiver lets you execute code at any of four key points in the lifespan of a feature—when the feature is activated, deactivating, installed, or uninstalling. We are interested in executing code when the HelloWorldFeature is activated or deactivating, so uncomment the
FeatureActivatedandFeatureDeactivatingmethods and feel free to remove the remaining commented lines in the class file.Update the
FeatureActivatedmethod to read and store the existing site title and then to change the site title to Hello World using the code in Listing 3-1. This code will execute anytime the Feature is activated.Example 3-1. The updated FeatureActivated method
public override void FeatureActivated(SPFeatureReceiverProperties properties)
{
    SPWeb site = (SPWeb)properties.Feature.Parent; // current site
    site.Properties["SiteTitle"] = site.Title; // store the current title
    site.Properties.Update(); // save the updated property
    site.Title = "Hello World"; // set a new title
    site.Update(); // apply changes
}
Update the
FeatureDeactivatingmethod to restore the original site title value using the code in Listing 3-2. This code will execute anytime the Feature is deactivating.Example 3-2. The updated FeatureDeactivating method
public override void FeatureDeactivating(SPFeatureReceiverProperties properties)
{
    SPWeb site = (SPWeb)properties.Feature.Parent; // current site
    site.Title = site.Properties["SiteTitle"]; // restore origional title
    site.Update(); // apply changes
}
Right click on the HelloWorld project and select Add
The Empty Element template will create a new node RibbonElement in the HelloWorld project that contains a single XML file named Elements.xml. The
Elements.xmlfile should be open in the code window; if not, double-click the newly createdElements.xmlfile to view its contents. We will define a custom action within the element to create a new button on the Share & Track tab of the Ribbon. Update theElements.xmlfile to match the XML in Listing 3-3.Example 3-3. CustomAction XML for creating a new Ribbon button.
<?xml version="1.0" encoding="utf-8"?>
<Elements xmlns="http://schemas.microsoft.com/sharepoint/">
  <CustomAction
    Id="Ribbon.Library.Actions.AddAButton"
    Location="CommandUI.Ribbon"
    RegistrationType="List"
    RegistrationId="101">
    <CommandUIExtension>
      <CommandUIDefinitions>
        <CommandUIDefinition
          Location="Ribbon.Library.Share.Controls._children">
          <Button Id="Ribbon.Library.Share.HelloWorldButton"
            Command="HelloWorldButtonCommand"
            Image32by32="/_layouts/images/ppeople.gif"
            LabelText="Hello World"
            TemplateAlias="o2" />
        </CommandUIDefinition>
      </CommandUIDefinitions>
      <CommandUIHandlers>
        <CommandUIHandler
          Command="HelloWorldButtonCommand"
          CommandAction="javascript:alert('Say Hello to the World!')," />
      </CommandUIHandlers>
    </CommandUIExtension>
  </CustomAction>
</Elements>

For a detailed discussion of the XML elements and attributes related to developing Features, see the section titled Feature Schemas in the SharePoint SDK at http://msdn.microsoft.com/en-us/library/ms414322(v=office.14).aspx. The RibbonElement needs to be associated with a feature in order to be activated. Since we only have one feature in our project, this association should have been done automatically. To confirm, double-click the HelloWorldFeature to open the Feature Designer window and ensure the RibbonElement is included in the Items in the Feature pane on the right. As you can imagine, the Feature Designer window makes it much easier to manage complex projects containing multiple features and feature items since you can now manage these relationships without having to manually edit raw XML. We will look at a similar designer to manage the package shortly. Your HelloWorldFeature feature should look similar to Figure 3-8.

We are now ready to build, deploy, and debug our project. During this process, Visual Studio— along with the SharePoint tools— will perform a standard build to generate assemblies, package necessary project items into the WSP, recycle the appropriate IIS app pool, retract any prior deployments of the project, install the new WSP, activate any features contained in the WSP, attach the debugger to the process, and open a browser window directed to the site selected for debugging. Of course, you have full control over this process and can customize by changing the order of steps, adding or removing steps, or specifying pre/post deployment commands to execute.
Double click the Package folder in the Solution Explorer to open the Package Designer window and ensure the correct project items have been specified to be included in the WSP. You should see your HelloWorldFeature in the Items in the Package pane on the right. Your HelloWorld package should look similar to Figure 3-9. Notice you are able to add the RibbonElement by itself or, as in this case, as a component of the Feature.
Press F5 or select Start Debugging on the Debug menu to begin the build process. Use the Visual Studio output window to view feedback as each step of the build and deployment process is executed. If you aren't getting the feedback, make sure Build is selected in the Show output from dropdown in the output window. If this is the first time you have attempted to debug a project on the selected site, you will be prompted to enable debugging in the
Web.configfile.Note
By default, the deploy process will activate any features contained in your WSP. However, the activation occurs prior to attaching the debugger to the SharePoint process so breakpoints in a
FeatureActivatedmethod will not be hit. You can change this behavior by modifying the deployment configuration. To do so, right-click on your project and select Properties. In the project properties window, select the Deploy tab and change the Active Deployment Configuration to No Activation. This removes the activate step so you will need to manually activate your feature once the debugger is attached.Once the debugger has been attached to the process, a new browser window will open to the site. If you elected only to deploy and not debug the solution, open a browser window and browse to the site you specified at project creation. The site title for your site should now be Hello World.
To view the newly added Hello World button, browse to any document library in the site and select the Library tab of the Ribbon. Your Hello World button should be visible next to the RSS Feed button in the Share & Track group. Click the Hello World button to execute the JavaScript code and display the alert box. Figure 3-10 shows a view of the site after performing this action.


Visual Studio 2008 extensions for Windows SharePoint Services 3.0, v1.3
http://www.microsoft.com/downloads/details.aspx?displaylang=en&FamilyID=fb9d4b85-da2a-432e-91fb-d505199c49f6Debugging SharePoint Solutions
http://msdn.microsoft.com/en-us/library/ee231550(v=VS.100).aspxSharePoint Foundation building blocks
http://msdn.microsoft.com/en-us/library/ee534971(v=office.14).aspxUsing the SharePoint client APIs
http://msdn.microsoft.com/en-us/library/ee537564(v=office.14).aspx