
In this chapter, we go into more detail about the AOP features available in Spring. In particular, we look at the topic in a much more real-world light: we explore the framework services in Spring that allow for transparent application of AOP; we cover real-world usage of AOP in the context of the sample application; and we discuss overcoming the limitations of Spring AOP using Spring/AspectJ integration.
First, we'll cover @AspectJ. Spring 2.5 brings a new way of writing aspects; it automatically turns classes with specific annotations into Spring AOP aspects. The @AspectJ support allows you to very easily and cleanly define aspects. Because the @AspectJ aspects are Spring beans, you have full access to Spring's DI features.
Introductions, mentioned briefly in the previous chapter, allow you to add interface implementations dynamically to any object on the fly using the familiar interceptor concept. In this chapter, we'll cover these in more detail.
After introductions, we'll look at how the ProxyFactoryBean, the class at the heart of Spring AOP, can affect the behavior of your application. We explain the difference between direct and proxied calls.
Next, we'll cover integrating AspectJ, which is a full featured, statically compiled AOP implementation. The feature set of AspectJ is much greater than that of Spring AOP, but AspectJ is much more complicated to use. As mentioned in the previous chapter, AspectJ is a good solution when you find that Spring AOP lacks a feature you need (particularly when it comes to the various pointcut types).
Finally, we will take a look at how you can use aspect-oriented programming in your applications. We will ignore the usual choices (e.g., logging and security) and offer a more realistic example.
In order to run some of the examples in this chapter, you need to obtain AspectJ. You can download it from http://eclipse.org/aspectj. We used version 1.5.4 of AspectJ for the examples in this chapter.
@AspectJ has nothing to do with AspectJ; it is a set of Java 5 annotations that Spring uses to parse the pointcuts and advice. This also means that @AspectJ aspects have no dependency on AspectJ; they use pure Spring AOP. The @AspectJ support offers a very easy and convenient way to create aspects; some IDEs come with @AspectJ support, simplifying the process of creating aspects.
Let's begin by writing the infamous logging aspect in Listing 6-1. We will write a single piece of around advice for every method call on the TestBean class.
Example 6.1. Simple @AspectJ Aspect
@Aspect
public class LoggingAspect {

    @Around("execution(* com.apress.prospring2.ch06.simple.TestBean.*(..))")
    public Object log(ProceedingJoinPoint pjp) throws Throwable {
        System.out.println("Before");
        Object ret = pjp.proceed();
        System.out.println("After");
        return ret;
    }

}
The first annotation, @Aspect simply tells Spring to treat this bean as an aspect, that is, to extract the pointcuts and advice from it. Next, we have the @Around annotation with an AspectJ pointcut expression. The advice is very simple: it "logs" the start of the call to the method, proceeds to invoke the advised method, and finally "logs" the end of the method call. Next, let's create a sample application and the TestBean class (see Listing 6-2).
Example 6.2. The TestBean and Sample Application for the Aspect
// TestBean.java
public class TestBean {

    public void work() {
        System.out.println("work");
    }

    public void stop() {
        System.out.println("stop");
    }

}

// LoggingAspectDemo.java
public class LoggingAspectDemo {

    public static void main(String[] args) {
        ApplicationContext ac = new ClassPathXmlApplicationContext(
                "/META-INF/spring/ataspectjdemo1-context.xml"
        );
        TestBean testBean = (TestBean) ac.getBean("test");
        testBean.work();
        testBean.stop();
    }

}
Finally, we put in the last piece of the puzzle: the ataspectjdemo1-context.xml file in Listing 6-3.
Example 6.3. ApplicationContext Configuration File
<?xml version="1.0" encoding="UTF-8"?>
<beans xmlns="http://www.springframework.org/schema/beans"
       xmlns:xsi="http://www.w3.org/2001/XMLSchema-instance"
       xmlns:aop="http://www.springframework.org/schema/aop"
xsi:schemaLocation="http://www.springframework.org/schema/beans
http://www.springframework.org/schema/beans/spring-beans.xsd
http://www.springframework.org/schema/aop
http://www.springframework.org/schema/aop/spring-aop.xsd">
<bean id="test" class="com.apress.prospring2.ch06.simple.TestBean"/>
</beans>When we run the application, it gets the test bean and calls its work() and stop() methods, but the aspect doesn't seem to work. We have forgotten to enable the @AspectJ support, and we haven't declared the LoggingAspect as a Spring bean in Listing 6-3. Luckily, both these things are easy to do; in fact, all we have to do is update the ataspectjdemo1-context.xml file (see Listing 6-4).
Example 6.4. Modified ataspectjdemo1-context.xml
<?xml version="1.0" encoding="UTF-8"?>
<beans xmlns="http://www.springframework.org/schema/beans"
       xmlns:xsi="http://www.w3.org/2001/XMLSchema-instance"
       xmlns:aop="http://www.springframework.org/schema/aop"
       xsi:schemaLocation="
            http://www.springframework.org/schema/beans
            http://www.springframework.org/schema/beans/spring-beans.xsd
            http://www.springframework.org/schema/aop
            http://www.springframework.org/schema/aop/spring-aop.xsd">

    <bean id="test" class="com.apress.prospring2.ch06.simple.TestBean"/>
    <bean class="com.apress.prospring2.ch06.simple.LoggingAspect"/>
    <aop:aspectj-autoproxy />

</beans>
The bold lines show the critical points of the configuration. First, we define the aop namespace. Next, we declare the LoggingAspect as a regular Spring bean, and finally, we use the <aop:aspectj-autoproxy /> tag. The code behind the <aop:aspectj-autoproxy /> tag is responsible for post-processing all beans that have at least one piece of advice. Spring will create a proxy for all advised beans. When we run the application now, we will see that our logging advice gets called, and the application prints out the following:
Before
work
After
Before
stop
After
Notice that the aspect is a regular Spring bean, which means we can use Spring to set its dependencies. As an example, let's improve the LoggingAspect to include a custom message for the before and after log entries (see Listing 6-5).
Example 6.5. ImprovedLoggingAspect
@Aspect
public class ImprovedLoggingAspect {
    private String beforeMessage;
    private String afterMessage;
@Around("execution(* com.apress.prospring2.ch06.simple.TestBean.*(..))")
public Object log(ProceedingJoinPoint pjp) throws Throwable {
System.out.println(String.format(this.beforeMessage,
pjp.getSignature().getName(), Arrays.toString(pjp.getArgs())));
Object ret = pjp.proceed();
System.out.println(String.format(this.afterMessage,
pjp.getSignature().getName(), Arrays.toString(pjp.getArgs())));
return ret;
}
@PostConstruct
public void initialize() {
Assert.notNull(this.beforeMessage,
"The [beforeMessage] property of [" + getClass().getName() +
"] must be set.");
Assert.notNull(this.afterMessage,
"The [afterMessage] property of [" + getClass().getName() +
"] must be set.");
}
public void setBeforeMessage(String beforeMessage) {
this.beforeMessage = beforeMessage;
}
public void setAfterMessage(String afterMessage) {
this.afterMessage = afterMessage;
}
}Here, you can see that we are treating the aspect as a plain Spring bean: we have defined two properties and a @PostConstruct-annotated method. Listing 6-6 shows the modifications to the ataspectjdemo1-context.xml to use the ImprovedLoggingAspect.
Example 6.6. Modified ApplicationContext Configuration File
<?xml version="1.0" encoding="UTF-8"?>
<beans xmlns="http://www.springframework.org/schema/beans"
       xmlns:xsi="http://www.w3.org/2001/XMLSchema-instance"
       xmlns:aop="http://www.springframework.org/schema/aop"
       xsi:schemaLocation="
            http://www.springframework.org/schema/beans
            http://www.springframework.org/schema/beans/spring-beans.xsd
            http://www.springframework.org/schema/aop
            http://www.springframework.org/schema/aop/spring-aop.xsd">

    <bean id="test" class="com.apress.prospring2.ch06.simple.TestBean"/>
    <bean class="com.apress.prospring2.ch06.simple.ImprovedLoggingAspect">
        <property name="beforeMessage" value="Before %s %s"/>
        <property name="afterMessage" value="After %s %s"/>
    </bean>
    <aop:aspectj-autoproxy />

</beans>
When we run the application, we see that the new aspect is working; its properties are set to the values in the configuration file. The application now prints this:
Before work []
work
After work []
Before stop []
stop
After stop []
You can see that creating aspects is no more difficult than writing standard Java code. Most IDEs will also offer some assistance with the @AspectJ work (Figure 6-1 shows IDE support in IntelliJ IDEA 7).

In the next section, we will take a more detailed look at the @AspectJ support in Spring.
Now that we have written our first @AspectJ aspect, we need to take a more detailed look at its features. We need to take a look at how to create pointcuts (including best and recommended practices) and how we can write advice. Let's begin by looking at pointcuts; we will use @pointcut whenever we are going to reference an @Pointcut-annotated method. We will say @pointcut expression when we refer to the code used in the @Pointcut annotation. To illustrate this, take a look at the following code snippet:
@Pointcut("execution(* com.apress.prospring2.ch06.simple.TestBean.*(..))")
private void testBeanExecution() { }
In this snippet, the testBeanExecution method is an @pointcut, and "execution(* com.apress.prospring2.ch06.simple.TestBean.*(..))" is a pointcut expression.
In our first aspect, we have used a pointcut in the around advice. We have specified the pointcut expression as constant. If we wanted to create another advice using the same pointcut, we'd have to duplicate the pointcut expression constant. To prevent this duplication, we can use the @Pointcut annotation to create a pointcut. Let's modify our logging aspect to use the @pointcut (see Listing 6-7).
Example 6.7. Using the @Pointcut Annotation
@Aspect
public class LoggingAspectPC {
    private String beforeMessage;
    private String afterMessage;

    @Pointcut("execution(* com.apress.prospring2.ch06.simple.TestBean.*(..))")
    private void testBeanExecution() { }

    @Around("testBeanExecution()")
    public Object log(ProceedingJoinPoint pjp) throws Throwable {
        System.out.println(String.format(this.beforeMessage,
                pjp.getSignature().getName(), Arrays.toString(pjp.getArgs())));
        Object ret = pjp.proceed();
        System.out.println(String.format(this.afterMessage,
                pjp.getSignature().getName(), Arrays.toString(pjp.getArgs())));
        return ret;
    }

    @PostConstruct
    public void initialize() {
        Assert.notNull(this.beforeMessage,
           "The [beforeMessage] property of [" + getClass().getName() +
           "] must be set.");
        Assert.notNull(this.afterMessage,
            "The [afterMessage] property of [" + getClass().getName() +
           "] must be set.");
    }

    public void setBeforeMessage(String beforeMessage) {
        this.beforeMessage = beforeMessage;
    }

    public void setAfterMessage(String afterMessage) {
        this.afterMessage = afterMessage;
    }
}
The code in bold shows that we have created the testBeanExecution @pointcut with the expression execution(* com.apress.prospring2.ch06.simple.TestBean.*(..)). The log advice uses the @pointcut, but we can now add another advice using the same @pointcut. Listing 6-8 shows a fragment of the LoggingAspectPC that uses the same testBeanExecution @pointcut.
Example 6.8. Using the Same Pointcut
@Aspect
public class LoggingAspectPC {
    @Pointcut("execution(* com.apress.prospring2.ch06.simple.TestBean.*(..))")
    private void testBeanExecution() { }

    @Around("testBeanExecution()")
    public Object log(ProceedingJoinPoint pjp) throws Throwable {
        ...
    }

    @After("testBeanExecution()")
    public void afterCall(JoinPoint jp) {
System.out.println("After");
}
....
}The code in bold shows that we have used the same @pointcut in two pieces of advice. Also note that the @pointcut is private, which means that we can only use it within this class. Let's expand this example a bit further: we will create a common set of @pointcuts and then use those in our aspects. Because an @pointcut is simply a method with the @Pointcut annotation, we can create the SystemPointcuts class in Listing 6-9.
Example 6.9. The SystemPointcuts Class
public final class SystemPointcuts {

    private SystemPointcuts() {

    }

    @Pointcut("execution(* com.apress.prospring2.ch06.simple.TestBean2.*(..))")
    public void testBeanExecution() { }

    @Pointcut("within(com.apress.prospring2.ch06.simple.TestBean2)")
____public_void_fromTestBeanExecution()_{_}
}
Notice that we have made the class final and created a private constructor: because we intend this class only as a holder for the @pointcut methods, we want to prevent anyone from creating instances of this class. Next, Listing 6-10 shows that we can now use the SystemPointcuts in any number of advices.
Example 6.10. Usage of the Pointcuts from the SystemPointcuts Class
@Aspect
public class PointcutDemoAspect {

    @Around("SystemPointcuts.testBeanExecution()")
    public Object log(ProceedingJoinPoint pjp) throws Throwable {
        System.out.println("Before");
        Object ret = pjp.proceed();
        System.out.println("After");
        return ret;
    }

    @Around("SystemPointcuts.fromTestBeanExecution()")
    public Object inTestBean(ProceedingJoinPoint pjp) throws Throwable {
        System.out.println("In Test Bean>");
        Object ret = pjp.proceed();
        System.out.println("<");
        return ret;
    }

}
The code in bold shows that we use the @pointcut methods declared in the SystemPointcuts class. We will complete the example with the TestBean2 and SimpleBean classes, diagramed in Figure 6-2.
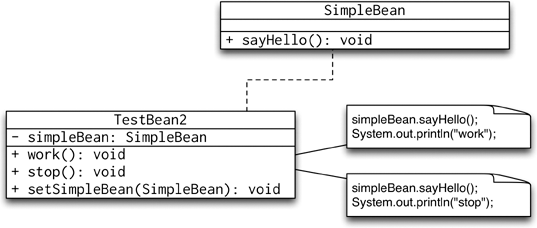
We create the ApplicationContext configuration file that defines the test and simple beans, and we inject the simple bean into the test bean (see Listing 6-11).
Example 6.11. ApplicationContext Confiuration File
<?xml version="1.0" encoding="UTF-8"?>
<beans xmlns="http://www.springframework.org/schema/beans"
       xmlns:xsi="http://www.w3.org/2001/XMLSchema-instance"
       xmlns:aop="http://www.springframework.org/schema/aop"
       xsi:schemaLocation="
            http://www.springframework.org/schema/beans
            http://www.springframework.org/schema/beans/spring-beans.xsd
            http://www.springframework.org/schema/aop
            http://www.springframework.org/schema/aop/spring-aop.xsd">

    <bean id="test" class="com.apress.prospring2.ch06.simple.TestBean2">
        <property name="simpleBean" ref="simple"/>
    </bean>
    <bean id="simple" class="com.apress.prospring2.ch06.simple.SimpleBean"/>
    <bean class="com.apress.prospring2.ch06.simple.PointcutDemoAspect"/>
    <aop:aspectj-autoproxy/>

</beans>
The example application uses the configuration file from Listing 6-11 and demonstrates that Spring applies the advices correctly according to the @pointcut methods. Because we wanted to demonstrate the within @pointcut, we have called the SimpleBean.sayHello() from outside TestBean2 (see Listing 6-12).
Example 6.12. Example Application for the SystemPointcuts Class
public class PointcutDemo {

    public static void main(String[] args) {
        ApplicationContext ac = new ClassPathXmlApplicationContext(
                "/META-INF/spring/ataspectjdemo2-context.xml"
        );
        TestBean2 testBean = (TestBean2) ac.getBean("test");
        SimpleBean simpleBean = (SimpleBean) ac.getBean("simple");
        testBean.work();
testBean.stop();
simpleBean.sayHello();
}
}When we run the example application, its output shows that Spring created the advised beans correctly. We have also used the execution and within @pointcut expressions. Let's now complete our discussion of @pointcut expressions by looking at available @AspectJ pointcut expressions.
Even though @AspectJ supports use of AspectJ syntax for pointcut expressions, Spring AOP does not support the entire range of AspectJ pointcuts. Table 6-1 summarizes the AspectJ pointcut expressions you can use in Spring AOP.
Table 6.1. @AspectJ Pointcut Expressions Supported in Spring AOP
Expression | Description |
|---|---|
| Matches method execution join points; you can specify the package, class and method name, its visibility, return type, and type of arguments. This is the most widely used pointcut expression. For example, |
| Matches join points when executed from the declared type. For example, |
| Matches join points by comparing the type of bean reference (the AOP proxy) with the specified type. For example, |
| Matches join points by comparing the type of bean being invoked with the specified type. |
| Matches join points by comparing the method argument types with the specified argument types. As an example, |
| Matches join points by checking that the target class of the invocation has the specified annotation. |
| Similar to |
| Similar to |
| Matches join points by checking the annotation on the method to be called with the specified annotation. For example, |
| Matches join points by comparing the bean's ID (or names); you can also use wildcards in the bean name pattern. An example might be |
You can combine pointcut expressions using the || (disjunction) and && (conjunction) operators and negate the expression using the ! (not) operator. You can apply these operators on both the @pointcut methods as well as the pointcut expressions. You can write pointcut expression directly (using code similar to Listing 6-13).
Example 6.13. Combining AspectJ Pointcut Expressions
execution(* com.apress.prospring2.ch06.simple.TestBean2.*(..))
&& within(com.apress.prospring2..*)
Alternatively, you can combine the @Pointcut-annotated methods with other @Pointcut-annotated method or a pointcut expression. The code in Listing 6-14 shows public @pointcuts same1, same2, and same3: the only difference among them is the code in the @Pointcut annotation.
Example 6.14. Combining the @Pointcut-Annotated Methods
public final class SystemPointcuts {

    private SystemPointcuts() {

    }

    @Pointcut("execution(* com.apress.prospring2.ch06.simple.TestBean2.*(..))")
    private void testBeanExec() { }

    @Pointcut("within(com.apress.prospring2..*)")
    private void withinProSpringPackage() { }

    @Pointcut("execution(* com.apress.prospring2.ch06.simple.TestBean2.*(..)) &&" +
            "within(com.apress.prospring2..*)")
    public void same1() { }

    @Pointcut("execution(* com.apress.prospring2.ch06.simple.TestBean2.*(..)) &&" +
            "withinProSpringPackage()")
    public void same2() { }

    @Pointcut("testBeanExec() && withinProSpringPackage()")
    public void same3() { }

}
Here, you can see that we have two private @pointcuts—testBeanExec and withinProSpringPackage—and that we use the private @pointcuts in the public @pointcuts same2 and same3. Before we take a look at how we can use the @pointcuts outside the @AspectJ infrastructure, we need to explore the pointcut expressions in more detail.
There are ten types of pointcut expressions; each type has its specific syntax. Even the execution expression, which seems fairly straightforward, can become quite complex when you make full use of its full syntax range.
The execution Expression
The syntax of the execution pointcut expression Spring uses is the same as the AspectJ execution syntax. Listing 6-15 defines the syntax formally.
Example 6.15. Formal Definition of the Execution Pointcut Expression Syntax
execution(modifiers-pattern?
    ret-type-pattern
    declaring-type-pattern? name-pattern(param-pattern)
    throws-pattern?)
The question mark (?) suffix marks the expression element as optional; in other words, we can leave it out. Let's analyze the * com.apress.prospring2.ch06.simple.TestBean2.*(..) expression we have already used: the * indicates any return type (ret-type-pattern) followed by a full class name (declaring-type-pattern). We follow the class name with another *(..), which means a method with any name and any number (including zero) and type of arguments. Because we did not specify the modifiers-pattern or the throws-pattern, Spring AOP will match methods with any modifiers and throwing any exceptions.
To declare a pointcut that matches any method (with any return type and any arguments, throwing any exception) in any class in a subpackage of com.apress.prospring2.ch06, we would need to write * com.apress.prospring2.ch06..*.*(..) . Analyzing the expression tells us to match a method with any name and any arguments (the last *()), returning any type (the first *) in any class (the middle *) in the package whose name starts with com.apres.prospring2.ch06 (notice the .. between the package name and class name). As a more realistic example, consider the pointcut expression in Listing 6-16.
Example 6.16. A More Realistic Pointcut Expression
public final class SystemPointcuts {

    private SystemPointcuts() {

    }

    @Pointcut("execution(* com.apress.prospring2.ch06..*.*(..)) &&" +
            "!execution(* com.apress.prospring2.ch06..*.set*(..)) &&" +
            "!execution(* com.apress.prospring2.ch06..*.get*(..))")
    public void serviceExecution() { }
    ...
}
You can probably guess what we will use the serviceExecution @pointcut for: we can use it in the tx:advice and make every method in all classes in the com.apress.prospring2.ch06.services package transactional, as long it is not a simple getter or setter. For simplicity, we say that a getter is a method whose name starts with get and takes no arguments, and a setter is simply any method whose name begins with set.
Tip
We prefer to use the @Transactional annotation to mark a method to be transactional; it is even simpler than using @pointcuts.
The within Expression
The within expression's formal syntax is far simpler than the syntax of the execution expression (see Listing 6-17).
You can use the usual .. and * wildcards; for example, to declare a pointcut that would match execution of any method invoked from within any class in the com package and its subpackages, you'd need to write within(com..*).
The this Expression
The syntax of the this pointcut expression is similar to the syntax of the within expression. The only difference is that we cannot use the .. and * wildcards: the semantics of the this pointcut are such that it would match any method execution on an object whose class matches the specified expression, but how could we match any class in the com package and its subpackages? Therefore, the only allowed syntax is this(class-name), for example, this(com.apress.prospring2.ch06.simple.TestBean2).
The target Expression
The syntax of the target expression is exactly the same as the syntax of the this expression. Because the target expression defines a pointcut that would match execution of any method on an object whose class matches the specified expression, we cannot use the wildcards. Therefore, the only valid syntax is target(class-name), for example, target(com.apress.prospring2.ch06.simple.SimpleBean).
The args Expression
The syntax of the args expression is args(type-pattern? (, type-pattern)*); in other words, we can specify zero, one, or more type-pattern expressions. It is important to note that while you can use the argument-pattern in the execution expression, the execution matching evaluates the formal argument types. The args expression matching evaluates the actual types of arguments passed to the method. As an example, take the class in Listing 6-18.
Example 6.18. The SimpleBean Class
public class SimpleBean {

    public void sayHello() {
        System.out.println("Hello");
    }

    public void x(CharSequence a, String b) {

    }

}
The pointcut execution(* SimpleBean.*(CharSequence, String)) would match calls to the method x("A", "B"), because the name and formal argument types match. However, the pointcut execution(* SimpleBean.*(String, String)) would not match, even if the call to the method uses two String arguments (and not a StringBuilder and String, for example). If we wanted to create a pointcut that matches calls to the x(CharSequence, String) method if and only if the actual argument types are String, String, we'll need to write args(String, String).
You can also use the .. wildcard in the type-pattern; to match calls to the method with the first argument of type Integer, followed by any number of arguments of any type and ending with a String argument, we'd write args(Integer, .., String).
The most common use of the args expression is in argument binding, which we will explore in the next section.
The @target Expression
The @target expression is another example of a simple expression that requires a full type name. Moreover, the type name should represent an @interface. Example uses of this expression are, therefore, @target(Magic) or @target(org.springframework.transaction.annotation.Transactional), where both Magic and Transactional are @interfaces with the @Retention(RetentionPolicy.RUNTIME) annotation and whose @Target annotations include ElementType.TYPE. The pointcut will match the call to all methods in the type with the annotation; to match methods with a particular annotation, use the @annotation expression.
The @within Expression
The @within expression requires a full @interface type name, and it will match calls to any methods originating from objects (or methods) with the specified annotation. As an example, we can write @within(StartsTransaction), where StartsTransaction is an @interface.
The @annotation Expression
Like the @target expression, the @annotation expression will match execution of any method with the specified annotation. A good example is @annotation(Transactional), which will match execution of any method with the Transactional annotation.
The @args Expression
The @args expression is similar to the args expression; the only difference is that it compares argument annotations rather than argument types. We can use this expression to match calls to methods with the specified annotated arguments. You can use the same wildcards as in the args expression.
The bean Expression
This last expression is truly Spring specific; it will match calls to all methods in a bean with an id or a name that matches the specified name. You can use the * wildcard in the bean name. To match calls to all methods in the simple bean, we'd write bean(simple); to match calls to all methods in beans whose id (or one of its names) ends with Service, we'd write bean(*Service).
Because the pointcuts defined using the @Pointcut annotation are Spring AOP-specific, we can use them even in the XML configuration. If we wanted to make all method executions in the TestBean2 participate in a transaction, we could use the SystemPointcuts.testBeanExecution() in the <aop:advisor . . ./> element. The XML configuration file in Listing 6-19 shows an example of this approach.
Example 6.19. Using the @Pointcuts in the XML Configuration File
<?xml version="1.0" encoding="UTF-8"?>
<beans xmlns="http://www.springframework.org/schema/beans"
       xmlns:xsi="http://www.w3.org/2001/XMLSchema-instance"
       xmlns:tx="http://www.springframework.org/schema/tx"
       xmlns:aop="http://www.springframework.org/schema/aop"
       xsi:schemaLocation="
            http://www.springframework.org/schema/beans
            http://www.springframework.org/schema/beans/spring-beans.xsd
            http://www.springframework.org/schema/aop
http://www.springframework.org/schema/aop/spring-aop.xsd
http://www.springframework.org/schema/tx
http://www.springframework.org/schema/tx/spring-tx.xsd">
<bean id="test" class="com.apress.prospring2.ch06.simple.TestBean2">
<property name="simpleBean" ref="simple"/>
</bean>
<bean id="simple" class="com.apress.prospring2.ch06.simple.SimpleBean"/>
<aop:config>
<aop:advisor advice-ref="tx-advice"
pointcut="com.apress.prospring2.ch06.simple. SystemPointcuts.testBeanExecution()"/>
</aop:config>
<bean id="transactionManager"
class="com.apress.prospring2.ch06.simple.NoopTransactionManager"/>
<tx:advice id="tx-advice" transaction-manager="transactionManager">
<tx:attributes>
<tx:method name="*" propagation="REQUIRED"/>
</tx:attributes>
</tx:advice>
</beans>
SystemPointcuts.testBeanExecution()"/>
</aop:config>
<bean id="transactionManager"
class="com.apress.prospring2.ch06.simple.NoopTransactionManager"/>
<tx:advice id="tx-advice" transaction-manager="transactionManager">
<tx:attributes>
<tx:method name="*" propagation="REQUIRED"/>
</tx:attributes>
</tx:advice>
</beans>Do not worry about the transactionManager bean and the tx:advice; the important portions of code are in bold. We define an advice (using the <aop:advisor . . ./> element); the advice is referencing the @Pointcut-annotated method from the SystemPointcuts class; the body of the advice is tx:advice. We give more detail about declarative transaction support in Spring in Chapter 16; for now, it is enough to say that the method execution will take part in a transaction, and the advice will commit the transaction if the method execution does not throw any exceptions; it will roll back the transaction if the target method throws any exception.
Now that we know how to write pointcut expressions (whether we use the @Pointcut-annotated methods or write the pointcut expressions directly in XML), we need to take a look at the types of advices we can use. We have already used an around advice (in the @Aspect example in Listing 6-1 and in the tx:advice in the XML configuration in Listing 6-19). We will cover the basic advices (before, after, after throwing, and around); we will then take a look at how we can access the arguments in the join point.
Before Advice
Let's begin with the before advice. As the name suggests, it runs before execution proceeds to the method's body, but unless we throw an exception, we cannot avoid the execution of the target method. This makes the before advices suitable for access control: we check whether the caller is allowed to call the target; if not, we throw an exception. Take a look at the UML class diagram in Figure 6-3, which shows the classes we are going to be using in the discussion of the before advice.
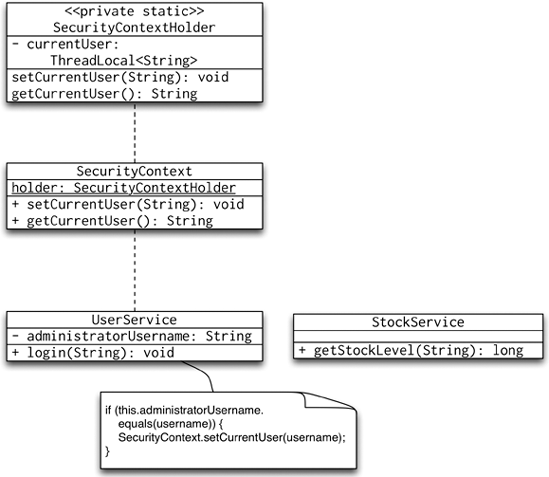
We now want to secure the StockService so that we can only call its methods after we have logged in. In fact, we'll say that we want to secure all classes in the com.apress.prospring2.ch06.services package so that we don't have to worry about security in the future. A naïve attempt at implementation of the before advice is in Listing 6-20.
Example 6.20. Naïve Implementation of the Before Advice
@Aspect
public class BeforeAspect {

    @Before("execution(* com.apress.prospring2.ch06.services.*.*(..))")
    public void beforeLogin() throws Throwable {
        if (SecurityContext.getCurrentUser() == null)
            throw new RuntimeException("Must login to call this method.");
    }

}
At first glance, this looks absolutely fine. To test the advice, we will combine the BeforeAspect with the XML configuration in Listing 6-21.
Example 6.21. The XML Configuration File for the Before Advice
<?xml version="1.0" encoding="UTF-8"?>
<beans xmlns="http://www.springframework.org/schema/beans"
       xmlns:xsi="http://www.w3.org/2001/XMLSchema-instance"
       xmlns:aop="http://www.springframework.org/schema/aop"
       xsi:schemaLocation="
            http://www.springframework.org/schema/beans
            http://www.springframework.org/schema/beans/spring-beans.xsd
            http://www.springframework.org/schema/aop
            http://www.springframework.org/schema/aop/spring-aop.xsd">

    <bean id="userService" class="com.apress.prospring2.ch06.services.UserService"/>
    <bean id="stockService"
        class="com.apress.prospring2.ch06.services.StockService"/>
    <bean class="com.apress.prospring2.ch06.before.BeforeAspect"/>

    <aop:aspectj-autoproxy_/>

</beans>
We have the BeforeAspect as a Spring bean, and we use the aspectj-autoproxy: we can therefore use the code from Listing 6-22 to access the advised services.
Example 6.22. Sample Application for the Before Advice
public class BeforeDemo {

    public static void main(String[] args) {
        ApplicationContext ac = new ClassPathXmlApplicationContext(
                "/META-INF/spring/beforedemo1-context.xml"
        );
        StockService stockService = (StockService) ac.getBean("stockService");
        System.out.println(stockService.getStockLevel("ABC"));
    }
}
When we run the application, it fails with a RuntimeException with the message "Must login to call this method." Great, it works! To test that we can call the service methods after logging in, we will add a call to get the UserService bean and call its login method. Listing 6-23 shows a code fragment that does just that.
Example 6.23. Code Fragment to Get the UserService and login
UserService userService = (UserService) ac.getBean("userService");
userService.login("janm");
The trouble is that the login method is also in a class in the services package; therefore, it is advised by the beforeLogin advice. Thus, we cannot log in, because we're not logged in. We'll need to modify our pointcut expression to exclude the login method. We can write the pointcut expression directly, but we're going to create two private @pointcut expressions and use them in the before advice's pointcut expression. Listing 6-24 shows how we've implemented the change.
Example 6.24. Change to the BeforeAspect
@Aspect
public class BeforeAspect {
@Pointcut("execution(* com.apress.prospring2.ch06.services.*.*(..))")
private void serviceExecution() { }
@Pointcut(
"execution(* com.apress.prospring2.ch06.services.UserService.login(..))")
private void loginExecution() { }
@Before("serviceExecution() && !loginExecution()")
public void beforeLogin() throws Throwable {
if (SecurityContext.getCurrentUser() == null)
throw new RuntimeException("Must login to call this method.");
}
}When we run the sample application now, it succeeds: we are allowed to call the UserService.login method even without being logged in, but we must be logged in to call all other methods.
After Returning Advice
As its name suggests, after returning advice runs after the target method finishes normally. To "finish normally" means that the method has not thrown any exceptions. The usual application for after returning advice is to perform auditing. Let's take the code in Listing 6-25, which shows after returning advice.
Example 6.25. After Returning Advice
@Aspect
public class AfterAspect {

    @AfterReturning("execution(* com.apress.prospring2.ch06.services.*.*(..))")
    public void auditCall() {
        System.out.println("After method call");
    }

}
This aspect defines one piece after returning advice for execution of all methods in all classes in the com.apress.prospring2.ch06.services package. To implement the sample application, let's begin the configuration file from Listing 6-26.
Example 6.26. XML Configuration File for the Sample Application
<?xml version="1.0" encoding="UTF-8"?>
<beans xmlns="http://www.springframework.org/schema/beans"
       xmlns:xsi="http://www.w3.org/2001/XMLSchema-instance"
       xmlns:aop="http://www.springframework.org/schema/aop"
       xsi:schemaLocation="
            http://www.springframework.org/schema/beans
            http://www.springframework.org/schema/beans/spring-beans.xsd
            http://www.springframework.org/schema/aop
            http://www.springframework.org/schema/aop/spring-aop.xsd">

    <bean id="userService" class="com.apress.prospring2.ch06.services.UserService"/>
    <bean id="stockService"
        class="com.apress.prospring2.ch06.services.StockService"/>
<bean class="com.apress.prospring2.ch06.afterreturning.AfterAspect"/>
<aop:aspectj-autoproxy />
</beans>Here, we define two service beans (the userService and stockService) and the AfterAspect bean. The anonymous AfterAspect bean contains our auditCall() after returning advice. We use this configuration file in the sample application that simply obtains the userService and stockService beans and uses their methods. The sample application's source code is in Listing 6-27.
Example 6.27. Sample Application for After Returning Advice
public class AfterDemo {

    public static void main(String[] args) {
        ApplicationContext ac = new ClassPathXmlApplicationContext(
                "/META-INF/spring/afterreturningdemo1-context.xml"
        );
        UserService userService = (UserService) ac.getBean("userService");
        userService.login("janm");

        StockService stockService = (StockService) ac.getBean("stockService");
        System.out.println(stockService.getStockLevel("ABC"));
    }

}
When we run this application, the output verifies that the auditCall after returning advice works; the application prints After method call, After method call, 193734. The problem is that the audit messages cannot access any details of the call: the advice, as we have written it, only knows that a method that matched the pointcut finished normally. We don't know which method it is, nor do we know the returned value. We can improve the advice by using the JoinPoint argument or by using the returning field of the @AfterReturning annotation. Listing 6-28 shows the first option—adding the JoinPoint argument to the advice method.
Example 6.28. Using the JoinPoint Argument
@Aspect
public class AfterAspect {

    @AfterReturning("execution(* com.apress.prospring2.ch06.services.*.*(..))")
    public void auditCall(JoinPoint jp) {
        System.out.println("After method call of " + jp);
    }

}
We can use the JoinPoint argument interface to find out details about the method that has just returned: perhaps the most interesting information we can obtain from the JoinPoint is the Method being executed and its arguments. The only trouble is that we can't use the JoinPoint to find the return value. To do this, we must stop using the JoinPoint argument and explicitly set the returning() and argNames() properties of the @AfterReturning annotation. Listing 6-29 shows the advice that can examine (and modify) the return value.
Example 6.29. Using the returning() and argNames() Properties
@Aspect
public class AfterAspect {

    @AfterReturning(
        pointcut = "execution(* com.apress.prospring2.ch06.services.*.*(..))",
        returning = "ret", argNames = "ret")
    public void auditCall(Object ret) {
        System.out.println("After method call of " + ret);
        if (ret instanceof User) {
            ((User)ret).setPassword("****");
        }
    }

}
Notice that we have defined the pointcut(), returning(), and argNames() properties of the @AfterReturning annotation to create much more powerful after returning advice. We can see the return value from the method call. We cannot change the returned value directly, but if the return type allows it, we can change the returned value's properties. This is similar to attempting to modify the value of a method argument and passing the modified value to the calling code.
After Throwing Advice
The next type of advice is after throwing, which executes when its target method throws an exception. As with the after returning advice, we can create advice that can have access to the thrown exception. Furthermore, the type of the exception in the advice's argument filters the exception type. Listing 6-30 shows an aspect that filters all IOExceptions thrown in the service calls.
Example 6.30. IOException After Throwing Advice
@Aspect
public class AfterThowingAspect {

    @AfterThrowing(
        pointcut = "execution(* com.apress.prospring2.ch06.services.*.*(..))",
        throwing = "ex", argNames = "ex")
    public void logException(IOException ex) {
        System.out.println("After method call of " + ex);
    }

}
The code in bold shows the most important areas of the advice: the throwing() property of the @AfterThrowing advice specifies the argument that will receive the exception, and the argNames() specifies the names of the arguments in the order in which they are declared. Now, when we run the sample application from Listing 6-31, it will fail, because the StockService.getStockLevel(String) method will throw a NullPointerException if the sku argument is null.
Example 6.31. Sample Application for the After Throwing Advice
public class AfterThrowingDemo {

    public static void main(String[] args) {
        ApplicationContext ac = new ClassPathXmlApplicationContext(
                "/META-INF/spring/afterthrowingdemo1-context.xml"
        );
        UserService userService = (UserService) ac.getBean("userService");
        userService.login("janm");

        StockService stockService = (StockService) ac.getBean("stockService");
        System.out.println(stockService.getStockLevel(null));
    }

}
Even though we have written after throwing advice (and configured the beans correctly in afterthrowingdemo1-context.xml), the advice does not get executed, because the type of the exception in its argument is IOException, not NullPointerException. If we change the advice's argument to Exception, it will work, printing the following.
... Exception in thread "main" java.lang.NullPointerException After method call of java.lang.NullPointerException at com.apress.prospring2.ch06.services.StockService.getStockLevel(StockService.java:9) ...
After Advice
The final type of after advice is the after or, more formally, finally advice. This executes regardless of whether the target method completes normally or throws an exception. However, we cannot access the method's return value or any exceptions it may have thrown. In most cases, you will use the finally advice to release resources, very much as you would in a try / catch / finally construct in Java.
Around Advice
The most powerful and most complicated advice is the around advice. It executes around the target method invocation. Therefore, the advice needs at least one argument, and it must return a value. The argument specifies the target being invoked, and the return value specifies the return value, regardless of where the return value comes from. You would typically find around advice in transaction management: the advice will begin a transaction before proceeding to call the target. If the target returns normally, the advice will commit the transaction; in case of any exceptions, it will perform a rollback. Another example is caching: the code in Listing 6-32 shows simple caching around advice.
Example 6.32. Around Advice for Caching
@Aspect
public class CachingAspect {
    private Map<MethodAndArguments, Object> cache =
            Collections.synchronizedMap(
                    new HashMap<MethodAndArguments, Object>());
    private Object nullValue = new Object();
private static class MethodAndArguments {
private Object target;
private Object[] arguments;
private MethodAndArguments(Object target, Object[] arguments) {
this.target = target;
this.arguments = arguments;
}
public boolean equals(Object o) {
if (this == o) return true;
if (o == null || getClass() != o.getClass()) return false;
MethodAndArguments that = (MethodAndArguments) o;
return Arrays.equals(arguments, that.arguments) &&
target.equals(that.target);
}
public int hashCode() {
int result;
result = target.hashCode();
result = 31 * result + Arrays.hashCode(arguments);
return result;
}
}
@Around("execution(* com.apress.prospring2.ch06.services.*.*(..))")
public Object cacheCalls(ProceedingJoinPoint pjp) throws Throwable {
Object cacheRet;
final MethodAndArguments methodAndArguments =
new MethodAndArguments(pjp.getTarget(), pjp.getArgs());
cacheRet = this.cache.get(methodAndArguments);
if (cacheRet == this.nullValue) return null;
if (cacheRet == null) {
Object ret = pjp.proceed();
cacheRet = ret;
if (cacheRet == null) cacheRet = this.nullValue;
this.cache.put(methodAndArguments, cacheRet);
return ret;
}
return cacheRet;
}
}The cache implemented in this aspect is definitely not an enterprise-grade cache, but it will demonstrate the around advice quite nicely. It takes the ProceedingJoinPoint argument and returns an Object; the argument gives everything we need to know about the execution of the target method, and the calling code will receive the value returned from the advice.
You may be wondering whether we must invoke the target method at all or whether we can invoke it more than once; the answer is yes. We can do anything we wish in the advice: we can implement advice that can handle retries, attempting to call the target three times before giving up. Or, as you have seen in Listing 6-32, we can skip the call to the target completely!
You may have noticed that we sometimes need to access the values of the arguments passed to the target from the advice. So far, you have only seen explicit access to the return value; you can also use the JoinPoint.getArgs to access the arguments. While this is possible, it feels like too much work, because the arguments are passed in as an Object[], and we would have to perform bounds checking and casting ourselves. Luckily, @AspectJ supports binding, where we can bind a value from the target to an argument in the advice. As an example, let's take a look at the code in Listing 6-33.
Example 6.33. An Aspect with Bound Arguments
@Aspect
public class BindingAspect {

    @Around(value =
            "execution(* com.apress.prospring2.ch06.services.StockService.*(..)) " +
            "&& args(cutoffDate, minimumDiscount)",
            argNames = "pjp, cutoffDate, minimumDiscount")
    public Object discountEnforcement(ProceedingJoinPoint pjp, Date cutoffDate,
                                      BigDecimal minimumDiscount)
            throws Throwable {
        return pjp.proceed();
    }
}
Here, we can see that the discountEnforcement advice will execute on execution of any method in the StockService class (the execution clause), as long as it has two arguments (the args clause) and as long as the type of the cutoffDate argument's type is Date and the minimumDiscount argument's type is BigDecimal (inferred from the advice method arguments). In addition to the two arguments passed in from the target, the advice method will receive the ProceedingJoinPoint instance. Also note the argNames() property of the @Around annotation: it explicitly specifies that the advice method's arguments are named pjp, cutoffDate, and minimumDiscount. The Spring AOP infrastructure will use the argNames() to decide which argument gets the bound value from the pointcut expression.
Note
The reason for the argNames() method's existence is that, once Java source code is compiled into bytecode, determining the argument names is impossible; we can obtain only their indexes and types. However, we refer to the argument names in pointcut and bind expressions; the argNames() method, therefore, represents a mechanism that can resolve an argument name to its index.
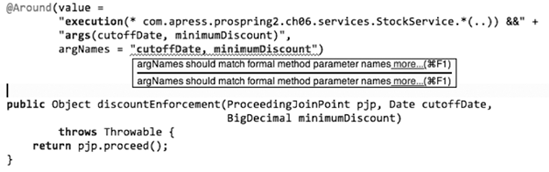
Even though you can leave out the JoinPoint (and its subinterfaces) from the argNames() property if it appears as the first argument of the advice method, we do not recommend doing so. Forgetting that the JoinPoint needs to be the first argument is far too easy; in addition, some IDEs will report errors if the names in argNames do not match the advice method's arguments (see Figure 6-4).
If you find that argNames is a bit clumsy, you do not have to specify it, and Spring AOP will use the debug information in the class files to determine the argument names. This is usually not enabled by default, but you can turn on argument names debug information using the -g:vars javac directive. Apart from allowing Spring AOP to determine the argument names, it will slightly increase the size of the compiled *.class files, which is usually not a problem at all.
More significant problems may be that the *.class files compiled with the -g:vars directive will be more readable when decompiled and that the compiler will not be able to apply an optimization to remove unused arguments. If you are working on an open source application, the first problem should not trouble you at all; the second problem is also moot if you write your code carefully and do not leave in unused arguments. If your class files do not have the necessary debugging information, Spring will attempt to match the arguments using their types. In our example in Listing 6-33, Spring can easily do this matching: ProceedingJoinPoint does not share a class hierarchy with either Date or BigDecimal. Similarly, Date and BigDecimal are different classes. If Spring cannot safely match the arguments using their types (for example, the advised method takes the ProceedingJoinPoint as its argument), it will throw an AmbiguousBindingException.
Introductions are an important part of the AOP feature set available in Spring. By using introductions, you can add new functionality to an existing object dynamically. In Spring, you can introduce an implementation of any interface to an existing object. You may well be wondering exactly why this is useful—why would you want to add functionality dynamically at runtime when you can simply add that functionality at development time? The answer to this question is easy. You add functionality dynamically when the functionality is crosscutting and thus not easily implementable using traditional object-oriented programming.
The Spring documentation gives two typical examples of introduction use: object locking and modification detection. In the case of object locking, which is implemented in the Spring documentation, we have an interface, Lockable, that defines the method for locking and unlocking an object. The intended application for this interface involves enabling the application to lock an object so that its internal state cannot be modified. Now, you could simply implement this interface manually for every class you wish to make lockable. However, this would result in a lot of duplicated code across many classes. Sure, you can refactor the implementation into an abstract base class, but you lose your one shot at concrete inheritance, and you still have to check the lock status in every method that modifies the state of the object. Clearly, this is not an ideal situation and has the potential to lead to many bugs and no doubt some maintenance nightmares.
By using introductions, you can overcome all of these issues. Using an introduction, you can centralize the implementation of the Lockable interface into a single class and, at runtime, have any object you wish adopt this implementation of Lockable. Not only does the object adopt the implementation of Lockable but it becomes an instance of Lockable in that it passes the instanceof test for the Lockable interface, even though its class does not implement this interface.
Using introductions obviously overcomes the problem of centralizing the implementation logic without affecting the concrete inheritance hierarchy of your classes, but what about all the code you need to write to check the lock status? Well, an introduction is simply an extension of a method interceptor, and as such, it can intercept any method on the object on which the introduction was made. Using this feature, you could check the lock status before any calls are made to setter methods and throw an Exception if the object is locked. All of this code is encapsulated in a single place, and none of the Lockable objects need to be aware of this.
Introductions are key to providing declarative services in applications. For instance, if you build an application that is fully aware of the Lockable interface, by using introductions, you declaratively define exactly which objects should be made Lockable.
We won't be spending any more time looking at the Lockable interface and how to implement it using introductions, because this is fully discussed in the Spring documentation. Instead, we focus on the other, unimplemented, example from the documentation—object modification detection. However, before we start, we will take a look at the basics behind building an introduction.
Call Tracking with Introductions
Object modification detection is a useful technique for many reasons. Typically, you apply modification detection to prevent unnecessary database access when you are persisting object data. If an object is passed to a method for modification but comes back unmodified, there is little point in issuing an update statement to the database. Using a modification check in this way can increase application throughput, especially when the database is already under a substantial load or is located on some remote network making communication an expensive operation.
Unfortunately, this kind of functionality is difficult to implement by hand, because it requires you to add to every method that can modify object state to check if the object state is actually being modified. When you consider all the null checks that have to be made and the checks to see if the value is actually changing, you are looking at around eight lines of code per method. You could refactor this into a single method, but you still have to call this method every time you need to perform the check. Spread this across a typical application with many different classes that require modification checks, and the maintenance of such an application will become much more difficult.
This is clearly a place where introductions will help. We do not want to have to make it so each class that requires modification checks inherits from some base implementation, losing its only chance for inheritance as a result, nor do we really want to be adding checking code to each and every state-changing method. Using introductions, we can provide a flexible solution to the modification detection problem without having to write a bunch of repetitive, error-prone code.
In this example, we are going to build a statistics collection framework using introductions. The modification check logic is encapsulated by the CallTracker interface, an implementation of which will be introduced into the appropriate objects, along with interception logic to perform modification checks automatically.
The CallTracker Interface
Central to the statistics solution is the CallTracker interface, which our fictional application uses to track its health. We do not look at how the application would use CallTracker; instead, we focus on the implementation of the introduction. Listing 6-34 shows the CallTracker interface.
Example 6.34. The CallTracker Interface
public interface CallTracker {

    void markNormal();

    void markFailing();

    int countNormalCalls();

    int countFailingCalls();

    String describe();

}
Nothing special here—the mark* methods simply increase a counter of normal or failing calls, and the count* methods return the appropriate counter value.
Creating a Mix In
The next step is to create the code that implements CallTracker and is introduced to the objects; this is referred to as a mix in. Listing 6-35 shows the implementation of the CallTracker interface; again, the implementation does nothing difficult.
Example 6.35. The DefaultCallTracker Class
public class DefaultCallTracker implements CallTracker {
    private int normalCalls;
    private int failingCalls;

    public void markNormal() {
        this.normalCalls++;
    }

    public void markFailing() {
        this.failingCalls++;
    }

    public int countNormalCalls() {
        return this.normalCalls;
    }

    public int countFailingCalls() {
        return this.failingCalls;
    }

    public String describe() {
        return toString();
    }

    @Override
    public String toString() {
        final StringBuilder sb = new StringBuilder();
        sb.append("DefaultCallTracker");
        sb.append("{normalCalls=").append(normalCalls);
        sb.append(", failingCalls=").append(failingCalls);
sb.append('}'),
return sb.toString();
}
}The first thing to notice here is the implementation of CallTracker, which is made up of the private normalCalls and failingCalls fields. This example highlights why you must have one mix in instance per advised object: the mix in introduces not only methods to the object but also a state. If you share a single instance of this mix in across many different objects, you are also sharing the state, which means all objects show as modified the first time a single object becomes modified.
Creating the Mix-In Aspect
The next step is to create an aspect that will include the after returning and after throwing advice as well as the mix-in declaration. Listing 6-36 shows the code we have written.
Example 6.36. Creating Advice for the Mix In
@Aspect
public class CallTrackerAspect {

    @Pointcut("execution(* com.apress.prospring2.ch06.services.*.*(..))")
    private void serviceCall() { }

    @DeclareParents(
        value = "com.apress.prospring2.ch06.services.*",
        defaultImpl = DefaultCallTracker.class)
    public static CallTracker mixin;

    @AfterReturning(
        value = "serviceCall() && this(tracker)",
        argNames = "tracker")
    public void normalCall(CallTracker tracker) {
        tracker.markNormal();
    }

    @AfterThrowing(
        value = "serviceCall() && this(tracker)",
        throwing = "t",
        argNames = "tracker, t")
    public void failingCall(CallTracker tracker, Throwable t) {
        tracker.markFailing();
    }

}
The new code in this aspect is the @DeclareParents annotation for the mixin field; it declares that for all classes in com.apress.prospring2.ch06.services we will introduce the CallTracker interface (the type of the field) using the DefaultCallTracker implementation.
Next, we define an @pointcut serviceCall() (because we will use it in the two separate pieces of advice).
Then, we create the after returning advice using the pointcut serviceCall() && this(tracker). The serviceCall() references to the @pointcut, and this(tracker) will match execution of all methods on an object that implements the CallTracker interface (because the type of the tracker expression is CallTracker in the advice method argument). Spring AOP will bind the tracker argument to the advised object; therefore, we can use the tracker argument in the advice body.
Finally, we write the after throwing advice using the same pointcut expression (serviceCall() && this(tracker)); Spring AOP will bind the tracker argument to the argument of the failingCall advice method. In addition to the CallTracker argument, we define in the @AfterThrowing annotation that we want to receive the exception thrown as the second argument of the failingCall method. Spring AOP infers the type of the exception from the type of the argument (Throwable, in this case).
Putting It All Together
Now that we have the aspect that introduces the mix in and the appropriate advice, we can write a sample application that uses the UserService and StockService beans we have already implemented. Listing 6-37 shows the source code of the sample application.
Example 6.37. The Introductions Sample Application
public class IntroductionDemo {

    public static void main(String[] args) {
        ApplicationContext ac = new ClassPathXmlApplicationContext(
                "/META-INF/spring/introductionsdemo1-context.xml"
        );
        UserService userService = (UserService) ac.getBean("userService");
        describeTracker(userService);
        userService.login("janm");
        userService.setAdministratorUsername("x");
        describeTracker(userService);

        StockService stockService = (StockService) ac.getBean("stockService");
        describeTracker(stockService);
        try {
            stockService.getStockLevel(null);
        } catch (Exception ignored) {

        }
        System.out.println(stockService.getStockLevel("ABC"));
        stockService.applyDiscounts(new Date(), new BigDecimal("10.0"));
        describeTracker(stockService);
    }

    private static void describeTracker(Object o) {
        CallTracker t = (CallTracker)o;
        System.out.println(t.describe());
    }

}
Notice that we are using the userService and stockService beans as usual: we call userService.login("janm"), followed by userService.setAdministratorUsername("x"); calls to the stockService bean are similar. However, we can now cast the userService and stockService beans to CallTracker; they now implement the newly introduced interface. We are sure you won't be too surprised to learn that we did not need to write any additional configuration apart from the standard XML configuration file in Listing 6-38.
Example 6.38. XML Configuration File for the Introductions Demonstration
<?xml version="1.0" encoding="UTF-8"?>
<beans xmlns="http://www.springframework.org/schema/beans"
       xmlns:xsi="http://www.w3.org/2001/XMLSchema-instance"
       xmlns:aop="http://www.springframework.org/schema/aop"
       xsi:schemaLocation="
            http://www.springframework.org/schema/beans
            http://www.springframework.org/schema/beans/spring-beans.xsd
            http://www.springframework.org/schema/aop
            http://www.springframework.org/schema/aop/spring-aop.xsd">

    <bean id="userService"
        class="com.apress.prospring2.ch06.services.DefaultUserService"/>
    <bean id="stockService"
        class="com.apress.prospring2.ch06.services.DefaultStockService"/>
    <bean class="com.apress.prospring2.ch06.introductions.CallTrackerAspect"/>

    <aop:aspectj-autoproxy />

</beans>
That is really all we needed to do. Spring AOP will proxy the DefaultUserService and DefaultStockService. Let's examine the DefaultUserService in more detail: it implements only the UserService, but the type of the userService bean after applying the CallTrackerAspect is JdkDynamicAopProxy—it is not an instance of the DefaultUserService. The proxy implements both the UserService interface and CallTracker mix-in interface. It intercepts calls to all methods and delegates the calls on the UserService interface to the DefaultUserService. The proxy also creates an instance of the DefaultCallTracker (defined in the @DeclareParents annotation) and delegates all calls on the CallTracker interface to the DefaultCallTracker instance.
The output from running the sample application should therefore come as no surprise:
before userService.login("janm"):
    DefaultCallTracker{normalCalls=0, failingCalls=0}

after userService.setAdministratorUsername("x"):
    DefaultCallTracker{normalCalls=2, failingCalls=0}

before stockService.getStockLevel(null):
    DefaultCallTracker{normalCalls=0, failingCalls=0}
193734

after stockService.applyDiscounts(...):
    DefaultCallTracker{normalCalls=2, failingCalls=1}
This output verifies that the CallTracker interface introduced to all classes in the com.apress.prospring2.ch06.services package worked and that we got one instance of the DefaultCallTracker for every advised class.
Introductions Summary
Introductions are one of the most powerful features of Spring AOP; they allow you not only to extend the functionality of existing methods but also to extend the set of interfaces an object implements dynamically. Using introductions is the perfect way to implement crosscutting logic that your application interacts with through well-defined interfaces. In general, this is the kind of logic that you want to apply declaratively rather than programmatically.
Obviously, because introductions work via proxies, they add a certain amount of overhead, and all methods on the proxy are considered to be advised, because the proxy needs to route every call to the appropriate target at runtime. However, in the case of many of the services you can implement using introductions, this performance overhead is a small price to pay for the reduction in code required to implement the service, as well the increase in stability and maintainability that comes from fully centralizing the service logic and adding management interface to your application.
So far, the aspects we have written are singletons—more accurately, Spring takes the singleton @Aspect-annotated beans and advices the targets using a singleton instance of the aspect. Let's take the aspect from Listing 6-39 and use it in our sample application.
Example 6.39. Simple Singleton Aspect
@Aspect
public class CountingAspect {
    private int count;

    @Before("execution(* com.apress.prospring2.ch06.services.*.*(..))")
    public void count() {
        this.count++;
        System.out.println(this.count);
    }

}
Let's complete the example with code from Listing 6-40, which shows the demonstration application. It obtains the familiar userService and stockService beans and makes two calls to the userService.login method, followed by one call to the stockService.getStockLevel() method.
Example 6.40. Sample Application for the Singleton Aspect
public class LifecycleDemo {

    public static void main(String[] args) {
        ApplicationContext ac = new ClassPathXmlApplicationContext(
                "/META-INF/spring/lifecycledemo1-context.xml"
        );
        UserService userService = (UserService) ac.getBean("userService");
        StockService stockService = (StockService) ac.getBean("stockService");

        for (int i = 0; i < 2; i++) {
            userService.login("janm");
        }
        stockService.getStockLevel("A");
    }

}
The last piece of the puzzle is the XML configuration file, which simply declares the userService, stockService, and CountingAspect beans.
Example 6.41. XML Configuration for the LifecycleDemo Application
<?xml version="1.0" encoding="UTF-8"?>
<beans xmlns="http://www.springframework.org/schema/beans"
       xmlns:xsi="http://www.w3.org/2001/XMLSchema-instance"
       xmlns:aop="http://www.springframework.org/schema/aop"
       xsi:schemaLocation="
            http://www.springframework.org/schema/beans
            http://www.springframework.org/schema/beans/spring-beans.xsd
            http://www.springframework.org/schema/aop
            http://www.springframework.org/schema/aop/spring-aop.xsd">

    <bean id="userService"
        class="com.apress.prospring2.ch06.services.DefaultUserService"/>
    <bean id="stockService"
        class="com.apress.prospring2.ch06.services.DefaultStockService"/>
    <bean class="com.apress.prospring2.ch06.lifecycle.CountingAspect"/>

    <aop:aspectj-autoproxy />

</beans>
Now, when we run the application, it will print 1, 2, 3, thus proving that the aspect exists in a single instance. If we want to keep state for different targets, we'll need to change the scope of the aspect bean to prototype. If we modify the CountingAspect bean definition in the XML configuration file from Listing 6-41 to the following
<bean class="com.apress.prospring2.ch06.lifecycle.CountingAspect"
    scope="prototype"/>
and run the sample application again with the new aspect bean scope, it will print 1, 2, 1: the application now maintains one instance of the aspect for every target. In effect, we have implemented a per this aspect; we can make this explicit by using a perthis expression in the @Aspect annotation:
@Aspect("perthis(execution(" +
        "* com.apress.prospring2.ch06.services.UserService.*(..)))")
public class PertargetCountingAspect {
...
}
The result of the modification is that Spring AOP will create a new instance of the aspect for each unique object executing the advised object.
Another life cycle strategy Spring AOP supports is pertarget. This works just like perthis, except it will create a new instance of the aspect for every unique target object at the matched join points.
Up to now, we have used the @AspectJ support in Spring to write aspects. We have relied on the underlying Spring AOP framework services to process the annotated beans and instrument the beans. If you cannot use annotations (perhaps you are running on a pre-1.5 JDK or you just don't like them), you can use XML configuration using the aop namespace. In this section, we will discuss the XML configuration and look under the hood of Spring AOP to find out how the @AspectJ support turns the annotated beans into a format usable for Spring AOP support.
To get us started, let's write an aspect that works just like the aspect in Listing 6-1, but this time we will use only XML configuration. We will start with Listing 6-42, which shows the XML configuration for the aspect.
Example 6.42. XML Configuration File
<?xml version="1.0" encoding="UTF-8"?>
<beans xmlns="http://www.springframework.org/schema/beans"
       xmlns:xsi="http://www.w3.org/2001/XMLSchema-instance"
       xmlns:aop="http://www.springframework.org/schema/aop"
       xsi:schemaLocation="
            http://www.springframework.org/schema/beans
            http://www.springframework.org/schema/beans/spring-beans.xsd
            http://www.springframework.org/schema/aop
            http://www.springframework.org/schema/aop/spring-aop.xsd">

    <bean id="userService"
        class="com.apress.prospring2.ch06.services.DefaultUserService"/>
    <bean id="stockService"
        class="com.apress.prospring2.ch06.services.DefaultStockService"/>

    <bean id="aspectBean" class="com.apress.prospring2.ch06.xml.AspectBean"/>

    <aop:config>
        <aop:pointcut id="serviceCall"
            expression="execution(* com.apress.prospring2.ch06.services.*.*(..))"/>

        <aop:aspect id="firstAspect" ref="aspectBean">
            <aop:before method="logCall" pointcut-ref="serviceCall"/>
        </aop:aspect>
    </aop:config>

</beans>
The code in bold declares a pointcut that matches execution of any method with any arguments in any class in the com.apress.prospring2.ch06.services package. The code we have written is similar to the @AspectJ code; the only code we need to show is the AspectBean in Listing 6-43.
Example 6.43. AspectBean Code
public class AspectBean {

    public void logCall(JoinPoint jp) {
        System.out.println(jp);
    }

}
The code is similar to the @AspectJ code; the difference is that there are no annotations at all. The sample application in Listing 6-44 uses the XML configuration and calls the now well-known methods of the userService and stockService beans.
Example 6.44. Sample Application for the XML aop Support
public class XmlDemo1 {

    public static void main(String[] args) {
        ApplicationContext ac = new ClassPathXmlApplicationContext(
                "/META-INF/spring/xmldemo1-context.xml"
        );
        UserService userService = (UserService) ac.getBean("userService");
        StockService stockService = (StockService) ac.getBean("stockService");

        userService.login("janm");
        stockService.getStockLevel("A");
    }

}
The code in the sample application remains the same as the code with @AspectJ aspects; in other words, the XML configuration is completely transparent, and the calling code is not aware that it is calling methods on advised beans. When we run the sample application, it prints the following:
> userService.login("janm"):
    org.springframework.aop.aspectj.MethodInvocationProceedingJoinPoint:
        execution(login)

> stockService.getStockLevel("A)":
    org.springframework.aop.aspectj.MethodInvocationProceedingJoinPoint:
        execution(getStockLevel)
We can see that both userService and stockService are correctly advised and that the AspectBean.logCall() method executes.
Just like in the @AspectJ support section, we will take a look at configuration elements for pointcut definitions. To define a pointcut, you need to write an <aop:pointcut . . ./> element as a child of the <aop:config> element. Let's take a look at the code from Listing 6-43 in more detail: Listing 6-45 shows a section of the XML configuration file.
Example 6.45. AOP Section of the XML Configuration File
...
    <aop:config>
        <aop:pointcut id="serviceCall"
            expression="execution(* com.apress.prospring2.ch06.services.*.*(..))"/>

        <aop:aspect id="firstAspect" ref="aspectBean">
            <aop:before method="logCall" pointcut-ref="serviceCall"/>
        </aop:aspect>
    </aop:config>
...
The code in bold shows that we have a pointcut with id="serviceCall", which we then use in the definition of the before advice in the firstAspect. Just as with @AspectJ support, we can refer to an @pointcut in the expression of the pointcut. Listing 6-46 shows a familiar definition of an @pointcut.
Example 6.46. @pointcut Definition
public final class Pointcuts {
    private Pointcuts() {

    }

    @Pointcut("execution(* com.apress.prospring2.ch06.services.*.*(..))")
    public void serviceExecution() { }

}
We can now use the Pointcuts.serviceExecution() @pointcut in the XML configuration by making a simple change to the <aop:pointcut . . ./> element.
<aop:pointcut id="serviceCall"
                  expression="com.apress.prospring2.ch06.xml.Pointcuts.
                  serviceExecution()"/>
The only drawback is that we are using annotations again. We believe that it is better to choose one configuration style in your application and stick with it; a mixture of @AspectJ and XML configuration can quickly get too complex to manage.
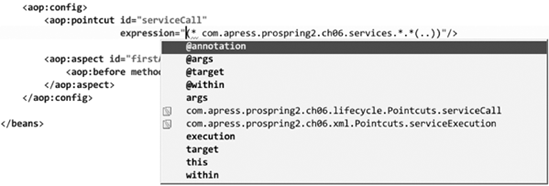
Going back to pure XML configuration, you can use all Spring AOP-supported pointcut expressions, and some IDEs come with code completion even for the XML-based Spring AOP (see Figure 6-5).
Advice in the XML configuration is similar to advice in @AspectJ; the only differences are that the beans representing the aspects are simple Spring beans and the configuration is split between the XML files and Java code in the aspect beans. The aop namespace is as powerful as the @AspectJ support. We have already seen an example of a simple before advice in Listing 6-42; let's explore the XML advice in more detail. Just like @AspectJ advice, XML advice needs a pointcut. You can refer to an existing pointcut (using the pointcut-ref attribute in the advice definition), or you can specify a pointcut expression directly (using the pointcut attribute in the advice definition). Listing 6-47 shows equivalent definitions of the before advice.
Example 6.47. Using pointcut-ref and pointcut Attributes
...
<aop:aspect id="firstAspect" ref="aspectBean">
    <aop:before method="logCall" pointcut-ref="serviceCall"/>
</aop:aspect>

<aop:aspect id="firstAspect" ref="aspectBean">
    <aop:before method="logCall"
        pointcut="execution(* com.apress.prospring2.ch06.services.*.*(..))"/>
</aop:aspect>
...
The difference is obvious: in the first snippet, we reference an existing pointcut declared using the <pointcut . . ./> element; in the second snippet, we specify the pointcut expression.
Next, we will look into the advices in the aop namespace in more detail.
Before Advice
To declare before advice, we need to create the <before> element as a child of the <aspect> element. The attributes of the <before> element are method, pointcut or pointcut-ref, and arg-names. You must always set the method and pointcut or pointcut-ref attributes. The method attribute is the name of a public method in a bean you reference in the <aspect> element; its arguments can vary, ranging from no arguments at all, through JoinPoint, to all arguments you are binding in the pointcut expression. If you are using binding, you should consider using the arg-names attribute to help the Spring AOP Framework correctly identify the bound arguments.
After Returning Advice
To create after returning advice, create an <after-returning> element as a child of the <advice> element. Just like in the before advice, you need to set the method and pointcut or pointcut-ref attributes. In most cases, you would also want to know the return value; to obtain this, set the returning attribute to the name of an Object argument of the method. Finally, you can also use arg-names to specify the argument names of the method in the method attribute. Let's take a look at the code in Listing 6-48, which shows how we can create an aspect that will audit calls to every method and censor some return values.
Example 6.48. Using the After Returning Advice
<?xml version="1.0" encoding="UTF-8"?>
<beans xmlns="http://www.springframework.org/schema/beans"
       xmlns:xsi="http://www.w3.org/2001/XMLSchema-instance"
       xmlns:aop="http://www.springframework.org/schema/aop"
       xsi:schemaLocation="
            http://www.springframework.org/schema/beans
            http://www.springframework.org/schema/beans/spring-beans.xsd
            http://www.springframework.org/schema/aop
            http://www.springframework.org/schema/aop/spring-aop.xsd">

    <bean id="userService"
         class="com.apress.prospring2.ch06.services.DefaultUserService"/>
    <bean id="stockService"
         class="com.apress.prospring2.ch06.services.DefaultStockService"/>

    <bean id="aspectBean" class="com.apress.prospring2.ch06.xml.AspectBean"/>
<aop:config>
<aop:aspect id="firstAspect" ref="aspectBean">
<aop:after-returning method="auditCall"
pointcut="execution(* com.apress.prospring2.
ch06.services.*.*(..))
&& target(target)"
arg-names="target, ret"
returning="ret"/>
</aop:aspect>
</aop:config>
</beans>Notice that our pointcut expression specifies execution of any method in any class in the services package and that we are binding the invocation target to an argument called target. We are also going to receive the return value the target returned in the AspectBean.auditCall() method. Looking at the arg-names attribute, you can clearly see that the auditCall method needs two arguments, and because we want to receive a target of any type and process any type of return value, the type of the arguments needs to be Object. We can now write the code for the AspectBean.auditCall method (see Listing 6-49).
Example 6.49. The AspectBean auditCall Method
public class AspectBean {

    public void auditCall(Object target, Object ret) {
        System.out.println("After method call of " + ret);
        if (ret instanceof User) {
            ((User)ret).setPassword("****");
        }
 }

}
We now have the auditCall method with two arguments: target and ret. Notice that the XML configuration in Listing 6-48 file specified the argument names in the correct order. This is quite easy to get wrong. Luckily, some IDEs will detect this and suggest a correction; Figure 6-6 shows this error correction in IntelliJ IDEA when we swapped the order of arguments from the correct target, ret to ret, target.

You can see that the <after-returning> element gives you the same configuration options as the @AfterReturning annotation in @AspectJ.
After Throwing Advice
As you already know, after throwing advice executes only when the matching method throws an exception. To create after throwing advice declaratively, we'll use the %(after-throwing%) element in the <aspect> element. We need to set at least the method, pointcut or pointcut-ref, and throwing attributes; in most cases, we will also set the arg-names attribute. Without any delay, let's take a look at the XML configuration in Listing 6-50.
Example 6.50. After Throwing Advice in XML
<?xml version="1.0" encoding="UTF-8"?>
<beans xmlns="http://www.springframework.org/schema/beans"
       xmlns:xsi="http://www.w3.org/2001/XMLSchema-instance"
       xmlns:aop="http://www.springframework.org/schema/aop"
       xsi:schemaLocation="
            http://www.springframework.org/schema/beans
            http://www.springframework.org/schema/beans/spring-beans.xsd
            http://www.springframework.org/schema/aop
            http://www.springframework.org/schema/aop/spring-aop.xsd">

    <bean id="userService"
        class="com.apress.prospring2.ch06.services.DefaultUserService"/>
    <bean id="stockService"
        class="com.apress.prospring2.ch06.services.DefaultStockService"/>

    <bean id="aspectBean" class="com.apress.prospring2.ch06.xml.AspectBean"/>

    <aop:config>
        <aop:aspect id="afterThrowingAspect" ref="aspectBean">
            <aop:after-throwing method="healthMonitoring"
                                pointcut="execution(* com.apress.prospring2.
                                                 ch06.services.*.*(..)) &&
                                                 target(target)"
                                arg-names="target,ex"
                                throwing="ex"/>
        </aop:aspect>
    </aop:config>

</beans>
This after throwing advice binds the target of the invocation and the exception thrown to the arguments of method healthMonitoring. This means that the healthMonitoring method needs to have two arguments; to catch any exception on any target, the arguments' types would have to be Object and Throwable. However, to show filtering based on argument types, we will take the code from Listing 6-51.
Example 6.51. After Throwing Method and Argument Filtering
public class AspectBean {

    public void healthMonitoring(Object target, NullPointerException ex) {
        System.out.println("Target " + target + " has thrown " + ex);
    }

}
Notice that the second argument's type is NullPointerException, so the advice will only run if the exception thrown by the target method is NullPointerException. To demonstrate after throwing advice, we will take the code from Listing 6-44, but call this:
stockService.getStockLevel(null);
After Advice
The after, or finally, advice executes after the target method completes, regardless of whether the target method finished normally or threw any exceptions. We declare the after advice using the <after> element in the <aspect> element; because it is after advice, we only need to set the method and pointcut or pointcut-ref attributes. We can use the arg-names attribute if we are using argument binding. Because of the nature of the advice, we cannot use the returning and throwing attributes. As an example, Listing 6-52 shows a simple after advice.
Example 6.52. After Advice Configuration
<?xml version="1.0" encoding="UTF-8"?>
<beans xmlns="http://www.springframework.org/schema/beans"
       xmlns:xsi="http://www.w3.org/2001/XMLSchema-instance"
       xmlns:aop="http://www.springframework.org/schema/aop"
       xsi:schemaLocation="
            http://www.springframework.org/schema/beans
            http://www.springframework.org/schema/beans/spring-beans.xsd
            http://www.springframework.org/schema/aop
            http://www.springframework.org/schema/aop/spring-aop.xsd">

    <bean id="userService"
         class="com.apress.prospring2.ch06.services.DefaultUserService"/>
    <bean id="stockService"
         class="com.apress.prospring2.ch06.services.DefaultStockService"/>

    <bean id="aspectBean" class="com.apress.prospring2.ch06.xml.AspectBean"/>

    <aop:config>
        <aop:aspect id="afterAspect" ref="aspectBean">
            <aop:after-throwing method="after"
                                pointcut="execution(* com.apress.prospring2.
                                                 ch06.services.*.*(..))
                                                 && target(target)"
                                arg-names="target"/>
        </aop:aspect>
    </aop:config>

</beans>
The advice method (AspectBean.after) needs only one argument, and because we only want to advise the UserService bean, we declare it as public void after(UserService target).
Around Advice
We've left the most general advice til last. As the name suggests, it runs around the matched method's execution, so you can write code that will execute before the matched method (you can manipulate the arguments or even skip the matched method execution completely). You can also execute any code after the matched method completes; you are free to catch any exceptions using a standard try / catch block. You can also manipulate the return value, as long as you return a type that is assignable to the return value of the matched method (e.g., you can return Long from advice that advises a method that returns Number, but you can't return String). To declare around advice, use the <around> element in the <aspect> element; you must set the method and pointcut or pointcut-ref attributes, and you may want to set the arg-names attribute. The code in Listing 6-53 shows our around advice.
Example 6.53. XML Configuration of Around Advice
<?xml version="1.0" encoding="UTF-8"?>
<beans xmlns="http://www.springframework.org/schema/beans"
       xmlns:xsi="http://www.w3.org/2001/XMLSchema-instance"
       xmlns:aop="http://www.springframework.org/schema/aop"
       xsi:schemaLocation="
            http://www.springframework.org/schema/beans
            http://www.springframework.org/schema/beans/spring-beans.xsd
            http://www.springframework.org/schema/aop
            http://www.springframework.org/schema/aop/spring-aop.xsd">

    <bean id="userService"
        class="com.apress.prospring2.ch06.services.DefaultUserService"/>
    <bean id="stockService"
        class="com.apress.prospring2.ch06.services.DefaultStockService"/>

    <bean id="aspectBean" class="com.apress.prospring2.ch06.xml.AspectBean"/>

    <aop:config>
        <aop:aspect id="aroundAspect" ref="aspectBean">
            <aop:around method="censorStringArguments"
                        pointcut="execution(* com.apress.prospring2.ch06.
                                         services.*.*(..)) and
                                         args(argument)"
                        arg-names="pjp, argument"/>
        </aop:aspect>
    </aop:config>

</beans>
Notice that we have defined two arguments, but we don't use the pjp argument in the pointcut expression at all. Your around advice method must have at least the ProceedingJoinPoint argument (otherwise, you would not be able to invoke the matched method!) and must return Object. In addition to the ProceedingJoinPoint argument, you are free to use as many bound arguments as you need. In our example, we have implemented a censoring advice method (its source code is in Listing 6-54).
Example 6.54. Around Advice Method
public class AspectBean {

    public Object censorStringArguments(ProceedingJoinPoint pjp, String argument)
        throws Throwable {
        Object[] arguments;
        if (argument != null) {
            System.out.println("censored " + argument + "!");
            arguments = new Object[] { "****" };
        } else {
            arguments = new Object[] { null };
        }
        return pjp.proceed(arguments);
    }
...
}
Here, you can see that the method's arguments match the value in the arg-names attribute and that the type of the second argument is String, which means that we'll only match methods that have one argument of type String; in our small application, those are UserService.setAdministratorUsername, UserService.login, and StockService.getStockLevel.
Now that we have covered all types of advice using XML configuration, we will take a look at the last area, introductions.
The last area we will cover in this section is introductions; if you recall, introductions offer a way to add additional methods to existing objects by proxying the advised objects, making the proxy implement the interfaces that the original implements plus any interfaces we declare. To use XML introductions, you need to use the <declare-parents> element under the <aspect> element; to actually make use of the newly declared parents (e.g., a newly implemented interface), you will need to create at least one piece of advice that uses the introduced interface. We are going to rework the example from Listing 6-36: we will introduce the CallTracker interface to the DefaultUserService and DefaultStockService. Listing 6-55 shows the configuration of the introduction of the CallTracker interface in XML.
Example 6.55. Introduction Declared in XML
<?xml version="1.0" encoding="UTF-8"?>
<beans xmlns="http://www.springframework.org/schema/beans"
       xmlns:xsi="http://www.w3.org/2001/XMLSchema-instance"
       xmlns:aop="http://www.springframework.org/schema/aop"
       xsi:schemaLocation="
            http://www.springframework.org/schema/beans
            http://www.springframework.org/schema/beans/spring-beans.xsd
            http://www.springframework.org/schema/aop
            http://www.springframework.org/schema/aop/spring-aop.xsd">

    <bean id="userService"
        class="com.apress.prospring2.ch06.services.DefaultUserService"/>
    <bean id="stockService"
        class="com.apress.prospring2.ch06.services.DefaultStockService"/>

    <bean id="aspectBean" class="com.apress.prospring2.ch06.xml.AspectBean"/>

    <aop:config>
        <aop:aspect id="aroundAspect" ref="aspectBean">
            <aop:declare-parents
                                 types-matching="com.apress.prospring2.
                                     ch06.services.*"
                                 implement-interface="com.apress.prospring2.
                                     ch06.introductions.CallTracker"
                                 default-impl="com.apress.prospring2.ch06.
                                     introductions.DefaultCallTracker"/>

            <aop:after-returning method="normalCall"
                                 arg-names="tracker"
                                 pointcut="execution(* com.apress.prospring2.
                                     ch06.services.*.*(..)) and this(tracker)"/>
            <aop:after-throwing method="failingCall"
                                arg-names="tracker"
                                pointcut="execution(* com.apress.prospring2.
                                    ch06.services.*.*(..)) and this(tracker)"/>
        </aop:aspect>
    </aop:config>

</beans>
In the <declare-parents> element, the types-matching attribute specifies the classes to which we want to introduce the interface defined in the implement-interface. To complete the <declare-parents> element, we need to specify the default-impl—the name of the class that implements the interface in implement-interface. If we stopped there, we could write
CallTracker usct = (CallTracker)ac.getBean("userService");Assuming that ac is the ApplicationContext instance configured using the XML configuration file from Listing 6-55, this would verify that the userService bean now implements the CallTracker interface, even though the DefaultUserService, the actual class of the bean, only implements the UserService. The only problem is that the application would not track calls; the values in the normalCalls and failingCalls fields in the DefaultCallTracker would never change. To complete this example, we need to create two pieces of advice: after returning and after throwing. Listing 6-56 shows the configuration of these two.
Example 6.56. After Returning and After Throwing Advices
...
    <aop:config>
        <aop:aspect id="aroundAspect" ref="aspectBean">
            <aop:declare-parents ... />

            <aop:after-returning method="normalCall"
                                 arg-names="tracker"
                                 pointcut="execution(* com.apress.prospring2.
                                     ch06.services.*.*(..)) and this(tracker)"/>
            <aop:after-throwing method="failingCall"
                                arg-names="tracker"
                                pointcut="execution(* com.apress.prospring2.
                                    ch06.services.*.*(..)) and this(tracker)"/>
        </aop:aspect>
    </aop:config>
...
To complete the advice, we need to implement the normalCall and failingCall methods in the AspectBean. Both pieces of after advice have the arg-names attribute set to tracker, so the methods will need one argument with the name tracker. Its type should be CallTracker; we will use its methods to count the calls. Listing 6-57 shows the implementation of the two advice methods.
Example 6.57. Implementation of the After Advice Methods
public class AspectBean {
...
    public void normalCall(CallTracker tracker) {
        tracker.markNormal();
    }

    public void failingCall(CallTracker tracker) {
        tracker.markFailing();
    }
...
}
The methods are very simple: they use the tracker argument to increment the appropriate call counter. We will complete the example with Listing 6-58, which shows the demonstration application. The application makes calls to the userService and stockService beans and displays the call statistics using the introduced CallTracker interface.
Example 6.58. Example Application for the Introductions
public class XmlDemo6 {

    public static void main(String[] args) {
        ApplicationContext ac = new ClassPathXmlApplicationContext(
                "/META-INF/spring/xmldemo6-context.xml"
        );
        UserService userService = (UserService) ac.getBean("userService");
        StockService stockService = (StockService) ac.getBean("stockService");

        userService.login("janm");
        stockService.getStockLevel("A");
        stockService.applyDiscounts(new Date(), BigDecimal.ONE);
describeTracker(userService); describeTracker(stockService); } private static void describeTracker(Object o) { CallTracker t = (CallTracker)o; System.out.println(t.describe()); } }
The application works and proves that we have successfully introduced the CallTracker interface on both beans.
You may be wondering which Spring AOP style to choose? @AspectJ is easy to use but requires that you use 1.5 JDK; XML-based configuration works with a pre-1.5 JDK. Our recommendation is to use @AspectJ wherever you can. The XML-based configuration may feel more familiar to seasoned Spring developers, but the issue is that, in XML-based configuration, the developers may not be aware that they are working on an aspect, and the XML configuration splits the functionality of a single unit into two files. Moreover, you cannot combine pointcuts with as much flexibility as you can with @AspectJ. If you recall, you can use a pointcut to specify the pointcut expression or pointcut-ref attribute to specify a reference to an existing pointcut expression in the XML configuration. However, you cannot combine a reference to an existing pointcut and a pointcut expression. For example, you cannot write code similar to the code in Listing 6-59.
Example 6.59. Illegal Combination of pointcut and pointcut-ref
<aop:config>
    <aop:pointcut id="x" expression="..."/>
    <aop:aspect ...>
        <aop:before pointcut="x() and target(y)" />
    </aop:aspect>
</aop:config>
The line in bold is not valid, because the pointcut expression x() and target(y) is not valid. The same value in the pointcut-ref attribute is also invalid, because no (pointcut) bean with ID x() and target(y) exists.
Possibly the worst approach is to combine the two approaches and use both @AspectJ and XML-based configuration: this can only lead to confusion and possibly duplicate advice.
Spring AOP support uses proxies; Figure 6-7 shows a UML class diagram of a proxy pattern.

The figure shows a JDK dynamic proxy; the proxy implements Interface1, Interface2, and Interface3. The implementation of the InvocationHandler.invoke() method handles all calls to all methods of the interfaces implemented by the proxy. In the case of Spring AOP, the InvocationHandler holds a reference to the advised object; it handles all before, after returning, after throwing, or around advice pertaining to the target method. If the target objects do not implement any interfaces or if you do not wish to use JDK dynamic proxies, you can use CGLIB proxies. CGLIB is a bytecode manipulation library, which you can use to proxy a class that does not implement any interface. Figure 6-8 shows the class diagram of a CGLIB proxy.
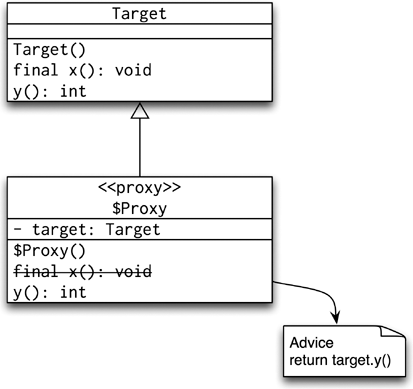
Essentially, CGLIB proxies are subclasses of the target class; because you cannot override final methods, advice on final methods will not work. Also, the constructor of the target (the advised class) will be called twice: once to create the advised class and the second time to create the proxy. Usually, two constructor calls do not cause any problems; if all you do in a constructor is check the arguments and set the instance fields, then you can run the constructor as many times as you want. However, if there is some kind of business logic in the constructor, it may cause problems. You can control which type of proxy Spring creates by setting the proxy-target-class="true" in the <aop:config . . ./> or the <aop:aspectj-autoproxy . . ./> elements. If you have more than one <aop:config . . ./> or <aop:aspectj-autoproxy . . ./> element in your configuration files and if at least one of them specifies proxy-target-class="true", then all proxies will use CGLIB as if we set proxy-target-class="true" in every configuration element.
Let's now take a look at the impact the proxying may have on your code. As an example, we will take the StockService interface and its implementation, the DefaultStockService. To demonstrate some of the concepts we will discuss in this section, we will make a subtle modification to the DefaultStockService. Listing 6-60 shows the modifications.
Example 6.60. Modified DefaultStockService
public class DefaultStockService implements StockService {

    public long getStockLevel(String sku) {
        try {
            Thread.sleep(2000L);
        } catch (InterruptedException ignored) {
        }
        return getPredictedStockLevel (sku) / 2L;
    }

    public long getPredictedStockLevel(String sku) {
        return 6L * sku.hashCode();
    }

    public void applyDiscounts(Date cutoffDate, BigDecimal maximumDiscount) {
        // do some work
    }

}
If we create an unproxied instance of the DefaultStockService and then call the getStockLevel("X") method, the call to getPredictedStockLevel operates on the same instance. Listing 6-61 demonstrates this concept more clearly.
Example 6.61. Calling Unproxied Methods
public class ProxyDemo {

    public static void main(String[] args) {
        StockService dss = new DefaultStockService();
        dss.getStockLevel("X");
    }

}
When we call dss.getStockLevel("X"), the dss references the DefaultStockService directly and therefore when the DefaultStockService.getStockLevel() calls the DefaultStockService.getPredictedStockLevel() method, it is the same as if we called ((DefaultStockService)dss).getPredictedStockLevel() from the main() method.
Next, consider a similar scenario, but this time, the StockService interface will be a proxy to the DefaultStockService. We will begin with JDK dynamic proxies. Listing 6-62 shows a JDK dynamic proxy for the StockService.
Example 6.62. JDK Dynamic Proxy for the StockService
public class ProxyDemo2 {

    private static class DelegatingInvocationHandler
        implements InvocationHandler {
        private Object target;

        private DelegatingInvocationHandler(Object target) {
            this.target = target;
        }
public Object invoke(Object target,
Method method,
Object[] args) throws Throwable {
return method.invoke(this.target, args);
}
}
public static void main(String[] args) {
DefaultStockService targetReference = new DefaultStockService();
StockService proxyReference =
(StockService) Proxy.newProxyInstance(
ProxyDemo2.class.getClassLoader(),
new Class<?>[] {StockService.class},
new DelegatingInvocationHandler(
targetReference
));
proxyReference.getStockLevel("X");
}
}When we call proxyReference.getStockLevel("X"), we are in fact calling the proxy. The proxy's InvocationHandler uses the DefaultStockService instance to delegate the method calls. Therefore, the proxyReference.getStockLevel() method operates on a different instance than the call to getPredictedStockLevel() in the DefaultStockService.
Before we can discuss the practical impact of proxying, we need to take a look at how Spring creates proxies. As you saw in Listing 6-62, creating even the simplest proxy is a lot of work. Spring simplifies this by providing the ProxyFactory class, which can not only create a proxy to the target object but also add any advice. Listing 6-63 shows a simple use of the ProxyFactory.
Example 6.63. Using the ProxyFactory
public class ProxyDemo3 {

    public static void main(String[] args) {
        DefaultStockService target = new DefaultStockService();
        ProxyFactory pf = new ProxyFactory(target);
        pf.addInterface(StockService.class);

        StockService stockService = (StockService) pf.getProxy();
        stockService.getStockLevel("A");
    }

}
We have created the target object (the DefaultStockService) and then used the ProxyFactory to create a proxy that implements the StockService. Next, we need to take a look at how we can use a subclass of the ProxyFactory to create advised proxies. To do this, we will look at the simple before advice in Listing 6-64.
Example 6.64. Simple Aspect with Before Advice
public class BeforeAspect {

    @Before("execution(* com.apress.prospring2.ch06.services.*.*(..))")
    public void simpleLog(JoinPoint jp) {
System.out.println("Before " + jp);
}
}There is nothing extraordinary about the aspect; it simply prints a message before the call to the advised method. Now that we have the aspect, we will use the AspectJProxyFactory to create an advised proxy. Listing 6-65 shows the code needed to create the advised proxy.
Example 6.65. Using AspectJProxyFactory
public class ProxyDemo4 {

    public static void main(String[] args) {
        DefaultStockService target = new DefaultStockService();
        AspectJProxyFactory pf = new AspectJProxyFactory(target);
        pf.addInterface(StockService.class);
        pf.addAspect(BeforeAspect.class);

        StockService stockService = (StockService) pf.getProxy();
        stockService.getStockLevel("A");
    }

}
When we now run this example, it will show the same output as if we used Spring's ApplicationContext configured with <aop:aspectj-autoproxy . . ./> and the aspect bean.
Now that we know how to use Spring to create advised proxies, we need to look at the implication of the proxy calls, which can become significant: imagine an advised object with an around advice that begins and commits every transaction for every method call. If you get the advised object (the proxy) and call its methods, the advice will work. However, when you call an advised method from within an advised object, the call will not go through the proxy, and the advice will not run. Therefore, when we use the StockService proxy in the sample application, we'll see that only the getStockLevel call is advised; the internal call to the getPredictedStockLevel method is not.
The best way to avoid this situation is not to chain method calls in your advised classes. In some situations, this chaining can in fact lead to problems (we explore some of the problems you can face in Chapter 11). However, there is another way that will allow you to make calls in the advised objects but direct them through the appropriate proxy. We strongly discourage you from doing so, but if you must, you can use the AopContext.currentProxy() method to obtain the proxy representing this. Listing 6-66 shows a modification to the DefaultStockService that demonstrates how to use this call.
Example 6.66. Modified DefaultStockService
public class DefaultStockService implements StockService {

    public long getStockLevel(String sku) {
        try {
            Thread.sleep(2000L);
        } catch (InterruptedException ignored) {
        }
        return ((StockService)AopContext.currentProxy()).
            getPredictedStockLevel(sku) / 2L;
    }
public long getPredictedStockLevel(String sku) {
return 6L * sku.hashCode();
}
public void applyDiscounts(Date cutoffDate, BigDecimal maximumDiscount) {
// do some work
}
}Instead of calling this.getPredictedStockLevel(sku), we obtain the proxy from AopContext.currentProxy() and call the getPredictedStockLevel on the proxy. If we attempt to run the sample application now, it will fail. We have to expose the current proxy in the configuration of the ProxyFactory (see Listing 6-67).
Example 6.67. Modified ProxyFactory Configuration
public class ProxyDemo4 {

    public static void main(String[] args) {
        DefaultStockService target = new DefaultStockService();
        AspectJProxyFactory pf = new AspectJProxyFactory(target);
        pf.addInterface(StockService.class);
        pf.setExposeProxy(true);
        pf.addAspect(BeforeAspect.class);

        StockService stockService = (StockService) pf.getProxy();
        stockService.getStockLevel("A");
    }

}
This is the final change needed to make the application work—when we run it, it shows that the before advice from Listing 6-64 ran for getStockLevel and getPredictedStockLevel:
Before org.springframework.aop.aspectj.MethodInvocationProceedingJoinPoint:execution(getStockLevel) Before org.springframework.aop.aspectj.MethodInvocationProceedingJoinPoint:execution(getPredictedStockLevel)
Even though this is the solution to the problem caused by proxying when chaining advised methods, we strongly urge you to rethink your design to prevent such chained calls. Only if there is no other option should you consider using the AopContext and changing the configuration of the ProxyFactory. Doing so will tie your beans very closely to Spring AOP; making your code dependent on the framework you use is the very thing Spring tries to avoid!
AOP provides a powerful solution to many of the common problems that arise with OOP applications. When using Spring AOP, you can take advantage of a select subset of AOP functionality that, in most cases, allows you to solve problems you encounter in your application. However, in some cases, you may wish to use some AOP features that are outside the scope of Spring AOP. In this case, you need to look at an AOP implementation with a fuller feature set. Our preference, in this case, is to use AspectJ, and because you can now configure AspectJ aspects using Spring, AspectJ forms the perfect complement to Spring AOP.
AspectJ is a fully featured AOP implementation that uses compile-time weaving to introduce aspects into your code. In AspectJ, aspects and pointcuts are built using a Java-like syntax, which reduces the learning curve for Java developers. We are not going to spend too much time looking at AspectJ and how it works, because that is beyond the scope of this book. Instead, we present some simple AspectJ examples and show you how to configure them using Spring. For more information on AspectJ, you should definitely read AspectJ in Action by Raminvas Laddad (Manning, 2003).
Let's get started with a simple example: we'll create an aspect and use the AspectJ compiler to weave it in. Next, we will configure the aspect as a standard Spring bean. We can do this because each AspectJ aspect exposes a method, aspectOf(), which can be used to access the aspect instance. Using the aspectOf method and a special feature of Spring configuration, you can have Spring configure the aspect for you. The benefits of this cannot be overstated. You can take full advantage of AspectJ's powerful AOP feature set without losing out on Spring's excellent DI and configuration abilities. This also means that you do not need two separate configuration methods for your application; you can use the same Spring ApplicationContext approach for all your Spring-managed beans and for your AspectJ aspects.
As an example, we are going to use AspectJ to advise all methods of all classes in the com.apress.prospring2.ch06.services package and write out a message before and after the method invocation. These messages will be configurable using Spring. Listing 6-68 shows the StockServiceAspect aspect (the file name is StockServiceAspect.aj in com/apress/prospring2/ch06/aspectj).
Example 6.68. StockServiceAspect Aspect
package com.apress.prospring2.ch06.aspectj;

public aspect StockServiceAspect {
    private String suffix;
    private String prefix;

    public void setPrefix(String prefix) {
        this.prefix = prefix;
    }

    public void setSuffix(String suffix) {
        this.suffix = suffix;
    }

    pointcut doServiceCall() :
        execution(* com.apress.prospring2.ch06.services.*.*(..));

    before() : doServiceCall() {
        System.out.println(this.prefix);
    }

    after() : doServiceCall() {
        System.out.println(this.suffix);
    }
}
Much of this code should look familiar. Essentially, we create an aspect called StockServiceAspect, and just like for a normal Java class, we give the aspect two properties, suffix and prefix, which we will use when advising all methods in all classes in the com.apress.prospring2.ch06.services package. Next, we define a named pointcut, doServiceCall(), for a single joinpoint, in this case, the execution of the service methods (AspectJ has a huge number of joinpoints, but coverage of those is outside the scope of this example). Finally, we define two pieces of advices: one that executes before the doServiceCall pointcut and one that executes after it. The before advice writes a line containing the prefix, and the after advice writes a line containing the suffix. Listing 6-69 shows how this aspect is configured in Spring.
Example 6.69. Configuring an AspectJ Aspect
<?xml version="1.0" encoding="UTF-8"?>
<beans xmlns="http://www.springframework.org/schema/beans"
       xmlns:xsi="http://www.w3.org/2001/XMLSchema-instance"
       xsi:schemaLocation="
            http://www.springframework.org/schema/beans
            http://www.springframework.org/schema/beans/spring-beans.xsd">

    <bean id="userService"
        class="com.apress.prospring2.ch06.services.DefaultUserService"/>
    <bean id="stockService"
        class="com.apress.prospring2.ch06.services.DefaultStockService"/>
    <bean class="com.apress.prospring2.ch06.aspectj.StockServiceAspect"
        factory-method="aspectOf">
        <property name="prefix" value="Before call"/>
        <property name="suffix" value="After call"/>
    </bean>

</beans>
As you can see, much of the configuration of the aspect bean is very similar to standard bean configuration. The only difference is the use of the factory-method attribute of the <bean> tag. The factory-method attribute is intended to allow classes that follow a traditional Factory pattern to be integrated seamlessly into Spring. For instance, if you have a class Foo with a private constructor and a static factory method, getInstance(), using factory-method allows a bean of this class to be managed by Spring. The aspectOf() method exposed by every singleton AspectJ aspect allows you to access the instance of the aspect and thus allows Spring to set the properties of the aspect. However, notice that we have not used the aop namespace at all; on top of that, the StockServiceAspect is not a valid Java source. To complete the example, Listing 6-70 shows a familiar code that uses the stockService and userService beans.
Example 6.70. AspectJ Sample Application
public class AspectJDemo1 {
    public static void main(String[] args) {
        ApplicationContext ac = new ClassPathXmlApplicationContext(
                "/META-INF/spring/aspectjdemo1-context.xml"
        );
        UserService userService = (UserService) ac.getBean("userService");
        userService.login("janm");

        StockService stockService = (StockService) ac.getBean("stockService");
        System.out.println(stockService.getStockLevel("ABC"));
    }

}
If we try to run the application directly from our IDE, it will fail. The output will indicate that there is no StockServiceAspect class; we expected this problem, because the StockServiceAspect is an aspect, not a Java class.
... Exception in thread "main"org.springframework.beans.factory.CannotLoadBeanClassException:Cannot find class [com.apress.prospring2.ch06.aspectj.StockServiceAspect]for bean with name 'com.apress.prospring2.ch06.aspectj.StockServiceAspect#0'defined in class path resource [META-INF/spring/aspectjdemo1-context.xml];nested exception is java.lang.ClassNotFoundException:com.apress.prospring2.ch06.aspectj.StockServiceAspect ...
To make the sample application run, we must use the AspectJ compiler. The AspectJ compiler is going to turn the StockServiceAspect into a Java class file, and it will weave in the aspect's code into the advised classes. In other words, the AspectJ compiler is going to produce different bytecode for the DefaultStockService than a standard Java compiler would, because it will weave in the StockServiceAspect. In addition to compile-time weaving, the AspectJ compiler will produce a valid Java bytecode file from the StockServiceAspect.aj source file. Perhaps the most important method in the compiled StockServiceAspect class is the public static Aspect aspectOf() method that we use in the Spring bean definition.
If you are familiar with AspectJ, you can skip this section; otherwise, read on to find out how to set up your computer to work with the AspectJ compiler. The first step is to get the AspectJ distribution from http://www.eclipse.org/aspectj. Download the installation package (.jar file) and install AspectJ to $ASPECTJ_HOME—typically /usr/share/aspectj-1.5 or C:Program Filesaspectj1-5. Once you have the AspectJ compiler installed, modifying the PATH environment variable to include $ASPECTJ_HOME/bin is convenient. When you now type ajc -version at the command prompt, you should see this:
AspectJ Compiler 1.5.4 built on Thursday Dec 20, 2007 at 13:44:10 GMT
Because using the AspectJ compiler directly is rather complex, we are going to use Apache Ant to simplify the work (for more information about Ant, go to http://ant.apache.org). The AspectJ distribution includes custom Ant tasks; to get these custom tasks installed, copy aspectjtools.jar from $ASPECTJ_HOME/lib to $ANTHOME/lib.
Now that we have installed the AspectJ compiler and configured Ant to include the AspectJ custom tasks, we can take a look at the build file (see Listing 6-71).
Example 6.71. The Ant Build File
<?xml version="1.0"?>
<project name="ch06" default="all" basedir="."
        xmlns:aspectj="antlib:org.aspectj">

    <property name="dir.src.main.java" value="./src/main/java"/>
    <property name="dir.src.main.resources" value="./src/main/resources"/>
    <property name="dir.module.main.build" value="./target/build-main"/>
    <property name="dir.lib" value="../../lib"/>
<property name="module.jar" value="ch06.jar"/>
<path id="module.classpath">
<fileset dir="${dir.lib}" includes="**/*.jar"/>
<fileset dir="${dir.lib}" includes="**/*/*.jar"/>
</path>
<target name="all">
<aspectj:iajc
outjar="${module.jar}"
sourceRootCopyFilter="**/*.java"
source="1.5"
target="1.5">
<classpath refid="module.classpath"/>
<sourceroots>
<path location="${dir.src.main.java}
/com/apress/prospring2/ch06/services"/>
<path location="${dir.src.main.java}
/com/apress/prospring2/ch06/aspectj"/>
<path location="${dir.src.main.java}
/com/apress/prospring2/ch06/common"/>
<path location="${dir.src.main.resources}"/>
</sourceroots>
</aspectj:iajc>
<java classname="com.apress.prospring2.ch06.aspectj.AspectJDemo1"
fork="yes">
<classpath>
<path refid="module.classpath"/>
<pathelement location="${module.jar}"/>
</classpath>
</java>
</target>
</project>When we build the sample application using this Ant script, the AspectJ compiler will weave in the aspect and create the StockServiceAspect. When we run the sample application (using ant) from Listing 6-70, it will print the following:
... [java] DEBUG [main] CachedIntrospectionResults.<init>(265) |Found bean property 'suffix' of type [java.lang.String] ... [java] DEBUG [main] AbstractBeanFactory.getBean(197) |Returning cached instance of singleton bean 'userService' userService.login("janm") [java] Before call [java] After call [java] DEBUG [main] AbstractBeanFactory.getBean(197) |Returning cached instance of singleton bean 'stockService' stockService.getStockLevel("ABC") [java] Before call stockService.getPredictedStockLevel("ABC") [java] Before call
[java] After call
[java] After call
[java] 193734
This output clearly shows that the aspect worked! We have successfully advised the DefaultStockService and DefaultUserService methods and set the aspect's prefix and suffix properties. Because the AspectJ compiler performs compile-time weaving, we do not need to worry about any proxying issues: the getPredictedStockLevel call from DefaultStockService.getStockLevel was advised without applying any AopContext wizardry.
By default, AspectJ aspects are singletons—you get a single instance per classloader. If you need to use different instances of the aspect depending on a pointcut, you'll have to write and configure the aspects differently. Listing 6-72 shows a per this aspect; "per this" means that AspectJ will create a different instance of the aspect for every match of the pointcut.
Example 6.72. Stateful (Per This) Aspect
package com.apress.prospring2.ch06.aspectj;

public aspect ThisCountingAspect perthis(doServiceCall()) {
    private int count;

    pointcut doServiceCall() :
        execution(* com.apress.prospring2.ch06.services.*.*(..));

    before() : doServiceCall() {
        this.count++;
        System.out.println("Before call");
    }

    after(Object target) : doServiceCall() && this(target) {
        System.out.println(target + " executed " + this.count + " times");
    }
}
The only problem is that we cannot configure this aspect in Spring: if we configure it with the usual prototype code, it will set the property only in one instance of the aspect, but that instance won't be the one that gets used in the join points. If we need a scoped AspectJ aspect, we cannot use Spring to configure its properties.
Load-time weaving is a process during which the weaver applies the aspects when the ClassLoader loads the advised class. AspectJ supports load-time weaving using a Java agent; you need to specify the agent's JAR file (see JVM's -javaagent command-line argument for details). However, agents bring some limitations: the obvious one is that agents only work with 1.5 and later JVMs, and a second limitation is that the JVM loads and uses the agent for the entire JVM. This may not be a significant problem in smaller applications, but when you get to a point where you need to deploy more than one application in a virtual machine, you may need more fine-grained control over the load-time weaving process.
Spring's load-time weaving support does just that: it allows you to control the load-time weaving for each ClassLoader. This is a great help when you are deploying a web application in a servlet container or an application server. You can configure a different load-time weaver for each web application and leave the container's class loading intact. Further, if you use Spring load-time weaving support, you may not need to change the configuration of some application servers and servlet containers.
We'll get started with a simple aspect that just tracks calls to all service methods. The aspect is trivial; its source code is in Listing 6-73.
Example 6.73. A Load-Time Weaving Demonstration Aspect
@Aspect
public class AuditAspect {

    @After(value =
              "execution(* com.apress.prospring2.ch06.services.*.*(..)) && " +
              "this(t)",
           argNames = "jp,t")
    public void audit(JoinPoint jp, Object t) {
        System.out.println("After call to " + t + " (" + jp + ")");
    }

}
Now that we have the aspect, we'll use it to advise our userService and stockService beans. Instead of using the <aop:aspectj-autoproxy />, we will use spring-agent.jar as the JVM agent and use the context namespace to initiate the load-time weaving. In addition to the ApplicationContext XML configuration file, we need to create the META-INF/aop.xml file. The aop.xml file is a standard component of AspectJ; it tells the AspectJ weaver which classes to weave at load time. Listing 6-74 shows the contents of the aop.xml file.
Example 6.74. The META-INF/aop.xml File
<!DOCTYPE aspectj PUBLIC
        "-//AspectJ//DTD//EN"
        "http://www.eclipse.org/aspectj/dtd/aspectj.dtd">
<aspectj>
    <weaver>
        <include within="com.apress.prospring2.ch06.services.*"/>
    </weaver>
    <aspects>
        <aspect name="com.apress.prospring2.ch06.ltw.AuditAspect"/>
    </aspects>
</aspectj>
The code in bold tells the AspectJ weaver to weave in the AuditAspect into all classes in the com.apress.prospring2.ch06.services package. To complete the example, Listing 6-75 shows the ApplicationContext XML configuration file with the <context:load-time-weaver> tag. The <context:load-time-weaver> tag has a single attribute, aspectj-weaving. You can set it to "on" to turn on load-time weaving, "off" to turn the load-time weaving, well, off, and "autodetect" to turn on load-time weaving if there is at least one META-INF/aop.xml file. If you omit the aspectj-weaving attribute, Spring assumes the value is "autodetect".
Example 6.75. The ApplicationContext XML Configuration File
<?xml version="1.0" encoding="UTF-8"?>
<beans xmlns="http://www.springframework.org/schema/beans"
       xmlns:xsi="http://www.w3.org/2001/XMLSchema-instance"
       xmlns:context="http://www.springframework.org/schema/context"
       xsi:schemaLocation="
            http://www.springframework.org/schema/beans
            http://www.springframework.org/schema/beans/spring-beans.xsd
            http://www.springframework.org/schema/context
            http://www.springframework.org/schema/context/spring-context.xsd">

    <bean id="userService"
        class="com.apress.prospring2.ch06.services.DefaultUserService"/>
    <bean id="stockService"
        class="com.apress.prospring2.ch06.services.DefaultStockService"/>

    <context:load-time-weaver />

</beans>
Before we can run this application to find out whether the load-time weaving worked, we need to add the -javaagent JVM argument. In our particular setup, the argument's value is -javaagent:../lib/org/springframework/spring/spring-agent.jar. Without the agent, the application would fail with an IllegalStateException:
... Caused by: java.lang.IllegalStateException:ClassLoader [sun.misc.Launcher$AppClassLoader]does NOT provide an 'addTransformer(ClassFileTransformer)' method.Specify a custom LoadTimeWeaver or start your Java virtual machine withSpring's agent: -javaagent:spring-agent.jar
The error message tells us what we already know: we need to specify the spring-agent.jar library as a JVM agent. When we do this, the application runs and prints this:
userService.login("janm") After call to com.apress.prospring2.ch06.services.DefaultUserService@4cb44131(execution(void com.apress.prospring2.ch06.services.DefaultUserService.login(String))) stockService.getStockLevel("ABC") After call to com.apress.prospring2.ch06.services.DefaultStockService@197a64f2(execution(long com.apress.prospring2.ch06.services.DefaultStockService.getPredictedStockLevel(String))) DefaultStockService.getPredictedStockLevel("ABC") After call to com.apress.prospring2.ch06.services.DefaultStockService@197a64f2(execution(long com.apress.prospring2.ch06.services.DefaultStockService.getStockLevel(String))) 193734
Not only does the application work with load-time weaving but the call from DefaultStockService.getStockLevel to DefaultStockService.getPredictedStockLevel is advised, demonstrating that there are no problems with proxying—the bytecode of the DefaultStockService class is not the same as the bytecode on disk, and the AspectJ weaver completed its work before the application's ClassLoader loaded the class. Not only does load-time weaving solve the proxying problems, it also removes any performance decrease introduced by the proxies. Because there is no proxy, the code runs as if it were compiled with the advice's code coded into every matching join point.
Spring uses the InstrumentationSavingAgent in the JVM agent library spring-agent.jar to save the current instance of the Instrumentation interface the JVM exposes. The DefaultContextLoadTimeWeaver will attempt to automatically detect the LoadTimeWeaver instance that best matches the application's environment. Table 6-2 shows the LoadTimeWeaver implementations for different environments.
Table 6.2. LoadTimeWeaver Implementations
LoadTimeWeaver | Environment |
|---|---|
| JVM started with Spring |
|
|
| Works in the GlassFish application server V2. |
| The implementation of the |
| Intended to be used with the |
| A test-only implementation of the LoadTimeWeaver (By "test-only," we mean that it performs the necessary weaving transformations on a newly created |
Whichever strategy you use, it is important to realize that load-time weaving uses AspectJ, not @AspectJ, as you might think after looking at the code in Listing 6-74. This means that we cannot use the bean() pointcut @AspectJ supports.
The first thing that comes to mind when someone mentions AOP is logging, followed by transaction management. However, these are just special applications of AOP. In our application development experience, we have used AOP for health and performance monitoring, call auditing, caching, and error recovery. More advanced uses of AOP include compile-time checks of architecture standards. For example, you can write an aspect that will enforce that you only call certain methods from certain classes. However, the more advanced cases have little to do with Spring AOP, so we will demonstrate performance and health monitoring. You can also refer to Chapter 22 for an example of the Cache SpringModule, which uses AOP to implement declarative caching support.
Being able to monitor applications is critical when they are deployed in the production environment. While you can use logging, finding a particular problem in the log is often difficult. It would be much better if we could track the performance of the application and quickly find any significant drops in performance. Also, it would be useful to record the exceptions that occurred during the application's runtime. Apart from recording the exception type (and message), recording the values of all arguments that could have caused the exception is important. To help us focus on the problems causing the most trouble in the application most of the time, we will also group the exception reports by exception type and argument values.
Before we can proceed with the implementation of the aspects, we will take a look at the other components of the application. Figure 6-9 shows the UML class diagram of the application's components.
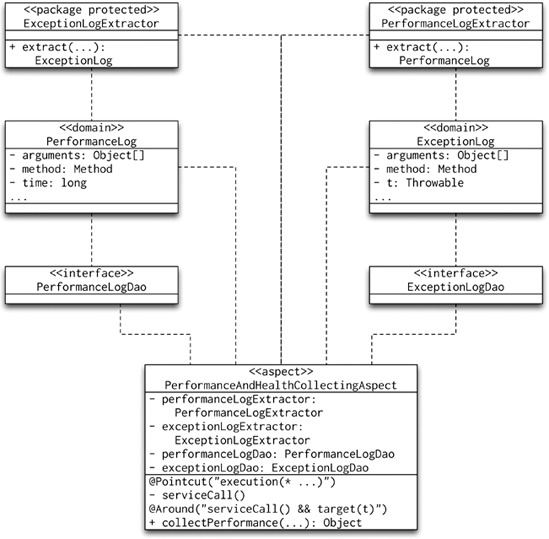
Now, we can take a look at the implementation of the PeformanceAndHealthCollectingAspect. The aspect only has one piece of around advice; this advice collects statistics about method execution times and possible exceptions. Listing 6-76 shows the PerformanceAndHealthCollectingAspect.
Example 6.76. PerformanceAndHealthCollectingAspect
@Aspect
public class PerformanceAndHealthCollectingAspect {

    private PerformanceLogDao performanceLogDao;
    private ExceptionLogDao exceptionLogDao;
    private PerformanceLogExtractor performanceLogExtractor =
            new PerformanceLogExtractor();
    private ExceptionLogExtractor exceptionLogExtractor =
            new ExceptionLogExtractor();

    @Pointcut("execution(* com.apress.prospring2.ch06.services.*.*(..))")
    private void serviceCall() { }

    @Around(value = "serviceCall() && target(target)",
            argNames = "pjp, target")
    public Object collectPerformance(ProceedingJoinPoint pjp, Object target)
            throws Throwable {
        Throwable exception = null;
        Object ret = null;

        StopWatch stopWatch = new StopWatch();
        stopWatch.start();
        try {
            ret = pjp.proceed();
        } catch (Throwable t) {
            exception = t;
        }
        stopWatch.stop();

        if (exception == null) {
            this.performanceLogDao.insert(
                    this.performanceLogExtractor.extract(pjp, target),
                    stopWatch.getLastTaskTimeMillis()
        } else {
            this.exceptionLogDao.insert(
                    this.exceptionLogExtractor.extract(pjp, target),
                    exception
            );
        }

        if (exception != null) throw exception;
        return ret;
    }

    public void setPerformanceLogDao(PerformanceLogDao performanceLogDao) {
        this.performanceLogDao = performanceLogDao;
    }
public void setExceptionLogDao(ExceptionLogDao exceptionLogDao) {
this.exceptionLogDao = exceptionLogDao;
}
}You can see that we record method performance and possible exceptions. We will use this information in the PerformanceMonitoringAspect. As its name suggests, this aspect is going to monitor the performance of the application. The aspect needs before and after advice; the before advice will record a start of the method call; the after advice will match and remove the start record. You may ask why we cannot use an around advice, as doing so would simplify tracking. The reason is that we need to be able to find out that a particular method is taking much longer than usual while it is still running. If we had implemented the health monitoring using around advice, our code would only find out that the method took much longer after it completed. Listing 6-77 outlines the implementation of the aspect.
Example 6.77. Outline Implementation of the PerformanceMonitoringAspect
@Aspect
public class PerformanceMonitoringAspect {

    @Pointcut("execution(* com.apress.prospring2.ch06.services.*.*(..))")
    private void serviceCall() { }

    @Before(value = "serviceCall() && target(target)",
            argNames = "jp, target")
    public void logStartCall(JoinPoint jp, Object target) {
        // log start call
    }

    @After(value = "serviceCall() && target(target)",
            argNames = "jp, target")
    public void logEndCall(JoinPoint jp, Object target) {
        // log end call
    }

}
The logging infrastructure must insert a record for each start call and remove it after the method finishes. The last component is the PerformanceMonitor class, which periodically scans the call log and for all entries found in the call log, checks the statistics collected in the PerformanceAndHealthMonitoringAspect. If the PerformanceMonitor finds a call that is taking much longer than usual, it can alert the application's administrators.
In this chapter, we concluded our discussion on AOP. We looked at the advanced options for pointcutting, as well as how to extend the set of interfaces implemented by an object using introductions. A large part of this chapter focused on using Spring Framework services to configure AOP declaratively, thus avoiding the need to hard-code AOP proxy construction logic into your code. We spent some time looking at how Spring and AspectJ are integrated to allow you to use the added power of AspectJ without losing any of the flexibility of Spring. Next, we looked at how you can use AspectJ with load-time weaving to minimize the overhead Spring AOP's proxies add to the application. Finally, we looked at how we can use AOP to solve an application-specific problems in real-life applications.
Even though we have discussed how to use AOP in Spring applications, we have barely scratched the surface of all the features AspectJ provides. If you are interested in more details about AspectJ, we recommend two excellent books. The first one is Eclipse AspectJ by Adrian Colyer, Andy Clement, George Harley, and Matthew Webster (Addison-Wesley, 2005), which provides a comprehensive introduction and reference for the AspectJ language; the second book, AspectJ in Action by Ramnivas Laddad (Manning, 2003), focuses on the syntax of AspectJ as well as covering a lot of general AOP topics.