
AJAX (Asynchronous JavaScript and XML) is a new approach to web application development that uses client-side scripting to exchange data with the web server. As a result, web pages are dynamically updated without interrupting the user interaction flow by a full page refresh. With AJAX, developers can create rich browser-based web applications that look and behave more like native desktop applications.
AJAX is not one technology but a combination of several:
XHTML and Cascading Style Sheets (CSS)
Document Object Model (DOM)
XML (and XSLT)
XMLHttpRequest (XHR)
JavaScript
Unlike many of the approaches used in the past, AJAX works in most modern browsers and doesn't require any proprietary software or hardware. In fact, one of the real strengths of AJAX is that developers who use it don't need to learn a new language or scrap their investments in server-side technology.
Several of the AJAX frameworks do not rely on Java. Most of these are implemented completely in JavaScript and designed to execute within the confines of a web browser. These frameworks leave the server-side implementation of AJAX to developers, allowing them to code in their preferred server-side languages. In this chapter, we will aim to simplify the task of adding AJAX interactions to your Spring web applications.
We will be using Direct Web Remoting (DWR). DWR is an AJAX framework that relies exclusively on Java and JavaScript. While it is not the only AJAX Remote Procedure Call (AJAX-RPC) framework available for the Java platform, it is one of the most mature and frequently used. Moreover, DWR integrates very nicely with Spring!
DWR is an open source initiative that makes calling Java functions from JavaScript easy. It is distributed under the Apache License, version 2. DWR lets JavaScript call Java methods as if they were running locally in the browser, when in fact the Java methods are running on the server. DWR has a number of features, including the ability to marshal virtually any data structure between Java and JavaScript. The two main components of DWR follow:
A Java servlet running on the server that processes requests and sends responses back to the browser
A set of JavaScript libraries running in the browser to send requests and dynamically update the web page
DWR dynamically generates JavaScript based on Java classes that use some AJAX calls, which gives the impression that the execution is happening on the browser, whereas in reality, the server is executing the code and DWR is marshalling the data back and forth. This method of using remote functions from Java in JavaScript gives DWR users a feel much like conventional RPC mechanisms, such as Remote Method Invocation (RMI), with the added benefit that it runs over the Web without requiring any browser plug-ins.
Before we begin our examples, let's quickly install DWR. You can get started with DWR in two different ways. The easiest way is to download the WAR (web archive) file and have a look around, but this doesn't allow you to see how easily DWR integrates with your existing Spring-based web application. To start using DWR with an existing application, you will need to download the latest dwr.jar file from www.getahead.org/dwr. Starting with version 2.0, DWR also requires commons-logging.jar. Place the JAR files in the WEB-INF/lib folder of an existing Java EE web application of your choice to complete the installation.
As we mentioned, we choose DWR because of its easy integration with Spring. Now, let's go through some examples to see exactly how to expose Spring-managed beans using DWR.
Integrating DWR into your existing Spring application is also simple. From version 2.0 of DWR, a new configuration mechanism is available when using DWR with Spring 2.5. The new mechanism uses the namespace support provided by Spring 2.5 and allows you to configure DWR entirely in Spring. This eliminates the need for an extra configuration file and provides tight integration between the bean or beans that you want to use remotely and the DWR configuration. Let's look at the simple Spring configuration file shown in Listing 19-1.
Example 19.1. Simple Spring Configuration File
<beans
xmlns="http://www.springframework.org/schema/beans"
xmlns:xsi="http://www.w3.org/2001/XMLSchema-instance"
xsi:schemaLocation="http://www.springframework.org/schema/beans
http://www.springframework.org/schema/beans/spring-beans-2.5.xsd">
<bean id="someBean" class="BeanClass">
        <property name="someProperty" ref="someOhterBean"/>
    </bean>

    <bean id="someOtherBean" class="OtherBeanClass"/>
</beans>
Here, someBean is an ordinary Spring bean that has a reference to someOtherBean, which is a normal Spring bean defined in the same configuration file.
The code in Listing 19-2 shows you how to remote someOtherBean to JavaScript using DWR.
Example 19.2. DWR-Related Configuration
<beans
        xmlns="http://www.springframework.org/schema/beans"
        xmlns:xsi="http://www.w3.org/2001/XMLSchema-instance"
        xmlns:dwr="http://www.directwebremoting.org/schema/spring-dwr"
        xsi:schemaLocation="http://www.springframework.org/schema/beans
            http://www.springframework.org/schema/beans/spring-beans-2.0.xsd
            http://www.directwebremoting.org/schema/spring-dwr
            http://www.directwebremoting.org/schema/spring-dwr-2.0.xsd">

    <bean id="someBean" class="BeanClass">
        <property name="somePropter" ref="someOtherBean"/>
        <dwr:remote javascript="Ajaxified">
            <dwr:include method="someMethod"/>
        </dwr:remote>
    </bean>

    <bean id="someOtherBean" class="OtherBeanClass"/>

    <dwr:configuration />

    <dwr:controller name="dwrController" debug="true"/>
</beans>
First of all, you need to define the XML namespace (xmlns) by providing an alias, in this case dwr, and link it to the URI of the schema. Note that the dwr alias can be replaced with anything you want as long as you use your alias instead of the dwr one in the following examples. Changing xmlns:dwr to xmlns:otheralias is all you need to do to change the alias.
If you have an IDE with XML schema support (e.g., IntelliJ or Eclipse), you should navigate inside the dwrService bean and use the automatic completion functionality to view all available tags provided by the DWR namespace.
Choose the dwr:remote tag, and you will see that the IDE will prompt you for the javascript name to use for exposing the bean. Note that the dwr:remote tag should be a nested tag of the someBean bean. That is all there is to it to configure DWR to remote the someBean bean under the JavaScript script named Ajaxified. However, we do need to somehow expose DWR to the outside world. Here, you have two options, and which is better depends mostly on whether you are using Spring MVC for your web application. If you are, you should use DwrServlet. If you are using any other web framework, use DwrSpringServlet.
Before explaining DWR in any detail, we will introduce a simple example scenario that we will build on throughout this chapter. We will use a minimal model based on user registration, consisting of a user representation and a data access object (DAO) to look up basic user details from a data store. The User class has id, username, and password strings. Listing 19-3 shows the User class.
Example 19.3. The User Class
public class User {

    public String id;
    public final String username;
    public final String password;

    public User(String username, String password) {
        this.username = username;
        this.password = password;
    }

    public String getId() {
        return id;
    }

    public void setId(String id) {
        this.id = id;
    }

    public String getUsername() {
        return username;
    }

    public String getPassword() {
        return password;
    }
}
Next, we will demonstrate the simple UserDao interface, which provides a capability to check the availability of a new username among other general features. Listing 19-4 shows the UserDao interface.
Example 19.4. The UserDao Interface
public interface UserDao {
    /**
     * Retrieves all the users
     * @return Collection of users
     */
    Collection<User> getAllUsers();

    /**
     * Saves a User to the datastore
     * @param user The User object to persist
     */
    void saveUser(User user);
/**
* Retrieves a user based on the User's identity
* @param id The identity of the User
* @return The retrieved User
*/
User getUser(String id);
/**
* Retrieves a user based on the User's username
* @param username The username
* @return The retrieved User
*/
User getUserByUsername(String username);
/**
* Deletes a User from the datastore
* @param user The User to delete
*/
void deleteUser(User user);
/**
* Checks whether a username is already taken or not
* @param username The username to check
* @return True or False based on whether the username is available or not
*/
boolean usernameExists(String username);
}For this example, we have used a static Map<String, Value> to hold all the existing users in the following implementation of the UserDao interface. Adding or deleting users will add or remove a User object from the Map<String, Value>. Listing 19-5 shows the UserDaoImpl class.
Example 19.5. The UserDaoImpl Class
public class UserDaoImpl implements UserDao {

    /**
     * Static datasource
     */
    private static Map<String, User> allUsers = new HashMap<String, User>();

    public Collection<User> getAllUsers() {
        return allUsers.values();
    }

    public void saveUser(final User user) {
        String id = String.valueOf(allUsers.size() + 1);
        user.setId(id);
        if (!usernameExists(user.getUsername())) {
            allUsers.put(user.getUsername(), user);
        } else {
            throw new
IllegalArgumentException("Username " + user.getUsername() + " already exists.");
        }
    }
public User getUser(final String id) {
return allUsers.get(id);
}
public User getUserByUsername(final String username) {
return allUsers.get(username);
}
public void deleteUser(final User user) {
allUsers.remove(user);
}
public boolean usernameExists(final String username) {
return allUsers.containsKey(username);
}
static {
allUsers.put("janm", new User("janm", "password", "address"));
allUsers.put("aleksav", new User("aleksav", "password", "address"));
allUsers.put("anirvanc", new User("anirvanc", "password", "address"));
}
}By its very nature, DWR creates a tight coupling between client-side and server-side code, with a number of implications. First, changes to the API of remoted methods need to be reflected in the JavaScript that calls the DWR stubs. Second (and more significantly), this coupling causes client-side concerns to affect server-side code. To get around this, we have introduced a DwrService interface and its implementation, which will provide the remoted methods required for the current example. Listing 19-6 shows the DwrService interface.
Example 19.6. The DwrService Interface
public interface DwrService {
    boolean usernameAvailability(String username);
}
Now, let's have a look at the implementation of the DwrService interface. Listing 19-7 shows the DefaultDwrService class, which implements the DwrService interface.
Example 19.7. The DefaultDwrService Class
public final class DefaultDwrService implements DwrService {

    private UserDao userDao;

    public boolean usernameAvailability(final String username) {
        return !this.userDao.usernameExists(username);
    }

    public void setUserDao(final UserDao userDao) {
        this.userDao = userDao;
    }
}
Here, you can see that the DefaultDwrService only uses the UserDao to check the username availability for a new user. Now, if at a later stage, we need to introduce a new method for some client-side-specific concern, we can easily do that in the DwrService interface and in its implementation.
Next, we will have a look at the DWR configuration, which will enable AJAX clients to construct DwrService and call its methods. This is very similar to the DWR configuration you saw earlier in the chapter. Listing 19-8 shows the DWR configuration to make the DwrService implementation remote.
Example 19.8. The DWR Configuration for DwrService
<beans
        xmlns="http://www.springframework.org/schema/beans"
        xmlns:xsi="http://www.w3.org/2001/XMLSchema-instance"
        xmlns:dwr="http://www.directwebremoting.org/schema/spring-dwr"
        xsi:schemaLocation="http://www.springframework.org/schema/beans
            http://www.springframework.org/schema/beans/spring-beans-2.5.xsd
            http://www.directwebremoting.org/schema/spring-dwr
            http://www.directwebremoting.org/schema/spring-dwr-2.0.xsd">

    <bean id="dwrService" class="com.apress.prospring2.ajax.service.DefaultDwrService">
        <property name="userDao" ref="userDao"/>
        <dwr:remote javascript="DwrService">
            <dwr:include method="usernameAvailability"/>
        </dwr:remote>
    </bean>

    <bean id="userDao" class="com.apress.prospring2.ajax.dataaccess.UserDaoImpl"/>

</beans>
In the preceding configuration, only the highlighted code relates to DWR. The <dwr:remote> tag has a javascript attribute, which specifies the name by which the object will be accessible from JavaScript code. In the nested <dwr:include> tag, the method parameter defines the name of the method that will be exposed. Alternately, the <dwr:remote> tag has a nested <dwr:exclude> tag, which defines the name of the method that will not be exposed. This tag can be helpful in situations where you don't want to expose one or two methods out of the many methods in the exposed object. Explicitly stating the methods to expose is good practice to avoid accidentally allowing access to potentially harmful functionality. If this element is omitted, all of the class's public methods will be exposed to remote calls.
Now to complete the configuration of our example, we need to configure DwrServlet in our web.xml file. Listing 19-9 shows the DwrServlet configuration.
Example 19.9. The web.xml File for DwrService
<?xml version="1.0" encoding="UTF-8"?>
<web-app version="2.5"
        xmlns="http://java.sun.com/xml/ns/javaee"
        xmlns:xsi="http://www.w3.org/2001/XMLSchema-instance"
        xsi:schemaLocation="http://java.sun.com/xml/ns/javaee
            http://java.sun.com/xml/ns/javaee/web-app_2_5.xsd">

        <!-- Location of the Spring bean definition files, for initialization of
             root Spring application context -->
    <context-param>
        <param-name>contextConfigLocation</param-name>
        <param-value>
            classpath*:/com/apress/prospring2/ajax/**/*-context.xml
        </param-value>
    </context-param>
<listener>
<listener-class>org.springframework.web.context.ContextLoaderListener  </listener-class>
</listener>
<servlet>
<servlet-name>ajaxdemo</servlet-name>
<servlet-class>org.springframework.web.servlet.DispatcherServlet</servlet-class>
</servlet>
<servlet-mapping>
<servlet-name>ajaxdemo</servlet-name>
<url-pattern>*.html</url-pattern>
</servlet-mapping>
<!-- DWR servlet setup -->
<servlet>
<servlet-name>dwr</servlet-name>
<servlet-class>org.directwebremoting.spring.DwrSpringServlet</servlet-class>
<init-param>
<param-name>debug</param-name>
<param-value>true</param-value>
</init-param>
</servlet>
<servlet-mapping>
<servlet-name>dwr</servlet-name>
<url-pattern>/dwr/*</url-pattern>
</servlet-mapping>
</web-app>
</listener-class>
</listener>
<servlet>
<servlet-name>ajaxdemo</servlet-name>
<servlet-class>org.springframework.web.servlet.DispatcherServlet</servlet-class>
</servlet>
<servlet-mapping>
<servlet-name>ajaxdemo</servlet-name>
<url-pattern>*.html</url-pattern>
</servlet-mapping>
<!-- DWR servlet setup -->
<servlet>
<servlet-name>dwr</servlet-name>
<servlet-class>org.directwebremoting.spring.DwrSpringServlet</servlet-class>
<init-param>
<param-name>debug</param-name>
<param-value>true</param-value>
</init-param>
</servlet>
<servlet-mapping>
<servlet-name>dwr</servlet-name>
<url-pattern>/dwr/*</url-pattern>
</servlet-mapping>
</web-app>The code marked in bold shows the DwrServlet configuration. Here, we have used DwrSpringServlet and have mapped it to the path /dwr/*. The servlet will automatically retrieve its configuration from the Spring bean container loaded by the ContextLoaderListener.
If you are already using Spring MVC, using DwrController is the most obvious choice, because you will benefit from a number of services provided to you by Spring MVC, like localization support. DwrController is a normal Spring controller that has a property that takes the DWR configuration as a property. The easiest way to use this controller is again to use a tag provided by the DWR namespace, as shown in Listing 19-10.
Example 19.10. Code Snippet Showing DwrController Configuration
<dwr:controller id="dwrController" debug="true"/>
Note that the debug property is optional and defaults to false. Make sure to map this controller to the path where you want to expose DWR, normally /dwr.
If DWRServlet's web.xml definition sets the init-param debug function to true, then DWR's extremely helpful test mode is enabled. Navigating to /{your-web-app}/dwr/ brings up a list of your classes that DWR has been configured to remote. Clicking through takes you to the status screen for a given class. The DWR test page for DwrService is shown in Figure 19-1. As well as providing a script tag that points to DWR's generated JavaScript for the class to paste into your web pages, this screen also provides a list of the class's methods. The list includes methods inherited from the class's supertypes.
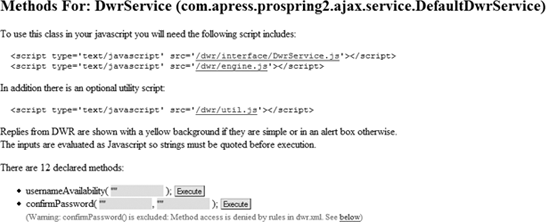
You can enter parameter values into the text boxes next to the accessible methods and click the Execute button to invoke them. The server's response will be displayed using JavaScript Object Notation (JSON) in an alert box, unless it is a simple value, in which case it will be displayed inline alongside the method. These test pages are very useful. Not only do they allow you to easily check which classes and methods are exposed for remoting but they also let you test that each method is behaving as expected.
Once you're satisfied that your remoted methods are working correctly, you can use DWR's generated JavaScript stubs to call on your server-side objects from client-side code.
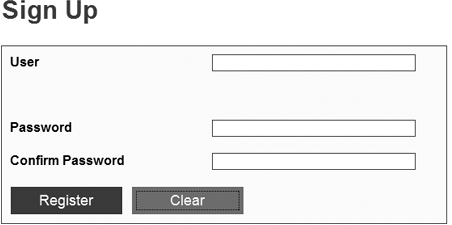
We have deployed the application on the root of a locally running Tomcat server (Tomcat 5.5). Once deployed, navigating to http://localhost:8080/index.html will bring up the simple user registration form. Figure 19-2 shows the empty form.
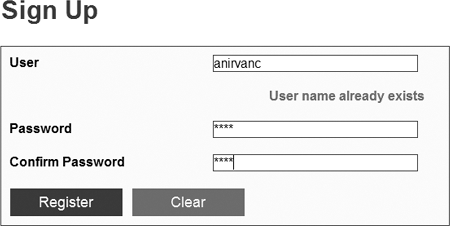
As we explained before, the UserDao interface maintains a static list of three users: janm, aleksav, and anirvanc. If we try to register as any of these existing users, a validation error will occur, as shown in Figure 19-3.
Earlier in the chapter, while working through our simple example, we mentioned that once DWR is properly configured and the web application is deployed, DWR will dynamically generate a JavaScript representation of remoted Java objects. Here, the biggest challenge in creating a remote interface that matches some Java code across AJAX is the usually asynchronous nature of AJAX, compared to the synchronous nature of a normal Java call. DWR addresses this problem by introducing a callback function that is called when the data is returned from the server. There are two recommended ways to make a call using DWR: by appending the callback function to the parameter list of a JavaScript function or by appending a call metadata object to a JavaScript function.
In our example, we had a Java method that looks like the one shown in Listing 19-11.
Example 19.11. A Java Method Exposed Using DWR
public boolean usernameAvailability(final String username) {
    return !this.userDao.usernameExists(username);
}
From JavaScript, we can use this method as shown in Listing 19-12.
Example 19.12. JavaScript Code to Call the Remote Method
<script type='text/javascript' src='/dwr/interface/DwrService.js'></script>
<script type='text/javascript' src='/dwr/engine.js'></script>
...
...
function checkUsernameAvailability(username) {
    DwrService.usernameAvailability(username, displayStatus);
    return false;
}

function displayStatus(nameStatus){
    if (!nameStatus) {
        alert("Username already exists");
    } else {
        Alert("Username is available");
    }
}
We have passed a simple callback JavaScript function displayStatus to the remoted method DwrService.usernameAvailability().
Alternatively, we could have used a different syntax to call a metadata object. This syntax uses a call metadata object that specifies the callback function and (optionally) other options. In this syntax, the code in Listing 19-12 would have changed into the snippet shown in Listing 19-13.
Example 19.13. Calling a Metadata Object
DwrService.usernameAvailability(username, {
  callback:function(status) { if (!status)
{ alert("Username not available.} else { alert("Username available");}}
});
Depending on your style, this approach may be easier to read than the simple callback, but more importantly, it allows you to specify extra call options.
The engine.js script is vital to DWR; since it is used to marshal calls from the dynamically generated interface JavaScript function, it is needed wherever DWR is used. With DWR versions 1.0 and 1.1, all functions had the prefix DWREngine, but as of version 2.0, the preferred prefix is dwr.engine. The engine.js script provides some important configurable options while working with DWR. In the following sections, we will have a closer look at some of the important features provided by engine.js.
In DWR, several remote calls can be sent to the server with a single HTTP request, which saves on round-trip times to the server and reduces latency. Calling dwr.engine.beginBatch() tells DWR not to dispatch subsequent remoted calls straight away and instead to combine them into a single batched request. A call to dwr.engine.endBatch() sends the batched request to the server. The remote calls are executed in order on the server side, and each JavaScript callback is invoked.
Batching can help to reduce latency in two ways: first, you avoid the overhead of creating an XMLHttpRequest object and establishing the associated HTTP connection for each call. Second, in a production environment, the web server won't have to deal with so many concurrent HTTP requests, improving response times.
Since AJAX is normally an asynchronous model, remote calls may not return in the order in which they were sent. dwr.engine.setOrdered(boolean) allows you to request that all replies are made in the strict order that they were sent. DWR achieves this by sending new requests only after older ones have been completed. By default, the Boolean parameter is set as false. You should always bear in mind that setting it to true will slow down your application and could leave users with an unresponsive browser if a message ever gets lost. Sometimes, better solutions, in which you make your application use the asynchronous model properly, are possible. Please think carefully before you decide to use this method.
Whenever DWR detects a failure, it calls an error or warning handler (depending on the severity of the error) and passes it the message. This error or warning handler could be used to display error messages in an alert box or to the status bar. To change the error handler, use dwr.engine.setErrorHandler(function), and to change the warning handler, use dwr.engine.setWarningHandler(function).
The util.js script contains a number of utility functions to help you update your web pages with JavaScript data (which might be returned from the server). You can use util.js outside of DWR, because (with the exception of useLoadingMessage) it does not depend on the rest of DWR to function. With DWR version 1.0 and 1.1, all functions had the prefix DWRUtil; from version 2.0, the preferred prefix is dwr.util. The old prefix will still work, though it is deprecated. The documentation generally uses the new version.
The four basic page manipulation functions, getValue[s], and setValue[s]() work on most HTML elements except tables, lists, and images. getText() works with select lists. A more comprehensive list of utility functions can be found at http://getahead.org/dwr/browser/util.
DWR has been designed with security in mind. You can use the <dwr:include> and <dwr:exclude> tags to white list only those classes and methods you wish to remote. This avoids accidental exposure of functionality that could be maliciously exploited. Moreover, using the debug test mode, you can easily audit all the classes and methods that are exposed to the Web.
DWR also supports role-based security. You can specify the Java EE role that a user must have to access a particular bean, via the bean's <dwr:creator> configuration. By deploying multiple URL-secured instances of the DWRServlet, each with its own dwr.xml configuration file, you can also provide different sets of users with access to different remote functionality. An example configuration to use Java EE servlet security is shown in Listing 19-14.
Example 19.14. Java EE Servlet-Based Security Configuration
<servlet>
  <servlet-name>dwr-user-invoker</servlet-name>
  <servlet-class>uk.ltd.getahead.dwr.DWRServlet</servlet-class>
  <init-param>
    <param-name>config-user</param-name>
    <param-value>WEB-INF/dwr-user.xml</param-value>
</init-param>
</servlet>
<servlet>
<servlet-name>dwr-admin-invoker</servlet-name>
<servlet-class>uk.ltd.getahead.dwr.DWRServlet</servlet-class>
<init-param>
<param-name>config-admin</param-name>
<param-value>WEB-INF/dwr-admin.xml</param-value>
</init-param>
</servlet>
<servlet-mapping>
<servlet-name>dwr-admin-invoker</servlet-name>
<url-pattern>/dwradmin/*</url-pattern>
</servlet-mapping>
<servlet-mapping>
<servlet-name>dwr-user-invoker</servlet-name>
<url-pattern>/dwruser/*</url-pattern>
</servlet-mapping>
<security-constraint>
<display-name>dwr-admin</display-name>
<web-resource-collection>
<web-resource-name>dwr-admin-collection</web-resource-name>
<url-pattern>/dwradmin/*</url-pattern>
</web-resource-collection>
<auth-constraint>
<role-name>admin</role-name>
</auth-constraint>
</security-constraint>
<security-constraint>
<display-name>dwr-user</display-name>
<web-resource-collection>
<web-resource-name>dwr-user-collection</web-resource-name>
<url-pattern>/dwruser/*</url-pattern>
</web-resource-collection>
<auth-constraint>
<role-name>user</role-name>
</auth-constraint>
</security-constraint>Using DWR, an attacker can cause the server to create an instance of any Java object that you specify in your DWR configuration, and (if you are using the BeanConverter interface) any Java object that is in any of the parameters to the methods of those classes. Any of the properties in those classes can then be set with whatever data the attacker wishes. This is all fairly obvious if you think about what DWR is doing, but it could cause problems for the unwary. If you create a FileBean with an appendStringToFile method and export it using DWR, you are giving an attacker a simple way of filling up your filesystem—think about the options you give attackers by using DWR. This type of scenario may make DWR sound risky, but similar issues exist with traditional web architectures; it's just that they are less obvious (and thus less likely to get fixed).
You can guard against failures in DWR access mechanisms by separating the classes accessed by DWR into a separate package and having them proxy the real code. You can double-check role-based security yourself if you wish. These options just add to the checks already made by DWR. A better idea than double-checking might be to audit the DWR source to ensure that the checks it is already doing are correct. The code has been checked over by several people already, but more eyes will always help.
You've seen how easy it is to implement a Java-backed AJAX application using DWR. Although the example scenario is a simple one, and we have taken a fairly minimal approach to implementing the use cases, you shouldn't underestimate the amount of work the DWR engine can save you over a homegrown AJAX approach. We have also shown how DWR has done all of the work for you. We wrote very few lines of JavaScript to implement the client, and on the server side, all we had to do was augment our regular SpringBean interface with some additional DWR-related configuration.
Of course, every technology has its drawbacks. As with any RPC mechanism, in DWR, you can easily forget that each call you make on a remoted object will take much longer than a local function call. DWR does a great job of hiding the AJAX machinery, but it's important to remember that the network is not transparent; making DWR calls involves latency, and your application should be architected so that remote methods are coarse grained.
DWR has its own solution to the latency issue in call batching (as you saw earlier in this chapter). If you can't provide a suitably coarse-grained AJAX interface for your application, use call batching wherever possible to combine multiple remote calls into a single HTTP request.
DWR has a lot to offer. It allows you to create an AJAX interface to your server-side domain objects quickly and simply, without needing to write any servlet code, object serialization code, or client-side XMLHttpRequest code. Deploying to your web application using DWR is extremely simple, and DWR's security features can be integrated with a Java EE role-based authentication system. DWR isn't ideal for every application's architecture, however, and it does require you to give some thought to the design of your domain objects' APIs.
If you want to learn more about the pros and cons of AJAX with DWR, the best thing would be to download it and start experimenting. While DWR has many features that we haven't covered in this chapter, http:// getahead.org/dwr is a good starting point for further information when you're taking DWR for a spin.
One of the most important points to take away from this chapter is that for AJAX applications, there is no one-size-fits-all solution. AJAX is a rapidly developing framework with new technologies and techniques emerging all the time. DWR itself is a very active project and is going through rapid development. Pretty soon, the next major release, DWR 3.0, will provide even more interesting features for integrating with Spring-based applications.