
When we go back a couple of decades and think about the beginnings of the World Wide Web, we realize how much—and at the same time how little—has changed. Some things have changed a great deal: the number of people using the Web; its availability, accessibility, and speed; and of course the range of services on offer. If you never enjoyed the dissonant sounds of a modem, you can't fully appreciate the ease with which we now watch high-quality videos via mobile broadband, fiber optic cable, and the like.
The vast increases in the number of users, performance, and services have also had a great influence on the development of the Web as we know it today. Changes to a system introduce new requirements that usually lead to the invention of new solutions (and new buzzwords) to meet those new requirements. These new technologies often come with their own sets of requirements, what brings us back to the beginning of this chapter and how little has changed since the birth of the Internet. Never mind the actual content of a web site; when browsing the Net, we are still mainly downloading HTML code via the same old protocols: mainly HTTP over TCP/IP.
The eight methods that HTTP defines (GET, POST, DELETE, PUT, HEAD, TRACE, OPTION, and CONNECT) were all that was needed when the Web merely consisted of linked text pages, all users were nice to each other, and it was bad manners to exploit security holes. Times have changed with a vengeance, and web developers these days have to cope with entirely different conditions.
While "free browsing" was trendy in the 1990s, almost every web application developer nowadays must have been confronted with the requirement to limit the user's navigational freedom and guide the user through a series of consecutive pages in a specific way for a business process to be completed. If you haven't had to implement such a process yourself yet, you have certainly participated in one the last time you placed an order with your favorite online retailer or booked a flight online.
Figure 18-1 shows a basic flowchart of a simplified version of such an airline ticket booking process. At the beginning, the user can search for flights until she has picked a suitable one. So far, the process is pretty straightforward. However, by confirming her flight selection, she enters a more complex booking process involving a set of steps that all need to be completed successfully before the selected flight can be booked. In our simple example, the user will have to enter her personal details correctly before she is asked to provide the airline with payment details. Once those details have been accepted, a final confirmation is requested before the tickets are booked, and the user can finally start looking forward to visiting her travel destination.

This is a very simple example, but we're sure you get the idea. Page sequences like this and more complex conversations usually require some sort of state management. HTTP is a stateless protocol, meaning that each request is completely independent of previous or later requests. Information is passed on through request parameters or session attributes. Achieving stateful navigational control spanning a sequence of pages in a stateless environment can be quite cumbersome.
There are other situations that can also cause problems in a web application. What if a user in the example flow entered the postal code of his old address in the personal details form, but only realized it after submitting his entries? Even if a link to the previous page is provided, many users will just click the Back button to go back. Theoretically, this should prompt the browser to display the last page purely retrieved from its own cache, but in practice, all browsers implement their own strategies. Some browsers even reload data from the server. Surely a web application should behave the same with all browsers; and especially in a way that the web developer can predict.
Another situation of concern is related to a user moving through the pages in the other direction. By knowing the correct URLs and the parameters that these URLs expect, a user can theoretically hop from one stage of a process to another while leaving out other stages in between. In our ticket booking example, we would want to make sure the user can't take an illegal shortcut and just skip, say, the page for entering payment details.
To mention a last common problem in web applications, think of a situation where a page seems to hang after you click a link or submit a form. Instead of just waiting in front of the screen, most of us would probably press the refresh button. The undesirable state this can lead to, especially if your last request was a POST request, is known as the double-submit problem. When you were just posting a comment for a blog, the worst thing that could happen was to post the same comment twice. People might think you're an impatient user; but now imagine if your last post had nothing to do with a blog but was a confirmation to take money out of your account. How painful could that be?
You may be wondering why we list all these problems. As you might have guessed by now, we're about to introduce you to a Spring module that offers solutions to all of them.
Spring Web Flow is a controller framework for implementing page flows in web applications that are based on MVC frameworks like Spring MVC, Struts, or JSF. In the MVC model two architecture shown in last chapter's Figure 17-2, Spring Web Flow takes its place in the box labeled "Controller," which is responsible for handling incoming requests, preparing the model, and passing the model to the view for rendering. However, unlike other web controller frameworks that operate on a request-to-request basis, Spring Web Flow allows you to capture full navigational paths—even very complex ones—involving a series of pages in a clear and concise way. It does this by representing them as flows.
A flow in Spring Web Flow is a self-contained module fulfilling the role of a template for a user-web-site session. The conversational scope was introduced by Spring Web Flow to fill the gap between the very granular request scope and the full-blown session scope. Conversations can make up the whole of a user session but usually only span a series of requests.
These templates, or flow definitions, describe the order and dependencies of all possible steps and tasks involved in fulfilling a business process or user conversation. They define which pages should be displayed, what business logic needs to be executed, and how these pages and the business logic are related to each other. Due to their modular character, flow definitions can easily be reused throughout an application.
Usually, before development work on a web site project begins, a concept of what is about to be developed is created. This can involve clients getting together with business analysts and interface architects creating loads of documentation. Or it can just as well be only you sitting down with pen and paper, making notes on what you want your web site to be like.
In either case, a common way to sketch out functional and behavioral requirements is to draw up a flowchart. Figure 18-2 shows the flowchart for a charity shop that wants to make its collection of second-hand books available online. Its users will be allowed to browse what's available and purchase the books they're interested in.

Flowcharts make it easier to visualize processes; in this respect, their role is similar to that of UML state diagrams. In general terms, state diagrams are used to describe the behavior of a system. They describe the possible states the system can be in, the internal and external events that can occur at these states, and the possible transitions between states triggered by the events.
State diagrams have a limited number of elements. All state diagrams begin with an initial state that describes the system when it is created. Beginning with this initial state, the system starts changing state. In diagrams, the initial state is represented by a filled circle. All other states are symbolized by rounded boxes. States can have activities associated with them that are depicted in the activity section of the state symbol using a do/action syntax. In addition to their main activities, states can also define entry and exit actions that are executed when a state is entered or left (see Figure 18-3).

Arrows between two states indicate possible transitions from one state to another in the direction of the arrow. Transitions are labeled with the event they are triggered by and can optionally also be tagged with an event [guard]/effect label. A guard is an expression that evaluates to a Boolean value and offers further control over the execution of a transition. A transition matching an event won't fire if the guard expression doesn't evaluate to true. If the transition does fire, the optionally defined actions get executed.
UML state diagrams also include the concept of superstates. Superstates are used when multiple states define the same transition(s) to another state. Instead of noting each transition for every state individually, the superstate declares the transition for all states that are members of the superstate.
Unless the system models an infinite loop, all systems come to an endpoint that declares the process completed. These end states are displayed by bordered, filled circles and don't declare any transitions, as that would defeat the purpose of an end state.
Coming back to our charity shop example, Figure 18-4 shows the previously described use case in UML state diagram notation.

You may be wondering why we're explaining UML state diagrams in a chapter on Spring Web Flow. The point is that state diagrams are used to visualize the type of model known as a finite state machine (FSM). Spring Web Flow is an implementation of an FSM. When you compare the flowchart in Figure 18-2 with the state diagram in Figure 18-4, you will see that the views map nicely onto states. Spring Web Flow does pretty much the same thing by treating all steps and tasks of a web application as states. So flow definitions show a high level of resemblance to state diagrams, which is why we found it important to explain them.
In the course of this chapter, you will see how closely Spring Web Flow follows the concept of FSMs and how the various elements are implemented. Better than just talking about Spring Web Flow is actually using it and seeing it in action. On the following pages, we'll guide you through getting hold of Spring Web Flow and show you step by step how to use it.
Before we can start building web applications with Spring Web Flow, we need to obtain the necessary libraries. Hence, our first step will be to download the Spring Web Flow distribution from the Spring Framework home page, at www.springframework.org/download. Like the Spring Framework libraries, the Spring Web Flow libraries are also available on a SourceForge download page where you can choose among all releases (http://sourceforge.net/project/showfiles.php?group_id=73357&package_id=148517). At the time of this writing, Spring Web Flow 2.0 is the latest release, and all the following examples in this chapter will be based on this version.
When the final version of Spring Web Flow 1.0 was released, it contained quite a few drastic changes compared to previous release candidates, causing quite a stir among users and prompting the developers to publish an upgrade guide. Initially, assuming that a lesson had been learned from this, we hoped fewer changes would arise while this chapter was being written. But since nothing is really final until the final release (and even then development still goes on), please be aware that depending on your version of Spring Web Flow, you might have to amend our samples to make them run. In case you experience any problems, the Spring Framework home page and the Spring Web Flow forum (http://forum.springframework.org/index.php) are good resources.
Spring Web Flow Nightly Builds
Like the Spring Framework itself, Spring Web Flow is under constant development with new features being added frequently. If you want to try out the latest features that haven't made their way into a full release yet, you can download nightly builds from http://static.springframework.org/downloads/nightly/snapshot-download.php?project=SWF.
Building Spring Web Flow from Source
It is also possible to build your own version of Spring Web Flow from scratch. To check out the latest version of the code, you first need a Subversion client installed. You can find the Subversion source code or precompiled binaries for a variety of operating systems at http://subversion.tigris.org/.
Windows users who prefer a graphical user interface might find the free tool TortoiseSVN helpful. It can be found at http://tortoisesvn.tigris.org/. With this tool installed, all SVN commands are just a right-click away. In addition, little icons directly indicate the status of a file (if it is up-to-date, modified, or deleted, just to name a few of the available options).
Either way, the repository URL you will have to connect to is https://springframework.svn.sourceforge.net/svnroot/springframework/spring-webflow/. You won't need a username or password.
You will find the latest development efforts in the trunk folder and all previous releases named accordingly in the tags folder. Figure 18-5 shows a screenshot of Spring Web Flow's Subversion repository as seen through TortoiseSVN. As already mentioned in the equivalent "Building Spring from Source Code" section in Chapter 2, it is possible to compile the trunk version, but we recommend compiling one of the tagged releases or milestones.

Checking out Spring Web Flow through a graphical user interface is straightforward. Now let's see how to achieve the same goal through the command line (see Listing 18-1).
Example 18.1. SVN Command to Check Out the 2.0 Release
svn checkout https://springframework.svn.sourceforge.net/svnroot/springframework/spring-webflow/tags/spring-webflow-2.0.0.RELEASE
Running this command will check out the aforementioned release into the directory the command has been issued from. For more details on how to use Subversion, see the online book Version Control with Subversion, freely available at http://svnbook.red-bean.com/. With the same command, you can check out any other tag (or branch, or even the trunk) of the repository. All you need to do is adjust the preceding URL to reflect your choice.
To build Spring Web Flow, you will need Java 1.5 or higher and Apache Ant 1.7 or higher. Spring Web Flow uses Apache Ivy as its dependency manager. If you haven't already installed Apache Ivy, there is a version bundled with Apache Ant that will be used automatically. If all these requirements are met, you should navigate to the build-spring-webflow subdirectory of your checkout directory. Then you can start the build by typing ant. This will compile all source code, produce the Spring Web Flow JAR files, and build the sample applications included in the source code distribution. If you want to build a different tag than the one in our example, it's worth checking the readme.txt file in your checkout directory for the correct ant target information.
Table 18-1 gives a list of the created JAR files that can be found in multiple subdirectory locations (e.g., in the target/artifacts subdirectory of each module and under the integration-repo directory). These JARs are the same ones you can download from the aforementioned SourceForge page. We will discuss the sample applications that are provided at the end of this chapter.
Table 18.1. Spring Web Flow Distribution JARs
JAR File | Description |
|---|---|
| This library contains all elements of the Spring Web Flow system. |
| This JAR contains the Spring Data Binding framework used internally by Spring Web Flow. |
|
|
| The spring-js library is one of the latest additions. It packages a JavaScript abstraction framework facilitating AJAX calls and other client-side behaviors. The |
Now that we have the necessary Spring Web Flow libraries, let us see what else we need to start building our first application.
In order to use Spring Web Flow in your application, you will need to include a few additional libraries to fulfill Spring Web Flow's dependency requirements. Table 18-2 provides a list of the additional libraries that are absolutely mandatory, as Spring Web Flow references them internally. Depending on which additional functionality you want to make use of (e.g., persistence with JPA), you will have to extend this list further. For a brief description of the mentioned libraries, refer to Chapter 2.
Table 18.2. Spring Web Flow Runtime Requirements
Dependency Group | JAR Files | Description |
|---|---|---|
|
| Additionally add |
Spring |
| Spring Web Flow 2.0.0.RELEASE requires the Spring Framework 2.5.4 or higher and at least Java 1.4. |
Spring Web Flow |
| Depending on whether you want to integrate Spring Web Flow with JSF, you also need to add org.springframework. faces-2.0.0.RELEASE.jar |
Expression Language | An Expression Language (EL) implementation (e.g., | JUnit is not required at runtime; it is only used for building and running the test suite. |
Testing |
|
Now then! It's time to get our hands dirty—not literally—and what could be more suitable to start with than building a Spring Web Flow version of the so well-known "Hello, World"? It will be a pretty simple version to get you started, but we're going to introduce new features with examples as we go along, slowly but surely enabling you to build complex web applications with Spring Web Flow.
First, we need a web application directory structure. It doesn't matter how you create it—whether you do it manually or with the help of your favorite IDE—as long as you have a directory for source code and libraries and a WEB-INF directory for the deployment descriptor and further configuration and application files.
To run this example, you will only need the minimum set of JAR files, as discussed previously—namely commons-logging.jar, spring-beans.jar, spring-context.jar, spring-core.jar, spring-web.jar, spring-webmvc.jar, an expression language implementation (we use ognl.jar), and of course spring-webflow.jar, spring-binding.jar, and spring-js.jar.
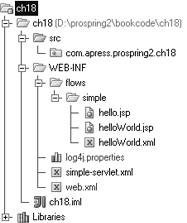
Underneath the WEB-INF directory, you should now create a new folder named flows. Within this directory, create two simple JSP files named hello.jsp and helloWorld.jsp, as shown in Listing 18-2 and Listing 18-3, respectively. These are the two files we are going to use to communicate with the world.
Example 18.2. hello.jsp
<%@ taglib prefix="form" uri="http://www.springframework.org/tags/form"%>
<!DOCTYPE html PUBLIC "-//W3C//DTD XHTML 1.0 Transitional//EN"
          "http://www.w3.org/TR/xhtml1/DTD/xhtml1-transitional.dtd">
<html>
<head>
  <title>Welcome to Spring Web Flow</title>
</head>
<body>
  <h1>Welcome to Spring Web Flow</h1>
  <form:form id="start">
    <input type="submit" name="_eventId" value="Click to say hello!" />
  </form:form>
</body>
</html>
Example 18.3. helloWorld.jsp
<!DOCTYPE html PUBLIC "-//W3C//DTD XHTML 1.0 Transitional//EN"
"http://www.w3.org/TR/xhtml1/DTD/xhtml1-transitional.dtd">
<html>
<head>
    <title>Welcome to Spring Web Flow</title>
</head>
<body>
    <h1>Hello, Web Flow!</h1>
</body>
</html>
Your directory structure should now look similar to Figure 18-6.
Next, we need a flow definition. Spring Web Flow offers you a convenient way to build flows using a simple XML-based definition language. Let us now add the helloWorld.xml file shown in Listing 18-4 to the flows directory.
Example 18.4. Basic XML Flow Template
<?xml version="1.0" encoding="UTF-8"?>
<flow xmlns="http://www.springframework.org/schema/webflow"
        xmlns:xsi="http://www.w3.org/2001/XMLSchema-instance"
        xsi:schemaLocation="http://www.springframework.org/schema/webflow
        http://www.springframework.org/schema/webflow/spring-webflow-2.0.xsd">

    <view-state id="hello">
        <transition on="*" to="helloWorld" />
    </view-state>

    <end-state id="helloWorld" view="helloWorld.jsp" />

</flow>
All Spring Web Flow flow definitions begin with this namespace declaration. All other elements that should become part of the flow definition are defined between the <flow> root element tags. For our example, we have added a single view-state with a transition child element and an end-state.
Now we have the sample views and the sample flow definition, but we're still missing the system configuration. In the last chapter, we covered Spring's DispatcherServlet, which we will also use in our Spring Web Flow application. We configure it in the web.xml file, as displayed in Listing 18-5. Our servlet is called simple, and we map all requests ending in *.html to it.
Example 18.5. Web Application Deployment Descriptor
<?xml version="1.0" encoding="ISO-8859-1"?>
<web-app xmlns="http://java.sun.com/xml/ns/j2ee"
    xmlns:xsi="http://www.w3.org/2001/XMLSchema-instance"
    xsi:schemaLocation="http://java.sun.com/xml/ns/j2ee
        http://java.sun.com/xml/ns/j2ee/web-app_2_4.xsd" version="2.4">

    <display-name>Pro Spring Chapter 18 Simple Hello World</display-name>
    <description>Introduction to Spring Web Flow</description>
<context-param>
<param-name>contextConfigLocation</param-name>
<param-value>/WEB-INF/simple-servlet.xml</param-value>
</context-param>
<servlet>
<servlet-name>simple</servlet-name>
<servlet-class>
org.springframework.web.servlet.DispatcherServlet
</servlet-class>
<load-on-startup>1</load-on-startup>
</servlet>
<servlet-mapping>
<servlet-name>simple</servlet-name>
<url-pattern>*.html</url-pattern>
</servlet-mapping>
</web-app>The final step to finish the setup of Spring Web Flow is done in the simple-servlet.xml application context file you can see in Listing 18-6.
Example 18.6. simple-servlet.xml
<beans xmlns="http://www.springframework.org/schema/beans"
       xmlns:xsi="http://www.w3.org/2001/XMLSchema-instance"
       xmlns:webflow="http://www.springframework.org/schema/webflow-config"
       xsi:schemaLocation="
           http://www.springframework.org/schema/beans
           http://www.springframework.org/schema/beans/spring-beans.xsd
           http://www.springframework.org/schema/webflow-config
           http://www.springframework.org/schema/webflow-config/
           spring-webflow-config.xsd">

    <bean id="publicUrlMappings"
          class="org.springframework.web.servlet.handler.SimpleUrlHandlerMapping">
        <property name="mappings">
            <value>
                /helloWorld.html=helloWorldHandler
            </value>
        </property>
    </bean>

    <bean id="helloWorldHandler"
           class="org.springframework.webflow.mvc.servlet.AbstractFlowHandler" />

    <bean class="org.springframework.webflow.mvc.servlet.FlowHandlerAdapter">
          <constructor-arg ref="flowExecutor" />
    </bean>

    <!-- Spring Web Flow Configuration -->
    <webflow:flow-executor id="flowExecutor" flow-registry="flowRegistry" />

    <webflow:flow-registry id="flowRegistry">
        <webflow:flow-location path="/WEB-INF/flows/helloWorld.xml" />
    </webflow:flow-registry>

</beans>
spring-webflow-config.xsd">
<bean id="publicUrlMappings"
class="org.springframework.web.servlet.handler.SimpleUrlHandlerMapping">
<property name="mappings">
<value>
/helloWorld.html=helloWorldHandler
</value>
</property>
</bean>
<bean id="helloWorldHandler"
class="org.springframework.webflow.mvc.servlet.AbstractFlowHandler" />
<bean class="org.springframework.webflow.mvc.servlet.FlowHandlerAdapter">
<constructor-arg ref="flowExecutor" />
</bean>
<!-- Spring Web Flow Configuration -->
<webflow:flow-executor id="flowExecutor" flow-registry="flowRegistry" />
<webflow:flow-registry id="flowRegistry">
<webflow:flow-location path="/WEB-INF/flows/helloWorld.xml" />
</webflow:flow-registry>
</beans>The SimpleUrlHandlerMapping should be an old friend by now. In its mapping property, we specify the URL we want to make our little application available under and map it to a handler. In the last chapter, you saw that the DispatcherServlet can delegate requests to any implementation of the HandlerAdapter interface. For Spring MVC controllers, there is the SimpleControllerHandlerAdapter, which is also used automatically if no HandlerAdapter is configured specifically. Since we're not using Spring MVC controllers in our example application, this class is not suitable for us. Fortunately, Spring Web Flow comes with its own HandlerAdapter implementation, FlowHandlerAdapter. Just as the SimpleControllerHandlerAdapter delegates requests to implementations of the Controller interface, the FlowHandlerAdapter handles requests with the help of implementations of the FlowHandler interface. (Actually, it's not as simple as that as you can imagine, but that's enough for you to know for the time being. You'll see exactly how it works in the "Flow Execution Architecture" section later in this chapter.)
Spring Web Flow ships with a default implementation of this interface, namely the AbstractFlowHandler. In spite of its name, it is not an abstract class, and we can instantiate it and use it for our example. We'll cover the interface and the class in more detail later. To enable the DispatcherServlet to use the FlowHandlerAdapter, we just need to add it to a context file and it will be picked up automatically when the context is initialized.
If you've asked yourself already how the flow definitions and flow handling find their way into the application, the FlowHandlerAdapter holds the answer. It has a FlowExecutor property that handles the execution of flows and needs to be set on construction.
To perform flow handling, the flowExecutor needs to have access to the flow definition(s). These are added to a flowRegistry that we define at the bottom of the simple-servlet.xml file. The flowExecutor holds a reference to the created flowRegistry and can hence access the flow definitions. (If all this explanation has been too quick for your liking, we will cover all the relevant components in more depth later in this chapter.)
Now that we have created all necessary files and configurations, it's time to build the application and deploy it. When we then direct the browser to http://localhost:8080/simple/helloWorld.html, we should see something like Figure 18-7.
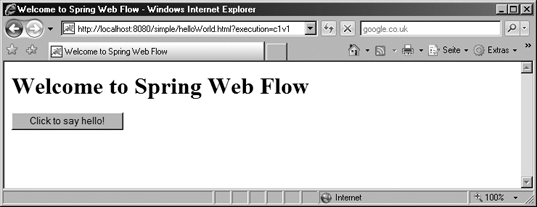
Clicking the "Click to say hello!" button will then take us to the next page, which should look like Figure 18-8. Hooray!

This use case is so simple that you normally wouldn't choose Spring Web Flow to implement it. We'll now introduce some more of the elements you can use to build a flow to highlight the areas where Spring Web Flow's advantages lie.
Going back to the concept of states in a state diagram, you'll remember that states are executing behaviors. In the state diagram examples, you've seen that the executed behaviors can be quite different from each other. Our example diagram in Listing 18-4 had states like "show" and "validate." To cater for these different behaviors, Spring Web Flow comes with a set of five different state types. You already used two of them in the "Hello, Web Flow!" sample application: <view-state> and <end-state>. Table 18-3 provides a list of the existing states and a description of the behaviors they execute.
Table 18.3. Spring Web Flow States
State Type | XML Element | Behavior |
|---|---|---|
View state |
| The behavior of a view state is generally to issue a response to the user; this is usually done by rendering a view. Once the user signals an event, the flow execution is resumed. |
Decision state |
| The responsibility of decision states is to make flow-routing decisions. A series of expressions can be configured, and the first expression that evaluates to |
Subflow state |
| When a subflow state is executed, a new flow is spawned as a subflow. The higher-level flow is put on hold while the new flow is executed. When the subflow terminates, execution of the higher-level flow is resumed. Potential end results returned by the subflow can determine the higher-level flow's next transition. |
Action state |
| An action state effects the execution of some logic—typically, this will be underlying business layer code. The result of this execution decides which transition to execute next. We mention the action state here for completeness. Spring Web Flow 2.0 favors the usage of the |
End state |
| If an end state is entered, the currently active flow session is terminated and the flow outcome is returned. If the active flow session is a subflow, only the subflow is terminated, and control is handed back to the parent flow. Terminating the top-level flow removes all information about the previous flow execution; the flow can't be resumed. |
We're now going to have a closer look at three of these states and how we can make use of them. Subflow states and action states will be covered in the "Advanced Concepts" section.
View states form the main way to communicate with the user. They display web application output and react to user input, enabling the user to actively take part in the flow. This section is going to explain how to use the <view-state> element to render views. The minimum configuration you need to define a view state is its ID. All states need to have IDs that are unique within the flow definition. There is no reason why you can't have two view states with the ID index within a web application, as long as those two IDs are elements of two different flows. Following is an example of a view state definition:
<view-state id="showPage" />
By convention, this view state will resolve to the view template showPage.jsp, which is located in the same directory as the flow definition. We took advantage of this convention in our "Hello, Web Flow!" application earlier. This convention is fine for small applications, but it can quickly grow out of hand as you get more view templates. With the view attribute, you can make more specific declarations as to exactly which view template to use. You have three options for the view identifiers.
The first option is to specify your view templates as relative to the flow-containing directory:
<view-state id="showPage" view="myPage.jsp" />
The path to your view template can also be relative to the web application root context. Generally, all view identifiers starting with a / will be treated as root-context-relative paths.
<view-state id="showPage" view="/WEB-INF/views/myPage.jsp" />
Some frameworks such as Spring MVC also allow you to use logical view names that are resolved by the framework. Spring MVC, for example, uses the ViewResolver infrastructure. In the "Integration with Spring MVC" section, we're going to show you how this is done.
<view-state id="showPage" view="myPage" />
You can then define view states as shown, without tying your flow definition to a specific view template technology.
Decision states are useful if the continuation of a flow depends on circumstances that need to be evaluated at runtime. They allow expressions to be set that are then evaluated in order to determine which transition to execute. Decision states are defined with the <decision-state> element.
<decision-state id="requiresShippingAddress">
    <if test="requestParameters.billingAddressIsAlsoShippingAddress"
        then="enterPaymentDetails" else="enterShippingAddress" />
</decision-state>
The else attribute of the <if> element is not mandatory. It is also perfectly OK to define multiple <if test=". . ." then=". . ."> child elements. If you have more than one expression to test, be aware that they are evaluated in order of their definition, and the first one to result in true will trigger its transition. If you define an <if> element with an else attribute and it's not the last expression defined in the decision state, you might end up wondering why certain transitions are not executed even though they should be.
The expression to evaluate can be anything the EL parser can evaluate—hence there is nothing to stop you from executing business logic here. However, the responsibility of the decision state is to execute controller logic, not business logic. Don't misuse the decision state for something that should rather be handled by an action.
End states mark the endpoints of a flow, declaring that the process is finished. If a flow reaches an end state, the flow session is terminated. If the terminated flow is a top-level flow, the entire flow execution ends and can't be resumed again. If instead a subflow session is terminated, the parent flow resumes and uses the outcome of the terminated subflow as the base for further transitions.
<end-state id="finished" />
Without any further configuration, end states return events that match their IDs. The previously defined end state would therefore return a finished event. As you will see in the "Advanced Concepts" section, you can also explicitly map any flow scope attributes as output attributes that will then be returned as data alongside the logical flow outcome.
By default, end states don't render any views. This is fine for subflows, since the parent flow will take over control. If the end state terminates a top-level flow, you can set the view attribute to specify which view to return. The same rules as for the view state also apply here, giving you full control over the view selection strategy.
<end-state id="helloWorld" view="helloWorld.jsp"/>
Now that we've covered a few basic state types, it is time to find out how we can navigate between them.
Transitions are used to progress the flow from one state to another. They are defined as child elements of any of the state elements except the end state, using the <transition> element, as shown following:
<transition on="event" to="otherState" />
You've seen a transition declared in the view state of our sample application in Listing 18-4. Since a state can react on multiple events with different transitions, you can define a list of <transition> child elements per state. When an event occurs, it is matched against the event specified in the on attribute, one transition after the other. The transitions are matched in order of their definition, and the first match will be executed.
<view-state id="chooseColor">
    <transition on="red" to="showRed" />
    <transition on="green" to ="showGreen" />
    <transition on="blue" to="showBlue" />
    <transition on="yellow" to="showYellow" />
    <transition on="red" to ="showOrange" /> <!-- never executes! -->
</view-state>
If you have a collection of states in a flow that all have one or more transitions in common, the <global-transitions> element allows you to declare those transitions once for all states. A good example is a cancel transition that should be available for every page in the flow (see Figure 18-9).

The definition of this global transition could look like Listing 18-7.
Example 18.7. Global Transitions
<global-transitions>
    <transition on="cancel" to="cancelled" />
</global-transitions>
Now that we've discussed the various states and how to transition from one to another, it's time to have a look at the events that trigger transitions. An event is basically the flow execution outcome of a state. When a decision state is executed, the flow evaluates the defined expression and chooses a transition based on this result. A view state, however, is executed by a view being rendered and returned. Even though the web application doesn't do anything after the response is generated, the state itself is theoretically still being executed. The flow execution result of a view state is generated when the user interacts with the view by clicking links or submitting forms back to the server.
Allowing the user to create events is simpler than you might think. All you need to do is include an _eventId parameter in the request. We assume you're already familiar with adding request parameters to URLs, but just for completeness, here's a simple example of a parameterized GET request:
Click <a href="${flowExecutionUrl}&_eventId=red">here</a> for REDTo transmit the event ID in a POST request, you have a few other options in conjunction with the <input> element in <form> elements. You can either use a hidden input field or submit buttons, as shown in forms one and two in Listing 18-8.
Example 18.8. Input Type Events
<html>
<head>
    <title>Colors</title>
</head>
<body>
    <form id="one" action="${flowExecutionUrl}" method="post">
        [...]
<p>Lorem ipsum dolor sit amet...</p>
<<input type="hidden" name="_eventId" value="yellow" />
[...]
</form>
<form id="two" action="${flowExecutionUrl}" method="post">
[...]
<p>Lorem ipsum dolor sit amet...</p>
<p><input type="submit" name="_eventId" value="blue" /></p>
<p><input type="submit" name="_eventId_green" value="Go green!" /></p>
</form>
</body>
</html>In form two, you can see two options to transmit the value of the _eventId parameter. The first option is to use the value from the value attribute of the input element. The second option is to append the value to the request parameter name following the pattern _eventId_${value}.
Don't worry too much about the ${flowExecutionUrl} expression. It is part of the context and scope variables that get automatically generated and added to the model by Spring Web Flow. We will cover those in the "Expression Languages and Scopes" section.
In the "Advanced Concepts" section, we will explain further features and elements you can use in your flow definition.
So far, we have introduced the essential elements of Spring Web Flow and how to configure them in a flow definition. You are now able to quickly draft a web site by simply concatenating views. In this section, we will explore some of the more complicated concepts in Spring Web Flow. We will begin by looking at how we can use an expression language to access the model, followed by how to invoke business logic. We will further discuss other ways to interact with the model scope and how to partially rerender views.
To access the data model, invoke bean methods, and defer evaluation of variables to runtime, Spring Web Flow uses EL. It supports two implementations of it: the Unified EL and OGNL (Object Graph Navigation Language). The current default EL implementation is jboss-el. If this library and the el-api library are already set on the classpath, they will be used automatically. Spring Web Flow versions 1.0.x use OGNL as the default implementation. Switching between the two implementations is as easy as copying a couple of JAR files or updating your project's dependency management configuration.
With the help of EL, Spring Web Flow can
Resolve and evaluate expressions, such as view names and transition criteria
Access client-side data in terms of request parameters and flow attributes
Access server-side held data structures such as
applicationContextandflowScopeInvoke methods on Spring beans
Spring Web Flow distinguishes between expressions that should simply be resolved and expressions that need to be evaluated. Evaluate expressions can only be defined as single string expressions and don't require (or rather allow) EL delimiters like ${ } and #{ }. An IllegalArgumentException will let you know if you did use them nevertheless. Evaluate expressions are defined as follows:
<evaluate expression="order.recalculateCosts()" />
Evaluate expressions that return a result can expose this through setting another expression in the result attribute. The following line of code would on execution call the findAllBooks method on the bookShopService bean and add the result list as attribute books to the flowScope:
<evaluate expression="bookShopService.findAllBooks()" result="flowScope.books" />
If your method returns a value that needs type conversion, you can specify the desired type in the result-type attribute as shown following. Spring Web Flow's DefaultConversionService adds four Converter implementations by default: TextToClass, TextToBoolean, TextToLabeledEnum, and TextToNumber. We think their names are self-explanatory.
<evaluate expression="bookShopService.findBookById(bookId)" result="flowScope.book"
        result-type="com.apress.prospring2.ch18.sample.Book
On the other hand, you will need the EL delimiters to specify expressions that are only to be resolved, like the locale attribute of the requestContext in this view:
<view-state id="index" view="index_${requestContext.locale}.jsp" />There are also several variables that are managed by Spring Web Flow that you can access from within a flow. First, let's have a look at the different scopes and contexts Spring Web Flow provides.
requestParameters
With the help of requestParameters, you can access all parameters transmitted in the incoming request:
<set name="flowScope.bookId" value="requestParameters.bookId" type="long" />
requestScope
The requestScope variable allows for setting attributes in the request scope. The request scope exists for as long as the flow handles the request. It gets created when the flow is called and is destroyed when the flow has responded.
<set name="requestScope.bookId" value="requestParameters.bookId" type="long" />
viewScope
To assign variables for a view, you can use the viewScope variable. Since the view scope's life span lasts from when a view state enters until the view state exits, it can't be referenced outside of that view state.
<view-state id="list" view="shop/list">
    <on-render>
      <evaluate expression="bookShopService.findAllBooks()"
            result="viewScope.books" />
    </on-render>
    [...]
</view-state>
Usage of the following EL variables is the same as shown in the earlier examples. Hence, we won't give any further examples unless there is a good reason.
flashScope
Spring Web Flow supports the concept of a flash scope. While the request scope only exists for the duration of a request, the flash scope is defined to store its values for a request and the subsequent request. After the second request has been handled, the flash scope is automatically cleared.
This scope was introduced to solve a common problem in web applications (which we'll describe further in the "Problem Solver" section later in this chapter). Generally, when an application processes a request and returns with a redirect response, the client will issue a new request to retrieve the resource (see Figure 18-10). Sometimes, however, some of the parameters in the initial request are needed by the handler of the redirect request. This is the gap between request scope and session scope that flash scope fills.
Spring Web Flow stores flash variables in flashScope. The flash scope exists for as long as the flow is alive but gets cleared after each view rendering. This is due to Spring Web Flow's alwaysRedirectOnPause property, which defaults to true. This property configures Spring Web Flow to always issue a redirect to render a view. Every user request is ultimately served by two requests.

flowScope
For variables that are needed throughout the execution of a flow, you can use the flow scope. You gain access to it via the flowScope variable. Flow scope exists from when a flow is started until it ends.
conversationScope
The conversation scope exists for the length of a user-web-site conversation. It is allocated when a top-level flow is started and destroyed when it ends. All subflows spawned by a top-level flow also have access to variables in this scope via the conversationScope variable.
Figure 18-11 should help visualize the lifetimes of the different scopes. When you set a variable into one of the scopes, you should address it with this scope when you retrieve it. If no scope is specified, Spring Web Flow will try each scope individually to resolve it. The scopes are searched in order of their lifetimes, starting with the most short-lived one: requestScope, flashScope, flowScope, and then conversationScope.

Table 18-4 gives a summary of the rest of Spring Web Flow's special EL variables.
Table 18.4. Spring Web Flow EL Variables
Variable | Description |
|---|---|
| This context variable gives you access to the current flow request represented by an instance of |
| An instance of |
| The external context represents a client call into the flow. The |
| This variable lets you access data on the current |
| For authentication purposes, a |
| This variable is used to store and retrieve messages that should be displayed, such as flow execution messages or error messages. The supported methods are defined in the |
| With the |
| This variable contains the context-relative URL to the current flow execution's view state. You need it, for example, to let the user post back data to the application. |
| This variable contains the identifier of the current flow execution snapshot. You can use it to address certain flow execution snapshots directly. |
So far, we've mainly covered how to get the user-facing page flow up and running, more or less ignoring that web applications mainly display dynamically generated content and process and store transmitted data. Being a controller framework, Spring Web Flow is also able to call underlying service layer code using evaluate expressions and actions.
Following the concept of an FSM, Spring Web Flow provides for calling actions at various points in the flow life cycle. Regardless of when an action is invoked, the definition syntax is always the same: all actions are declared with the <evaluate> element. The most basic form to declare it is just to define it with an expression to evaluate. This expression can be a method on a variable the flow has access to and includes Spring beans in the application context.
<evaluate expression="bookStoreService.saveOrder()" />
In case the invoked method returns a result that you want to make available to the whole flow, you can assign it to a flow scope variable by using the result attribute:
<evaluate expression=" bookStoreService.findAllBooks" result="flowScope.books" />
A last attribute of the <evaluate> element makes it possible to specify the type of the result in case it's not a simple list as in our example:
<evaluate expression=" bookStoreService.findBookById" result="flowScope.book"
        result-type="com.apress.prospring2.ch18.sample.Book" />
Actions can be invoked at various points in a flow. For one, they can be invoked when the flow starts or ends, as shown in Listing 18-9.
Example 18.9. Invoking an Action on Flow Start or End
<?xml version="1.0" encoding="UTF-8"?>
<flow xmlns="http://www.springframework.org/schema/webflow"
    xmlns:xsi="http://www.w3.org/2001/XMLSchema-instance"
    xsi:schemaLocation="http://www.springframework.org/schema/webflow
        http://www.springframework.org/schema/webflow/spring-webflow-2.0.xsd">

  <on-start>
    <evaluate expression="exampleService.onStart()" />
  </on-start>

  [...]

  <on-end>
    <evaluate expression="exampleService.onEnd()" />
  </on-end>

</flow>
They can also be invoked when a state is entered or left, as in Listing 18-10.
Example 18.10. Invoking an Action on State Entry or Exit
<view-state id="showPage">
  <on-entry>
    <evaluate expression="exampleService.onEntry()" />
  </on-entry>
  <on-exit>
    <evaluate expression="exampleService.onExit()" />
  </on-exit>
</view-state>
They can be invoked when a view is rendered, as in Listing 18-11.
Example 18.11. Invoking an Action When a View is Rendered
<view-state id="list" view="shop/list">
  <on-render>
    <evaluate expression="service.findAllBooks()" result="requestScope.books" />
  </on-render>
</view-state>
And they can be invoked when a transition is executed, as in Listing 18-12.
Example 18.12. Invoking an Action on a Transition
<view-state id="list" view="shop/list">
  <on-render>
    <evaluate expression="service.findAllBooks()" result="requestScope.books" />
  </on-render>
  <transition on="view" to="viewBook">
    <set name="requestScope.id" value="requestParameters.bookId" type="long" />
    <evaluate expression="service.findBookById(requestScope.id)"
            result="flowScope.book" />
  </transition>
</view-state>In the previous chapter, we talked you through a series of Spring MVC controller implementations. One of them was the AbstractFormController, which can automatically bind request parameters to a POJO command object. The same functionality is also available in Spring Web Flow.
A model object for a view to bind request parameters to is declared with the model attribute of the <view-state> element. If you have a page in the flow where a user should, for example, enter address details, you could have an Address POJO as in Listing 18-13 with address detail attributes and define this class to be used as the data binding model.
Example 18.13. Address POJO
package com.apress.prospring2.ch18.sample;

import java.io.Serializable;

public class Address implements Serializable {
private static final long serialVersionUID = 100L;
private String address1;
private String address2;
private String postcode;
private String town;
/** getters and setters left out for brevity **/
}Listing 18-14 gives the flow definition of the very basic address flow. This flow consists of two pages. The first page will show four input fields to enter address details. After the Next button is clicked, a second page will simply print these entries out.
Example 18.14. address.xml Flow State Definition
<?xml version="1.0" encoding="UTF-8"?>
<flow xmlns="http://www.springframework.org/schema/webflow"
    xmlns:xsi="http://www.w3.org/2001/XMLSchema-instance"
    xsi:schemaLocation="http://www.springframework.org/schema/webflow
        http://www.springframework.org/schema/webflow/spring-webflow-2.0.xsd">

    <var name="address" class="com.apress.prospring2.ch18.sample.Address" />

    <view-state id="start" view="address/shippingAddress" model="address">
      <transition on="next" to="confirm" />
    </view-state>

    <view-state id="confirm" view="address/showAddress" />

</flow>
At the beginning, we create the flow variable address, which is an instance of Address. By setting this variable as a model attribute in the start view, we tell Spring Web Flow to use this object for data binding. This allows us to implement a simple submit form by using the convenient spring-form tags (Listing 18-15).
Example 18.15. Simple Address Details Input Form
<%@ taglib prefix="form" uri="http://www.springframework.org/tags/form" %>
<!DOCTYPE html PUBLIC "-//W3C//DTD HTML 4.01 Transitional//EN"
"http://www.w3.org/TR/html4/loose.dtd">
<html>
<head>
<title>Web Flow Book Shop</title>
</head>
<body>
  <h1>Shipping Address Details</h1>
  <p>Please enter your shipping address details:</p>
    <form:form id="shippingDetails" modelAttribute="address">
      <table>
      <tr>
       <td>Address 1: </td>
       <td><form:input path="address1"/></td>
      </tr>
<tr>
<td>Address 2: </td>
<td><form:input path="address2"/></td>
</tr>
<tr>
<td>Post code: </td>
<td><form:input path="postcode"/></td>
</tr>
<tr>
<td>Town/City: </td>
<td><form:input path="town"/></td>
</tr>
<tr>
<td><input type="submit" name="_eventId" value="next"></td>
</tr>
</table>
</form:form>
</body>
</html>The confirm event submitted by clicking the button triggers the transition to the second view state, which is called confirm. In this transition, the posted parameters are automatically bound to the address object in flow scope. When, afterward, the confirm state is rendered, the EL expressions are resolved against the objects in the scopes. That allows us to print them out, as shown in Listing 18-16.
Example 18.16. Display Details Page Fragment
[...]
<table>
  <tr>
    <td>Address 1: </td>
    <td>${address.address1}</td>
  </tr>
  <tr>
    <td>Address 2: </td>
    <td>${address.address2}</td>
  </tr>
  <tr>
    <td>Post code: </td>
    <td>${address.postcode}</td>
  </tr>
  <tr>
    <td>Town/City: </td>
    <td>${address.town}</td>
  </tr>
</table>
[...]
If for any reason you don't want to bind the input parameters on a certain event, you can declare this on the transition. You just have to add bind="false".
<view-state id="start" view="address/shippingAddress" model="order">
    <transition on="next" to="confirm" />
    <transition on="cancel" to="end" bind="false" />
</view-state>
Usually, all forms on web sites have one or more mandatory input fields. If a submitted form is lacking parameters that are essential for further request processing, it makes sense to check for these parameters as soon as possible. As you've seen in the last chapter, you can make use of Validator implementations to validate the submitted command object. The same is also possible in Spring Web Flow.
You can validate your model programmatically in two ways. The first is to define validate methods on the model. The method signatures have to follow this convention:
public void validate${viewStateId}(MessageContext context)To enable postcode validation on our address in the example, we can add the validateStart method to the Address class:
public void validateStart(MessageContext context) {
    if(!StringUtils.hasLength(postcode)) {
        context.addMessage(new MessageBuilder().error().source("postcode").
        defaultText("Postcode is missing.").build());
    }
}
If the postcode is null or empty, an error message is added to the message context marking that the validation has failed. Referring back to the concept of FSMs, a validation method basically acts as the guard for a transition. If the guard expression doesn't evaluate to true, the transition isn't executed, and the source state is rerendered. In our example, this means that if the address isn't validated successfully, the transition to the second page isn't executed, but the start state is reentered.
The other way to validate a model is by using validator classes. Method signatures in such a validator need to follow this convention:
public void validate${viewStateId}(<<Model object>>, MessageContext context)To perform the same validation of the Address object with this approach, all we need to do is create an AddressValidator class, as shown in Listing 18-17, and comment out the validate method in the Address class.
Example 18.17. AddressValidator Class
@Component
public class AddressValidator {

    public void validateStart(Address address, MessageContext context) {
        if(!StringUtils.hasLength(address.getPostcode())) {
            context.addMessage(new MessageBuilder().error().source("postcode")
                    .defaultText("Enter Postcode").build());
        }
    }
}
We add this bean to the application context by marking it with the @Component annotation. If in your project you haven't already done so, you'd have to add the <context:component-scan /> element to your application context to let the bean be picked up on context initialization, as shown in Listing 18-18.
Example 18.18. Enabling Annotations
<?xml version="1.0" encoding="UTF-8"?>
<beans xmlns="http://www.springframework.org/schema/beans"
    xmlns:xsi="http://www.w3.org/2001/XMLSchema-instance"
    xmlns:context="http://www.springframework.org/schema/context"
    [...]
xsi:schemaLocation="
http://www.springframework.org/schema/beans
http://www.springframework.org/schema/beans/spring-beans-2.5.xsd
http://www.springframework.org/schema/context
http://www.springframework.org/schema/context/spring-context-2.5.xsd
[...]">
<context:component-scan base-package="com.apress.prospring2"/>
[...]
</beans>Spring Web Flow also allows you to react to user events by rerendering only certain parts of a web site. All you need to do is to specify a transition matching the user event and the needed actions. In the following example, we have a transition for a children event. If this event occurs, the findAllByCategory of the bookShopService bean is invoked and the returned result is added as the attribute books to viewScope.
With the <render> element, you specify the IDs of the HTML elements you wish to rerender (see Listing 18-19). Multiple IDs need to be comma separated.
Example 18.19. Partial Rerendering of Views
<view-state id="list" view="shop/list">
  <on-render>
    <evaluate expression="bookShopService.findAllBooks()"
        result="flowScope.books" />
  </on-render>

  <transition on="all" to="list" />
    <transition on="children">
        <evaluate expression="bookShopService.findAllByCategory(currentEvent)"
                result="viewScope.books" />
        <render fragments="bookTable" />
    </transition>
     <transition on="computer">
        <evaluate expression="bookShopService.findAllByCategory(currentEvent)"
                result="viewScope.books" />
        <render fragments="bookList" />
    </transition>
</view-state>All flows, whether top-level flows or subflows, can be passed input parameters and can pass back output parameters. This is particularly useful if a flow needs to operate on request-specific data or a subflow is used to create an object that has to be passed back to the initiating flow.
To define input parameters, use the <input> element at the beginning of the flow definition. In the basic version, you only need to specify the name and value of the argument. If the expression language parser can evaluate the value, the name is used as the key when the argument is put into the flow scope.
<input name="book" value="flowScope.book" />
If you add the attribute required="true", a FlowInputMapperException will be raised if the value couldn't be found when the subflow state was entered.
<input name="book" value="flowScope.book" required="true" />
An extract of a flow definition could look like the code fragment in Listing 18-20. From a viewBook state, the buy event will trigger a transition to the checkout subflow. We pass the book object of the higher-level flow into the subflow.
Example 18.20. Parent Flow Passing Input to Subflow
<view-state id="viewBook" view="shop/view">
     <transition on="buy" to="startCheckout" />
 </view-state>

 <subflow-state id="startCheckout" subflow="checkout">
     <input name="book" />
     <transition on="success" to="orderConfirmed" />
 </subflow-state>

 <end-state id="orderConfirmed" />
Flow output parameters are defined with the <output> element of the end state. The example checkout flow might want to return a Boolean value or another object as a checkout result to report back to the higher-level flow.
<end-state id="orderCheckedOut">
    <output name="checkoutResult" />
</end-state>
The output result can also be retrieved through an expression:
<output name="checkoutResult" value="order.id" />
As we've just discussed, a flow can call another flow and start it as a subflow. Execution of the parent flow is put on hold until the subflow returns. The subflow returns a specific outcome as an event to the parent flow. This event triggers the next transition in the resumed parent flow.
Subflows are called with the <subflow-state> element shown following:
<subflow-state id="enterShop" subflow="shop">
    <transition on="orderConfirmed" to="thankYou">
        <evaluate expression="bookShopService.saveOrder(currentEvent.order)" />
    </transition>
      <transition on="orderCancelled" to="start" />
</subflow-state>
In this case, the parent flow will call the shop flow as a subflow. If the shop flow returns with an orderConfirmed event, the order is saved and the parent flow transitions to a thankYou state. If the subflow returns with an orderCancelled event, the parent flow will move to the start state.
As with regular flows, you can pass input parameters into the subflow. To do so, declare the parameters with the <input> element, in the subflow state (Listing 18-21) as well as in the subflow definition (Listing 18-22).
Example 18.21. Subflow State in Higher-Level Flow Definition
<?xml version="1.0" encoding="UTF-8"?>
<flow xmlns="http://www.springframework.org/schema/webflow"
    xmlns:xsi="http://www.w3.org/2001/XMLSchema-instance"
    xsi:schemaLocation="http://www.springframework.org/schema/webflow
        http://www.springframework.org/schema/webflow/spring-webflow-2.0.xsd">

    [...]

    <subflow-state id="enterShop" subflow="shop">
        <input name="bookId" />
        <transition on="orderConfirmed" to="thankYou" />
        <transition on="orderCancelled" to="start" />
    </subflow-state>

    [...]

</flow>
Example 18.22. Subflow Flow Definition
<?xml version="1.0" encoding="UTF-8"?>
<flow xmlns="http://www.springframework.org/schema/webflow"
    xmlns:xsi="http://www.w3.org/2001/XMLSchema-instance"
    xsi:schemaLocation="http://www.springframework.org/schema/webflow
        http://www.springframework.org/schema/webflow/spring-webflow-2.0.xsd">

    [...]
    <input name="bookId" value="flowScope.bookId" required="true"/>
    [...]

</flow>
Flow definitions encapsulate business processes in little modules. If you have two or more business processes that have a sequence of steps in common, you can define the common steps as a separate flow that can then be reused as subflows in the higher-level business process flows.
Architecturally, Spring Web Flow is separated into three main components that each have their own responsibilities, and two convenience components for configuration and testing, as Figure 18-12 illustrates.

So far in this chapter, we've looked at the elements of the execution core component: the definition of flows, states, transitions, and so forth, and how to configure them. We'll now take a look at the other two components, namely the executor and the execution engine component.
If the execution core gives you the templates for elements to construct a flow, the execution engine gives you the building materials, tools, and construction plan to instantiate and execute a flow definition. The responsibility of the executor is to drive and coordinate these flow executions.
We just explained the three core flow execution components and what their responsibilities are. This section will further explain how these components interact with each other.
Figure 18-13 shows a simple activity diagram that should help you visualize the steps, especially the functions that the flow executor performs.
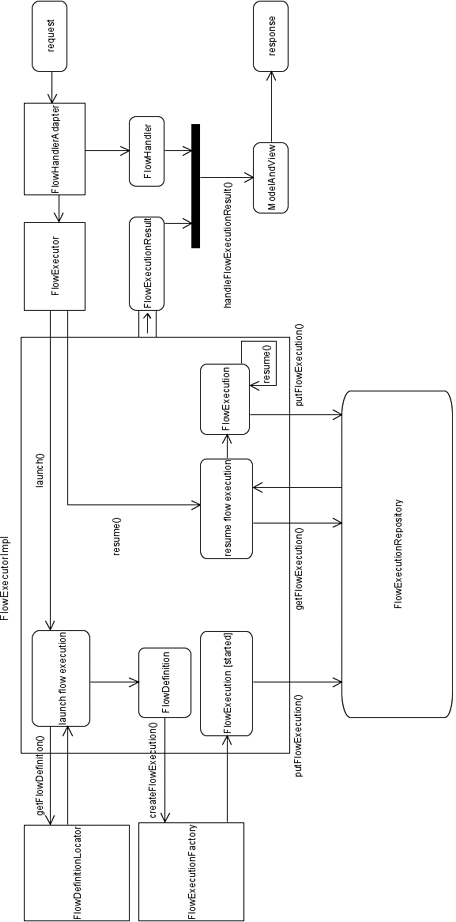
When a request comes in, the DispatcherServlet will map it to a FlowHandler via the FlowHandlerAdapter. The FlowHandlerAdapter checks for flow execution parameters in the request. If no flow execution details are found, the FlowExecutor is called to launch a new FlowExecution. For this process, the FlowExecutor retrieves the FlowDefinition from the FlowDefinitionLocator (flow repository). The FlowDefinition is then passed to the FlowExecutionFactory as a template for a FlowExecution. Before the FlowExecutionResult is calculated, the newly created FlowExecution is stored in the FlowExecutionRepository.
In the case where flow execution parameters are found in the incoming request, the parameters are used to retrieve the FlowExecution from the repository. Execution of this FlowExecution is then resumed and executed. The FlowExecution's new state is then stored as a new entry in the flow execution repository before the FlowExecutionResult is calculated.
The FlowExecutionResult object that the FlowExecutor passed back to the FlowHandlerAdapter is then used together with a FlowHandler in the handleFlowExecutionResult method. This method eventually returns a ModelAndView object, and the response can then be rendered.
As illustrated in Figure 18-13, the flow executor is the central component of Spring Web Flow responsible for handling all aspects related to the execution of flow definitions. The FlowExecutor interface exposes only two methods: launchExecution and resumeExecution. This abstraction successfully hides the internal complexity of the flow execution life cycle: creating and launching new flow executions and resuming already existing flow executions. Behind the scenes, the default implementation FlowExecutorImpl has three helpers in the form of properties to be set (see Table 18-5).
Table 18.5. FlowExecutorImpl Properties
Property Type | Description | Default |
|---|---|---|
|
| The responsibility of the |
|
| The |
|
| The |
On the following pages, we'll have a closer look at these interfaces and their default implementations, starting with the flow definition registry.
To make your flow definitions eligible for execution, you need to register them with a flow definition registry. As you've seen in the "Hello, Web Flow!" application, this is done via the <webflow:flow-registry> element in the application context. You can specify individual flow definitions using the child element <webflow:flow-location path=". . ." />. By setting the id attribute on this element, you can override the filename-equals-flow-ID convention. For example, the flow defined in myFlow.xml can have the ID myId instead of the default ID of myFlow. Multiple flow definitions can be added at the same time by specifying a directory or file name pattern within <webflow:flow-location-pattern value=". . ." />. The two <flow-location/> child elements are not mutually exclusive and can be used together.
<webflow:flow-registry id="flowRegistry">
    <webflow:flow-location path="/WEB-INF/myFlowDirectory/singleFlow.xml" />
    <webflow:flow-location path="/WEB-INF/otherDirectory/myFlow.xml" id="myId" />
    <webflow:flow-location-pattern value="/WEB-INF/otherFlows/**/*.xml" />
</webflow:flow-registry>
A declaration in this form uses the default flow builder service implementations. These flow builder services are hooks into Spring Web Flow's flow builder, allowing you to customize services like conversionService, formatterRegistry, expressionParser, and viewFactoryCreator. The following is a sample configuration of custom flow builder services:
<webflow:flow-registry id="flowRegistry"
        flow-builder-services=" flowBuilderServices ">

<webflow:flow-builder-services id="flowBuilderServices"
        conversion-service="conversionService"
        formatter-registry="formatterRegistry"
        expression-parser="expressionParser"
        view-factory-creator="viewFactoryCreator" />

<bean id="conversionService" class="..." />

<bean id="formatterRegistry" class="..." />

<bean id="expressionParser" class="..." />

<bean id="viewFactoryCreator" class="..." />
conversionService
You came across the ConversionService before in the "Expression Languages and Scopes" section. During flow execution, the Converters defined on the ConversionService are used to convert one object type into another. As mentioned previously, the default implementation DefaultConversionService is configured with four default Converter implementations: TextToClass, TextToBoolean, TextToLabeledEnum, and TextToNumber. In case you need your own custom object conversion behavior instead of or in addition to these four standard converters, Spring Web Flow allows for easy extension. We'll quickly show how to add a converter for our custom class FlightNumber. We'll start with the FlightNumber class shown in Listing 18-23.
Example 18.23. FlightNumber Class
public class FlightNumber {

    private String carrier;
    private Integer number;
/** getters and setters ommitted for brevity **/ }.
The next step is to create our TextToFlightNumber converter by implementing the three methods the Converter interface defines (see Listing 18-24).
Example 18.24. TextToFlightNumber Converter
public class TextToFlightNumber implements Converter {

    public Object convert(Object source, Class targetClass, Object context)
            throws ConversionException {
        /** conversion code **/
    }

    public Class[] getSourceClasses() {
        return new Class[] { String.class };
    }

    public Class[] getTargetClasses() {
        return new Class[] { FlightNumber.class };
    }
}
The next step will be to implement our own ConversionService. One possibility is to simply extend the DefaultConversionService and override its protected addDefaultConverters method, as shown in Listing 18-25.
Example 18.25. Extending DefaultConversionService
public class MyConversionService extends DefaultConversionService {
    @Override
    protected void addDefaultConverters() {
        super.addDefaultConverters();
        addConverter(new TextToFlightNumber());
    }
}.
The last step is to register the MyConversionService with the flow builder services (see Listing 18-26).
Example 18.26. Register MyConversionService
<webflow:flow-builder-services id="builderService"
        conversion-service="myService" />

<bean id="myService" class="com.apress.prospring2.ch18.MyConversionService"/>
Using the FormatterRegistry
The FormatterRegistry controls a list of Formatter implementations that are registered with it. Unlike Converters, which can perform conversion from any defined source class to any defined target class, Formatters only convert from String to Object and vice versa. Formatter implementations are used by views to control the string representations of object types. The default FormatterRegistry implementation DefaultFormatterRegistry registers Formatter instances for the number, Boolean, and date object types on initialization.
Listing 18-27 shows a Formatter implementation for our FlightNumber class.
Example 18.27. FlightNumberFormatter Class
public class FlightNumberFormatter implements Formatter {
    public String format(Object object) throws IllegalArgumentException {
        FlightNumber fn = (FlightNumber)object;
        return fn.getCarrier() + fn.getNumber();
}

    public Object parse(String formattedString) throws InvalidFormatException {
        FlightNumber fn = new FlightNumber();
        /** omitted for brevity **/
        return fn;
    }
}
Again, we simply extend the default implementation DefaultFormatterRegistry and override the registerDefaultFormatters method (see Listing 18-28).
Example 18.28. MyFormatterRegistry Class
public class MyFormatterRegistry extends DefaultFormatterRegistry {
    @Override
    protected void registerDefaultFormatters() {
        super.registerDefaultFormatters();
        registerFormatter(FlightNumber.class, new FlightNumberFormatter());
    }
}
To configure the flow builder services to use this implementation, we'll have to change our context file (Listing 18-29).
Example 18.29. Registering MyFormatterRegistry
<webflow:flow-builder-services id="builderService"
        formatter-registry="myRegistry" />

<bean id="myRegistry" class="com.apress.prospring2.ch18.MyFormatterRegistry"/>
expressionParser
The expressionParser allows you to customize expression parsing in your Spring Web Flow applications. Spring Web Flow currently supports two EL libraries: JBoss (the default) and OGNL.
viewFactoryCreator
You can use the viewFactoryCreator attribute to enable a custom ViewFactoryCreator. There are currently two implementations of this interface shipped with Spring Web Flow: the JsfViewFactoryCreator, which creates JsfViewFactory instances for integration with JSF; and the MvcViewFactoryCreator, which creates MvcViewFactories for integration with Spring MVC.
By default, the MvcViewFactoryCreator creates view factories that resolve their views as resources relative to the flow's working directory. We're going to show you how you can customize the MvcViewFactoryCreator to resolve views via Spring MVC's ViewResolver infrastructure in the section on Integration with Spring MVC.
The FlowExecutionRepository interface is the subsystem interface responsible for saving and restoring flow executions. Each flow execution represents a state of an active flow definition. This interface completely hides the way the execution state is actually stored.
Spring Web Flow's default implementation is the DefaultFlowExecutionRepository, which extends the AbstractSnapshottingFlowExecutionRepository class. This repository stores snapshots of flow executions. A snapshot is a copy of a flow execution at a specific moment. Each snapshot is assigned a unique execution key under which it is indexed in the repository. With their unique IDs, snapshots can be restored and continued. This is particularly useful if you need to provide full support of the browser navigation buttons. When the Back button is clicked, you can just retrieve the previous snapshot from the repository.
The DefaultFlowExecutionRepository holds references to helper properties, as summarized in Table 18-6.
Table 18.6. DefaultFlowExecutionRepository Properties
Property Type | Description |
|---|---|
| This is a service for managing conversations. This interface defines three methods, which handle the creation of a conversation ( |
| This interface uses the session as a conversation container. |
| This interface defines one method, |
| This interface restores flow executions as instances of |
| This interface specifies the contract for |
| This interface creates and restores snapshots from flow executions by serializing or deserializing them to or from byte arrays. |
The ConversationManager handles the persistence of conversations. The default implementation SessionBindingConversationManager stores conversations in the HttpSession. By creating your own implementation, you can hook in a different approach to persist conversations.
The DefaultFlowExecutionRepository defines two parameters for performance tuning, as shown following:
<webflow:flow-executor id="flowExecutor" flow-registry="flowRegistry">
    <webflow:flow-execution-repository max-executions="5"
        max-execution-snapshots="9"/>
</webflow:flow-executor>
Use the max-executions attribute to put an upper limit on the number of flow executions stored per user session. The max-execution-snapshots attribute lets you further limit the number of snapshots per flow execution to be kept as history in storage.
This section is going to show you how to integrate Spring Web Flow into a Spring MVC environment. To fully demonstrate the integration between Web Flow and Spring MVC, we will extend the "Hello, Web Flow!" application.
When we went through the configuration of the "Hello, Web Flow!" example, we explained that Spring Web Flow integrates with the Spring MVC DispatcherServlet by registering the FlowHandlerAdapter. All you need do is add the following bean declaration to the application context:
<bean class="org.springframework.webflow.mvc.servlet.FlowHandlerAdapter">
    <constructor-arg ref="flowExecutor" />
</bean>
Back then, we also promised to cover this class and its responsibilities in more detail later—so here we go. The FlowHandlerAdapter encapsulates the chain of command associated with executing flows; that is launching and resuming flows, as well as handling the outcomes of these two commands. Launching and resuming flows are activities that get delegated to the launchExecution and resumeExecution methods of the flowExecutor property set on construction of the FlowHandlerAdapter. These two methods return a FlowExecutionResult object. Together with the original request and response objects, the application context, and the correct FlowHandler implementation, this result object is then passed on to the handleFlowExecutionResult method, which completes handling of the request and eventually returns a ModelAndView object for rendering.
A FlowHandler implementation is a helper utility to access a single flow definition in your application. If you do not want to fully implement the FlowHandler interface yourself, you can use the convenience AbstractFlowHandler superclass. It simply returns null for all defined operations, and since (despite its name) it is not abstract, your subclasses are not forced to override methods other than the ones they need.
Using the FlowHandlerAdapter-based integration approach, you will need to create one FlowHandler per flow. If many of your flows don't require specific handling, but follow the default rules, creating a class for each can quickly feel a bit excessive.
A different approach to integrating Spring Web Flow with Spring MVC is to use a FlowController. A FlowController is an adapter between a Spring MVC Controller and the Spring Web Flow engine. It extends Spring MVC's AbstractController and has the same attributes for interacting with Spring Web Flow as the FlowHandlerAdapter: a reference to a FlowExecutor, a reference to a FlowUrlHandler, and a reference to an AjaxHandler.
It performs the same chain of command, implementing AbtractController's protected ModelAndView handleRequestInternal(HttpServletRequest request, HttpServletResponse response) as the FlowHandlerAdapter in its public ModelAndView handle(HttpServletRequest request, HttpServletResponse response, Object handler) method. For simple cases, consider therefore mapping a typical FlowController as in Listing 18-30 as a handler for multiple flows.
Example 18.30. FlowController and URL Mapping
<bean id="flowController"
          class="org.springframework.webflow.mvc.servlet.FlowController">
    <property name="flowExecutor" ref="flowExecutor" />
</bean>
<bean id="publicUrlMappings"
class="org.springframework.web.servlet.handler.SimpleUrlHandlerMapping">
<property name="mappings">
<value>
/sampleApp.html=helloWorldFlowHandler
/colours.html=flowController
/address.html=flowController
</value>
</property>
</bean>As you can also see from this example, Spring MVC controllers and Spring Web Flow flow handlers can be used together nicely.
Spring Web Flow 2.0 introduced a new convention for resolving views relative to the flow's working directory. An existing Spring MVC application, however, will probably already be using the Spring MVC ViewResolver infrastructure to resolve views. Spring Web Flow allows you to make use of the existing infrastructure by registering the existing viewResolver instances with an MvcViewFactoryCreator:
<webflow:flow-registry id="flowRegistry" flow-builder-services="builderService">
    <webflow:flow-location-pattern value="/WEB-INF/flows/**/*.xml" />
</webflow:flow-registry>

<webflow:flow-builder-services id="builderService"
        view-factory-creator="myViewFactoryCreator" />

<bean id="myViewFactoryCreator"
        class="org.springframework.webflow.mvc.view.MvcViewFactoryCreator">
    <property name="viewResolvers" ref="internalJspViewResolver" />
</bean>

<bean id="internalJspViewResolver"
        class="org.springframework.web.servlet.view.InternalResourceViewResolver">
    <property name="prefix" value="/WEB-INF/views/" />
    <property name="suffix" value=".jsp" />
</bean>
This MvcViewFactoryCreator is used to customize the flow builder services that are registered with the flow registry by referencing it in the flow-builder-services attribute.
Whatever the technology used in a web application, security is a concern that must be addressed. Security in web applications is about authenticating and authorizing users. Authentication is the process in which the user is prompted to prove that they are who they claim to be. Authorization is the subsequent process that decides if a user, once identified, should be allowed to do what she requests. Many web applications have to handle users who are granted different sets of permissions. A forum application, for example, usually categorizes users as administrators, moderators, registered users, or anonymous users. This is a typical role-based approach, since access to the web site and its functionality depends on the user's role. A web application needs to ensure that only duly authorized users can access sensitive parts of the application.
If you have been writing web applications with Spring MVC for a while, you have probably come across Spring Security (or Acegi Security System for Spring, as it was formerly known). It is a comprehensive solution to the requirement for integrating security features into Java EE-based applications. Spring Security supports a number of authentication mechanisms ranging from simple form-based authentication, through automatic "remember-me" authentication, to LDAP or CAS authentication. It also supports further security features such as channel security (to ensure requests only arrive via HTTPS) and JCaptcha to ensure the web site is interacting with a human being rather than a script.
This feature set not only extends what is offered in the servlet specification, but it also helps your application stay container-independent and hence more portable. In addition to the support you get out of the box, you can extend the feature set with custom implementations of the core interfaces.
You can use this Spring module to secure the paths in your Spring Web Flow application. On the following pages, we're going to briefly talk you through a simple integration example that shows the three steps to setting up Spring Security and configuring it once you have the necessary binaries.
It is beyond the scope of this book to explain all the Spring Security mechanisms and configurations in full. For further details and examples, please have a look at the Spring Security reference documentation available on the module's home page, at http://static.springframework.org/spring-security/site/index.html.
Setting up Spring Security involves configuration in three places: the web.xml file, the application context, and the flow definition. The first step is to enable Spring Security within your web application. This is done by adding the following filter to the web.xml configuration:
<filter>
  <filter-name>springSecurityFilterChain</filter-name>
  <filter-class>org.springframework.web.filter.DelegatingFilterProxy</filter-class>
</filter>

<filter-mapping>
  <filter-name>springSecurityFilterChain</filter-name>
  <url-pattern>/*</url-pattern>
</filter-mapping>
This filter provides us with a hook for the Spring Security infrastructure. The next two steps handle the setup and configuration of this infrastructure.
This step is going to show how authentication and authorization are set up.
The authentication process usually follows much the same pattern in any web application. You make a request to the web server, which decides that you've asked for a protected resource. The server then checks if you are already authorized. In the case you are not authorized, a response is sent indicating that you have to authenticate. Depending on the authentication mechanism defined, you are either redirected to a login form page or the browser tries to retrieve your identity in another way (Basic, cookie, etc.). After you provide your credentials, the server will check if they are valid and retry your initial request if validation was successful. If you have the right authorities to access the requested resource, it will be returned; otherwise, an HTTP 403 error will occur.
The decision to authenticate a user is made by Spring Security's AuthenticationManager with the help of AuthenticationProvider objects. The minimum configuration you need to define and configure an AuthenticationManager is to declare one or more AuthenticationProvider objects with the <security:authentication-provider> element, as shown in Listing 18-31.
Example 18.31. Spring Security AuthenticationProvider
<security:authentication-provider user-service-ref="myUserDetailsService" />

<security:authentication-provider>
    <security:user-service>
        <security:user name="admin" password="admin" authorities="ROLE_ADMIN" />
        <security:user name="user" password="user" authorities="ROLE_USER" />
    </security:user-service>
</security:authentication-provider>
The AuthenticationProvider uses a UserDetailsService to access your user details in the data storage. This service can be a reference to your own implementation accessing a database, or an in-memory data storage with the <security:user-service> element. Listing 18-31 defined a user service providing the details for two users. This is a useful technique when you need to set up authentication quickly (e.g., when you're prototyping an application).
Also very useful during testing of an application is the TestingAuthenticationProvider, as it accepts any credentials. You can simply mark it with the <security:custom-authentication-provider/> element, and it will be automatically registered with the AuthenticationManager. Don't forget to take it out before going into production, though.
<bean id="authenticationProvider"
      class="org.springframework.security.providers.TestingAuthenticationProvider">
    <security:custom-authentication-provider/>
</bean>
By specifying an authentication mechanism like HTTP form login or Basic, we define how the user details should be retrieved. The following short line will fully configure simple HTTP form authentication:
<security:http auto-config="true" />
Behind the scenes, this is equivalent to the following configuration:
<security:http>
    <security:intercept-url pattern="/**" access="ROLE_USER" />
    <security:form-login />
    <security:anonymous />
    <security:http-basic />
    <security:logout />
    <security:remember-me />
<security:/http>
For our example, we're only interested in the first two child elements. For a description of other elements and their attributes, please refer to the Spring Security reference documentation.
The <security:intercept-url> element defines which URLs of the application require which access authorities. In this configuration, URLs can only be accessed from ROLE_USER authority holders. The second child element, <security:form-login />, specifies that we want to enable form-based authentication. In this basic form, Spring security will do all the login form setup work for us, including rendering a simple login page.
When authentication is requested, a default login screen will be rendered. If login is successful, the user's initial request is retried. To make use of a self-designed login screen, you will need to make a few changes to the configuration.
First add the login-page attribute to the <security:form-login> element:
<security:form-login login-page="/login.html" />
This attribute specifies the URL that handles rendering the login screen. It's the page a user gets redirected to if authentication is required. Since this is a URL that needs to be accessible by all users, including unauthenticated users, we'll need to add another <security-intercept-url> element. By setting filters="none", we define that we don't want any security filters to be applied. Our final configuration will look like this:
<security:http auto-config="true">
    <security:intercept-url pattern="/login.html" filters="none" />
    <security:form-login login-page="/login.html" />
</security:http>
Patterns of URL interceptors are matched in order of declaration. Make sure you don't "hide" an interceptor behind another that has a more general pattern.
The final step is to mark a flow definition or flow definition element as requiring authentication. For this purpose, Spring Web Flow provides you with the <secured> element. When you add this element to a flow, state, or transition definition, only users with the correct access rights will be allowed to enter the flow or state or execute the transition. Which access requirements are needed is defined in the attributes attribute:
<secured attributes="..." />
A common way to separate access rights is through the use of a role-based approach, as mentioned earlier. Users are granted roles as authorities—for example, ROLE_USER and ROLE_ADMIN. Roles are created by defining strings that start with ROLE_. To secure a flow or flow element to only be accessed by registered users with the ROLE_USER authority, you define this as an attribute that needs to match:
<secured attributes"ROLE_USER" />
You can define multiple roles that should be allowed access by adding them as a comma-separated list. With the match attribute, you can further specify whether the user should have any or all of the roles defined. The following code sample defined on a flow would require the user to have both the ROLE_USER and ROLE_ADMIN authorities to get access to the flow. The match attribute defaults to any:
<secured attributes="ROLE_USER,ROLE_ADMIN" match="all" />
The role-based approach is Spring Security's default way to make access decisions. If you want to use a different approach, we suggest considering the Spring Security reference documentation for help.
After all the changes we made to the address example, we can now see Spring Security in action. When the new version is deployed, redirect your browser to http://localhost:8080/ch18/address.html. Instead of being shown the input form, you'll be forwarded to a login screen (see Figure 18-14).

Remember that we defined users user and admin in the user details service. When we now submit username user with password user, we'll be forwarded to the requested address details page (see Figure 18-15).

By adding a security constraint to a transition as shown in Listing 18-32, we can further ensure that only users with this authority are allowed to transition.
Example 18.32. Securing a Transition
<?xml version="1.0" encoding="UTF-8"?>
<flow xmlns="http://www.springframework.org/schema/webflow"
    xmlns:xsi="http://www.w3.org/2001/XMLSchema-instance"
    xsi:schemaLocation="http://www.springframework.org/schema/webflow
        http://www.springframework.org/schema/webflow/spring-webflow-2.0.xsd">

    <secured attributes="ROLE_USER" />
<var name="address" class="com.apress.prospring2.ch18.sample.Address" />
<view-state id="start" view="address/shippingAddress" model="address">
<transition on="admin" to="admin" bind="false">
<secured attributes="ROLE_ADMIN"/>
</transition>
<transition on="next" to="confirm" />
</view-state>
<view-state id="confirm" view="address/showAddress" />
<view-state id="admin" view="address/admin" />
</flow>In the application, you will find that user admin can proceed to the admin page, while user user is denied access with an HTTP 403 response code, as shown in Figure 18-16.

In this section, we briefly introduced Spring Security and its features. We then explained the configuration steps to enable Spring Security in a Spring Web Flow web application and demonstrated them using a simple address details entry use case.
Remember that at the very beginning of this chapter we named a few common problems and concerns in a web application and promised that Spring Web Flow would offer a solution. Let's have a look back and see how we did.
Navigational control is achieved by treating a web site as a state machine. All allowed paths through the states are defined in a flow definition. Access to certain areas can also be restricted by adding security constraints.
The different scopes and automatic model binding allow the application to manage its state, adding the stateful aspect. A well-defined set of possible transitions out of a state ensures that the web site user can't just jump to a certain page, possibly trying to shortcut a process they should step through.
To fully understand how Spring Web Flow goes about this issue, we need to have a look at a different concept first: the POST-REDIRECT-GET pattern. The HTTP specification calls for the GET request to "retrieve whatever information (in the form of an entity) is identified by the Request-URI." A GET request is not meant to submit data in a form that changes the state of the server. This is essentially what distinguishes it from a POST request. GET requests should allow the browser to be safe to automatically rerequest, while POST requests will prompt for user interaction.
The POST-REDIRECT-GET pattern describes the transformation of serving a POST request by serving a GET request. This is achieved by the server responding to a POST request with an HTTP redirect response, supplying a new URL for the requested resource. The browser will then automatically request the new URL with a GET request.
As you have seen, every view state rendered is stored as a snapshot in the flow execution repository. The key required to retrieve them from the repository is transmitted in the request URL. When a user clicks the Back button of his browser and the browser doesn't find the data in its cache, the URL that the browser rerequests will contain the flow execution key. With this key, Spring Web Flow can easily retrieve the state of the flow at that point in time from its repository and return it. The alwaysRedirectOnPause attribute (which tells Web Flow to always issue a redirect to render a view) is set to true by default. You can manually switch it off as shown following:
<webflow:flow-executor id="flowExecutor" flow-registry="flowRegistry">
      <webflow:flow-execution-attributes>
         <webflow:always-redirect-on-pause value="false"/>
     </webflow:flow-execution-attributes>
</webflow:flow-executor>Spring Web Flow wouldn't be a good member of the Spring module family if testability wasn't one of its major features. While writing test code for other controller frameworks can be tiring and error prone, testing an entire flow definition is actually very simple.
Spring Web Flow comes with a test package of useful test and mock classes. To give you an example, we'll write a test case for the "Hello, Web Flow!" flow definition from the beginning of this chapter. Please be aware that you'll have to add junit.jar 3.8 or greater to your build path to make the tests run.
We start by creating a HelloWorldIntegrationTest class that extends org.springframework.webflow.test.execution.AbstractXmlFlowExecutionTests. We are forced to implement the FlowDefinitionResource getResource(FlowDefinitionResourceFactory resourceFactory) method declared in an abtract superclass of the AbstractXmlFlowExecutionTests class. This method is a hook to provide the test with the flow definition we want to test, which in our case is the helloWorld.xml file (see Listing 18-33).
Example 18.33. Providing an XML Flow Definition As a Resource for the Test
@Override
protected FlowDefinitionResource getResource(
            FlowDefinitionResourceFactory resourceFactory) {
    String path = "webapp/WEB-INF/flows/helloWorld.xml";
    return resourceFactory.createFileResource(path);
}
The flowDefinitionResourceFactory also provides other helpful methods to create a FlowDefinitionResource. The createClassPathResource enables you to locate flow definitions on the classpath, and several overloaded createResource methods allow you to pass in a self-configured AttributeMap for further configuration possibilities.
But let's go back to our example. We're now ready to start adding the real tests. A simple test to make sure our configuration is correct is shown in Listing 18-34.
Example 18.34. Testing the Test Configuration
public void testStartExecution() {
    MockExternalContext context = new MockExternalContext();
    startFlow(context);
    assertCurrentStateEquals("hello");
}
The bar is green, hooray! Let's see how we can test the transition to the helloWorld end state (see Listing 18-35).
Example 18.35. Testing Transition to End State
public void testTransitionToHelloWorldState() {
    MockExternalContext context = new MockExternalContext();
    setCurrentState("hello");
    context.setEventId("submit");
    resumeFlow(context);
    assertTrue(getFlowExecution().hasEnded());
}
Theoretically, we could start the flow execution again as we did in testStartExecution. If you want to test more complex flows that have a greater number of states, you'll find the setCurrentState method very useful, allowing you to "cheat" and jump directly to a certain state of the flow instead of having to programmatically transition to it first.
We then specify the ID of the event we would like to occur. That way, we can fine-tune exactly which transition and hence which path we would like to test. In our example, the transition is triggered on any event that occurs, so we could specify anything we like. By calling resumeFlow, the flow gets executed with the information given in the context. All being well, the helloWorld flow will have transitioned to the helloWorld end state, and we can test this by checking if the flow execution has really ended.
In this chapter, we introduced the controller framework Spring Web Flow. We showed you how to get started, including getting the binaries. We covered the elements and concepts of Spring Web Flow: what a flow is and how to define one, and what its elements are and how to use them. We explained how to use automatic form binding, how to call subflows, and how to pass input and output parameters. We also gave a brief insight in securing flow definitions with Spring Security.
By exploring how Spring Web Flow works internally, we gave you an understanding of how and where you can customize the flow execution to fit your needs. We discussed which problems Spring Web Flow is trying to solve and how it goes about doing so.
If you want to have a look at more examples of certain features or see integration with another framework in action, Spring Web Flow comes with a variety of helpful sample applications. It also provides an extensive test suite that you can use as a template for your own test cases. Have a look into your Spring Web Flow distribution for the sources and visit the project home page for links to see the applications working.