
In this chapter, we are going to discuss typical design patterns of Spring applications. We will start with simple console applications and conclude with complex Java EE applications. We are not going to limit ourselves to a pure academic discussion of object-oriented programming and will include recommendations for directory structure, build procedures, testing, and deployment.
We will begin with a description of the directory structure of a typical Spring project, followed by Java design patterns, and a section on Spring application patterns. We will describe some of the typical situations we have solved in Spring applications. We believe that this section will help you tackle some of the more complex requirements in your own applications.
After reading this chapter, you should be able to create and manage even very complex Spring applications; moreover, you will have a good overview of how you can combine the technologies in the Spring Framework to create elegant and well maintainable applications.
Before we begin discussing programming patterns, we need to have a look at the directory structure. An elegant directory structure will simplify the build process and make it easy to find any part of the application's source (be it Java code, script, or JSP file) and to exclude the output of the compilers or code generators from source control.
The project's directory structure should also make it easy to split the project in to modules. Large Java EE applications mostly need to be split across several modules, which are usually packaged in separate JAR files.
Let's begin by looking at relatively simple applications. Take a look at Listing 8-1, which shows the directory structure of a simple Spring application. Such an application could be a command-line database manipulation utility, with only a handful of classes and one Spring context file.
Example 8.1. Simple Application Directory Structure
./src
./src/main
./src/main/java
./src/main/resources
./src/main/sql
./src/test/java
./src/test/resources
./target/test/classes
./target/production/classes
The src directory contains all source files needed to build and test the application; the target directory contains compiled classes and copied resources. Following the Maven 2 directory structure recommendations, the src directory is split into main and test. These correspond to the main source code and test code; code in the test directory can depend on the code in the main directory, but code in the main directory cannot depend on code in the test directory. The resources subdirectories contain non-Java files that are part of the source code, such as Spring context files; the sql directory contains SQL scripts needed to create the database, for example. The target directory contains all compiled code; this directory should not be versioned in your source control system.
The directory structure in Listing 8-1 works fine for a simple Spring application or a shared module, but it does not fit a web application very well. The web application directory structure looks like Listing 8-2.
Example 8.2. Web Application Directory Structure
./web
./web/WEB-INF/webapp-servlet.xml
./web/WEB-INF/web.xml
./web/WEB-INF/views
./web/WEB-INF/views/**/*.jsp
You can see that we have not included any Java code in our web application. There is a good reason for this: we usually package the Java code for the web application in a separate JAR file, so the web application's code is split into two directories: one containing only the Java code and one containing only the web code.
The overall structure of a web application's directory structure looks very similar to the one in Listing 8-3.
Example 8.3. Overall Structure of the Web Application
core
  src
    main
      java
      sql
    test
      java

web
  src
    main
      java
    test
      java

webapp
  src
    resources
      images
      styles
    war
      WEB-INF
        views
        tags
        web.xml
      META-INF
We consider this to be the least intrusive approach for applications where you do not need to use Java EE features that require more complex packaging and deployment strategies. The core directory contains the application's domain, data, and service layers; the web directory contains only the web code. It must be said that this structure does not enforce strict layer separation (for that, you'd need to split the core module into domain, data access, and service modules), but for homogeneous and not overly complex applications, we've found that it is the best match.
The intramodule dependencies are very simple: core depends only on external libraries; web depends on core; and webapp depends on web (and transitively on core).
Complex applications will, in most cases, require a more detailed directory structure. The main reason for this is the need to logically separate the application into several reusable modules. Even though the reusable modules are not easy to identify, they are easy to set up in the standard directory structure: simply create a top-level directory for each independent module.
This can be a highly controversial topic; each developer has a preferred way of naming classes, interfaces, and packages. However, it is very important that the entire team share the same naming conventions. We recommend following standard Sun Java programming naming conventions. Packaging is a far more complex issue, and in most cases, it determines how flexible your application is going to be. Figure 8-1 shows a large application split into several packages and deployed across two JVMs.
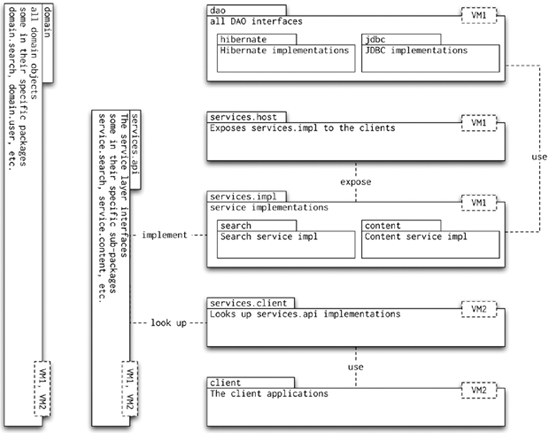
We found that splitting the service layer into service APIs, service API implementation, and service host and client packages allows us to use the service host in integration tests even outside an application server. This is certainly an advantage that outweighs the more complex packaging.
In the next section, we will take a look at the logical building blocks of a Spring application.
Now that you know how to structure the source code of your application, it is time to look at Java design patterns in Spring applications. We shall reiterate Spring's "programming against interfaces" mantra by showing the practical impact of the two injection strategies (constructor and dependency injection). Next, we will focus on the creational design patterns: Singleton, Factory, and Factory Method. Then we will look at the Template Method pattern, which is extensively used in Spring's data access libraries.
This is not a design pattern as such, but it is a very important part of all Spring applications. As you know, interfaces separate the purpose of a component from the internal details of any implementation.
When creating interfaces that will be used in a Spring application, keep the interfaces focused on a very specific task and never mix concerns. Listing 8-4 shows an example of an interface that has more than one concern.
Example 8.4. Mixed-Concern Interface
public interface InvoiceManagementService {
    void file(Invoice invoice);
    void dispute(Long id, String reason);
    BigDecimal getDiscount(Long customerId, Long productId);
}
The first two methods are perfectly valid in the InvoiceManagementService interface. The actions they are likely to perform match the name of the interface. The third method does not really belong to the InvoiceManagementService interface. The getDiscount(Long, Long) method is the most obviously misplaced one.
The situation becomes much more apparent if we attempt to implement this interface. The implementation is forced to deal with discount calculation, even though it may be more appropriate to deal with just the invoice manipulation. The solution to this is to create two interfaces, InvoiceManagementService and DiscountCalculationService (see Listing 8-5).
This group of patterns deals with object creation. In most cases, the objects you create can be fully initialized by passing appropriate arguments to the constructor or by calling a few setter methods. There are, however, situations where object creation is either very complex or very resource intensive. In those situations, it can be more efficient to use one of the creational patterns. The first of these is the Singleton pattern, closely followed by the Factory pattern. The Prototype pattern is also widely used in Spring; the same is true for the Object Pool and Lazy Initialization pattern. Finally, the Builder pattern is used in the configuration handlers. Let's now take a closer look at all of these patterns, see where we can find them in Spring and how we can use them in our application code.
Singleton
The first pattern we will take a look at is the Singleton pattern. This restricts the existence of objects in the JVM to one and only one instance of the particular class. The objects created are called singletons.
Note
Spring has a slightly different concept of singletons: Spring will manage one and only one instance of a class for any bean definition. In other words, using Spring, you can have multiple instances of the same class in the same JVM, as long as they are defined as separate beans in your Spring configuration files.
To prevent calling code from accidentally creating multiple instances of a singleton class, we provide only a private constructor and one static method that returns the sole instance of the class. Figure 8-2 shows the UML diagram for the Singleton pattern.
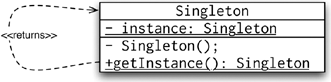
It is very likely that most, if not all, of the beans in your applications can be singletons. In the stateless architecture that Spring applications usually follow, the implementations of the data access interfaces should not keep state between calls; the same applies to the service objects and holds true for the controllers in the web tier. Unless you specifically request your beans to be prototypes, Spring's BeanFactory implementations will treat your beans as singletons (in the Spring sense, the one and only one instance per bean definition). That means that when you call the getBean() methods with the same arguments for nonprototype beans, you will get the same instance of the bean. This brings us nicely to the next design pattern, Factory.
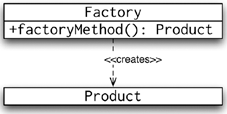
Factory
The Factory pattern is responsible for creating objects, but it is different from the Singleton pattern in that the factory class is usually a different class from the class being created and the construction process is generally more complex. Figure 8-3 shows the UML diagram for the Factory pattern.
Builder
Another object creational pattern is the Builder pattern. In conjunction with a director, the builder is responsible for creating instances of objects. The director calls methods of the builder so that it can return the finished object at the end. The builder itself is usually an abstract class or an interface; the director can therefore use different implementations of the builder. Figure 8-4 shows a UML diagram of the Builder pattern.
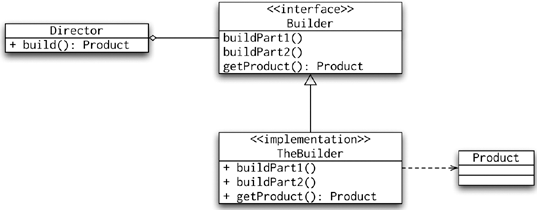
It is not unusual to see the Builder pattern use the Singleton or Factory patterns. This approach is used in Spring in its use of the Builder pattern. The BeanDefinitionBuilder (which combines the factory pattern) is used by the namespace handlers to create instances of the BeanDefinitions that are then used to construct the Spring-managed beans.
Prototype
Prototype is another creational pattern; the prototype uses a template object that can be used to create and initialize multiple individual instances of a class as well as instances of any subclasses. It is usual to initialize the prototype with some default values and then obtain its copies (or its subclasses). Figure 8-5 shows the UML diagram for the Prototype pattern.
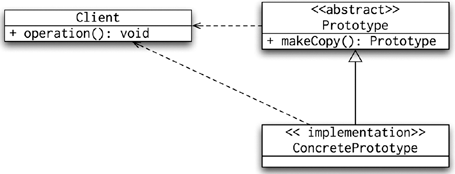
The usage of the prototype in pure Java code (without Spring) involves the implementation of the abstract Prototype class and its makeCopy() method. The only difficulty is that the makeCopy() method should return any possible subclasses. The code in Listing 8-6 shows the implementation of the Prototype pattern in plain Java.
Example 8.6. Prototype Implementation Example
public abstract class Message {
    private String sender;
    public Message makeCopy() {
        try {
            Message copy =  this.getClass().newInstance();
            copy.setSender(this.sender);
            return copy;
        } catch (InstantiationException e) {
            return null;
        } catch (IllegalAccessException e) {
            return null;
        }
    }
}

public class EmailMessage extends Message {
    @Override
    public String toString() {
        return "EmailMessage";
    }
}

public class PrototypeDemo {
     private Message message;
     PrototypeDemo(Message message) {
        this.message = message;
    }
    Message makeMessage() {
        return this.message.makeCopy();
    }
    public static void main(String[] args) {
        Message prototype = new EmailMessage();
        PrototypeDemo demo = new PrototypeDemo(prototype);
        System.out.println("Message "  + demo.makeMessage());
    }
}
In the code example, the Message class is the prototype, the EmailMessage is the concrete prototype, and the PrototypeDemo is the client that uses the prototype to obtain additional instances. Listing 8-7 shows the Spring context file for the prototype object declaration.
Example 8.7. Spring Context File for the Prototype Example
<!DOCTYPE beans PUBLIC "-//SPRING//DTD BEAN//EN"
    "http://www.springframework.org/dtd/spring-beans.dtd">
<beans>
    <bean id="prototypeClient"
          class="com.apress.prospring2.ch08.
creational.prototype.SpringPrototypeClient">
        <property name="message1" ref="message"/>
        <property name="message2" ref="message"/>
    </bean>

    <bean id="message"
        class="com.apress.prospring2.ch08.creational.prototype.EmailMessage"
       scope="prototype"/>
</beans>
creational.prototype.SpringPrototypeClient">
<property name="message1" ref="message"/>
<property name="message2" ref="message"/>
</bean>
<bean id="message"
class="com.apress.prospring2.ch08.creational.prototype.EmailMessage"
scope="prototype"/>
</beans>The context file looks like any other Spring context file; the only notable line is the scope="prototype" attribute. The BeanFactory will create a new instance of the message bean every time it is referenced. The message1 and message2 properties of the prototypeClient bean will therefore receive copies of the original message bean. Listing 8-8 shows code we can use to prove that the messages are indeed new instances.
Example 8.8. Sample Application Using the Spring Prototype Pattern
public class SpringPrototypeClient {
    private Message message1;
    private Message message2;

    public void run() {
        System.out.println("Message1 " + this.message1.toString());
        System.out.println("Message2 " + this.message2.toString());
        System.out.println("Messages == " + (this.message1 == this.message2));
    }

    public void setMessage1(Message message1) {
        this.message1 = message1;
    }

    public void setMessage2(Message message2) {
        this.message2 = message2;
    }
}

public class SpringPrototypeDemo {

    public static void main(String[] args) {
        ApplicationContext context =
            new ClassPathXmlApplicationContext("prototype-context.xml",
SpringPrototypeDemo.class);
        SpringPrototypeClient client =
(SpringPrototypeClient) context.getBean("prototypeClient");
client.run();
}
}The run() method in the SpringPrototypeClient prints out the values of message1 and message2 and finally indicates whether the two messages are the same objects. The output of running the SpringPrototypeDemo follows:
Message1 EmailMessage
Message2 EmailMessage
Messages == false
The patterns in this group are used in the implementation of interactions between elements of the application. They are used to alter behavior of existing classes, make existing classes appear as other classes, and add functionality to existing classes.
Proxy
Proxy is a widely-used pattern in Spring applications; its use is often hidden behind standard Spring beans. A proxy is an object that stands in place of the original object, and thus intercepts (and thus sees first) all method calls to the target object. Because of this, the proxy can modify the behavior of the target object; the range of the modifications spans from simple tracing, before and after processing, to invoking completely different methods. A complete proxy UML diagram is shown in Figure 8-6.
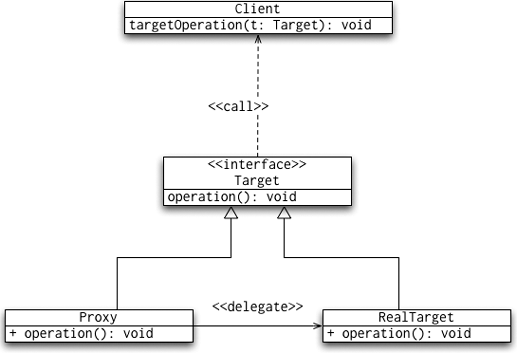
You have seen proxy examples in the AOP chapters of this book. If you like, you can revisit Chapter 5 and Chapter 6 for more details.
Adapter
The next pattern to discuss is Adapter. As the name suggests, it is used to make an alien interface or class usable for a client. Figure 8-7 shows the UML diagram of the classical representation of the Adapter pattern.
The uses of the Adapter pattern are mainly in the domain of application code, not Spring itself. Nevertheless, Spring makes use of the Adapter pattern in the JMS and AOP packages. A good example can be found in MessageListenerAdapter and MessageListenerAdapter102. Both these classes implement the MessageListener interface but then adapt the onMessage(Message, Session) call to the adaptee. The adaptee does not have to implement the MessageListener (or the SessionAwareMessageListener) interface. The adapters can delegate to any other method of the adaptee.
Wrapper and Decorator
The Wrapper and Decorator patterns are very similar to one another; in fact, you can say that a wrapper is a special type of decorator. Let's therefore focus on decorator, which, as the name suggests, adds additional functionality to the decorated object. A good example of the Decorator pattern in action is in web programming, when we might want a decorator to display results. If, for example, the result received from a service layer call is a collection of domain objects, but thepresentation needs additional information about each element, you do not want to complicate your domain objects with fields and methods needed only for the presentation. That's why you should consider implementing a decorator. This decorator will take the domain object as its argument and add the necessary functionality. The presentation tier will receive the decorated domain objects. Figure 8-8 shows the UML diagram of the Decorator pattern.
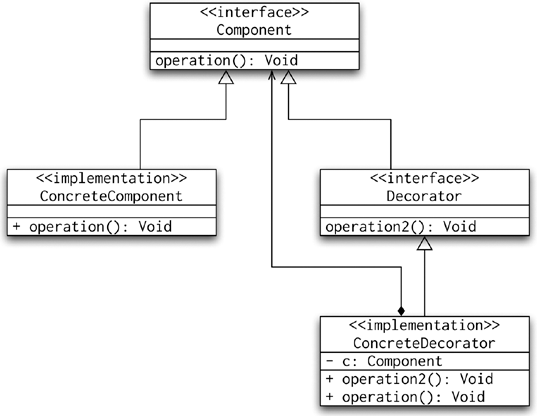
As already mentioned, the most frequent use of Decorator is in the presentation tier. Our favorite JSP tag library for displaying tabular data is DisplayTag (http://displaytag.sourceforge.net/11/), and it makes extensive use of the Decorator pattern.
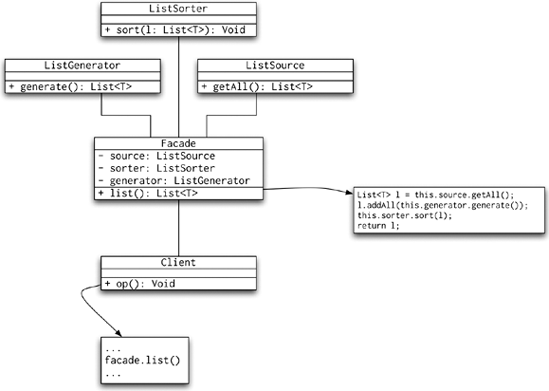
Facade
The purpose of the Facade pattern is to hide a complex structure of calls behind a simple interface that clients can use. Typically, a call to a facade method involves various calls to the methods behind the facade. That is why this pattern is sometimes referred to as the business or service facade. The UML diagram in Figure 8-9 shows the potentially complex interactions in a facade.
Of all the many patterns in this group, the patterns that we will focus on are Observer, Strategy, and Template Method. You will probably be familiar with some of these patterns already, because the Observer pattern is rather widely used. Let's take a look at these patterns in more detail.
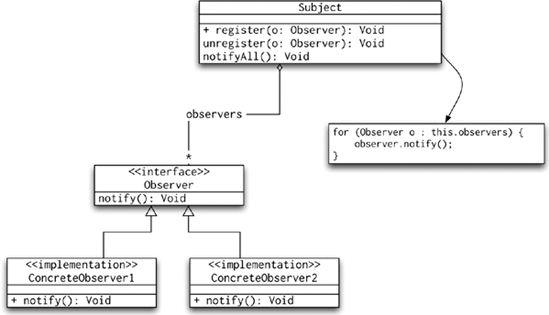
Observer
Observer is used in situations where any number of other objects (observers) need to be notified when the observed object changes its state. Its use in Spring may represent a situation where you implement the ApplicationListener to receive notifications from Spring. Following our convention of illustrating patterns with UML diagrams, Figure 8-10 shows the Observer pattern diagram.
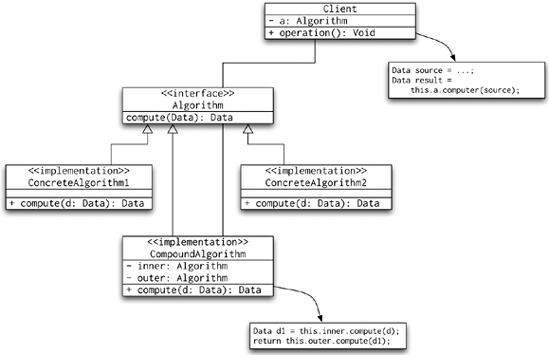
Strategy
Strategy is a specific programming pattern where the algorithm for obtaining a result can be selected at runtime. The UML diagram for this pattern is shown in Figure 8-11.
The Template Method pattern is used to implement a skeleton of an algorithm. In other words, it implements the common parts of a computation and delegates the details to the implementation subclasses. This way, the subclasses cannot disrupt the overall computation but are free to perform their subtasks in any way necessary. The UML diagram for this pattern is shown in Figure 8-12.
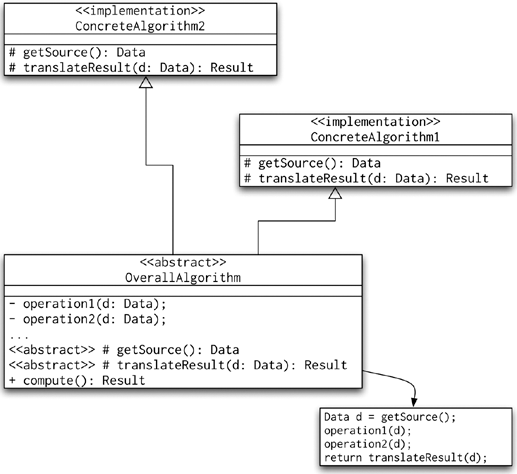
This is perhaps the most widely used pattern in Spring applications—or at least in the ones that use Spring's data access classes. In short, the Template Method pattern represents a fragment of an algorithm or some other process. This process is completely enclosed and guarded by the framework.
You may have noticed that this pattern is widely used in Spring's data access template classes, namely in JdbcTemplate, HibernateTemplate, SqlMapClientTemplate, JdoTemplate, and ToplinkTemplate. Let's focus our discussion on the HibernateTemplate class: consider its Object execute(HibernateCallback action) method. Its argument is an implementation of the HibernateCallback, which represents the code fragment that needs to be executed in a guarded section provided in the HibernateTemplate.execute method. As programmers, we do not need to worry about error management in the body of the HibernateCallback.doInHibernate() method; this exactly represents the Template Method pattern.
Another example of the template method is in the DAO support convenience superclasses that Spring provides. Take, for example, the HibernateDaoSupport class: it implements the InitializingBean interface, and the attendant afterPropertiesSet method is declared as final. That means that any subclasses cannot change the initialization, but Spring offers them a chance to provide additional initialization by overriding the initDao method. The code in Listing 8-9 shows a similar situation in a web application.
Example 8.9. Template Method Pattern in a Web Tier
public abstract class ProductServiceSupport implements InitializingBean {
    protected ProductDao productDao;

    /**
     * Subclasses may override this method to perform additional initialization
     * that will be performed as the last action of the afterPropertiesSet method.
     * This implementation does nothing.
     */
    protected void initService() throws Exception { /* do nothing */ }

    public final void afterPropertiesSet() throws Exception {
        Assert.notNull(this.productDao, "The productDao must be set");
        initController();
    }

    public final void setProductDao(ProductDao productDao) {
        this.productDao =productDao;
    }
}

public class IndexController extends ProductControllerSupport {
Another example is a failover block, where you attempt to acquire a resource and if the acquire call fails, you try another resource. Whichever resource you manage to acquire, you want to execute the same code.
Now that we have covered some of the design patterns and their usage in isolation, it is time to look at the patterns we have identified in the context of various enterprise applications we have implemented using Spring. In this section, we will present typical features of large applications and the solution we believe will give the best results. Along with the solution, we will explain why we have chosen it and what its potential shortcomings are. Remember that the solutions we will discuss in this section are not the only ones available.
Also keep in mind that this section is not an exhaustive list of enterprise application patterns; it is a selection of problems we encounter most often when implementing Java EE applications with Spring.
The first concept we will mention here is the logical layered design of applications, which is the fundamental concept of maintainable applications. All the layers of your application may run in the same virtual machine and use local calls; you don't necessarily have to write a complex distributed application. The layers are illustrated in Figure 8-13.
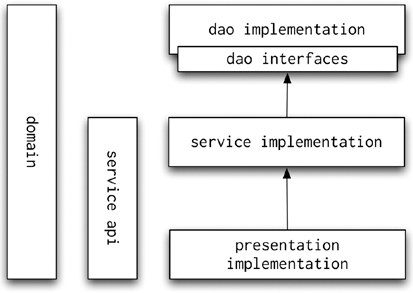
As you can see from the diagram, the domain layer spans the entire application; the domain objects are accessible to every layer of the application. Next, the service API defines the interfaces of the application services. The services are accessible to the presentation tier. The presentation layer accesses the service APIs using the service lookup code, which connects to the service API implementation exposed by the service host.
Next, the service implementations use the data access interfaces, which are ultimately implemented in the DAO implementation. The important point to observe here is that the presentation implementation cannot access the DAO interfaces, not to mention the DAO implementation. You can see in Figure 8-13 that the presentation layer can only access the service layer, which in turn, has access to the DAO interfaces. The presentation implementation is limited to using the service API interfaces.
Distributed applications can be set up using the same logical layering as Figure 8-13 shows, because the Spring setup can be left unchanged as the dependencies between layers are on interfaces. If you need to create a distributed application, you can set up the application in a more complex way, as illustrated in Figure 8-14.

As you can see, the difficulty with a distributed application is the virtual machine boundary between the service host and service lookup. These two layers are responsible for exposing the service implementation so that it is accessible to the service lookup code. The service lookup code finds the service APIs and returns them to the presentation implementation.
All of the patterns we will show in this chapter work with both distributed and local applications.
In most applications, you need to deal with potentially large result sets. For performance and usability reasons, displaying the entire result set at once is often unacceptable. You need to implement some kind of paging mechanism, and you have two fundamental choices: either leave the presentation layer to deal entirely with the paging or add support for paging to all layers. While the first option is the easier to implement (indeed, with projects like DisplayTag, you add one attribute to a JSP tag, and all your paging is done), such approaches could suffer from severe performance and memory usage limitations. Imagine calling a service method that returns thousands of objects—each time you want to display one page of the result all these objects are collected from the database and then the presentation layer pages them. Or if the presentation layer has to keep thousands of large objects in memory so it can perform the paging correctly, a memory usage problem would be expected. So, while using presentation layer paging as a short-term fix is possible, the long-term solution should use an approach similar to the one we will show now.
Let's begin by looking at Figure 8-15; it shows a typical data flow without paging support.
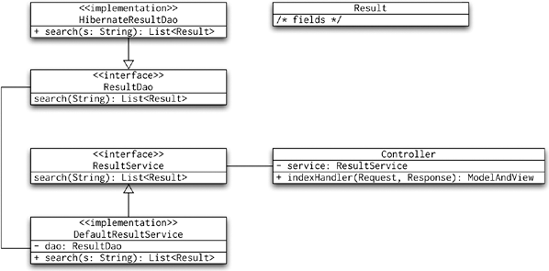
Now, you can see that the Controller uses the ResultService (and indirectly its implementation, the DefaultResultService) to perform some kind of search and gets a List of Result object back. The data access layer (defined by the ResultDao and implemented in HibernateResultDao) acts on the requests of the DefaultResultService, goes to the database, and fetches all Result objects that matched the search strings. Unfortunately, this means that any paging must be left to the presentation tier (the Controller or a JSP page).
The widely accepted solution to this problem is to pass a search argument object to the service and DAO layers and receive a search result back. The argument will include the first record and a maximum number of records to fetch; the result will include up to a maximum number of Result objects and a number of total Result objects. Because the search argument and result objects are likely to be very similar for various types of searches, expressing them as abstract classes can be useful, as illustrated in Figure 8-16.
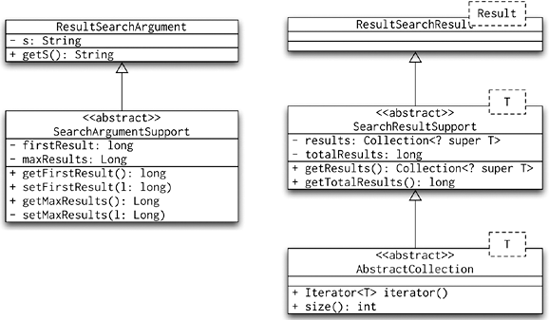
As you can see, the ResultSearchArgument only adds the search strings, and the ResultSearchResult does not add any fields to their superclasses. The service and DAO layers need to be modified so that they take the argument object and return the result object. Listing 8-10 shows how this might look in code.
Example 8.10. Paging Implementation in Hibernate
public interface ResultDao {
    ResultSearchResult search(ResultSearchArgument a);
}

public class HibernateResultDao
extends HibernateResultSupport implements ResultDao {
    public ResultSearchResult search(final ResultSearchArgument a) {
        return (ResultSearchResult) getHibernateTemplate().execute(
new HibernateCallback() {
            public Object doInHibernate(Session session)
                                      throws HibernateException, SQLException {
                Query query;
                ResultSearchResult result = new ResultSearchResult();
                query = session.createQuery("from Result where name = :s");
                query.setString("s", a.getS());
                query.setFirstResult(a.getFirstResult());
                query.setMaxResults(a.getMaxResults());
                result.setResult(query.list());

                query = session.createQuery(
"select count(*) from Result where name = :s");
                query.setString("s", a.getS());
                result.setTotalResults((Long)query.uniqueResult());

                return result;
            }
        });
    }}

public interface ResultService {
    ResultSearchResult search(ResultSearchArgument a);
}

public class DefaultResultService implements ResultService {
    private ResultDao resultDao;

    public ResultSearchResult search(ResultSearchArgument a) {
        return this.resultDao.search(a);
    }
}

   public void setResultDao(ResultDao resultDao) {
        this.resultDao = resultDao;
    }
}
Even though the implementation uses Hibernate, the general principle would remain the same for any other DAO implementation. You select the specific page and a total number of results that would match the search argument. It means two trips to the database, but the performance benefit over fetching all records, passing them up the call stack, and leaving the presentation tier to discard most of the results, can be substantial. For more information about Hibernate, see Chapter 11.
The specifics of processing the paging requests on the client side depend on the final presentation layer; we give an example of a JSP page using a simple Controller and the DisplayTag library in Chapter 17.
Some applications need to process the user input, and if the user input contains errors, the application has to return a number of possible problems. An example you should be familiar with is the Java compiler. It processes input (compiles code) and returns compilation errors (if any). If you were to write an application that compiles and runs Java sources received from the user, indicating all discoverable errors at once would be best, rather than stopping at the first erroneous line.
Making error messages localizable and maximizing code reuse for the result reports are also desirable. Thus we can create the ResultSupport class as shown in Figure 8-17.
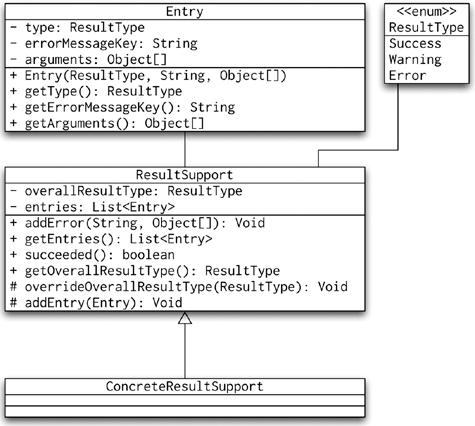
The service calls in our application now return the ResultSupport subclasses, which can report multiple errors from one call. In addition to reporting multiple errors, the callers (usually in the presentation layer) can easily check whether the call succeeded or not. Finally, you can very easily write a custom JSP tag that can be used in a JSP page in code similar to the one shown in Listing 8-11.
Example 8.11. JSP Page Displaying a Result
<%@ page contentType="text/html;charset=UTF-8" language="java" %>
<%@ taglib prefix="c" uri="http://java.sun.com/jsp/jstl/core" %>
<%@ taglib prefix="ps" uri="http://www.apress.com/prospring2/tags" %>
<html xmlns="http://www.w3.org/1999/xhtml"
     xmlns:xsi="http://www.w3.org/2001/XMLSchema-instance"
     xsi:schemaLocation="http://www.w3.org/MarkUp/SCHEMA/xhtml11.xsd"
     xml:lang="en" >
<head>
    <title>Result</title>
</head>
<body>
<h2>We have processed the data</h2>
<ps:result result="${result}">
    <c:if test="${succeeded}">
        <b>The update was successful</b><br/><br/>
    </c:if>
    <c:if test="${!succeeded}">
        <b>The update has failed</b><br/><br/>
     </c:if>
</ps:result>
</body>
</html>
The ps:result tag's implementation is shown in Listing 8-12. We found this to be a very efficient way of passing complex results back to the user interface.
Example 8.12. ResultSupportTag Implementation
public class ResultSupportTag extends RequestContextAwareTag implements BodyTag {
    private ResultSupport result;
    private boolean showDetail = true;
    private boolean showHeader = true;
    private boolean hideSuccess = true;
    private static final Pattern LOCALISED_PATTERN = Pattern.compile("@L(.*)");
    private static Map<ResultSupport.ResultType, String> resultTypeClasses =
        new HashMap<ResultSupport.ResultType, String>();

    static {
        for (ResultSupport.ResultType resultType :
               ResultSupport.ResultType.values()) {
            resultTypeClasses.put(resultType, resultType.name().toLowerCase());
        }
    }

    public void setResult(ResultSupport result) {
        this.result = result;
    }

    public void setShowDetail(boolean showDetail) {
        this.showDetail = showDetail;
    }

    public void setShowHeader(boolean showHeader) {
        this.showHeader = showHeader;
    }

    public void setHideSuccess(boolean hideSuccess) {
        this.hideSuccess = hideSuccess;
    }
protected int doStartTagInternal() throws Exception {
if (this.result == null) return Tag.SKIP_BODY;
ResultSupport.ResultType overallResultType =
this.result.getOverallResultType();
//noinspection UnnecessaryBoxing
pageContext.setAttribute("succeeded", Boolean.valueOf(result.succeeded()));
if (overallResultType == ResultSupport.ResultType.Success
&& this.hideSuccess) {
// the result is a success and the user doesn't want to see
the success message
return Tag.EVAL_BODY_INCLUDE;
}
String resultTypeText =
HtmlUtils.htmlEscape(getResultTypeMessage(overallResultType));[HL1]
JspWriter out = pageContext.getOut();
out.write("<div class="result">
");
if (this.showHeader) {
// write out the overall result (if requested)
out.write("<span class="");
out.write(resultTypeClasses.get(overallResultType)); out.write("">");
out.write(resultTypeText);
out.write("</span>
");
}
// write out the details, if requested
if (this.showDetail) {
out.write("<ul>");
for (ResultSupport.Entry entry : this.result.getEntries()) {
out.write("<li class="");
out.write(resultTypeClasses.get(entry.getType())); out.write("">");
writeMessage(out, entry);
out.write("</li>
");
}
out.write("</ul>
");
}
// close the main element
out.write("</div>
");
return Tag.EVAL_BODY_INCLUDE;
}
private void writeMessage(JspWriter out, ResultSupport.Entry entry)
throws IOException {
String key = entry.getErrorMessageKey();
Matcher matcher = LOCALISED_PATTERN.matcher(key);
if (matcher.matches()) {
key = matcher.group(1);
}
String message = getRequestContext().getMessage(key,
entry.getArguments(), key);
out.write(HtmlUtils.htmlEscape(message));
}private String getResultTypeMessage(ResultSupport.ResultType resultType) {
switch (resultType) {
case Error:
return getRequestContext().getMessage("error", "Error");
case Success:
return getRequestContext().getMessage("success", "Success");
case Warning:
return getRequestContext().getMessage("warning", "Warning");
}
// not really possible if we're careful not to forget to add to
the switch above
throw new IllegalArgumentException("Result type not supported");
}
public void setBodyContent(BodyContent bodyContent) {
// noop
}
public void doInitBody() throws JspException {
// noop
}
}Some applications require what are best described as user interface transactions. The Java EE pattern name for this is Unit of Work. The user sequentially adds more information about the work that is to be performed in a transaction. Starting a transaction in the traditional sense (to treat the whole process of user interaction as one unit that has to be completed before we commit any work) and keeping it open across many user interface interactions is not a good idea. Doing so will cause performance bottlenecks when the user makes modifications to data that other transactions might use. Even worse, the user may simply close the browser, leaving our transaction stranded until the session expires.
Clearly, using transactions is not an option. Instead, we must collect all information about the work the user wants to run transactionally and perform the actual work only when the user clicks the final submit button. Following the pattern we will show here, giving feedback to the user at each step is easy, and you can just as easily store the unit of work data so that the user can come back to an unfinished unit of work and complete it later. Finally, this pattern can also be used to submit the unit of work for asynchronous processing with minimal impact on the code.
Let's begin with a definition of the domain object that represents the unit of work. We will show a document upload with additional metadata. Listing 8-13 shows the domain object for our unit of work.
Example 8.13. DocumentUploadTransaction Domain Object
public class DocumentUploadTransaction {
    private Long id;
    private byte[] content;
    private String headline;
    private List<Category> categories;

    public Long getId() {
        return id;
    }
public void setId(Long id) {
this.id = id;
}
public byte[] getContent() {
return content;
}
public void setContent(byte[] content) {
this.content = content;
}
public String getHeadline() {
return headline;
}
public void setHeadline(String headline) {
this.headline = headline;
}
public List<Category> getCategories() {
return categories;
}
public void setCategories(List<Category> categories) {
this.categories = categories;
}
}The actual meaning of headline and categories properties is not our main concern at this point. The main concern is how the presentation layer will use this object. We will create the DocumentService with the methods shown in Listing 8-14.
Example 8.14. DocumentService Interface
public interface DocumentService {

    Long begin();
    DocumentUploadResult upload(long id, byte[] content);
    DocumentUploadResult setCategories(long id, List<Category> categories);
    DocumentUploadResult setHeadline(long id, String headline);
    DocumentUploadResult commit(long id, boolean synchronous);
    void abandon(long id);

}
The interface itself is very simple; its use is slightly more complex. The presentation tier code will call the begin() method to obtain an identifier for the unit of work. It will then repeatedly call the upload, setCategories, and setHeadline methods until the user is satisfied or until the returned DocumentUploadResults indicate failures. Notice that the DocumentUploadResult here extends the ResultSupport class from the multiple errors reporting pattern. Once the user is satisfied with the result and clicks the final submit button, the presentation tier code calls the commit() method. Notice that the commit method includes the synchronous argument. The outline of the implementation is shown in Figure 8-18.
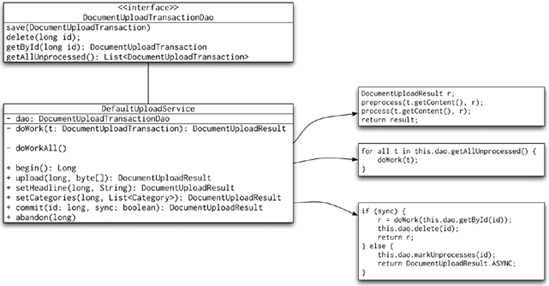
The implementation of the upload, setHeadline, and setCategories methods simply updates the DocumentUploadTransaction object and then performs processing similar to that done in the doWork(DocumentUploadTransaction) method, except it does not perform any data updates. This means that the returned result is not absolutely guaranteed to be correct. It is possible, though unlikely, that the methods will indicate success though the call to the commit method ultimately fails. This is why even the commit method returns a DocumentUploadResult object.
The interesting part of this pattern is the implementation of the commit code for asynchronous requests. We simply mark the DocumentUploadTransaction object as unprocessed, which means that it will be picked up by the doWorkAll() method. You may notice that no code explicitly calls the doWorkAll method; it is up to a scheduler (see Chapter 12 for more details) to invoke this method periodically to perform the processing. This method then calls the doWork(DocumentUploadTransaction) method that performs the processing.
The final, and perhaps most important, point is that the doWorkAll() and doWork(DocumentUploadTransaction) methods must be marked as transactional in the Spring transaction configuration (see Chapter 16 for more details). This way, we ensure that the user sees the upload process as a transaction (unit of work in our application). The transaction semantics are enforced by processing the definition of the unit of work in an actual transaction.
Notice that you do not have to implement the DocumentUploadTransactionDao to actually go to the database, because for some applications, it may be quite enough to implement with code similar to that shown in Listing 8-15.
Example 8.15. Simple Implementation of DocumentUploadTransactionDao
public class HeapDocumentUploadTransactionDaoimplements DocumentUploadTransactionDao { private Map<Long, DocumentUploadTransaction> data = Collections.synchronizedMap(new HashMap<Long, DocumentUploadTransaction>()); public void save(DocumentUploadTransaction transaction) { long id = this.data.size() + 1; transaction.setId(id); this.data.put(id, transaction); } public void delete(long id) { this.data.remove(id); } public DocumentUploadTransaction getById(long id) { return this.data.get(id); } public synchronized List<DocumentUploadTransaction> getAllUnprocessed() { List<DocumentUploadTransaction> result =new LinkedList<DocumentUploadTransaction>(); for (DocumentUploadTransaction t : this.data.values()) { if (t.isUnprocessed()) result.add(t); } return result; } }
This approach will work quite well when the expected number of active units of work is fairly low. If you expect a high volume of units of work, you will be better off using a real database. Using a database will give you the additional benefit of being able to save a unit of work, thus allowing the users to stop their work and return to it at some later point. Automatically saving the unit of work before the session expires is also possible, thus sparing the users the inconvenience of preparing the unit of work again, is also possible.
The database approach will also allow you to add permission control to the upload process; it is quite possible to have a group of users who can prepare the units of work but cannot actually commit them. This task can be reserved to a power user who will check the unit of work and decide to commit or abandon it.
Most enterprise applications need some kind of background processing. Background processes are those that are not triggered by the user interface. To put it more precisely, the user cannot see the result of the processing immediately. Using scheduling in Spring (see Chapter 12) is not difficult, but managing the jobs is harder. Though we found that the JMX console provides adequate support for management of scheduled jobs, we do not want to restrict our options to JMX alone. Figure 8-19 shows the solution we found to be most flexible.
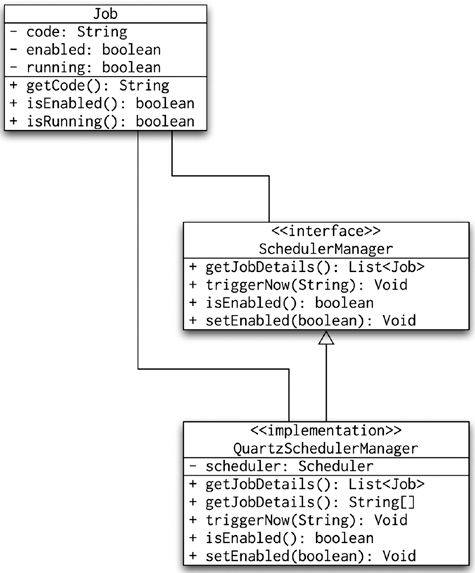
The diagram shows quite clearly that the Job class is an object that records information about the Job objects in a scheduler-agnostic way. The Quartz scheduler, for example, uses a concept of job groups and job names. What the UML diagram doesn't show is that the implementation of the SchedulerManager interface prepares the name returned in the Job class and parses it back in the triggerNow(String) method. In addition to the code building and parsing, we have also marked the QuartzSchedulerManager as a JMX resource. Listing 8-16 shows the full source of the QuartzSchedulerManager.
Example 8.16. JMX-Annotated Scheduler Manager
@ManagedResource(objectName = "com.apress.prospring.ch08.scheduler:name=manager",description = "The scheduler manager") public class QuartzSchedulerManager implements SchedulerManager { private Scheduler scheduler; private static final Pattern JOB_NAME_PATTERN =Pattern.compile("([^:]*)::(.*)");
public List<Job> getJobsDetails() {
        try {
            List<Job> result = new LinkedList<Job>();
            String[] groups = this.scheduler.getJobGroupNames();
            for (String group : groups) {
                String[] names = this.scheduler.getJobNames(group);
                for (String name : names) {
                    Job job = new Job(String.format("%s::%s", group, name));
                    job.setEnabled(true);
                    result.add(job);
                }
            }
            return result;
        } catch (SchedulerException ex) {
            throw new RuntimeException(ex);
        }
    }

    @ManagedAttribute(description = "The scheduled jobs")
    public String[] getJobs() {
        try {
            List<String> result = new LinkedList<String>();
            String[] groups = this.scheduler.getJobGroupNames();
            for (String group : groups) {
                String[] names = this.scheduler.getJobNames(group);
                for (String name : names) {
                    result.add(String.format("%s::%s", group, name));
                }
            }
            return result.toArray(new String[result.size()]);
        } catch (SchedulerException ex) {
            throw new RuntimeException(ex);
        }
    }

    @ManagedOperation(description = "Trigger a job identified by the argument now")
    @ManagedOperationParameters({
        @ManagedOperationParameter(name = "job", description = "The job name")
    })
    public void triggerNow(String job) {
        Matcher matcher = JOB_NAME_PATTERN.matcher(job);
        if (matcher.matches()) {
            try {
                this.scheduler.triggerJob(matcher.group(2), matcher.group(1));
            } catch (SchedulerException ex) {
                throw new RuntimeException(ex);
            }
        }
    }

    @ManagedAttribute(description = "Indicates whether the scheduler is enabled")
    public boolean isEnabled() {
        return true;
    }

    @ManagedOperation(description = "Enables or disables the scheduler")
    @ManagedOperationParameters({
@ManagedOperationParameter(name = "enabled",description = "Enable or disable") }) public void setEnabled(boolean enabled) { // noop } public void setScheduler(Scheduler scheduler) { this.scheduler = scheduler; } }
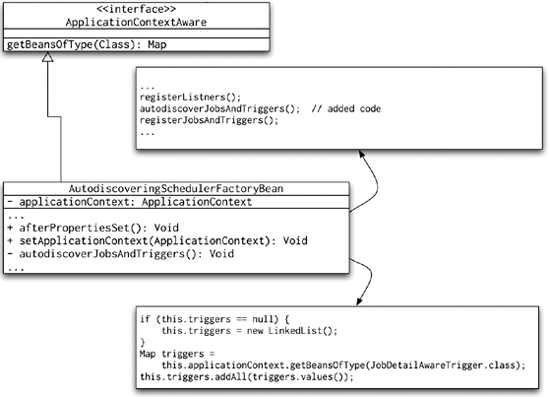
Now, we can define as many Quartz triggers in our application's Spring context files as we need. But we also need to declare them in the reference of the SchedulerFactoryBean; this is not a problem in a smaller application, but it becomes an issue with a large enterprise application. Therefore, we have created a new implementation of the SchedulerFactoryBean, the AutodiscoveringSchedulerFactoryBean. Figure 8-20 shows a high-level overview of our implementation: we have added the autodiscoverJobsAndTriggers() method, which we call from the afterPropertiesSet() method; the remainder of the code is taken from the original SchedulerFactoryBean.
To complete the picture, look at the code shown in Listing 8-17. We define the AutodiscoveringSchedulerFactoryBean and all necessary JMX beans. After we have completed this configuration, all we need to do is to create a Quartz JobDetail bean. It will automatically be discovered when the application starts up. It will be exposed in the JMX SchedulerManager MBean, and it will be made available to scheduling management that uses the SchedulerManager bean.
Example 8.17. Spring Context File for the Scheduler Manager
<?xml version="1.0" encoding="UTF-8"?>
<beans xmlns="http://www.springframework.org/schema/beans"
                         ...>

    <bean id="mbeanServer"
class="org.springframework.jmx.support.MBeanServerFactoryBean">
        <property name="locateExistingServerIfPossible" value="true"/>
    </bean>
    <bean id="mainScheduler" class="uk.gov.ukti.bpb.services.
host.scheduler.AutodiscoveringSchedulerFactoryBean">
        <property name="autoStartup" value="true"/>
    </bean>
    <bean id="schedulerManager"
        class="uk.gov.ukti.bpb.services.host.scheduler.QuartzSchedulerManager">
        <property name="scheduler" ref="mainScheduler"/>
    </bean>

    <bean id="jmxAttributeSource"
          class="org.springframework.jmx.export.
annotation.AnnotationJmxAttributeSource"/>

    <bean id="assembler"
          class="org.springframework.jmx.export.
assembler.MetadataMBeanInfoAssembler">
        <property name="attributeSource" ref="jmxAttributeSource"/>
    </bean>

    <bean id="namingStrategy"
          class="org.springframework.jmx.export.naming.MetadataNamingStrategy">
        <property name="attributeSource" ref="jmxAttributeSource"/>
    </bean>

    <bean class="org.springframework.jmx.export.MBeanExporter">
        <property name="autodetect" value="true"/>
        <property name="server" ref="mbeanServer"/>
        <property name="assembler" ref="assembler"/>
        <property name="namingStrategy" ref="namingStrategy"/>
    </bean>

</beans>
Here, we can see all the important elements of the scheduling management code: the MBeanServer (see Chapter 21) and the Quartz scheduler (see Chapter 12). The demonstration application consists of a simple Java class whose code is shown in Listing 8-18.
Example 8.18. Sample Application for the Scheduler Manager
public class Main {

    public static void main(String[] args) throws Exception {
        new ClassPathXmlApplicationContext(new String[] {
                "scheduler-context.xml",
                "main-context.xml"
        }, Main.class);
new BufferedReader(new InputStreamReader(System.in)).readLine();
}
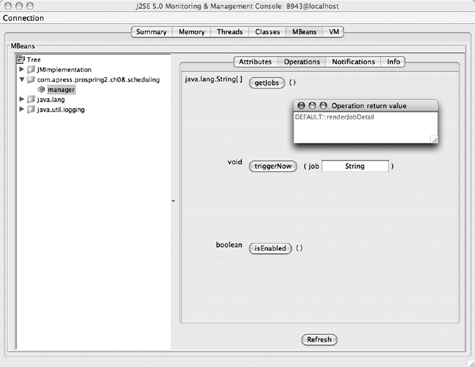
}When we run this application with the -Dcom.sun.management.jmxremote JVM argument (this is required in JVMs before version 1.6; if you're using Java 1.6, you don't have to add this parameter), we can then see the JConsole window shown in Figure 8-21.
Note
JConsole is a graphical tool that connects to the running JVM, usually for application monitoring purposes. You can find more about JMX and JConsole in Chapter 16 or on the Sun web site at http://java.sun.com/developer/technicalArticles/J2SE/jconsole.html.
Now that you know how to deal with scheduled jobs, we can move ahead and see how we can use this knowledge to send e-mail.
Most applications need to notify their users by e-mail. Simpler applications can get away with using Spring's e-mail integration and synchronously sending the e-mails using an SMTP mail transport. However, more advanced applications usually cannot tolerate the delay of connecting to the SMTP server and may require scheduling of the delivery of the e-mails and infrastructure for retries and reports on e-mails sent.
To do this, we usually create a message queue with a scheduled process that processes the queue and sends the messages asynchronously. Together with the scheduling infrastructure we introduced earlier, you can build efficient e-mail-sending applications. In addition to the sending process, adding some kind of templating engine is useful so that you can customize the e-mail being sent out. We will show how we can separate template generation from storage.
The main components of the solution are illustrated in Figure 8-22.
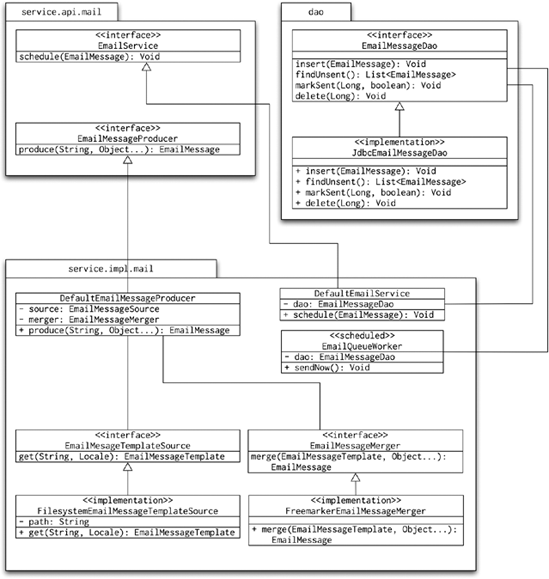
The diagram shows the main components of the system. The data access tier implements storage of the EmailMessage objects. The service APIs are represented by the EmailService and EmailMessageProducer. The implementation of the EmailService (the DefaultEmailService) simply validates the passed EmailMessage class and stores it in the database. It then gets picked up by the EmailQueueWorker, which operates on the message queue in the database. The clients (that is the code that uses the service APIs) use the EmailMessageProducer to obtain an EmailMessage. The EmailMessage is identified by its code; it usually includes placeholders for arguments, which are passed to the producer in the Object . . . argument parameter. The implementation of the EmailMessageProducer (the DefaultEmailMessageProducer) uses implementations of the EmailMessageTemplateSource and EmailMessageMerger. The task of the EmailMessageTemplateSource is to look up the e-mail template identified by its code; the merger will take the content of the template and merge it with the arguments to produce the final EmailMessage, which is almost ready to be queued using the EmailService. By "almost ready," we mean that the message body and subject are set; all that remains to be done is to specify the recipient and add any potential attachments.
As you can see, there are important things to consider in a real implementation. The e-mail templates should be stored externally, perhaps on the filesystem or in the database. Also, including the locale is important when looking up the e-mail templates. You may argue that your application does not need to support different languages, but adding this feature is easy, and you can always produce templates in your default language.
When implementing the scheduler, you should add some management information: you may find it useful to track the numbers of retry e-mails sent, the size of the queue, and many other values.
The final section of this chapter deals with error reporting. This is an extremely important aspect of good application design. With enough information about the errors that occur, debugging becomes a lot easier. However, recording just enough information about application failures is very tricky. I am sure you would never write code similar to that shown in Listing 8-19.
Example 8.19. Bad Example of Error Handling
public class SimpleClient {
    private FileUploadService fileUploadService;
    private static final Log logger = LogFactory.getLog(SimpleClient.class);

    public void uploadTerrible() {
        try {
            this.fileUploadService.upload("me", "text/plain",
System.currentTimeMillis(), new byte[] { 1, 2, 3 });
} catch (Exception e) {
// Go away!
}
}
public void setFileUploadService(FileUploadService fileUploadService) {
this.fileUploadService = fileUploadService;
}
}Silently ignoring exceptions is not good practice in Java (or any other type of) programming. The code in Listing 8-19 gives no feedback to the user in case of an error. When the users complain that the application did not work as it should, the programmers may find it hard to reproduce the problem. A solution that addresses some of these issues is shown in Listing 8-20.
Example 8.20. Slightly Improved Error Logging
public class SimpleClient {
    private FileUploadService fileUploadService;
    private static final Log logger = LogFactory.getLog(SimpleClient.class);

    public void uploadBetter() {
        try {
            this.fileUploadService.upload("me", "text/plain",
System.currentTimeMillis(), new byte[] { 1, 2, 3 });
} catch (Exception e) {
logger.error(e);
}
}
public void setFileUploadService(FileUploadService fileUploadService) {
this.fileUploadService = fileUploadService;
}
}The code here addresses the issue of silently swallowing the exception. However, it simply writes it out to a log. Now, even if we turned the logging down to the ERROR level, if we had 1,000 requests, the log would still contain 26 lines; at the DEBUG level, we would have to go through 2,865 lines to locate the errors!
However, we are still missing more information about the errors. We get the message, but that is usually not enough information. Ideally, we would have the method arguments that contain additional information, so that we can create a test to expose the failure. In addition to this, it would be better if we didn't have to scan through the log files to find problems. Consider this solution: for every service-layer method call, we create an around advice that logs the arguments supplied and proceeds with the invocation. If the invocation fails with an exception, we write the details of the exception to a database, together with the method arguments and stack trace. We then transparently rethrow the exception so that the clients do not notice that there was advice. The database could very quickly become clogged with exception reports. Chances are, however, that most of the exceptions will be the same or very similar. Therefore, we can record a count of each exception. Ultimately, we would like to see a report that looks like Table 8-1.
Table 8.1. Sample Exception Report
Stack Count | Last Date | Exception | Trace | Method |
|---|---|---|---|---|
1312 | 03/10/2007 | NullPointerException | . . . | DefaultUploadService.fileUpload(null, "Foo", 10, null); |
10 | 03/10/2007 | FileNotFoundException | . . . | DefaultFileAccessService.load("/vaar/content/file.txt"); |
1 | 02/10/2007 | NumberFormatException | . . . | DefaultUserService.updateCount("janm", "one hundred"); |
This report shows clearly that the exception we need to look at (because it happened 1,312 times!) is the NullPointerException thrown from the call to the DefaultUploadSercvice.fileUpload method with null, "Foo", 10, and null arguments. We can now write a test to verify what the correct functionality should be. Generally, we should not throw low-level exceptions such as NullPointerException from methods that should have verified their arguments and thrown more specific exceptions, hence NullPointerException may indicate that we have forgotten such a check.
To achieve all this, we will make use of the Spring AspectJ support (for more information, see Chapter 6). The most important component is the aspect, which is shown in Listing 8-21.
Example 8.21. The Around Error Collecting Aspect
@Aspect
public class ErrorLoggingAroundAspect {
    private ErrorLogDao errorLogDao;
@Around("execution(* com.apress.prospring2.ch08.errorreporting.*Service.*(..))")
public Object doBasicProfiling(ProceedingJoinPoint pjp) throws Throwable {
try {
return pjp.proceed();
} catch (Throwable t) {
insertThrowable(t, pjp);
throw t;
}
}
private void insertThrowable(Throwable t, ProceedingJoinPoint pjp)
throws IOException {
StringWriter writer = new StringWriter();
t.printStackTrace(new PrintWriter(writer));
writer.close();
this.errorLogDao.insert(writer.toString(), pjp.getSignature().getName());
}
public void setErrorLogDao(ErrorLogDao errorLogDao) {
this.errorLogDao = errorLogDao;
}
}This around advice applies to all invocations in classes with names matching the *Service pattern in the com.apress.prospring2.ch08.errorreporting package. The aspect simply proceeds with the invocation, and if invocation fails, will log the failed method using the ErrorLogDao and then rethrow the exception. The ErrorLogDao implementation is very straightforward, and it does not differ from any other DAO implementation—it simply collects the ErrorLog domain objects. The implementation is shown in Listing 8-22.
Example 8.22. The ErrorLogDao Interface and Domain Object
public interface ErrorLogDao {

    void insert(String stackTrace, String method);

    List<ErrorLog> getAll();
}

public class HeapErrorLogDao implements ErrorLogDao {

    private List<ErrorLog> errors = new LinkedList<ErrorLog>();

    public void insert(String stackTrace, String method) {
        for (ErrorLog log : this.errors) {
            if (log.getMethod().equals(method) &&
                    log.getStackTrace().equals(stackTrace)) {
                log.setCount(log.getCount() + 1);
                return;
            }
        }
        this.errors.add(new ErrorLog(stackTrace, method));
    }
public List<ErrorLog> getAll() {
return this.errors;
}
}
public class ErrorLog {
private String stackTrace;
private String method;
private int count = 1;
// getters and setters
}The only important bit to consider is that the insert() method does not just blindly add a new record; it checks whether there is another identical exception report, in which case it simply increases its count. The final piece of the puzzle is the Spring context file, which is shown in Listing 8-23.
Example 8.23. The Spring Context File for the Error Reporting Demonstration
<?xml version="1.0" encoding="UTF-8"?>
<beans xmlns="http://www.springframework.org/schema/beans"
                             ...>

    <bean id="fileUploadService"
        class="com.apress.prospring2.ch08.errorreporting.DefaultFileUploadService"/>

    <bean id="client"
class="com.apress.prospring2.ch08.errorreporting.SimpleClient">
        <property name="fileUploadService" ref="fileUploadService"/>
    </bean>

    <bean id="errorLogDao"
class="com.apress.prospring2.ch08.errorreporting.HeapErrorLogDao"/>

    <bean class="com.apress.prospring2.ch08.
errorreporting.ErrorLoggingAroundAspect">
        <property name="errorLogDao" ref="errorLogDao"/>
    </bean>
    <aop:aspectj-autoproxy/>

</beans>
The lines in bold define the aspect and wire it into the Spring beans so that when we run the application, we get output like this:
[2 * upload(me,text/plain,11,[B@578426, Stack trace com.apress.prospring2.ch08.errorreporting.InvalidLevelException:Level must not be divisible by 11. at com.apress.prospring2.ch08.errorreporting.DefaultFileUploadService.upload(DefaultFileUploadService.java:19) SNIP , 1 * upload(me,text/plain,22,[B@578426, Stack trace com.apress.prospring2.ch08.errorreporting.InvalidLevelException:Level must not be divisible by 11. at com.apress.prospring2.ch08.errorreporting.DefaultFileUploadServiceupload(DefaultFileUploadService.java:19) SNIP , 1 * upload(me,text/plain,33,[B@578426, Stack tracecom.apress.prospring2.ch08.errorreporting.InvalidLevelException:Level must not be divisible by 11. at com.apress.prospring2.ch08.errorreporting.DefaultFileUploadServiceupload(DefaultFileUploadService.java:19) SNIP
This is exactly what we were looking for: we get a list of the exceptions encountered, and we can see how many times each exception occurred, what the method arguments were, and the stack trace of the exception. All you have to do now is to provide a more production-ready implementation of the DAO, and you'll be ready to keep a close eye on your application.
In this chapter, we discussed some high-level designs we use in large Spring applications. The standard design patterns allow you to communicate a particular object-oriented programming concept easily to other members of your team. If everyone understands the design patterns, you can use them as building blocks when describing your solution.
We also had a look at some of the patterns we ourselves have encountered and implemented in building Spring applications. We have tried to find as many practical examples as possible. With a complex framework such as Spring, you can easily overlook useful ways of combining the different features of the framework to get the most out of it. Use the patterns we have described as ideas for your own applications.
After reading this chapter, you should try out some of the concepts we talked about and see how they can be applied to your current or future projects.